Room Escape: Detective Phantom | Level 19
Hello everyone and welcome to the walkthrough for the nineteenth level of “Room Escape: Detective Phantom”. In the nineteenth level, our task is to save our friend, but we will have to move quickly.
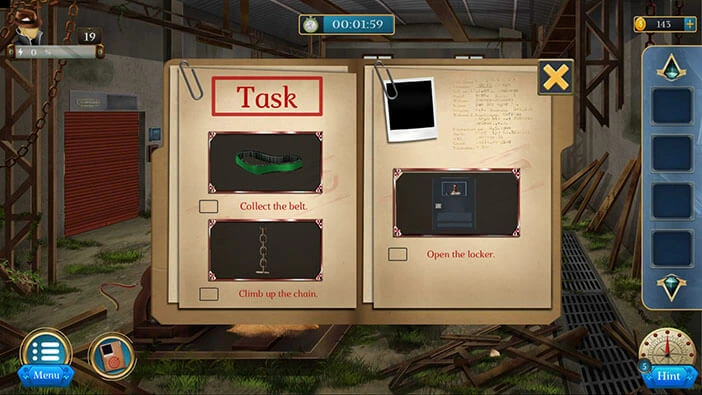
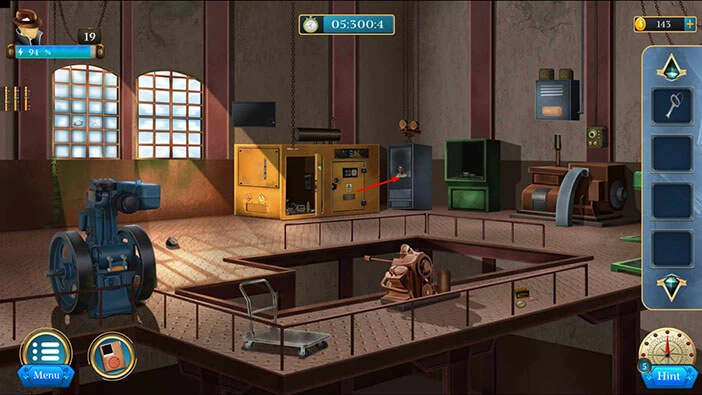
Our objectives are to “Collect the belt” “Climb up the chain” and “Open the locker”. Tap on the “X” button to go back.
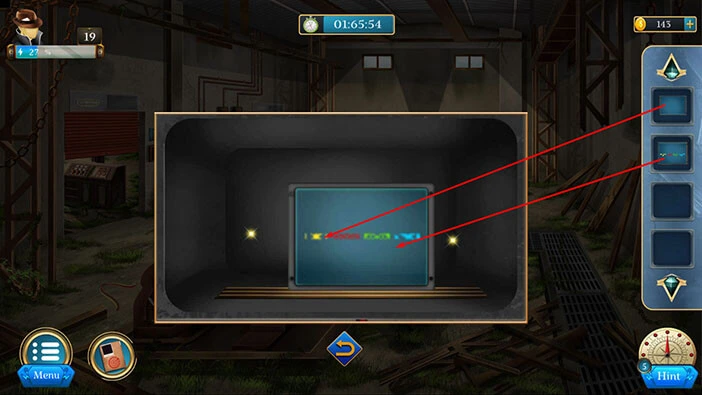
If you tap on the display, you will discover the main puzzle. However, in order to solve it, we will have to find some clues. Let’s do that.
Tap on the arrow at the bottom to go back.
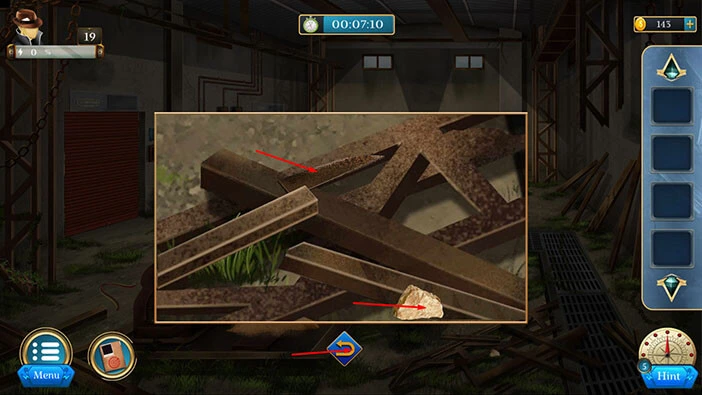
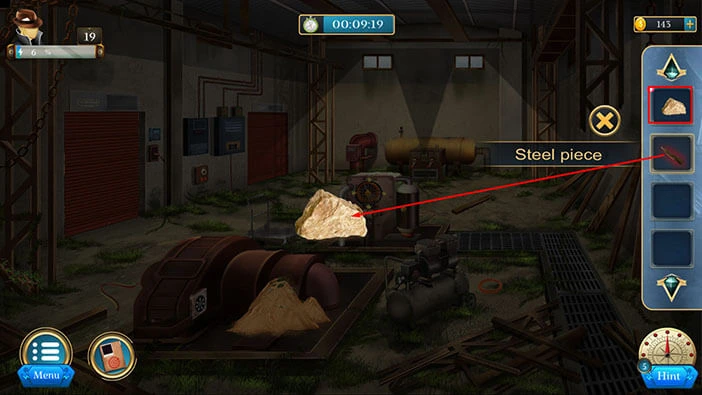
Let’s tap on the metal bars on the right to take a closer look at them.
Tap on the metal bars to move them aside, and under them, you will find a “Steel piece” and a “Stone”. Let’s tap on them to pick them up.
After that, tap on the arrow at the bottom to go back.
Select the “Stone” from the inventory and it will appear in the middle of the screen. After that, select the “Steel piece” from the inventory and sharpen it on the stone.
Once you’re done, tap on the sharpened “Steel piece” to pick it up.
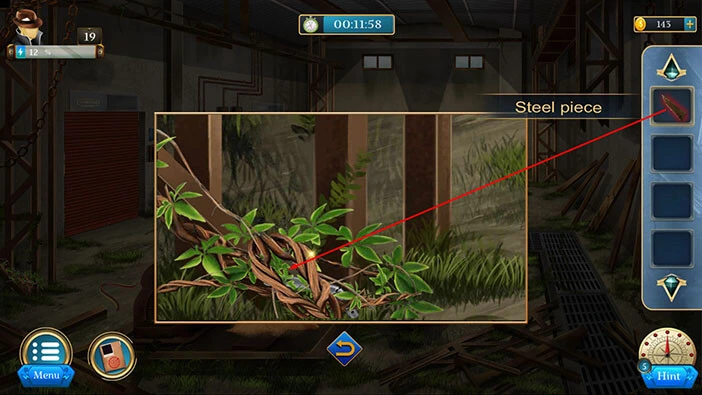
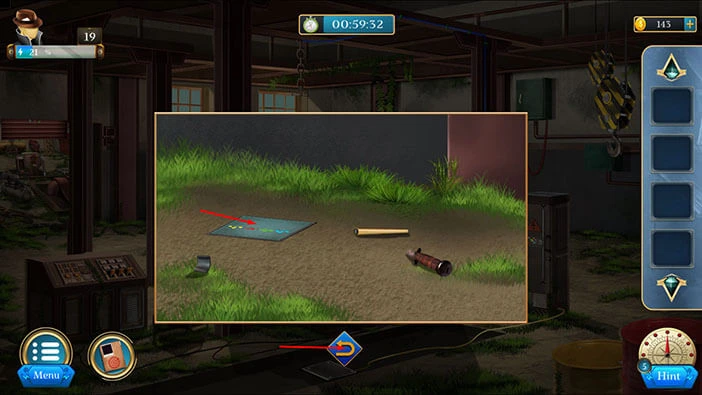
Next, let’s tap on the vines on the left to take a closer look at them.

Select the sharpened “Steel piece” from the inventory and use it to cut the vines.
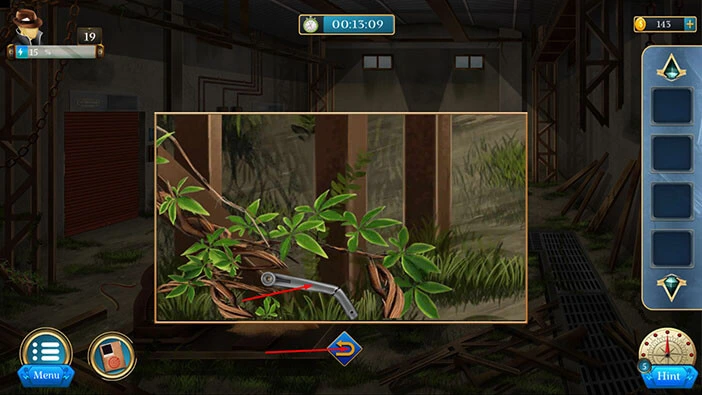
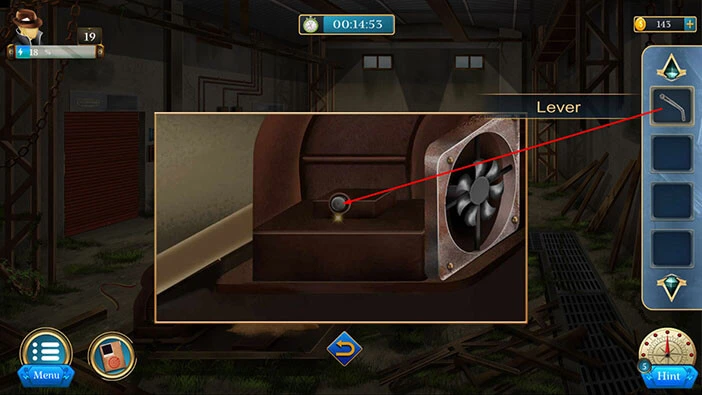
Under the vines, you will find a “Lever”. Let’s tap on it to pick it up. After that, tap on the arrow at the bottom to go back.
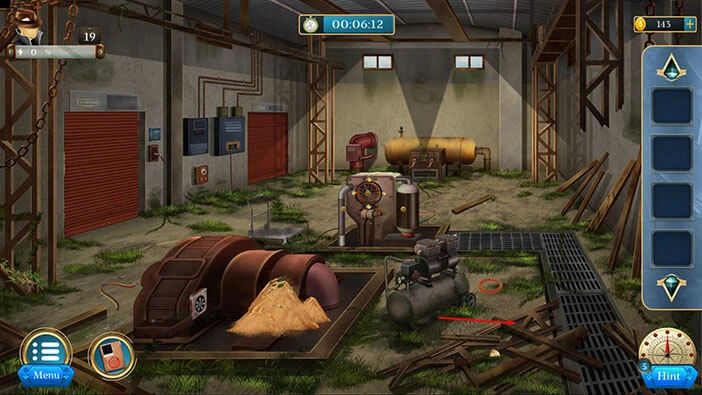
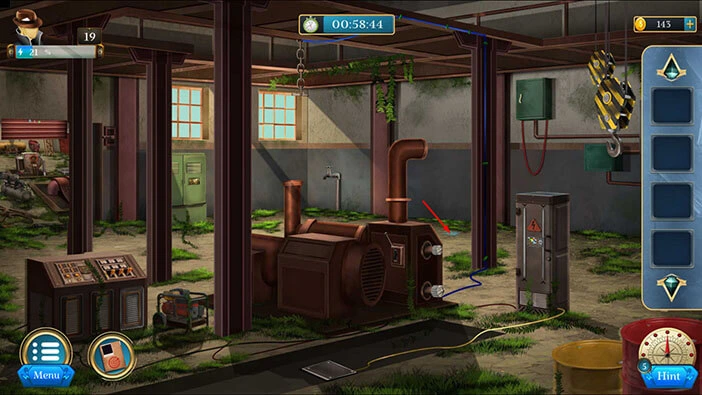
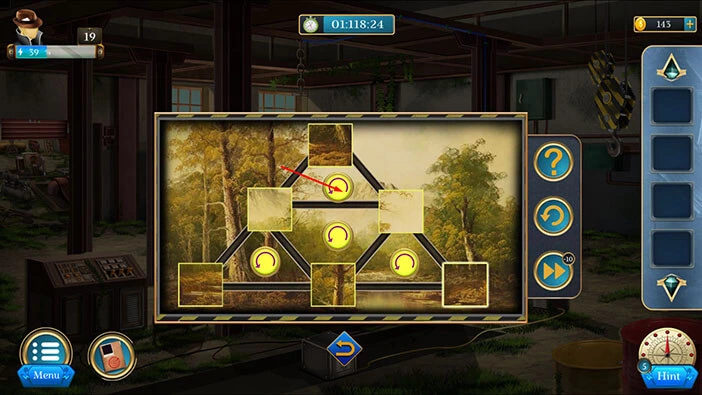
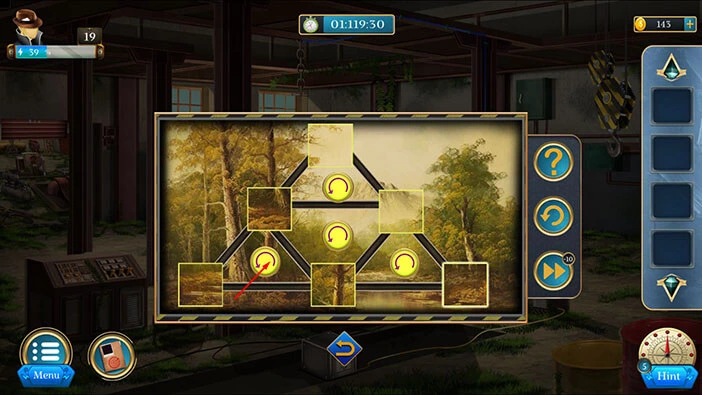
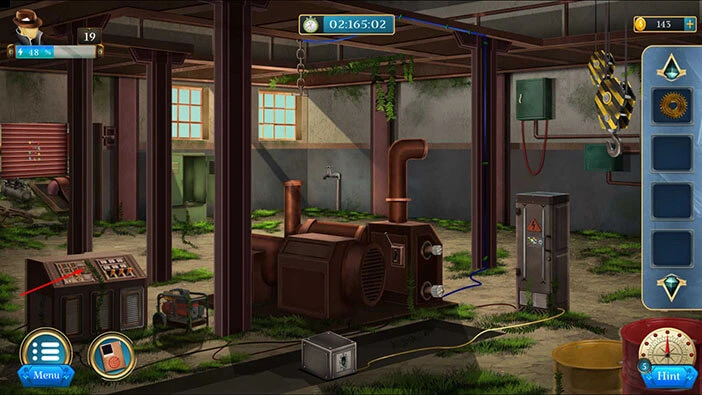
Next, let’s tap on the machine on the left to take a closer look at it.
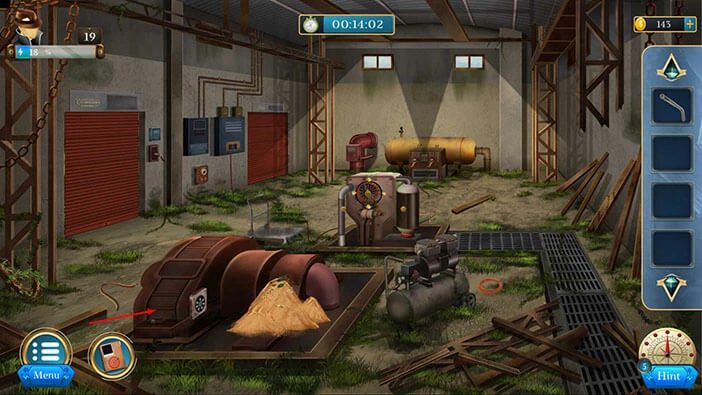
Select the “Lever” from the inventory and insert it into the empty slot.
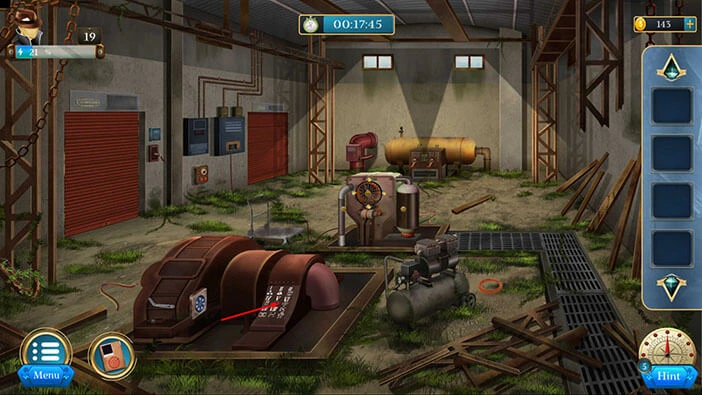
With that, you will start the fan, and it will blow away the sand on the right, revealing a control panel that was hidden under it.
So, let’s tap on the control pane to take a closer look at it.
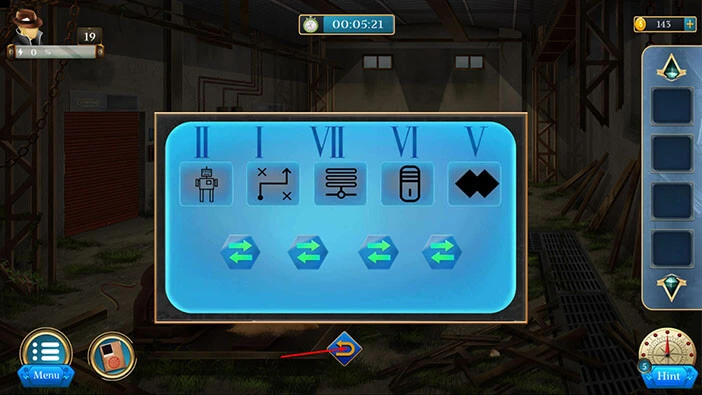
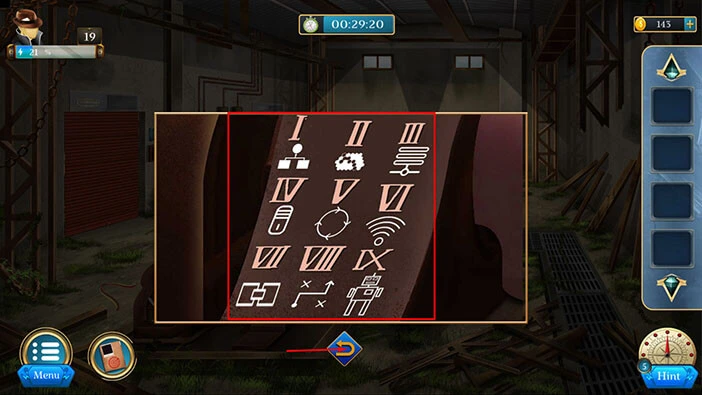
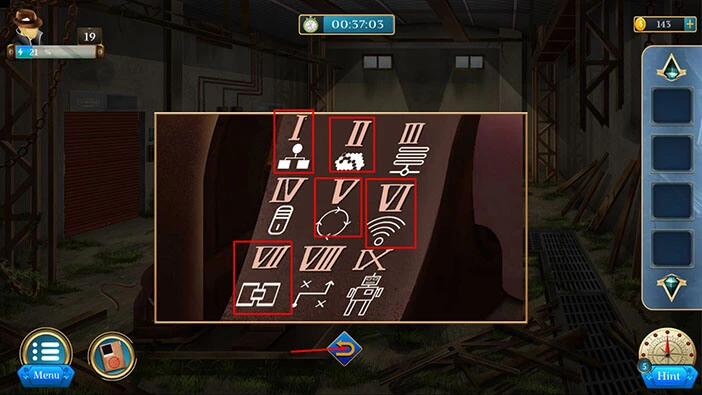
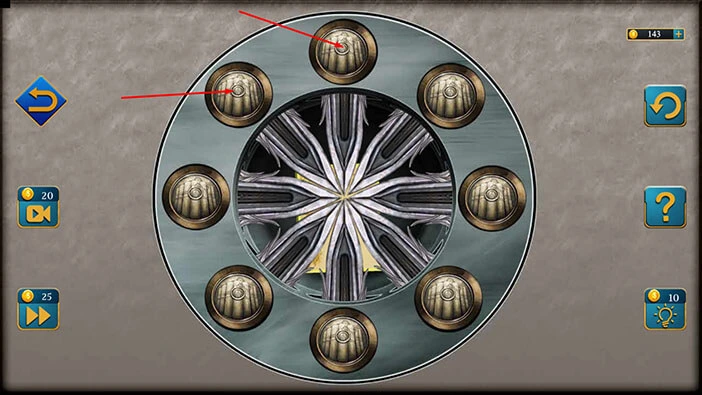
Here, you will see nine symbols. These symbols represent the hint for the next puzzle so we will come back to them in a moment.
For now, let’s tap on the arrow at the bottom to go back.
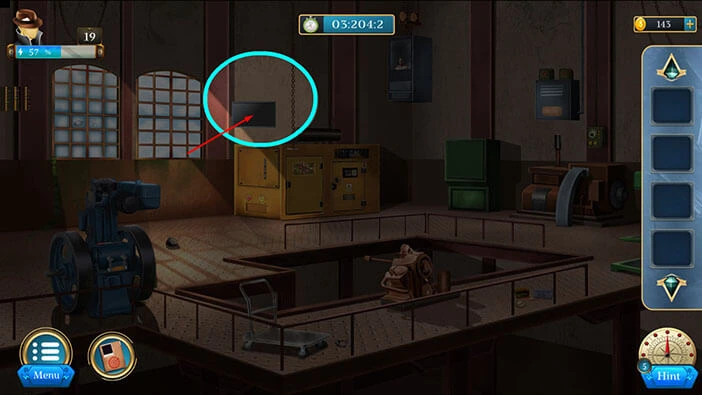
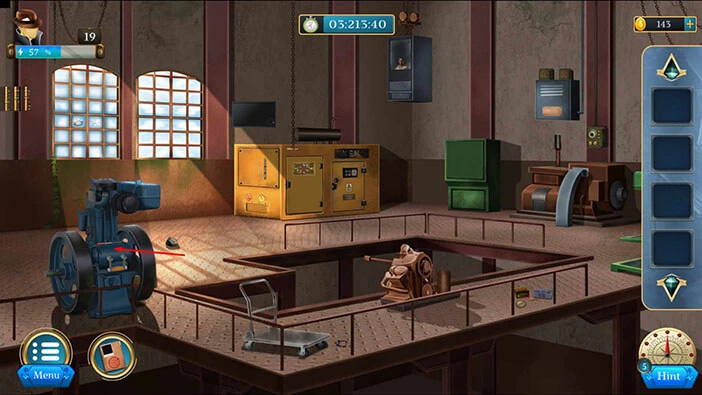
Next to the first red door on the left, you will notice a display screen. Let’s tap on it to take a closer look.

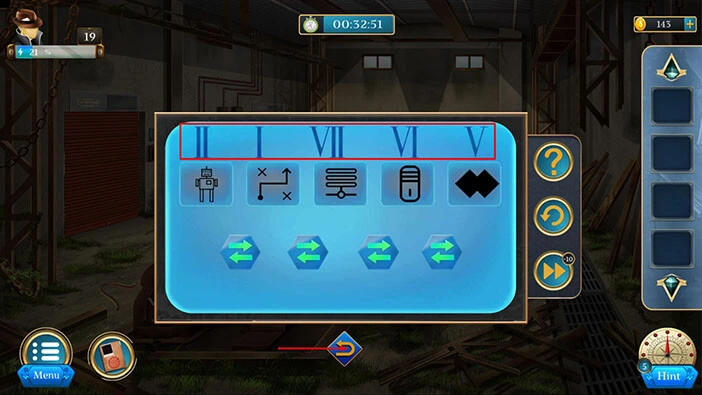
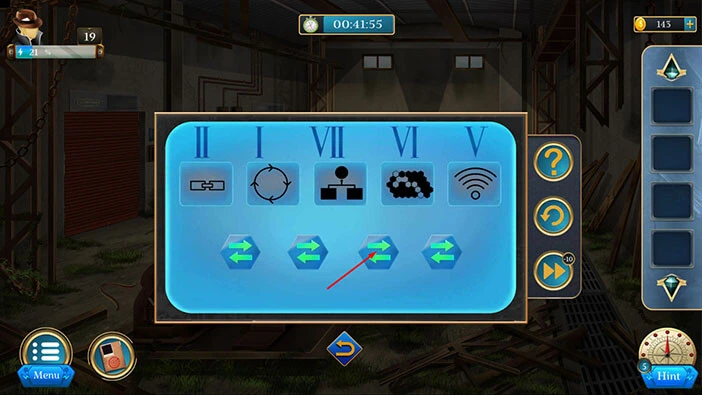
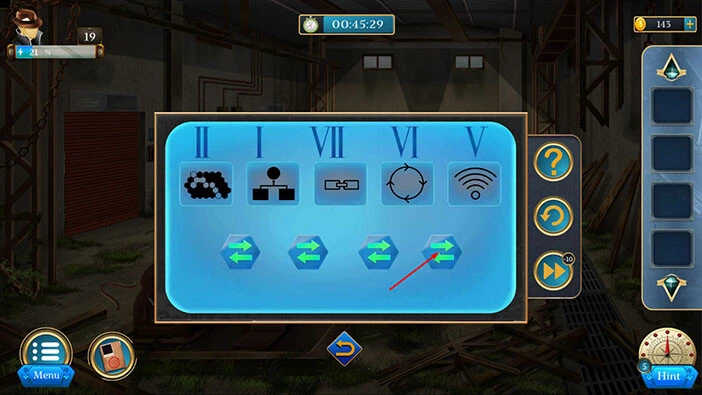
Here, we can see five symbols and a Roman numeral above each number. Let’s memorize/ write down these five Roman numerals. We have, II, I, VII, VI, and V.
Once you’re done, tap on the arrow at the bottom to go back.
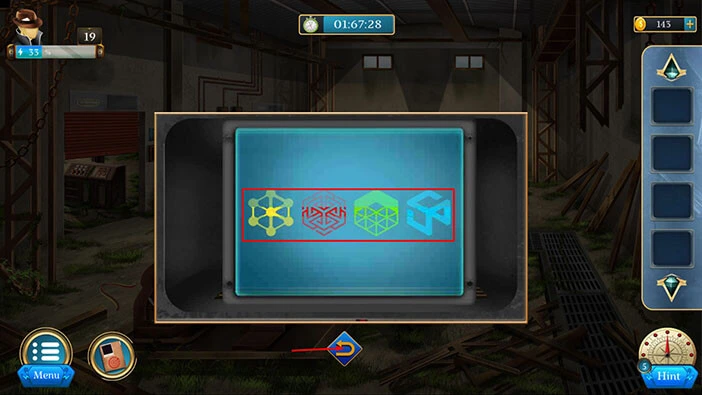
Let’s go back to the symbols on the control panel.

Ok, let’s memorize/write down the symbols below the Roman numerals that we previously discovered. So, these symbols are below II, I, VII, VI, and V.
Once you’re done, tap on the arrow at the bottom to go back.
Let’s go back to the puzzle on the display screen.

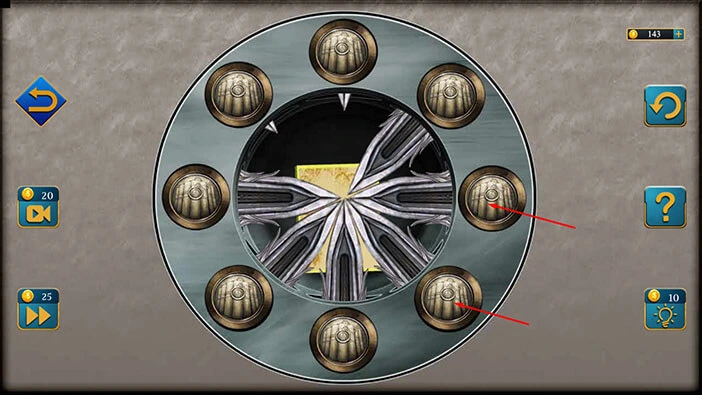
Our next task is to set the correct symbol in each slot below the Roman numeral. We discovered the right symbols by examining the control panel, so let’s set them. We will do that in several steps. Let’s begin.
Step 1
Tap once on each slot to change the symbol inside it.

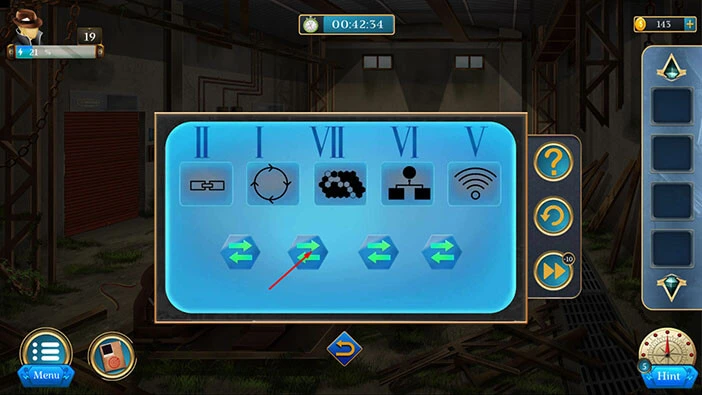
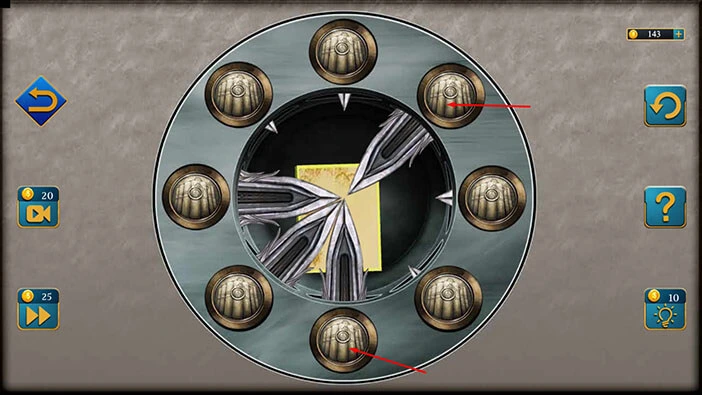
Step 2
Let’s tap on the third arrow to move the fourth symbol into the third slot.
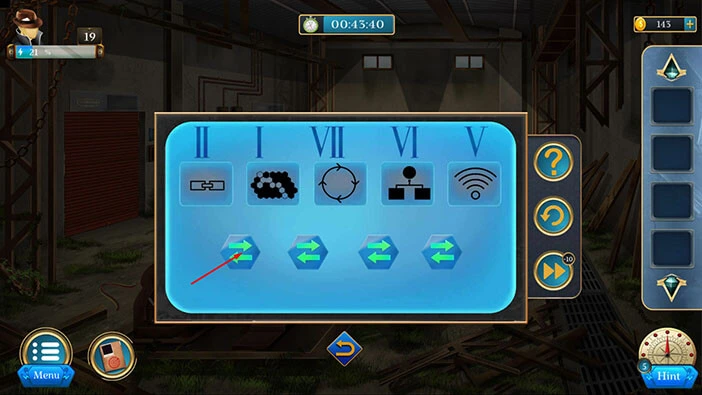
Step 3
Let’s tap on the second arrow to move the third symbol into the second slot.
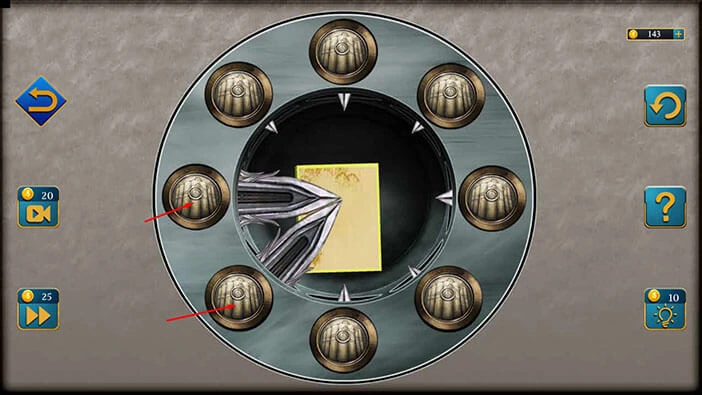
Step 4
Let’s tap on the first arrow to move the second symbol into the first slot.
Step 5
Let’s tap on the third arrow to move the fourth symbol into the third slot.
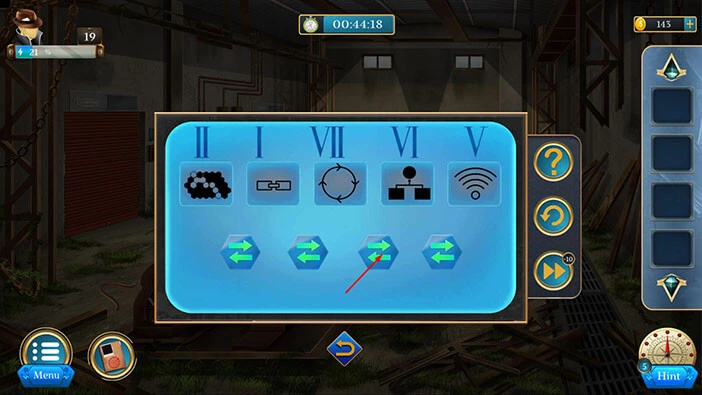
Step 6
Let’s tap on the second arrow to move the third symbol into the second slot.
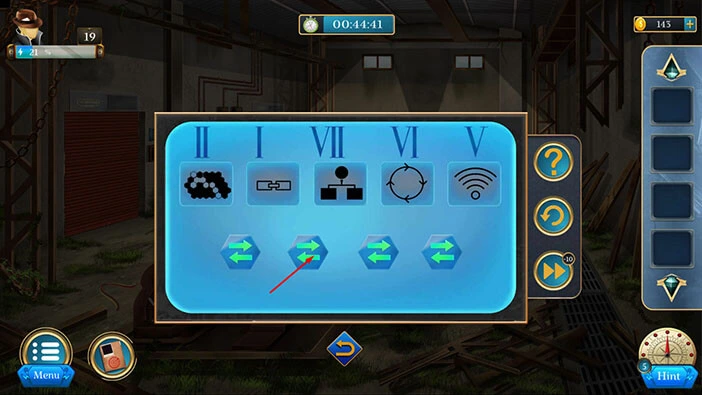
Step 7
Let’s tap on the fourth arrow to move the fifth symbol into the fourth slot. With that, you will place all symbols into the correct slots.
The red door will automatically open as soon as you solve the puzzle on the display screen. Let’s explore the next room. Tap on the red door to proceed.
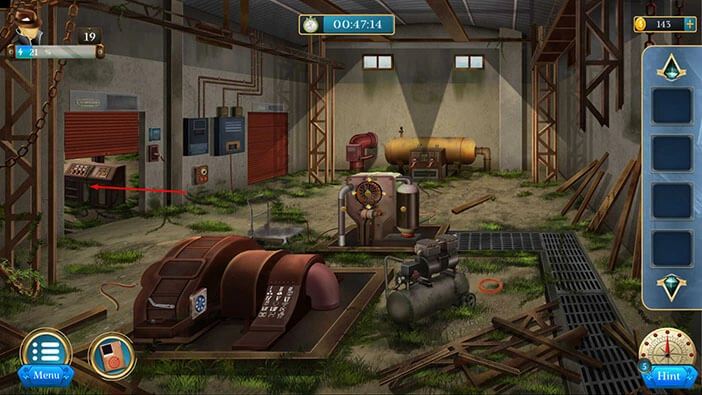
You will hear your friend crying for help from the second floor. So, we have to find a way to get to him.
Let’s tap on the blue item on the floor to take a closer look at it.
Here, you will find a “Plate”. Let’s tap on it to pick it up. After that, tap on the arrow at the bottom to go back.
Let’s tap on the door on the left to go back to the previous room.
Next, let’s tap on the wooden beam on the ground to take a closer look at it.

Tap on the wooden beam to move it aside, and under it, you will discover another “Panel”. Let’s tap on it to pick it up.
After that, tap on the arrow at the bottom to go back.
Next to the second red door, you will notice another panel. Let’s tap on it to take a closer look.

Select the first “Panel” and place it on the display screen. After that, select the other “Panel” and place it on the display screen.
Four symbols will appear on the screen. Let’s memorize/write down the symbols and their colors because this information represents the solution for the next puzzle.
Once you’re done, tap on the arrow at the bottom to go back.
Let’s go back to the previous room. Tap on the first red door on the left.

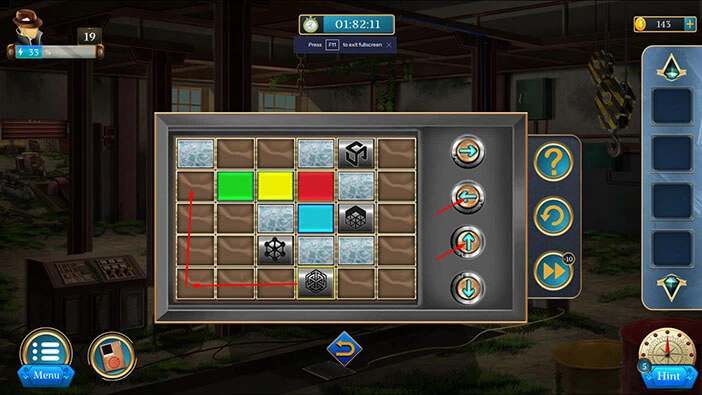
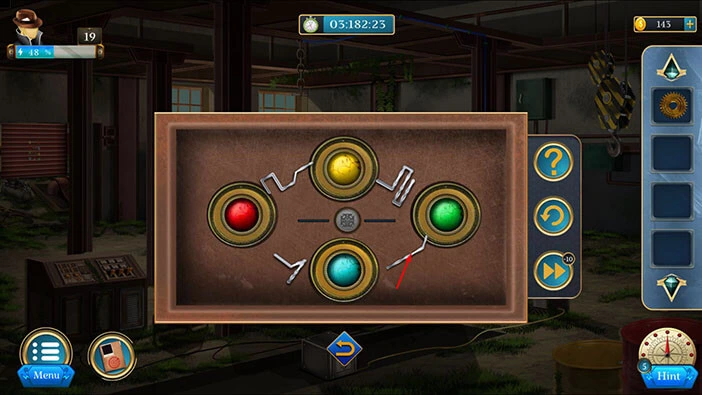
You will notice a puzzle on the pillar on the right. Let’s tap on it to take a closer look, and tap again to start the interaction.

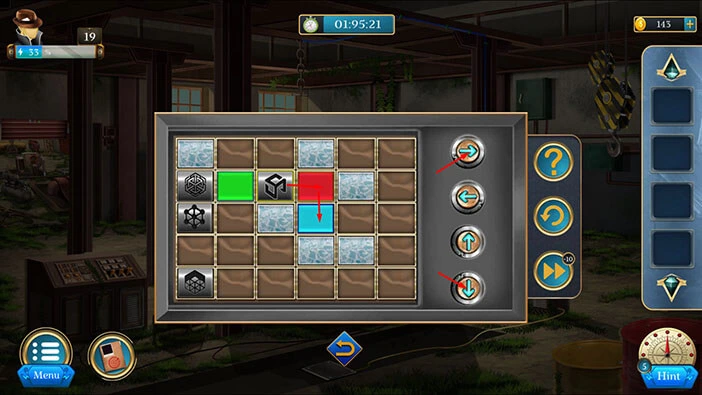
Ok, here we can see a grid with four symbols that we discovered previously, and we also know the correct color for each symbol. So, our task is to place the symbols into the slots of the correct color. We will do this puzzle in several steps. Let’s begin.
Step 1
Select the symbol located in the fourth slot of the fifth row. Tap on the left arrow to move the symbol all the way to the left to the first slot in the fifth row. After that, tap on the up arrow to move the symbol all the way up to the first slot in the second row.
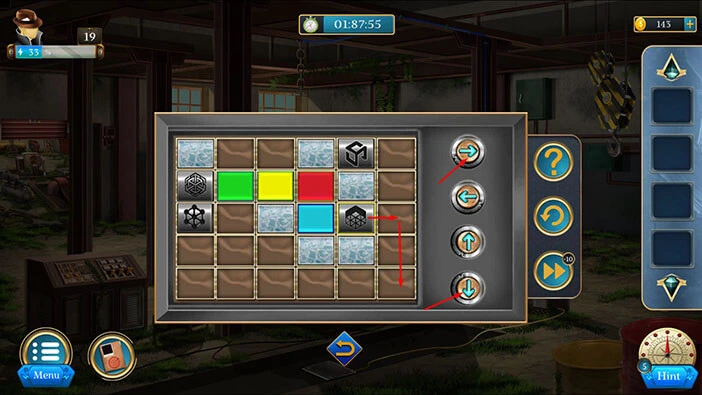
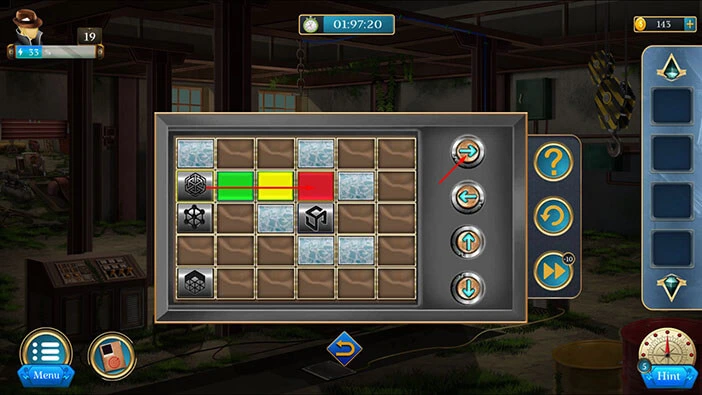
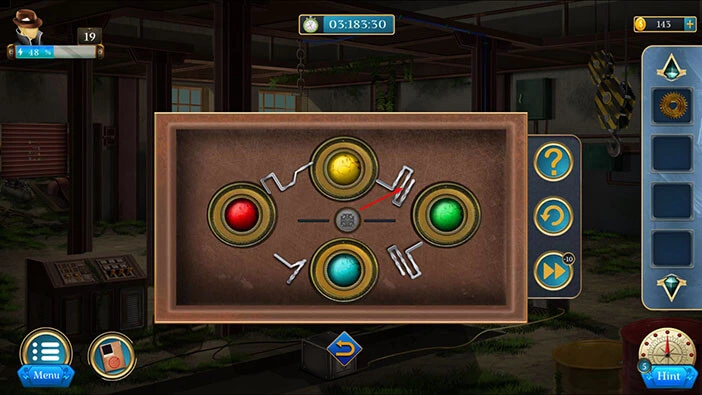
Step 2
Select the symbol located in the third slot of the fourth row. Tap on the left arrow to move the symbol all the way to the left to the first slot in the fourth row. After that, tap on the up arrow to move the symbol to the first slot in the third row.

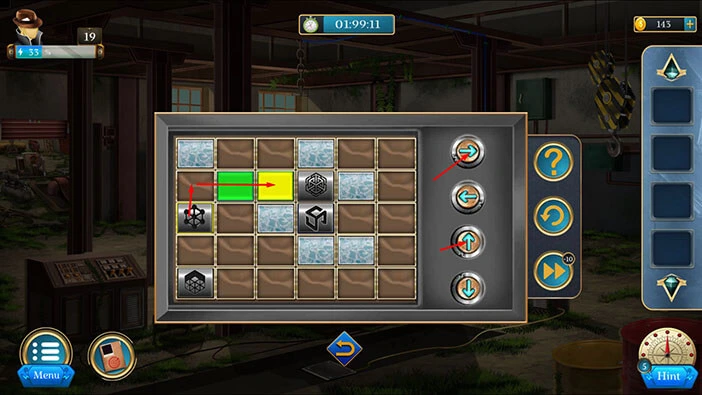
Step 3
Select the symbol located in the fifth slot of the third row. Tap on the right arrow to move the symbol to the right to the sixth slot in the fourth row. After that, tap on the down arrow to move the symbol to the sixth slot in the fifth row.
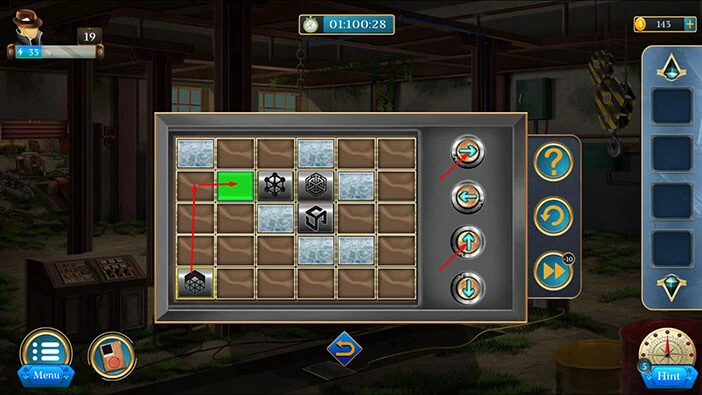
Step 4
Tap on the left arrow to move the symbol all the way to the left to the first slot in the fifth row.

Step 5
Select the symbol located in the fifth slot of the first row. Tap on the right arrow to move the symbol to the right to the sixth slot in the first row. After that, tap on the down arrow to move the symbol to the sixth slot in the fifth row.

Step 6
Tap on the left arrow to move the symbol to the second slot in the fifth row. After that, tap on the up arrow to move the symbol to the second slot in the first row.

Step 7
Tap on the right arrow to move the symbol to the third slot in the first row. After that, tap on the down arrow to move the symbol to the third slot in the second row.

Step 8
Tap on the right arrow to move the symbol to the fourth slot in the second row. After that, tap on the down arrow to move the symbol to the fourth slot in the third row (Blue slot).
Step 9
Select the symbol located in the first slot of the second row. Tap on the right arrow to move the symbol all the way to the right to the fourth slot in the second row (Red slot).
Step 10
Select the symbol located in the first slot of the third row. Tap on the up arrow to move the symbol up to the first slot in the second row. After that, tap on the right arrow to move the symbol to the third slot in the second row (Yellow slot).
Step 11
Select the symbol located in the first slot of the fifth row. Tap on the up arrow to move the symbol up to the first slot in the second row. After that, tap on the right arrow to move the symbol to the second slot in the second row (Green slot).
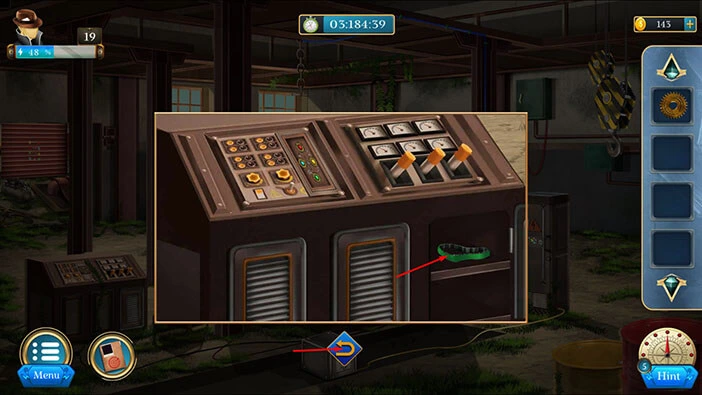
With that, you will solve this puzzle, and you will restore power to a small machine in the middle of the room (you can see a yellow wire leading to this machine). Tap on it, and a small metal box will be lifted up from the secret compartment.
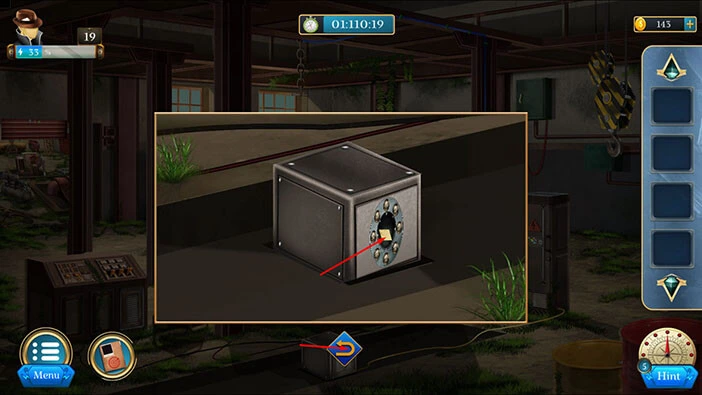
Tap on the box to take a closer look at it, and tap again to start the interaction.

Our next task is to tap on the buttons in the correct sequence in order to unlock this puzzle. We will do that in several steps. Let’s begin.
Step 1
Tap on the button in the top left corner, then tap on the button at the top.
Step 2
Tap on the button on the right, then tap on the button in the bottom right corner.
Step 3
Tap on the button in the top right corner, then tap on the button at the bottom.
Step 4
Lastly, tap on the on the left, then tap on the button in the bottom left corner, and you will unlock this puzzle.
Once you solve the puzzle, you will unlock the box, and inside you will find a “Button”. Let’s tap on it to pick it up.
After that, tap on the arrow at the bottom to go back.
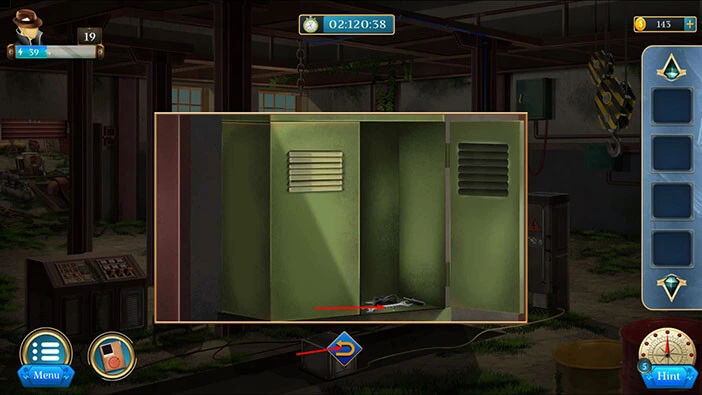
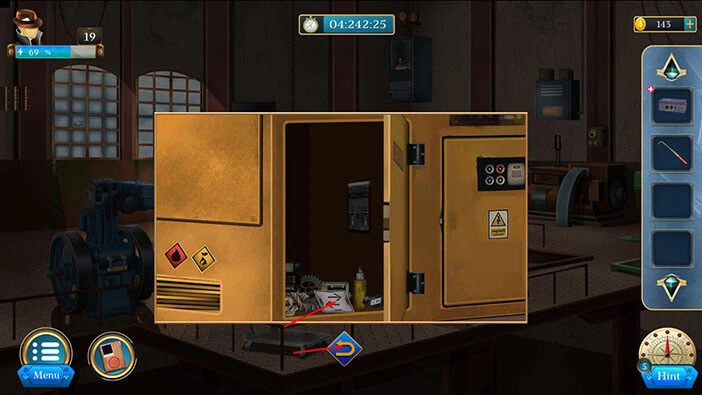
Next, let’s tap on the green locker to take a closer look at it, and tap again to start the interaction.
You will notice that an item in the bottom right corner slot is missing so let’s select the “Button” from the inventory and insert it into this slot.
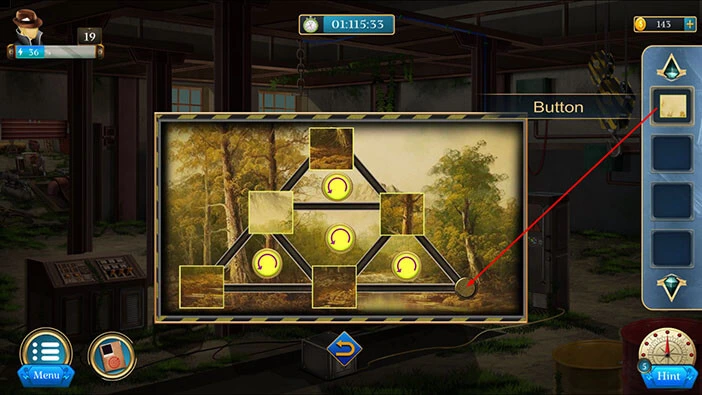
Here, we have another puzzle, and our task is shuffle the pieces and assemble the background image. We will do this puzzle in several steps. Let’s begin.
Step 1
Tap once on the arrow in the bottom right corner to shuffle the images.
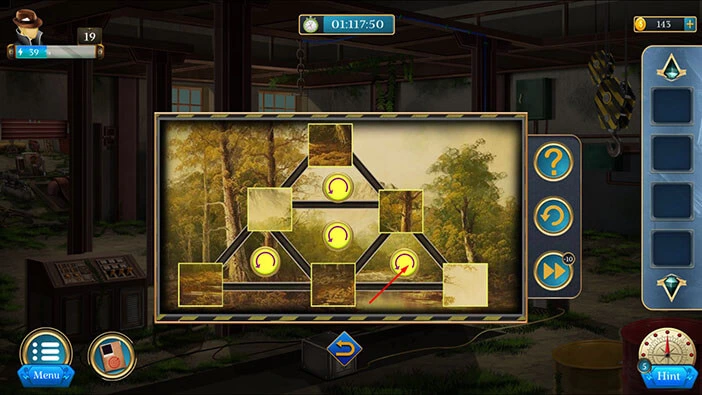
Step 2
Tap once on the top arrow to shuffle the images.
Step 3
Tap once on the arrow in the bottom left corner to shuffle the images, and you will solve this puzzle.
You will unlock and open the locker as soon as you solve this puzzle, and inside you will find a “Spanner”. Let’s tap on it to pick it up.
After that, tap on the arrow at the bottom to go back.
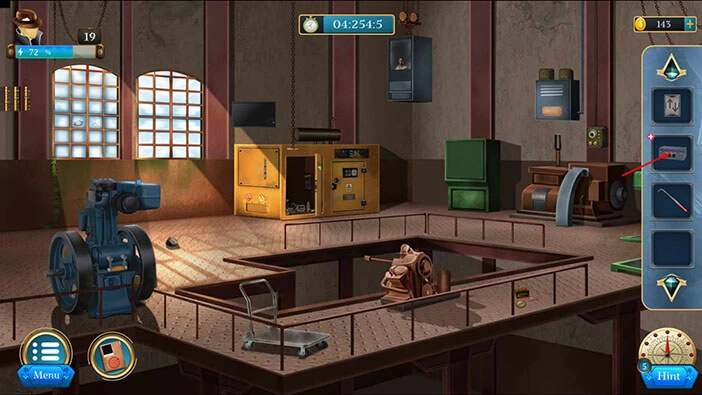
Let’s go back to the previous room. Tap on the door on the left.

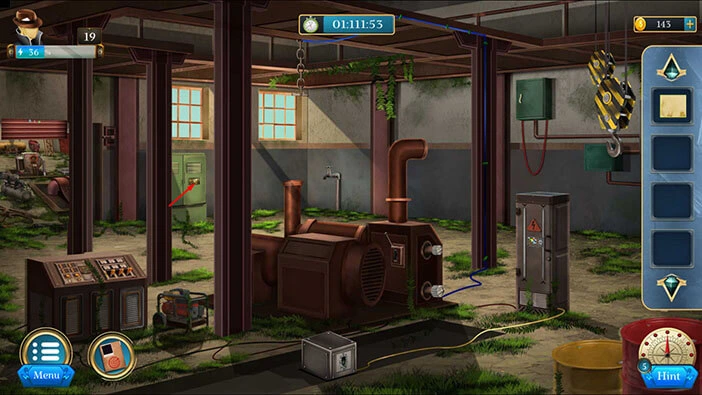
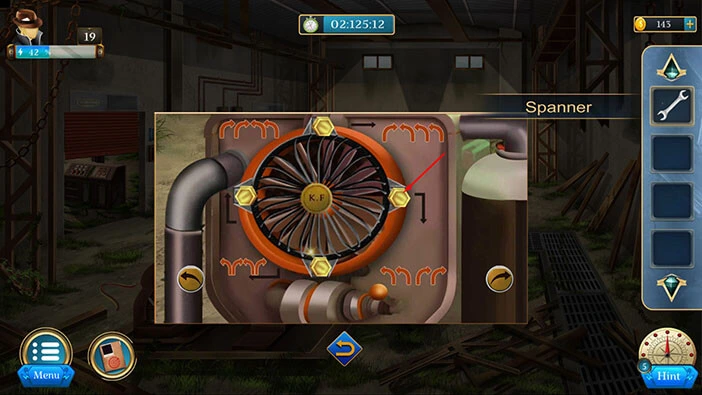
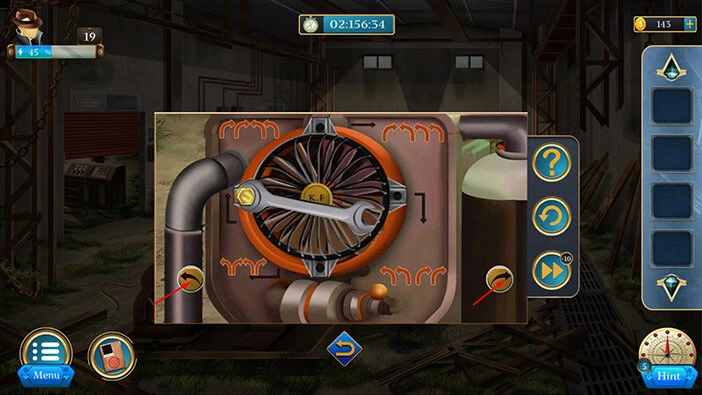
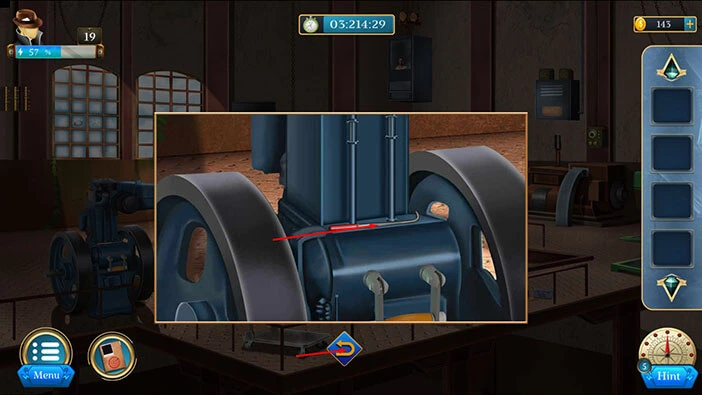
Next, let’s tap on the fan, located on the machine in front of us, to take a closer look at it.
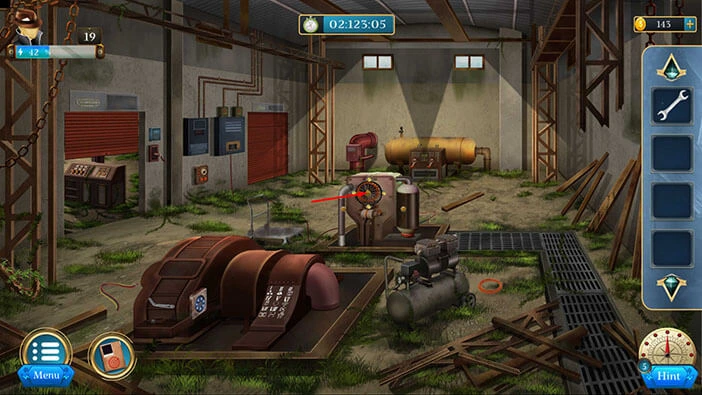
Here, we have another puzzle. Our task is to use the wrench to remove the screws, by tapping on the correct arrows. We will do this puzzle in several steps. Let’s begin.
Step 1
Select the “Spanner” from the inventory and place it on the screws.
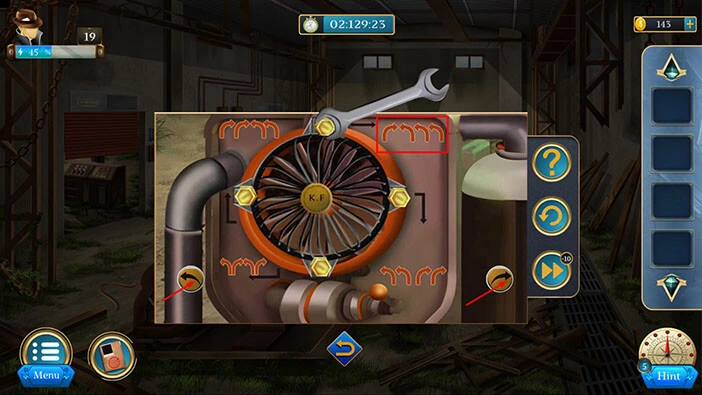
Step 2
The “Spanner” will lock onto the top screw. You can see the hint for this screw right next to it (on the right). So, let’s tap once on the right arrow, then tap three times on the left arrow, and we will remove the top screw.
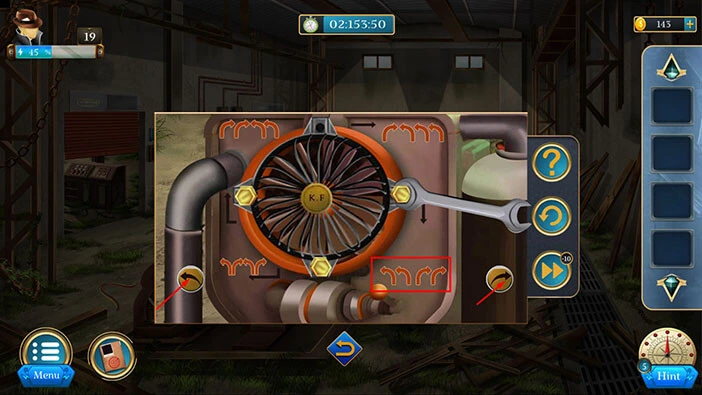
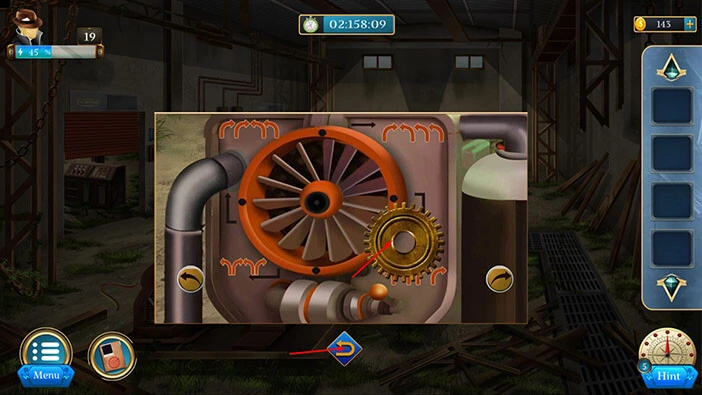
Step 3
The “Spanner” will lock onto the right screw. You can see the hint for this screw right next to it (in the bottom right corner). So, let’s tap twice on the left arrow, then tap twice on the right arrow, and we will remove the right screw.
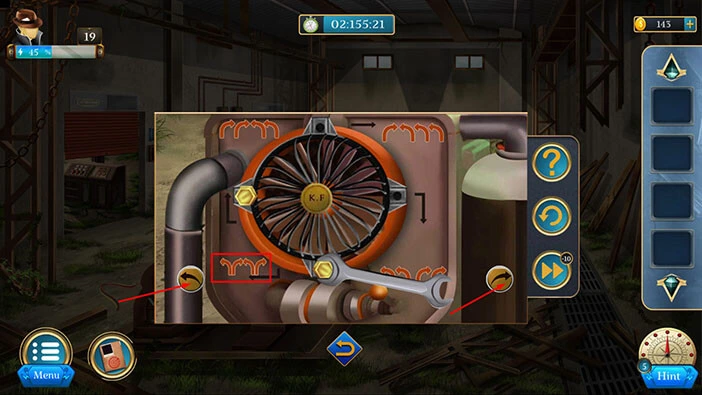
Step 4
The “Spanner” will lock onto the bottom screw. You can see the hint for this screw right next to it (in the bottom left corner). So, let’s tap on the left, right, left, and right arrow, and we will remove the bottom screw.
Step 5
The “Spanner” will lock onto the left screw. You can see the hint for this screw right next to it (in the top left corner). So, let’s tap twice on the right arrow, then tap twice on the left arrow, and we will remove the left screw.
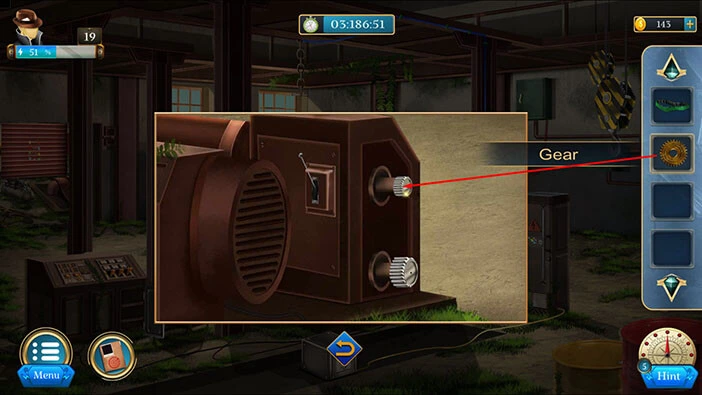
Once you remove all four screws, you will find a “Gear”. Let’s tap on it to pick it up.
After that, tap on the arrow at the bottom to go back.
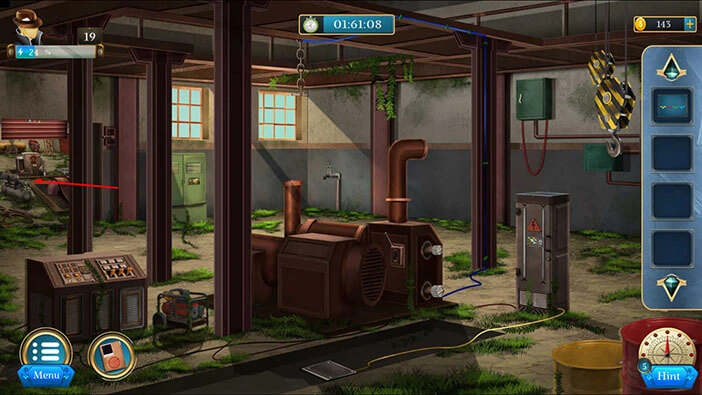
Let’s go back to the previous room. Tap on the door on the left.

Next, let’s tap on the lever, located on the wall next to the door, to take a closer look at it.

Tap on the handle, several times, to lower the door.
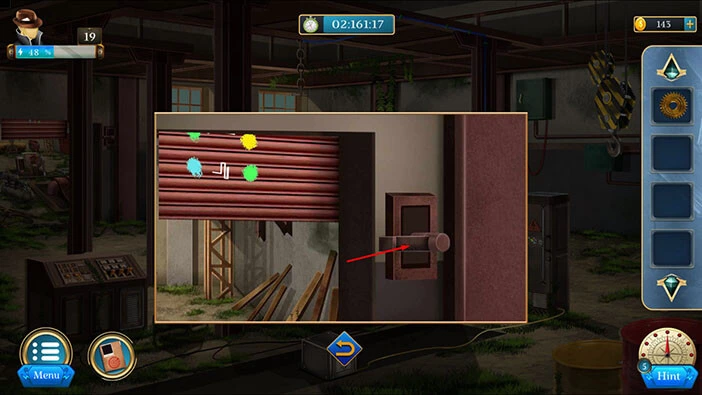
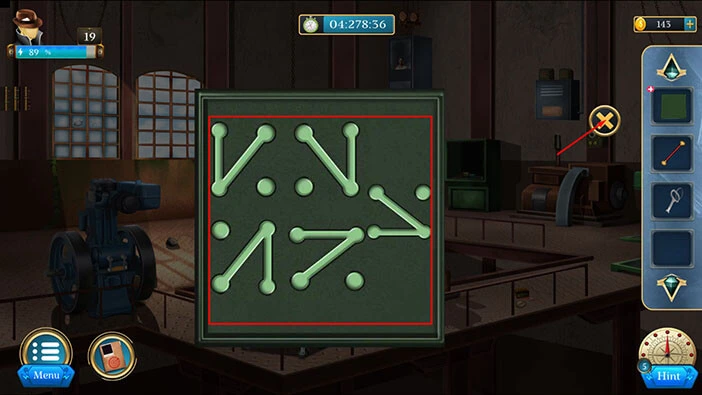
Here, we will discover the hint for the next puzzle. Here, you will notice that each pair of colors is connected by a line of different shape. So, let’s memorize/write down the colors and the shape of the lines that connect them.
Once you’re done, tap on the arrow at the bottom to go back.
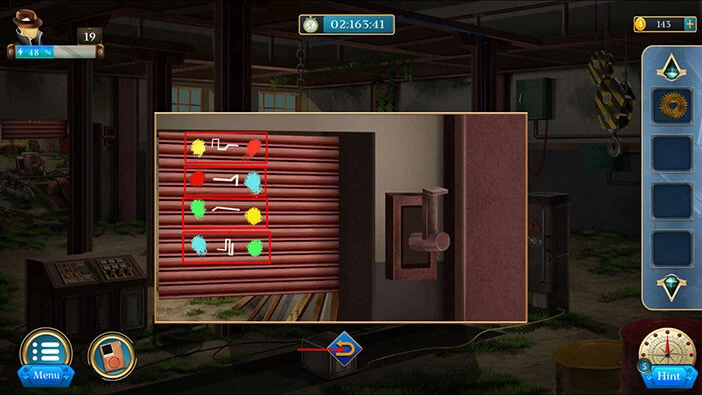
Next, let’s tap on the machine on the left to take a closer look at it, and tap again to start the interaction.
Here, we have another puzzle. Our task is to set the correct lines between each pair of colors (we discovered this information by lowering the door). We will do this puzzle in several steps. Let’s begin.
Step 1
Tap twice on the line that connects the red and yellow buttons.

Step 2
Tap twice on the line that connects the red and blue buttons.

Step 3
Tap twice on the line that connects the blue and green buttons.
Step 4
Lastly, tap twice on the line that connects the yellow and green buttons, and you will solve this puzzle.
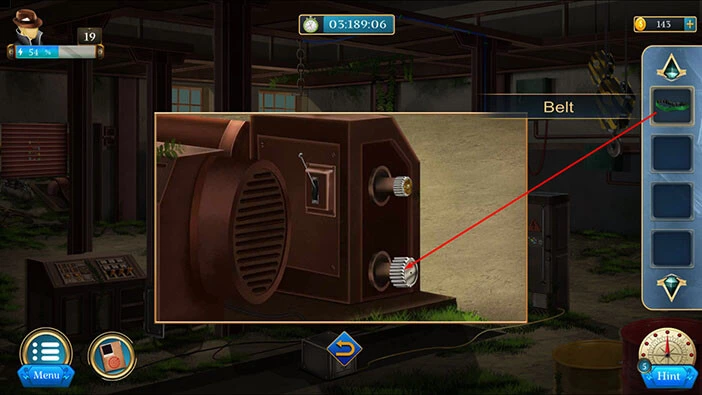
You will open the door on the machine, as soon as you solve the puzzle, and inside you will find a “Belt”. Let’s tap on it to pick it up.
After that, tap on the arrow at the bottom to go back.
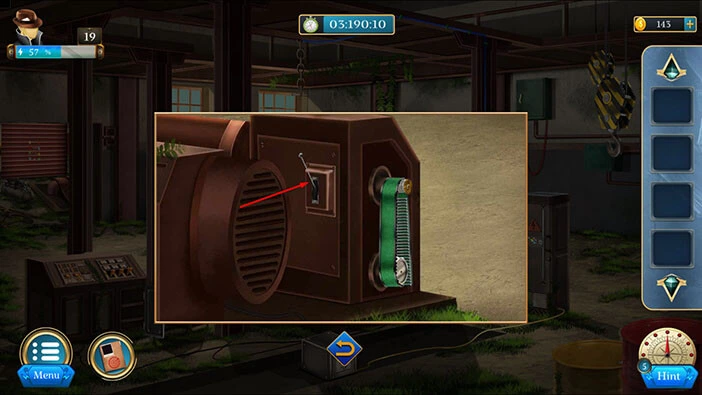
Next, let’s tap on the machine on the right to take a closer look at it.

Select the “Gear” from the inventory and attach it to the top cog.
Next, select the “Belt” from the inventory and use it to connect the two parts of the machine.
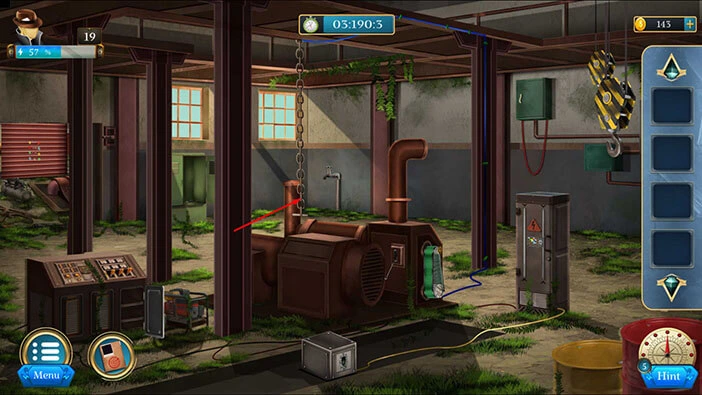
Lastly, pull the lever to activate the machine. With that, you will lower the chain.
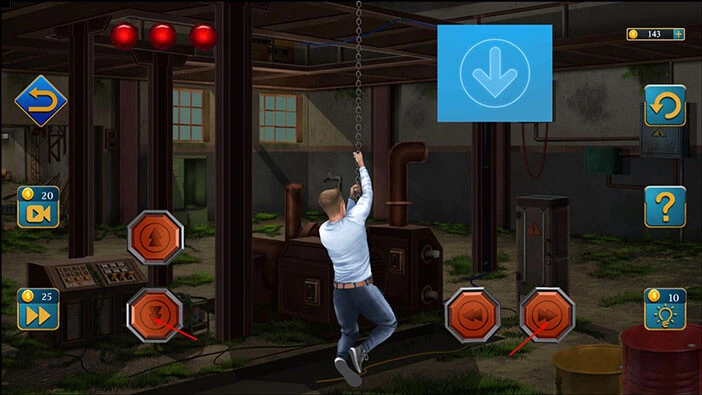
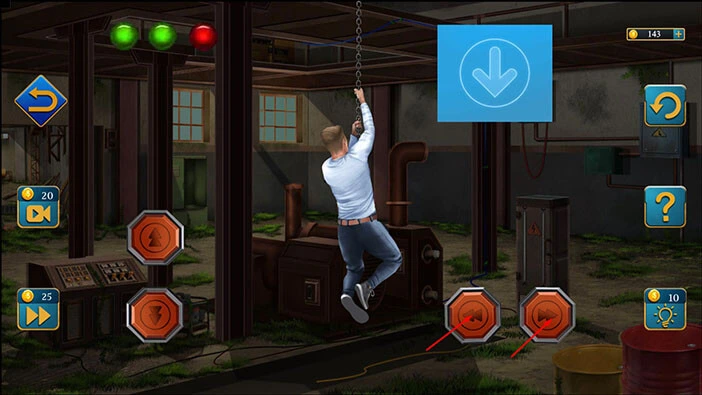
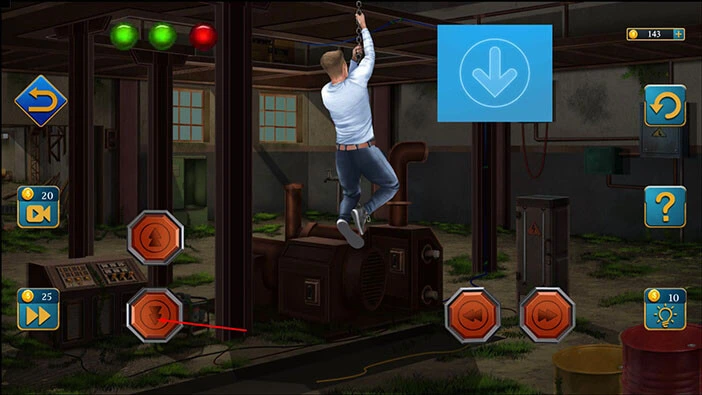
Our task is to climb up the chain to the second floor, so let’s tap on it to start the interaction.
Our next task is to climb to the second floor. You can see the correct order of the arrows by observing the display screen in the top right corner.
We will do this puzzle in several steps. Let’s begin.
Step 1
Tap on the right arrow, then tap on the down arrow.
Step 2
Tap on the left arrow, then tap on the up arrow.
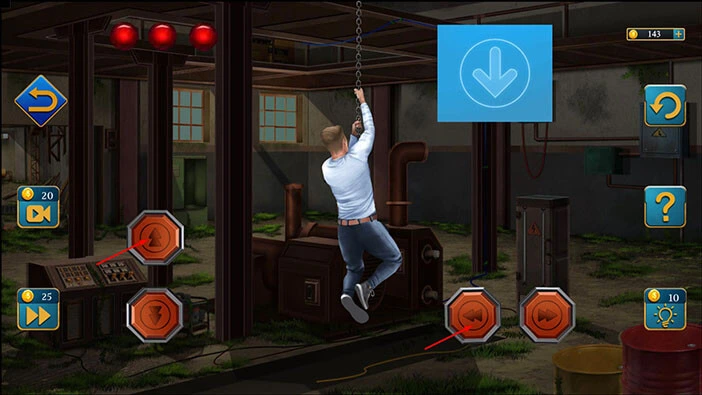
Step 3
Lastly, tap on the down arrow, and you will complete the first part of the puzzle. The first of the three green lights will be turned on, so we will have to repeat this process two more times.
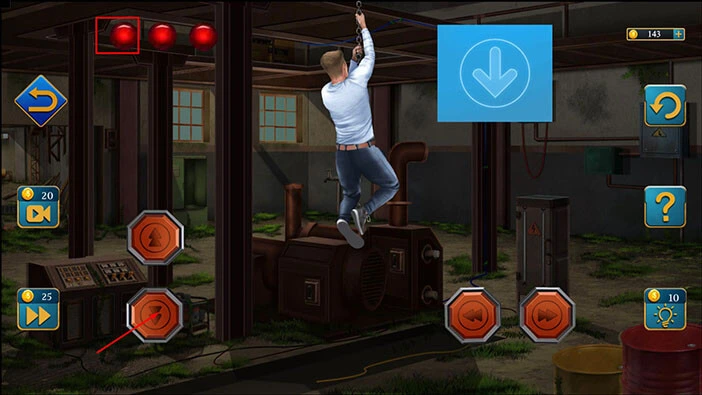
Step 4
Tap on the left arrow, then tap on the right arrow.
Step 5
Tap on the down arrow, then tap on the right arrow.

Step 6
Lastly, tap on the up arrow, and you will complete the second part of the puzzle. The second green light will be turned on.

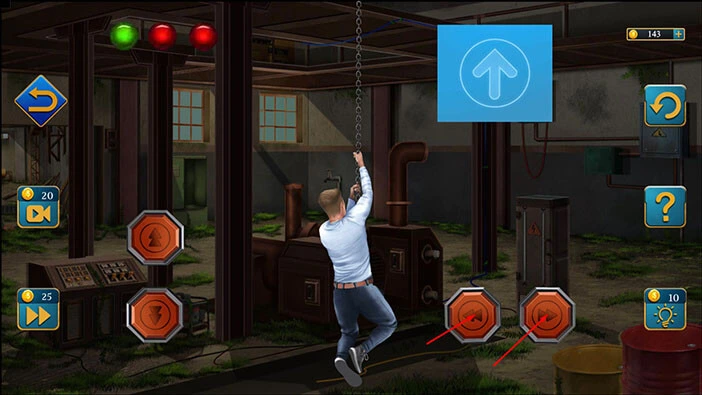
Step 7
Tap on the up arrow, then tap on the down arrow.

Step 8
Tap on the right arrow, then tap on the left arrow.
Step 9
Lastly, tap on the down arrow, and your character will climb to the second floor.
Ok, we reached the second floor. Let’s tap on the TV to take a closer look at it, and tap again to start the interaction.
The “Black Spider” will appear on the screen, and he will taunt our character. Here, we will discover the hint for the next puzzle. Tap on the arrow on the screen to activate the hint. The dot will change position and it will also change its color. Our goal is to memorize/write down the position and the color of the dot. Let’s do that.
First position = Green dot in the top slot
Second position = Yellow dot in the top right slot
Third position = Light blue dot in the top left corner
Fourth position = Blue dot in the bottom corner
Fifth position = Red dot in the bottom left corner
Sixth position = Pink dot in the bottom right corner
Once you’re done, tap on the arrow at the bottom to go back.

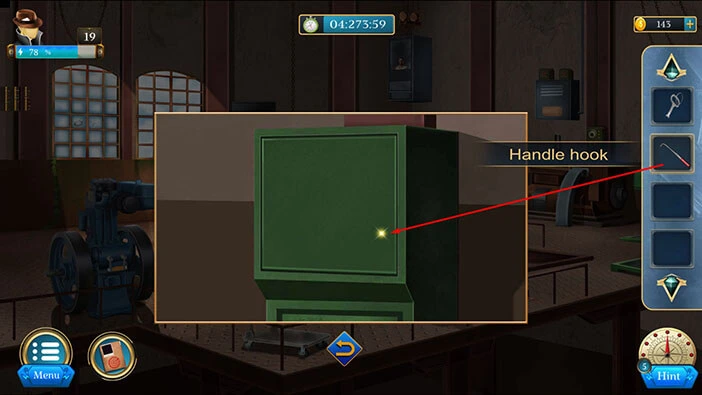
Next, let’s tap on the machine on the left to take a closer look at it.
Here, you will find a “Handle hook”. Let’s tap on it to pick it up.
After that, tap on the arrow at the bottom to go back.
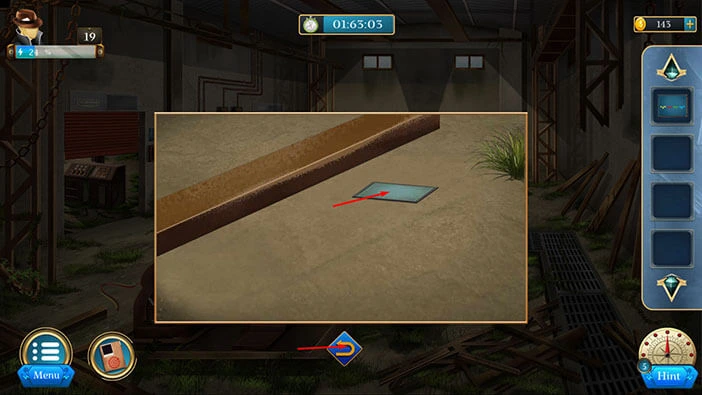
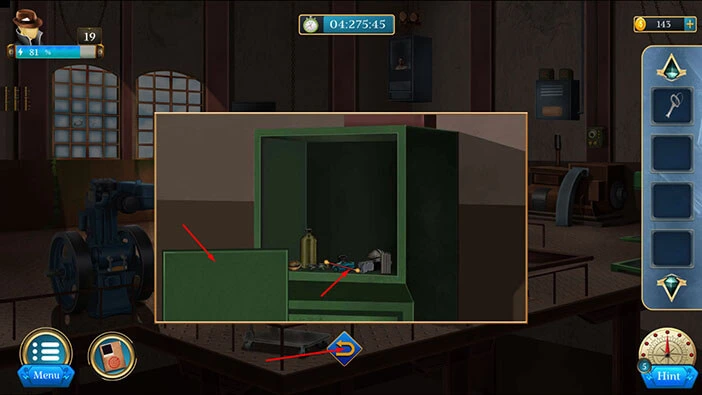
Next, let’s tap on the items on the floor to take a closer look at them.

Here, you will find a “Box”. Let’s tap on it to pick it up.
After that, tap on the arrow at the bottom to go back.

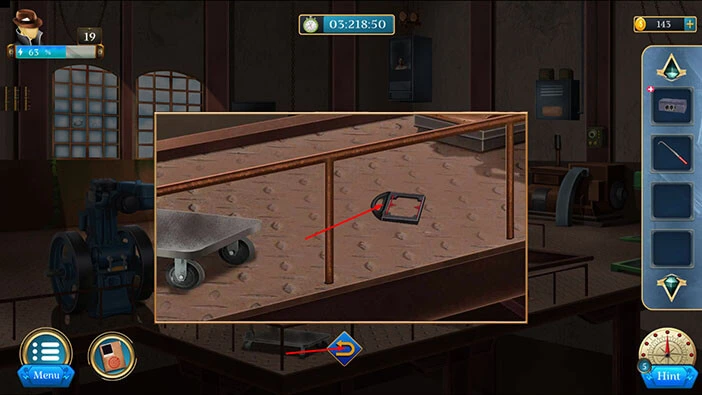
Next, let’s tap on the item next to the cart to take a closer look at it.
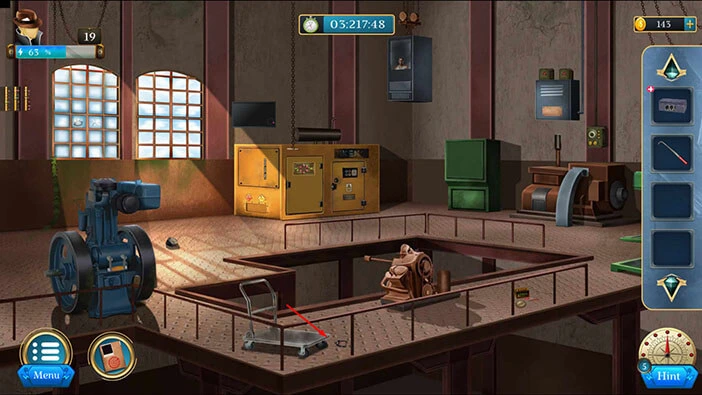
Here, you will find a “Pointer”. Let’s tap on it to pick it up.
After that, tap on the arrow at the bottom to go back.
Next, let’s tap on the item in the top left corner of the screen to take a closer look at it.
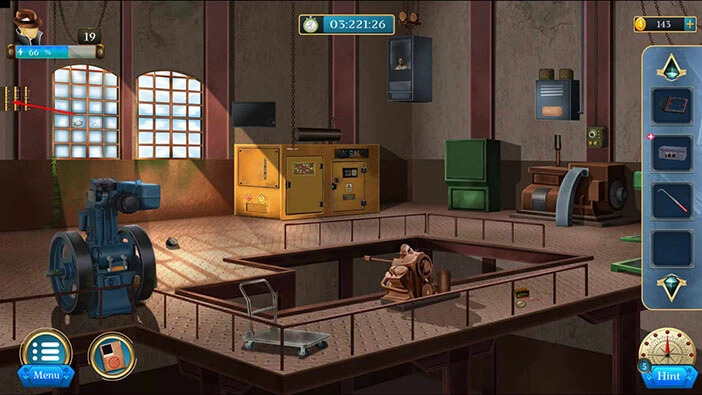
Select the “Pointer” from the inventory and place it on the first ruler.
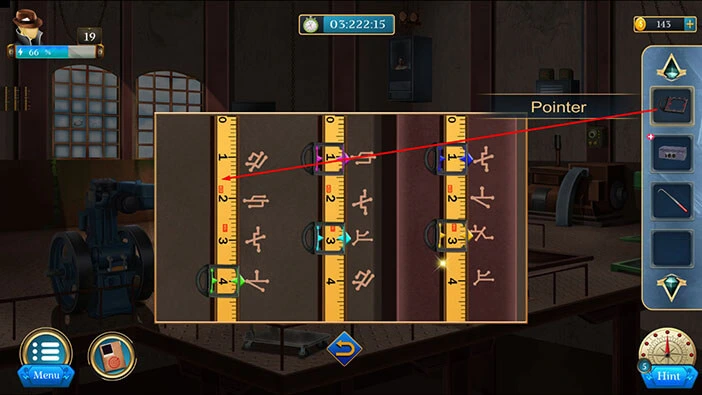
Next, let’s tap on the red pointer to place it in the correct position, and it will point at the number 1.
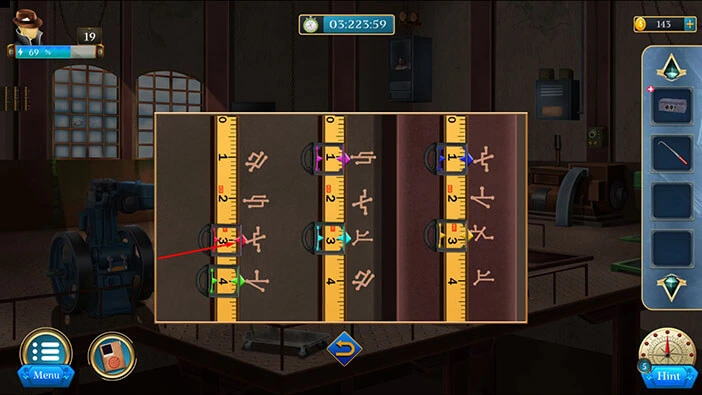
Here, we have a hint for the next puzzle. Let’s memorize/write down the symbols marked by pointers.
Once you’re done, tap on the arrow at the bottom to go back.

Let’s tap on the display screen, located on the machine in the top right corner, to take a closer look at it, and tap again to start the interaction.

Let’s set the correct symbols. We will do that in several steps. Let’s begin.
Step 1
Tap three times on the button in the top slot.

Step 2
Tap four times on the button in the top right corner.

Step 3
Tap three times on the button in the top left corner.

Step 4
Tap three times on the button at the bottom.
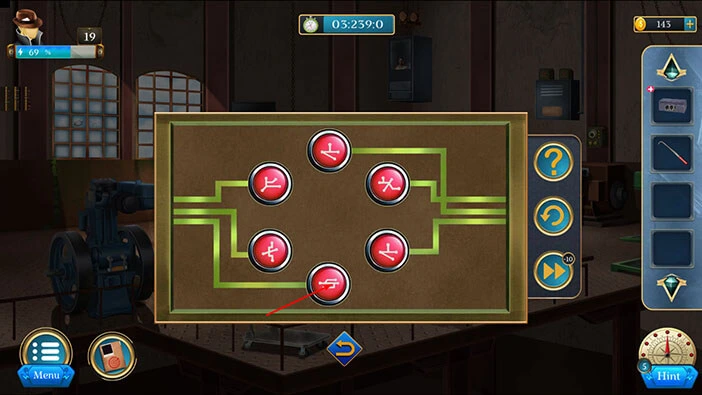
Step 5
Tap once on the button in the bottom left corner.

Step 6
Tap four times on the button in the bottom right corner, and you will solve this puzzle.
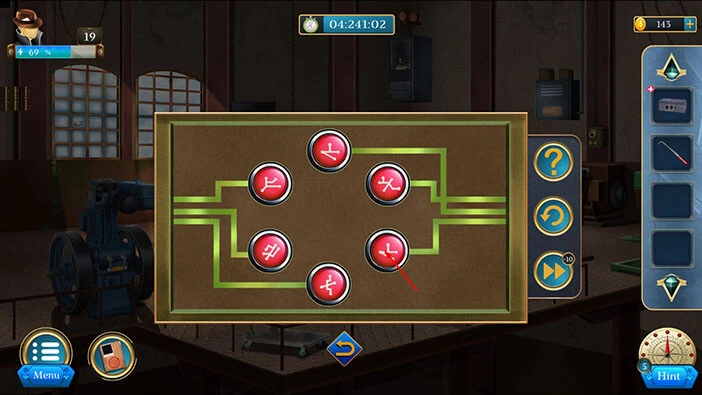
You will unlock the locker, and inside you will find a “Puzzle piece”. Let’s tap on it to pick it up. After that, tap on the arrow at the bottom to go back.
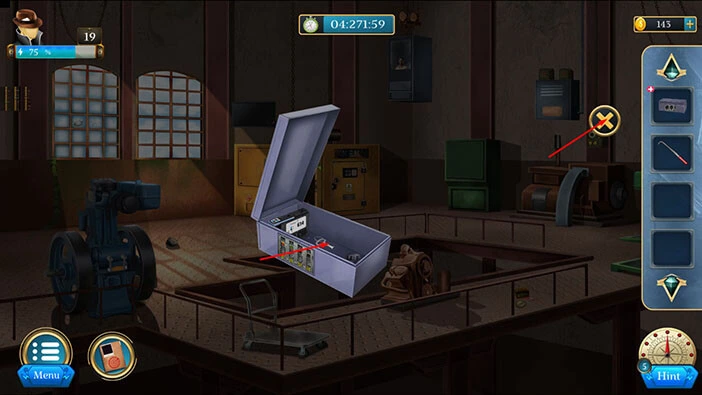
Select the “Box” from the inventory and it will appear in the middle of the screen, tap on it again to start the interaction.
Select the “Puzzle piece” from the inventory and insert it into the empty slot.
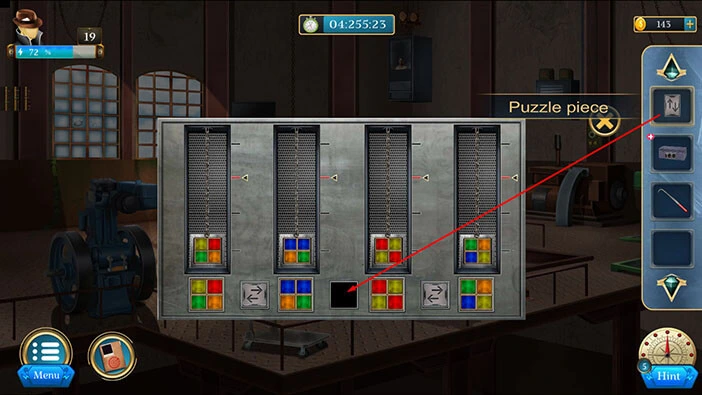
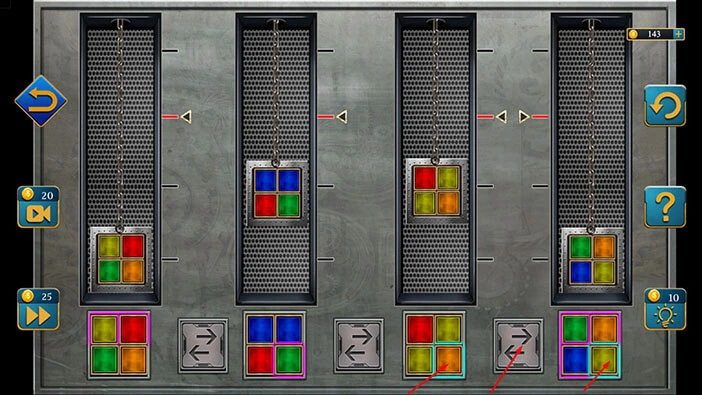
Here, we have another puzzle. Our task is to raise all four boxes to the third spot, marked with red lines and arrows. We will do this puzzle in several steps. Let’s begin.
Step 1
Select the bottom left slot of the second square and the bottom right slot of the third square. After that, tap on the arrow to swap these two pieces.
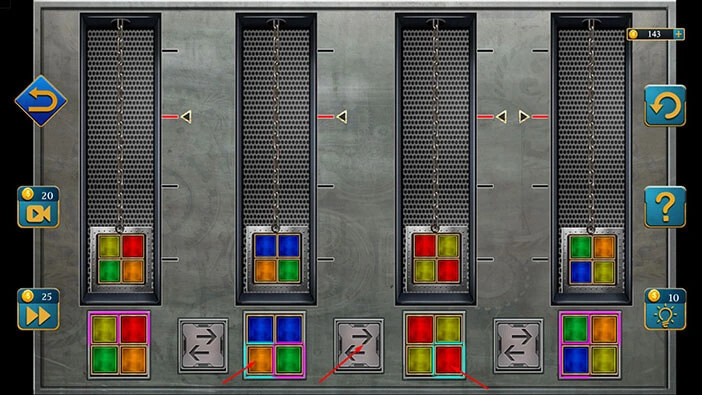
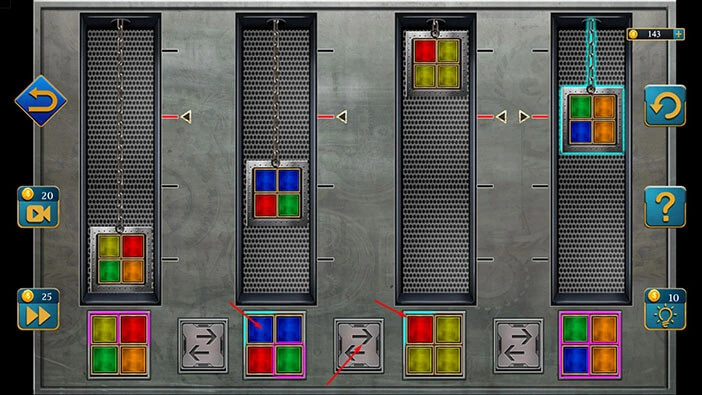
Step 2
Select the bottom right slot of the third square, and the bottom right slot of the fourth square. After that, tap on the third arrow to swap these two pieces.
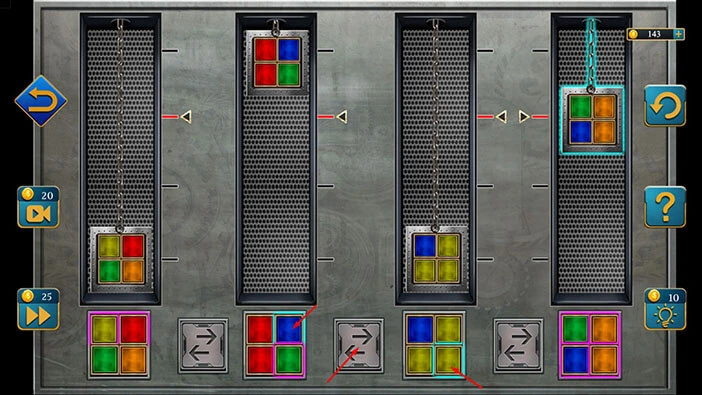
Step 3
Select the top left slot of the second square and the top left slot of the third square. After that, tap on the second arrow to swap these two pieces.
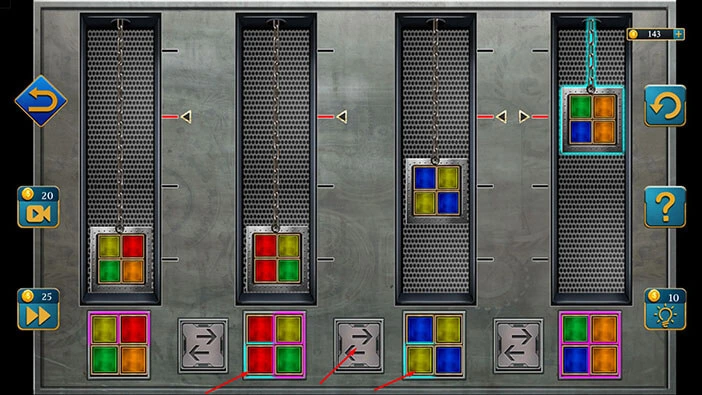
Step 4
Select the top right slot of the second square, and the bottom right slot of the third square. After that, tap on the second arrow to swap these two pieces.
Step 5
Select the bottom left slot of the second square, and the bottom left slot of the third square. After that, tap on the second arrow to swap these two pieces.
Step 6
Select the bottom left slot of the first square and the top left slot of the second square. After that, tap on the first arrow to swap these two pieces.
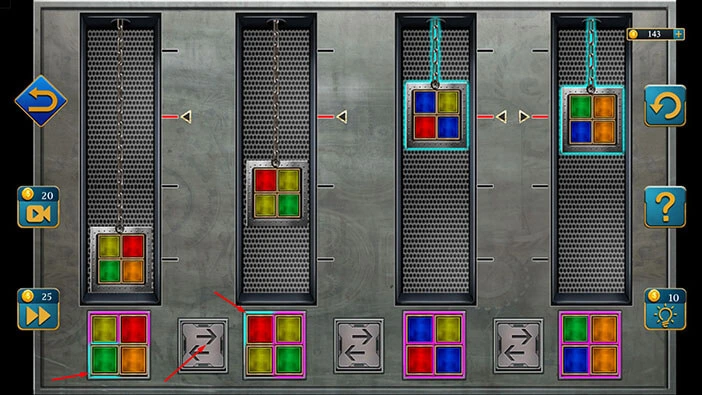
Step 7
Select the bottom right slot of the first square, and the bottom left slot of the second square. After that, tap on the first arrow to swap these two pieces. With that, you will solve this puzzle.
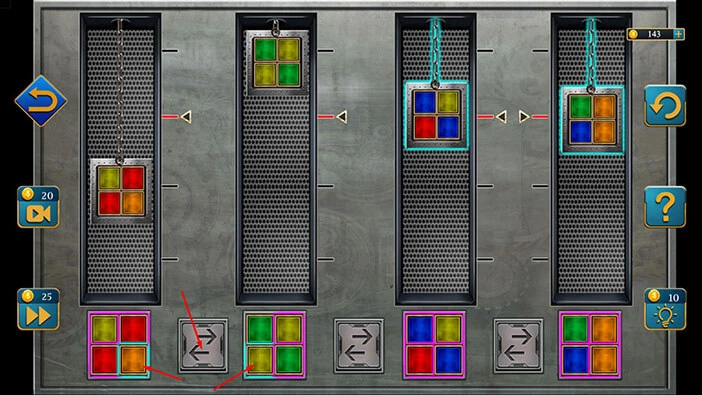
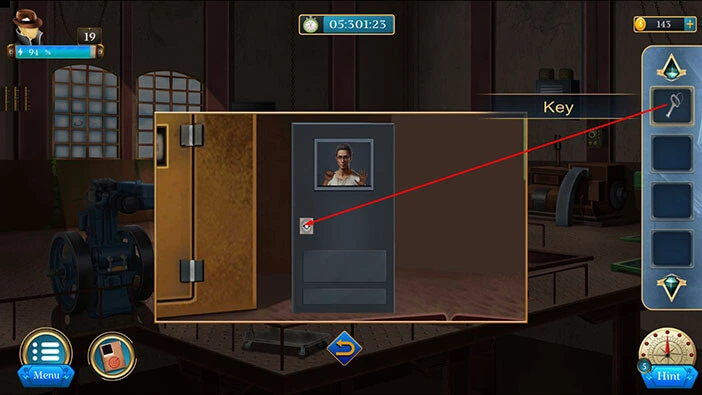
You will open the box, and inside you will find a “Key”. Let’s tap on it to pick it up.
After that, tap on the “X” button to close this window.
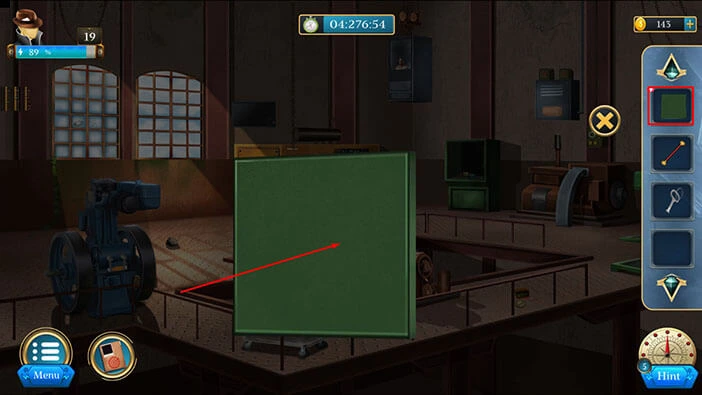
Next, let’s tap on the green box in the top left corner of the room to take a closer look at it.
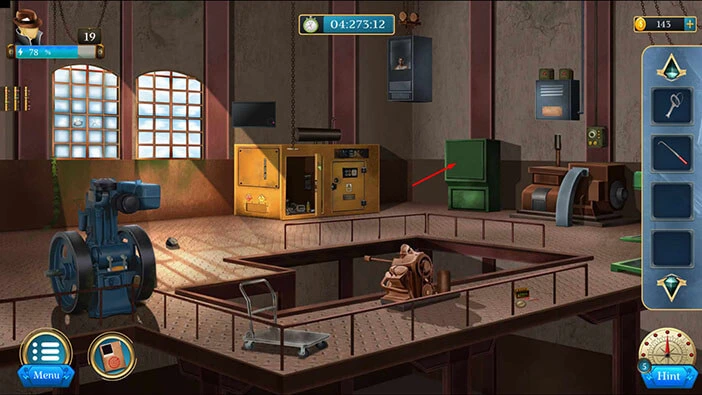
Select the “Handle hook” from the inventory and use it to open the box.
Inside, you will find a “Pin”. Let’s tap on it to pick it up. Also, let’s tap on the green “Plate” (the one that we just removed) to pick it up.
After that, tap on the arrow at the bottom to go back.
Select the “Plate” from the inventory and it will appear in the middle of the screen. Tap on the plate again to turn it around.
Here, you will discover the five symbols that represent a hint for the next puzzle. Let’s memorize/write down these symbols.
Once you’re done, tap on the “X” button to close this window.
Next, let’s tap on the power box to take a closer look at it, and tap again to start the interaction.

Select the “Pin” from the inventory and insert it into the empty slot.
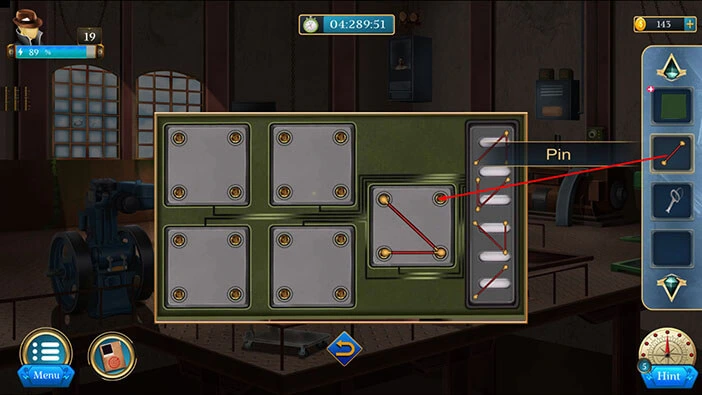
Here, we have another puzzle. Previously (at the back side of the plate), we saw five symbols that matched the shapes of the wires in this puzzle. So, our next task is to place the wires into the correct slot. We will do that in several steps. Let’s begin.
Step 1
Select the second wire and place it into the top left slot.
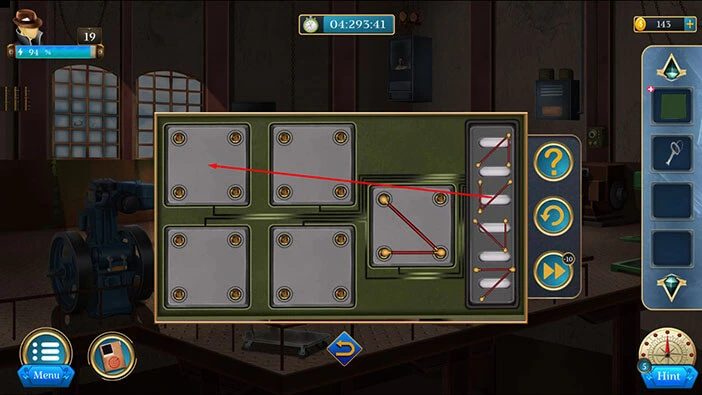
Step 2
Select the third wire and place it into the top right slot.
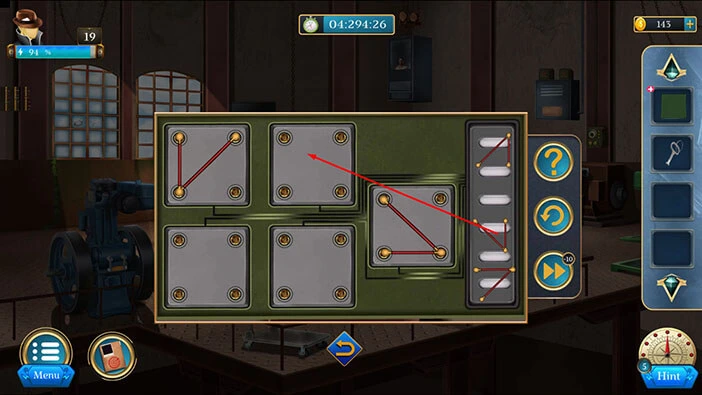
Step 3
Select the first wire and place it into the bottom left slot.
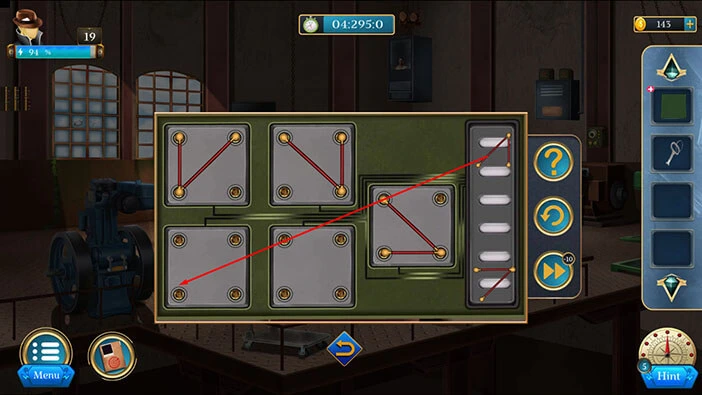
Step 4
Lastly, select the fourth wire and place it into the bottom right slot. With that, you will solve this puzzle, and you will lower the cage.

Let’s tap on the cage to take a closer look at it.
Select the “Key” from the inventory and use it to unlock the cage, and free Detective’s friend.
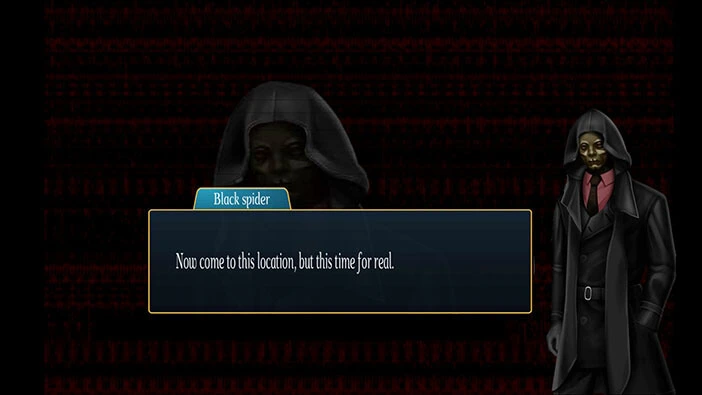
Well, the “Black Spider” ran away again. We will get him next time.
With that, we have reached the end of the nineteenth level. If you want to see the walkthrough for the twentieth level, tap on the next part button.
Thank you for reading.