Room Escape: Detective Phantom | Level 18
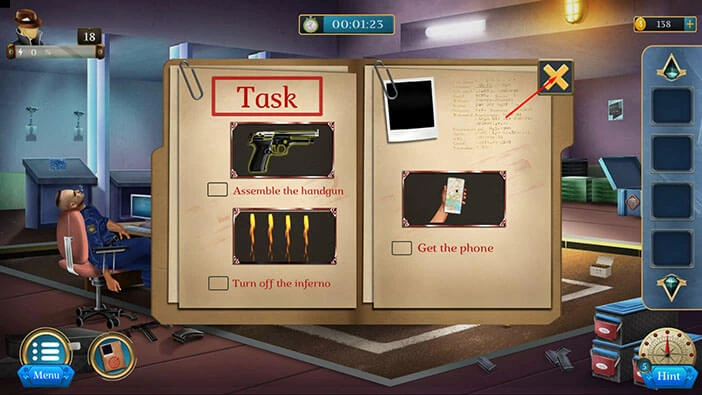
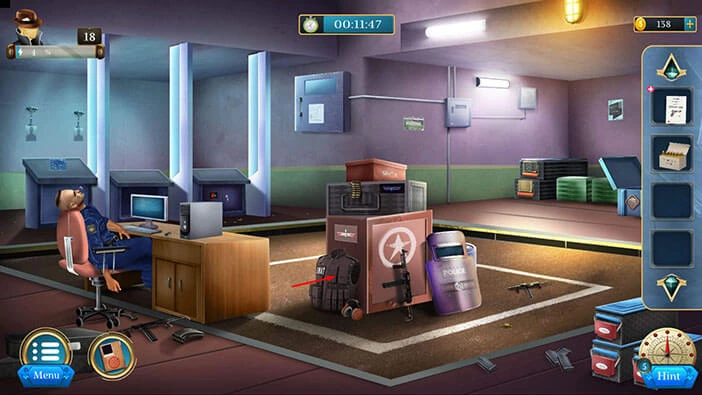
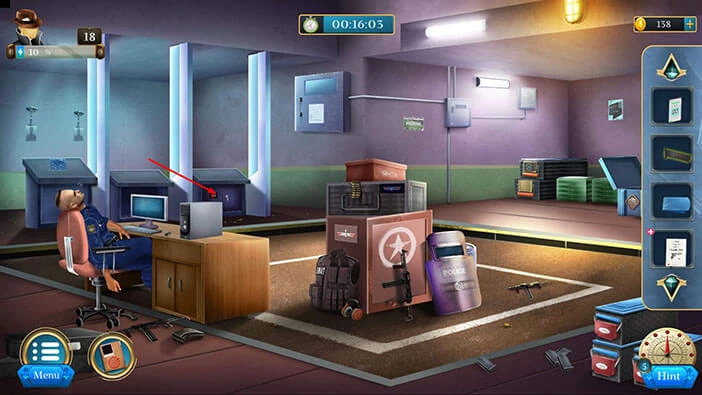
Hello everyone and welcome to the walkthrough for the eighteenth level of “Room Escape: Detective Phantom”. In the eighteenth level, our task is to save our friend, but first, we must find a way to obtain a gun.
Our objectives are to “Assemble the handgun” “Turn off the inferno” and “Get the phone”. Tap on the “X” button to go back.
On the right side of the room, you will notice a box of “Bullets”. Let’s tap on it to take a closer look and tap again to pick it up.
After that, tap on the arrow at the bottom to go back.
Next, let’s tap on the police shield to take a closer look at it, and tap again to move it aside.
Here, you will find an “Instruction catalog”. Let’s tap on it to pick it up.
After that, tap on the arrow at the bottom to go back.
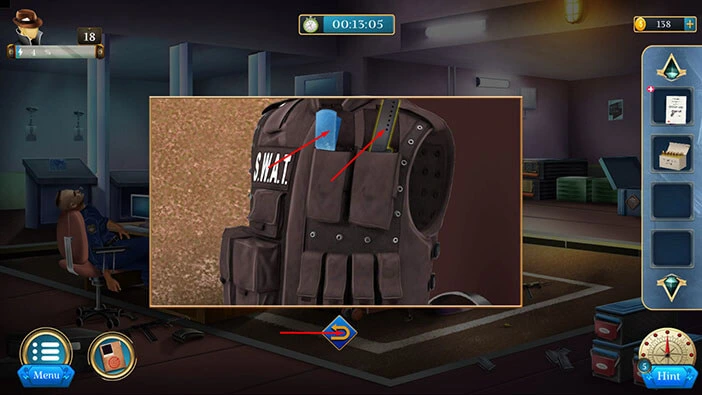
Next, let’s tap on the SWAT vest to take a closer look at it.
Next, tap on the two pockets to open them.
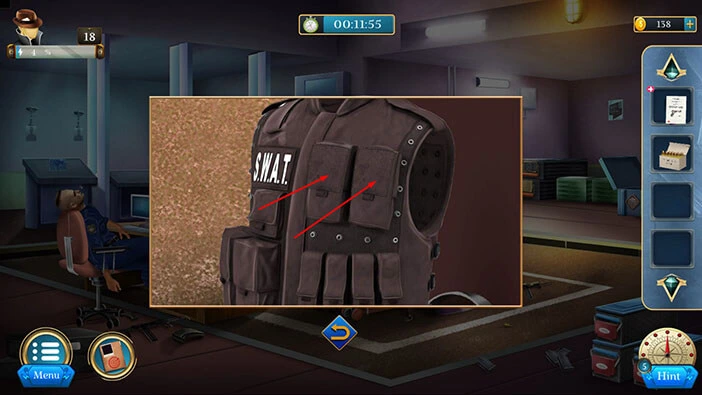
In the pockets, you will find a “Blueprint” and a “Magazine”. Let’s tap on these two items to pick them up.
After that, tap on the arrow at the bottom to go back.
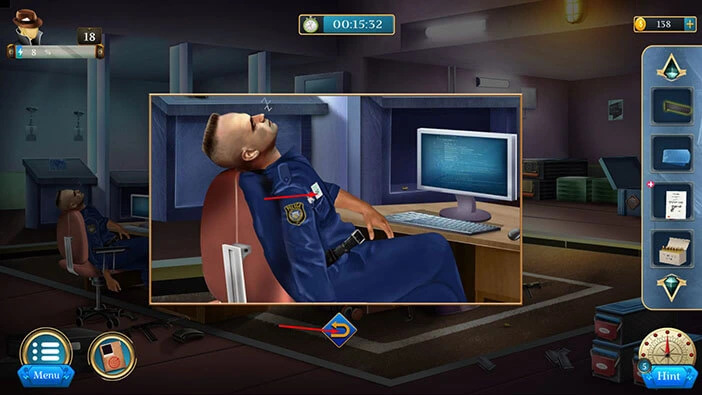
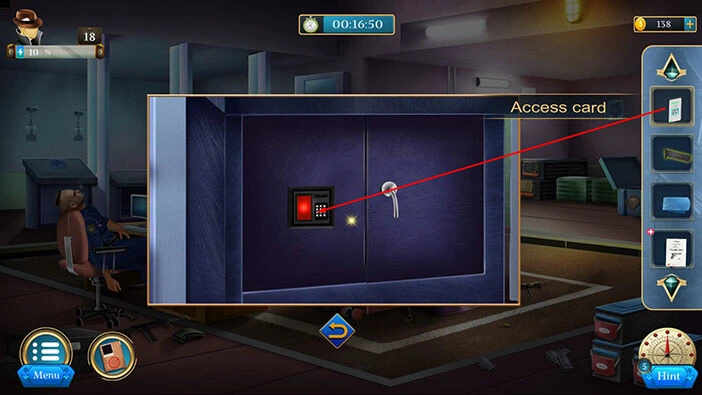
Next, let’s tap on the security guard to take a closer look at him, then tap on the pocket to open it.

In the pocket, you will find the “Access card”. Let’s tap on it to pick it up.
After that, tap on the arrow at the bottom to go back.
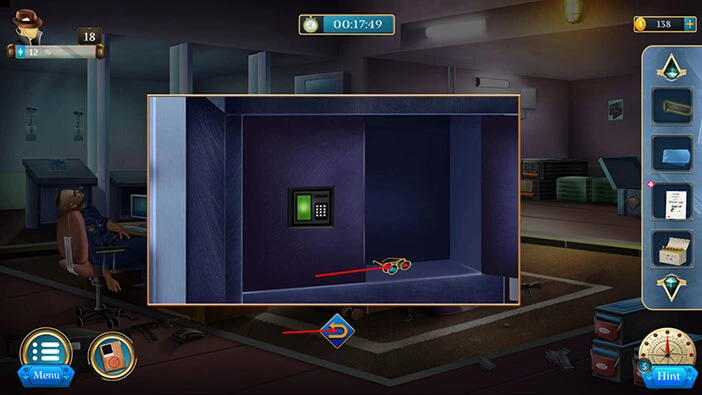
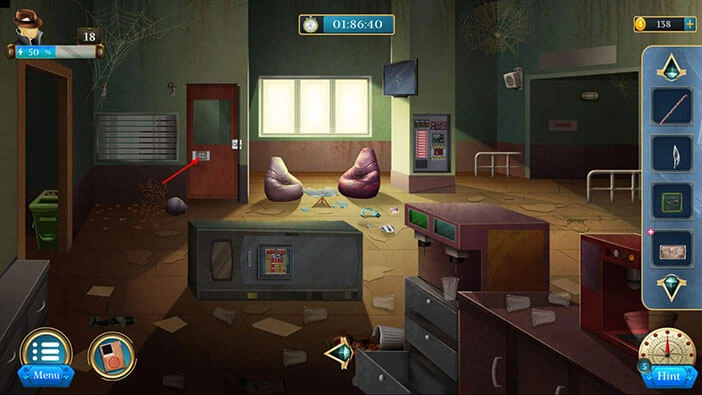
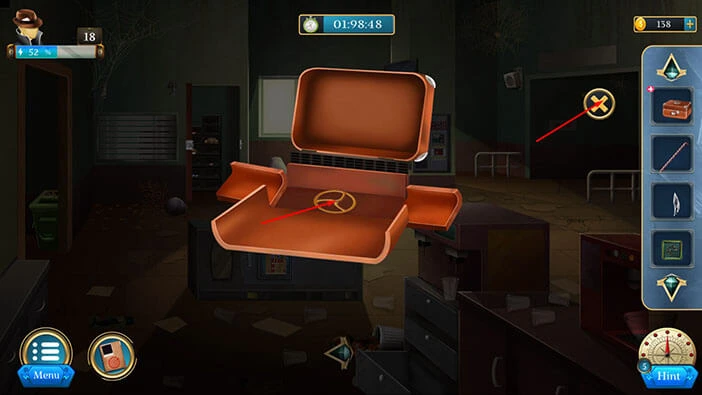
Next, let’s tap on the safe on the left to take a closer look at it.
Select the “Access card” from the inventory and use it to unlock the safe. After that, tap on the door to open it.
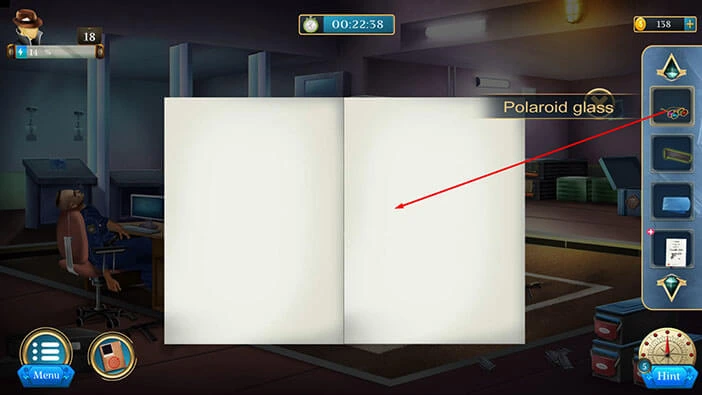
In the safe, you will find a “Polaroid glass”. Let’s tap on it to pick it up. After that, tap on the arrow at the bottom to go back.
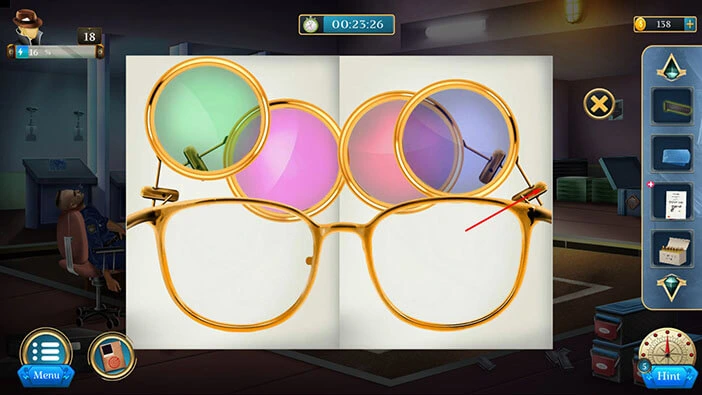
Select the “Instruction” book from the inventory and it will appear in the middle of the screen. Let’s tap on it to open it.
Select the “Polaroid glass” from the inventory and use it to look at the instructions page.
Let’s tap on the handle on the right side of the glass to lower it.
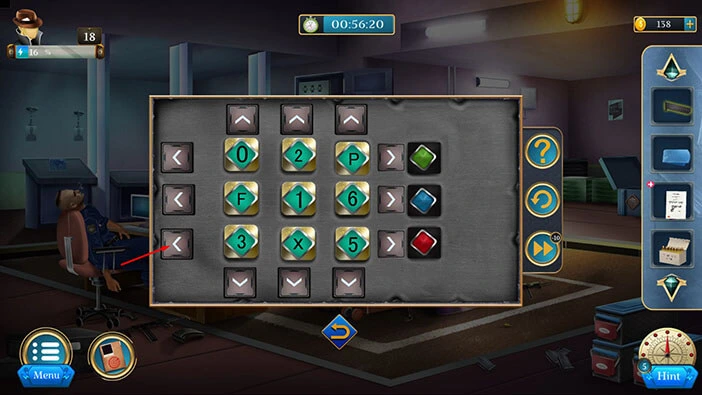
Here, we can see a hint for the next puzzle. So, let’s memorize/write down the following information. Blue glass,
On = 1
Off = 6
Blink = F
Once you’re done, tap on the handle on the right to raise the glass.

Next, let’s tap on the glass in on the left to lower this glass.
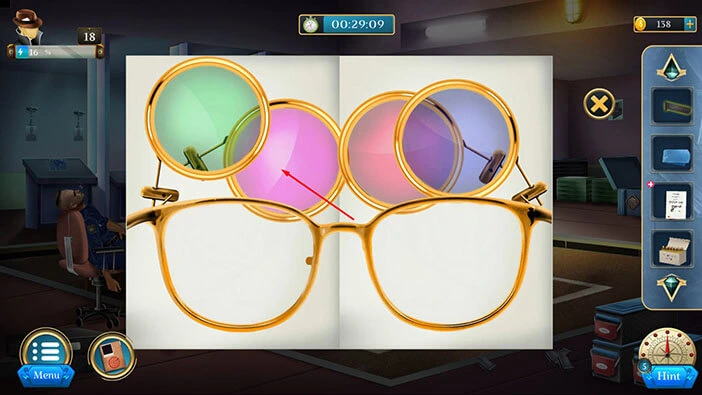
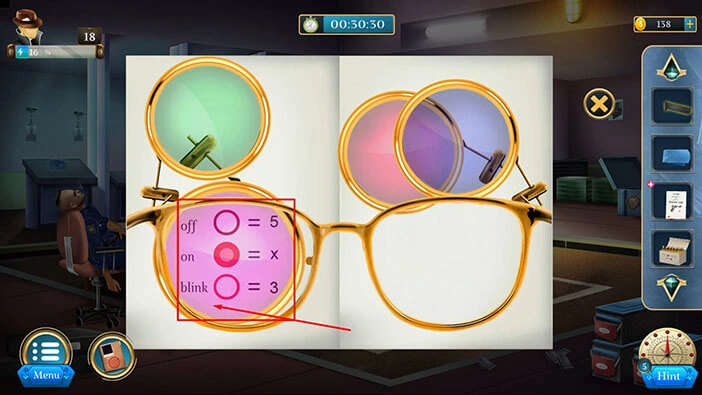
Let’s memorize/write down the following information. Pink glass,
Off = 5
On = X
Blink = 3
Once you’re done, tap on the glass to raise it.
Next, let’s tap on the glass in the top left corner to lower this glass.
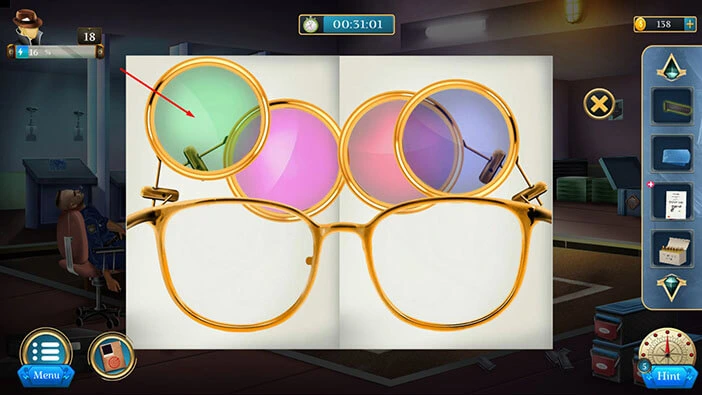
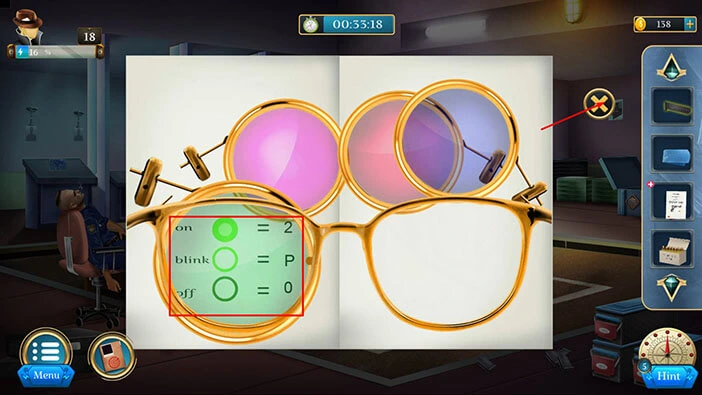
Let’s memorize/write down the following information. Green glass,
On = 2
Blink = P
Off = 0
Once you’re done, tap on the “X” button to close this window.
Next, on the left, you will see the blueprint. Let’s tap on it to take a closer look.

Next, let’s tap on the power box on the wall on the left to take a closer look at it, and tap again to open it.

Next, tap on the lever to turn on the power. After that, tap on the arrow at the bottom to go back.

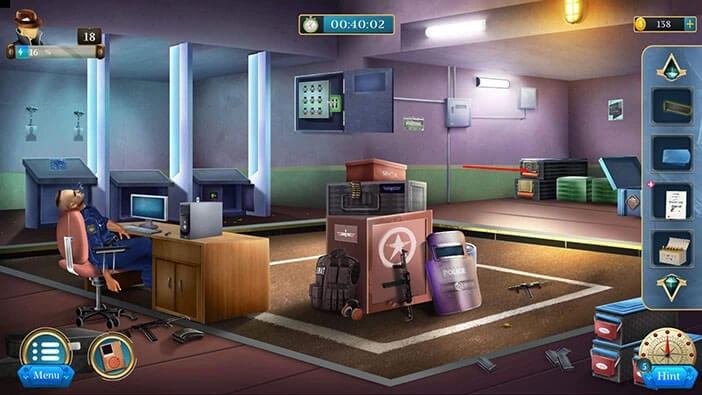
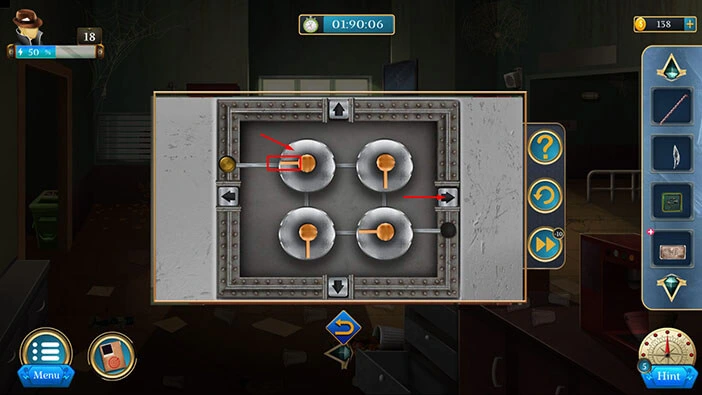
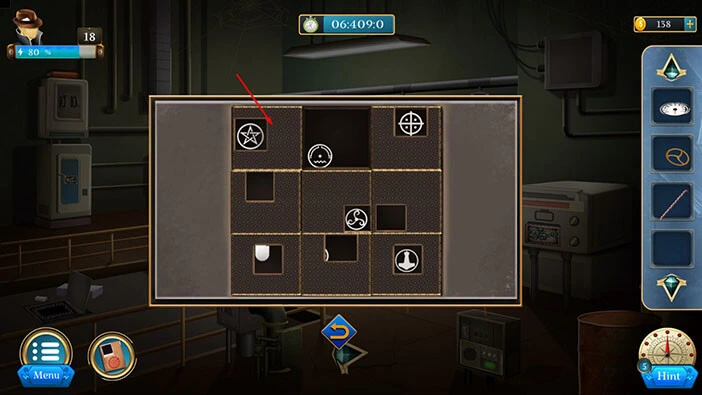
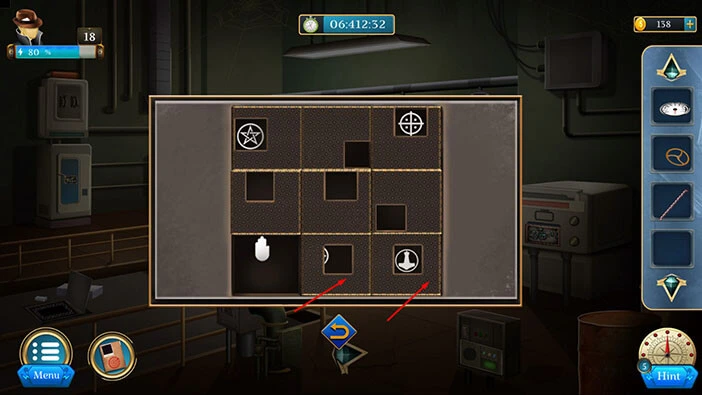
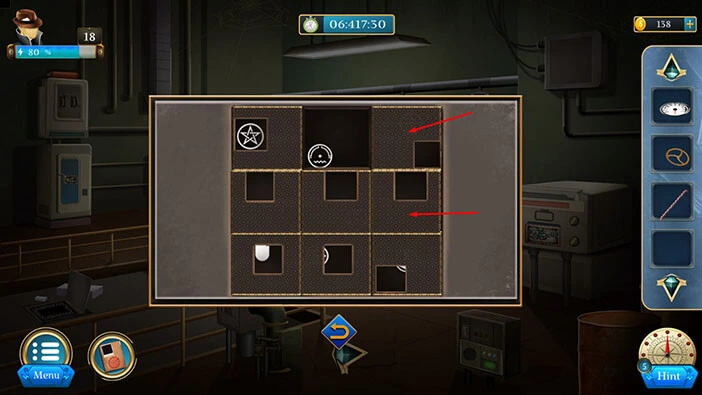
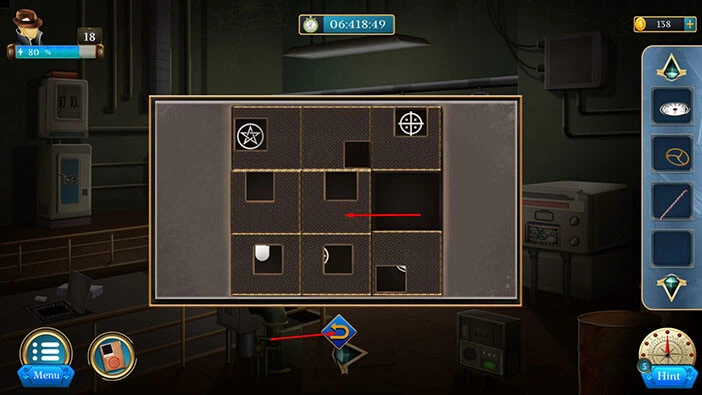
Next, let’s tap on the box in the top left corner of the room to take a closer look at it, and tap again to start the interaction.
Here, we have another puzzle. Our task is to set the slots on the grid to match the hint that we discovered by using the “Polaroid glass”. We will do that in several steps. Let’s begin.
Step 1
Tap once on the first arrow at the top to rotate the symbols.

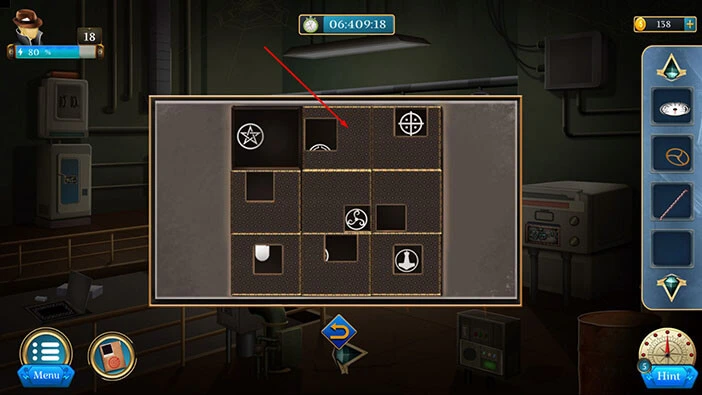
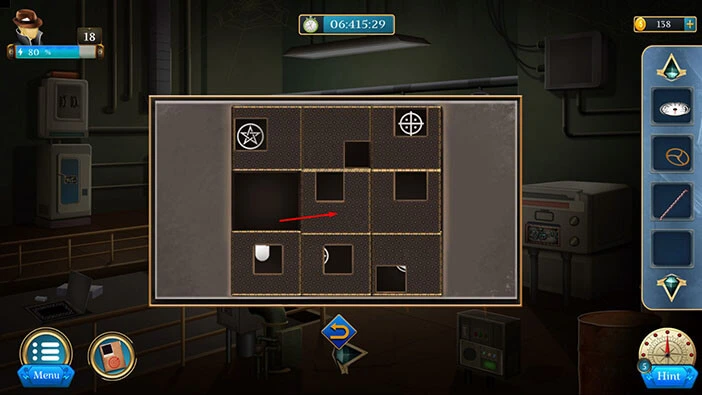
Step 2
Tap once on the first arrow on the left to rotate the symbols.

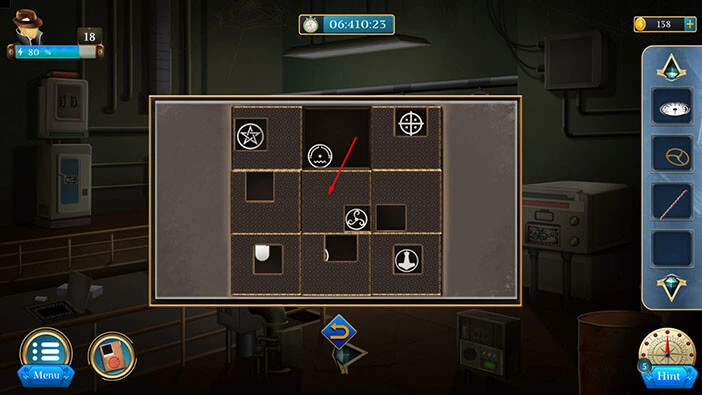
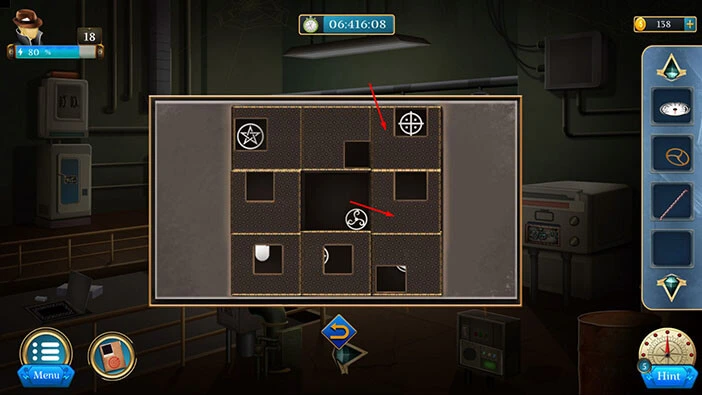
Step 3
Tap once on the second arrow on the left to rotate the symbols.
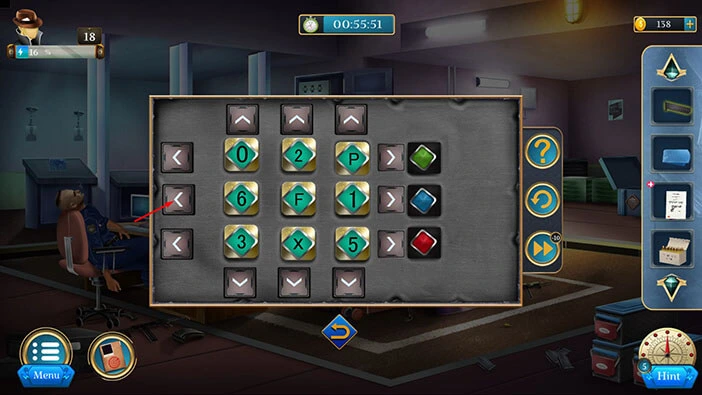
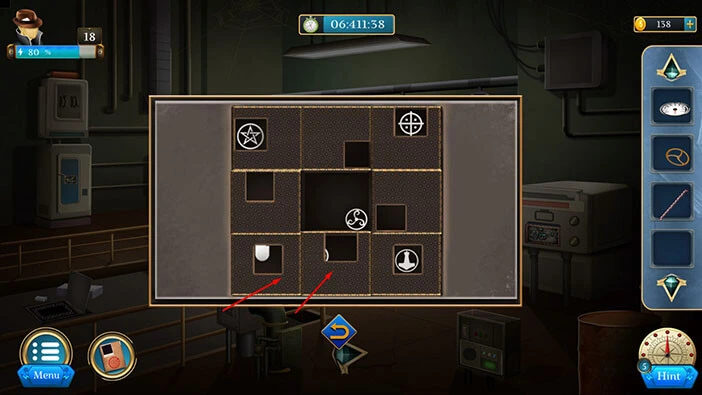
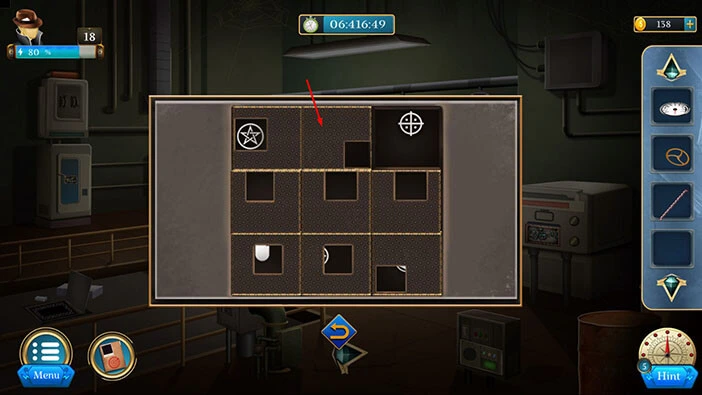
Step 4
Tap once on the third arrow on the left to rotate the symbols. With that, you will solve this puzzle.
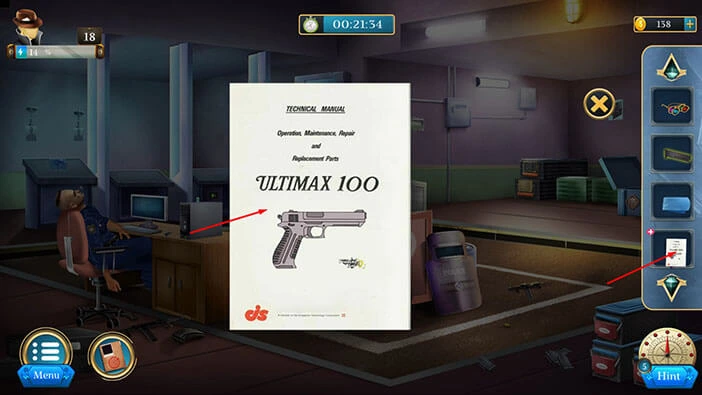
In the box, you will find a bunch of gun parts. Tap on all of them to pick them up.
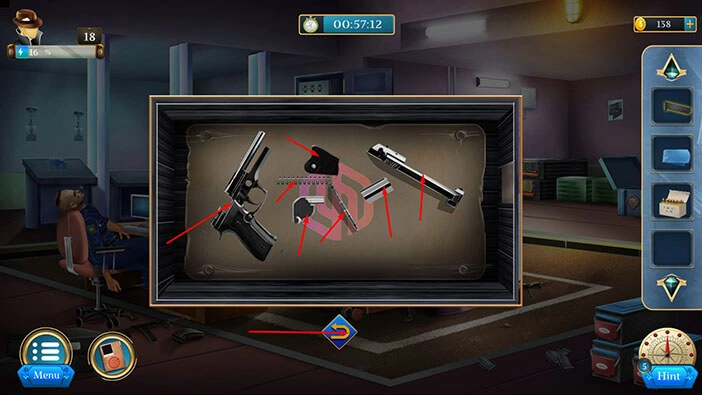
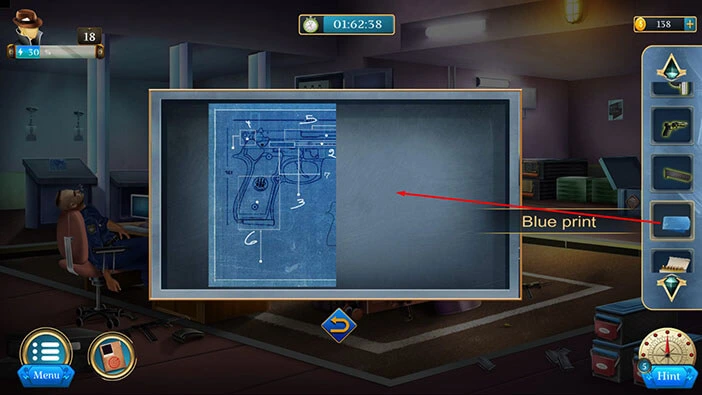
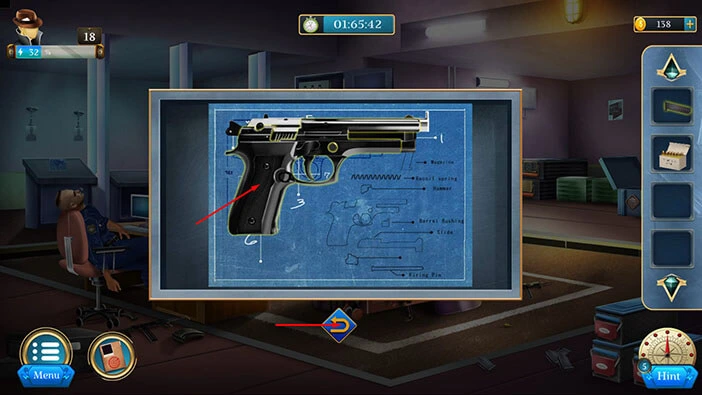
Next, on the left, you will notice a blueprint. Let’s tap on it to take a closer look, and tap again to start the interaction.

Select the part of the “Blueprint” from the inventory and place it next other part of the blueprint.
Select all gun parts from the inventory and place them on the blueprint.
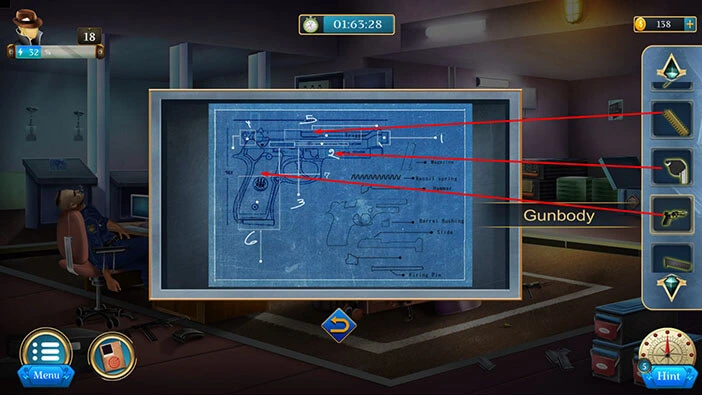
We have assembled the “Gun”. Let’s tap on it to pick it up.
After that, tap on the arrow at the bottom to go back.
Select the “Gun” from the inventory and it will appear in the middle of the screen. After that, select the “Magazine” from the inventory and place it next to the gun.

Next, select the “Bullets” from the inventory and place them next to the magazine.
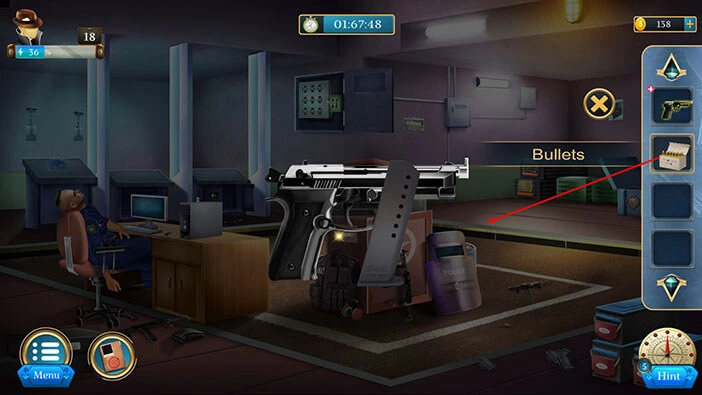
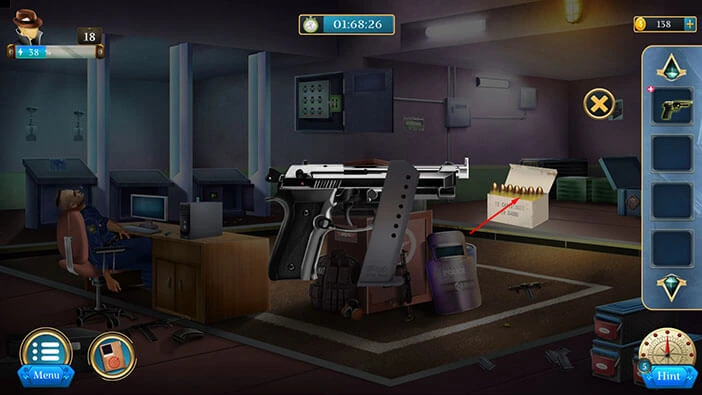
Lastly, tap on the “Bullets” to load them into the magazine. Our character will automatically take the magazine and insert it into the handgun, and with that, we finally have a functional firearm.
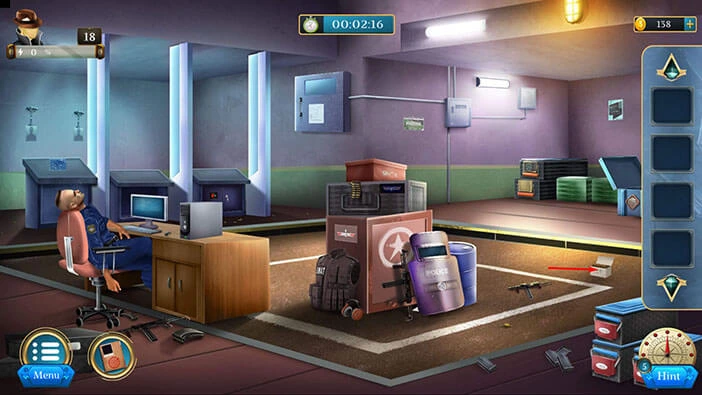
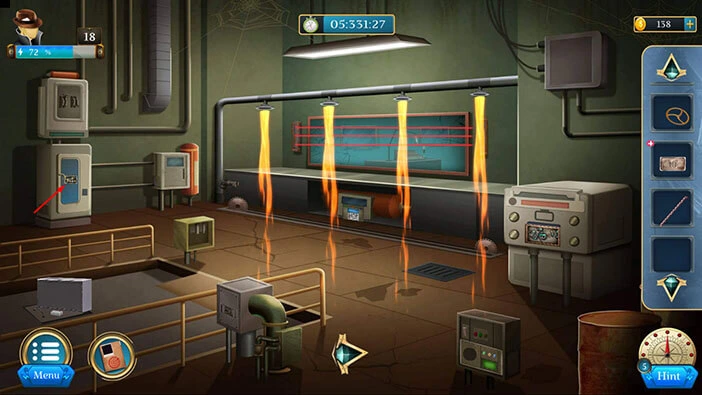
Our next task is to get to disable the traps and get the mobile.
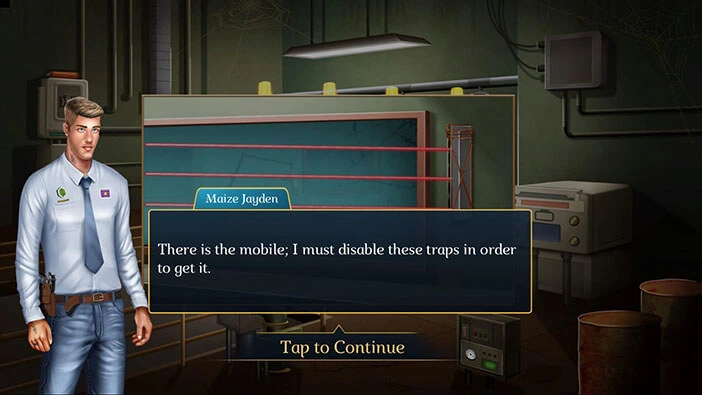
Let’s tap on the arrow at the bottom to proceed to the next room.
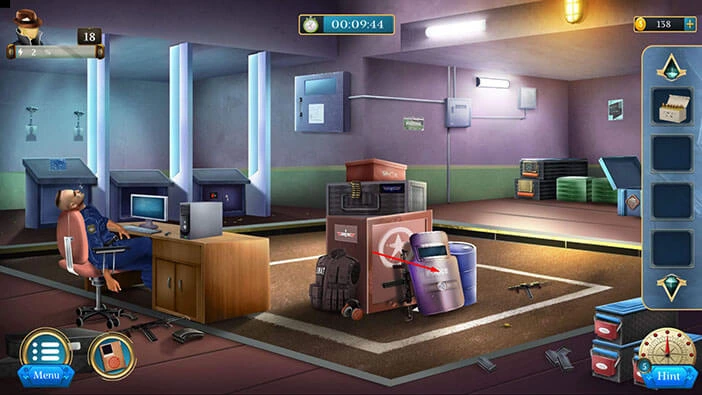
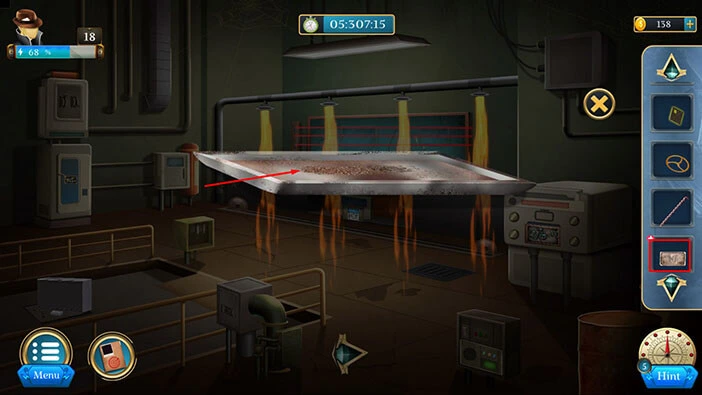
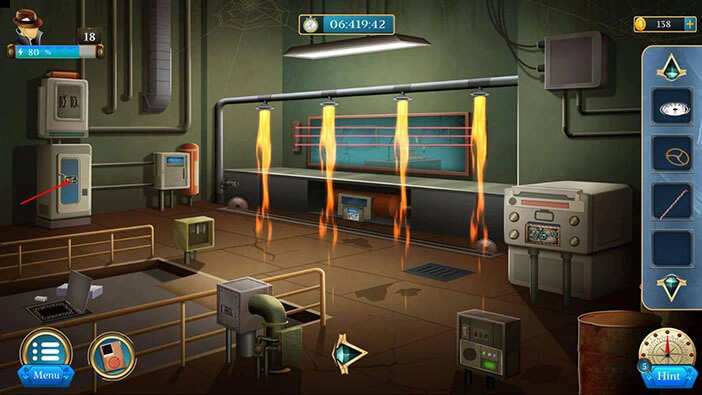
On the machine on the right, you will notice a “Metal plate”. Let’s tap on it to pick it up.
After that, tap on the arrow at the bottom to go back.
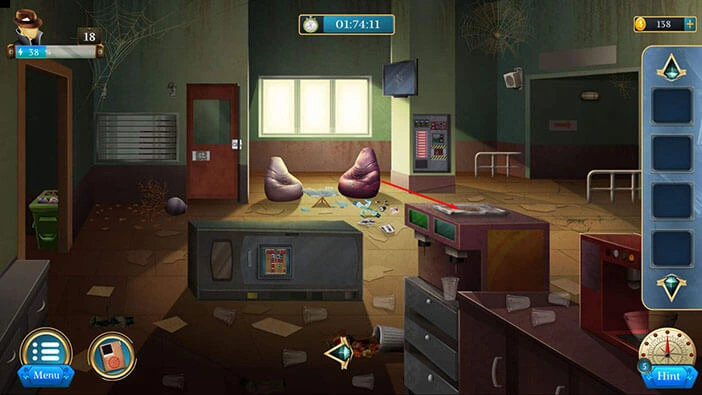
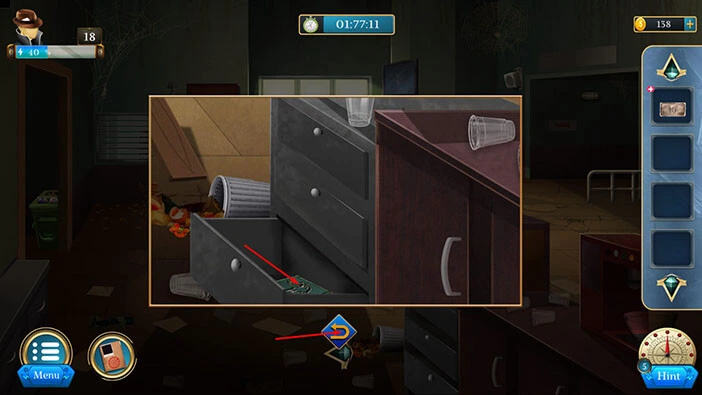
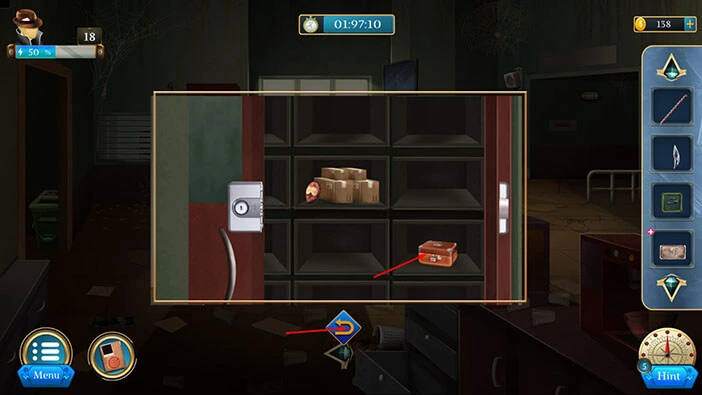
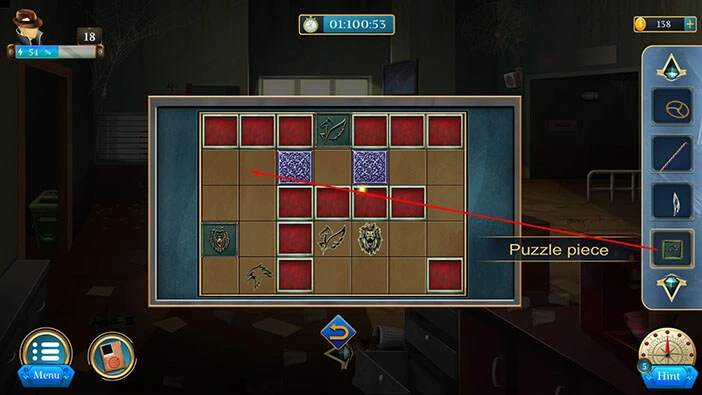
Next, let’s tap on the bottom drawer of the desk on the right to take a closer look at it, and tap again to open it.

In the drawer, you will find a “Puzzle piece”. Let’s tap on it to pick it up.
After that, tap on the arrow at the bottom to go back.
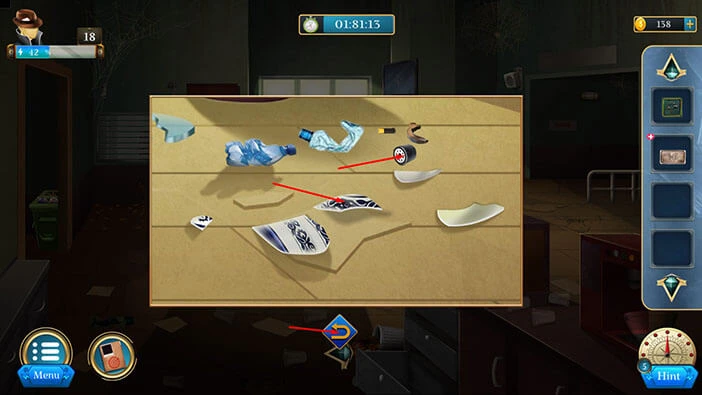
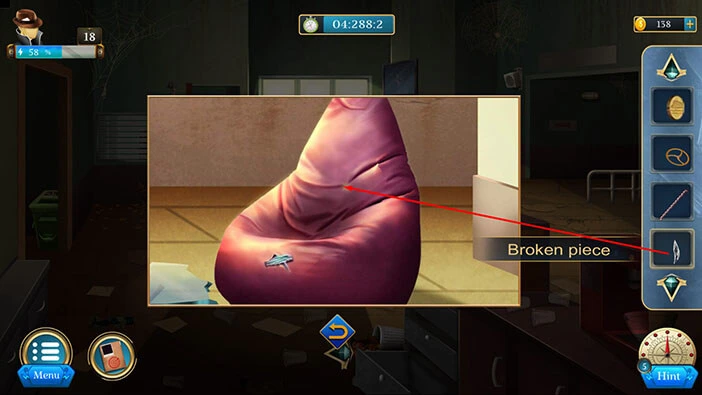
Next, let’s tap on the garbage on the floor to take a closer look at it.
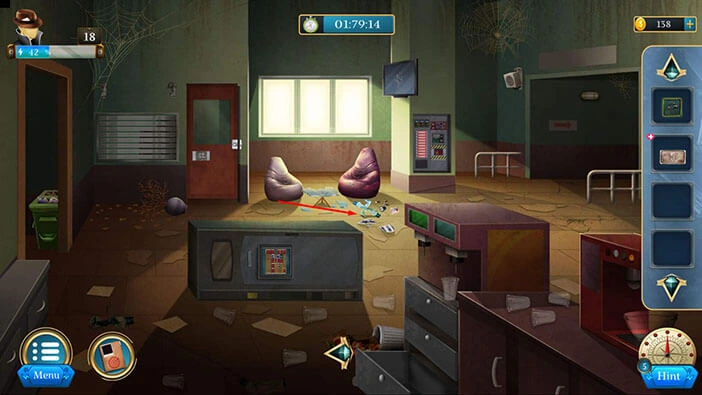
Here, you will find a “Broken piece” and “Garbage”. Let’s tap on these two items to pick them up.
After that, tap on the arrow at the bottom to go back.
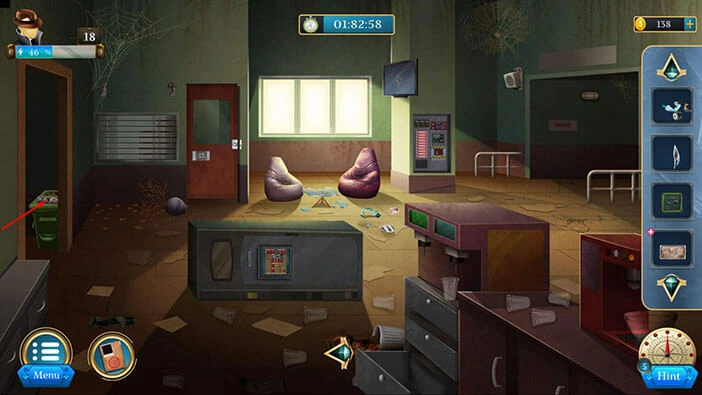
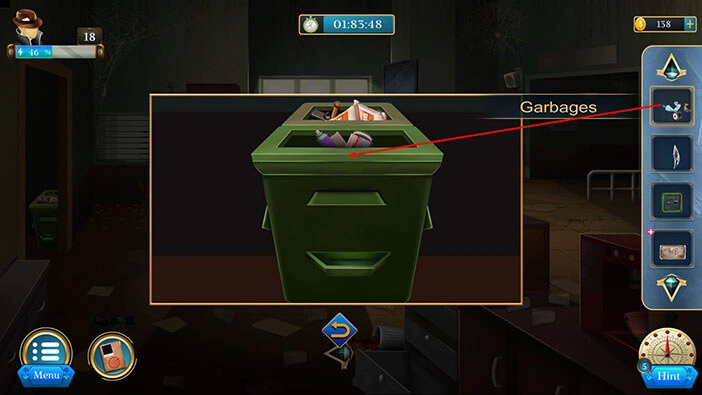
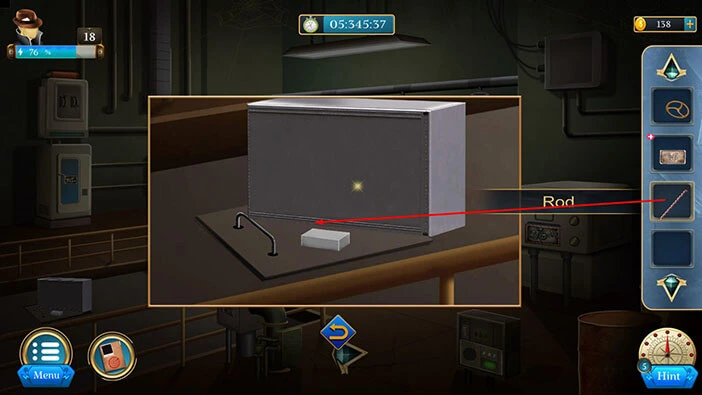
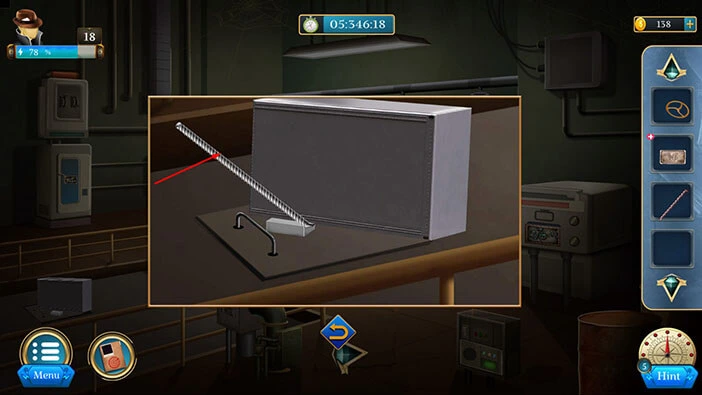
Let’s tap on the trash can on the left to take a closer look at it.
Select the “Garbage” from the inventory and put it into the trash can.
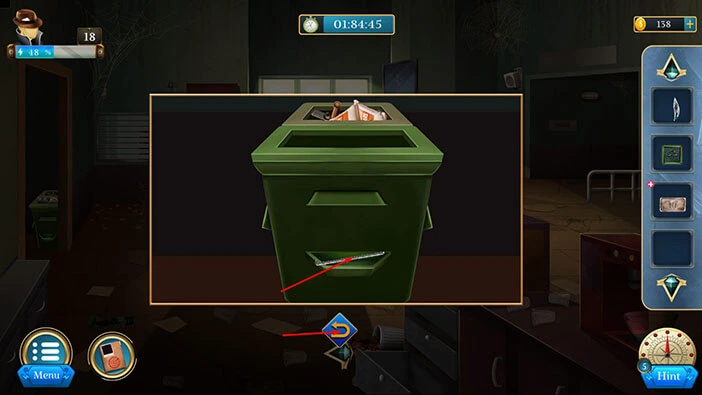
The “Rod” will fall out of the trash can. Let’s tap on it to pick it up.
After that, tap on the arrow at the bottom to go back.
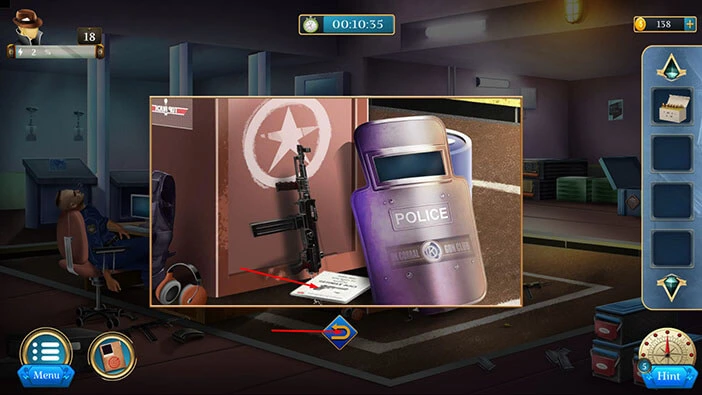
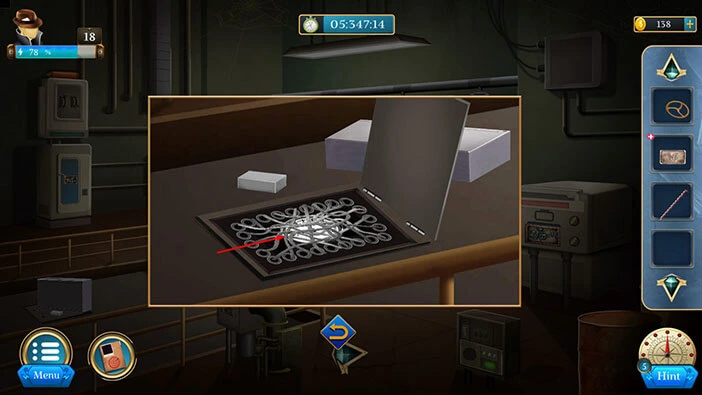
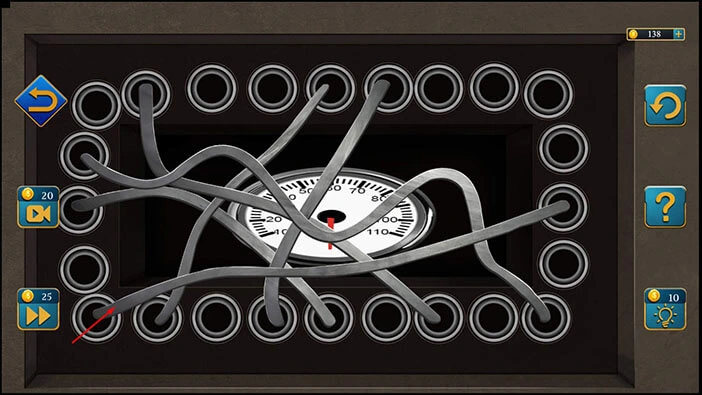
Let’s tap on the door in front of you, so let’s tap on it to take a closer look. After that, tap on the lock on the door to start the interaction.
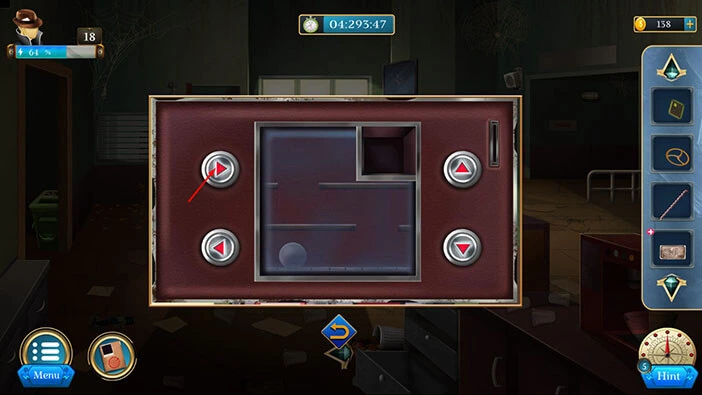
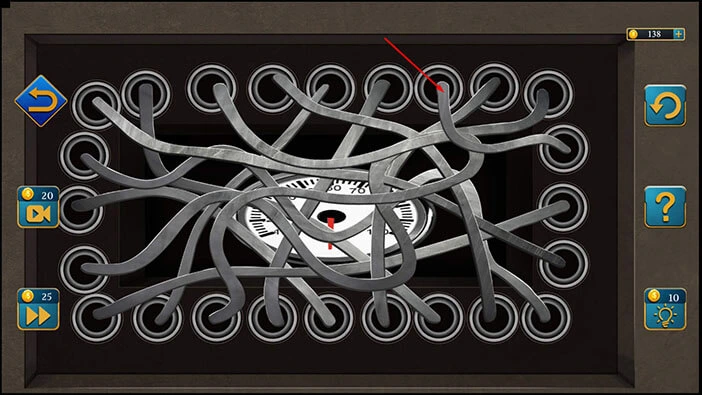
Here, we have another puzzle. Our task is to move the ball from the top left slot into the bottom right slot. We will do that in several steps. Let’s begin.
Step 1
Tap three times on the top left disk to rotate it, and the pipe should point to the left. After that, tap on the arrow on the right to move the ball to the top left slot, and into the pipe.
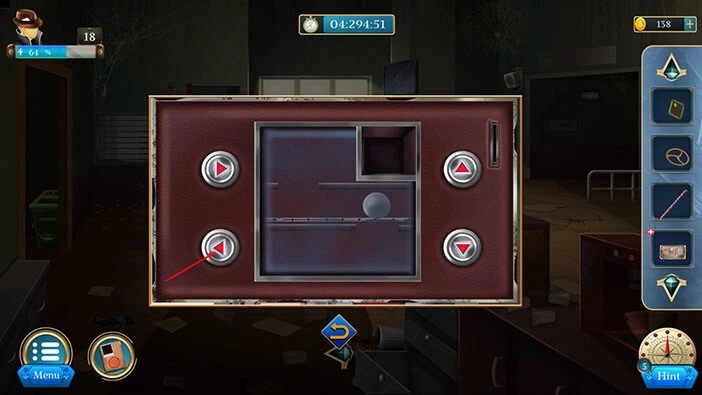
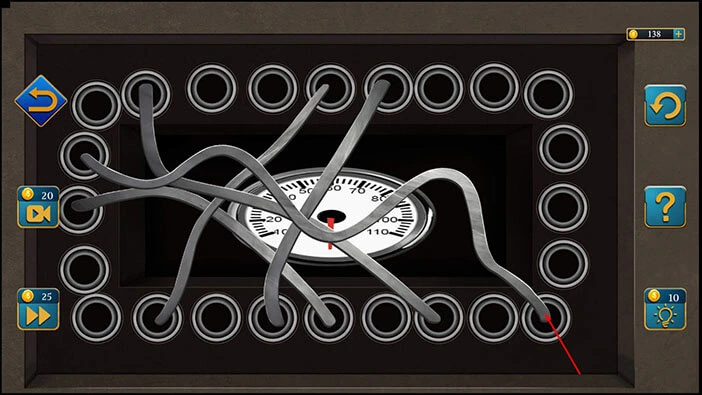
Step 2
Tap three times on the top left disk to rotate it, and the pipe should point down. Next, tap twice on the slot in the bottom left slot, and the pipe should point up. After that, tap on the up arrow to move the ball to the bottom left slot, and into the pipe.

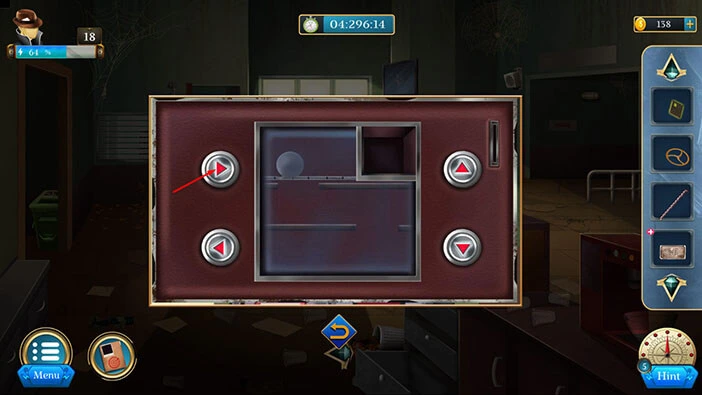
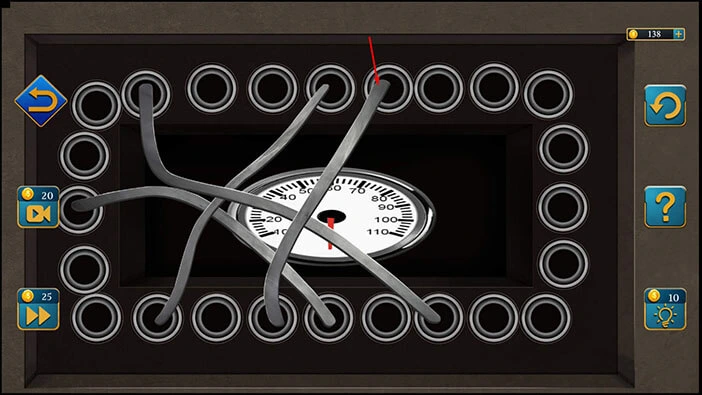
Step 3
Tap once on the bottom left disk to rotate it, and the pipe should point to the left. After that, tap on the right arrow to move the ball to the bottom left slot, and into the pipe.

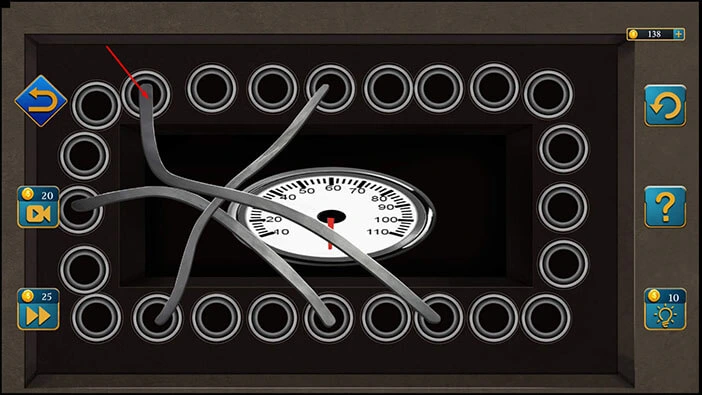
Step 4
Tap twice on the bottom right disk to rotate it, and the pipe should point to the right. After that, tap on the right arrow to move the ball to the right slot, and you will solve this puzzle.

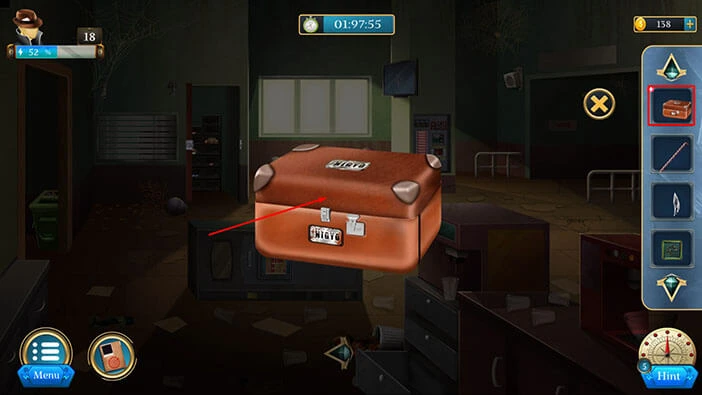
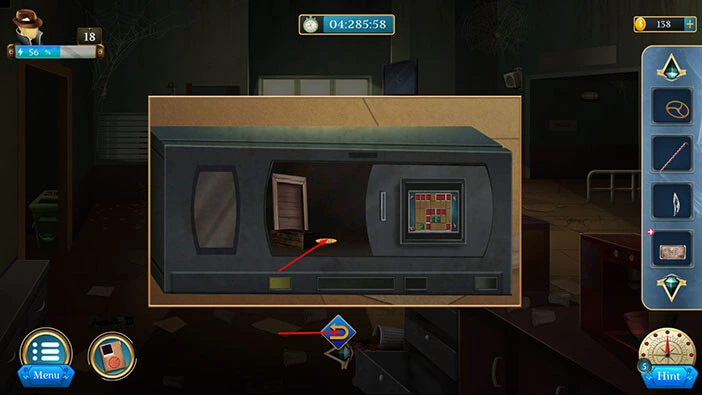
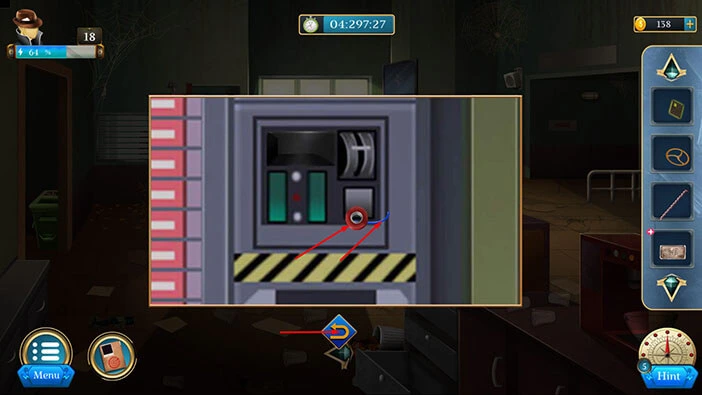
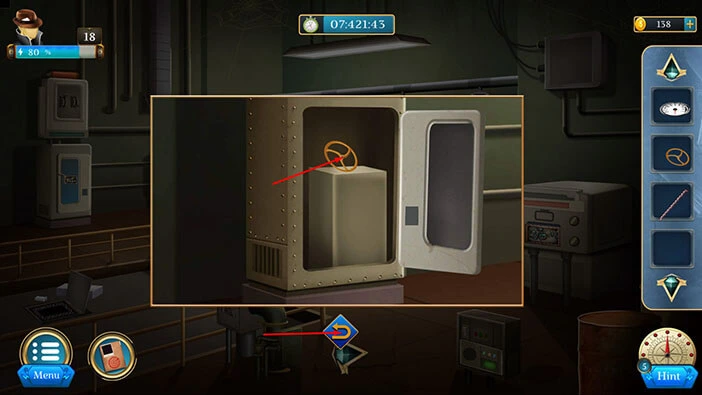
Inside you will find a “Box”. Let’s tap on it to pick it up. After that, tap on the lock on the door to start the interaction.
Select the box from the inventory and it will appear in the middle of the screen. After that, tap on the box to open it.
In the box, you will find a “Wheel”. Let’s tap on it to pick it up. After that, tap on the “X” button to close this window.
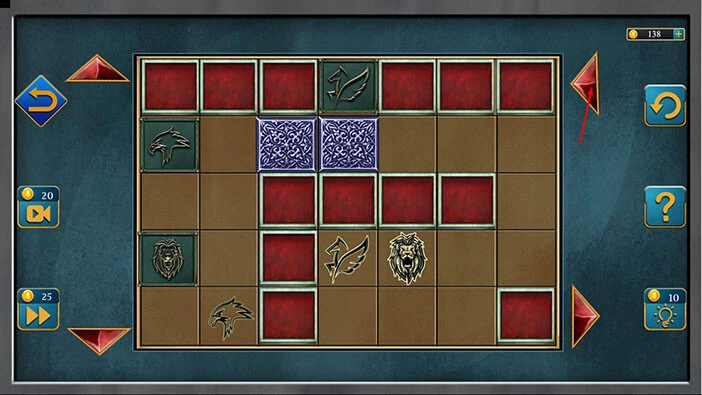
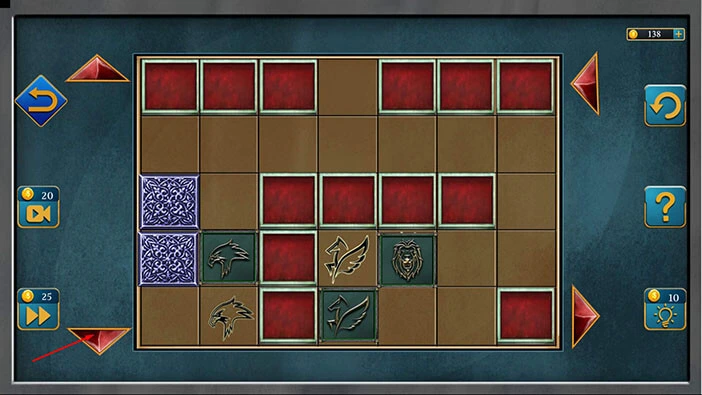
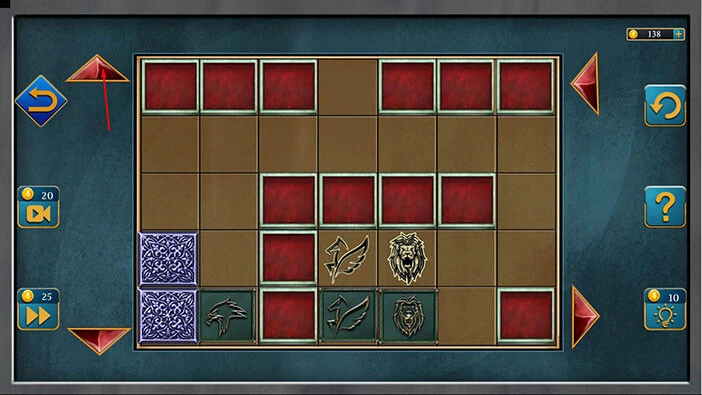
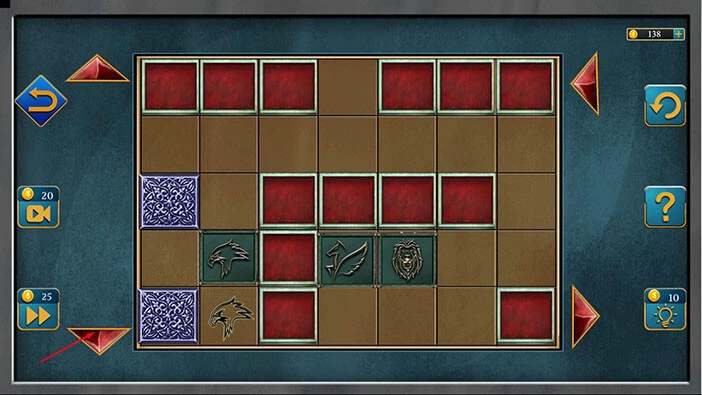
Next, tap on the puzzle in front of you to take a closer look at it, and tap again to start the interaction.

Select the “Puzzle piece” from the inventory and put it on the grid.
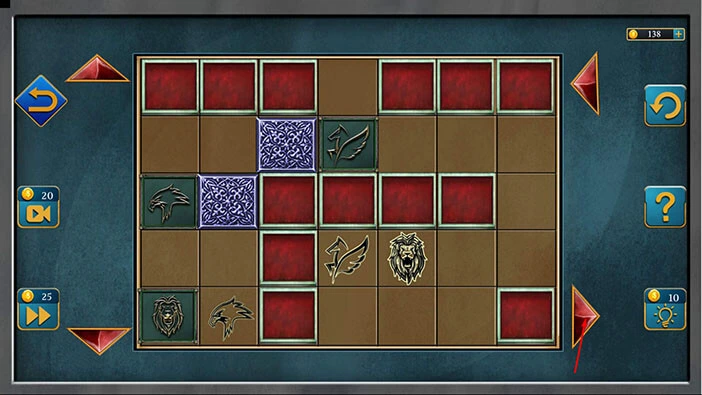
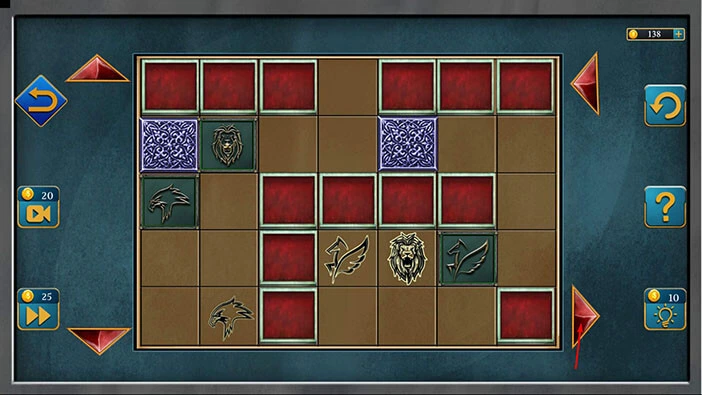
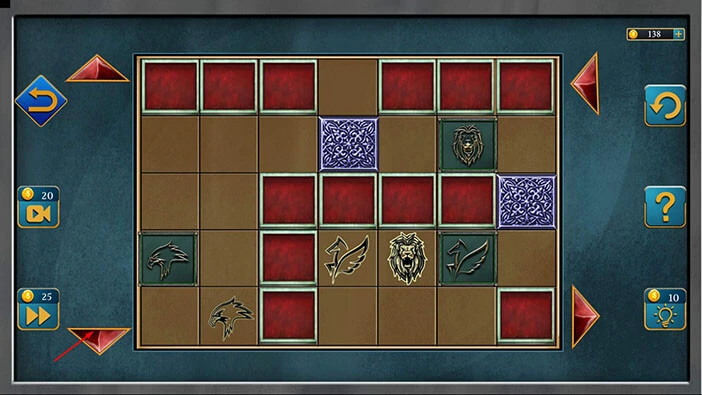
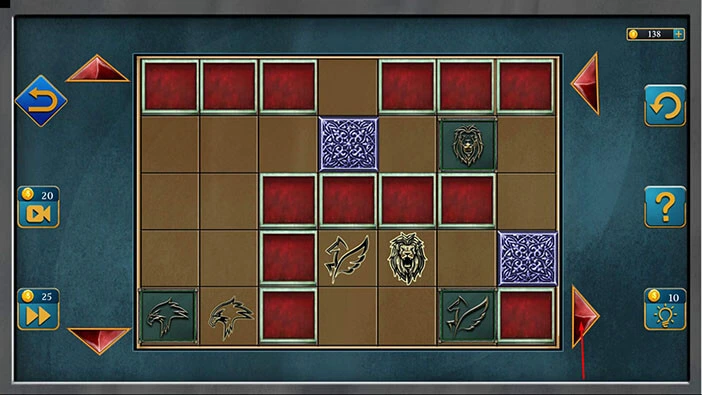
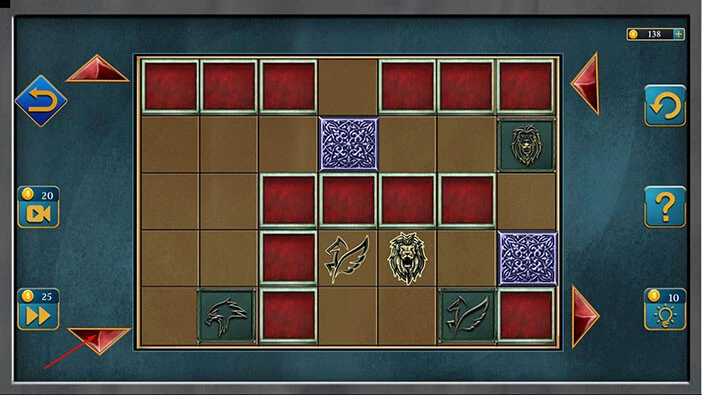
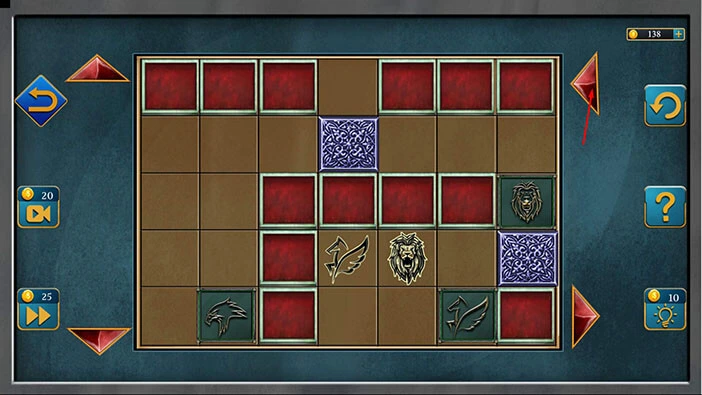
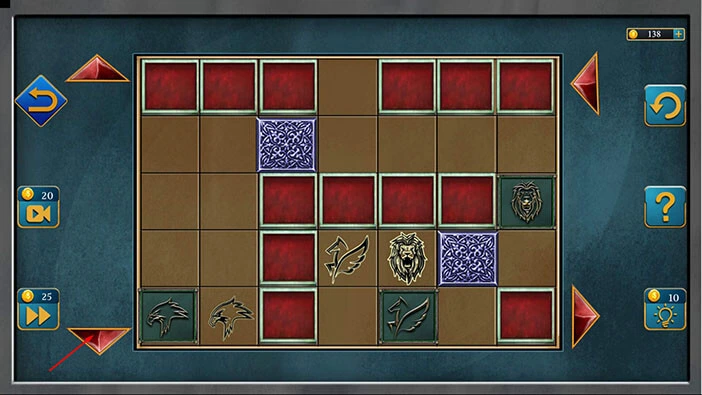
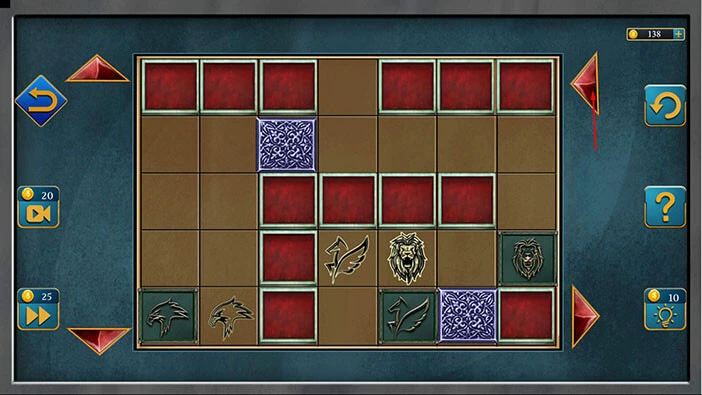
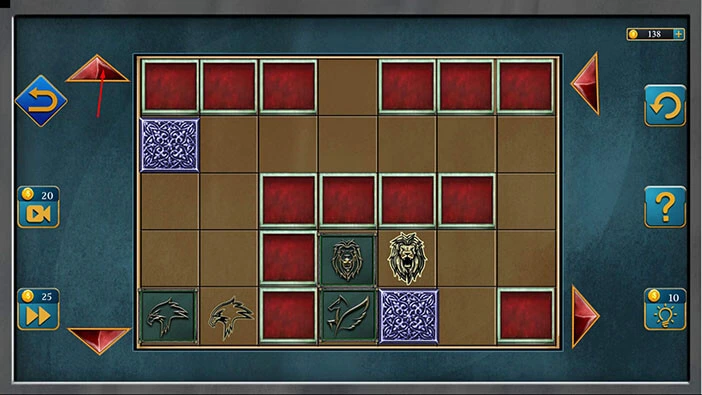
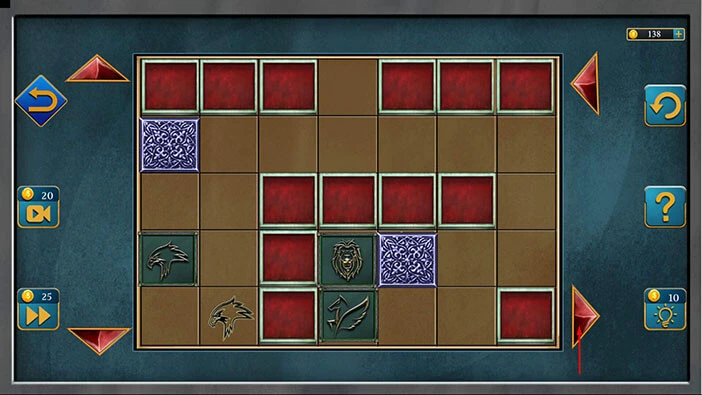
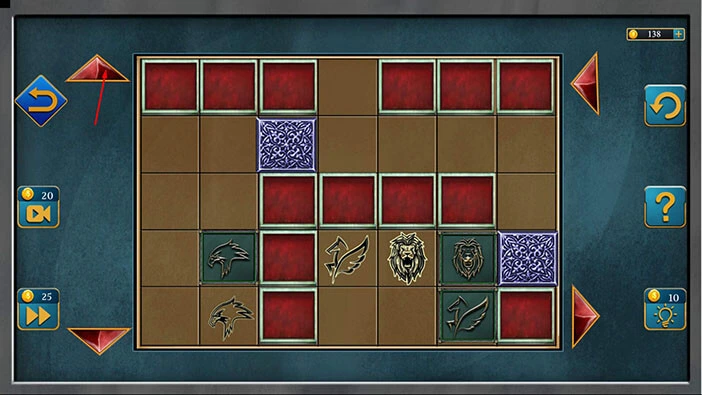
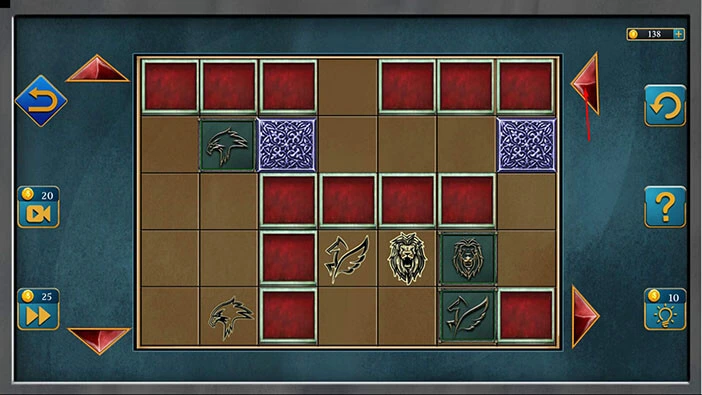
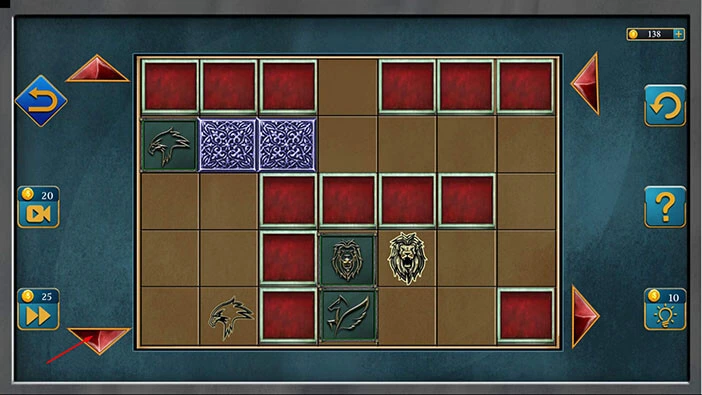
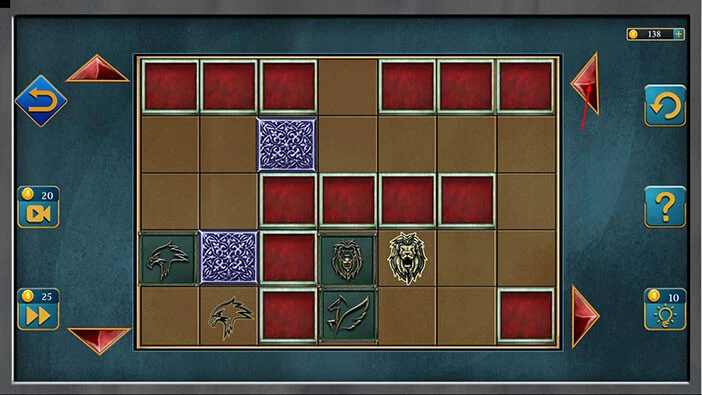
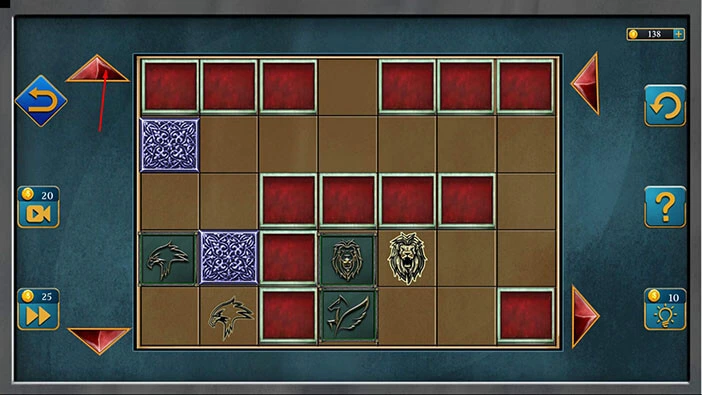
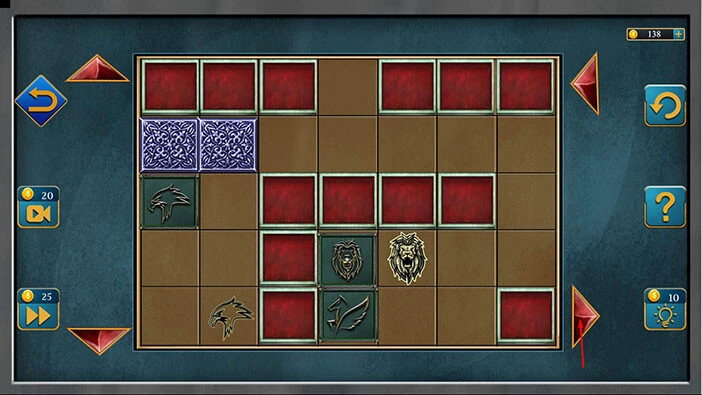
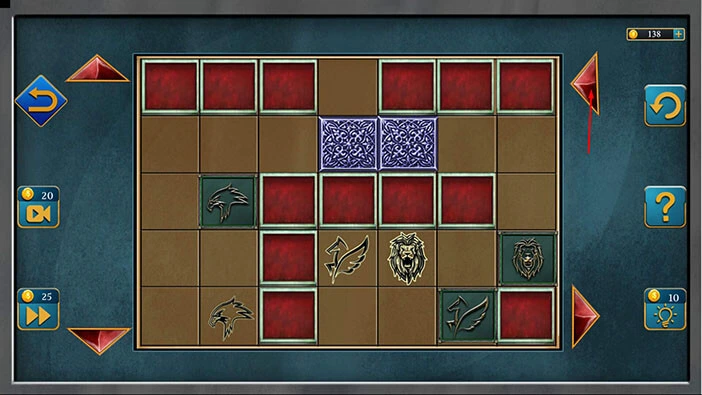
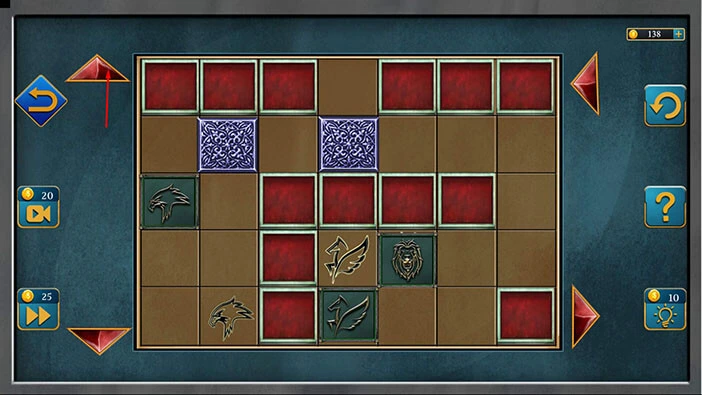
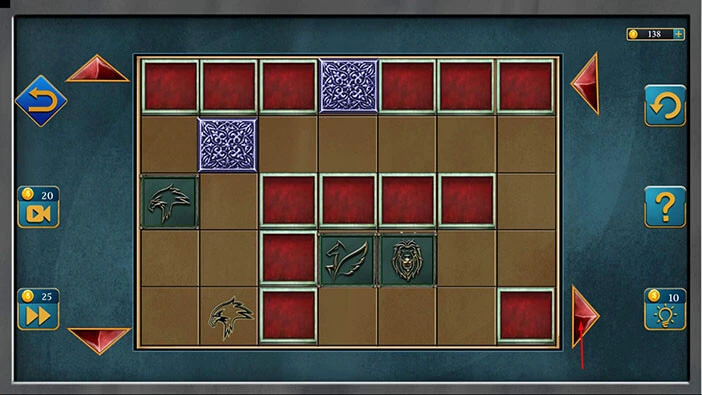
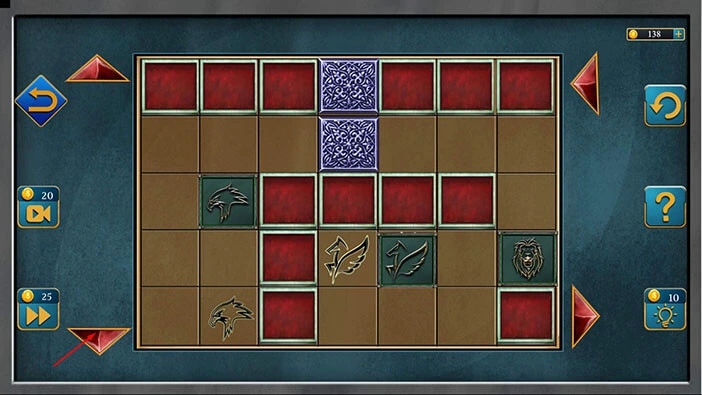
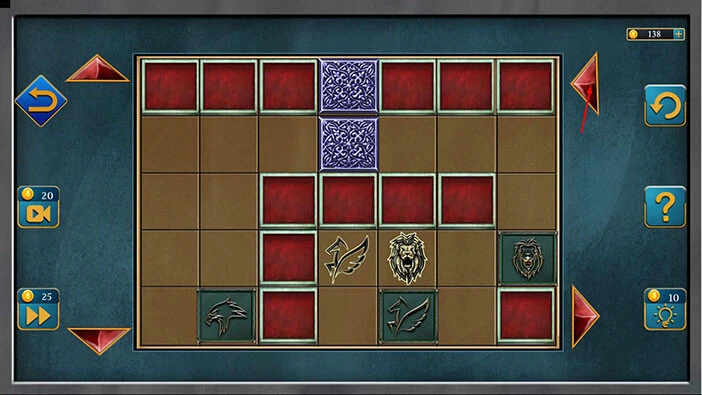
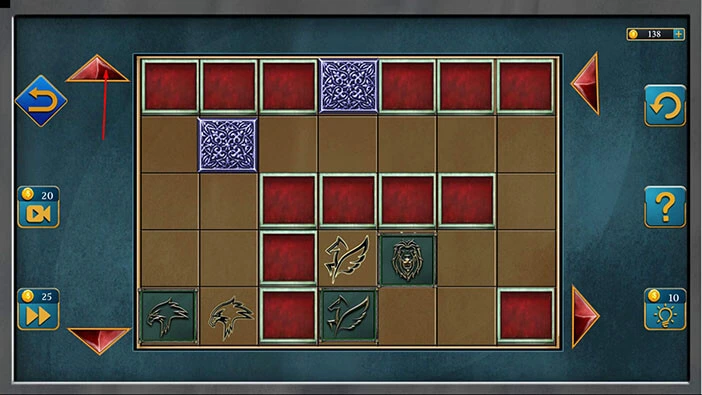
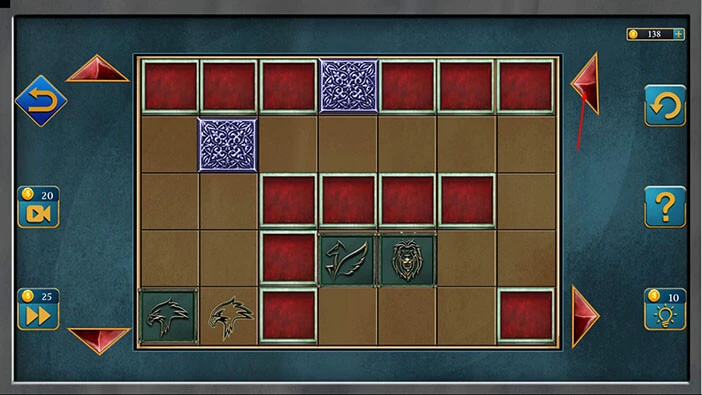
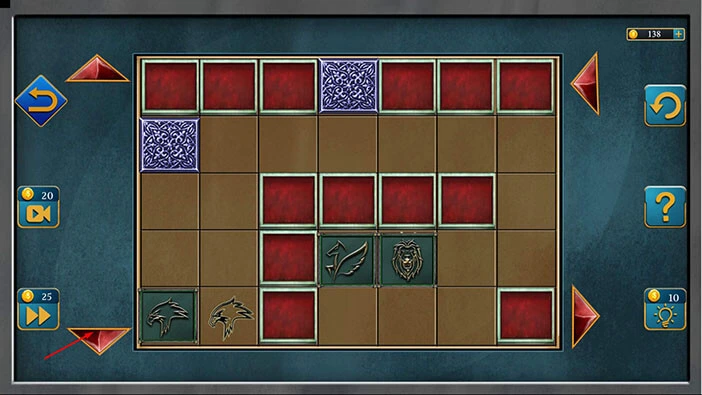
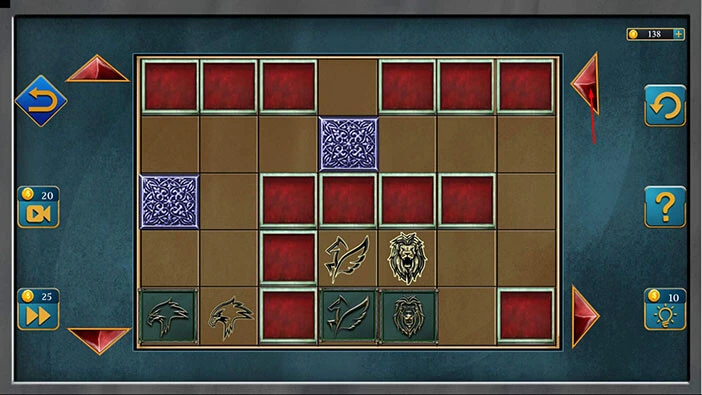
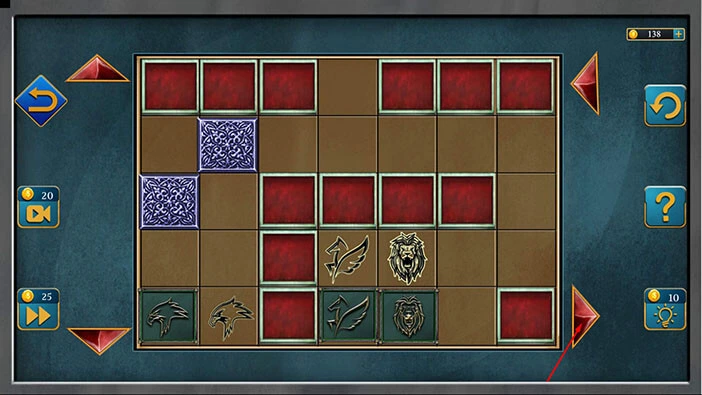
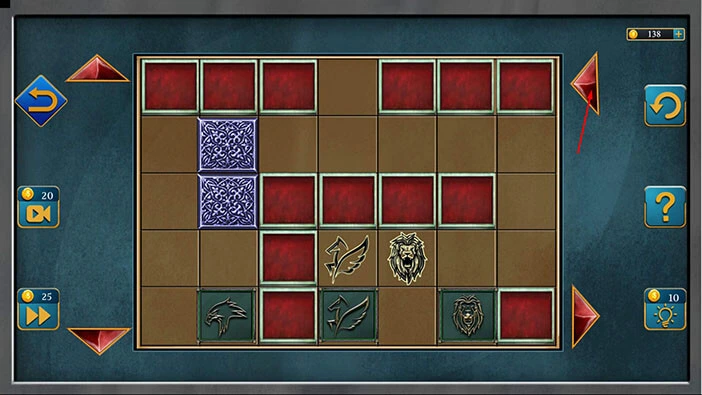
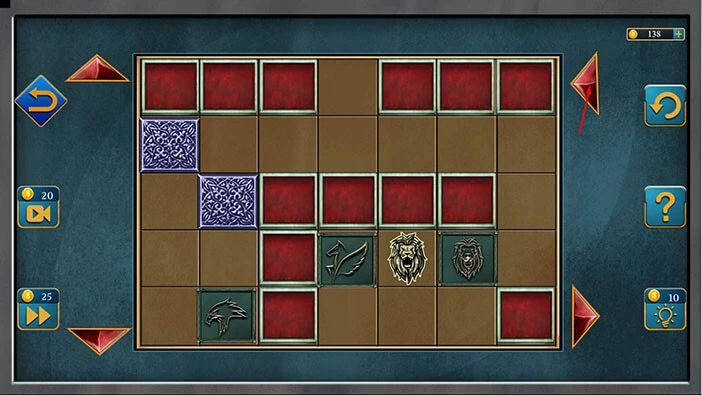
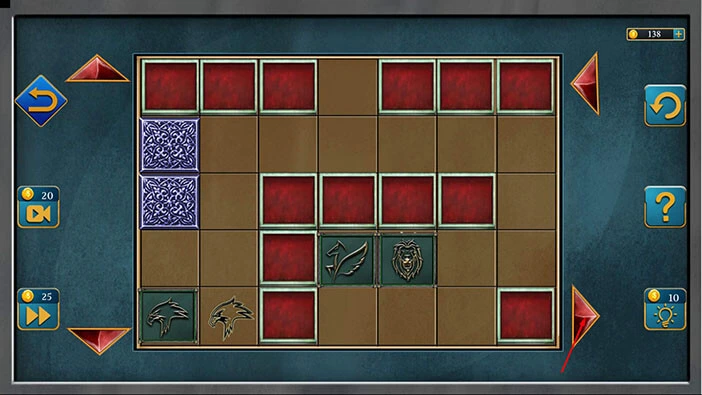
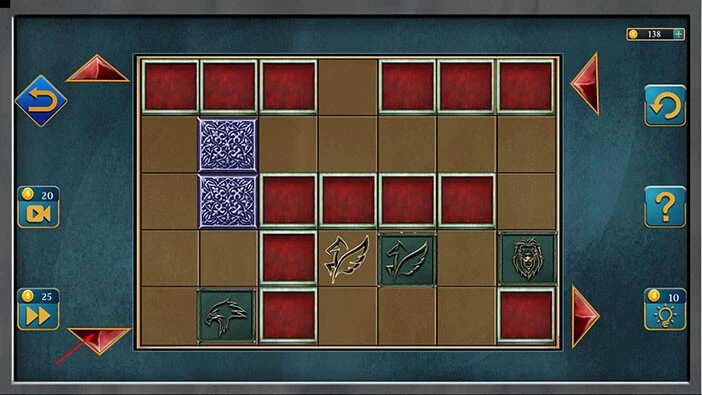
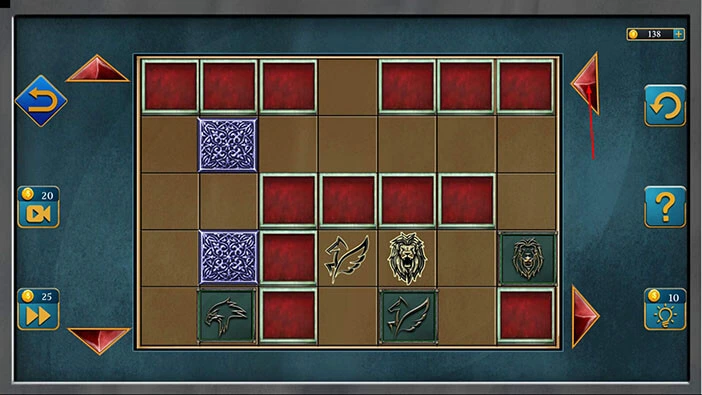
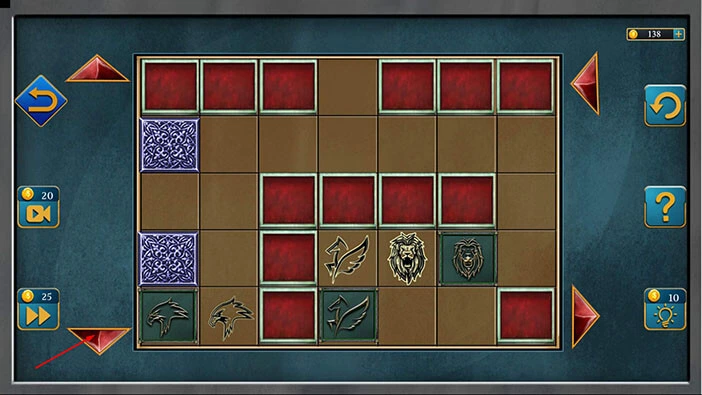
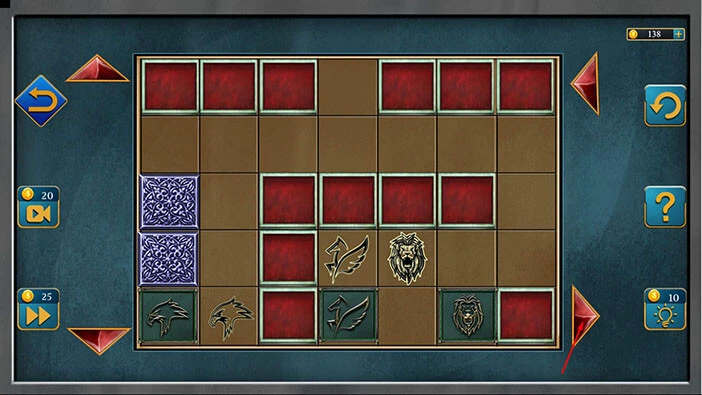
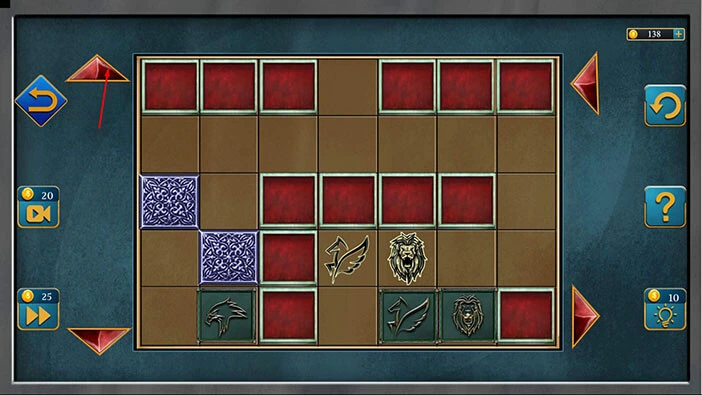
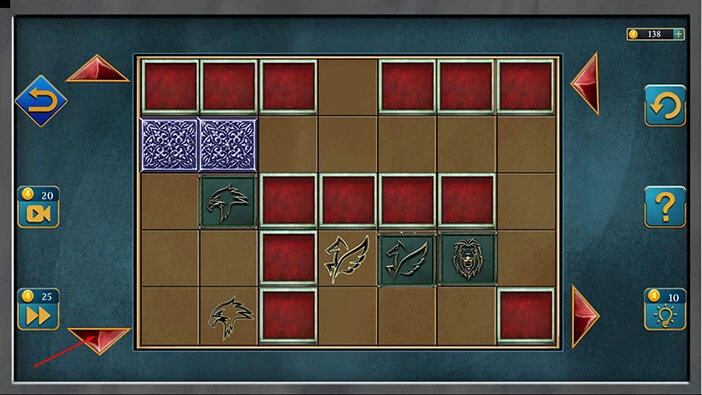
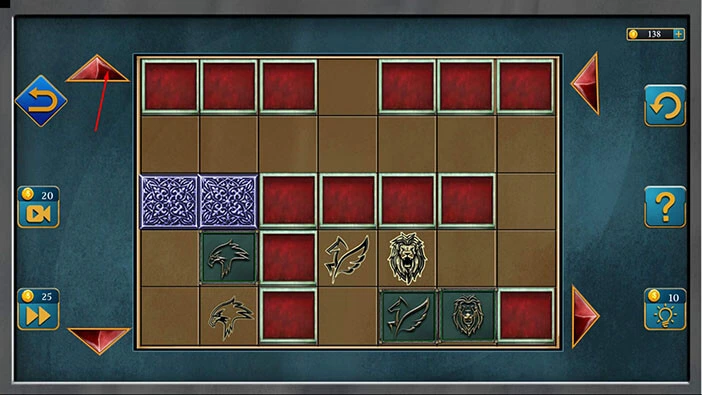
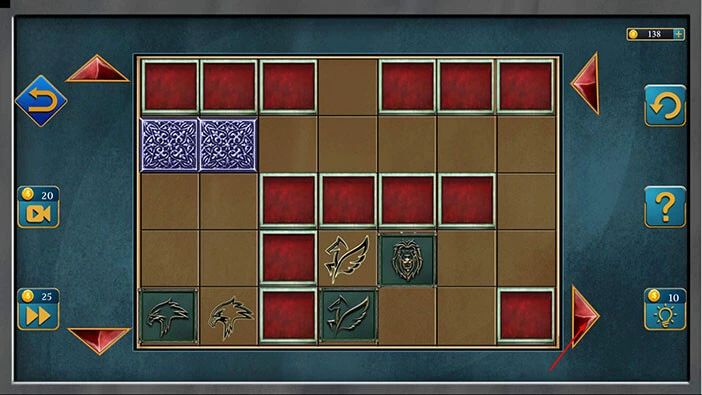
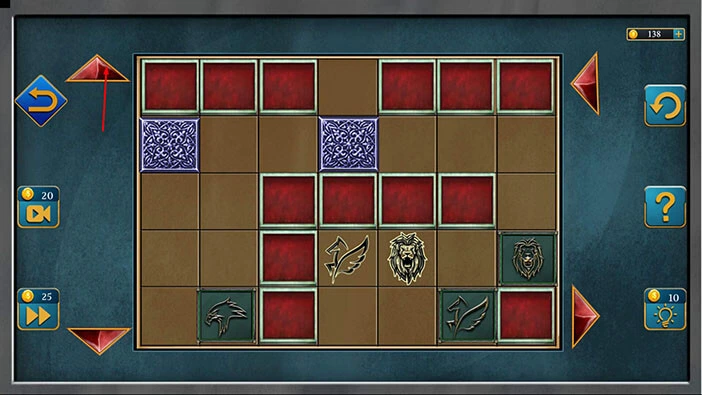
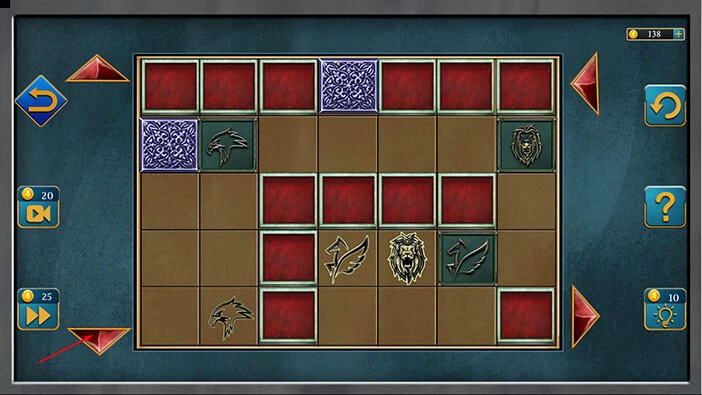
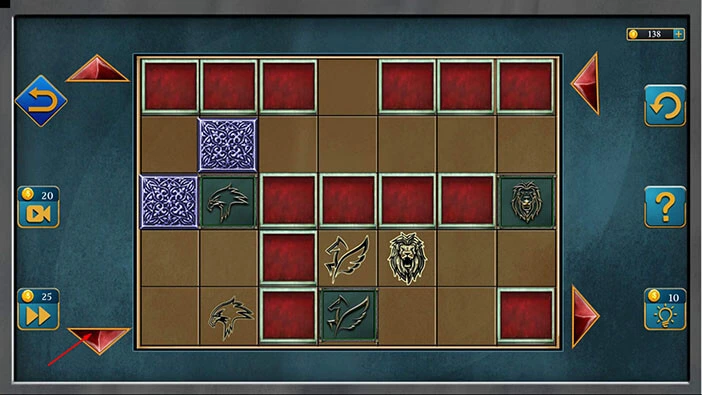
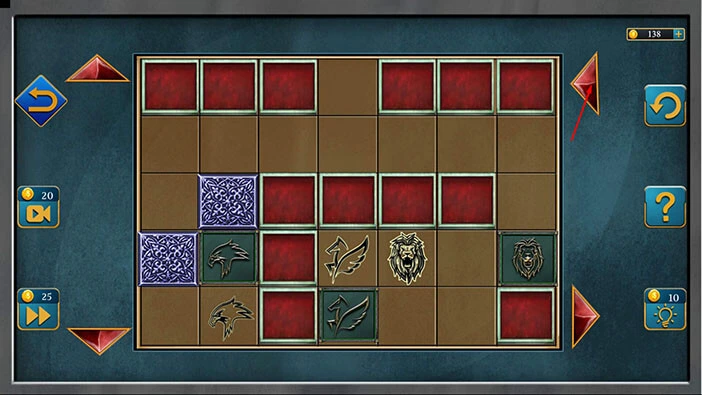
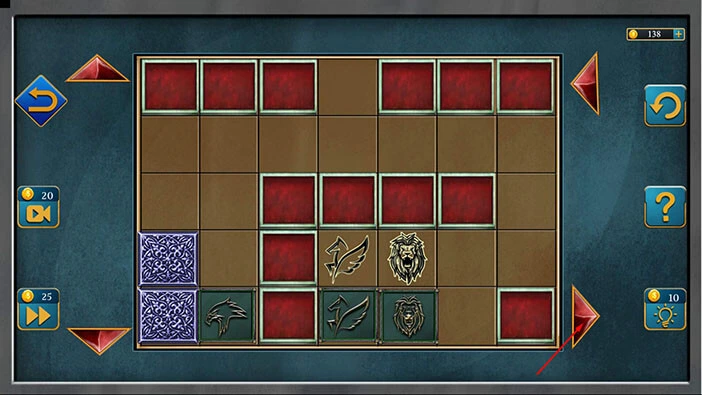
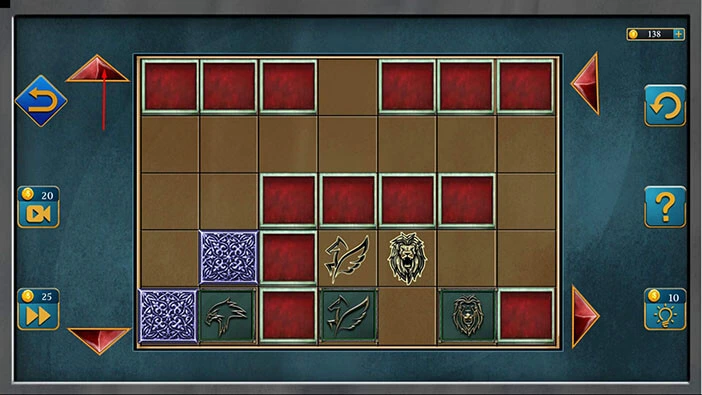
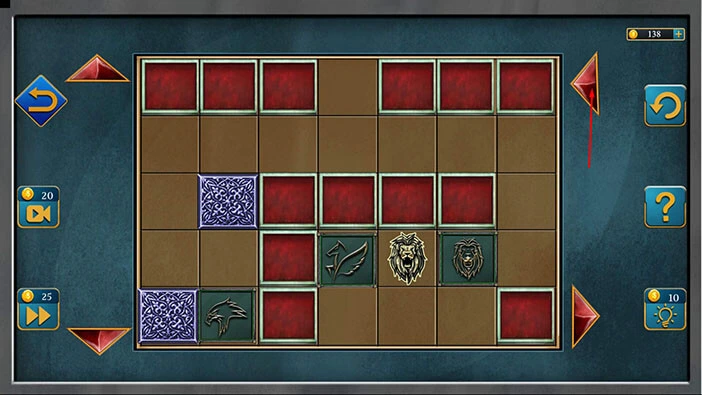
Here, we have another puzzle. We can see three puzzle pieces, an Eagle, A lion, and a falcon. Our task is to place these puzzle pieces into the matching slots. We will do this puzzle in several steps. Let’s begin.
Step 1
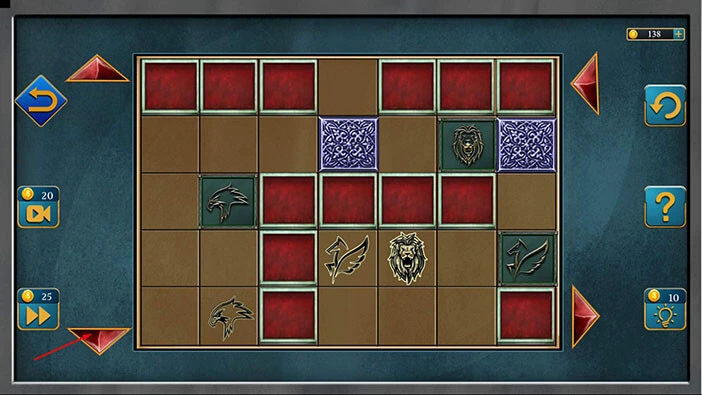
Tap once on the “Left” arrow to move the elements to the left.
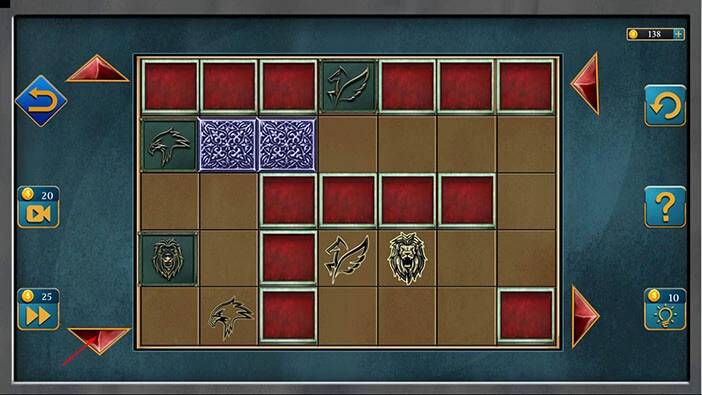
Step 2
Tap once on the “Down” arrow to move the elements down.
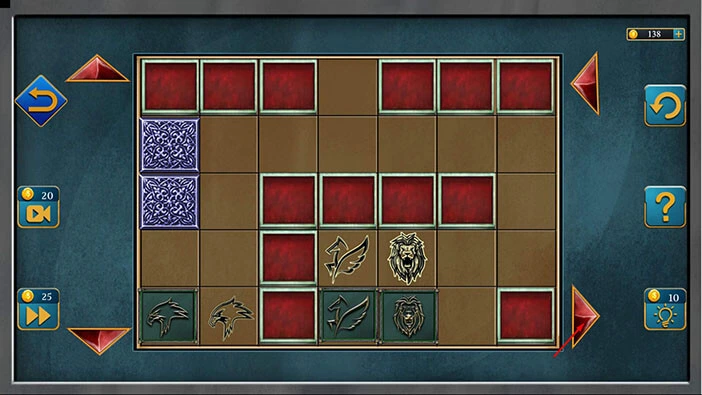
Step 3
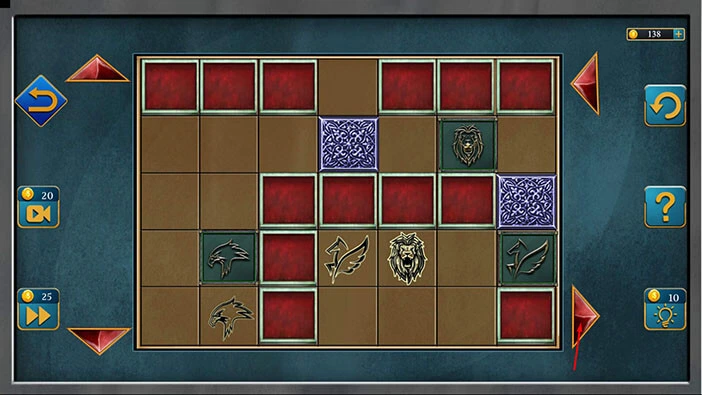
Tap three times on the “Right” arrow to move the elements to the right.
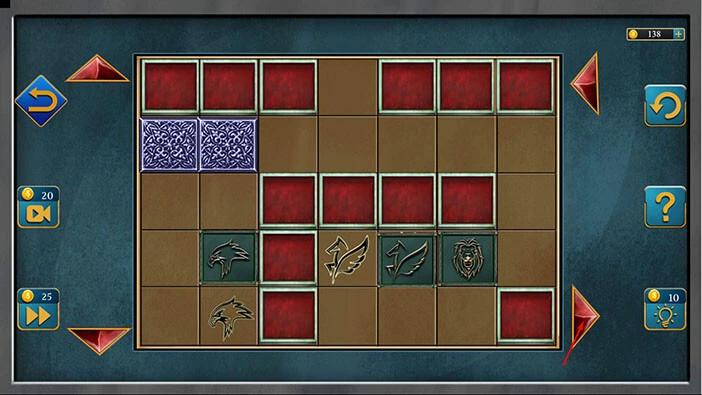
Step 4
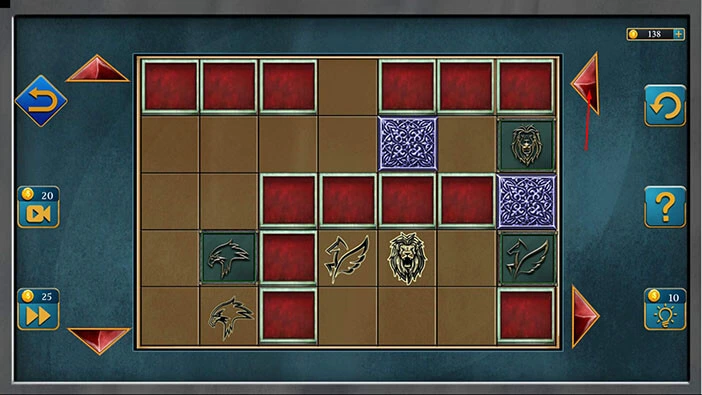
Tap twice on the “Down” arrow to move the elements down.
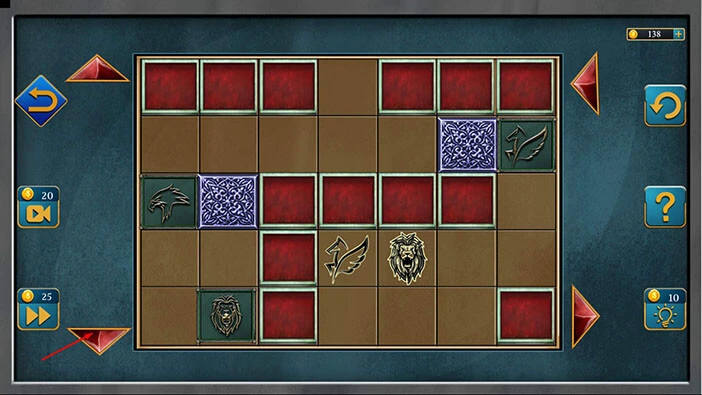
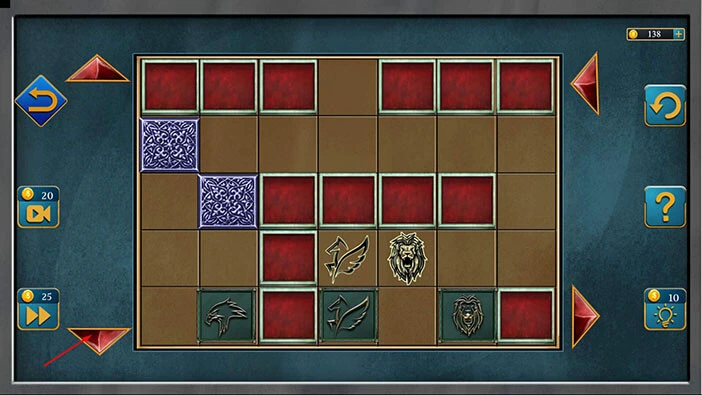
Step 5
Tap once on the “Left” arrow to move the elements to the left.
Step 6
Tap three times on the “Up” arrow to move the elements up.
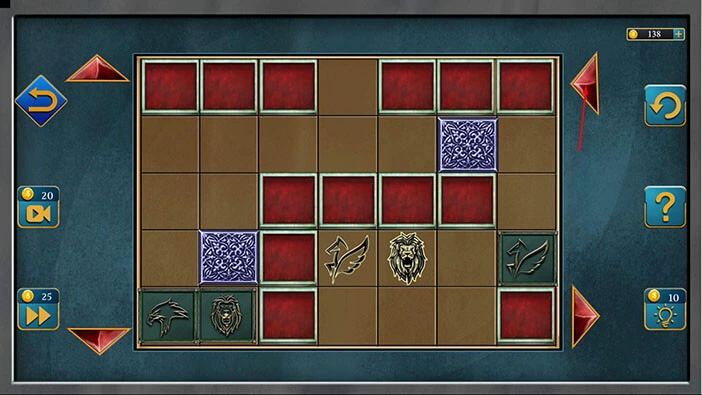
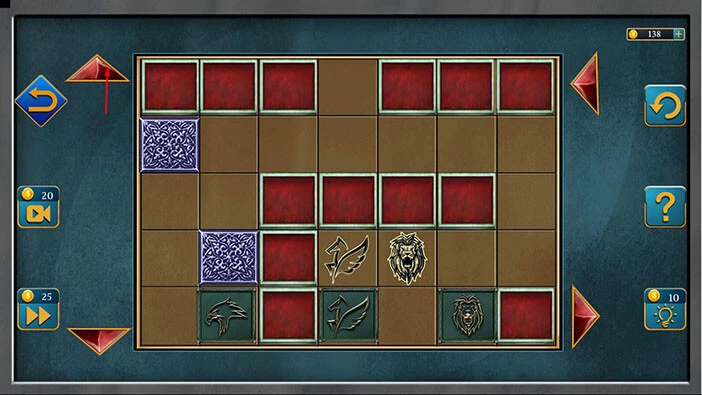
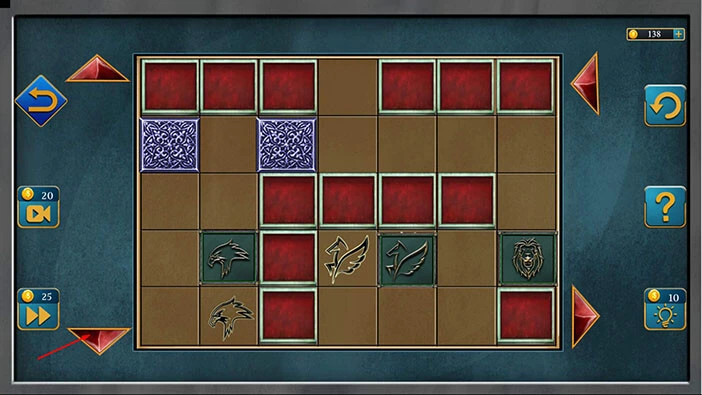
Step 7
Tap four times on the “Right” arrow to move the elements to the right.
Step 8
Tap once on the “Down” arrow to move the elements down.
Step 9
Tap once on the “Right” arrow to move the elements to the right.
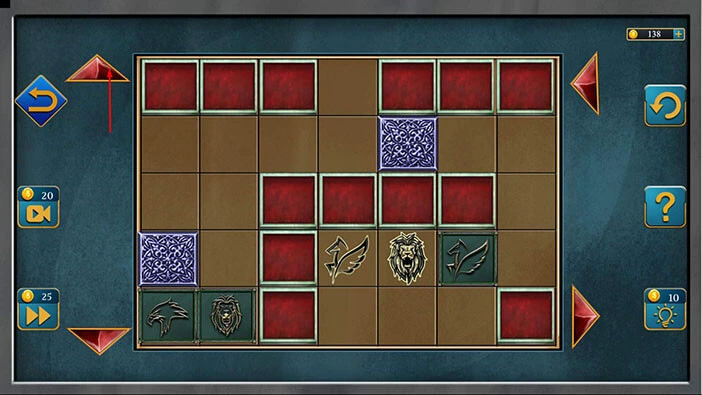
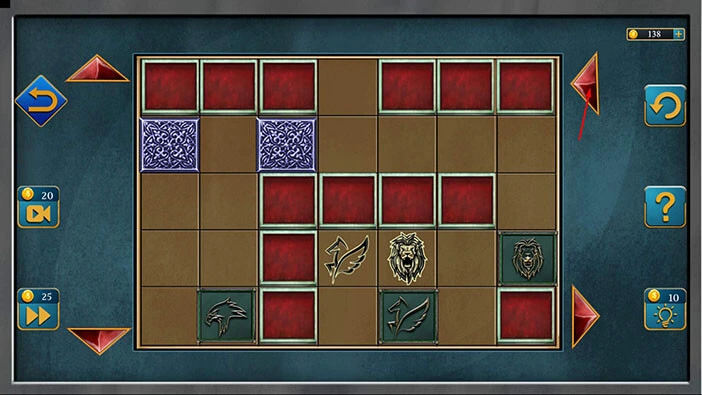
Step 10
Tap once on the “Left” arrow to move the elements to the left.
Step 11
Tap once on the “Down” arrow to move the elements down.
Step 12
Tap once on the “Right” arrow to move the elements to the right.
Step 13
Tap once on the “Down” arrow to move the elements down.
Step 14
Tap once on the “Left” arrow to move the elements to the left.
Step 15
Tap once on the “Down” arrow to move the elements down.
Step 16
Tap three times on the “Left” arrow to move the elements to the left.
Step 17
Tap once on the “Up” arrow to move the elements up.
Step 18
Tap twice on the “Right” arrow to move the elements to the right.
Step 19
Tap twice on the “Up” arrow to move the elements up.
Step 20
Tap four times on the “Left” arrow to move the elements to the left.
Step 21
Tap twice on the “Down” arrow to move the elements down.
Step 22
Tap twice on the “Left” arrow to move the elements to the left.
Step 23
Tap twice on the “Up” arrow to move the elements up.
Step 24
Tap three times on the “Right” arrow to move the elements to the right.
Step 25
Tap twice on the “Left” arrow to move the elements to the left.
Step 26
Tap once on the “Up” arrow to move the elements up.
Step 27
Tap twice on the “Right” arrow to move the elements to the right.
Step 28
Tap twice on the “Down” arrow to move the elements down.
Step 29
Tap twice on the “Left” arrow to move the elements to the left.
Step 30
Tap once on the “Up” arrow to move the elements up.
Step 31
Tap once on the “Left” arrow to move the elements to the left.
Step 32
Tap once on the “Down” arrow to move the elements down.
Step 33
Tap twice on the “Left” arrow to move the elements to the left.
Step 34
Tap once on the “Right” arrow to move the elements to the right.
Step 35
Tap once on the “Left” arrow to move the elements to the left.
Step 36
Tap once on the “Right” arrow to move the elements to the right.
Step 37
Tap once on the “Down” arrow to move the elements down.
Step 38
Tap once on the “Up” arrow to move the elements up.
Step 39
Tap once on the “Left” arrow to move the elements to the left.
Step 40
Tap twice on the “Right” arrow to move the elements to the right.
Step 41
Tap once on the “Down” arrow to move the elements down.
Step 42
Tap once on the “Left” arrow to move the elements to the left.
Step 43
Tap once on the “Down” arrow to move the elements down.
Step 44
Tap once on the “Right” arrow to move the elements to the right.
Step 45
Tap three times on the “Up” arrow to move the elements up.
Step 46
Tap once on the “Down” arrow to move the elements down.
Step 47
Tap once on the “Up” arrow to move the elements up.
Step 48
Tap once on the “Right” arrow to move the elements to the right.
Step 49
Tap once on the “Down” arrow to move the elements down.
Step 50
Tap twice on the “Left” arrow to move the elements to the left.
Step 51
Tap twice on the “Right” arrow to move the elements to the right.
Step 52
Tap three times on the “Up” arrow to move the elements up.
Step 53
Tap once on the “Down” arrow to move the elements down.
Step 54
Tap twice on the “Left” arrow to move the elements to the left.

Step 55
Tap once on the “Down” arrow to move the elements down.
Step 56
Tap twice on the “Left” arrow to move the elements to the left.
Step 57
Tap twice on the “Down” arrow to move the elements down.
Step 58
Tap once on the “Up” arrow to move the elements up.
Step 59
Tap twice on the “Down” arrow to move the elements down.
Step 60
Tap once on the “Right” arrow to move the elements to the right.
Step 61
Tap once on the “Up” arrow to move the elements up.
Step 62
Tap once on the “Left” arrow to move the elements to the left, and with that, you will solve this puzzle.
You will unlock the compartment as soon as you solve the previous puzzle. Inside, you will find a “Coin”. Let’s tap on it to pick it up.
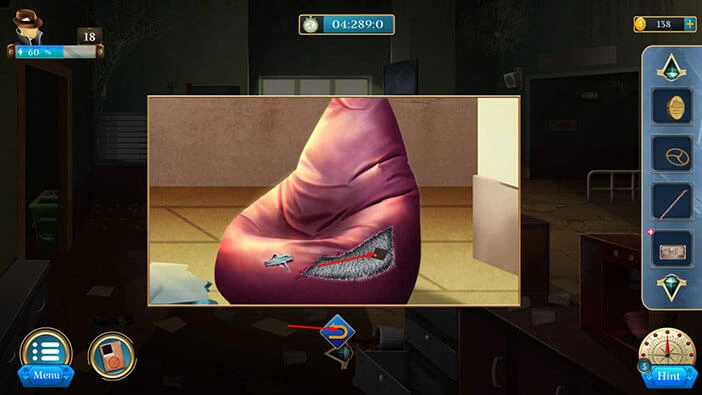
Next, let’s tap on the armchair on the right to take a closer look at it.

Select the “Broken piece” from the inventory and use it to cut open the armchair.
Inside, you will find a “Chip piece”. Let’s tap on it to pick it up. After that, tap on the arrow at the bottom to go back.
Next, let’s tap on the vending machine on the right to take a closer look at it, and tap again to start the interaction.
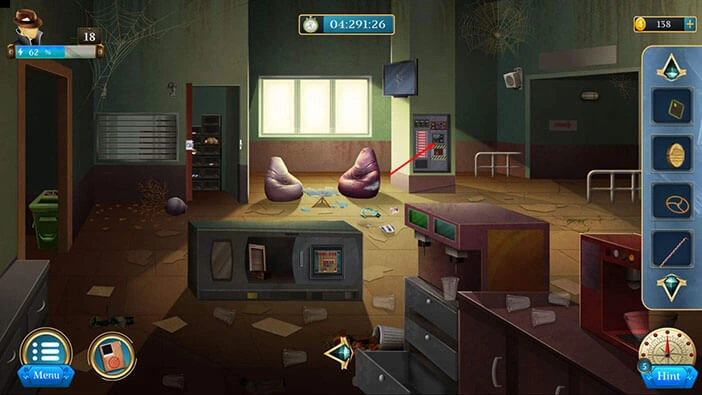
Select the “Coin” from the inventory and put it into the coin slot.
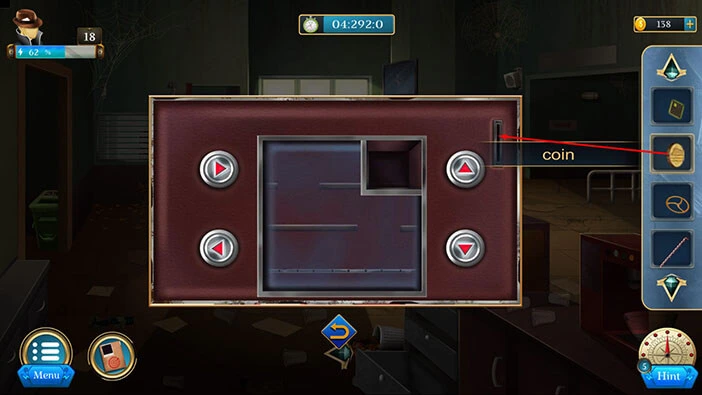
Here, we have another puzzle. Our task is to get the metal ball to the exit in the top right corner. We will do this puzzle in several steps. Let’s begin.
Step 1
Tap once on the right arrow to move the metal ball to the right.
Step 2
Tap once on the up arrow to move the metal ball up.

Step 3
Tap once on the left arrow to move the metal ball to the left.
Step 4
Tap once on the up arrow to move the metal ball up.

Step 5
Lastly, tap once on the right arrow to move the metal ball to the right and you will reach the exit.
You will discover a “Tape” and a “Wire”. Let’s tap on them to pick them up. After that, tap on the arrow at the bottom to go back.
Let’s go to the next room. Tap on the arrow at the bottom.

Select the “Metal plate” from the inventory and it will appear in the middle of the screen. After that, tap on the metal plate to turn it toward you.
Next, select the “Rod” from the inventory and use it to remove rust.
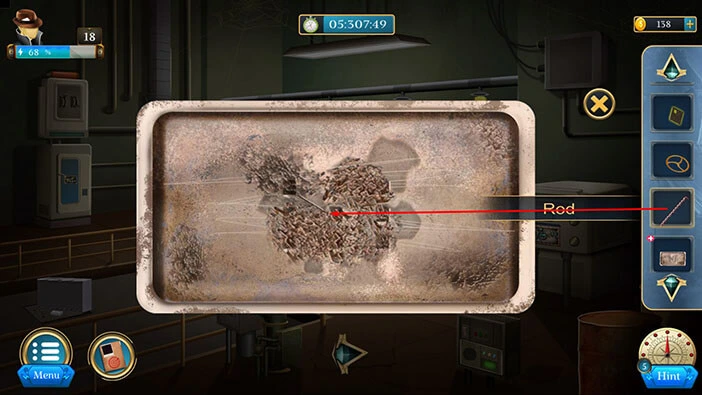
Here, we can see the path of the arrow. Let’s memorize/write down this path because we will need this information for the next puzzle. Here, we have,
The first point = first slot in the first row
The second point = second slot in the second row
The third point = first slot in the third row
The fourth point = second slot in the third row
The fifth point = third slot in the third row
Once you’re done, tap on the “X” button to close this window.
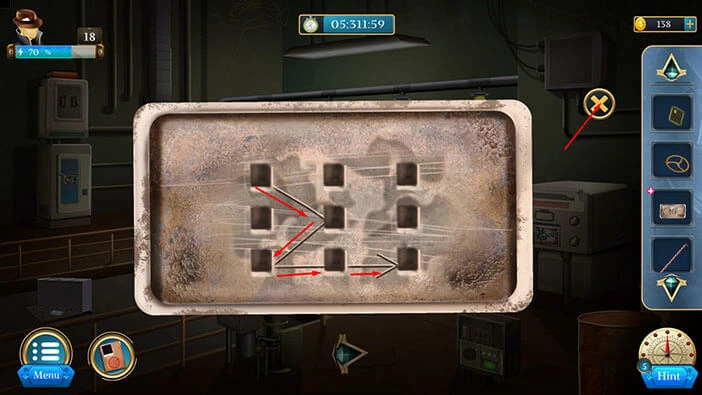
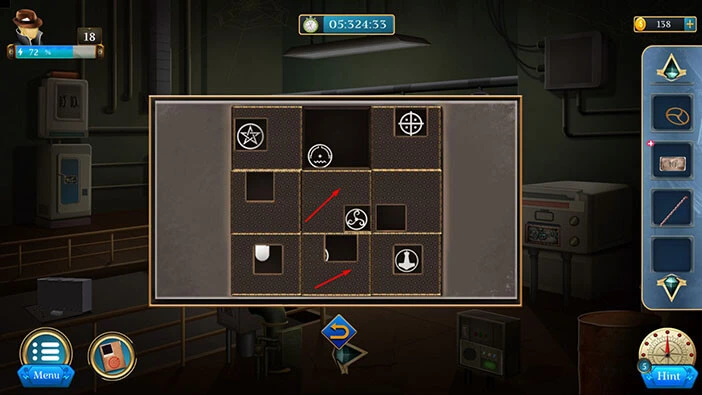
Next, tap on the metal box in front of you to take a closer look at it, and tap again to start the interaction.
Here, we can discover another hint. You will notice that the symbols here are arranged in a 3×3 grid, just like the points of the arrow (that we discovered on the metal plate).
So, the first symbol should be at the first arrow point, etc. We will do this puzzle in several steps. Let’s begin.
Step 1
First, select the “Chip piece” from the inventory and insert it into the empty slot.
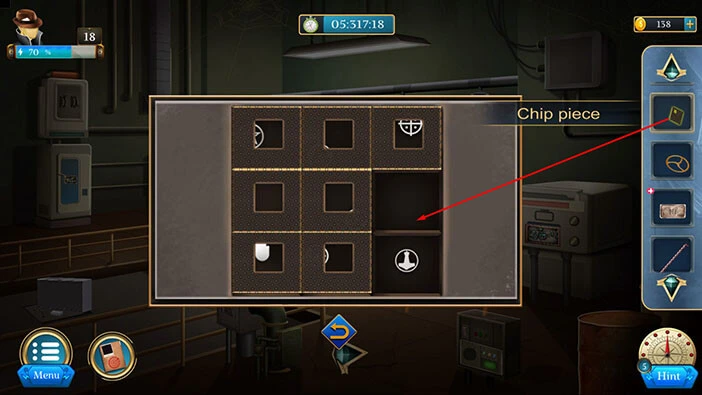
Step 2
Ok, the first arrow point = the first slot in the first row. So, the first symbol = Star in the circle. Let’s memorize/write down this symbol.
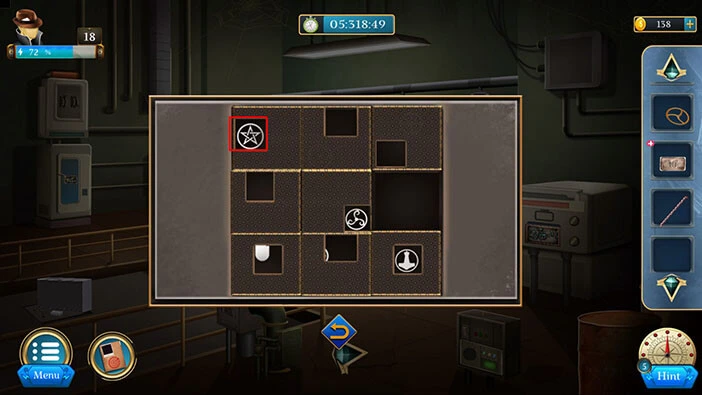
Step 3
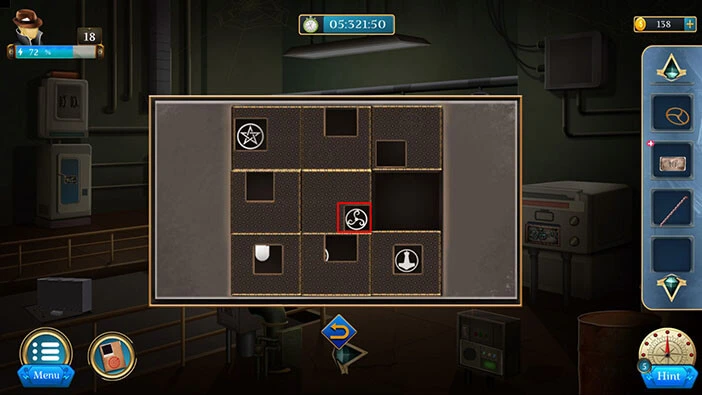
The second arrow point = the second slot in the second row. So, the second symbol = A wheel in the circle. Let’s memorize/write down this symbol.
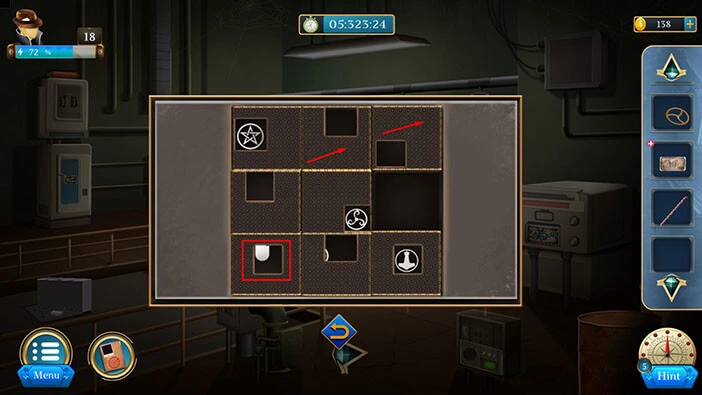
Step 4
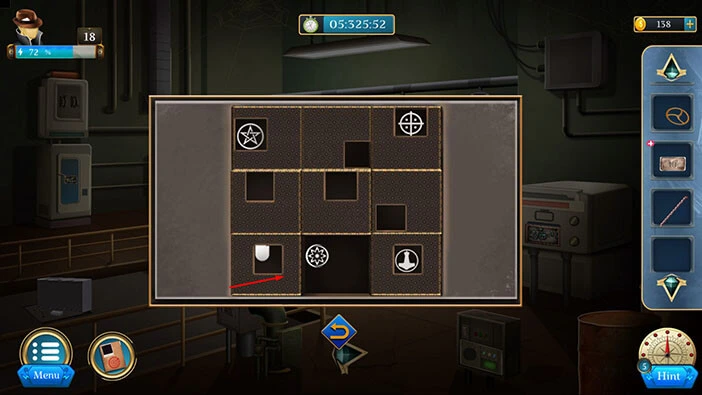
The third arrow point = the first slot in the third row. So, let’s select the symbol at this position. Let’s tap on the third slot in the first row, then tap on the second slot in the first row.
Step 5
Tap on the second slot in the second row, then tap on the second slot in the third row.
Step 6
Lastly, tap on the first slot in the third row to move it.
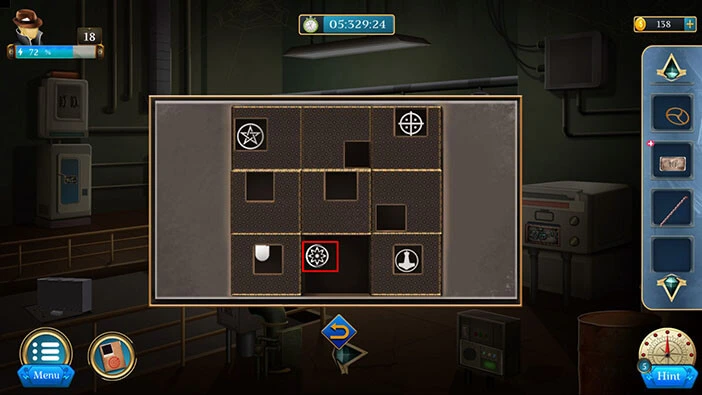
Step 7
As we already mentioned, the third arrow point = the first slot in the third row. So, the third symbol = Candle (at least that’s how I see it). Let’s memorize/write down this symbol.
Once you’re done, tap on the second slot in the third row.

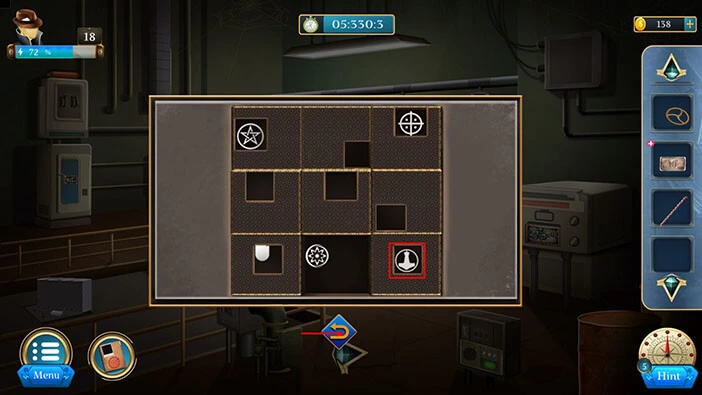
Step 8
The fourth arrow point = second slot in the third row. So, the fourth symbol = A flower in the circle. Let’s memorize/write down this symbol.
Step 9
Lastly, the fifth point = third slot in the third row. So, the fifth symbol = A tower in the circle. Let’s memorize/write down this symbol.
Once you’re done, tap on the arrow at the bottom to go back.
Next, let’s tap on the machine on the left to take a closer look at it and tap again to start the interaction.
Here, we have another puzzle. To solve it, we should enter the symbols that we just discovered. However, to interact with this puzzle, we have to do a few more things.
So, for now, let’s tap on the arrow at the bottom of the screen to go back.
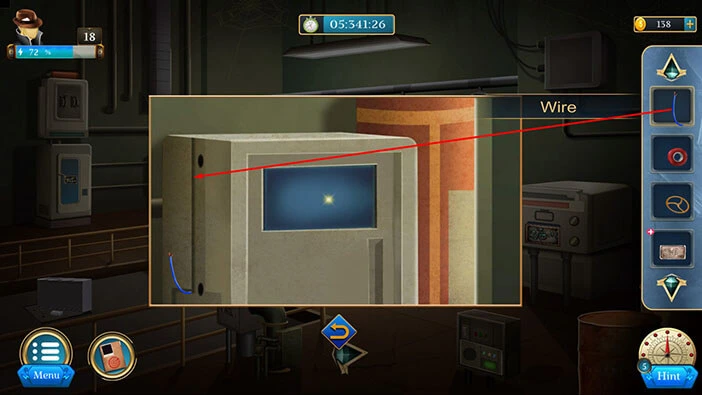
Next, let’s tap on the machine in the top left corner of the screen to take a closer look at it.

Select the “Wire” from the inventory and place it next to the other part of the wire.
Next, select the “Tape” from the inventory and connect the wires.
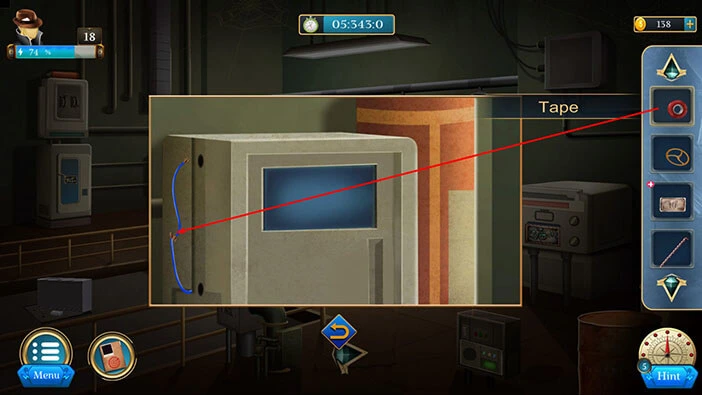
Here, we have another puzzle. We will come back to it a bit later. Let’s tap on the arrow at the bottom to go back.

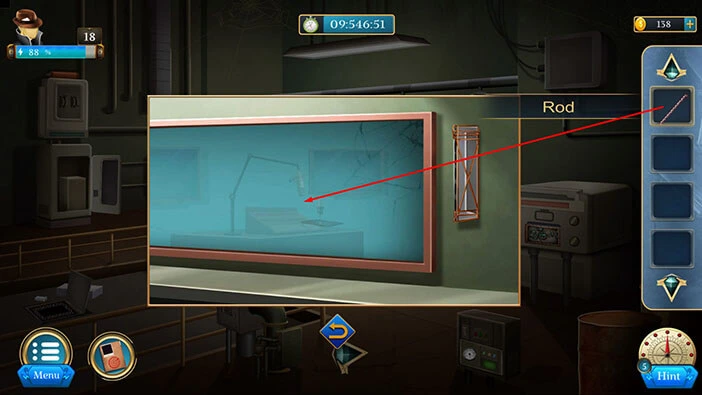
Next, let’s tap on the box, located on the floor on the left, to take a closer look at it.

Select the “Rod” from the inventory and put it under the box.
After that, tap on the rod several times to move the box.
You will discover another puzzle. Let’s tap on it to start the interaction.
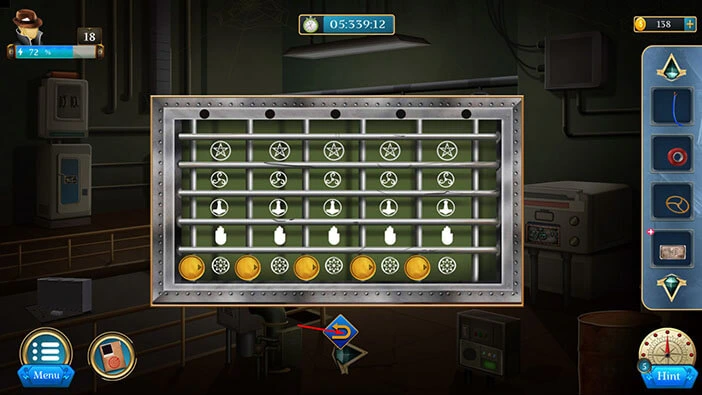
Our task is to remove the stripes in a certain order (starting from the top stripe). We will do that in several steps. Let’s begin.
Step 1
Let’s tap on the seventh slot in the top row to remove the stripe attached to this point.
Step 2
Let’s tap on the third slot in the top row to remove the stripe attached to this point.
Step 3
Let’s tap on the ninth slot in the top row to remove the stripe attached to this point.

Step 4
Let’s tap on the fourth slot in the top row to remove the stripe attached to this point.
Step 5
Let’s tap on the first slot in the top row to remove the stripe attached to this point.
Step 6
Let’s tap on the eighth slot in the top row to remove the stripe attached to this point.
Step 7
Let’s tap on the first slot in the bottom row to remove the stripe attached to this point.
Step 8
Let’s tap on the ninth slot in the bottom row to remove the stripe attached to this point.
Step 9
Let’s tap on the sixth slot in the top row to remove the stripe attached to this point.
Step 10
Let’s tap on the second slot in the top row to remove the stripe attached to this point.
Step 11
Let’s tap on the fifth slot in the top row to remove the stripe attached to this point.
Step 12
Lastly, let’s tap on the fifth slot in the bottom row to remove the stripe attached to this point.
Inside, you will find a “Meter”. Let’s tap on it to pick it up. After that, tap on the arrow at the bottom to go back.
Let’s go back to the one of the previous puzzles. Tap on the puzzle on the box in front of you to take a closer look.

We already discovered the symbols that we need in this puzzle, but in order to interact with the coins, we have to place the slots in this puzzle in the specific positions. I know that this doesn’t make much sense (probably a bug), but it is what it is. So, let’s solve this puzzle. We will do that in several steps. Let’s begin.
Step 1
Tap on the third slot in the first row to move it down. After that, tap on the second slot in the first row to move it to the right.
Step 2
Tap on the first slot in the first row to move it to the right.
Step 3
Tap on the second slot in the first row to move it to the left.
Step 4
Tap on the second slot in the second row to move it up.
Step 5
Tap on the second slot in the third row to move it up. After that, tap on the first slot in the third row to move it to the right.
Step 6
Tap on the second slot in the third row to move it to the left. After that, tap on the third slot in the third row to move it to the left.
Step 7
Tap on the third slot in the second row to move it down. After that, tap on the second slot in the second row to move it to the right.

Step 8
Tap on the first slot in the second row to move it to the right.

Step 9
Tap on the second slot in the second row to move it to the left.
Step 10
Tap on the third slot in the second row to move it to the left. After that, tap on the third slot in the first row to move it down.
Step 11
Tap on the second slot in the first row to move it to the right.
Step 12
Tap on the third slot in the first row to move it to the left. After that, tap on the third slot in the second row to move it up.
Step 13
Tap on the second slot in the second row to move it to the right. After that, tap on the arrow at the bottom to go back.
Let’s go back to the machine on the left. Tap on it to start the interaction.
Here, we have another puzzle. Our task is to place the coins next to the symbols that we discovered by examining the previous two hints. Let’s do that. So, we had,
The first symbol = Star in the circle.
The second symbol = A wheel in the circle
The third symbol = Candle
The fourth symbol = A flower in the circle
The fifth symbol = A tower in the circle
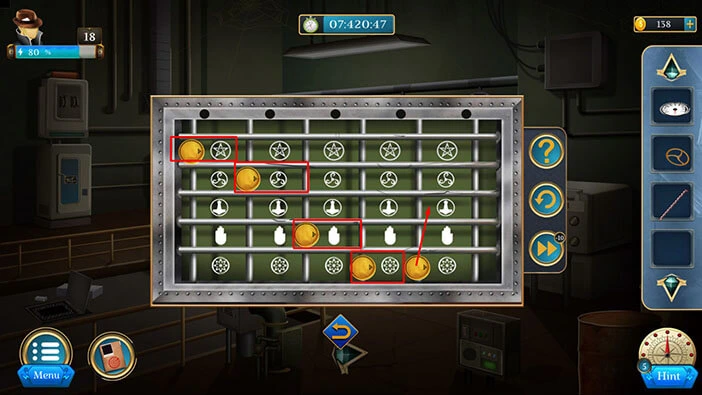
With that, you will unlock the compartment on the machine, and inside you will find a “Wheel”. Let’s tap on it to pick it up.
After that, tap on the arrow at the bottom to go back.
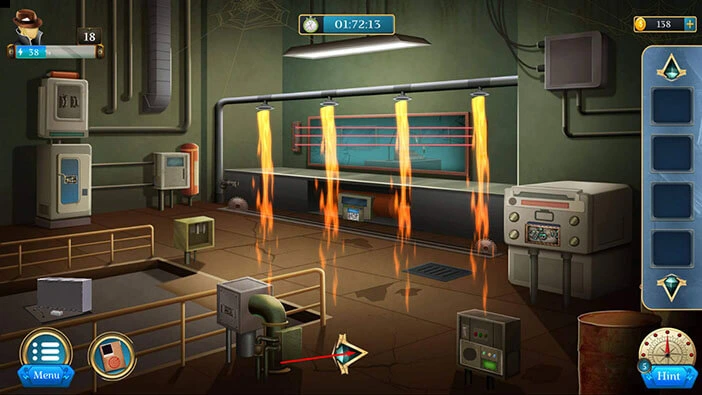
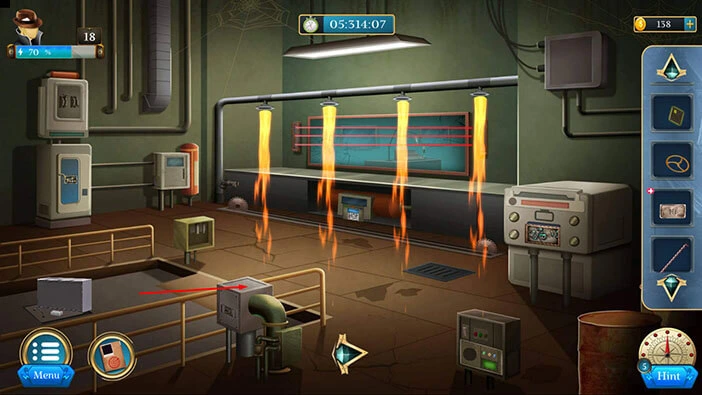
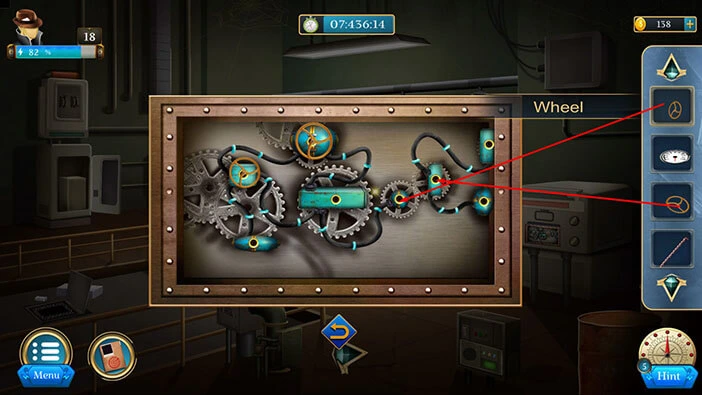
Next, let’s tap on the machine on the right to take a closer look at it, and tap again to start the interaction.
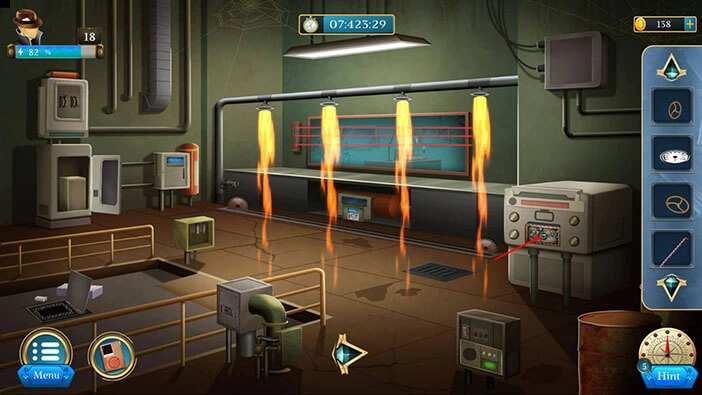
Select the two “Wheels” from the inventory and insert them into the empty slots.
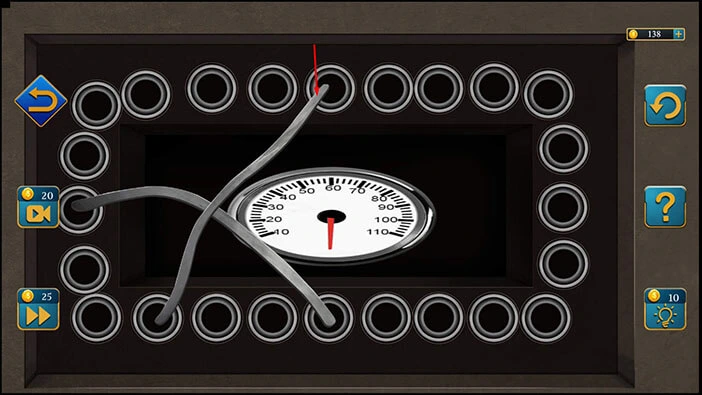
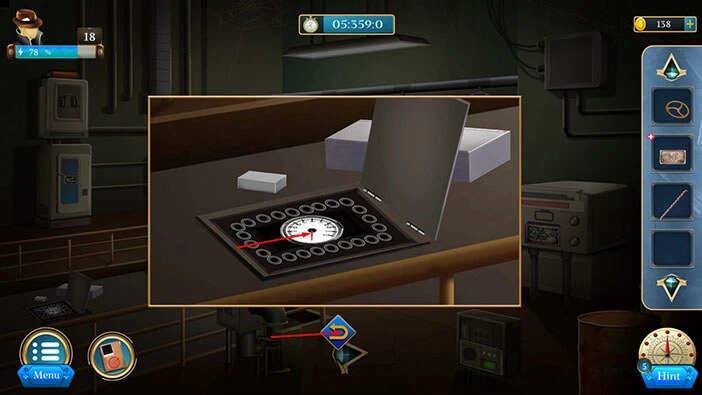
With that, you will disable the flame trap. Let’s continue. Tap on the box in the bottom right corner of the room to take a closer look at it, and tap again to start the interaction.

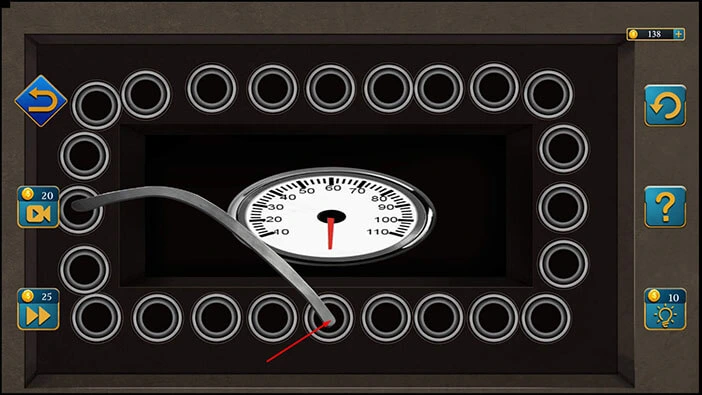
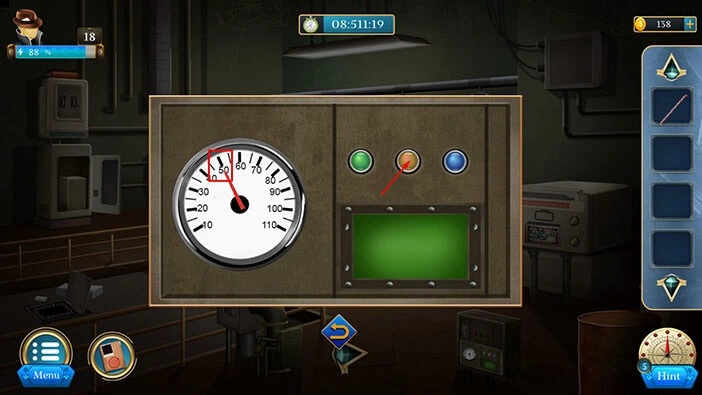
Select the “Meter” from the inventory and place it into the empty slot.
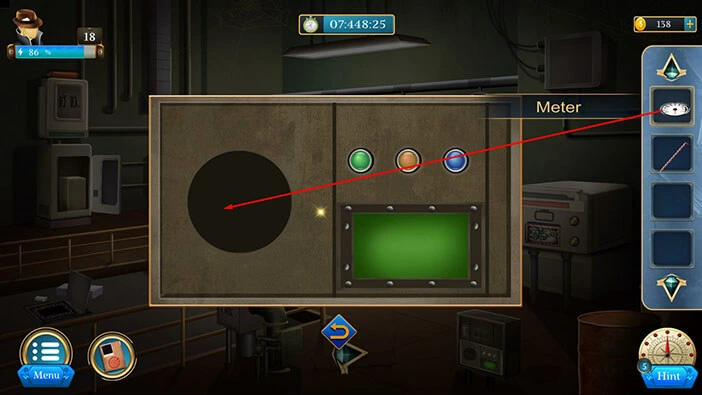
Let’s tap on the green button. You will notice that the arrow is pointing at the number 30. Let’s memorize/write down this information. First value = 30.

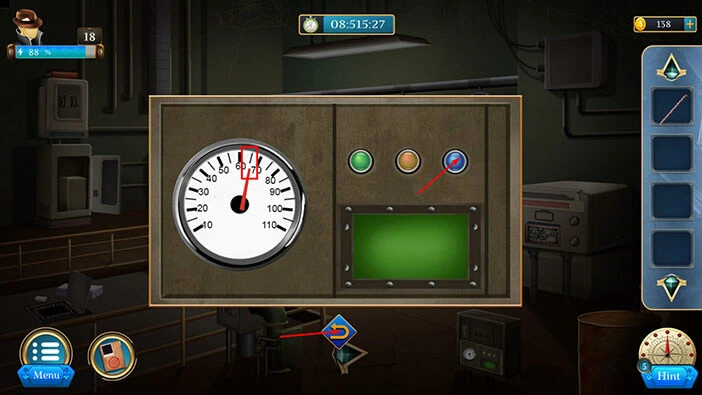
Let’s tap on the yellow button. You will notice that the arrow is pointing at the number 50. Let’s memorize/write down this information. Second value = 50.
Let’s tap on the blue button. You will notice that the arrow is pointing at the number 65. Let’s memorize/write down this information. Third value = 65.
Once you’re done, tap on the arrow at the bottom to go back.
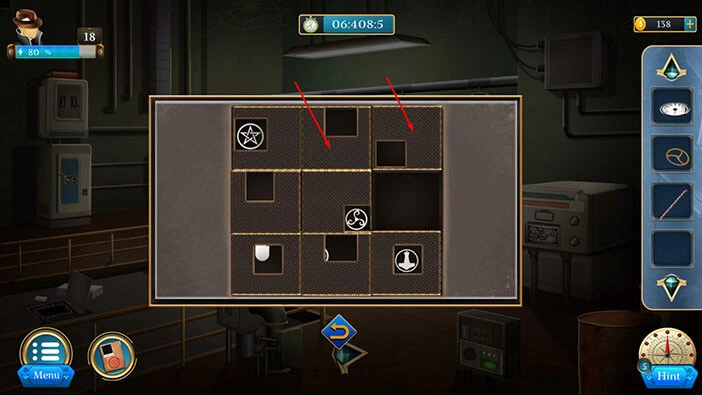
Next, let’s tap on the machine in the top left corner of the room to take a closer look at it.

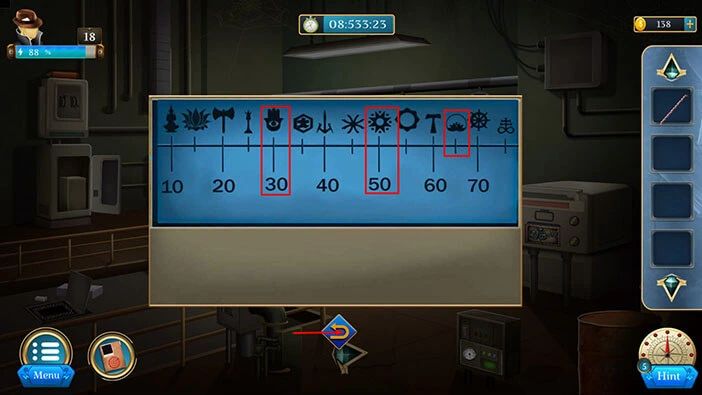
Here, you will see several symbols above the line. Let’s find the symbols that match the values that we discovered previously. So, here we have,
The first symbol = above the number 30 you will see the “Eyeball symbol”
The second symbol = above the number 50 you will see the “Star” symbol
The third symbol = above the number 65 you will see the “Explosion in a circle”
Let’s memorize/write down these symbols. Once you’re done, tap on the arrow at the bottom to go back.
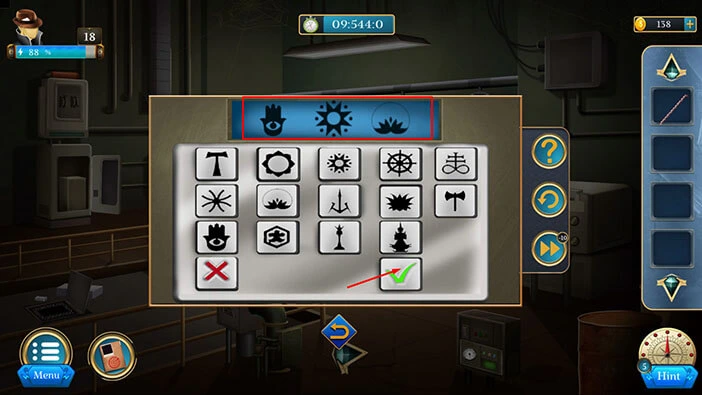
Next, let’s tap on the machine on the right to take a closer look at it, and tap again to start the interaction.
Let’s enter the symbols that we discovered. So, let’s enter the “Eyeball symbol”, “Star symbol”, and “Explosion in a circle”.
Once you’re done, tap on the green check mark symbol to confirm.
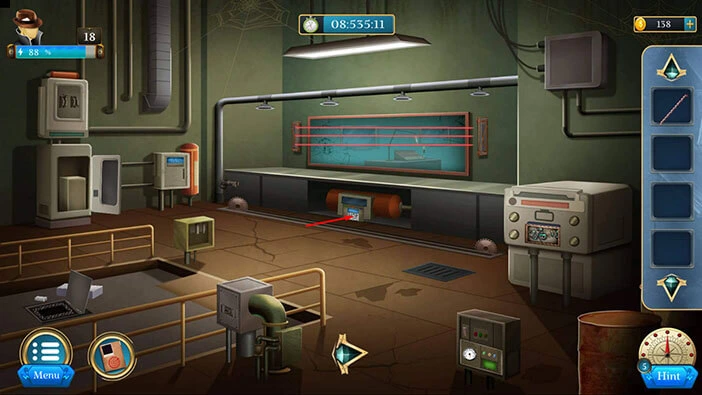
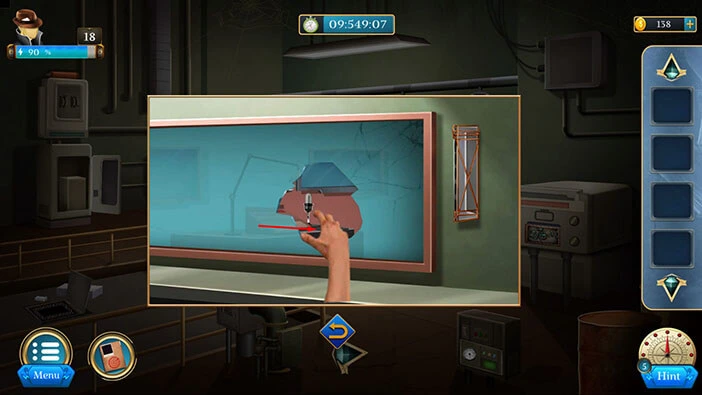
With that, you will disable the lasers. So, let’s tap on the mirror to take a closer look at it.

Select the “Rod” from the inventory and use it to break the glass.
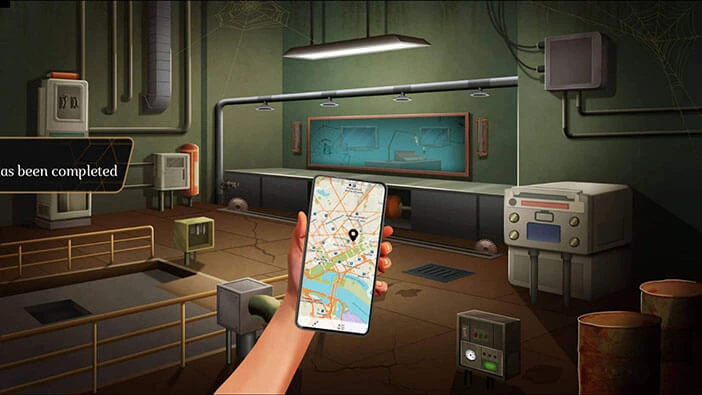
Inside, you will find a mobile phone. Let’s tap on it to pick it up.
You will discover the location of your friend, and with that, you will complete this level.
With that, we have reached the end of the eighteenth level. If you want to see the walkthrough for the nineteenth level, tap on the next part button.
Thank you for reading.