Room Escape: Detective Phantom | Level 12
Hello everyone and welcome to the walkthrough for the twelfth level of “Room Escape: Detective Phantom”. In the twelfth level, our task is to save the girl.
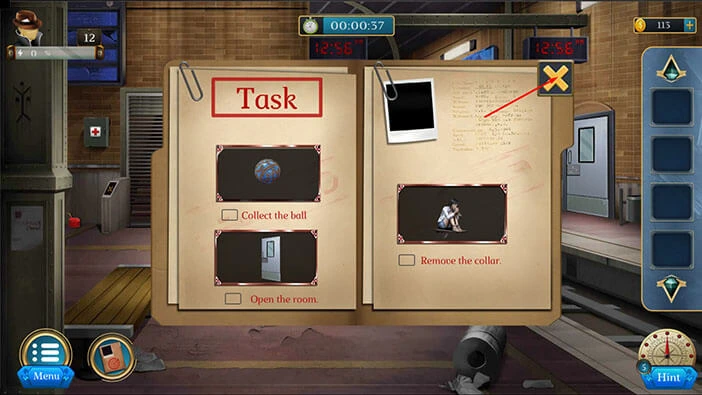
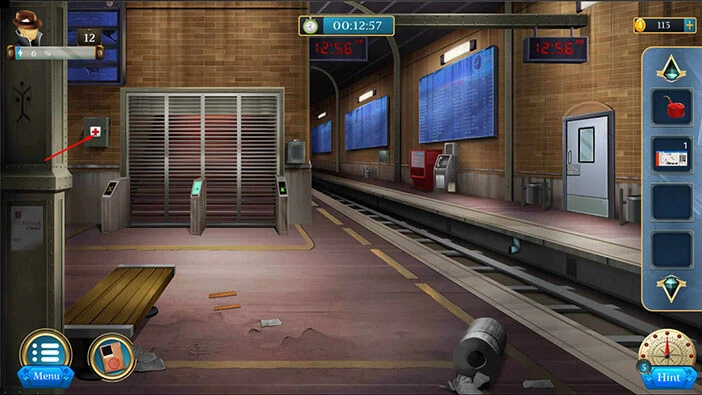
Our objectives are to “Collect the ball” “Open the room” and “Remove the collar”. Tap on the “X” button to go back.
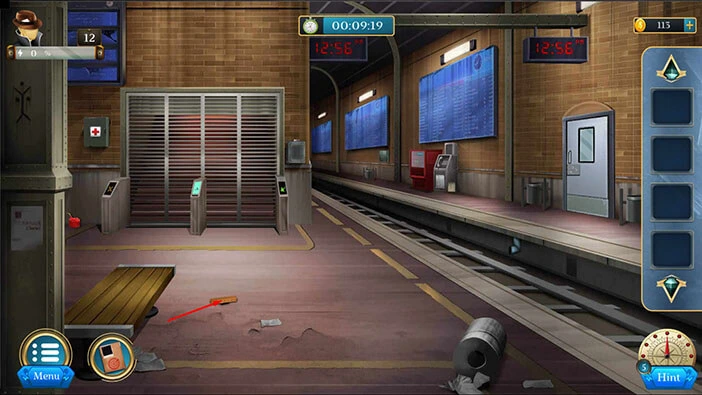
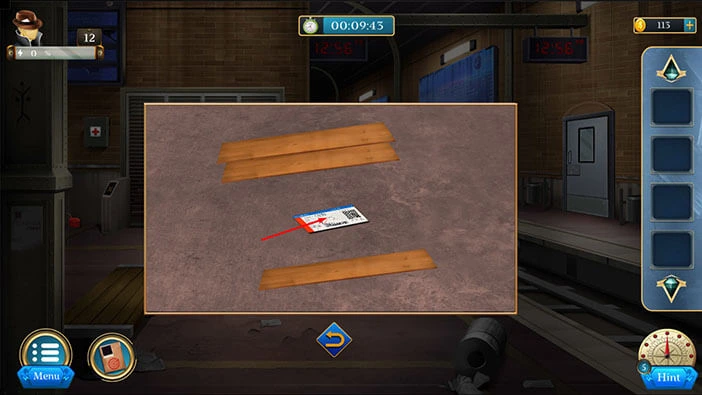
On the ground in front of you, you will notice some wooden planks. Let’s tap on them to take a closer look, and tap again to move them aside.
Under the planks, you will find a “Ticket”. Let’s tap on it to pick it up. After that, tap on the arrow at the bottom to go back.
In the top left corner of the screen, you will notice an “Oil can”. Let’s tap on it to take a closer look, and tap again to pick it up.
After that, tap on the arrow at the bottom to go back.
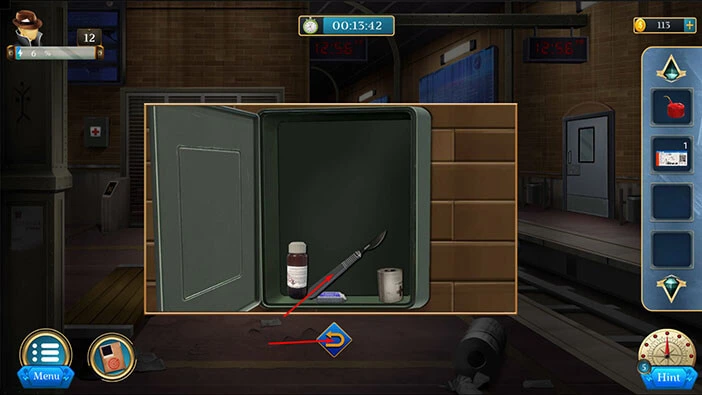
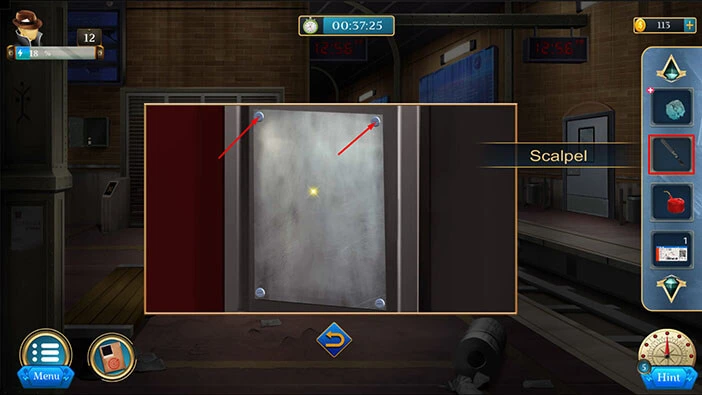
Next, on the left side of the wall you will notice a first aid box. Let’s tap on it to take a closer look, and tap again to open it.
Inside, you will find a “Scalpel”. Let’s tap on it to pick it up. After that, tap on the arrow at the bottom to go back.
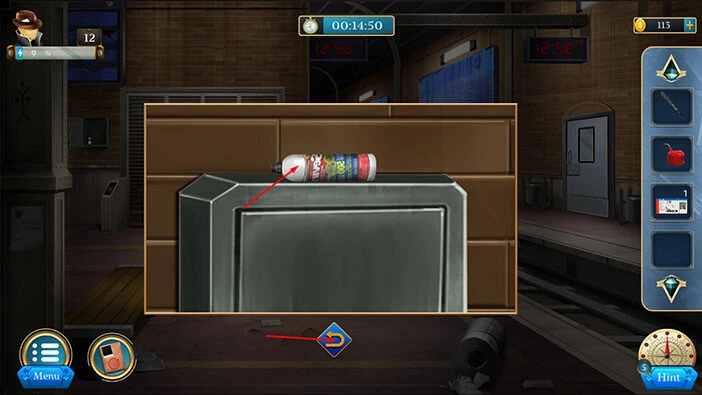
On the wall, just to the right of the metal gate, you will notice a metal box. Let’s tap on it to take a closer look.
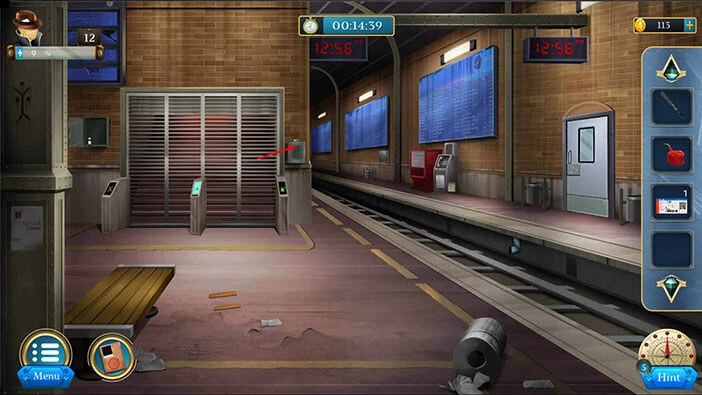
Here, you will find a “Spray” so let’s tap on it to pick it up. After that, tap on the arrow at the bottom to go back.
If you take a look below the ground on the right (above the train tracks), you will notice the open pipe. Let’s tap on it to take a closer look.

Select the “Spray” from the inventory and use it to remove the bugs in the pipe.
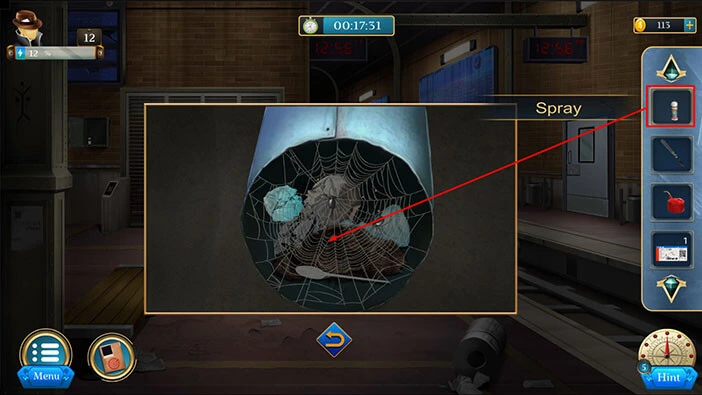
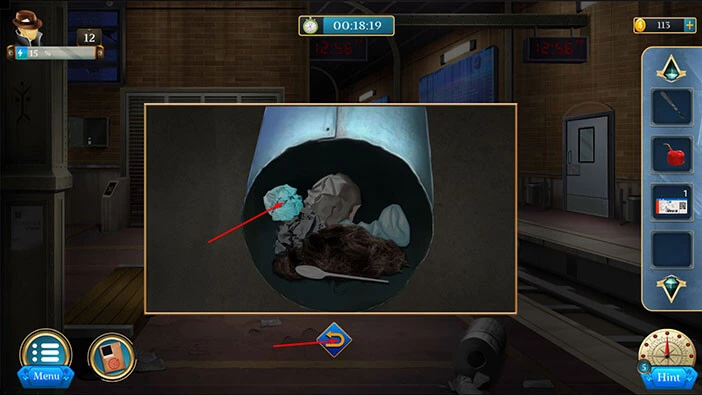
Let’s tap on the “Paper” on the right to pick it up. After that, tap on the arrow at the bottom to go back.
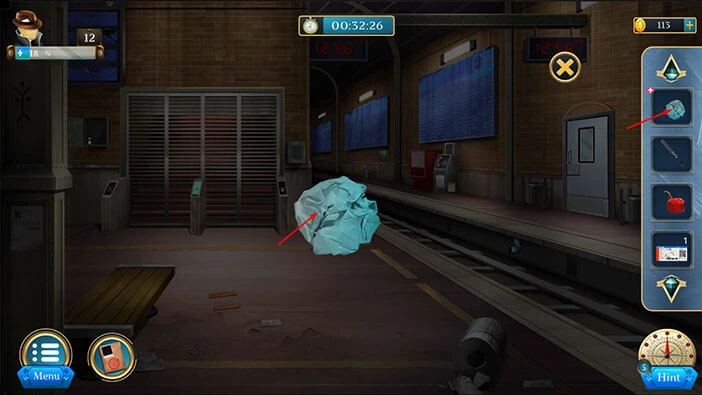
Select the “Paper” in your inventory and it will appear in the middle of the screen. After that, tap on the “Paper” to unroll it.
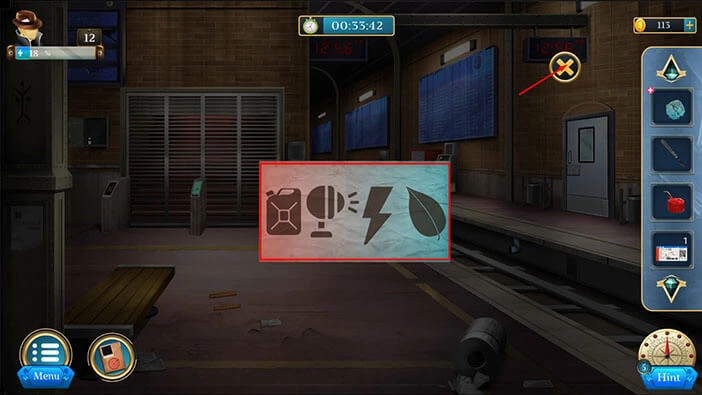
Here, we can see four symbols. These symbols represent the hint for one of the future puzzles, and we will take another look at it once we need it.
For now, tap on the “X” button to put down the paper.
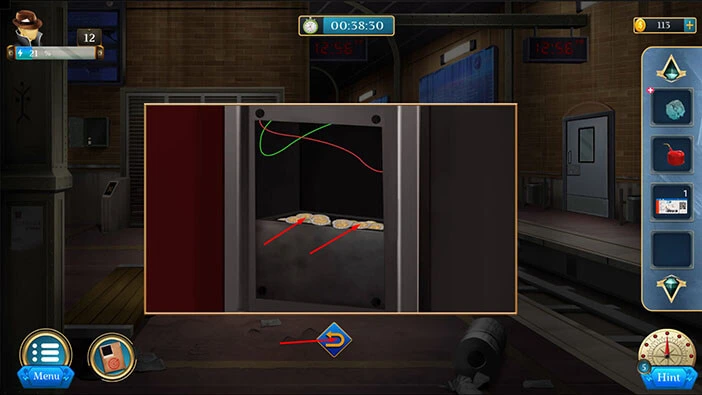
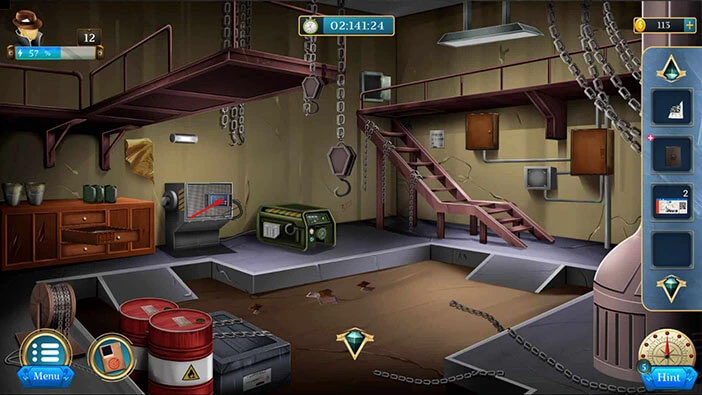
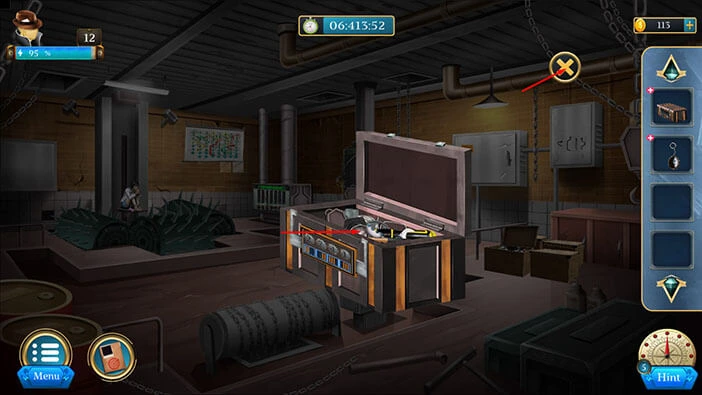
If you take a look at the wall on the right, you will notice a grey machine. Let’s tap on it to take a closer look.
If you tap on the cover, our character will say that he needs a tool to remove it. So, let’s select the “Scalpel” from the inventory and use it to remove the screws on the cover.
In the machine, you will find four “Coins”. Let’s tap on them to pick them up.
After that, tap on the arrow at the bottom to go back.
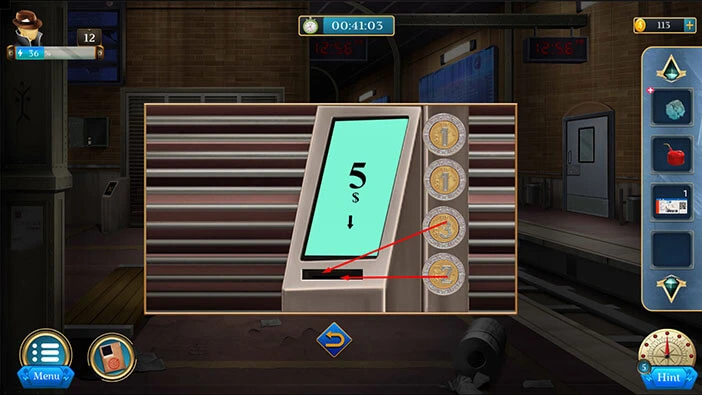
Next, let’s tap on the display screen in front of the large gate to take a closer look at it.

Next, select the four “Coins” from the inventory and place them to the right of the display screen.
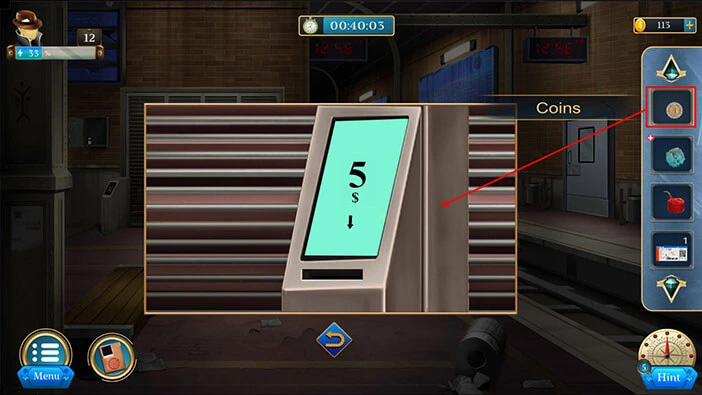
We need 5$ to proceed, so let’s drag the 3$ and 2$ coins into the slot.
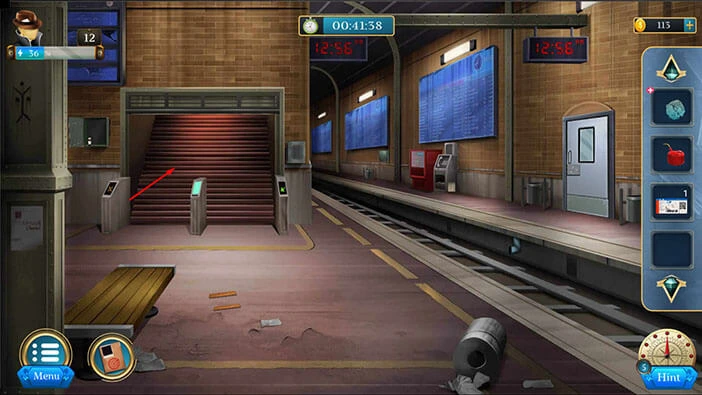
With that, you will open the gate. Let’s proceed to the second floor.
On the ground in front of you, you will notice another “Ticket”. Let’s tap on it to pick it up.
After that, tap on the arrow at the bottom to go back.
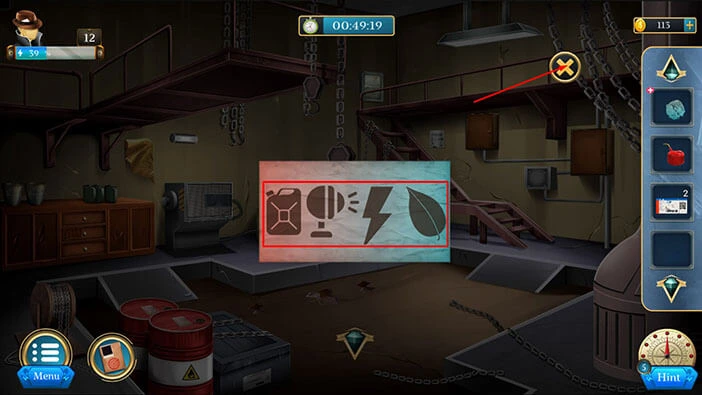
Next, let’s tap on the “Paper” in our inventory to take another look at it.

Let’s memorize/write down these four symbols because we will need them for the next puzzle. Here, we have, a “Gas can”, a “Microphone pointing to the right”, “Lightning”, and a “Leaf”.
Once you’re done, tap on the “X” button to put down the paper.
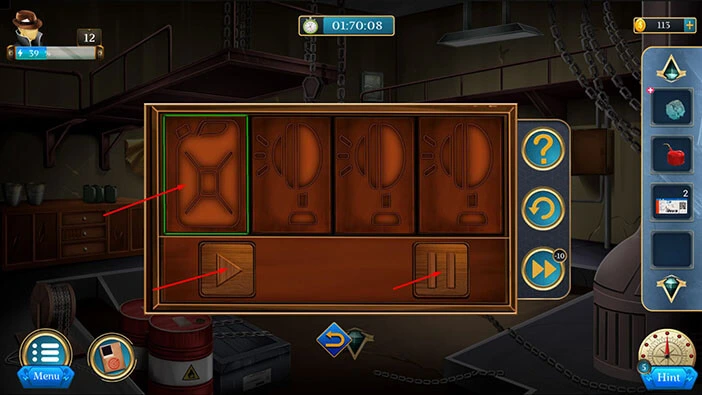
Next, let’s tap on the middle drawer on the left to take a closer look at it, and tap again to start the interaction.

Here, you will notice four slots. Let’s set the symbols in the slots to match the symbols in the “Paper”. We will do this in four steps. Let’s begin.
Step 1
Tap on the first slot to select it (the green border will appear around this symbol). After that, tap on the “Play” button and the symbols in this slot will change. Let’s tap on the “Pause” button once we see a “Gas can” symbol.
Step 2
Tap on the second slot to select it (the green border will appear around this symbol). After that, tap on the “Play” button and the symbols in this slot will change. Let’s tap on the “Pause” button once we see a “Microphone pointing to the right”.

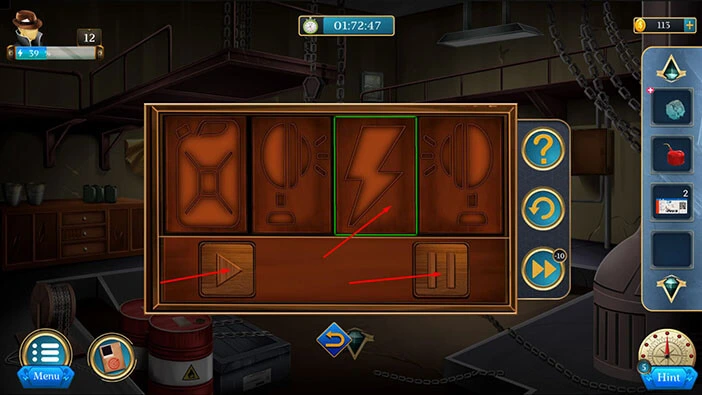
Step 3
Tap on the third slot to select it (the green border will appear around this symbol). After that, tap on the “Play” button and the symbols in this slot will change. Let’s tap on the “Pause” button once we see a “Lightning” symbol.
Step 4
Tap on the fourth slot to select it (the green border will appear around this symbol). After that, tap on the “Play” button and the symbols in this slot will change. Let’s tap on the “Pause” button once we see a “Leaf” symbol.

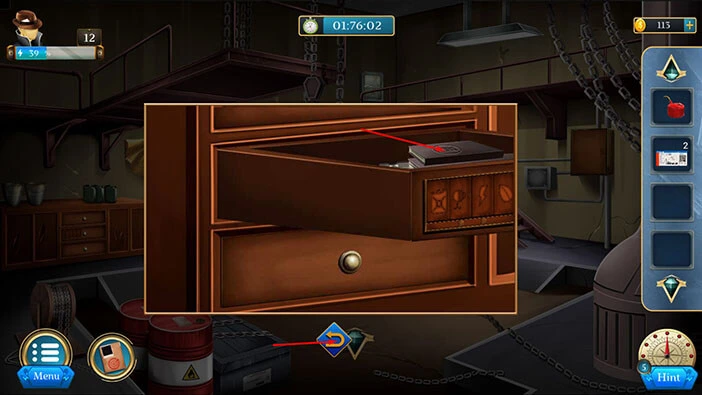
With that, you will open the drawer, and inside you will find a “Catalogue”. Let’s tap on it to pick it up.
After that, tap on the arrow in the bottom left corner of the screen to go back.
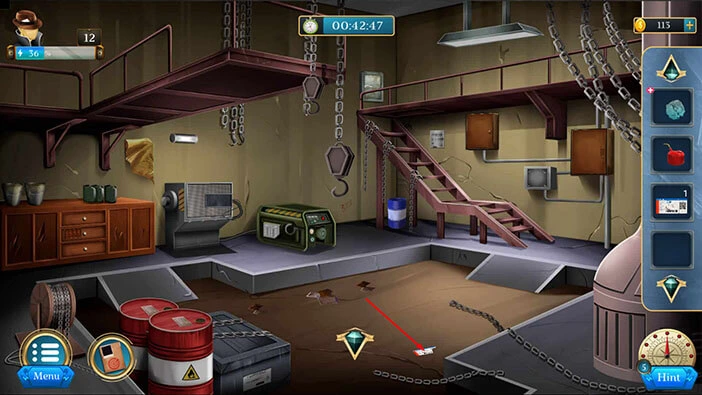
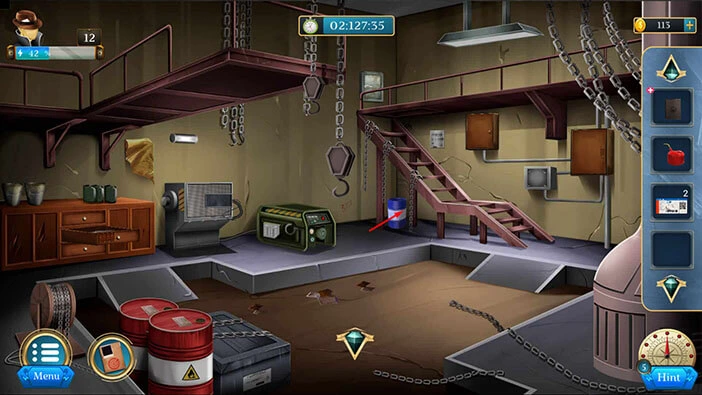
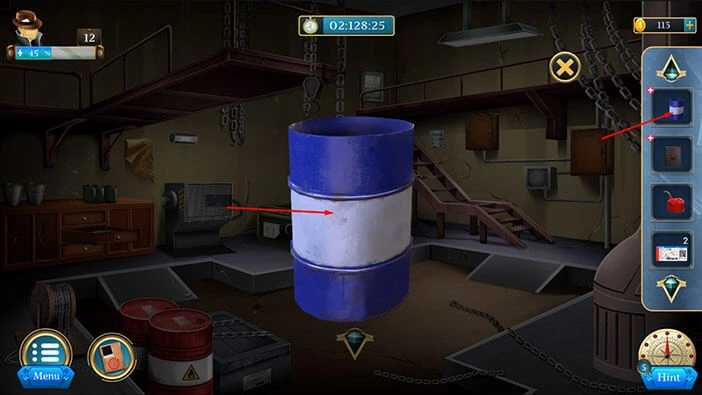
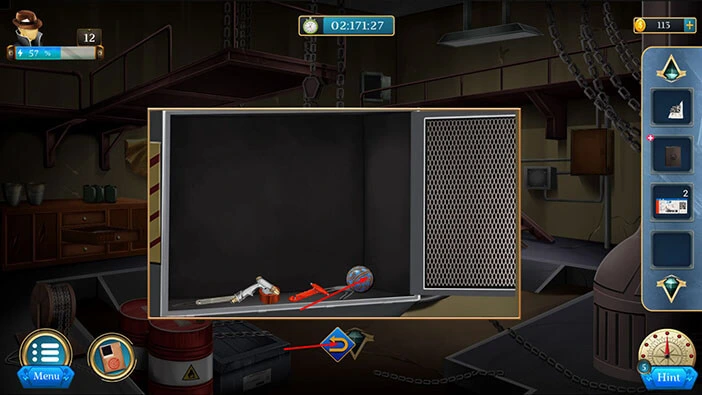
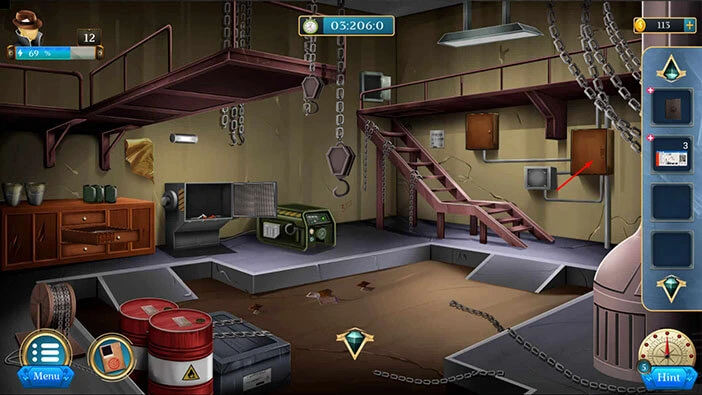
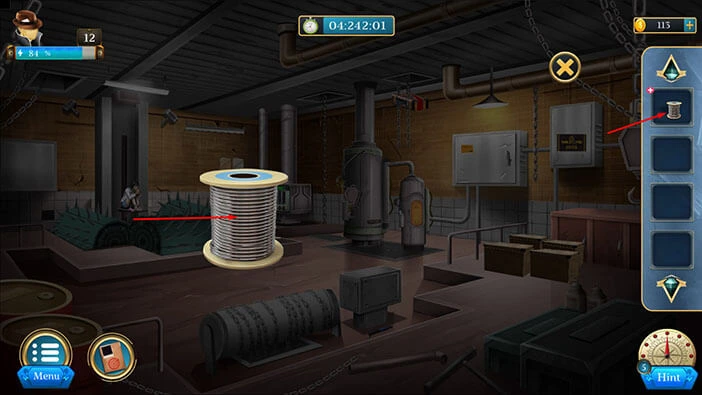
Next, in the top right corner of the room, you will notice a blue barrel. Let’s tap on it to take a closer look, and tap again to pick it up. A “Drum” will be added to your inventory.
After that, tap on the arrow at the bottom to go back.
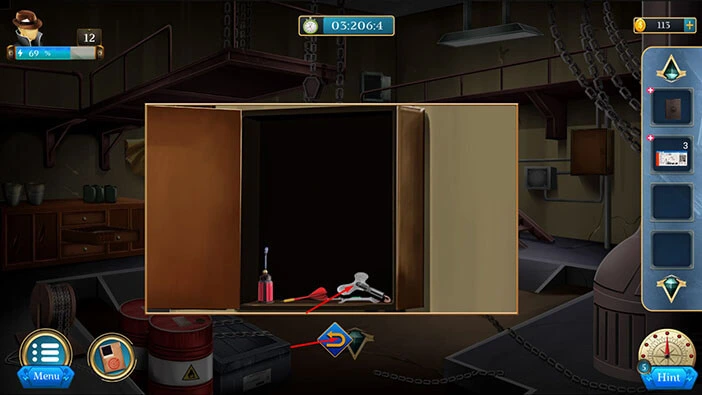
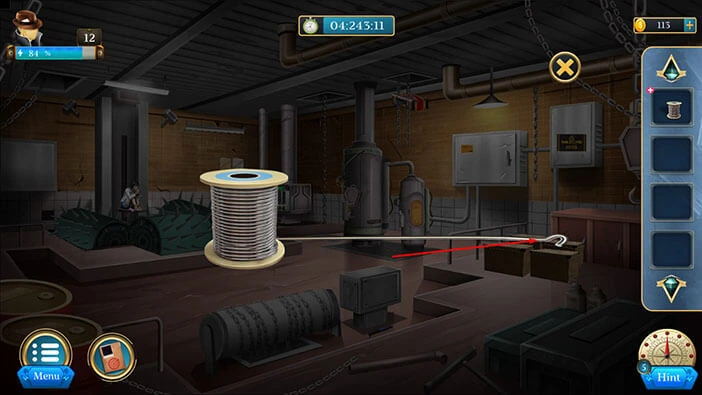
Select the “Drum” from the inventory and it will appear in the middle of the screen. After that, tap on the “Drum” to turn it over.
A saw and a “Ticket piece” will fall out of the barrel. Let’s tap on the “Ticket piece” to pick it up.
After that, tap on the “X” button to close this window.

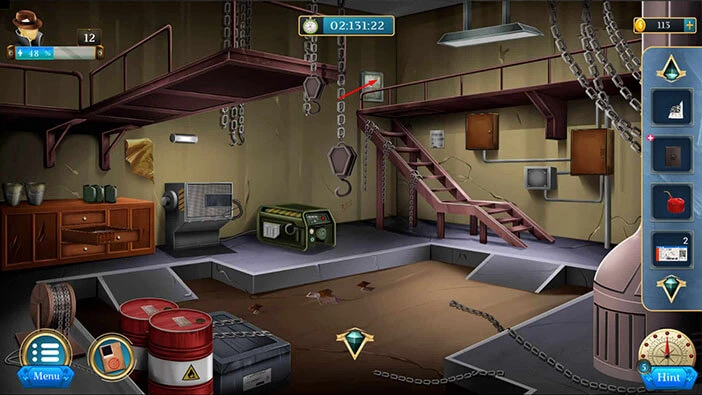
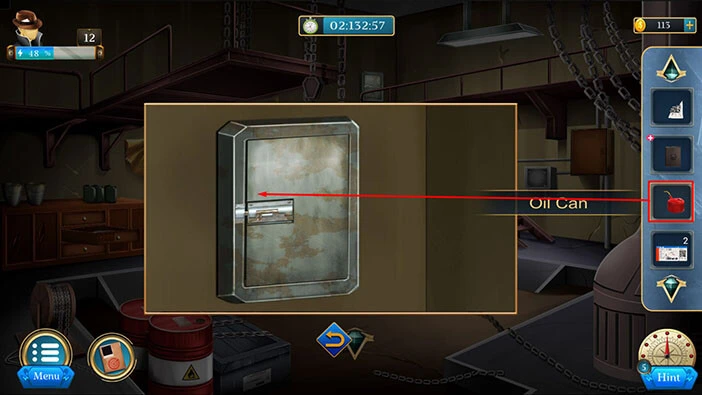
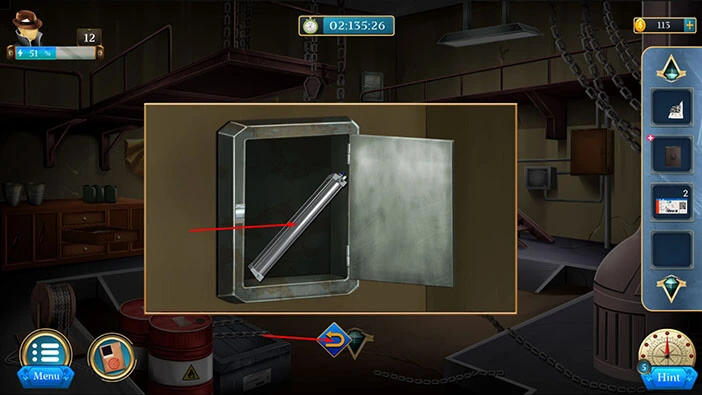
Above the stairs on the right, you will notice a small metal door. Let’s tap on it to take a closer look.
If you tap on the door, you will discover that the door is stuck and that we will need some kind of lubricant to open it.
So, let’s select the “Oil can” from the inventory and use it on the door.
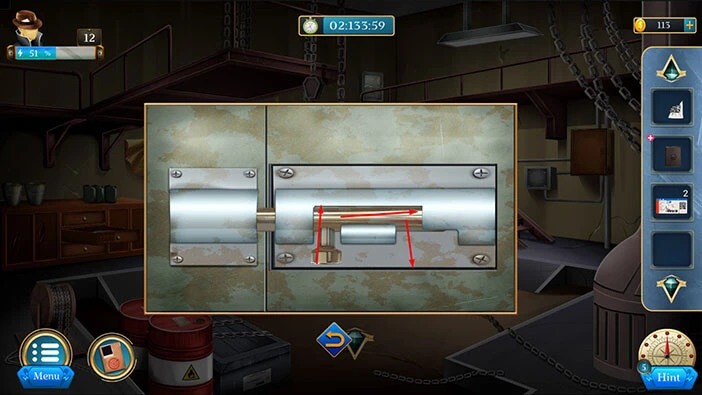
Next, let’s unlock the door. Tap on the lock, several times, and you will open the door.
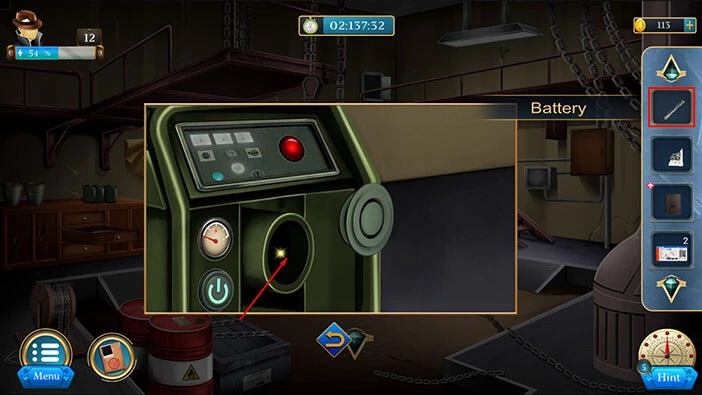
Inside, you will find a “Battery”. Let’s tap on it to pick it up.
After that, tap on the arrow at the bottom to go back.
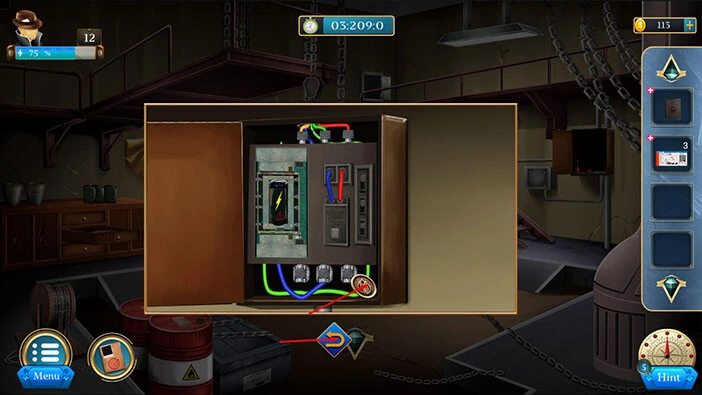
Next, let’s tap on the green generator to take a closer look at it, and tap again to remove the hatch.
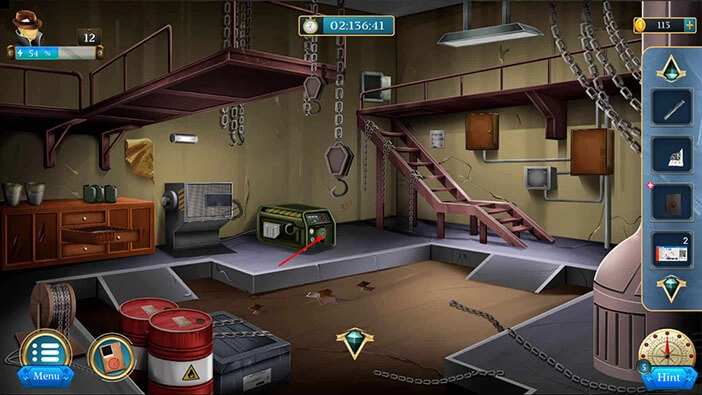
Select the “Battery” from the inventory and insert it into the machine.
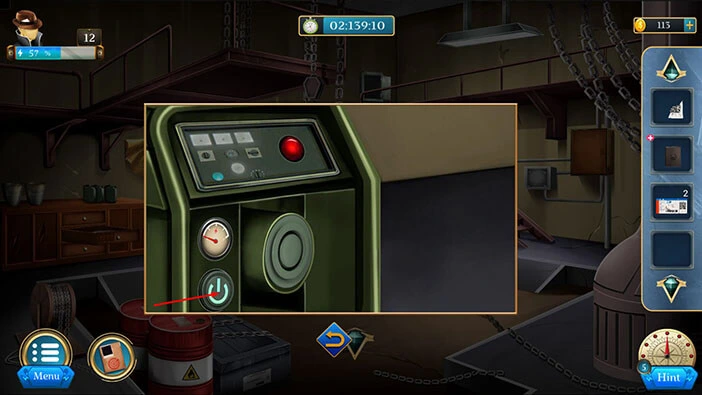
Lastly, let’s tap on the power button to start the generator. With that, we will restore the power, and the machine on the left will be turned on.
Next, tap on the machine on the left to take a closer look at it, and tap again to start the interaction.
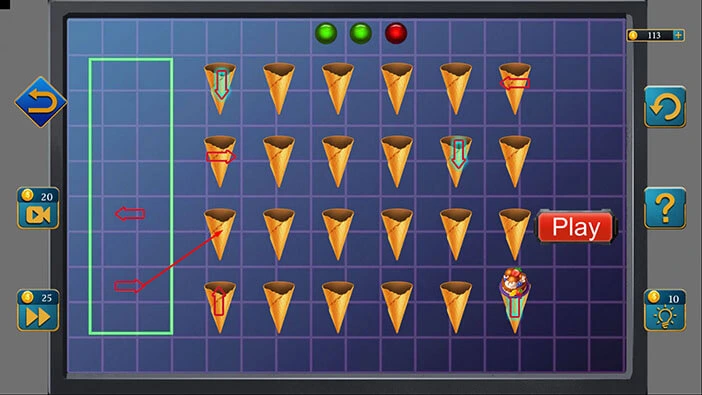
Here, we have another puzzle. Our task in this puzzle is to fill all ice cream cones. We can see twenty-four ice cream cones, arranged in four rows with six cones per row.
If we take a look at the sixth ice cream cone in the fourth row, you will notice an arrow. This is our starting point. We can see two more arrows on the grid.
Besides that, we can see four arrows on the left. We can use these arrows to redirect the path of the ice cream. We will do this puzzle in several steps. Let’s begin.
Step 1
Select the “Right” arrow and place it on the first ice cream cone in the first row.
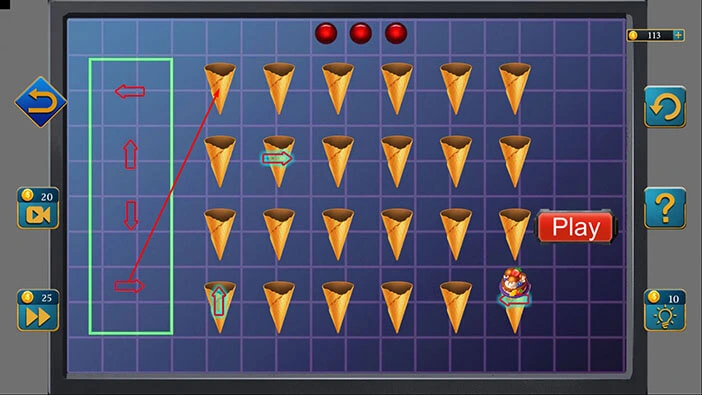
Step 2
Select the “Down” arrow and place it on the sixth ice cream cone in the first row.
Step 3
Select the “Left” arrow and place it on the sixth ice cream cone in the third row.

Step 4
Lastly, select the “Up” arrow and place it on the second ice cream cone in the third row. After that, tap on the “Play” button to confirm.

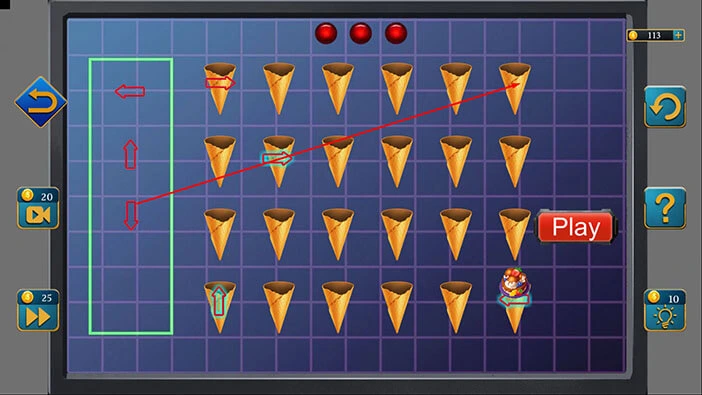
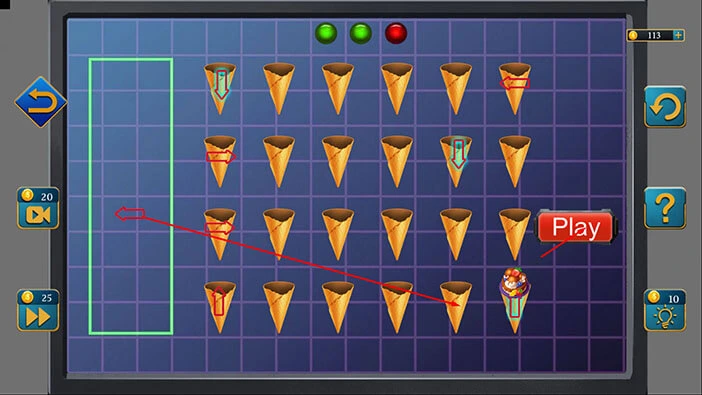
You will notice the green light at the top. We have to turn on two more lights, so we will have to solve two more puzzles of this type. Let’s do that.
Step 1
Select the “Right” arrow and place it on the first ice cream cone in the third row.

Step 2
Select the “Up” arrow and place it on the sixth ice cream cone in the third row.
Step 3
Select the “Left” arrow and place it on the sixth ice cream cone in the first row.

Step 4
Select the “Down” arrow and place it on the first ice cream cone in the first row. After that, tap on the “Play” button to confirm.

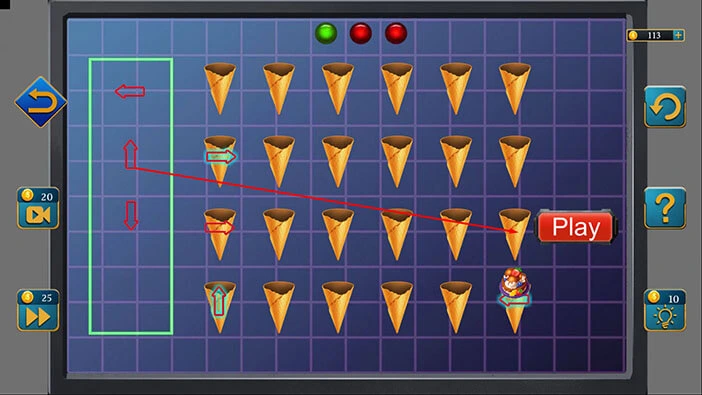
You will notice two green lights at the top. We have to turn on one more light, so we will have to solve one more puzzle of this type. Let’s do that.
Step 1
Select the “Left” arrow and place it on the sixth ice cream cone in the first row.

Step 2
Select the “Right” arrow and place it on the first ice cream cone in the second row.

Step 3
Select the “Right” arrow and place it on the first ice cream cone in the third row.
Step 4
Select the “Left” arrow and place it on the fifth ice cream cone in the fourth row. After that, tap on the “Play” button to confirm.
You will solve this puzzle, and with that, you will unlock the door. Inside, you will find a “Ball”. Let’s tap on it to pick it up.
After that, tap on the arrow at the bottom to go back.
Let’s go back to the first floor. Tap on the arrow at the bottom of the screen.

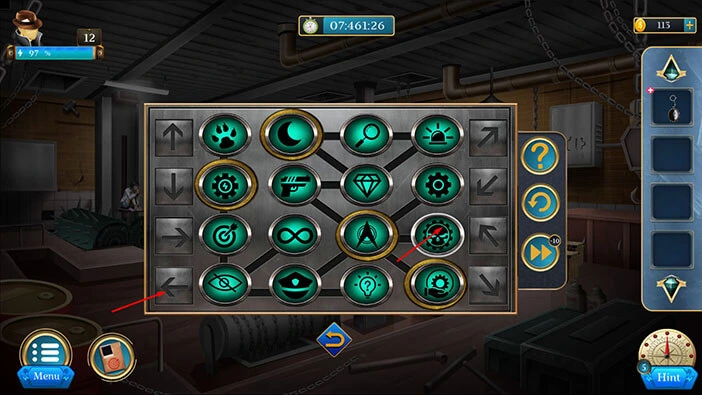
Let’s tap on the green box in the top right corner of the screen to take a closer look at it, and tap again to start the interaction.
Next, select the “Ball” from the inventory and put it into the labyrinth.
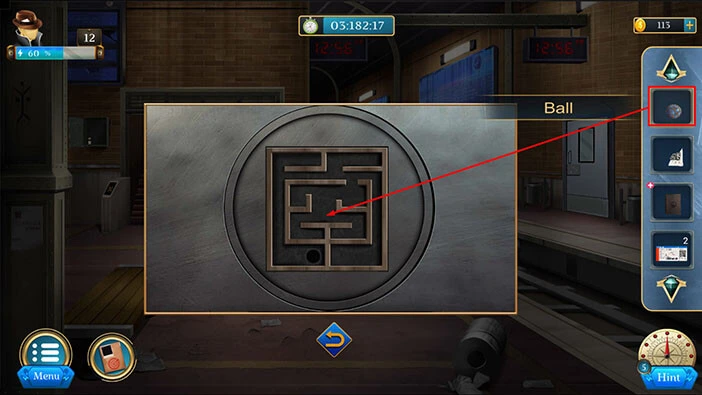
Our next task is to lead the ball to the black hole. We can do that by rotating the puzzle. We will do this puzzle in several steps. Let’s begin.
Step 1
Tap twice on the arrow on the left.
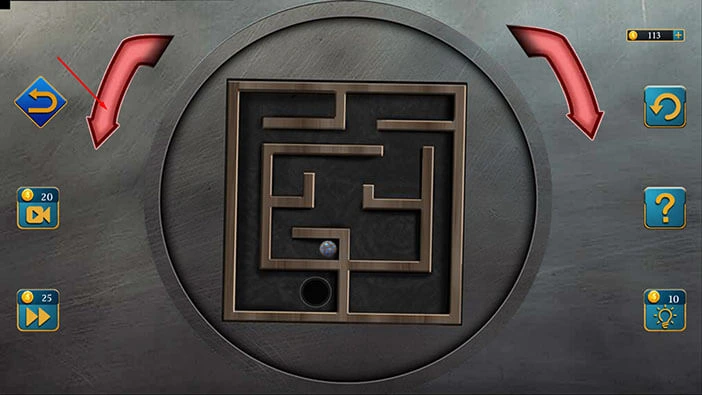
Step 2
Tap two more times on the arrow on the left.
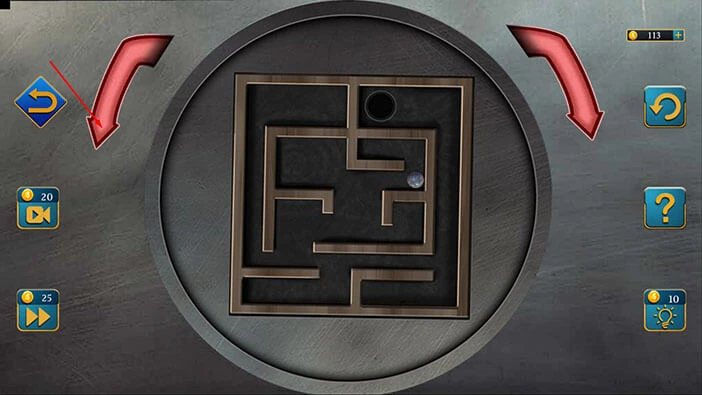
Step 3
Tap two more times on the arrow on the left.
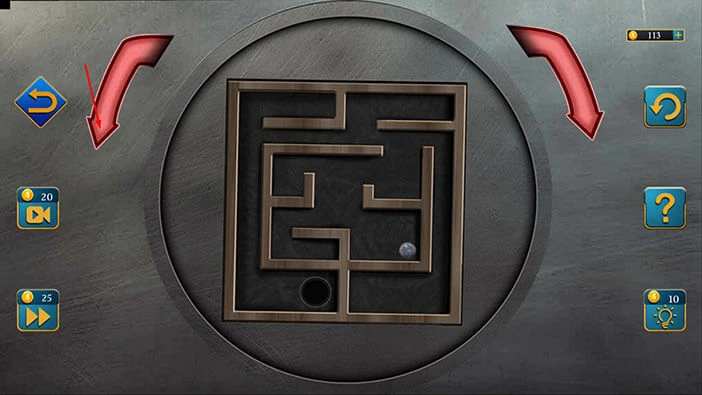
Step 4
Tap one more time on the arrow on the left.
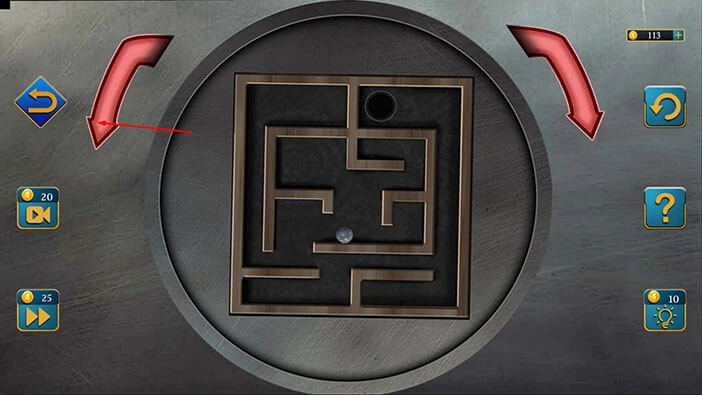
Step 5
Tap two times on the arrow on the right.
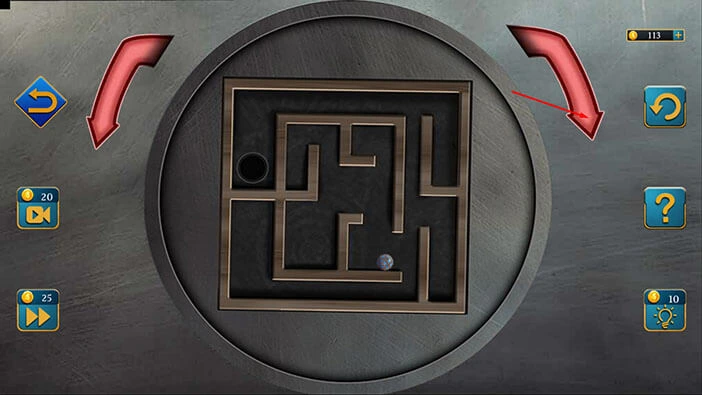
Step 6
Tap two more times on the arrow on the right and you will solve this puzzle.
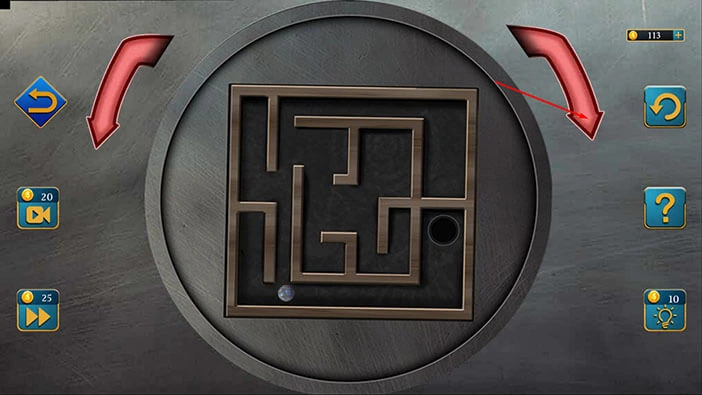
In the box, you will find another “Ticket”. Let’s tap on it to pick it up.
After that, tap on the arrow at the bottom to go back.
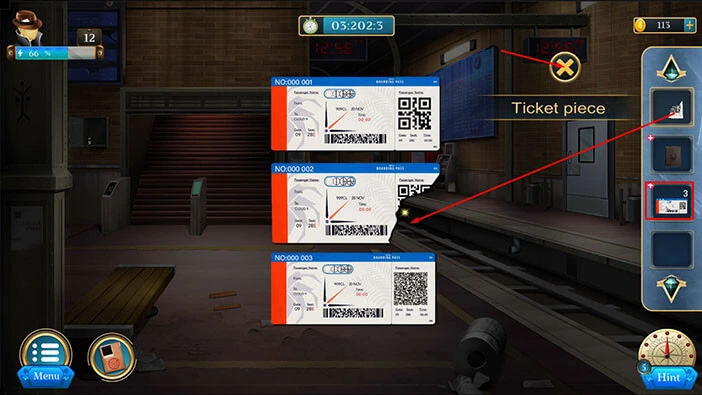
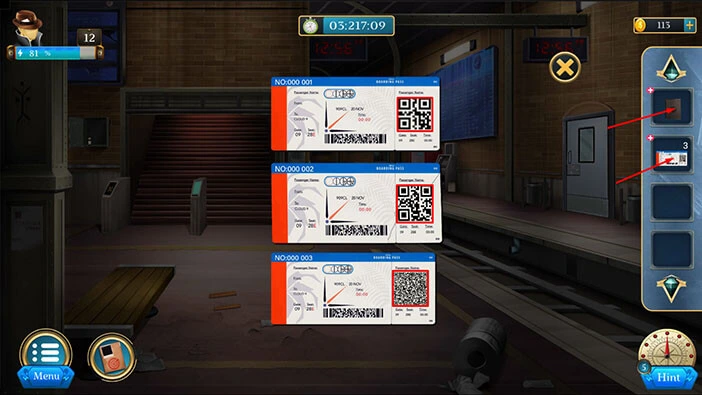
Next, select the three “Tickets” from the inventory and they will appear in the middle of the screen. You will notice that the piece of the ticket in the middle is missing.
So, let’s select the “Ticket piece” from the inventory and use it to assemble the ticket in the middle.
After that, tap on the “X” button to close this window.
Let’s go back to the second floor. Tap on the stairs to proceed.

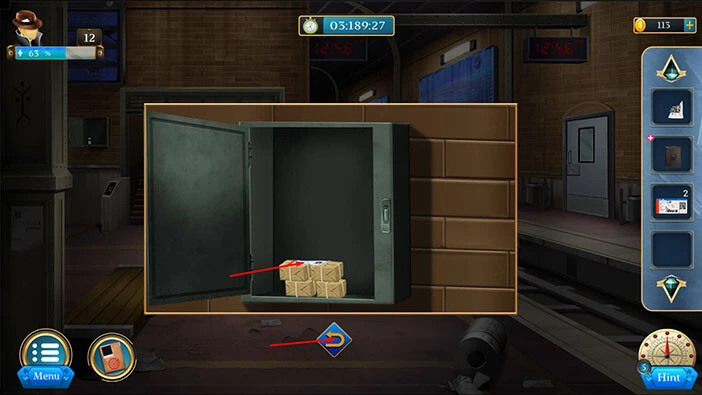
Next, let’s tap on the brown on the box on the right to take a closer look at it, and tap again to open it.
In the box, you will find a “Key”. Let’s tap on it to pick it up.
After that, tap on the “X” button to close this window.
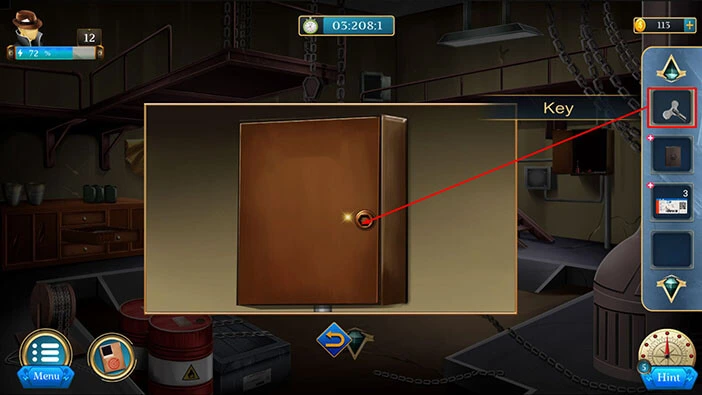
Next, let’s tap on the other brown box to take a closer look at it.
This box is locked, so let’s select the “Key” from the inventory and use it to unlock the box.
In the box, you will find a “Button”. Let’s tap on it to pick it up. After that, tap on the “X” button to close this window.
We can use the “Button” that we found in the box to solve the puzzle on the first floor. So, let’s tap on the arrow at the bottom of the screen to go back.
Next, let’s tap on the door on the right to take a closer look at it and tap again to start the interaction.

Here, we have another puzzle. You will notice that one button is missing. So, let’s select the “Button” from the inventory and insert it into the empty slot.
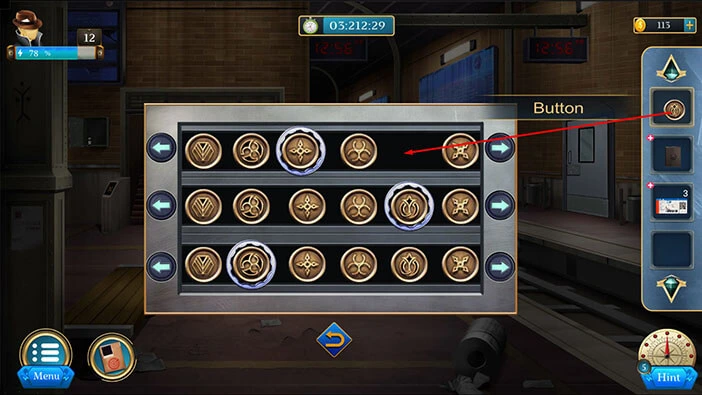
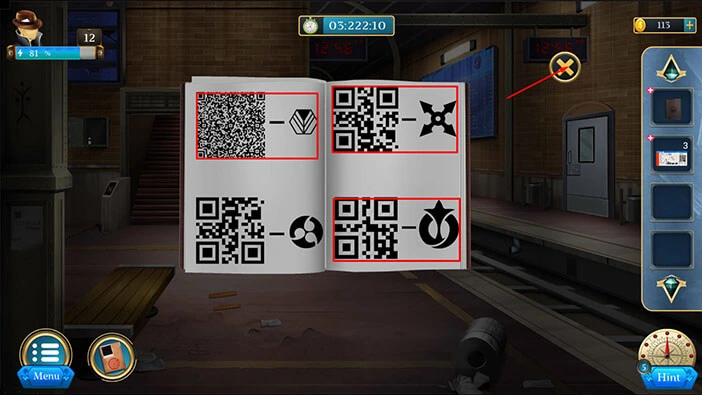
In this puzzle, our task is to place the correct symbols into each of the three slots (a special slot in each row). To discover the correct symbols, we have to examine the hints in our inventory, so let’s do that.
Tap on the three tickets in your inventory to examine them, and they will appear in the middle of the screen.
We will see a certain pattern on each ticket. Let’s try to memorize/write down the pattern on each ticket.
Once you’re done, tap on the “Catalogue” in your inventory to examine it.
We can see the pattern from the top ticket in the bottom right corner. Next, to this pattern, we can see a symbol that looks like a “Coiled Snake” (kind of). So, the top symbol = Coiled snake.
We can see the pattern from the middle ticket in the top right corner. Next, to this pattern, we can see a symbol that looks like a “Throwing star”. So, the middle symbol = Throwing star.
We can see the pattern from the bottom ticket in the top left corner. Next, to this pattern, we can see a symbol that looks like a “Suit”. So, the bottom symbol = Suit.
Let’s memorize/write down this information. Once you’re done, tap on the “X” button to close this window.
Let’s go back to the puzzle. Tap on the door on the right.
Let’s set the correct symbols.
At the top, we should have the “Coiled Snake” symbol. So, let’s tap four times on the arrow on the right.
In the middle, we should have the “Throwing Star” symbol. So, let’s tap five times on the arrow on the right.
At the bottom, we should have the “Suit” symbol. So, let’s tap once on the arrow on the right.
With that, you will solve this puzzle.

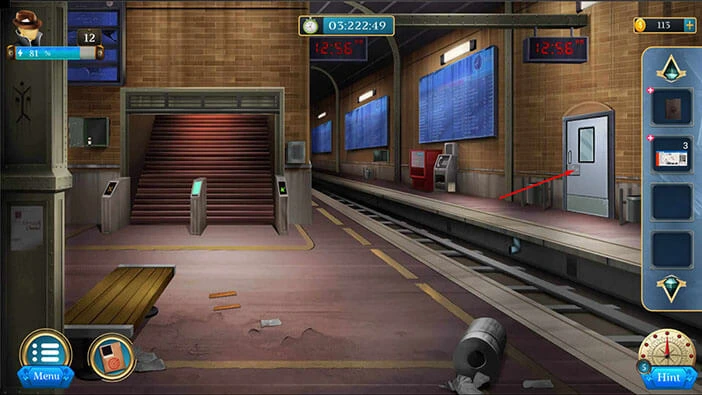
You will unlock and open the door as soon as you solve the puzzle. Let’s tap on the door to proceed to the next room.
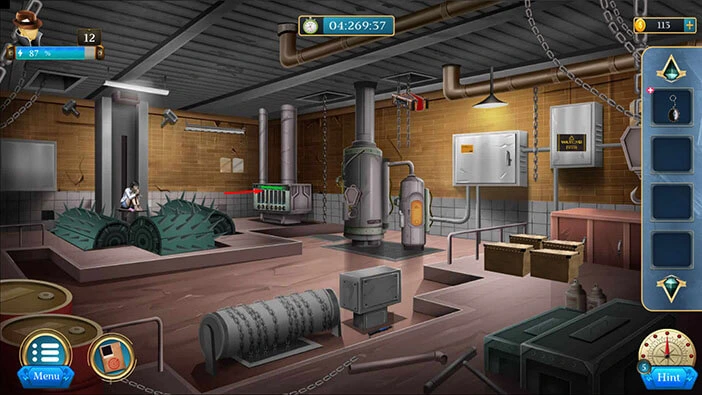
Our next task is to stop the spikes. Let’s explore this room.
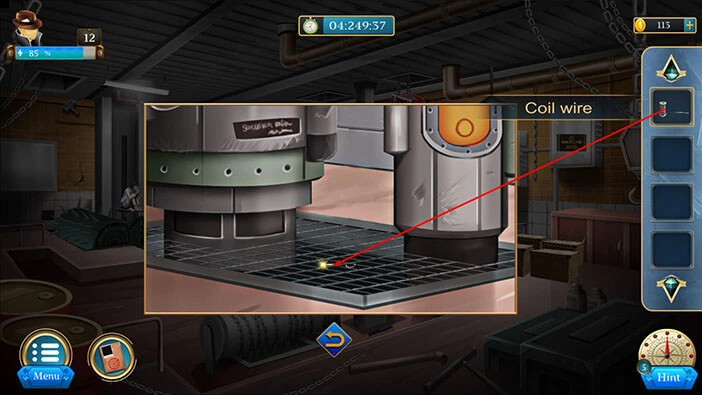
On the floor on the left, you will notice a “Coil wire”. Let’s tap on it to take a closer look, and tap again to pick it up.
After that, tap on the arrow at the bottom to go back.

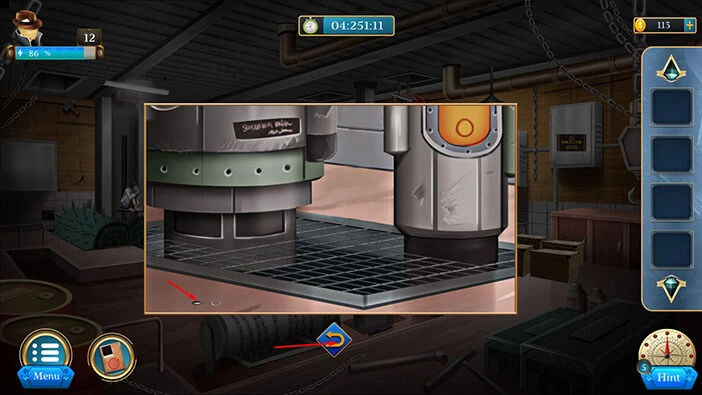
Select the “Coil wire” from the inventory and it will appear in the middle of the screen. After that, tap on the coil wire to unroll it.
Next, let’s tap on the “Coil wire” to pick it up. After that, tap on the “X” button to close this window.
Next, you will notice the two boilers in the room. Let’s tap on them to take a closer look.

Here, you will notice an item on the bars, but our character can’t reach it with his bare hands. So, let’s select the “Coil wire” from the inventory and use it to reach this item.
You will reach the “Keychain” so let’s tap on it to pick it up. After that, tap on the arrow at the bottom to go back.
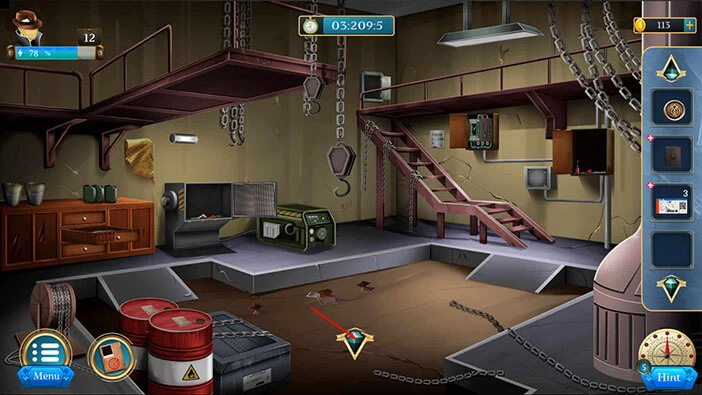
Let’s tap on the green machine on the right to take a closer look at it and tap again to start the interaction.
Our next task is to stop the spikes, and we can do that by setting the switches on the machine. We will do this puzzle in several steps. Let’s begin.
Step 1
Tap once on the first switch.
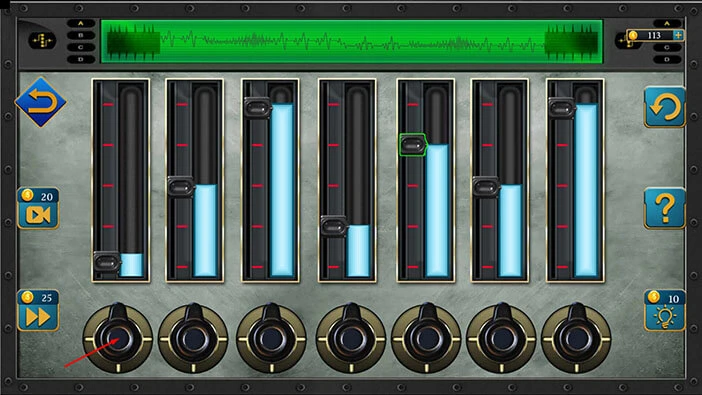
Step 2
Tap twice on the second switch.
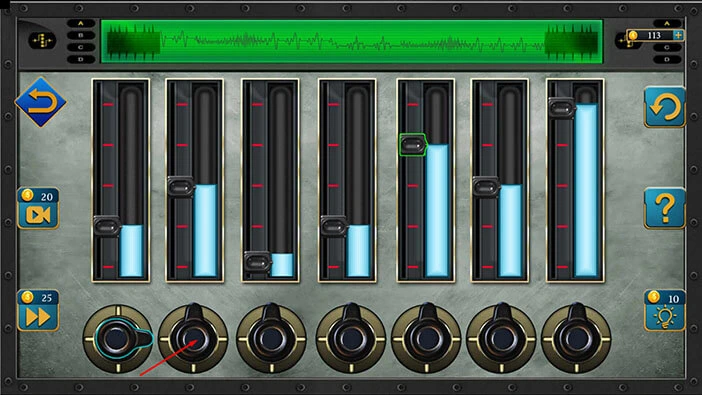
Step 3
Tap three times on the third switch.

Step 4
Tap four times on the fourth switch.
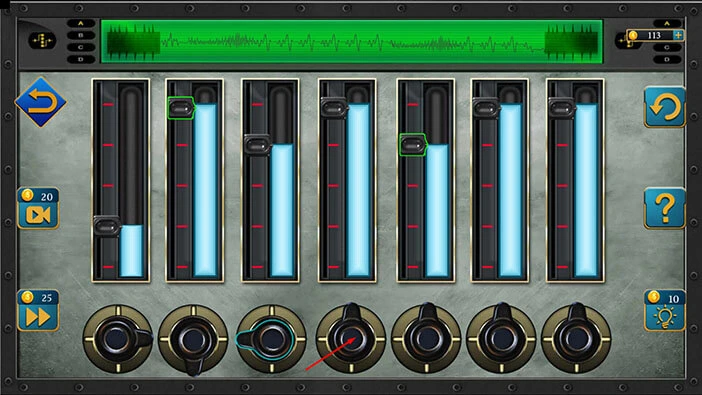
Step 5
Tap five times on the fifth switch.
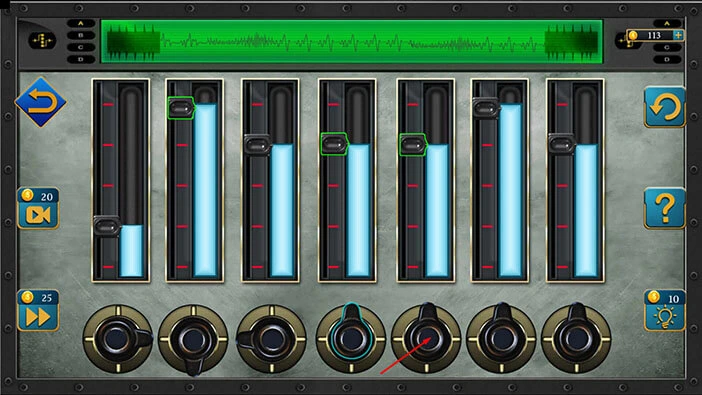
Step 6
Tap six times on the sixth switch.

Step 7
Lastly, tap twice on the seventh switch and you will solve this puzzle.
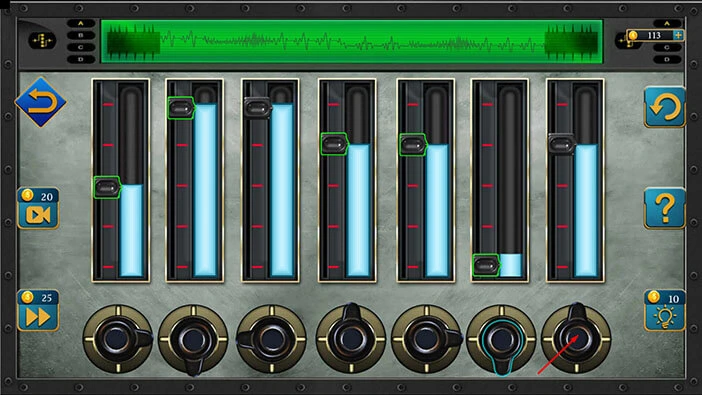
Once you set the bars to the correct levels, you will solve the puzzle. With that, you will stop the spikes. Let’s continue.
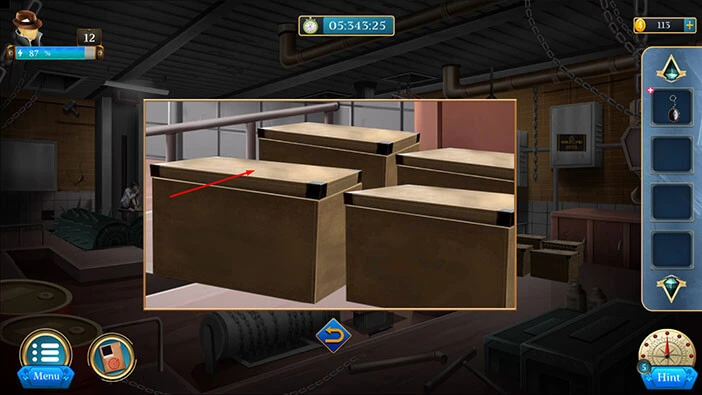
On the right, you will notice four wooden boxes. Let’s tap on them to take a closer look.

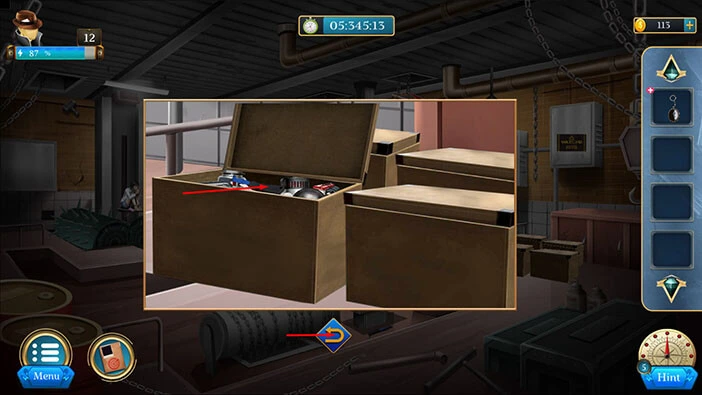
Tap on the box on the left to open it.
In the box, you will find a “Cutter Handle”. Let’s tap on it to pick it up.
After that, tap on the arrow at the bottom to go back.
Below the grey box in front of you, you will notice two items. Let’s tap on them to take a closer look.

On the ground, you will find a “Cutter handle” and a “Nut”. Let’s tap on these items to pick them up.
After that, tap on the arrow at the bottom to go back.
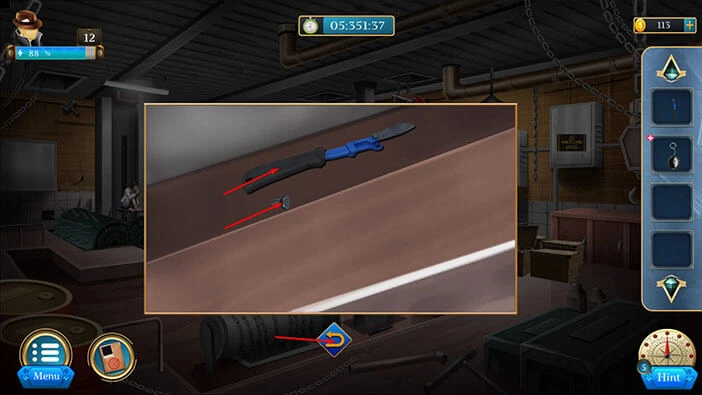
Select the “Cutter handle” (with the plus sign) from the inventory and it will appear in the middle of the screen. After that, select the other “Cutter handle” and drag it to the first handle.
Next, select the “Nut” from the inventory and place it into the empty slot between the two handles.
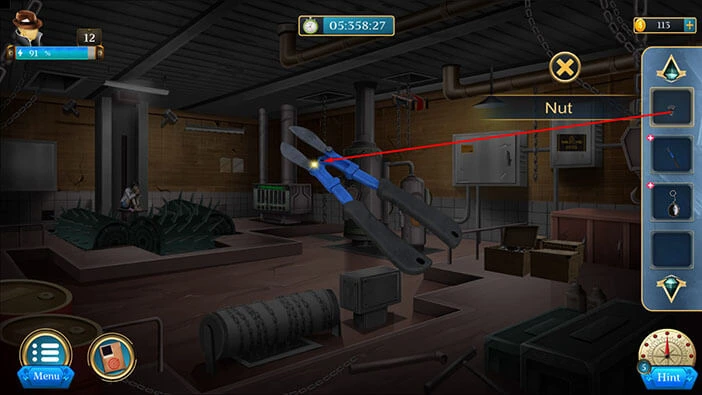
With that, you will assemble the “Cutter”. Let’s tap on it to pick it up. After that, tap on the “X” button to close this window.
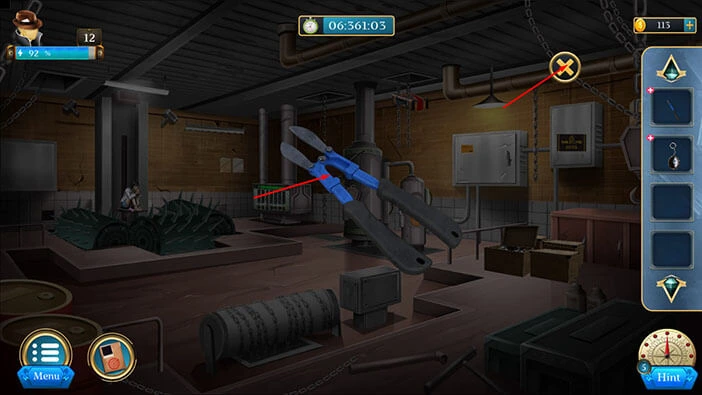
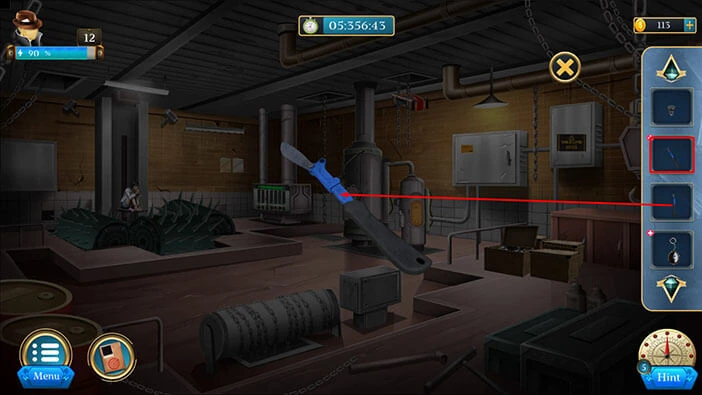
Next, let’s tap on the chain, located in the top right corner of the room, to take a closer look at it.

Next, select the “Cutter” from the inventory and use it to cut the chain.
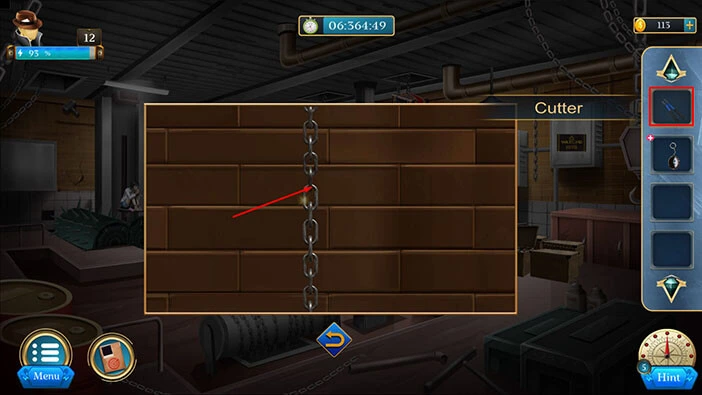
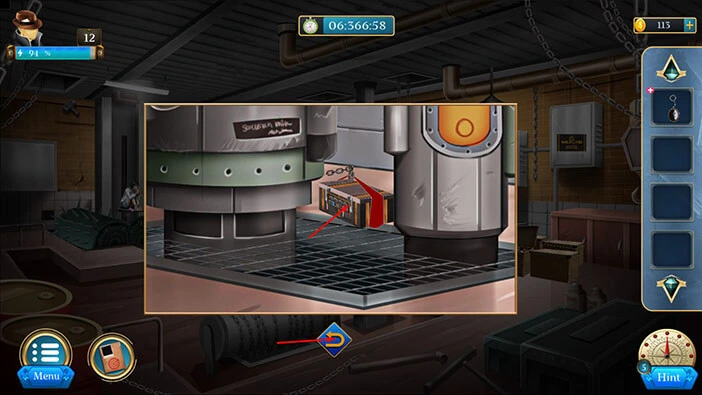
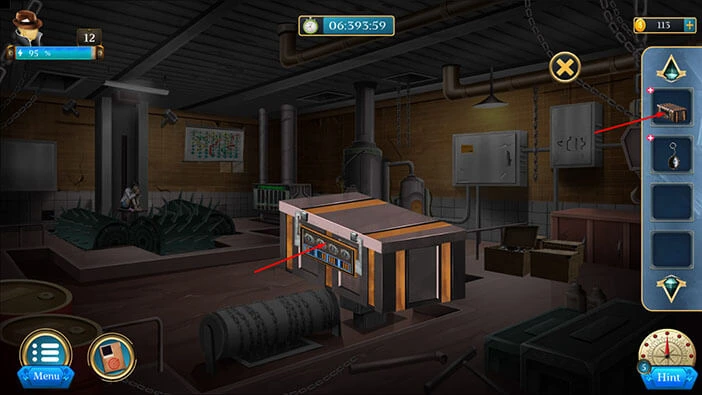
As soon as you cut the chain, you will release the other chain with the box, and it will fall down. Let’s tap on it to take a closer look.

Here, you will find a “Box”. Let’s tap on it to pick it up. After that, tap on the arrow at the bottom to go back.
Our next task is to unlock the box in our inventory. However, to do that, we need to discover a four digit code. Let’s do that.
Tap on the “Warning” sign on the grey box on the right to take a closer look at it.

Let’s tap on the sign, several times to remove it.
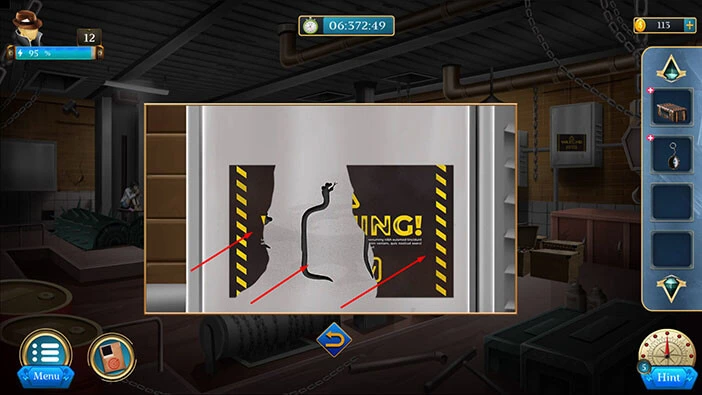
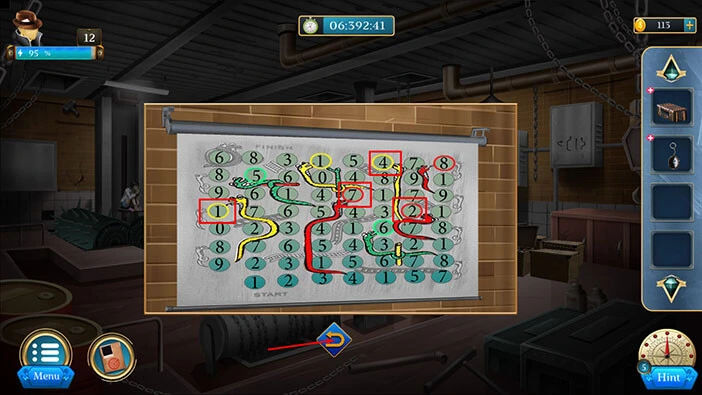
Here, you will discover four snakes. Let’s memorize/write down the shape of the snakes (starting from left to right) because we will need this information for the next puzzle.
Once you’re done, tap on the arrow at the bottom to go back.
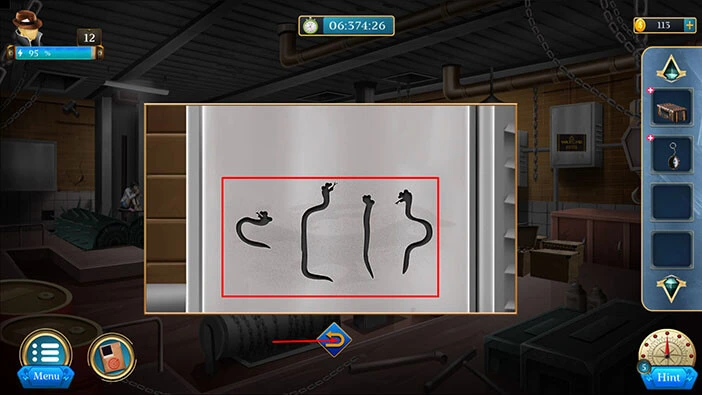
If you take a look at the wall in the top left corner of the room, you will notice a piece of paper. Let’s tap on it to take a closer look, and tap again to unroll it.

Here, you will notice several snakes, and each snake is pointing to a single number. So, let’s find the snakes that match the shapes that we saw previously.
First, on the right, you will notice a red snake pointing to the number 2. This is our first number. (This is the first number because the snake of this shape was the first one (looking from left to right) in the drawing that we examined a moment ago).
Second, in the middle, you will notice a red snake pointing to the number 7. This is our second number.
Third, in the top right, you will notice a yellow snake pointing to the number 4. This is our third number.
Fourth, on the left, you will notice a yellow snake pointing to the number 1. This is our fourth number.
When we put it all together, we will get the number “2741”. Let’s memorize/write down this number because we will need it to unlock the box.
Once you’re done, tap on the arrow at the bottom to go back.
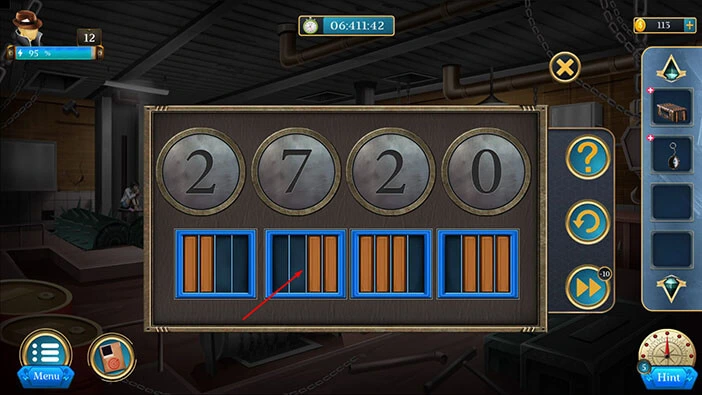
Next, let’s tap on the box in our inventory to examine it, and it will appear in the middle of the screen. Tap on the box again to start the interaction.
Here, we have another puzzle. We already discovered the correct number, “2741” but now we need to set it.
The first button will increment the first two numbers, and the second button will increment the last two numbers. The third button will increment all numbers except the last one, and the last button will increment all numbers except the first one.
So, let’s set these four slots to the number “2741”. We will do that in several steps. Let’s begin.
Step 1
Tap five times on the fourth button.
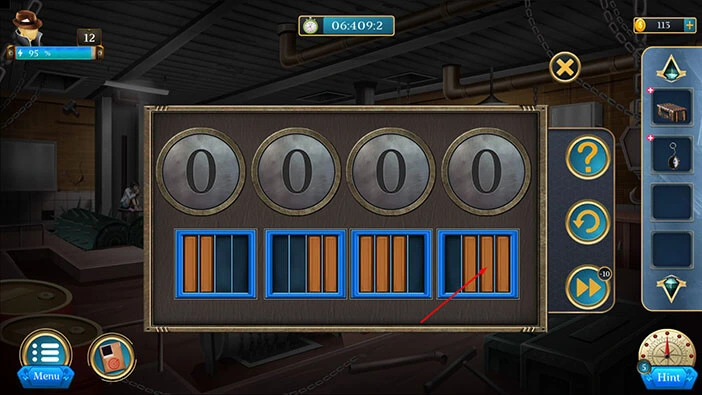
Step 2
Tap five times on the second button.

Step 3
Tap two times on the third button.

Step 4
Tap two times on the second button and you will set the correct number.
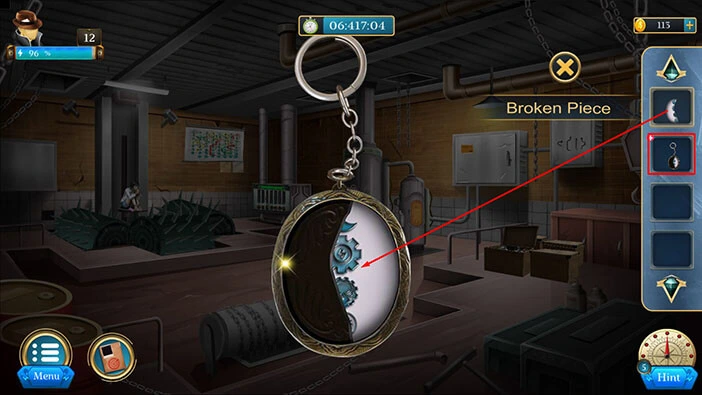
You will unlock the box as soon as you enter the number “2741”. In the box, you will find a “Broken piece”. Let’s tap on it to pick it up.
After that, tap on the “X” button to go back.
Select the “Keychain” from the inventory and it will appear in the middle of the screen. You will notice that half of the medallion is missing. So, let’s select the “Broken piece” from the inventory and merge it with the “Keychain”.
After that, tap on the “X” button to close this window.
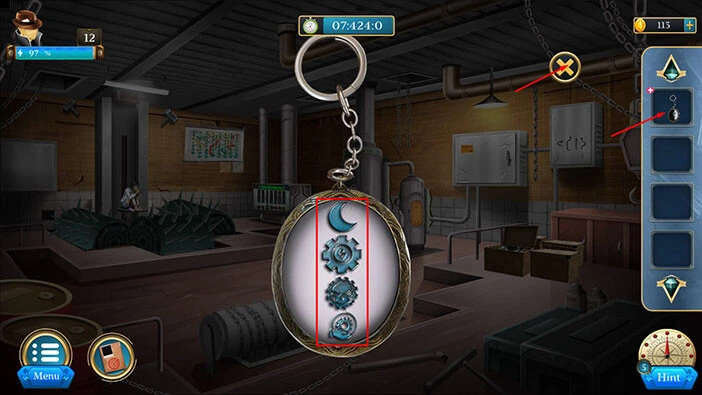
Next, let’s tap on the “Keychain” from the inventory to examine it. Here, we can see four symbols. Let’s memorize/write down these symbols because we will need them for the next puzzle. Here, we can see
The first symbol = Moon
The second symbol = Gear
The third symbol = Gear with skull
The fourth symbol = Hand holding a gear
Once you’re done, tap on the “X” button to close this window.
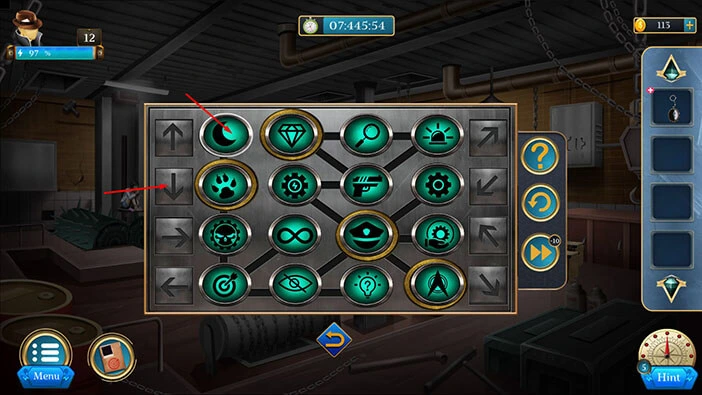
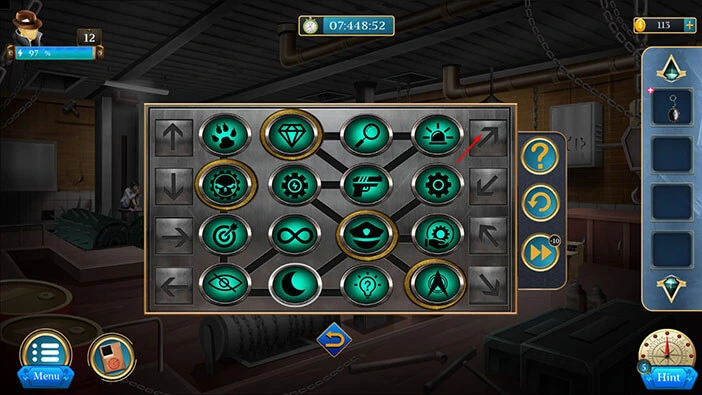
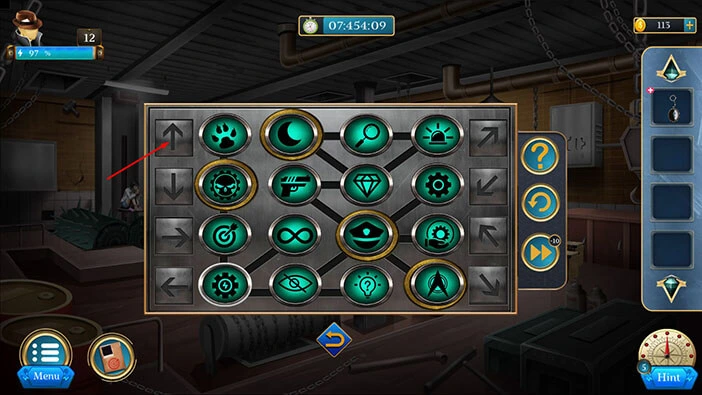
Next, let’s tap on the girl to take a closer look at it, then tap on her collar to start the interaction.

Here, we can see symbols arranged in four rows. In each row, we can see that one slot has a yellow outline. To unlock the collar, we should enter the symbols that we discovered on the “Keychain”. We will do this puzzle in several steps. Let’s begin.
Step 1
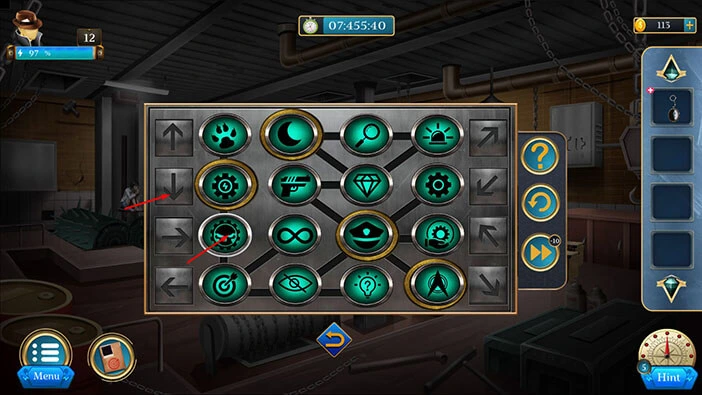
Select the “Moon” symbol, located in the first slot in the first row. After that, tap on the “Down” arrow three times to move the “Moon” symbol.
Step 2
Next, tap once on the “Right” arrow to move the “Moon” symbol.

Step 3
Next, tap once on the “Top right” arrow to move the “Moon” symbol.
Step 4
Next, tap once on the “Top left” arrow to move the “Moon” symbol.
Step 5
Next, tap once on the “Right” arrow to move the “Moon” symbol.
Step 6
Next, tap once on the “Top left” arrow to move the “Moon” symbol.
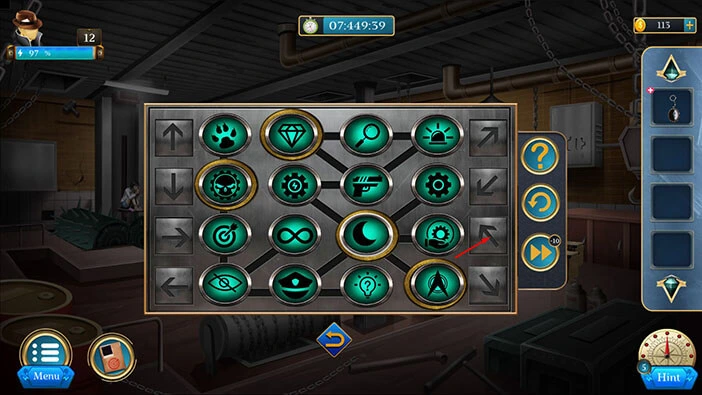
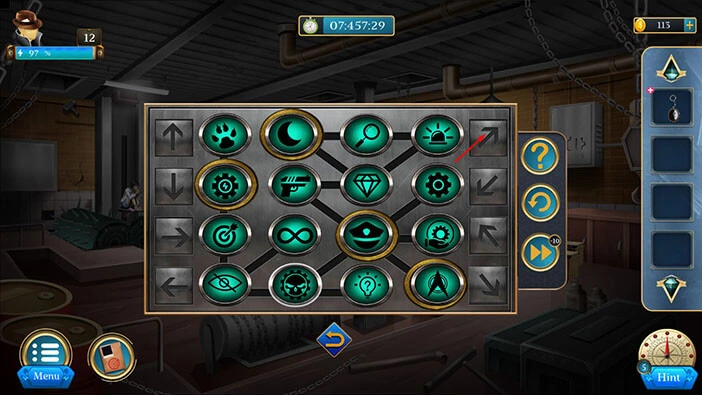
Step 7
Select the “Gear” symbol, located in the third slot in the third row. After that, tap on the “Down left” arrow to move the “Gear” symbol.

Step 8
Next, tap on the “Left” arrow to move the “Gear” symbol.

Step 9
Next, tap twice on the “Up” arrow to move the “Gear” symbol.
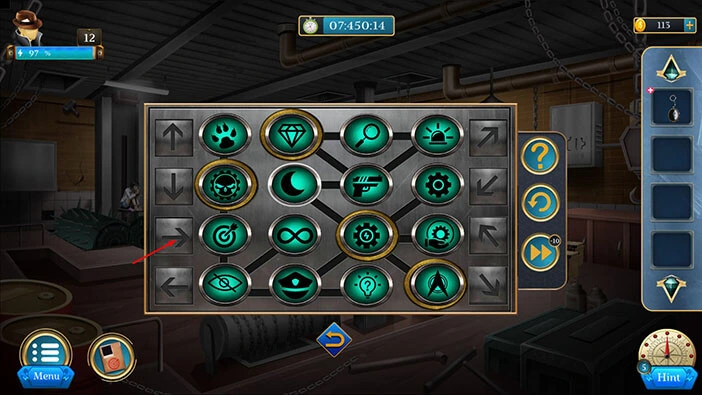
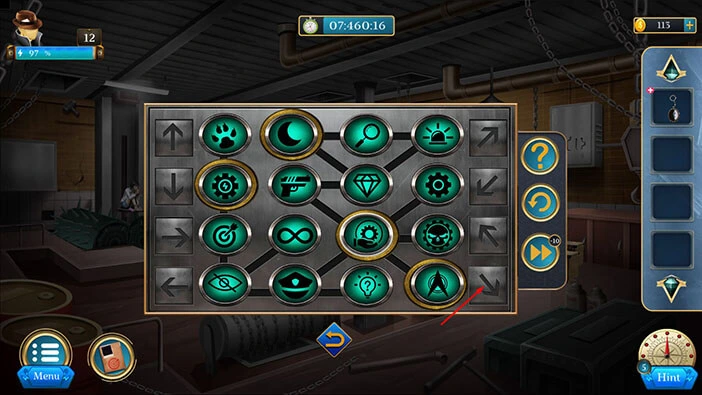
Step 10
Select the “Gear with skull” symbol, located in the first slot in the third row. After that, tap on the “Down” arrow to move the “Gear with skull” symbol.
Step 11
Next, tap on the “Right” arrow to move the “Gear with skull” symbol.

Step 12
Next, tap on the “Top right” arrow to move the “Gear with skull” symbol.
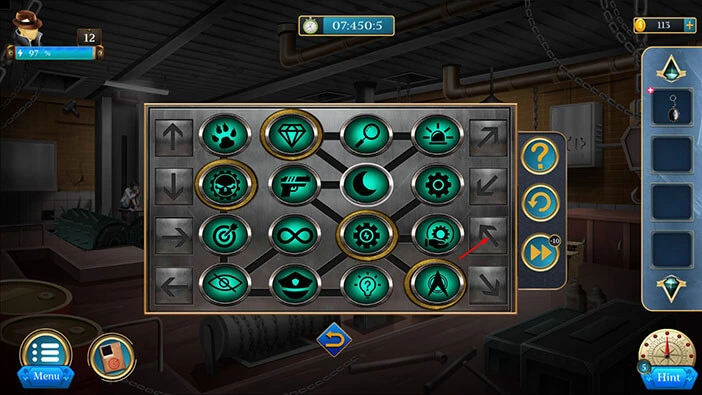
Step 13
Select the “Hand holding a gear” symbol, located in the fourth slot in the third row. After that, tap on the “Left” arrow to move the “Hand holding a gear” symbol.

Step 14
Next, tap on the “Bottom right” arrow to move the “Hand holding a gear” symbol.
Step 15
Select the “Gear with skull” symbol, located in the fourth slot in the third row. After that, tap on the “Left” arrow to move the “Gear with skull” symbol.
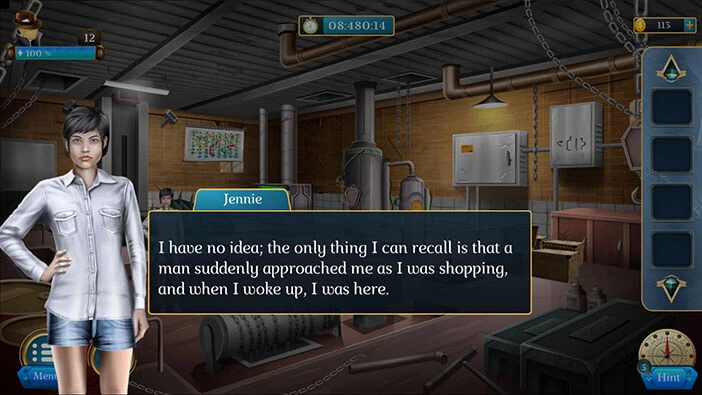
With that, you will remove the collar, and you will free the girl. Jenny will thank our character for freeing her, but she can’t provide any useful information. She was shopping and noticed someone approaching her from behind. That’s the only thing that she remembers before blacking out. When she woke up, she was trapped in this room.
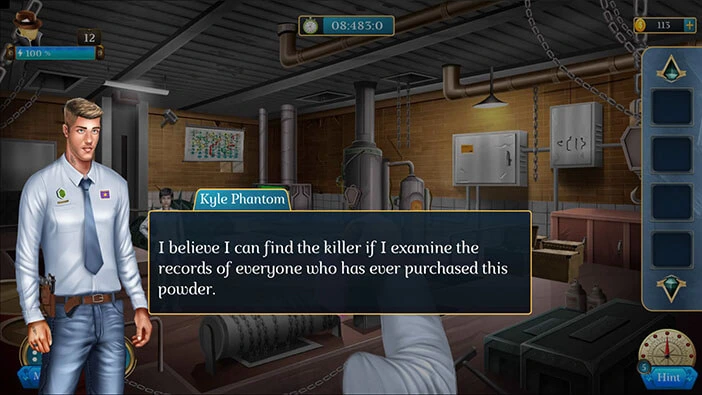
Kyle, our character, will also find a “sedative powder for hypnosis”. That’s how the “Black Spider” managed to hypnotize his victims. Kyle believes that he can find the “Black Spider” if he can find all the persons that purchased this powder.
With that, we have reached the end of the twelfth level. If you want to see the walkthrough for the thirteenth level, tap on the next part button.
Thank you for reading.