Escape Room The Mist Chapter IV Part 1
Hello everyone and welcome to the first part of our walkthrough for Chapter 4 of “Escape Room The Mist.” At the beginning of the fourth chapter, you will again find yourself in a horse-drawn carriage with a very old lady. But, now we know that our character is Jason, and looks like the old lady is his ex-wife.
Tap on the red curtains behind the old lady to get off the carriage and we will begin the fourth chapter of this story.
NOTE: The first part of the walkthrough for chapter 4 follows the story up to a point where you find a skull. At this point, you will be teleported back to the first room.
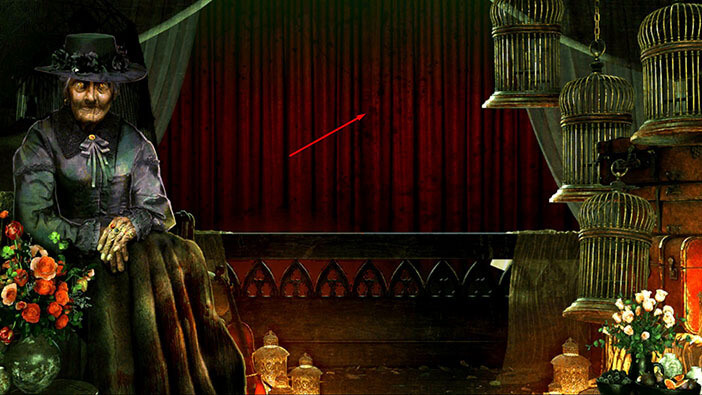
CHAPTER 4 ALICE
Let’s explore this room. Tap on the wooden box in front of you to take a closer look at it.
Tap on the “White pigment” at the top of the box to pick it up. After that, tap on the middle part of the box to open it, and tap again to start the interaction.
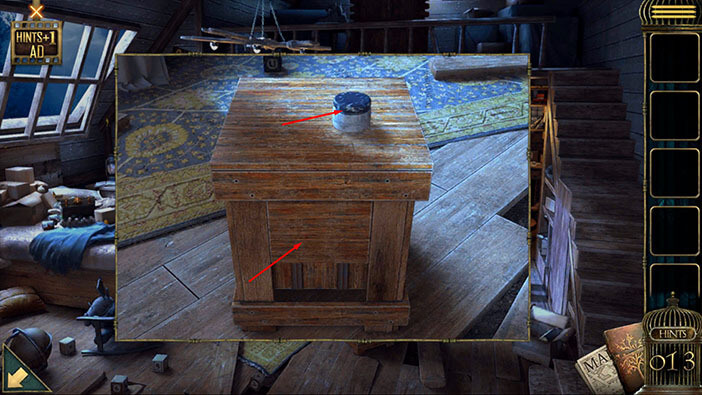
Here, we have another minigame. Our goal is to shuffle the pieces of the puzzle and uncover the small (2 square long) drawer in the middle.
We will do this puzzle in several steps. Let’s begin.
Step 1
There is a small horizontal piece in the middle of the puzzle, and it is partially covering the drawer. Drag this piece to the left. After that, drag the long vertical piece located in the top-middle part of the puzzle, and drag it all the way down.
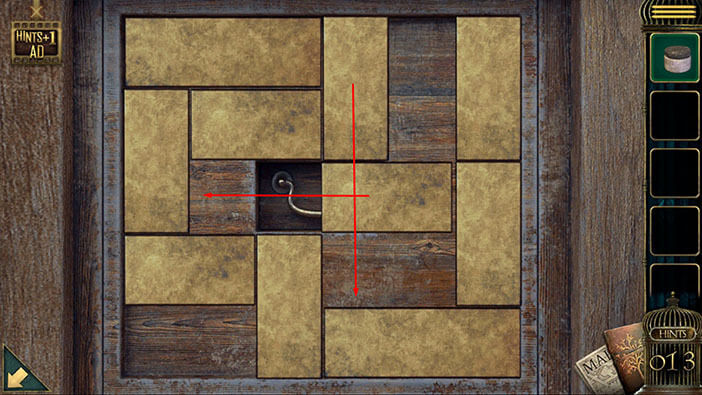
Step 2
Drag the long horizontal piece (located in the top-left corner) one slot (square) to the right. After that, drag the small vertical piece (located on the left side) by one slot up.
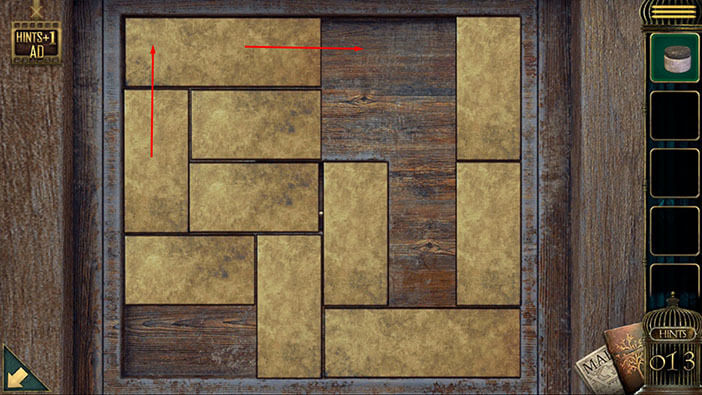
Step 3
Drag the small horizontal piece (located in the middle of the puzzle) one slot to the left. After that, drag the small vertical piece (located in the middle of the puzzle) by one slot up.
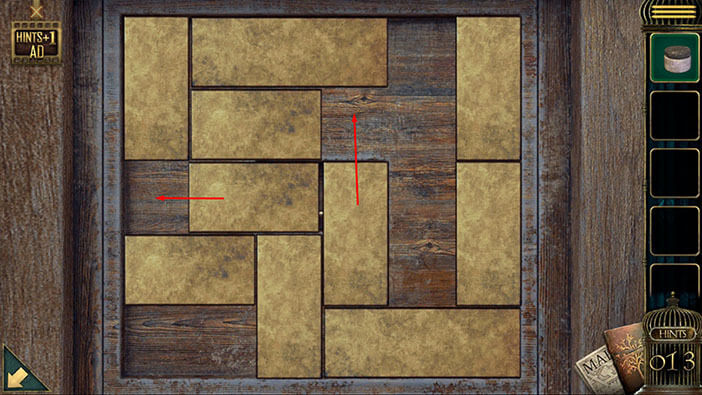
Step 4
Drag the small vertical piece (located just below the drawer (in the middle)) by one slot up. After that, drag the large horizontal piece (located in the bottom right corner) all the way to the left.
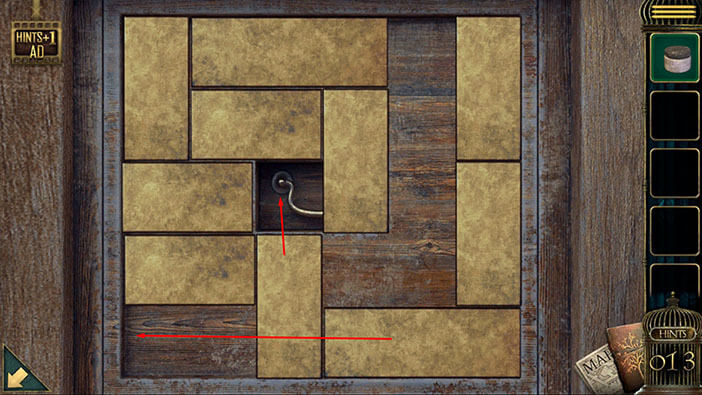
Step 5
Drag the two, small vertical pieces (located on the right side of the puzzle) all the way down. After that, drag the large horizontal piece (located in the top-middle) all the way to the right.
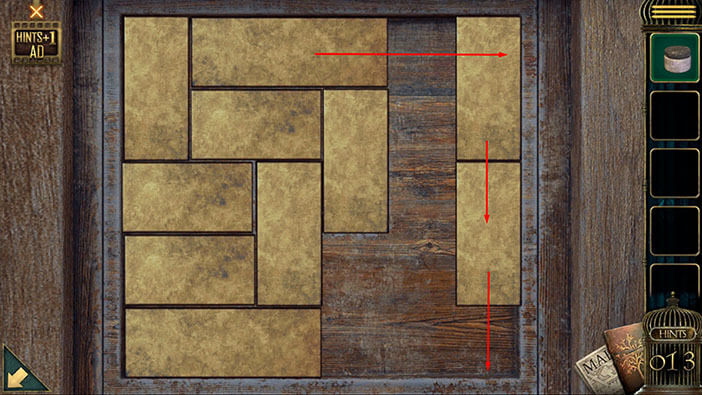
Step 6
Drag the small vertical piece (located in the middle) all the way down. After that, drag the small horizontal piece (located above the drawer) all the way to the right.
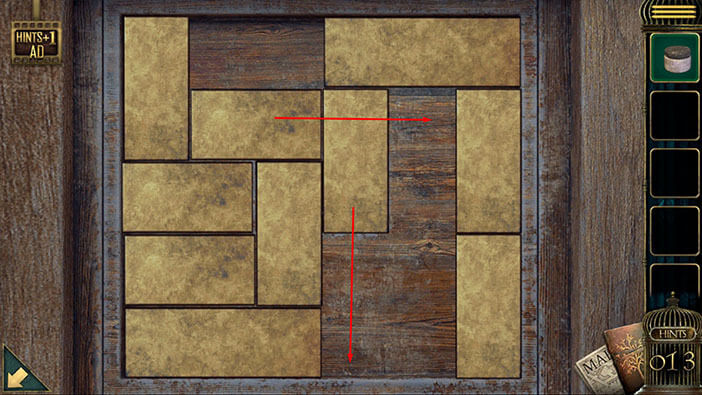
Finally, drag the small vertical piece (that is covering the left side of the drawer) all the way up, and you will solve this puzzle.
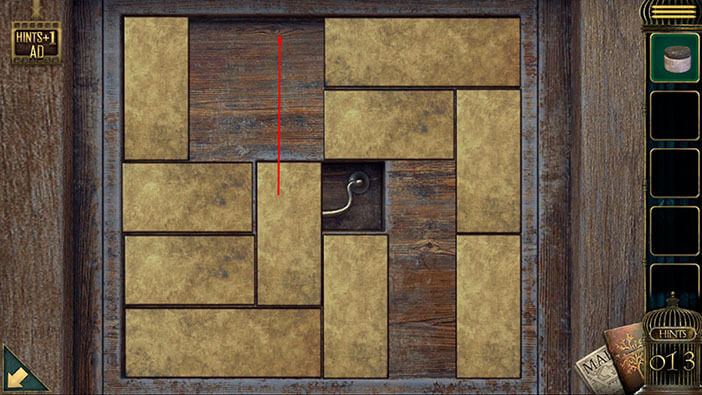
The drawer on the wooden box will open and inside you will find “Green pigment”. Tap on it to pick it up.
After that, tap on the arrow in the lower left corner to go back.
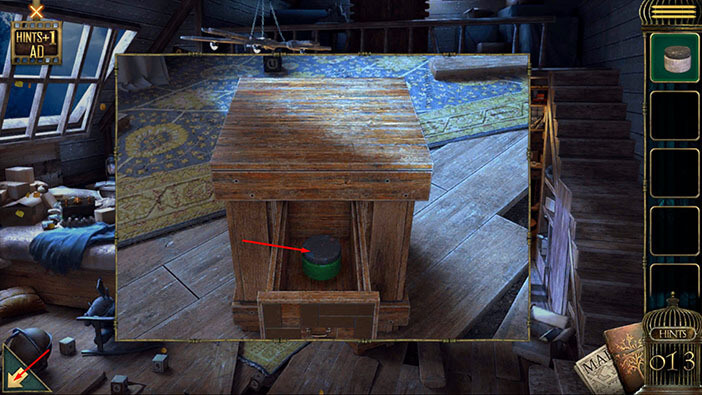
Next, tap on the small cabinet located on the desk on the right, to take a closer look at it.
Here, you will find two items. Tap on the “Paintbrush” and “Hidden Item (Alice) – small statue” to pick them up.
After that, tap on the arrow in the lower left corner to go back.
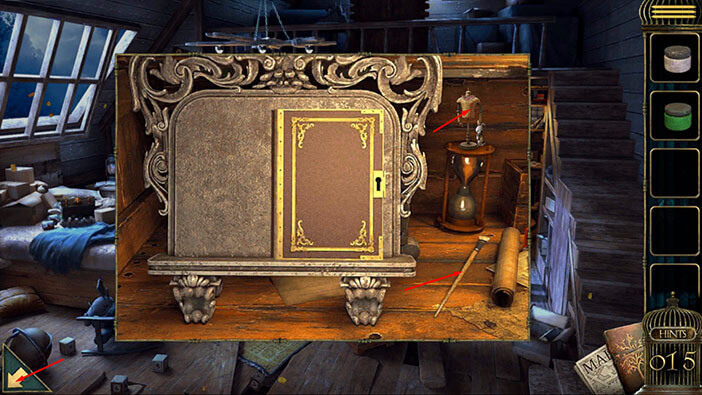
Tap on the second floor to examine it.
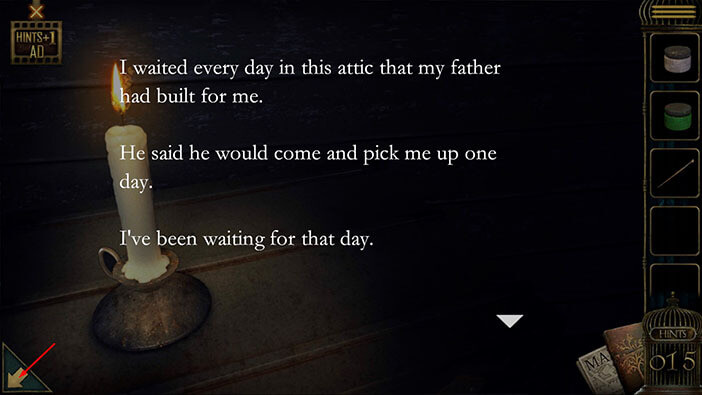
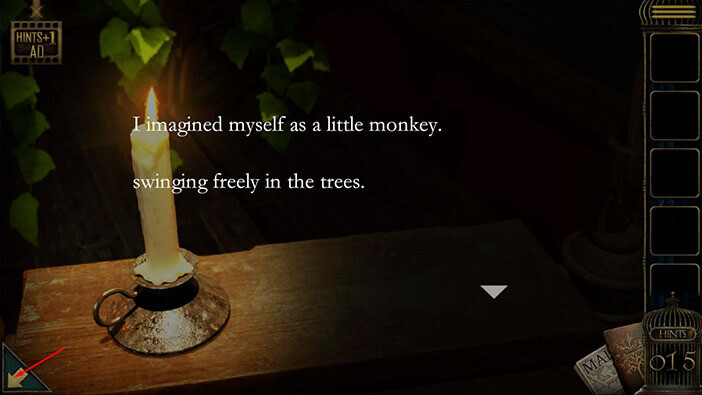
Let’s tap on the candle in the corner to discover another part of the story.
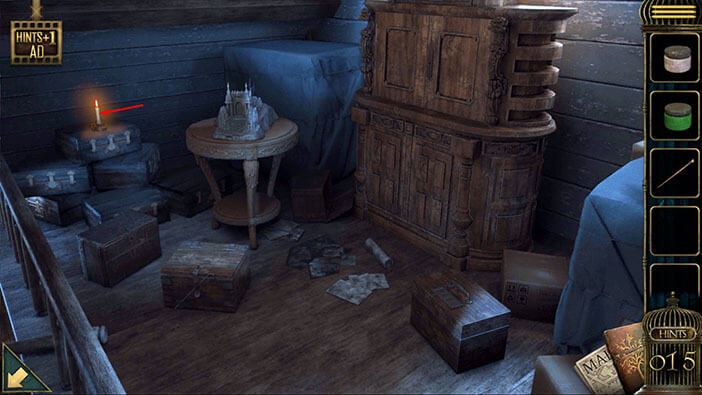
Alice’s father promised that he will let her out of the attic, one day when he felt it was safe to leave. However, it seems that he never showed up, and Alice spent her days alone in the attic. Did he forget about her? We will probably discover the answer to this question at the very end of the game.
Tap on the arrow in the lower left corner to go back.
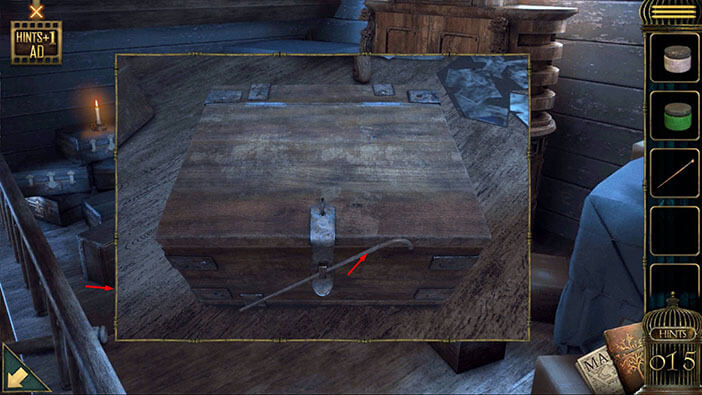
We are still upstairs. Tap on the wooden box in front of the small table, to take a closer look at it.
Tap on the metal bar to pull it out, and you will unlock the box.
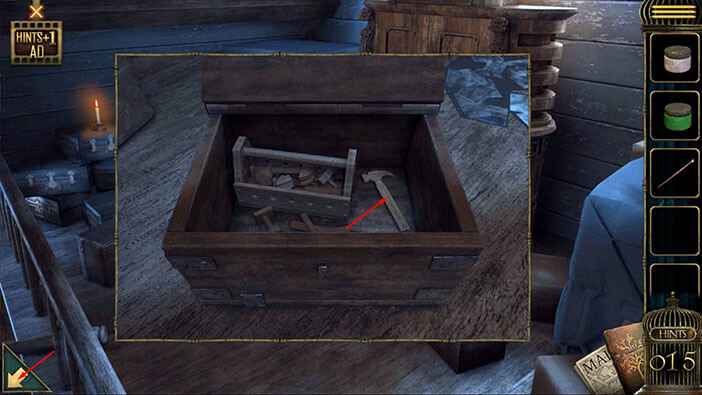
In the box, you will find a “Wooden Hammer” so let’s tap on it to pick it up. After that, tap on the arrow in the lower left corner to go back.
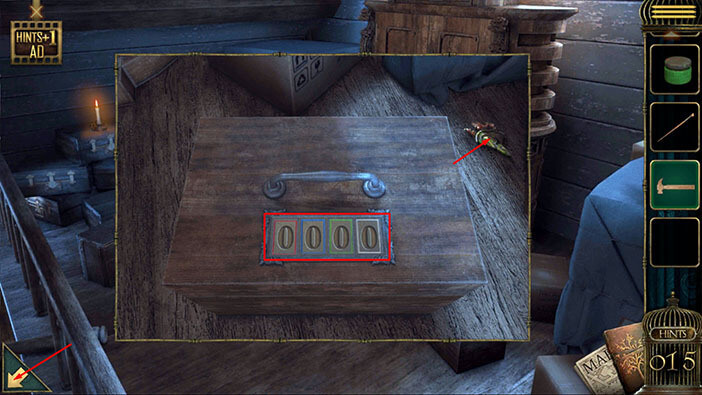
Next, tap on the wooden box on the right to take a closer look at it (we are still upstairs).
You will notice that we will need a four-digit code to open the box. Also, each digit is associated with one of the four colors. Just take note of this box, because we will come back to it a bit later.
For now, tap on the first “Family badge piece (Alice)” to pick it up. After that, tap on the arrow in the lower left corner to go back, downstairs.
Next, tap on the grey panel, located just to the right of the roof window, to take a closer look at it.
Select the “Wooden Hammer” from the inventory and use it to open the panel.
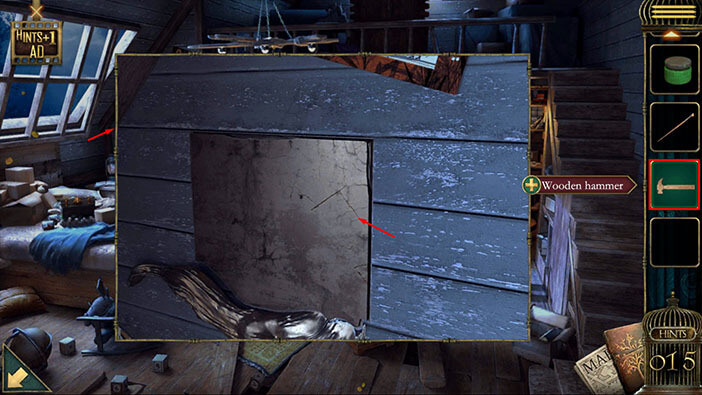
Once you remove the panel, you will see a hand that was hidden behind it. Let’s take a closer look at the hand.
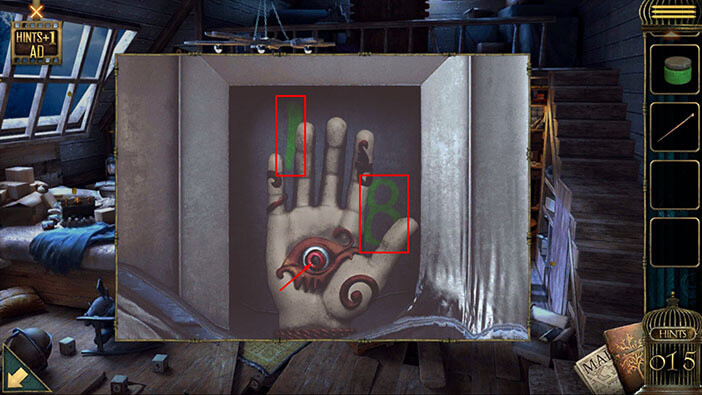
Tap on the eye on the palm of the hand to activate it. The eye will open and you will see two green numbers. Let’s memorize/write down these numbers because we will need this information for the next puzzle. So,
Green numbers = 1, 8.
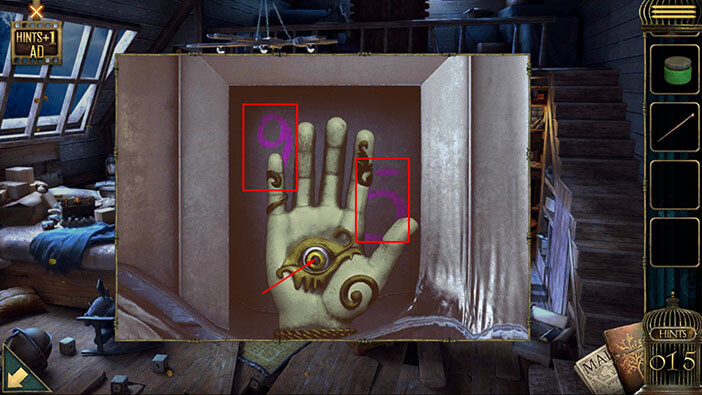
Tap on the eye on the palm of the hand again to activate it. The eye will open again, and we will see two purple numbers. Let’s memorize/write down these numbers.
Purple numbers = 9, 5.
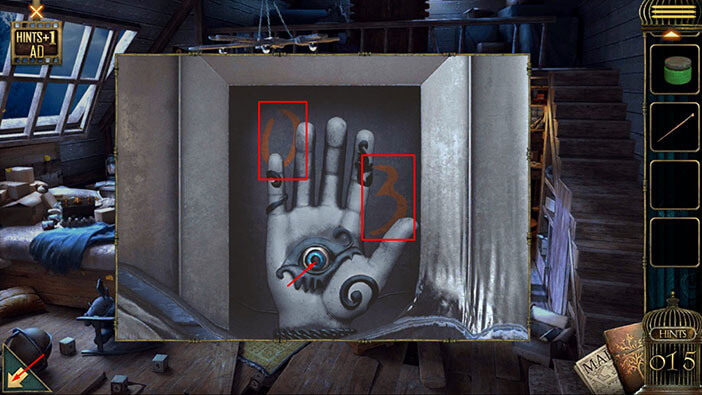
Tap on the eye on the palm of the hand again. The eye will open again, and we will see two orange numbers. Let’s memorize/write down these numbers.
Orange numbers = 0, 3.
Once you’re done, tap on the arrow in the lower left corner to go back.
Next, tap on the top part of the cabinet on the left (next to the board) to take a closer look at it and tap again to start the interaction.
Here, we can see three pairs of numbers, and each pair is associated with one of the three colors, green, purple, and orange. Previously, we discovered three pairs of numbers of the matching color, and these numbers represent the solution for this puzzle. So, let’s enter these numbers. We had,
Green numbers = 1, 8.
Purple numbers = 9, 5.
Orange numbers = 0, 3.
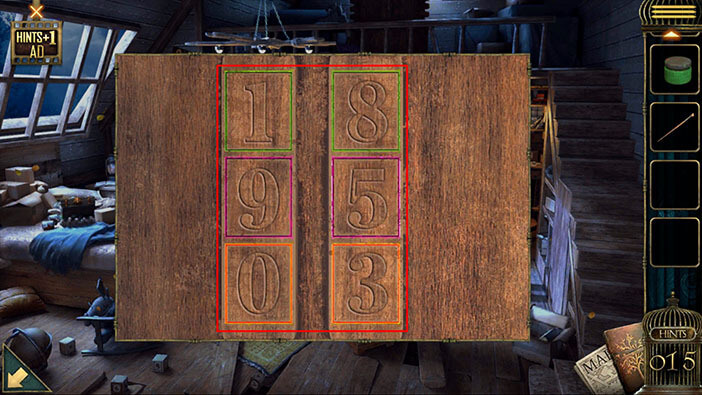
The cabinet will open as soon as you enter the correct numbers, and inside you will find two items. Tap on the “Blue pigment” on the top shelf, and “Paper with tips” on the bottom shelf to pick them up.
After that, tap on the arrow in the lower left corner to go back.
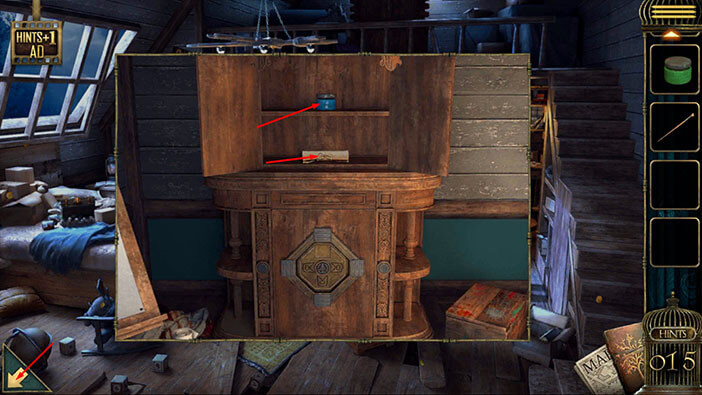
Next, tap on the whiteboard on the left to take a closer look at it. Below the board, on the bottom shelf, you will see a “Red pigment”. So, let’s select the other three pigments (white, green, and blue) from our inventory and place them on the bottom shelf.
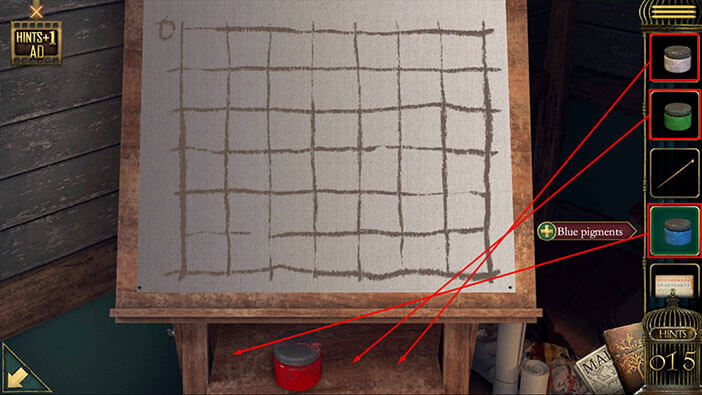
Next, select “Brush” from the inventory and place it on the left side of the grid. You will also notice that the “Paper with tips” is now attached to the top right corner of the paper.
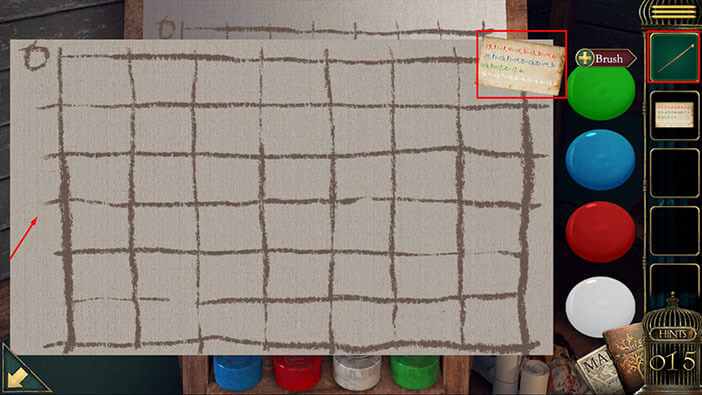
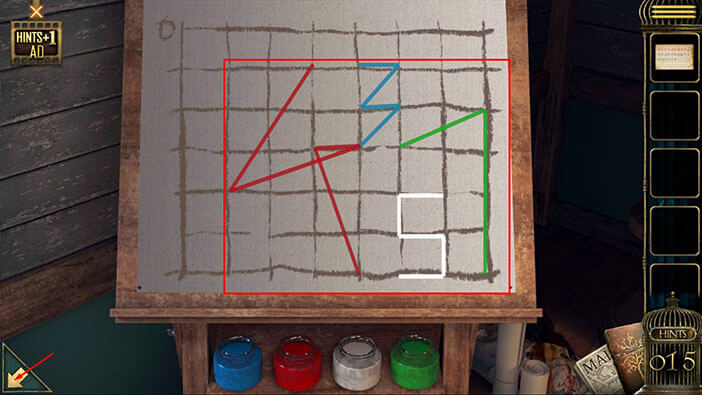
Let’s tap on the paper with tips at the top right corner. As soon as you do that, our character will draw some lines on the paper, following the instructions on the “Paper with tips”.
If you look at these lines, you will notice that lines of each color form a number. Let’s memorize/write down these numbers because they represent the code for the wooden box upstairs. So, we have
Red number 4.
Blue number 3.
Green number 7.
White number 5.
Once you’re done, tap on the arrow in the lower left corner to go back.
Tap on the second floor to examine it. After that, tap on the wooden box on the right to take a closer look at it, and tap again to start the interaction.
We can see that each number is associated with one color. We discovered these numbers when our character wrote them down on the whiteboard, so let’s enter these numbers. We had,
Red number 4.
Blue number 3.
Green number 7.
White number 5.
So, enter “4375”.
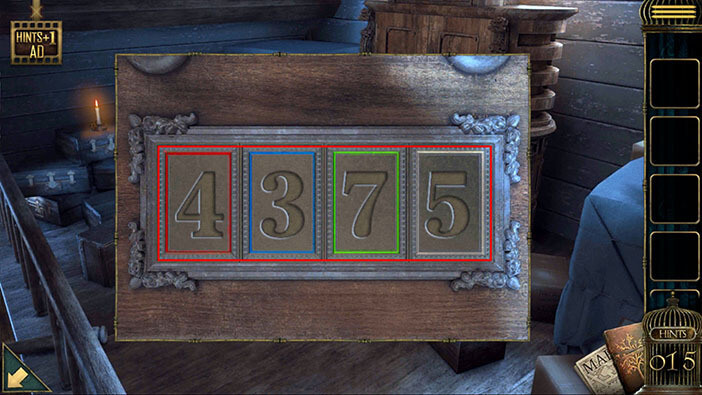
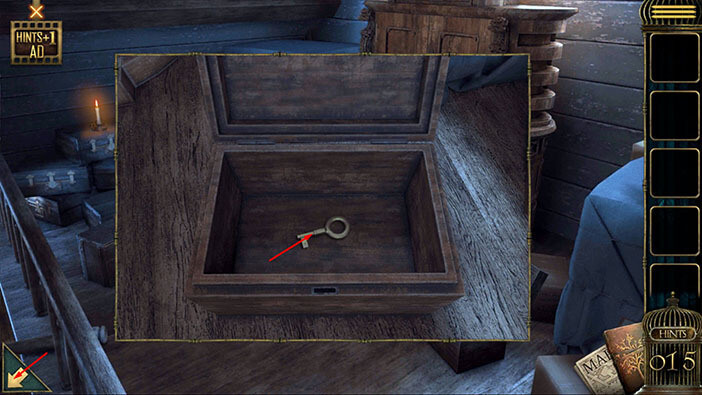
The box will open as soon as you enter the correct password, and inside you will find the “Key”. Tap on it to pick it up.
After that, tap on the arrow in the lower left corner to go back to the first floor.
Next, let’s take another look at the “shiny” cabinet on the desk on the right.
Select the key from the inventory and use it to unlock the cabinet.
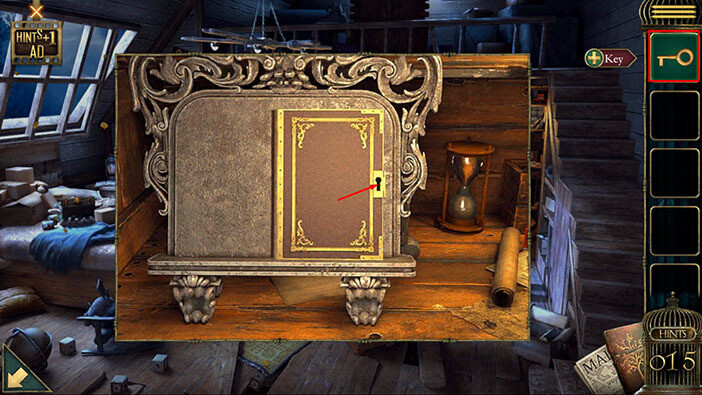
The cabinet door will open and inside you will see the picture of a young girl, probably Alice. This picture represents a single page in a very large book. Tap on this picture to take a look at the next page. After that, tap on the next picture on the right to look at the next page.
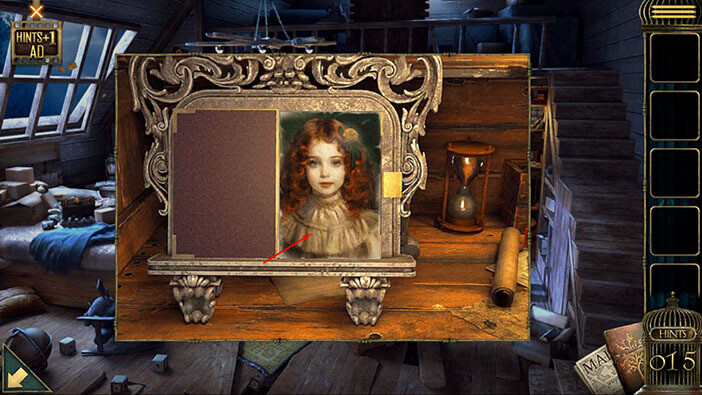
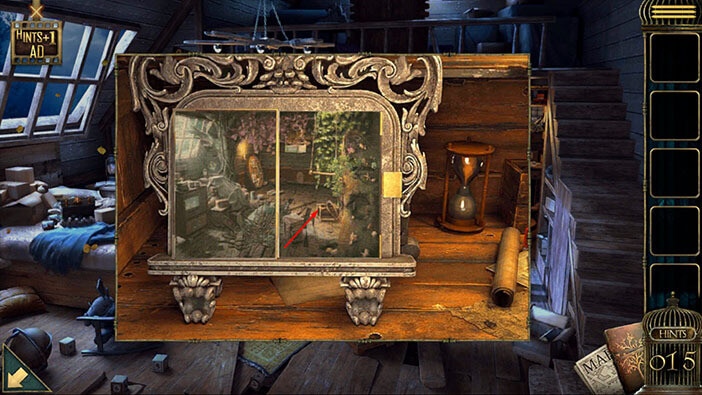
When you tap on this, third picture, you will be teleported into the next room.
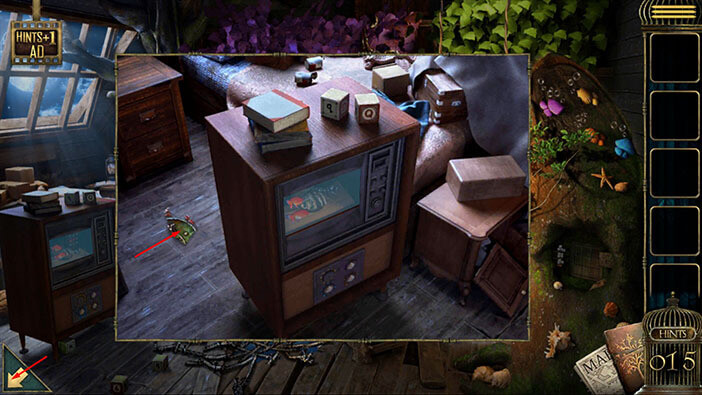
Next, tap on the TV on the left to take a closer look at it.
Just to the right of the TV, you will see a second “Family badge piece (Alice)”. Tap on it to pick it up. We will come back to the TV a bit later and tackle another puzzle.
Once you’re done, tap on the arrow in the lower left corner to go back.
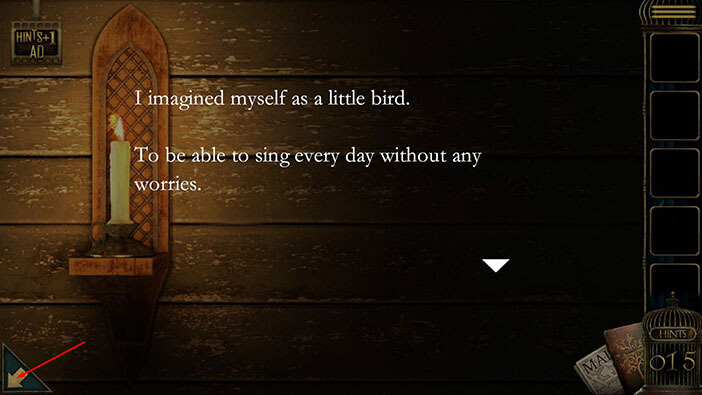
Next, tap on the candle on the left to discover another part of the story.
Alice, locked in the attic, felt like a caged bird. She only wanted to be free and happy.
Tap on the arrow in the lower left corner to go back.
We can tap on the candle on the swing on the right to discover another part of the story. But, this text will only confirm what we already knew, that Alice only wanted to be free.
Again, tap on the arrow in the lower left corner to go back.
Ok, let’s proceed to the next puzzle. If you take a look at the tree stump on the right, you will notice a hole in the middle of the tree. You will also notice some kind of a board with a grid in this hole. Tap on it to take a closer look.
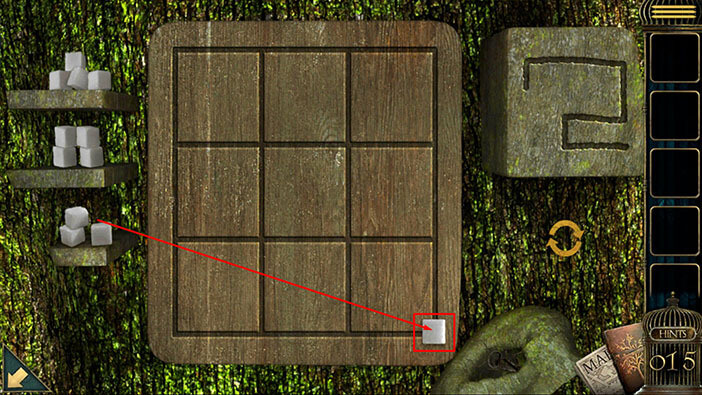
On the left, we can see three shelves with sugar cubes. We will use these cubes to solve this puzzle. But, before we do that, let’s examine everything that we can see on the screen.
In the middle, we can see a grid. The grid has four vertical and four horizontal lines. Here, we are interested in the lines, not the slots/squares of the grid.
Lastly, on the right, we can see a strange shape/path. Our task is quite simple, we should take sugar cubes from the shelves on the left, and use them to form this shape/path on the grid. We will do that in several steps. Let’s begin.
Step 1
We can see that the path on the right begins in the lower left corner. So, take a sugar cube from the bottom shelf on the left and place it on the intersection of the fourth (looking from left to right) vertical line, and the fourth (looking from top) horizontal line.
Step 2
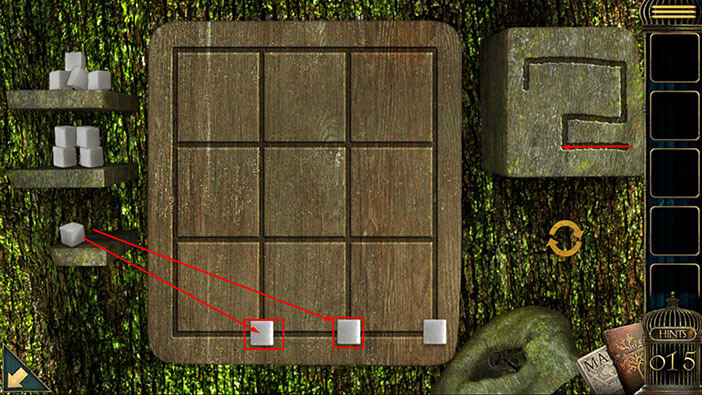
Next, take the sugar cube from the bottom shelf, and place it on the intersection of the third vertical line, and the fourth horizontal line.
After that, take another sugar cube from the bottom shelf, and place it on the intersection of the second vertical line, and the fourth horizontal line.
Step 3
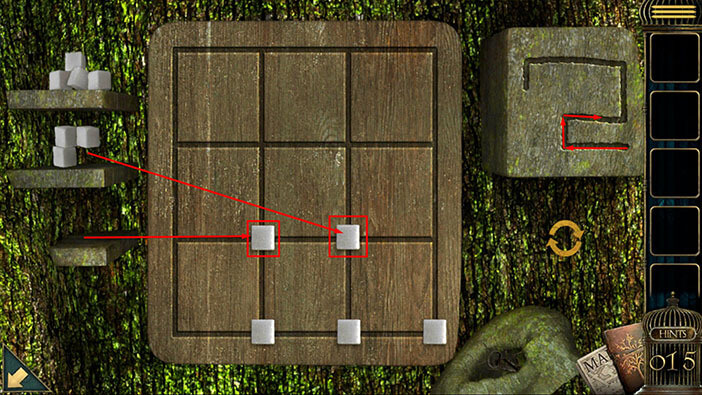
Take the sugar cube from the bottom shelf, and place it on the intersection of the second vertical line, and the third horizontal line.
After that, take a sugar cube from the middle shelf, and place it on the intersection of the third vertical line, and the third horizontal line.
Step 4
Take the sugar cube from the middle shelf, and place it on the intersection of the fourth vertical line, and the third horizontal line.
After that, take another sugar cube from the middle shelf, and place it on the intersection of the fourth vertical line, and the second horizontal line.
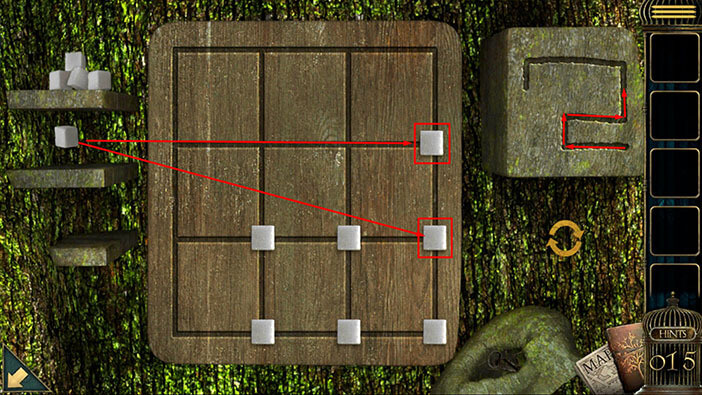
Step 5
Take the sugar cube from the middle shelf, and place it on the intersection of the fourth vertical line, and the first horizontal line.
After that, take a sugar cube from the top shelf, and place it on the intersection of the third vertical line, and the first horizontal line.
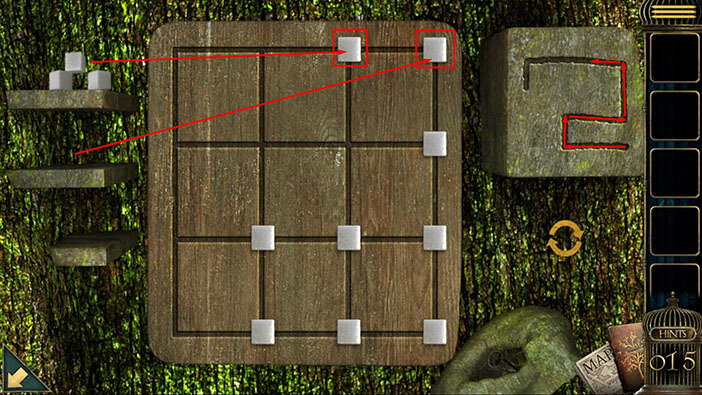
Step 6
Take the sugar cube from the top shelf, and place it on the intersection of the second vertical line, and the first horizontal line.
After that, take another sugar cube from the top shelf, and place it on the intersection of the first vertical line, and the first horizontal line.
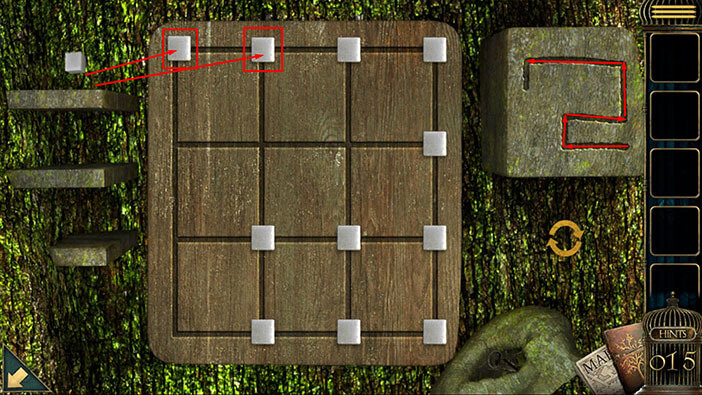
Step 7
Finally, take the sugar cube from the top shelf, and place it on the intersection of the first vertical line, and the second horizontal line. With this step, you will complete the path on the right.
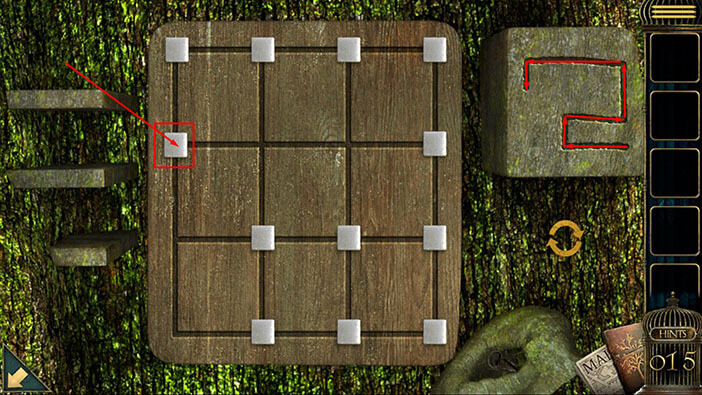
The ant will appear in the bottom right corner of the grid as soon as you place the sugar cubes at the correct spots. The ant will move from sugar cube to sugar cube, eating them as it goes. Behind it, the trail of sugar will remain, and this trail will form the path on the right.
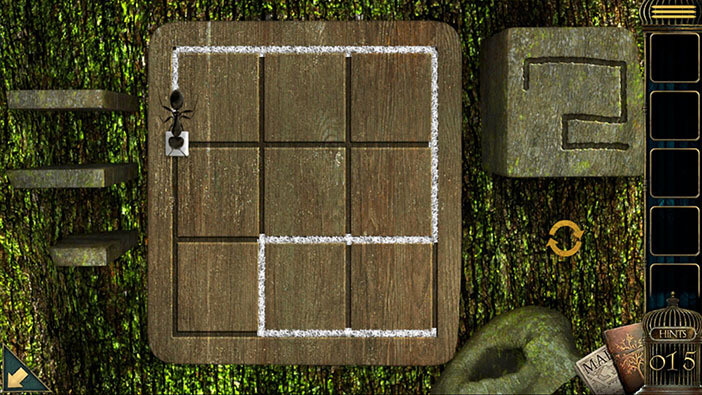
As soon as the ant eats all the cubes, you will unlock the hidden compartment behind the board/grid, and inside you will find “Hexagonal flower tile”.
After that, tap on the arrow in the lower left corner to go back.
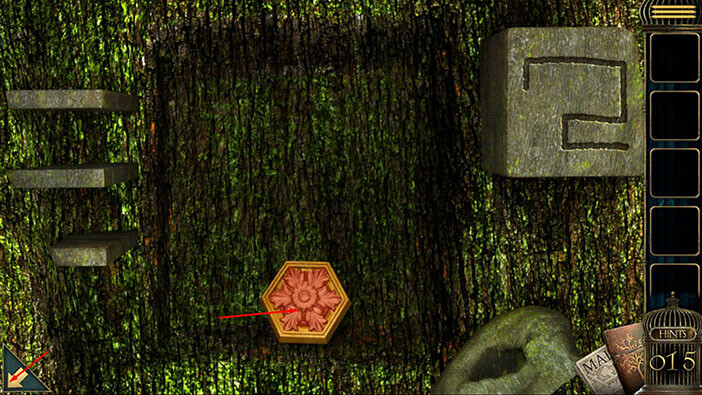
Ok, it’s time for us to proceed to the next puzzle. Tap on the tree stump with birds located in the left corner of the room to take a closer look at it.
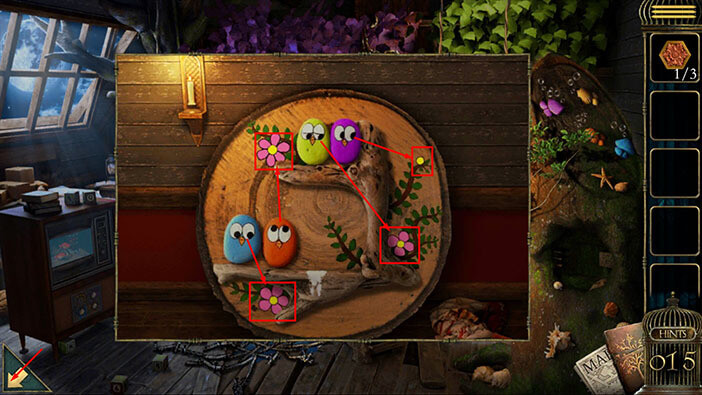
If you take a closer look at the birds, you will notice that each bird is looking at one flower. This represents a hint for the next puzzle, and here we should pay attention to several things. We should memorize/write down the following information.
First, the color of the bird. Next, we should identify the flower that the bird in question is looking at. Lastly, we should count the number of petals of this flower. Let’s do that.
The yellow bird is looking at the flower in the bottom right corner. We can see that this flower has four petals. So,
Yellow = 4
The purple bird is looking at the flower on the right. We can see that this flower doesn’t have any petals. However, the minimum number for the next puzzle is 1, as you will soon see. So,
Purple = 1
The blue bird is looking at the flower in the bottom left corner. We can see that this flower has five petals. So,
Blue = 5
The orange bird is looking at the flower above it. We can see that this flower has six petals. So,
Orange = 6
Once you’re done, tap on the arrow in the lower left corner to go back.
Next, tap on the small wooden box in front of you to take a closer look at it.
Here, we can see four colors at the top of the box. Let’s memorize/write down the order of the colors. We have Yellow/Orange/Blue/Purple. These colors match the colors of the birds that we saw earlier. So, the order of the colors represents the order of the numbers associated with these colors.
Tap on the grid with the numbers below to start the interaction.
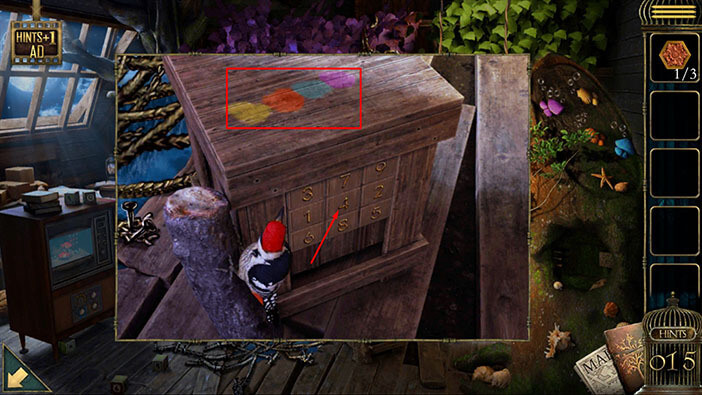
The first color on the box is Yellow. The yellow bird was looking at the flower with four petals, so, our first number is number 4.
Tap on the number 4 and the woodpecker on the left will press it for you.
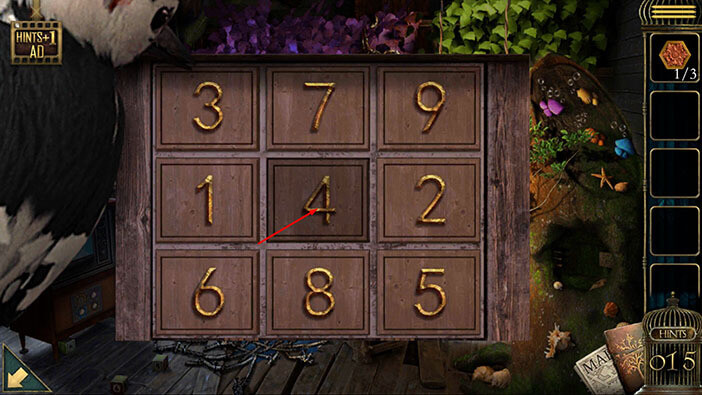
The second color on the box is Orange. The orange bird was looking at the flower with six petals, so, our second number is number 6.
Tap on the number 6.
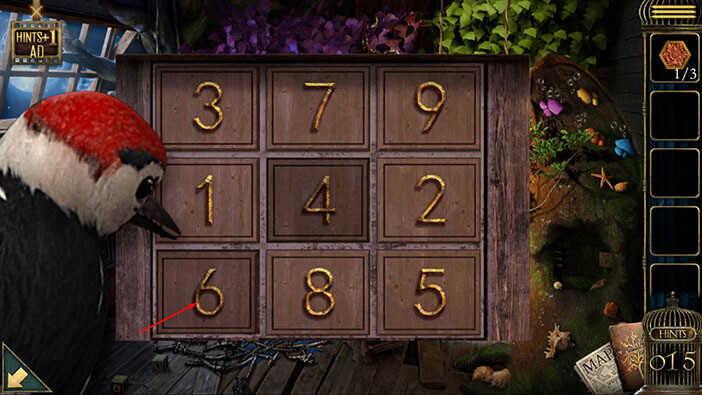
The third color on the box is Blue. The blue bird was looking at the flower with five petals, so, our third number is number 5.
Tap on the number 5.
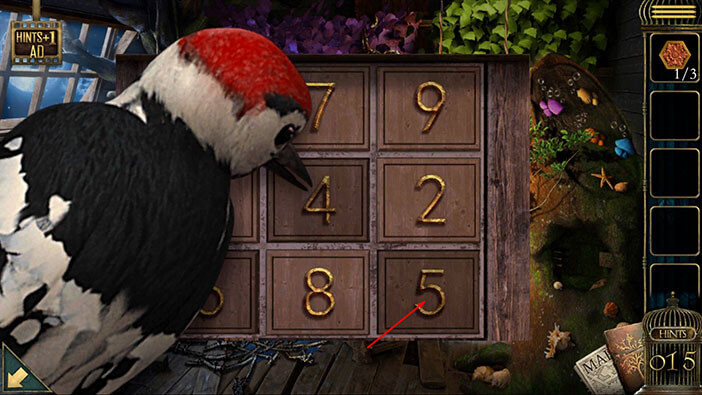
The fourth color on the box is Purple. The purple bird was looking at the flower with no petals. But, as you can see, the number 0 doesn’t exist on the grid. So, let’s our fourth number is probably 1.
Tap on the number 1.
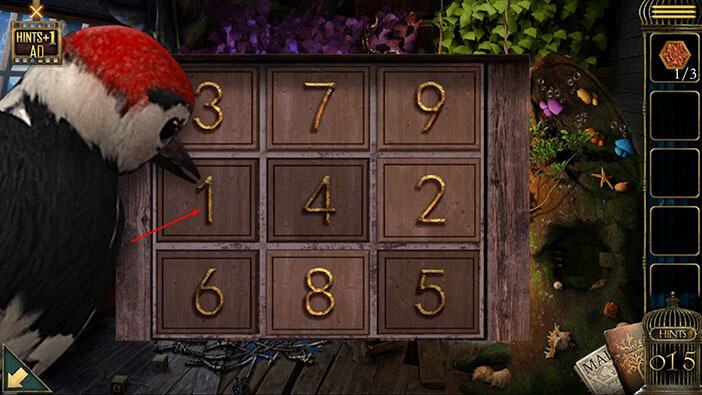
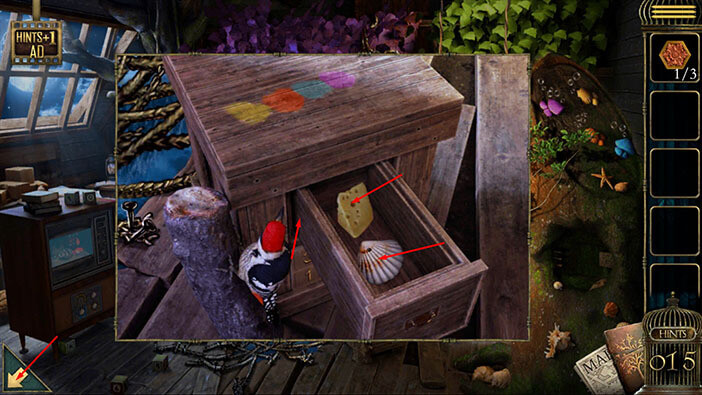
You will unlock the drawer as soon as you enter the correct code. So, let’s tap on the drawer to open it.
Inside you will find two items, “Cheese” and a “Shell”. Tap on them to pick them up.
After that, tap on the arrow in the lower left corner to go back.
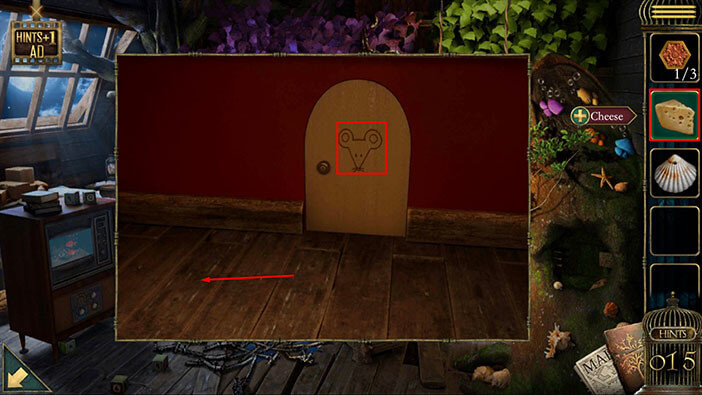
Next, tap on the small door in the back to take a closer look at it.
Here, you will see a drawing of the mouse on the door, so let’s try to lure it out. Select “Cheese” from the inventory and put it on the floor near the door.
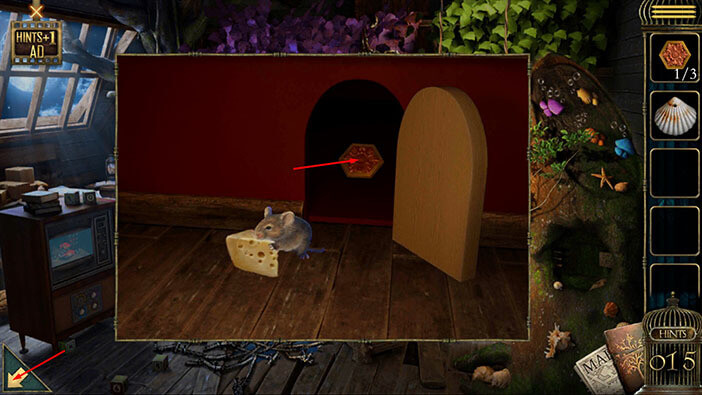
The mouse will be drawn to the smell of cheese, and it will come out to get it. Inside the mouse hole, we can see another “Hexagonal flower tile” so let’s tap on it to pick it up. We now have 2 out of 3 hexagonal tiles.
Once you’re done, tap on the arrow in the lower left corner to go back.
Ok, let’s proceed to the next puzzle. Tap on the TV on the left to take a closer look at it. After that, tap on the lower part of the TV to start the interaction.
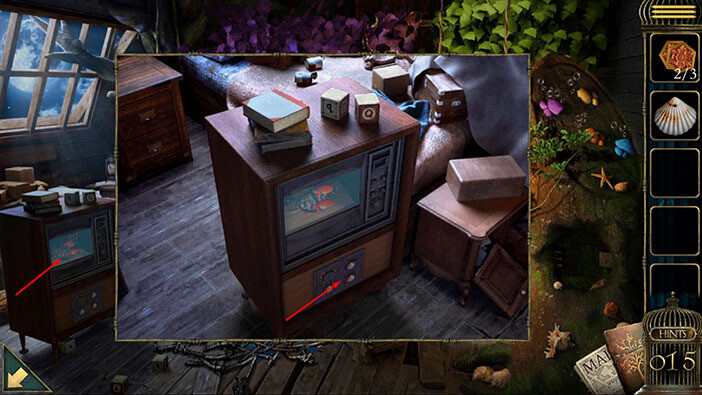
Here, we can see three seashells but the shell in the fourth slot is missing. So, select the “Shell” from the inventory and insert it into the empty slot.
Well, as you probably guessed, we will have to set the four shells/dials to the correct values in order to solve this puzzle. However, we still do not know the correct values, and that’s something that we will have to discover. Also, each shell is associated with a different color, and the colors are yellow, purple, blue, and orange.
Once you’re done, tap on the arrow in the lower left corner to go back.
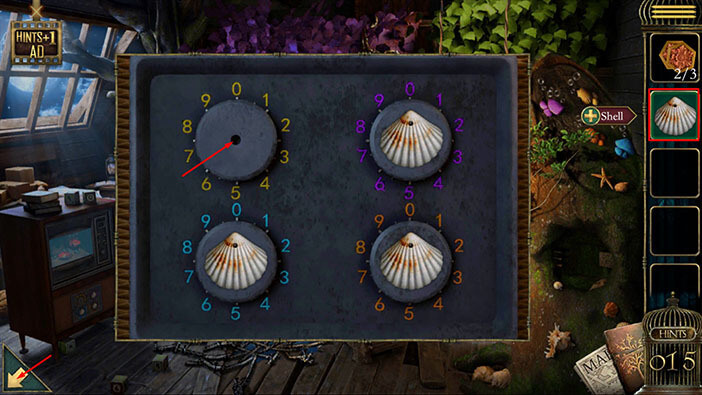
Next, let’s tap on the top of the tree trunk on the right to take a closer look at it.
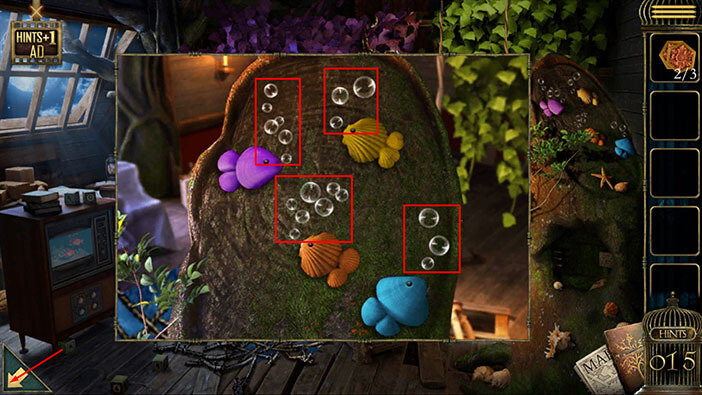
Here, we can see four fish of different colors, yellow, purple, blue, and orange. So, the colors of the fish match the colors of the seashell dials that we saw on TV.
Also, you will probably notice that each fish released a certain number of bubbles, and that’s what we’re interested in. The number of bubbles represents the correct value for seashell dials. So, let’s memorize/write down this information.
Yellow fish = 3 bubbles
Purple fish = 6 bubbles
Orange fish = 7 bubbles
Blue fish = 3 bubbles
Once you’re done, tap on the arrow in the lower left corner to go back.
Let’s go back to the seashell dials on the TV. Tap on the TV to take a closer look at it, then tap on the four dials below the TV to start the interaction.
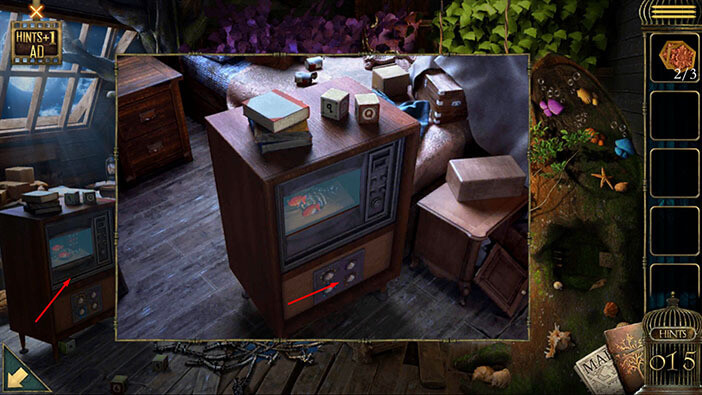
Ok, let’s set the dials to the correct values.
The shell in the top left is surrounded by yellow numbers. The yellow fish had 3 bubbles. So,
The Yellow Shell = 3.
The shell in the top right is surrounded by purple numbers. The purple fish had 6 bubbles. So,
The Purple Shell = 6.
The shell in the bottom left is surrounded by blue numbers. The blue fish had 3 bubbles. So,
The Blue Shell = 3.
Lastly, the shell in the bottom right is surrounded by orange numbers. The orange fish had 7 bubbles. So,
The Orange Shell = 7.
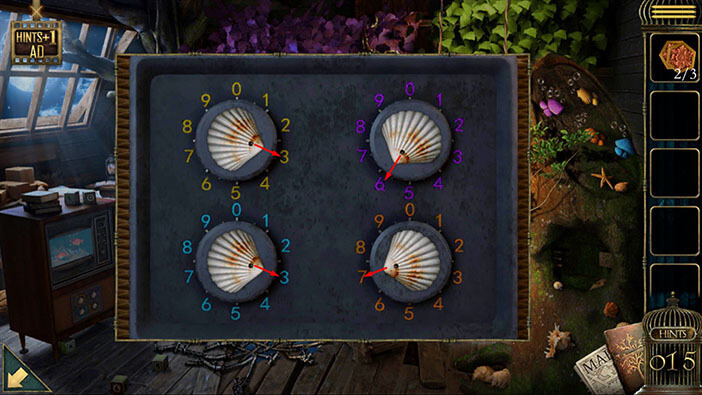
The front of the TV will open as soon as you set the dials to the correct values. So, let’s tap on the front of the TV and see what we can find inside.
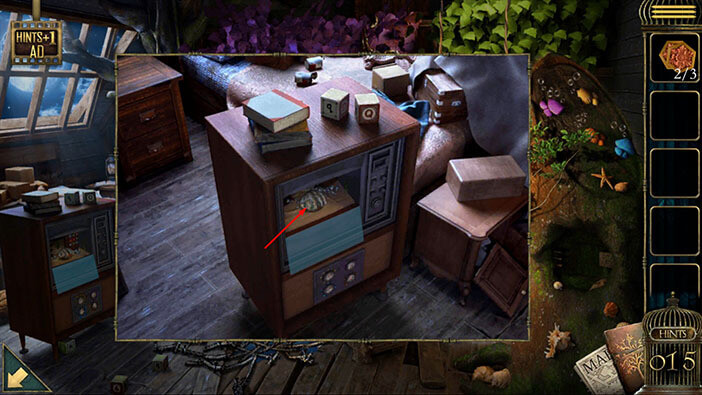
Here, we have two puzzles. To solve the first puzzle, we will have to examine the shelf with the butterflies on the right. For the other puzzle, we will have to examine the shelf with snails on the left.
You will also notice some symbols on the large seashell in front of you. Let’s tap on the symbols to examine them.
In the top row, we can see four snails and the symbol “greater than” between them. For this puzzle, we will have to determine the weights of the snail types and arrange them starting from the heaviest.
But, we will first focus on the butterfly puzzle. In the bottom row, we can see five butterflies, and there is also a symbol below each butterfly. So, let’s take a look at the first symbol (looking from left to right).
Here, we can see a triangle and a white dot in the lower right corner. Memorize this shape and the position of the dot.
Once you’re done, tap on the arrow in the lower left corner to go back.
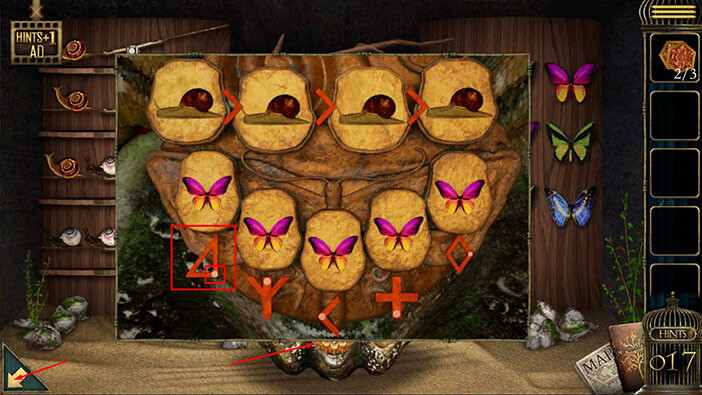
Ok, on the right we have 9 butterflies arranged in the 3×3 grid. Our task is to draw the triangle on this grid, and the dot on the triangle will point to the location of the first butterfly.
In this case, that would be the blue butterfly in the lower right corner of the grid (the third butterfly in the third row). Memorize this information.
Once you’re done, tap again on the symbols on the large seashell.
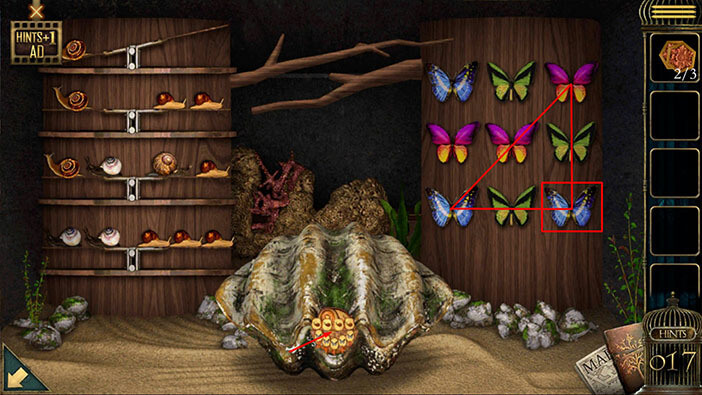
So, we discovered the first type of butterfly. Tap twice on the first slot to set it to Blue Butterfly.
Next, let’s take a look at the next symbol which looks like a trident (kind of). At the top of the middle spike, you will see a white dot. Memorize this shape and the position of the dot.
Once you’re done, tap on the arrow in the lower left corner to go back.
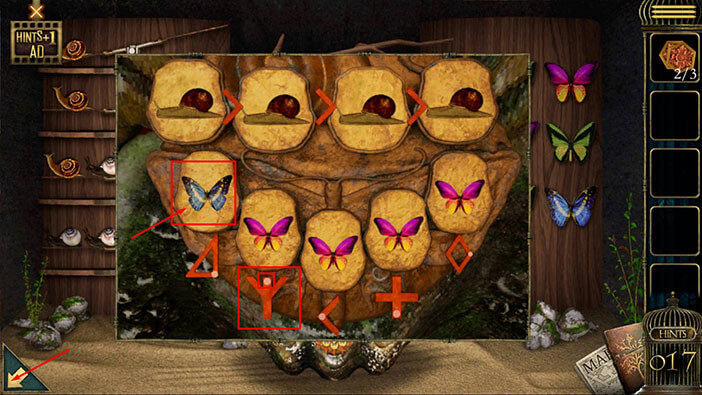
Let’s draw the “trident” symbol on the butterfly grid, and you will notice a green butterfly at the position of the white dot. So, let’s memorize this information, green butterfly.
After that, tap again on the symbols on the large seashell.

We discovered the second type of butterfly. Tap once on the second slot to set it to Green Butterfly.
Let’s take a look at the next symbol which looks like a symbol “lower than”. On the left side of the symbol, you will see a white dot. Memorize this shape and the position of the dot.
Once you’re done, tap on the arrow in the lower left corner to go back.
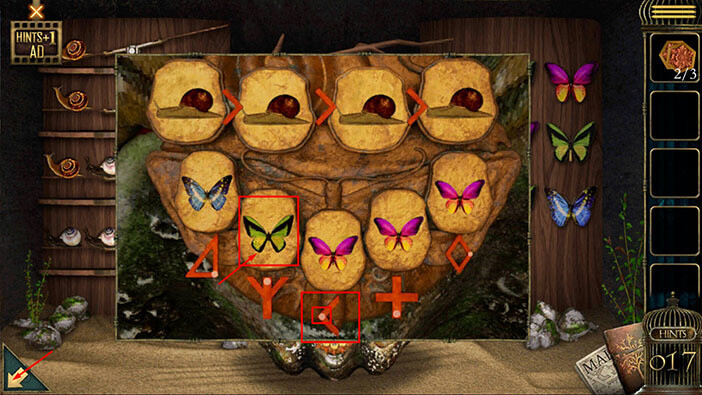
Let’s draw the “lower than” symbol on the butterfly grid, and you will notice a pink butterfly at the position of the white dot. So, let’s memorize this information, pink butterfly.
After that, tap again on the symbols on the large seashell.

We discovered the third type of butterfly, and it’s the pink butterfly. So, we already have the correct type of butterfly in the third slot.
Let’s take a look at the next symbol which looks like a “plus” symbol. On the bottom of the symbol, you will see a white dot. Memorize this shape and the position of the dot.
Once you’re done, tap on the arrow in the lower left corner to go back.
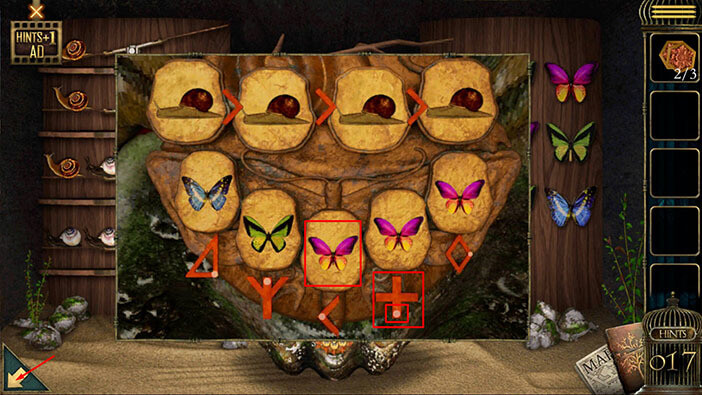
Let’s draw the “plus” symbol on the butterfly grid, and you will notice a green butterfly at the position of the white dot. So, let’s memorize this information, green butterfly.
After that, tap again on the symbols on the large seashell.

We discovered the fourth type of butterfly. Tap once on the fourth slot to set it to Green Butterfly.
Let’s take a look at the next symbol which looks like a “rhombus”. On the right side of the symbol, you will see a white dot. Memorize this shape and the position of the dot.
Once you’re done, tap on the arrow in the lower left corner to go back.
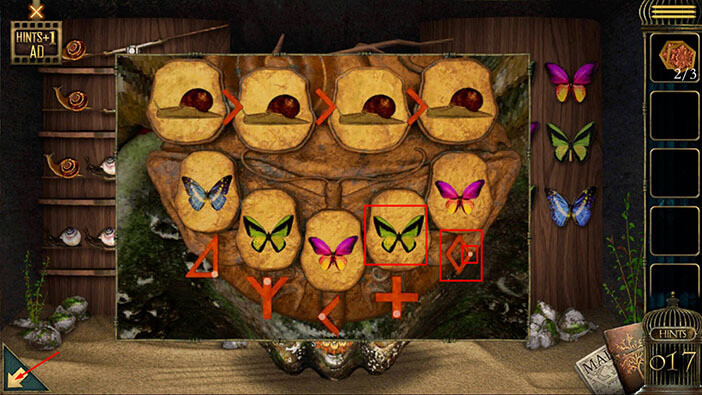
Let’s draw the “rhombus” on the butterfly grid, and you will notice a green butterfly at the position of the white dot. So, let’s memorize this information, green butterfly.
After that, tap again on the symbols on the large seashell.
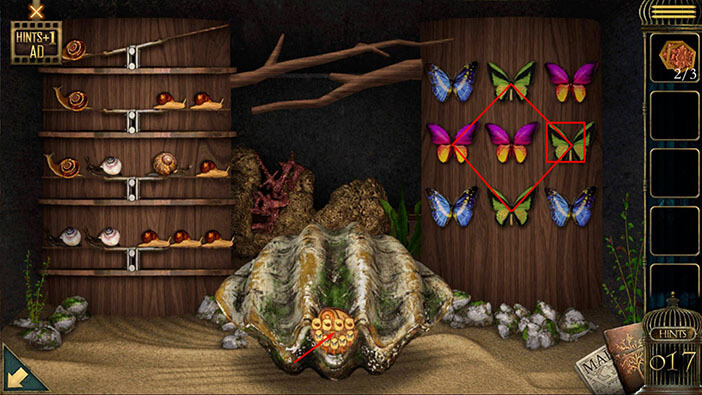
We discovered the fourth type of butterfly. So, tap once on the fourth slot to set it to the green butterfly, and you will solve the first part of the puzzle. However, nothing will happen, because we also have to solve the other part of the puzzle.
Ok, let’s proceed to the second part of the puzzle in which we have to determine the weight of each type of snail. Let’s do that.
Tap on the arrow in the lower left corner to go back.
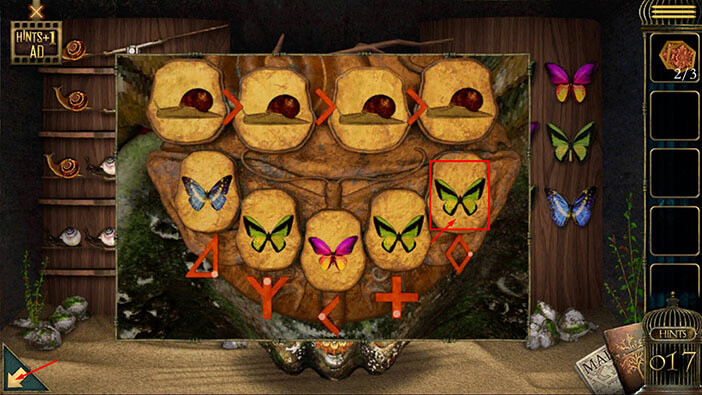
Ok, first let’s take a look at the bottom shelf. On the right side, we can see three snails with the red shell, and two white snails on the left side. The snails are on the seesaw, so two snails on the left must have the same weight as the three snails on the right. So, let’s presume that each of the snails on the right weights 10.
So, 3 red snails = 30. This means, that 2 white snails = 30. One White Snail = 30 / 2 = 15. Let’s write down this information.
Red snail = 10.
White snail = 15.

If we look at the second shelf from the top, we will see two red snails on the right and one snail with the, let’s say, dark yellow shell on the left. So, two red snails = 20. This means that,
Dark Yellow snail = 20 (2x 10). Memorize/write down this information.
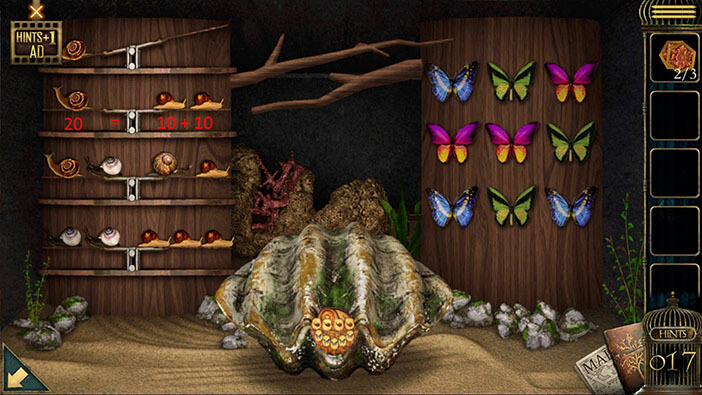
Lastly, if we take a look at the third shelf from the top, we will see one Dark Yellow snail (20) and one White snail (15) on the left. So, the weight on the left side of the shelf is 20 + 15 = 35.
The weight on the right side is also 35. On the right, we have Brown Snail (?) and the Red Snail (10). With this information, we can easily determine the weight of the Brown Snail.
Brown snail = 35 – 10 = 25. Let’s write down this information.
Once you’re done, tap again on the symbols on the seashell to start the interaction.

Ok, let’s arrange the snails by weight starting with the heaviest.
Brown snail (25) > Dark Yellow snail (20) > White snail (15) > Red snail (10).
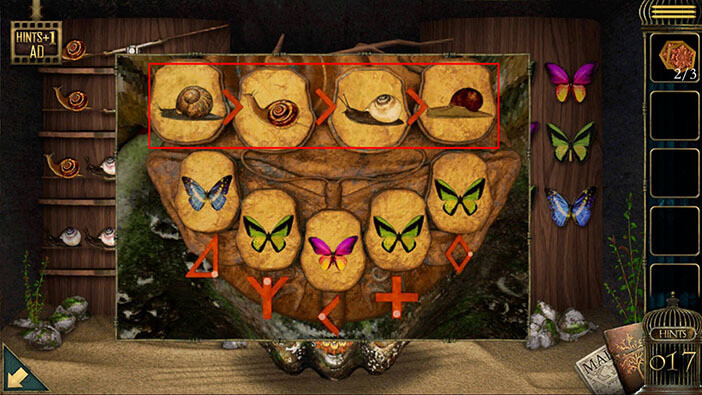
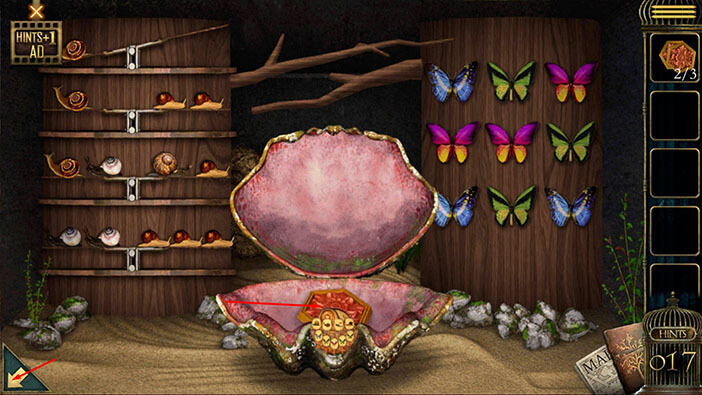
The seashell will open when you solve both puzzles and inside you will find another “Hexagonal flower tile”. Tap on it to pick it up.
After that, tap on the arrow in the lower left corner to go back.
Next, tap on the box below the monkey (located below the purple flowers on the ceiling) to take a closer look at it, and tap again to start the interaction.
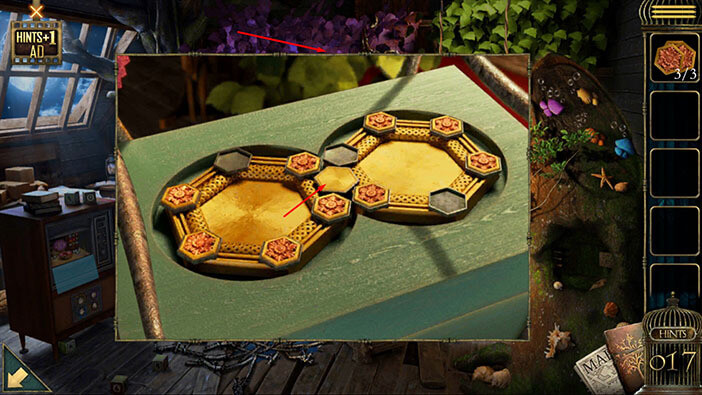
Here, we can see a picture of an old man in the middle slot. We can also see three empty slots, so select the three “Hexagonal flower tiles” from the inventory and put them into the empty slots.
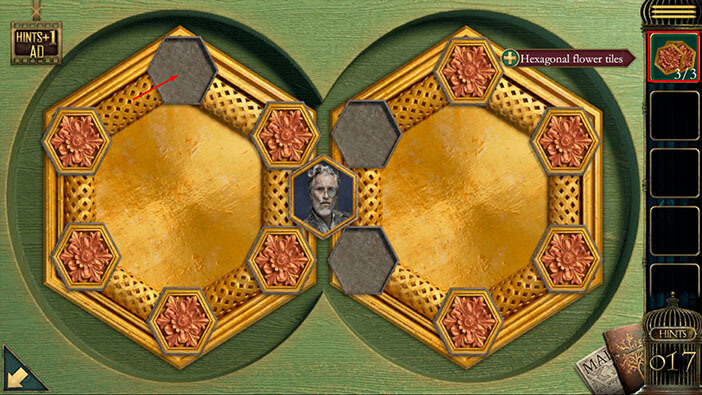
Now, we have another minigame. Our task is to find two pictures that match the picture in the middle. We will do this puzzle in several steps. Let’s begin.
Step 1
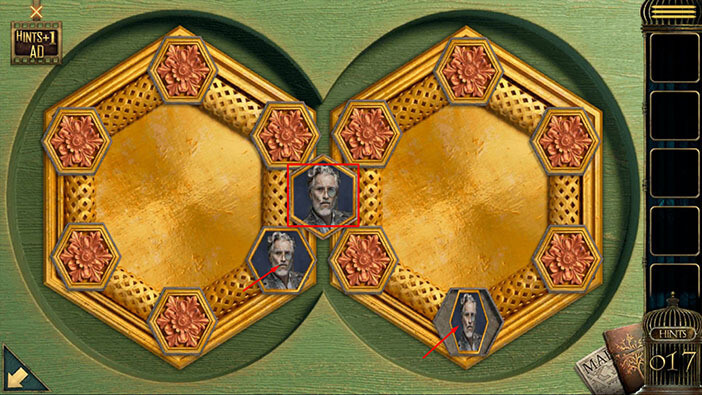
Here, we’re looking for two pictures of an old man (probably Jason’s father). The first picture is located on the left side of the puzzle, in the bottom right slot. The second picture is located on the right side, in the bottom slot. Tap on these two slots.
Step 2
Next, we are looking for two pictures of a dark-haired man (probably Jason). The first picture is located on the left side of the puzzle, in the top right slot. The second picture is located on the right side, in the bottom right slot. Tap on these two slots.
Step 3
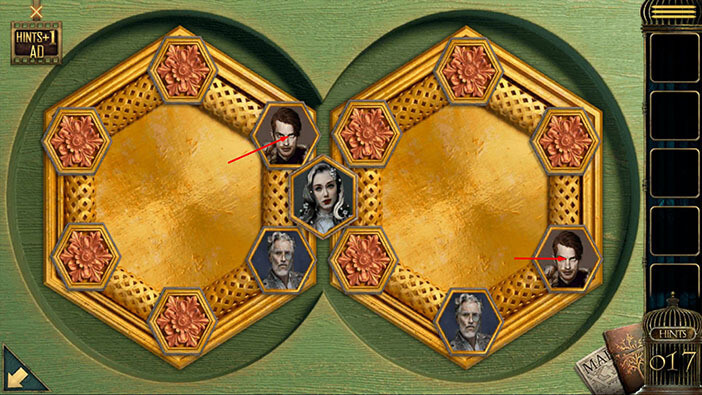
Next, we are looking for two pictures of a silver-haired woman (probably Jason’s wife). The first picture is located on the left side of the puzzle, in the top left slot. The second picture is located on the right side, in the top slot. Tap on these two slots.
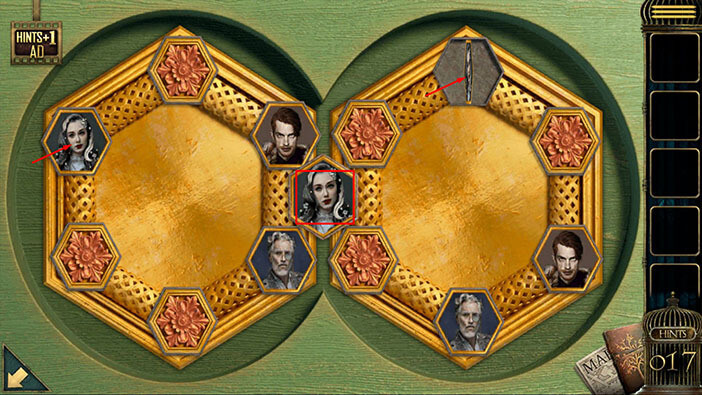
Step 4
Next, we are looking for two pictures of a red-haired woman (probably Jason’s mother). The first picture is located on the left side of the puzzle, in the bottom left slot. The second picture is located on the right side, in the bottom left slot. Tap on these two slots.
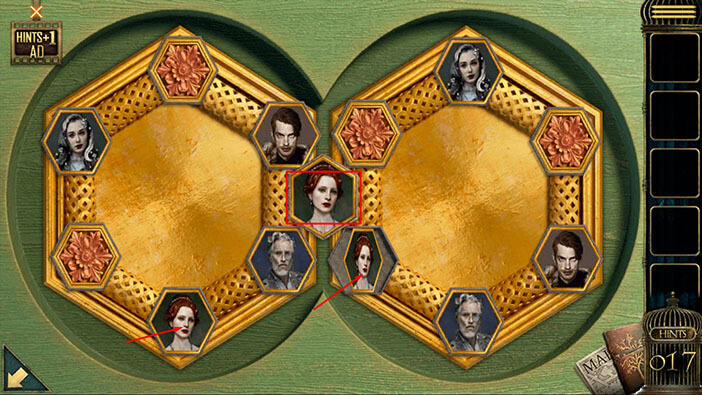
Step 5
Next, we are looking for two pictures of a young girl (probably Jason’s daughter). The first picture is located on the left side of the puzzle, in the top slot. The second picture is located on the right side, in the top right slot. Tap on these two slots.
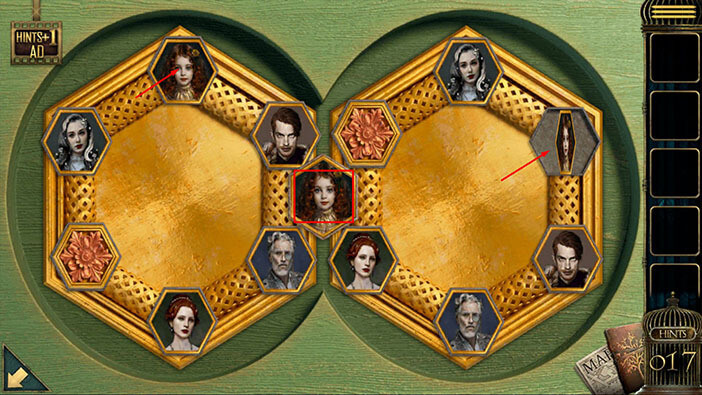
Step 6
Lastly, we are looking for two pictures of the letter “R”. Tap on the last two slots.
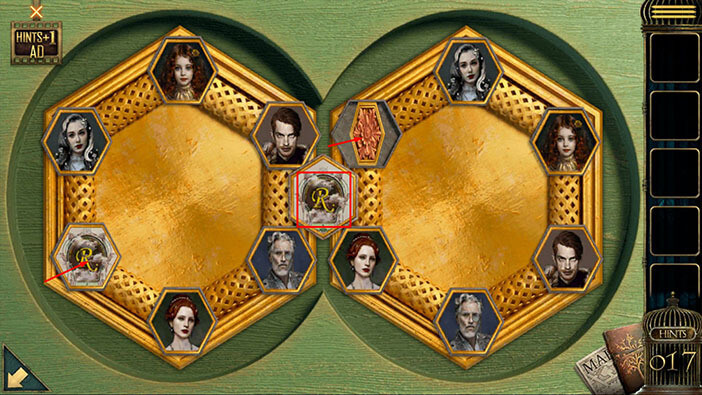
The box will open as soon as you solve the puzzle, and inside you will find “Game Cube”. Tap on it to pick it up. You will be automatically transferred to the second row (we’ve been here before).
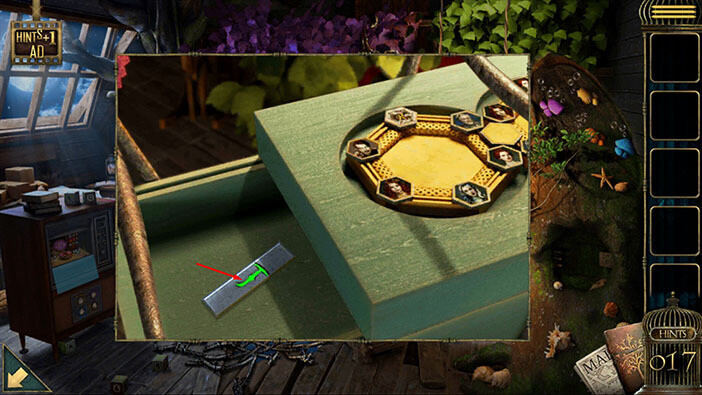
Next, tap on the large cabinet located behind the whiteboard to take a closer look at it, and tap again on the bottom part of the cabinet to start the interaction.
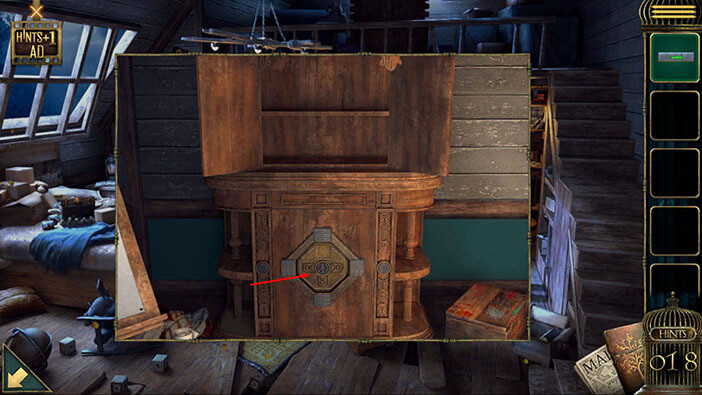
In this puzzle, we can see four containers, and each container should have three smaller pieces. But, one piece is missing from the container on the bottom, so select the “Game Cube” from the inventory and insert it into the empty slot.
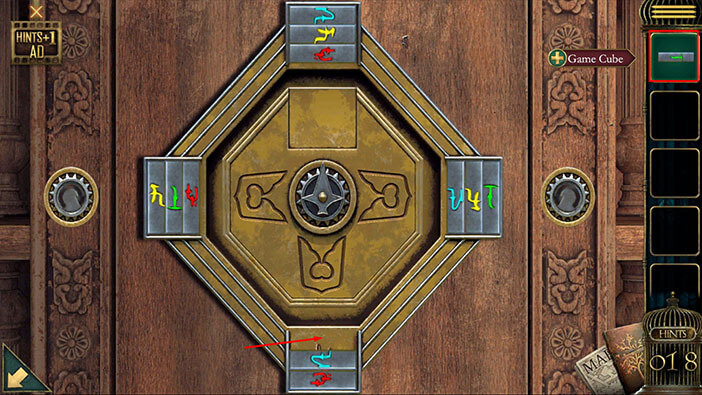
Our next task is to transfer the pieces to the container of the matching color. We can remove the pieces from the four containers by placing them into the small container in the middle. If you remove at least two pieces from the container, you will see the sign and the color of that container. The top container is blue, the right container is green, the bottom container is red, and the left container is yellow.
So, let’s transfer the pieces to the containers of the matching color. We will do this puzzle in several steps. Let’s begin.
Step 1
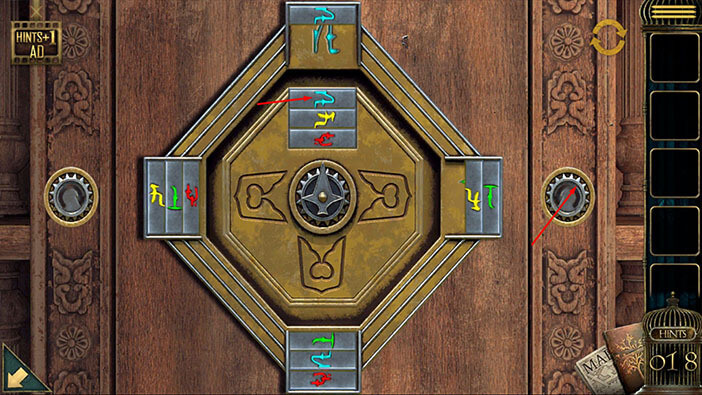
Tap on the first two pieces in the top container to pick them up and you will notice a blue symbol in this container. After that, tap on the gear on the left to rotate the inner part to the right.
After that, tap on the first (piece) in the container on the right to pick it up.
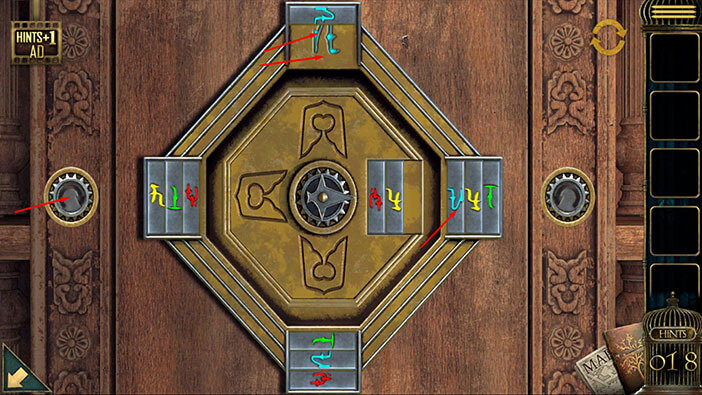
Step 2
Tap on the gear on the right to rotate the inner part to the left. After that, tap on the blue piece to transfer it to the top (Blue) container.
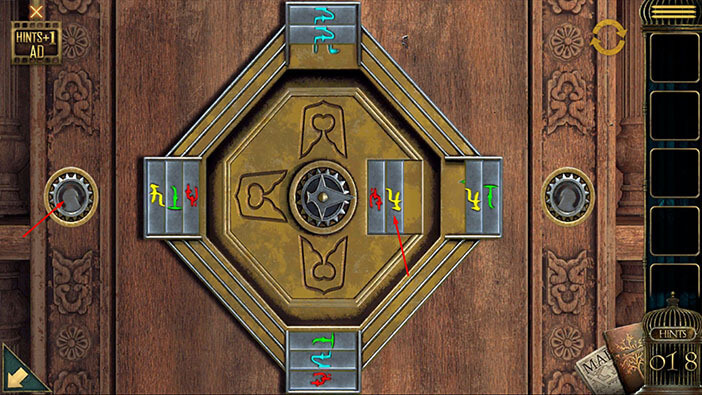
Step 3
Tap on the gear on the left to rotate the inner part to the right. After that, tap on the yellow piece to transfer it to the right (Yellow) container.
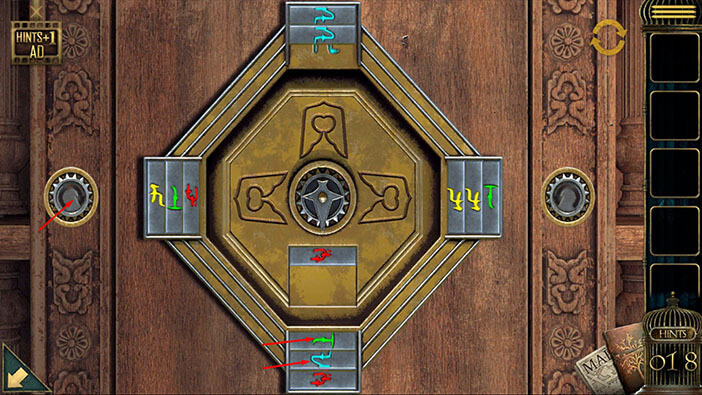
Step 4
Tap on the gear on the left to rotate the inner part to the right. After that, tap on the green and blue pieces in the bottom container to pick them up.
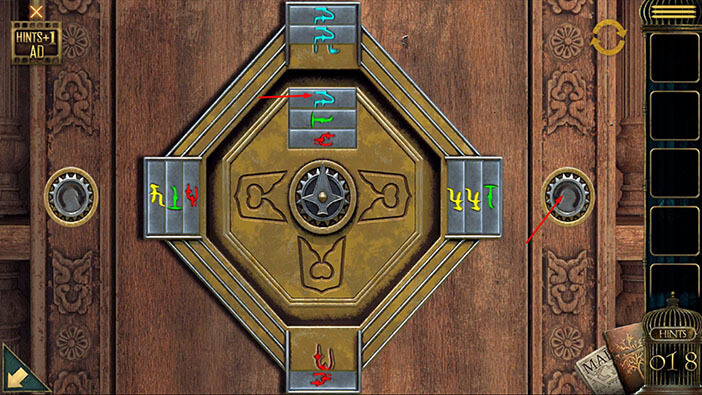
Step 5
Next, tap twice on the gear on the right to rotate the inner part to the top container. After that, tap on the blue piece to transfer it to the top (Blue) container.
Step 6
Next, tap once on the gear on the right to rotate the inner part to the left container. After that, tap on the red piece to pick it up.
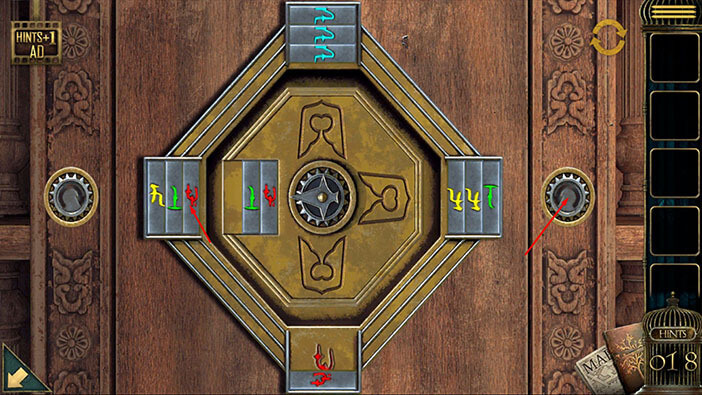
Step 7
Next, tap once on the gear on the right to rotate the inner part to the bottom container. After that, tap on the red piece to transfer it to the bottom container.
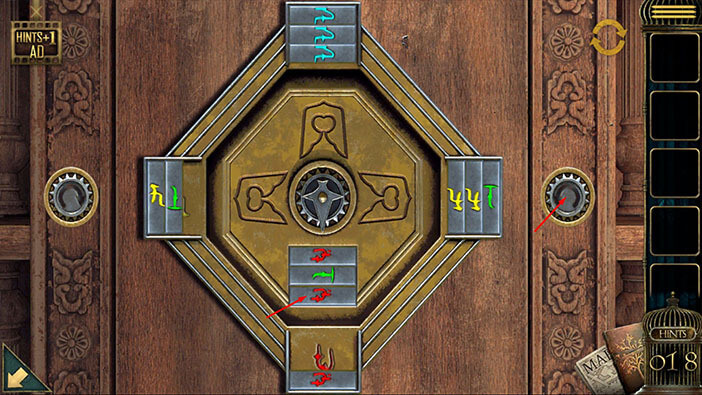
Step 8
Next, tap once on the gear on the left to rotate the inner part to the left container. After that, tap on the green piece to transfer it to the left container.

Step 9
Next, tap once on the gear on the right to rotate the inner part to the bottom container. After that, tap on the red piece to transfer it to the bottom container.
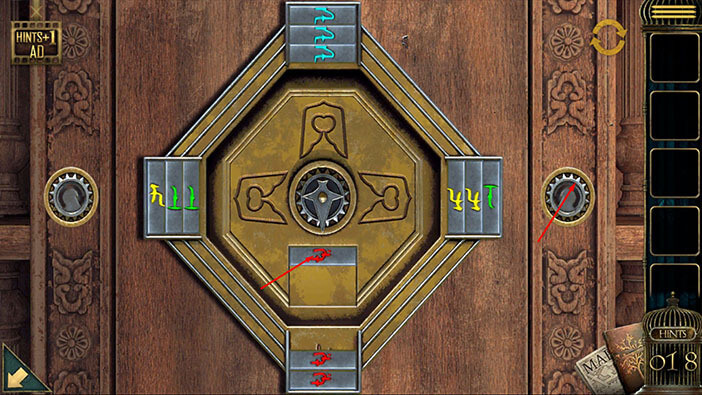
Step 10
Next, tap once on the gear on the left to rotate the inner part to the left container. After that, tap on the two green pieces to pick them up.
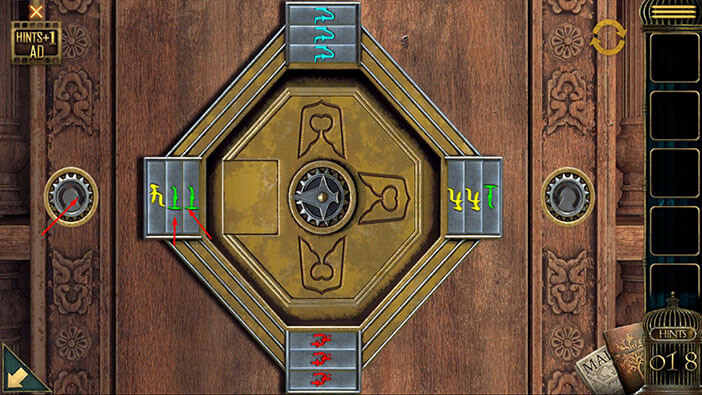
Step 11
Next, tap twice on the gear on the left to rotate the inner part to the right container. After that, tap on the yellow piece to pick it up.
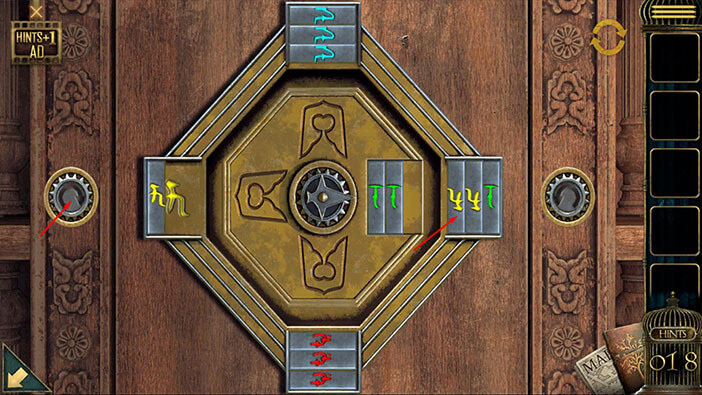
Step 12
Next, tap twice on the gear on the right to rotate the inner part to the left container. After that, tap on the yellow piece to transfer it to the left container.
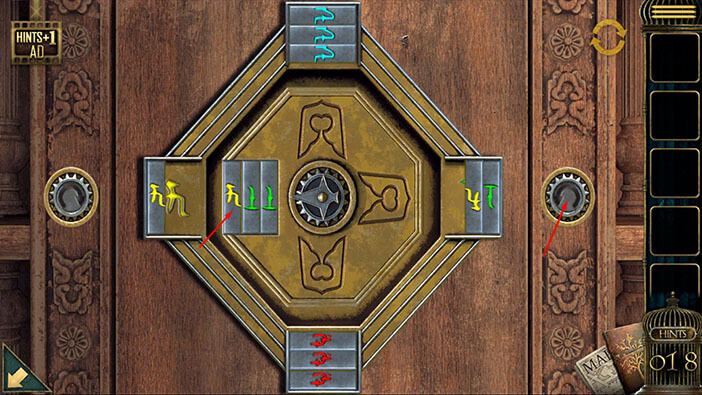
Step 13
Next, tap twice on the gear on the left to rotate the inner part to the right container. After that, tap on the yellow piece to pick it up.

Step 14
Next, tap twice on the gear on the right to rotate the inner part to the left container. After that, tap on the yellow piece to transfer it to the left container.
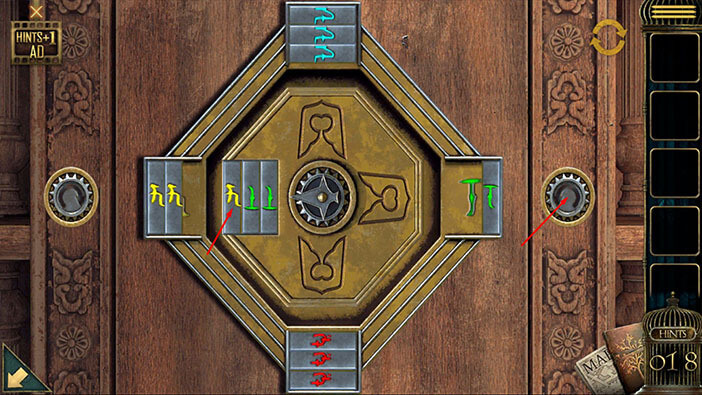
Step 15
Finally, tap twice on the gear on the left to rotate the inner part to the right container. After that, tap on the two green pieces to transfer them to the right container.
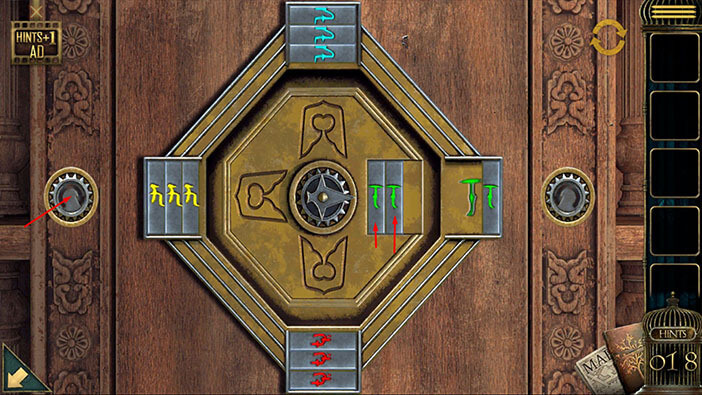
You will open the bottom part of the cabinet by solving the previous puzzle, and inside you will find a “Rocker” to pick it up.
After that, tap on the arrow in the lower left corner to go back.
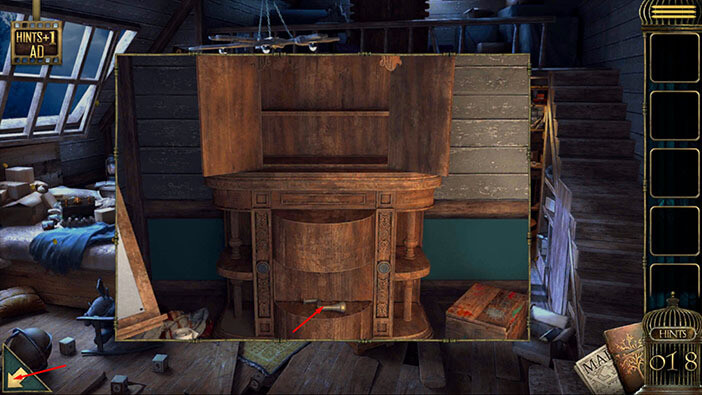
Next, tap on the wooden box located on the bed on the left, to take a closer look at it.
Select the “Rocker” from the inventory and insert it into the slot on the left side of the box.
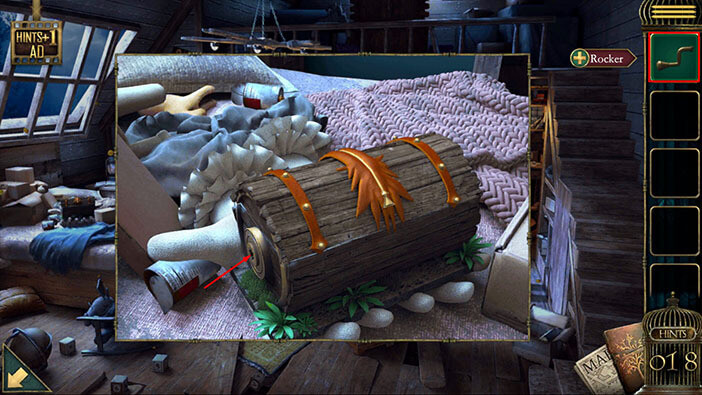
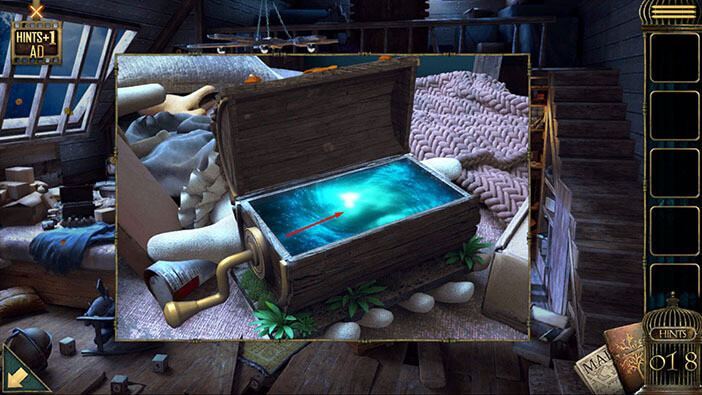
Your character will use the “Rocker” to open the box, and inside you will find a strange blue light. This light is actually a portal to the next room, so let’s go through it and see what’s on the other side.
You will be transferred to an amusement park that only exists in Alice’s memory.
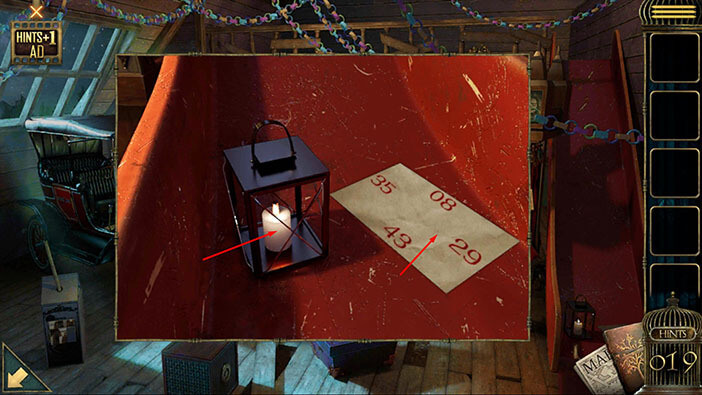
Let’s explore this room. Tap on the lantern in the right corner of the room to take a closer look at it.
Just to the right of the lantern, you will see a note. Tap on it to pick it up and “Paper with tips” will be added to your inventory.
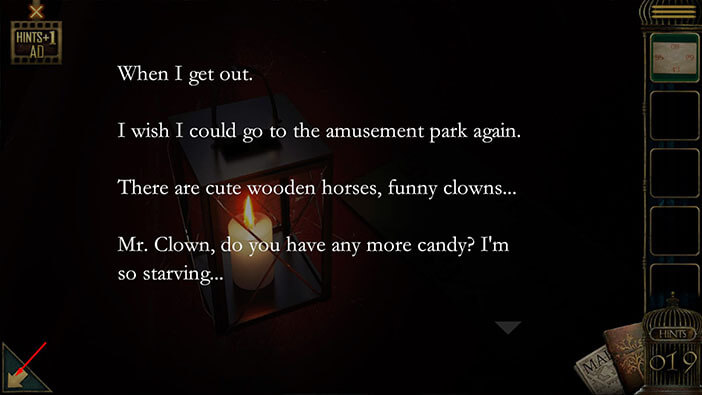
After that, tap on the lantern to reveal another part of the story.
We will find out that Alice really liked amusement parks, and enjoyed every time she visited them. However, we will also discover that she’s starving and hopes that the clown could give her candy…
Tap on the arrow in the lower left corner to go back.
Next, tap on the open purple box with a picture of a girl (located on the floor in front of you) to take a closer look at it. Tap again to start the interaction.
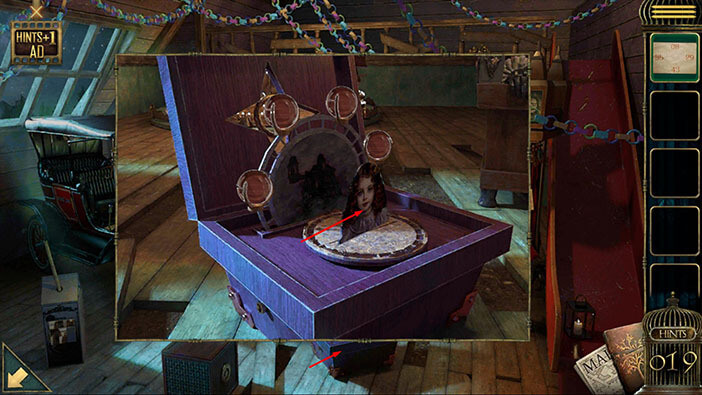
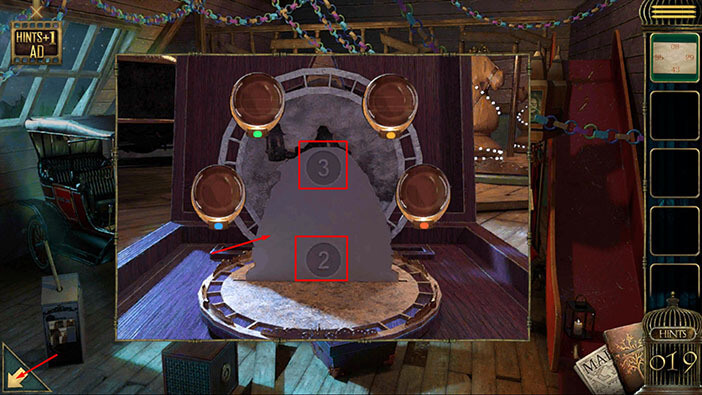
The little girl in the picture looks like Alice. Tap on the picture to rotate it and you will discover two numbers at the back of the photo. Number 3 at the top, and number 2 at the bottom. Memorize/write down these numbers and their positions because we will need this information in order to solve the next puzzle.
Once you’re done, tap on the arrow in the lower left corner to go back.
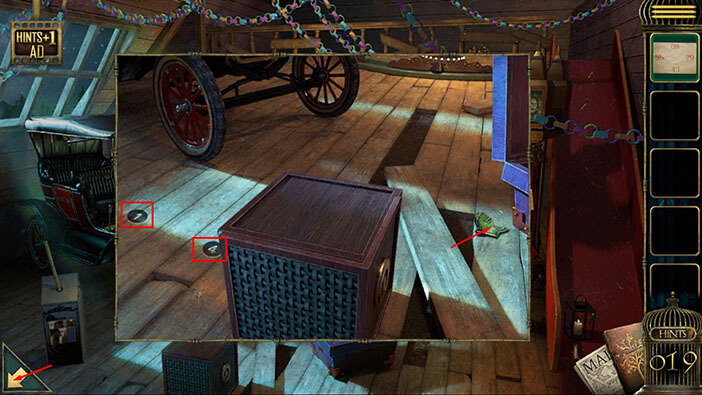
Next, tap on the wooden box located next to the loose plank to take a closer look at it.
On the left side of the box, you will see two numbers. Number 1 on the left, and number 4 on the right. Memorize/write down these numbers and their positions because we will need this information in order to solve the next puzzle.
Before we proceed, you will notice the third “Family badge piece (Alice)” (the green item on the right). Tap on it to pick it up.
Once you’re done, tap on the arrow in the lower left corner to go back.
Previously we picked up the “Paper with tips” and there were some numbers on it. So, let’s tap on this paper in our inventory to examine it.
Here, you will see four numbers. At the following positions, left, top, right, and bottom. Previously, we discovered numbers 1 to 4 at the same positions. The numbers 1 to 4 represent the chronological order of the numbers on this tip. So, let’s write that down.
Number 1 was located on the left. So,
The First Number = 35
Number 2 was located at the bottom. So,
The Second number = 43
Number 3 was located at the top. So,
The Third number = 08
Number 4 was located on the right. So,
The Fourth number = 29.
Once you’re done, tap on the note to bring it down.
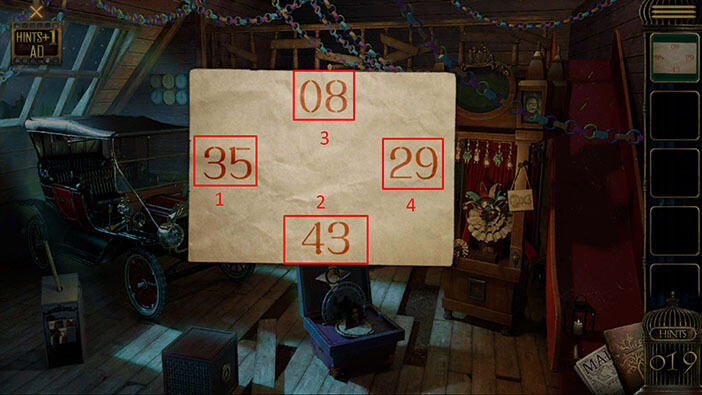
Next, tap on the car door on the left to take a closer look at it.
Let’s tap on the numbers in the order that we discovered. So, we had 35/43/08/29
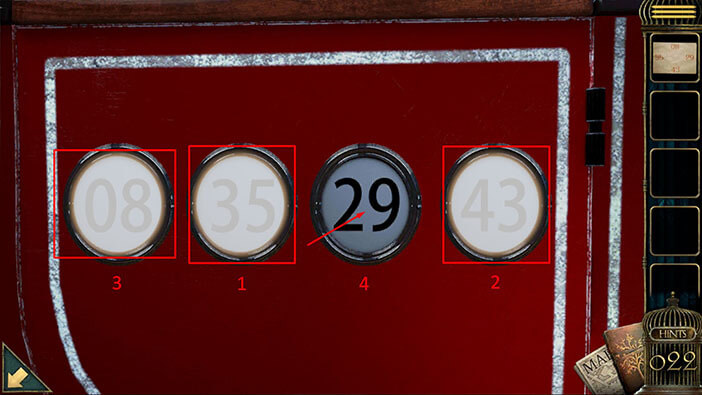
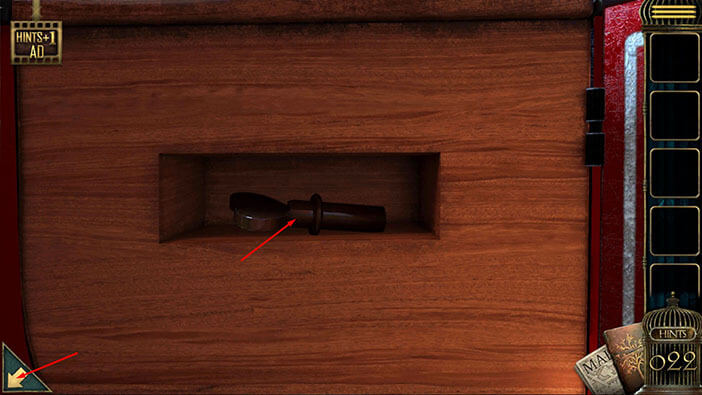
You will open the door as soon as you enter the numbers in the correct door, and inside you will find a “Heart-shaped key”. Tap on it to pick it up.
After that, tap on the arrow in the lower left corner to go back.
Let’s tap on the purple box again to take a closer look at it.
Select the “Heart-shaped key” from the inventory and insert it into the keyhole on the left.
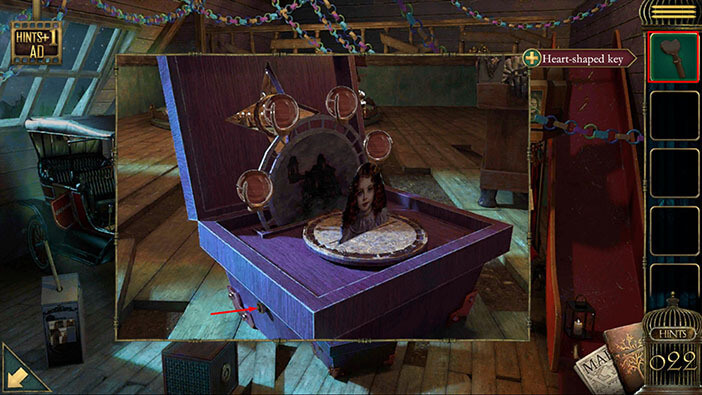
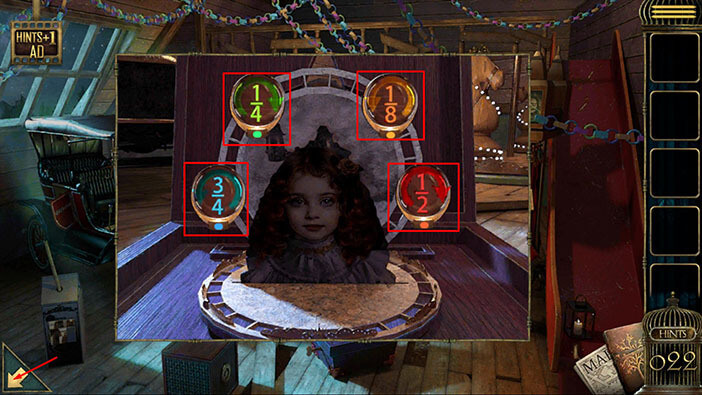
As soon as you turn the key, the disk with fractions will appear behind the picture of the girl. Let’s take a look at the fractions, we are also interested in the color of the numbers, and the direction of the arrows. Let’s memorize/write down this information because we will need it for the next puzzle.
Blue = 3 / 4. The arrow is pointing from right to left.
Green = 1 / 4. The arrow is pointing from left to right.
Yellow = 1 / 8. The arrow is pointing from right to left.
Red = 1 / 2. The arrow is pointing from left to right.
Once you’re done, tap on the arrow in the lower left corner to go back.
Next, on the wall on the left side, just above the car, you will see six clocks. Tap on them to take a closer look.
Here, we can see six clocks. One red, two yellow, and three blue clocks. Each clock is pointing at 12 o’clock. Also, you will notice that there are only 8 hour marks (lines) on each clock instead of 12. So, 1 line represents one-eighth, or two quarters.
Let’s start with the red clock. Previously we had Red = 1 / 2. And the arrow was pointing from left to right. So, we should move the hour hand on the red clock by one-half to the right.

Next up are the yellow clocks. Previously we had Yellow = 1 / 2. And the arrow was pointing from right to left (counterclockwise). So, we should move the hour hand on the yellow clocks by one-eighth (1 line) to the left.
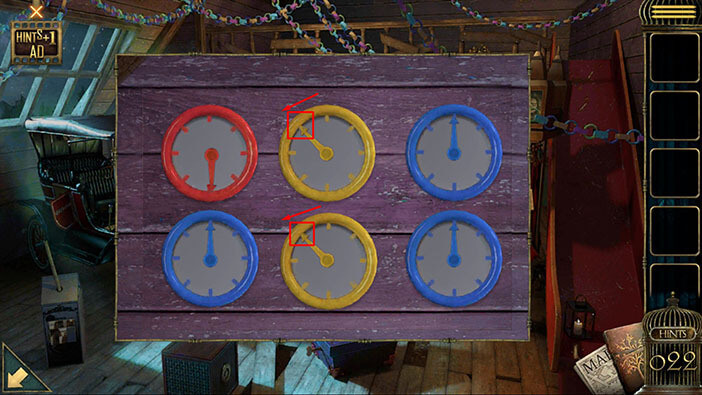
Lastly, we have three blue clocks. Previously we had Blue = 3 / 4. And the arrow was pointing from right to left (counterclockwise). So, we should move the hour hand on the blue clocks by three quarters (6 lines) to the left.

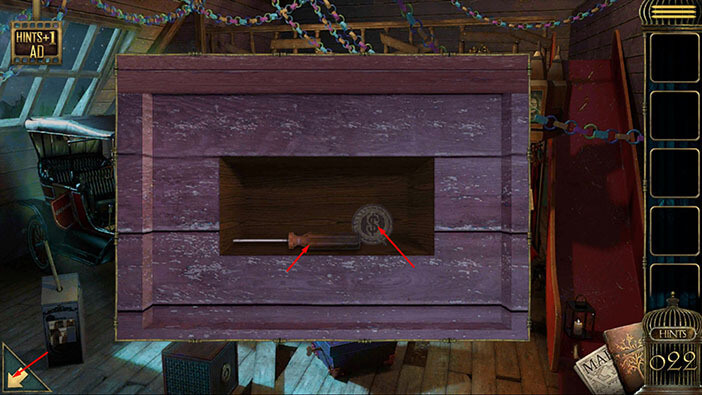
The secret compartment in the wall will open as soon as you set the clocks, and inside you will find two items, a “Screwdriver” and a “Gold Coin”. Tap on them to pick them up.
After that, tap on the arrow in the lower left corner to go back.
Next, tap on the symbols above the carousel to take a closer look at it.
Select the “Screwdriver” from the inventory and use it to remove the metal panel on the left.
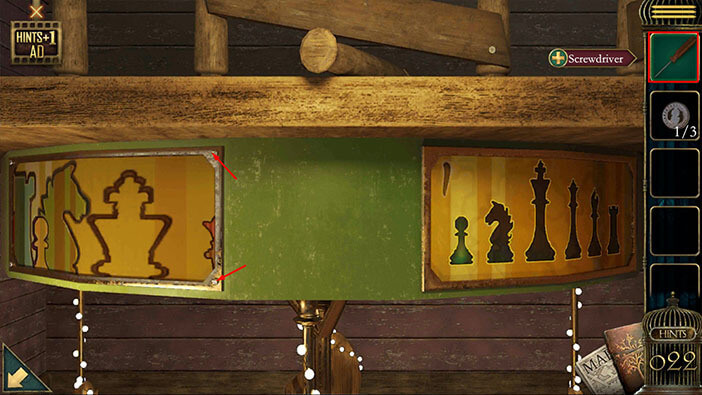
Inside you will find a “Puzzle” and “Paper with tips”. Tap on them to pick them up.
After that, tap once on the arrow in the lower left corner to go back and look at the top of the carousel, once more.
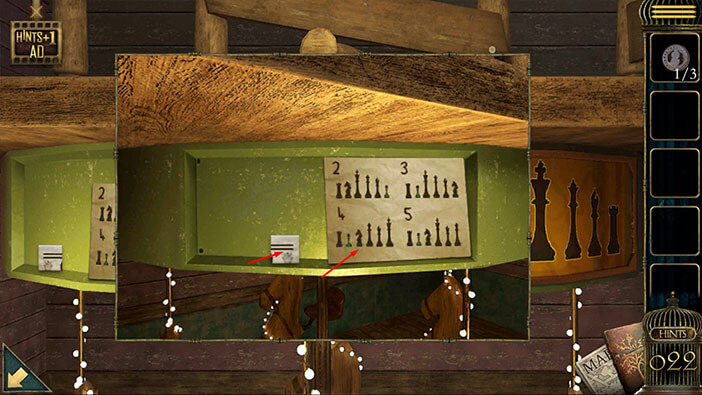
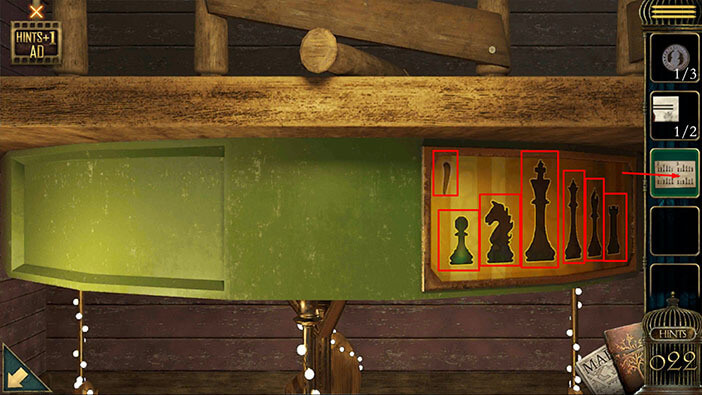
Next, let’s take a look at the poster with chess pieces on the right. Here, we can see six chess pieces, and we can also see a number one in the top left corner of the poster.
Let’s memorize/write down the order of the chess figures because we will need this information in order to figure out the solution for the next puzzle. So, here we have
Pawn / Knight / King / Queen / Bishop / Rook
Once you’re done, tap on the “Paper with tips” in your inventory to examine it.
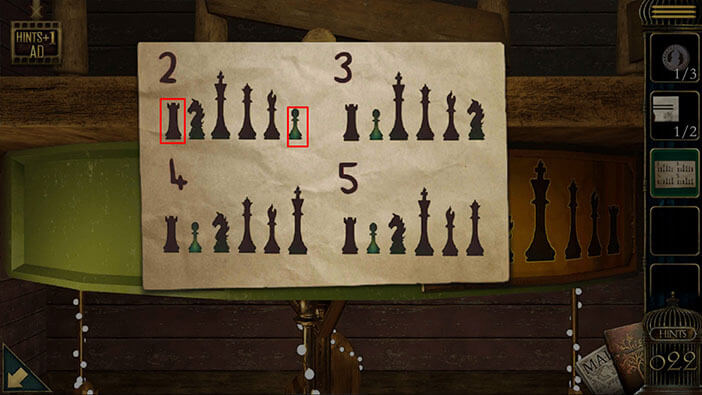
Ok, let’s take a look at the order of chess pieces below the number 2.
If you closely examine the order of the figures, you will notice that the rook and the pawn have swapped positions compared to the first image. So, the first chess piece “Pawn”, and the last chess piece “Rook” have swapped positions.
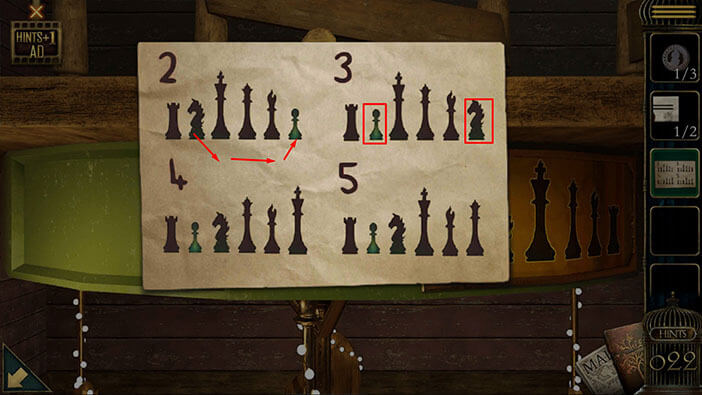
We are looking for a pattern here. Next, we will compare the positions of the chess pieces in the second and third pictures.
Next, we will compare the order of the chess pieces in the second and third pictures. If you closely examine the order of the figures, you will notice that the “Knight” and the “Pawn” have swapped positions compared to the second image. So, the second chess piece “Knight”, and the last chess piece “Pawn” have swapped positions. (When we compared the first and the second picture, the first and the last chess piece swapped positions)
Next, we will compare the positions of the chess pieces in the third and fourth pictures.
Next, we will compare the order of the chess pieces in the third and fourth pictures. If you closely examine the order of the figures, you will notice that the “King” and the “Knight” have swapped positions compared to the third image. So, the third chess piece “King”, and the last chess piece “Knight” have swapped positions.
Next, we will compare the positions of the chess pieces in the fourth and fifth pictures.
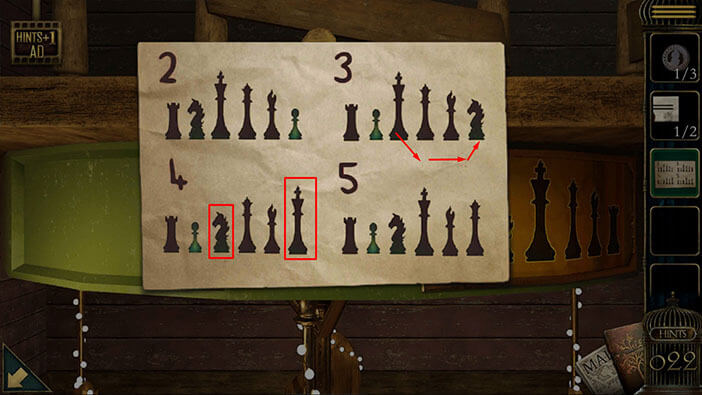
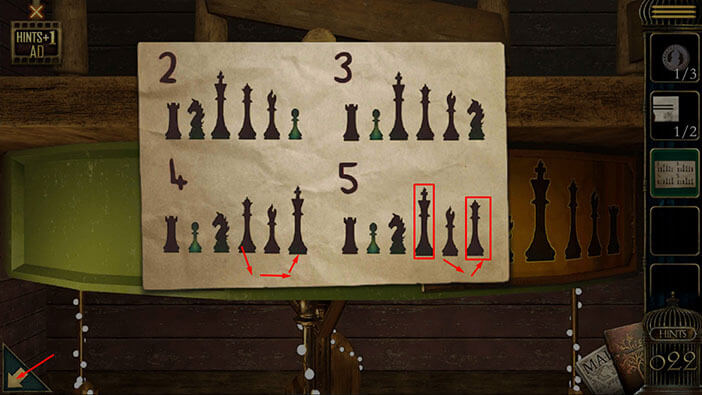
Next, we will compare the order of the chess pieces in the fourth and fifth pictures. If you closely examine the order of the figures, you will notice that the “Queen” and the “King” have swapped positions compared to the fourth image. So, the fourth chess piece “Queen”, and the last chess piece “King” have swapped positions.
Well, we can see a pattern here. The number of the picture represents which piece will be swapped in the next picture. This chess piece will be always swapped with the last (sixth) chess piece. With this information, we can predict the order of the chess pieces in the next picture.
So, the order of the chess pieces in the sixth picture should be the same as the order of the chess pieces in the fifth picture, but the fifth and sixth chess pieces should swap positions. In other words, the “Bishop” and the “Queen” should swap positions.
With that said, the order of the chess pieces in the sixth picture should be
Rook / Pawn / Knight / King / Queen / Bishop. Memorize/write down this information because we will need it in order to solve the next puzzle.
Once you’re done, tap on the arrow in the lower left corner to go back.
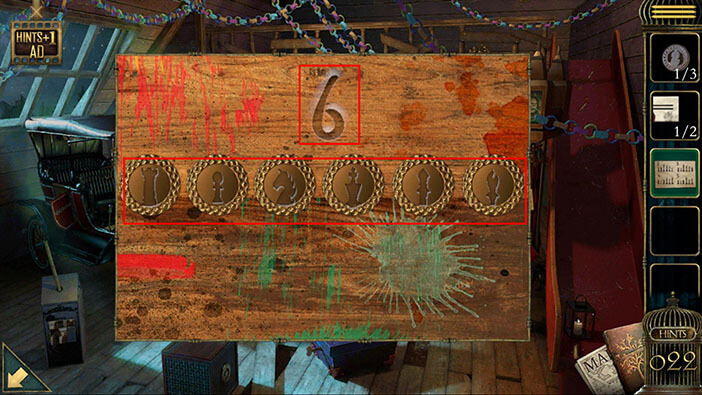
Next, tap on the wooden box in the left corner of the room (behind the carousel) to take a closer look at it, and tap again to start the interaction.
You will notice number 6 on the box and you will see that we will need to set six chess figures in the correct order to unlock this box. Luckily, we already discovered the correct order of the chess figures for box number 6. So, enter
Rook / Pawn / Knight / King / Queen / Bishop.
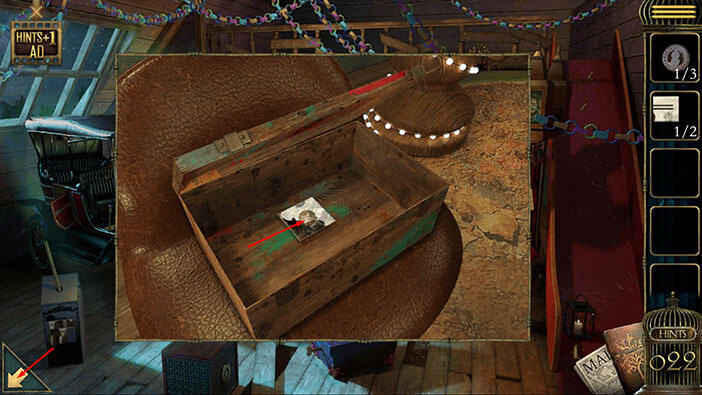
The box will open as you enter the chess pieces in the correct order, and inside you will find another “Puzzle”. Tap on it to pick it up.
After that, tap on the arrow in the lower left corner to go back.
Next, tap on the grey box in the left corner of the room to take a closer look at it.
Here, you will see a puzzle, but two of the pieces are missing. So, select the two “Puzzle” pieces from the inventory and insert them into the empty slot.
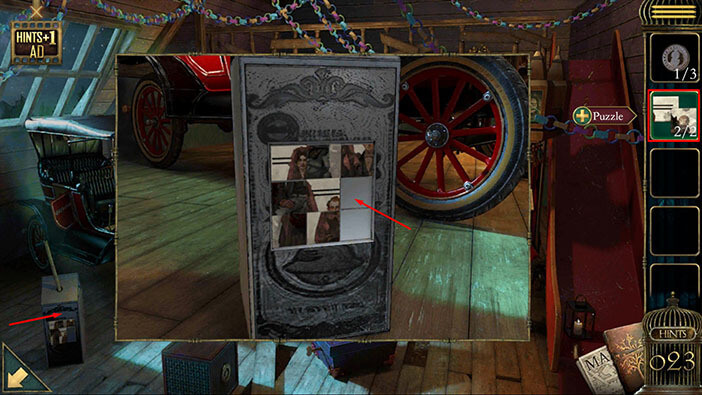
Ok, here we have another puzzle. Our task is to shuffle the pieces and assemble the picture. We will do this in several steps. Let’s begin.
Step 1
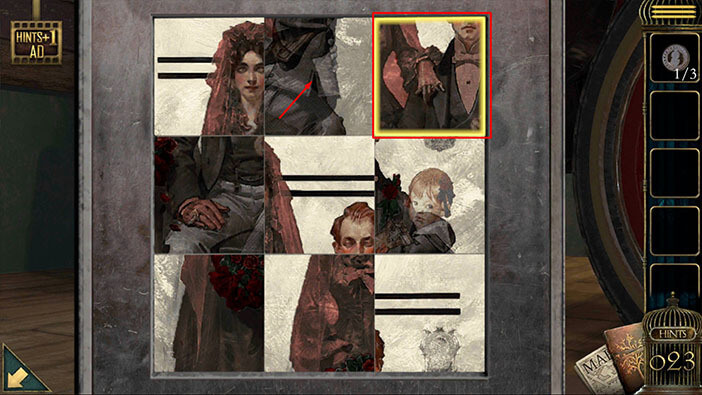
Select the third (left to right) piece in the first row, then tap on the second piece in the first row to swap their positions.
Step 2
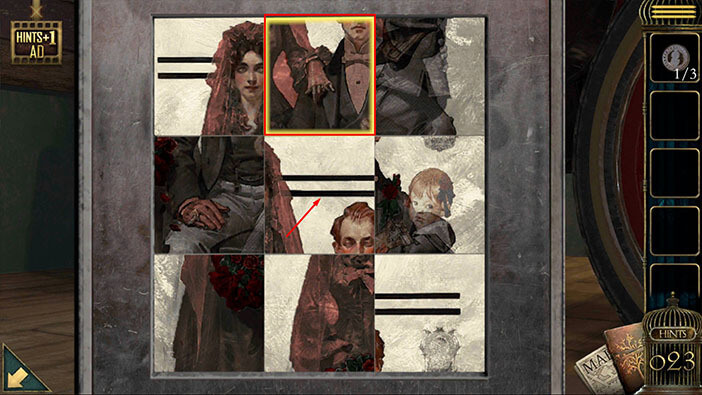
Select the second piece in the first row, then tap on the second piece in the second row to swap their positions.
Step 3
Select the third piece in the first row, then tap on the third piece in the third row to swap their positions.
Step 4
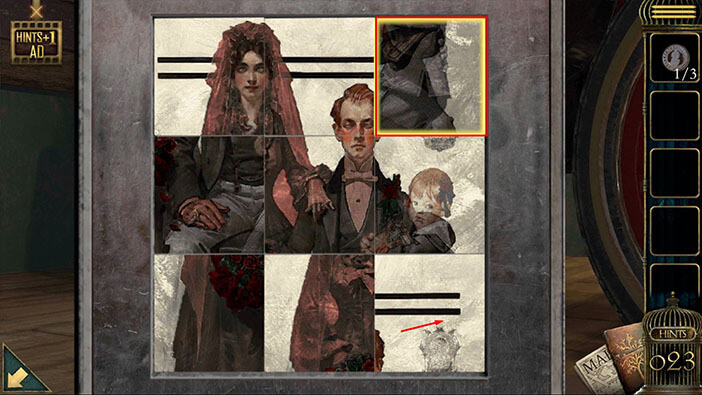
Select the second piece in the third row, then tap on the first piece in the third row to swap their positions.
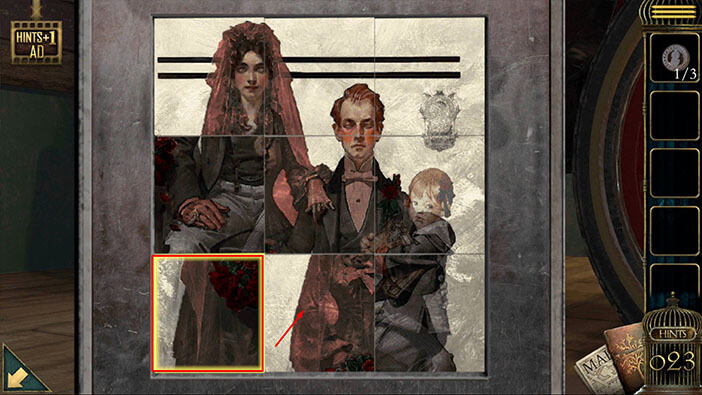
Step 5
Select the first piece in the third row, then tap on the first piece in the second row to swap their positions.
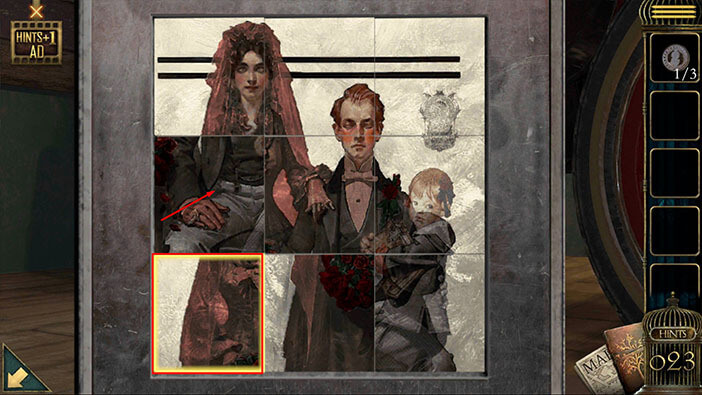
Step 6
Lastly, select the first piece in the third row, then tap on the second piece in the third row to swap their positions. With this last step, you will solve this puzzle.
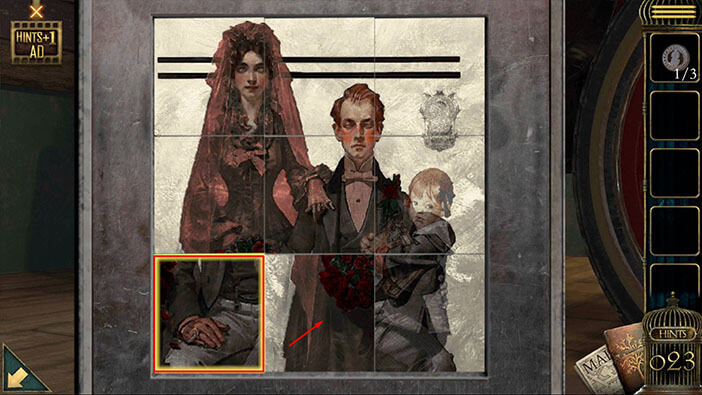
You will unlock the box as soon as you solve the puzzle, and inside you will find another “Gold Coin”. Tap on it to pick it up and you will have 2 out of 3 gold coins.
After that, tap on the arrow in the lower left corner to go back.
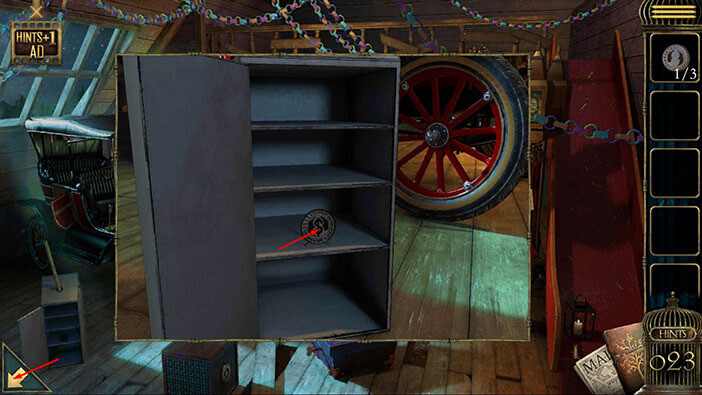
Let’s proceed to the next puzzle. Tap on the area between the headlights of the car to start the interaction.
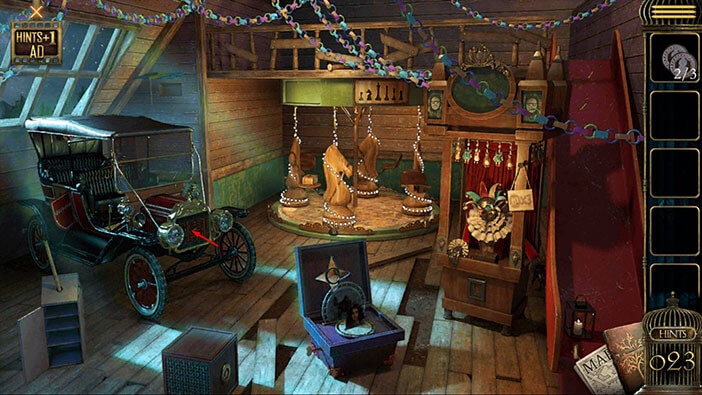
Here, we have a very interesting puzzle. The letters A, B, T, O, T, and Z are already present and these letters can’t be moved. You will notice that each letter is located inside a node, and there are connections between each node. On the left, you will see 6 more letters.
Our task is to place the letters on the left in the nodes and follow a specific path that will allow us to form an alphabet (in the correct order). This shouldn’t be too hard. Let’s solve this puzzle.
Step 1
Take a look at the first part of the path in the picture below. We will follow this path and place the first set of six letters “C, D, E, F, G, H”.
Once you’re done, tap on the “Down” arrow (below the box with letters) on the left to get the next set of six letters.
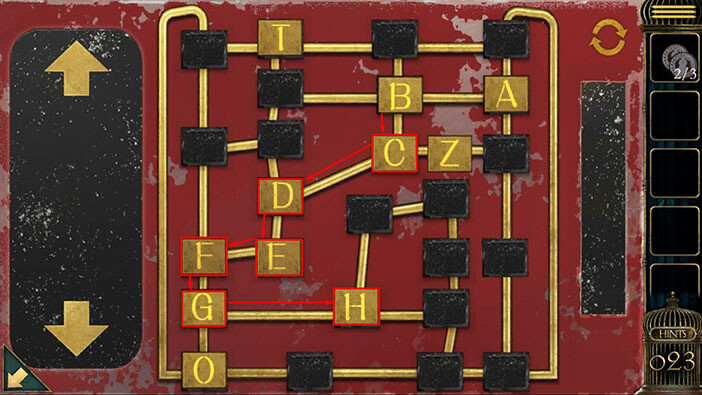
Step 2
Let’s insert the next six letters. Take a look at the second part of the path (from letter H to letter N) in the picture below. We will follow this path and place the second set of six letters “I, J, K, L, M, N”.
Once you’re done, tap on the “Down” arrow on the left to get the next set of six letters.
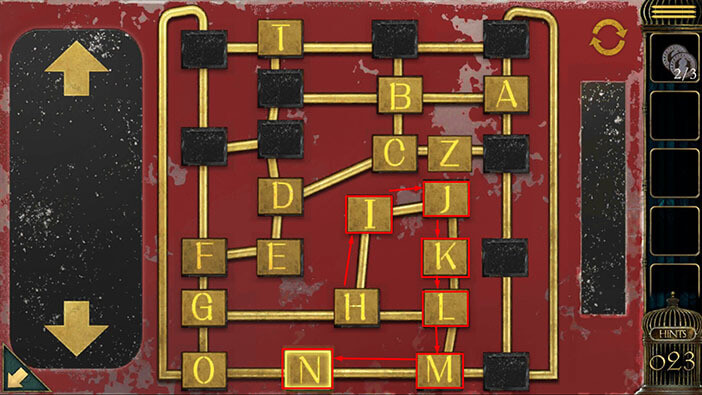
Step 3
Let’s insert the next six letters. Take a look at the third part of the path (from letter O to letter V) in the picture below. We will follow this path and place the third set of six letters “I, J, K, L, M, N”.
Once you’re done, tap on the “Down” arrow on the left to get the last set of letters.
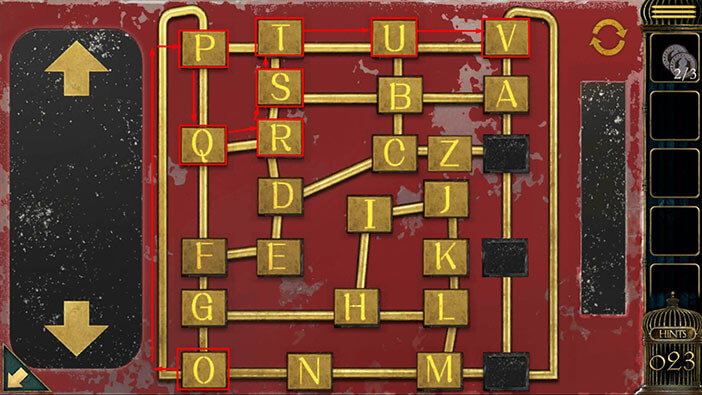
Step 4
Let’s insert the last three letters. Take a look at the fourth part of the path (from letter V to letter Z) in the picture below. We will follow this path and place the last three letters “W, X, Y”.
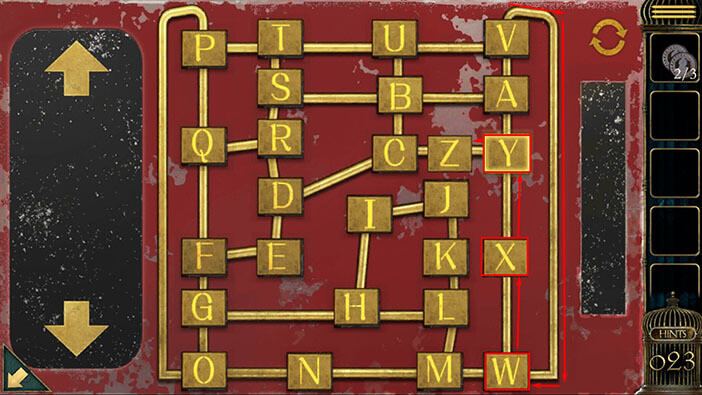
The panel on the right will open as soon as you place all the letters of the alphabet in the correct order, and inside you will find a “Swivel Handle”. Tap on it to pick it up.
After that, tap on the arrow in the lower left corner to go back.
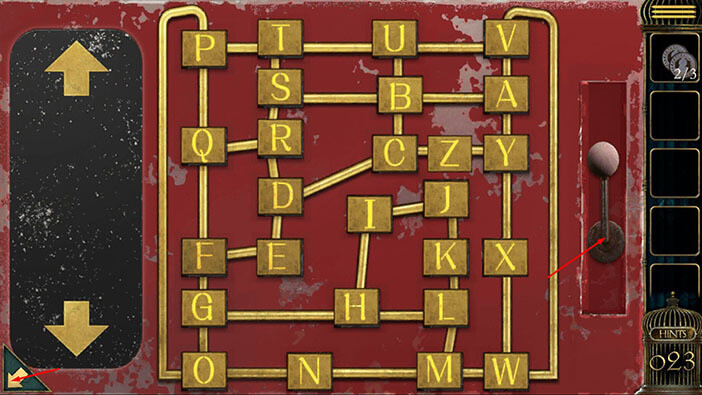
Next, let’s take another look at the box next to the loose plank.
If you examine the box, you will notice the empty slot on the right. So, select the “Swivel Handle” from the inventory and insert it into the empty slot.
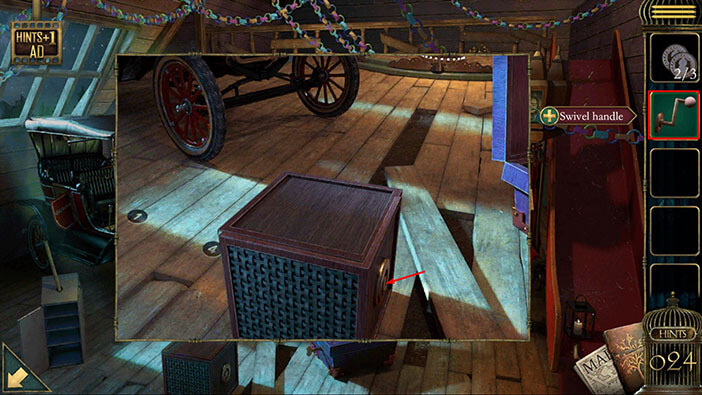
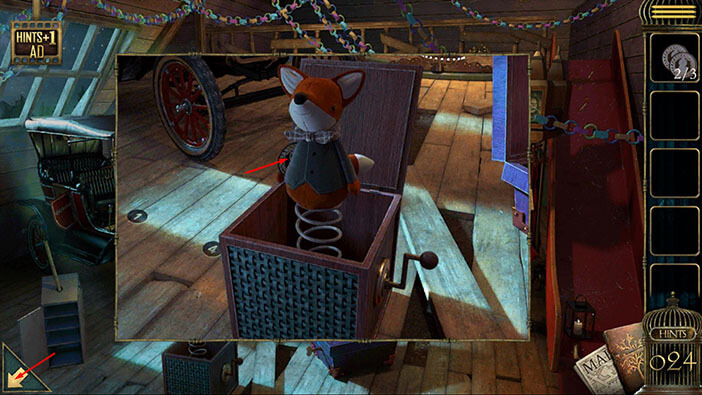
A toy fox will jump out of the box, and you will notice another “Gold Coin” sticking out behind its back. Tap on it to pick it up.
After that, tap on the arrow in the lower left corner to go back.
Next, tap on the clown in the box on the right to take a closer look at it.
After that, select the three “Gold coins” and insert them into the coin slot (located below the clown).
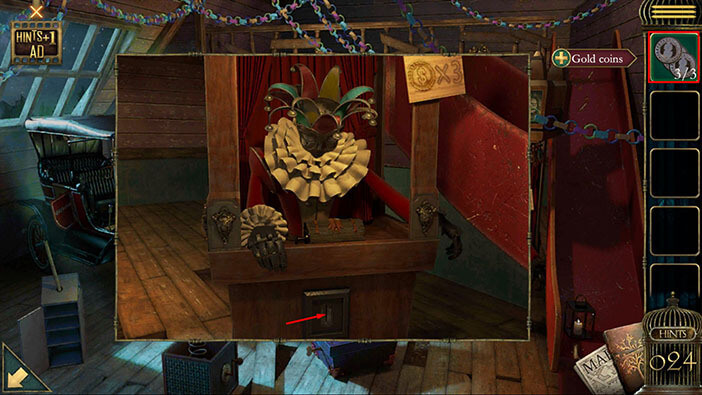
The small wooden box, located just below the clown will open as soon as you insert the gold coins, and inside you will find a “Skull”. Tap on it to pick it up.
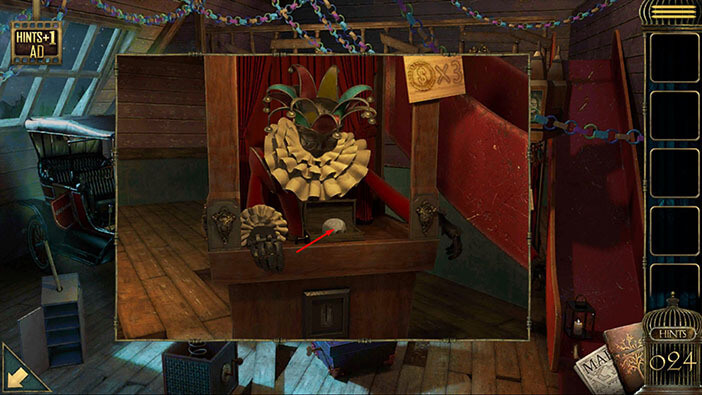
As soon as you pick up the “Skull”, you will be teleported into the next room. It seems that Alice was awakened from her sleep by the unbearable hunger. Well, I think it’s safe to presume that the “Skull” belonged to Alice…
We will end the first part of the Chapter 4 walkthrough here. Tap on the next part button to proceed to the second part of the Chapter 4 walkthrough.
Thank you for reading.