Escape Room The Mist Chapter III Part 2
Hello everyone and welcome to the second part of our walkthrough for Chapter 3 of “Escape Room The Mist.” At the end of the previous part, we used the cannon to blast through the bars on the window, and this opened the way to the next room.
Tap on the window to take a closer look at it, then tap on the arrow to proceed to the next room.
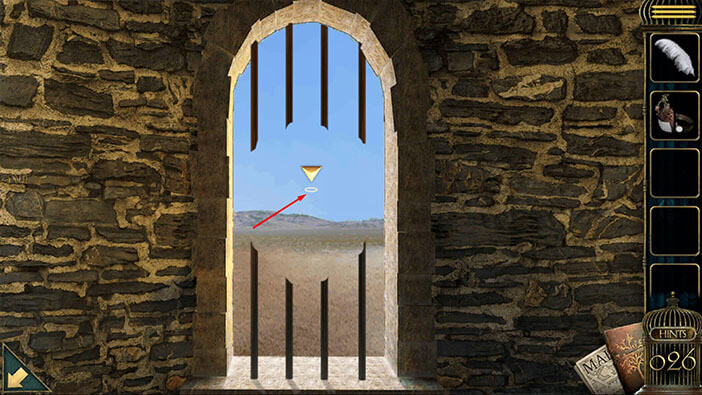
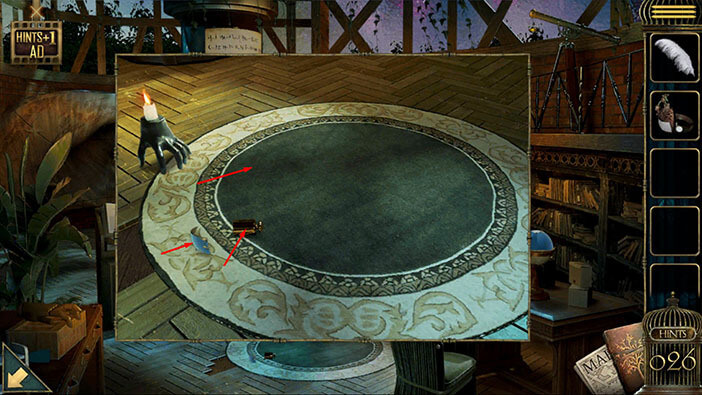
Let’s explore this room. Tap on the large circle on the floor to take a closer look at it.
Here, we will find two items. Tap on the “Weight – the Sword” and the “Globe Jigsaw Puzzle” to pick them up.
After that, tap on the large circle, and you will find and open the secret compartment in the floor.
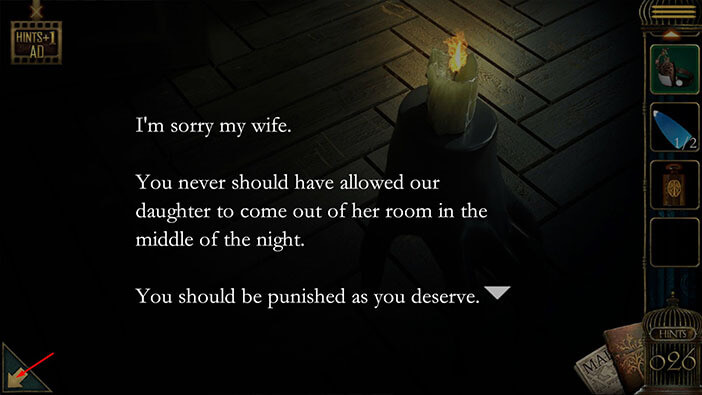
Next, let’s tap on the hand on the left side to reveal another part of the story.
Here, we will find out that Jason blames his wife because their daughter managed to slip out of her room. So, Jason thinks that his wife deserves to be punished, even though, objectively, it wasn’t her fault. I would also presume that something bad happened to their daughter when she left the room.
Let’s go back. Tap on the arrow in the lower left corner.
Next, let’s tap on the iron hand on the box in the left corner of the room to take a closer look at it.
Here, we should do two things. First, tap on the “Globe Jigsaw Puzzle” on the left to pick it up, and you will collect the second piece.
Second, select the “Ring” from the inventory and put it on the index finger on the iron hand.
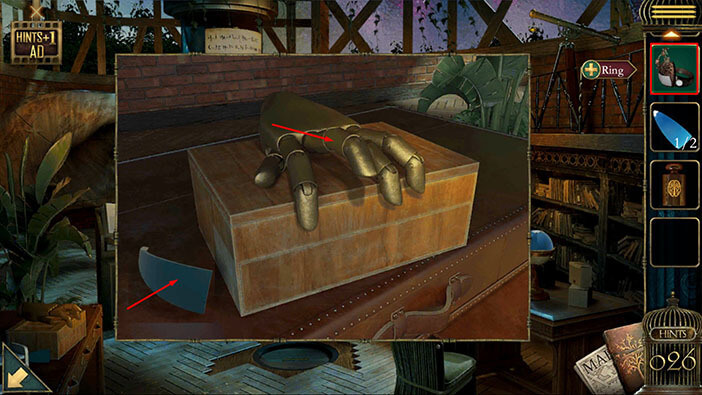
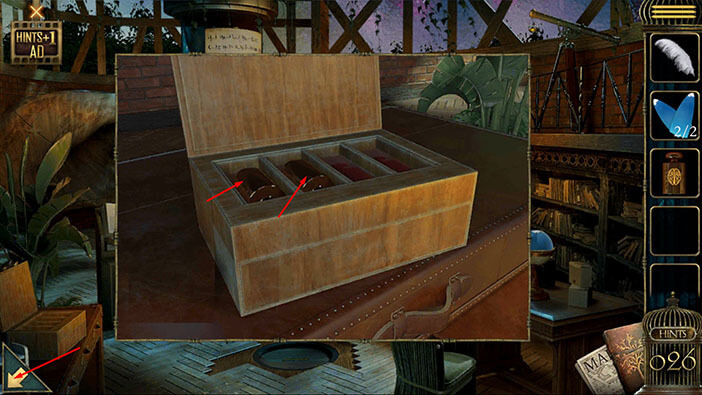
You will open the box as soon as you put the ring on the index finger and inside you will find two weights. Tap on them to pick them up. “Weight – the Heart” and “Weight – the Brain” will be added to your inventory.
If you look into the box, you will notice that there are four slots for the weights and they should be arranged by their mass. However, we need to find one more weight, and then we have to find a way to determine the mass of each weight.
Once you’re done, tap on the arrow in the lower left corner to go back.
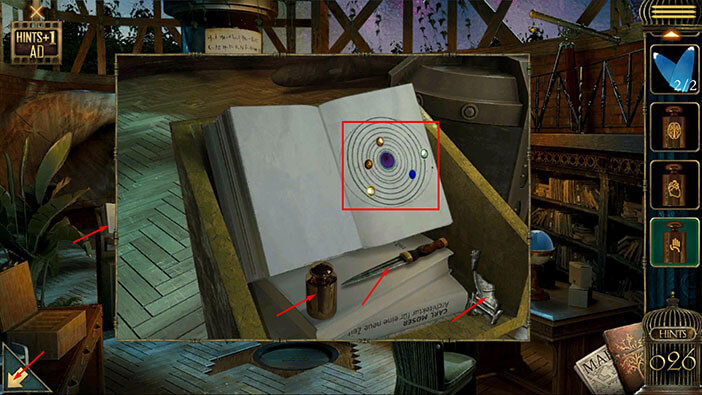
Next, tap on the open book on the left to take a closer look at it.
Here, we will find three items. Tap on the “Weights – The Hand”, “Knife”, and the third “Family badge piece (Jason)” to pick them up. Also, pay attention to the book, because we will return to it later in this walkthrough.
Once you’re done, tap on the arrow in the lower left corner to go back.
Ok, we have found all four weights, so now we have to determine their mass. To do that, let’s go back to the room with the large heart.
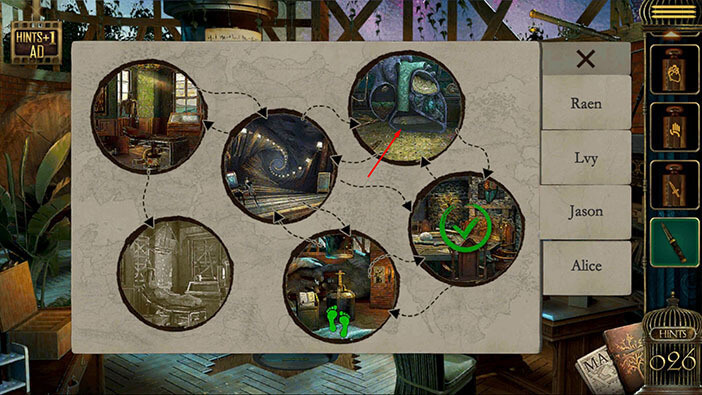
Tap on the map icon in the lower right corner to bring up the map. After that, tap on the room on the right in the top row.
Next, tap on the balance scale on the left to take a closer look at it.
First, select the “Feather” from the inventory and place it on the left side.
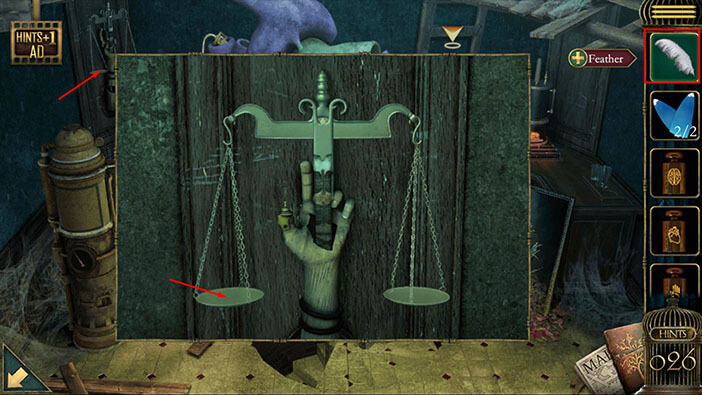
Let’s compare the mass of the weights. We will do this in several steps. Let’s begin.
NOTE: I experienced a bug while solving this puzzle. The name of the weights didn’t match the picture of the weight. For example, the weight with the picture of the brain was named “Weight – The Sword”. So, we will focus on the picture on the weight while solving this puzzle, and we will ignore the buggy text.
Step 1
First, select “Weight – The Heart” from the inventory and place it on the right side.
You will notice that the scale on the right won’t move, and it looks like the feather is heavier.
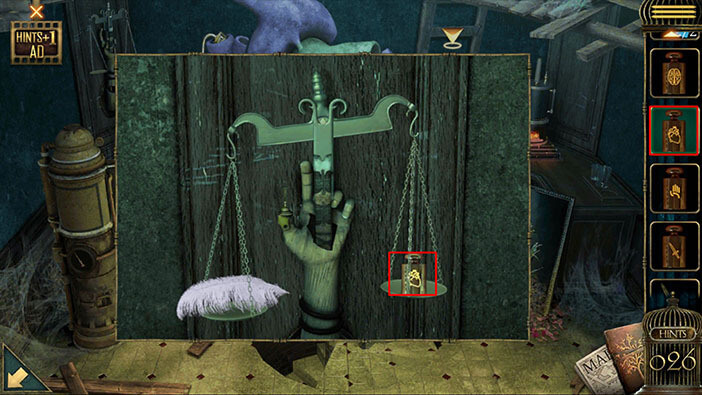
Step 2
Select “Weight – The Brain” from the inventory and place it on the right side.
You will notice that “Weight – The Brain” is slightly heavier than “Weight – The Heart”. It has approximately the same weight as the “Feather”.
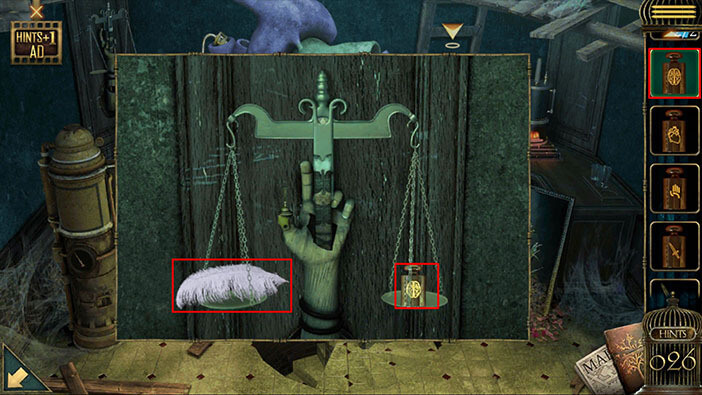
Step 3
Select “Weight – The Sword” from the inventory and place it on the right side.
You will notice that “Weight – The Sword” is slightly heavier than “Weight – The Brain”. It is also slightly heavier than the “Feather” on the right side.
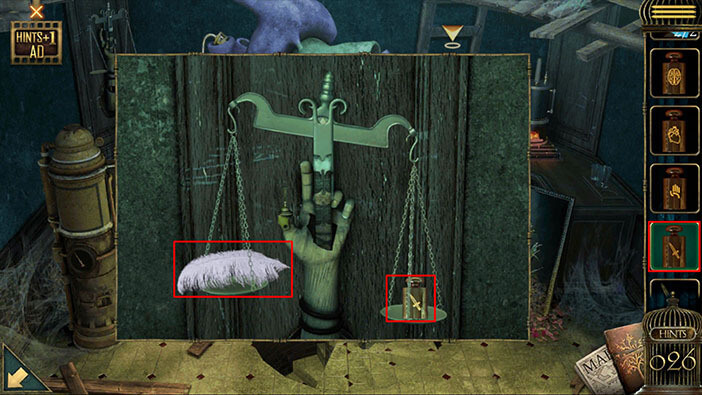
Step 4
Select “Weight – The Hand” from the inventory and place it on the right side.
You will notice that “Weight – The Hand” is slightly heavier than “Weight – The sword”. It is also much heavier than the “Feather” on the right side.
Once you’re done tap on the arrow in the lower left corner to go back.
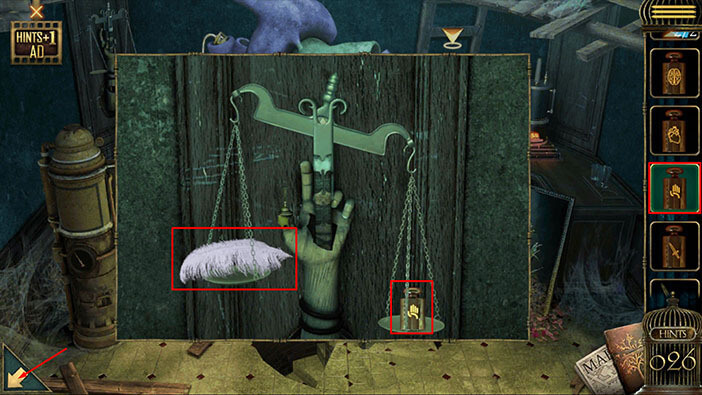
Ok, we measured the weights, and we can now arrange them from the lightest to the heaviest.
“Weight – The Heart” / “Weight – The Brain” / “Weight – The Sword” / “Weight – The Hand”.
Well, now we can go back to the last room. Tap on the map icon in the lower right corner to bring up the map. After that, tap on the middle room in the bottom row.
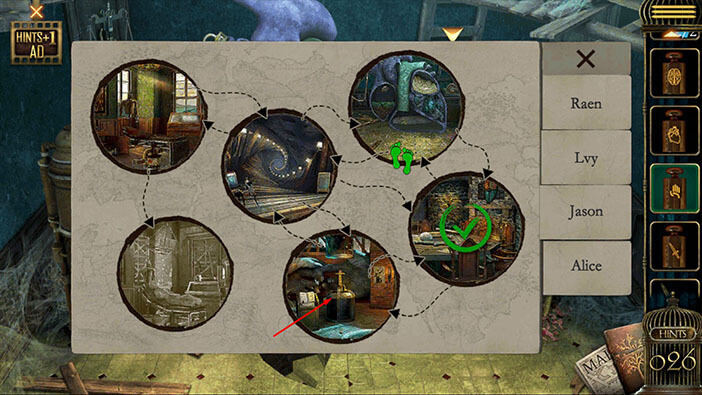
Tap on the wooden box on the left to take a closer look at it, then tap again to start the interaction.
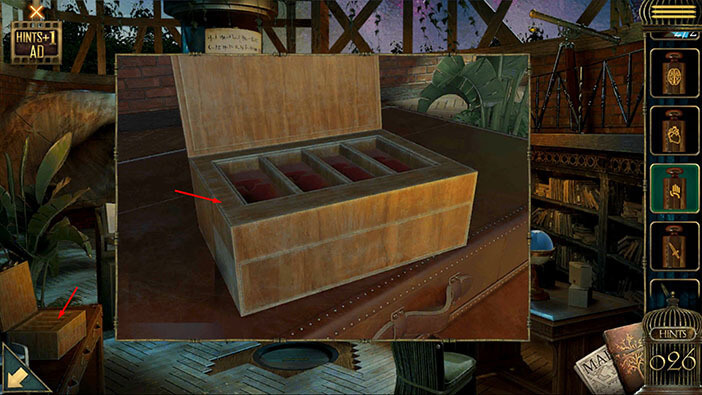
Let’s place the weights into the correct slots. We will do this in four steps. Let’s begin.
NOTE: We will focus on the image on the weight, and ignore the text because
Step 1
The lightest weight was the Heart. So, select the “Weight – The Heart” and place it into the 2g slot (the third one looking from left to right).
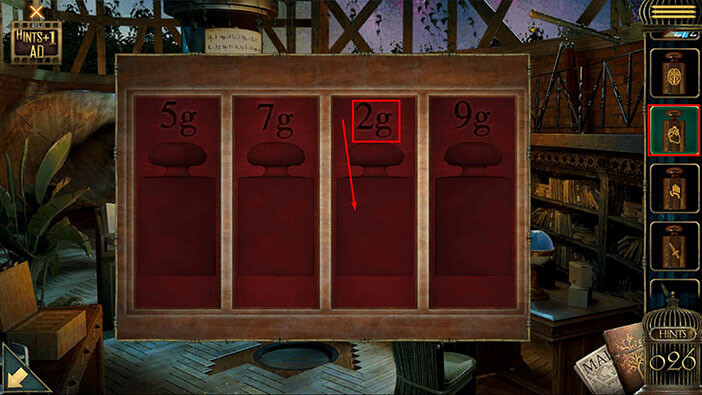
Step 2
“Weight – the Brain” was slightly heavier than “Weight – The Heart”. So, select “Weight – The Brain” and place it into the 5g slot (the first one looking from left to right).
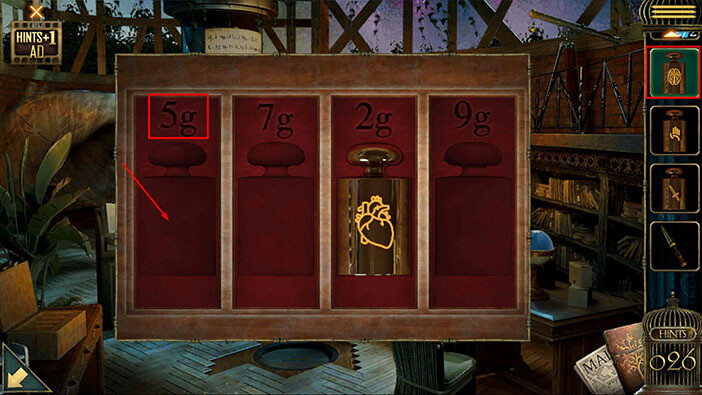
Step 3
“Weight – the Sword” was slightly heavier than “Weight – The Brain”. So, select “Weight – The Sword” and place it into the 7g slot (the second one looking from left to right).
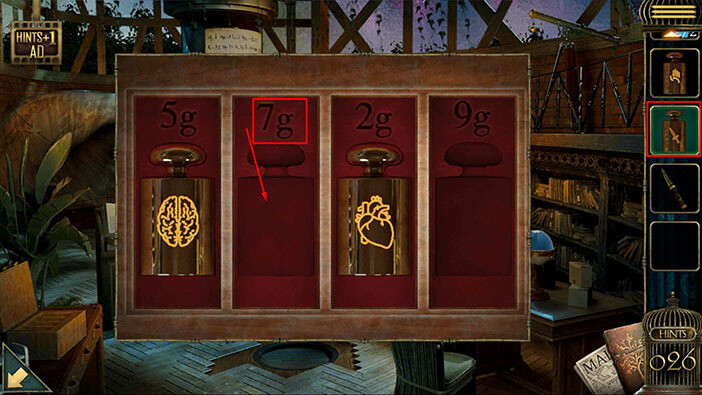
Step 4
Lastly, “Weight – The Hand” was the heaviest, so select this weight from the inventory and place it into the slot labeled 9g.
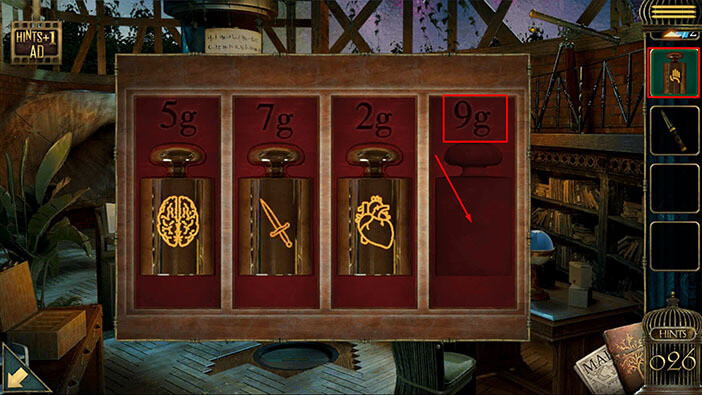
The hidden compartment in the lower part of the wooden box will open as soon as you correctly arrange the weights. In this compartment, you will find a “Paper with tips” so tap on it to pick it up. If you closely examine the “Paper with tips” you will see some numbers. This will be important later in this walkthrough. For now, we will focus on the next puzzle.
Once you’re done, tap on the arrow in the lower left corner to go back.
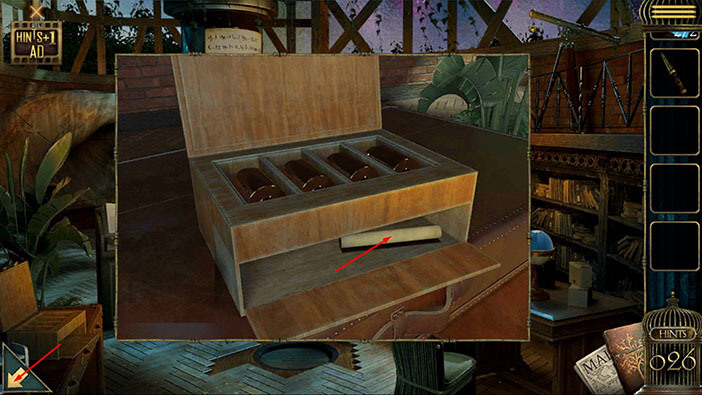
Tap on the globe on the desk on the right to take a closer look at it.
We can see a globe, but two of its pieces are missing. So, select the two “Globe jigsaw puzzle pieces” from the inventory and insert them into the empty slots.
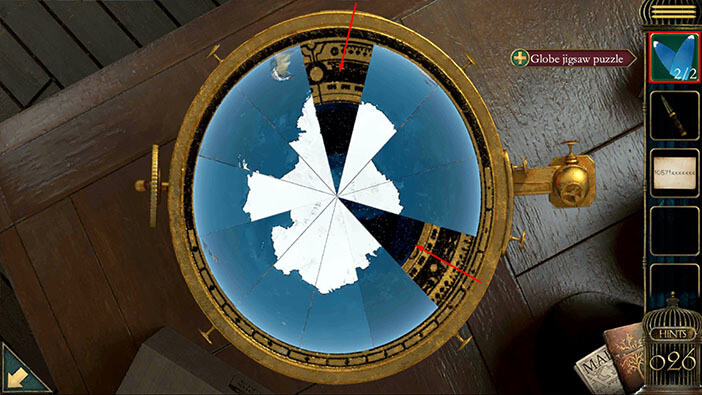
Here, we have another puzzle. Our task is to assemble the globe by rearranging the pieces. We will do this puzzle in multiple steps. Let’s begin.
Step 1
Select the puzzle piece located at the 8 o’clock position, and swap it with the puzzle piece located at the 12 o’clock position.
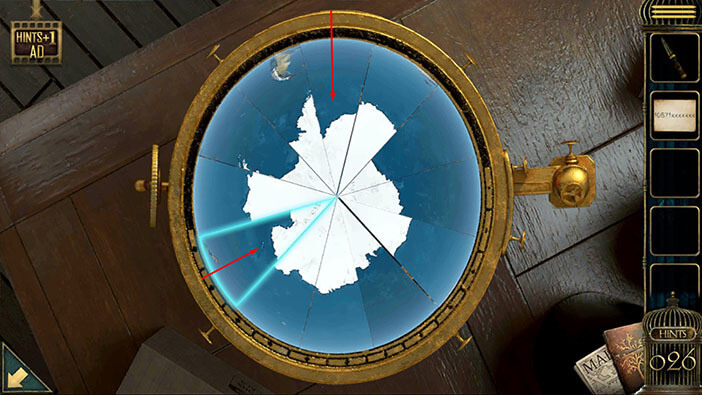
Step 2
Select the puzzle piece located at the 5 o’clock position, and swap it with the puzzle piece located at the 12 o’clock position.
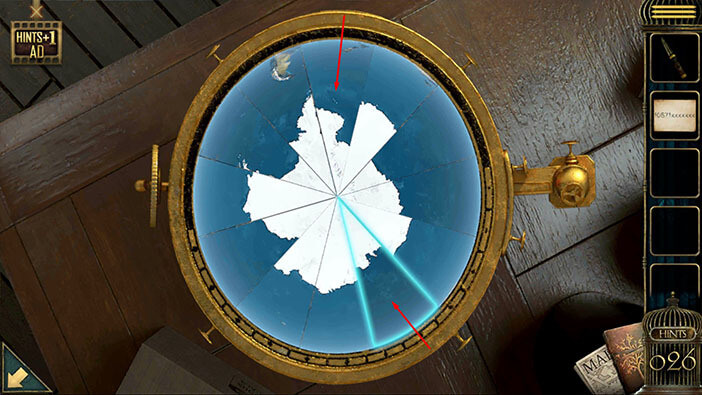
Step 3
Select the puzzle piece located at the 8 o’clock position, and swap it with the puzzle piece located at the 12 o’clock position.
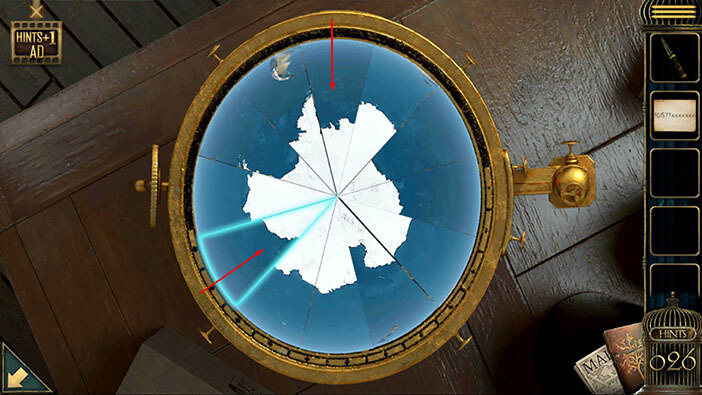
Step 4
Select the puzzle piece located at the 10 o’clock position, and swap it with the puzzle piece located at the 12 o’clock position.
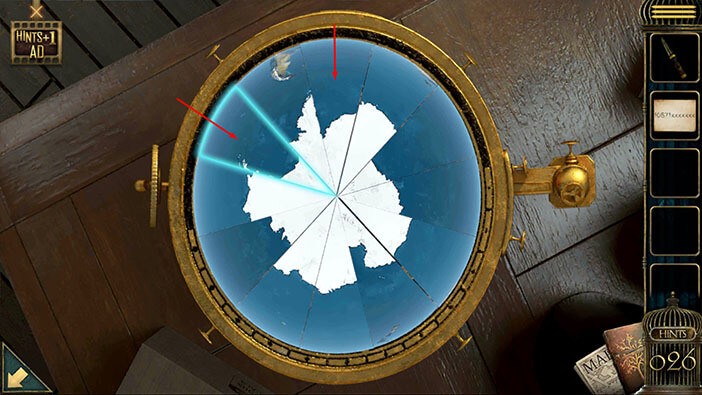
Step 5
Select the puzzle piece located at the 2 o’clock position, and swap it with the puzzle piece located at the 1 o’clock position.
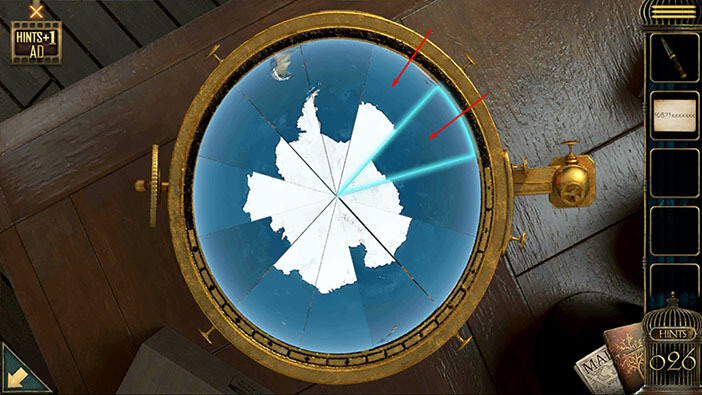
Step 6
Select the puzzle piece located at the 10 o’clock position, and swap it with the puzzle piece located at the 1 o’clock position.
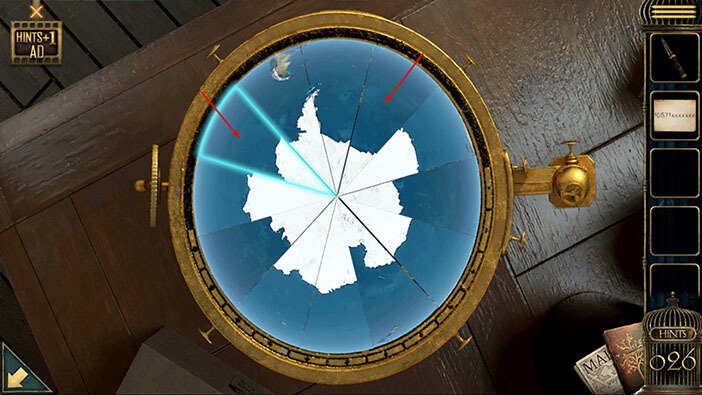
Step 7
Select the puzzle piece located at the 4 o’clock position, and swap it with the puzzle piece located at the 2 o’clock position.
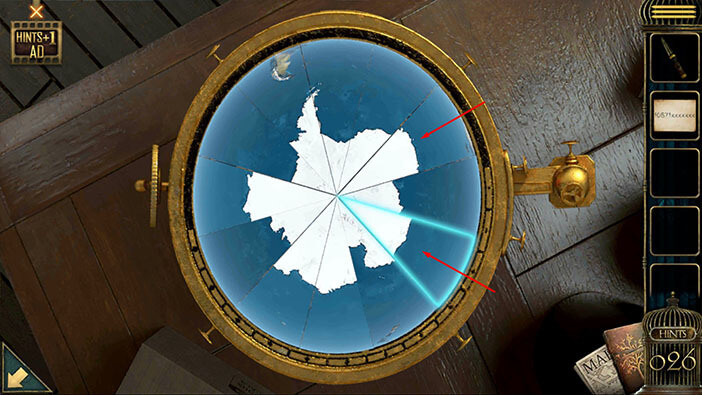
Step 8
Select the puzzle piece located at the 4 o’clock position, and swap it with the puzzle piece located at the 3 o’clock position.
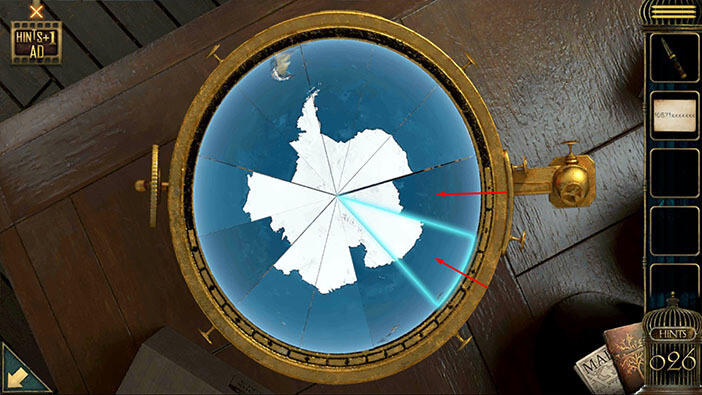
Step 9
Select the puzzle piece located at the 6 o’clock position, and swap it with the puzzle piece located at the 3 o’clock position.
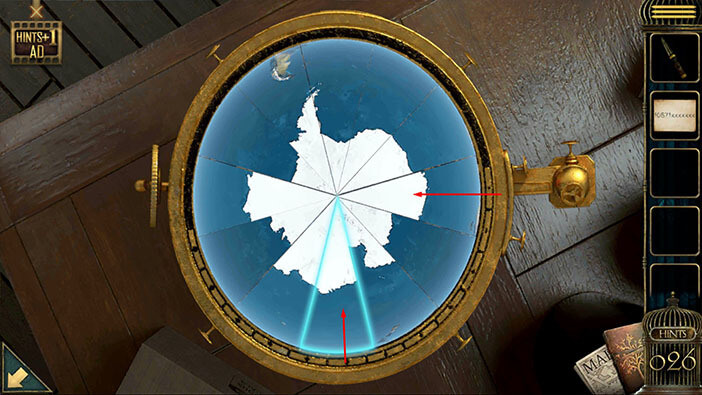
Step 10
Select the puzzle piece located at the 5 o’clock position, and swap it with the puzzle piece located at the 4 o’clock position.
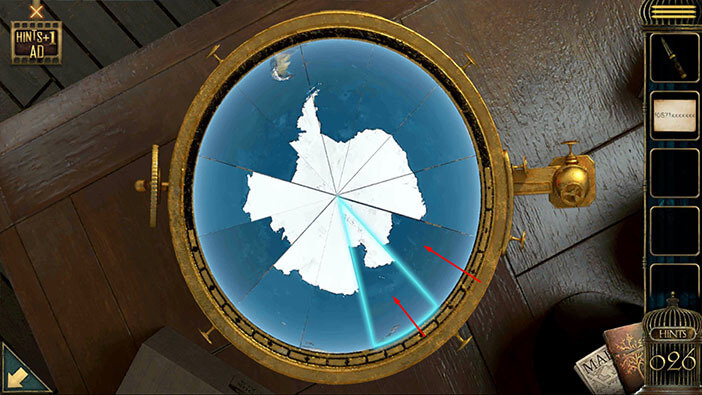
Step 11
Select the puzzle piece located at the 7 o’clock position, and swap it with the puzzle piece located at the 4 o’clock position.
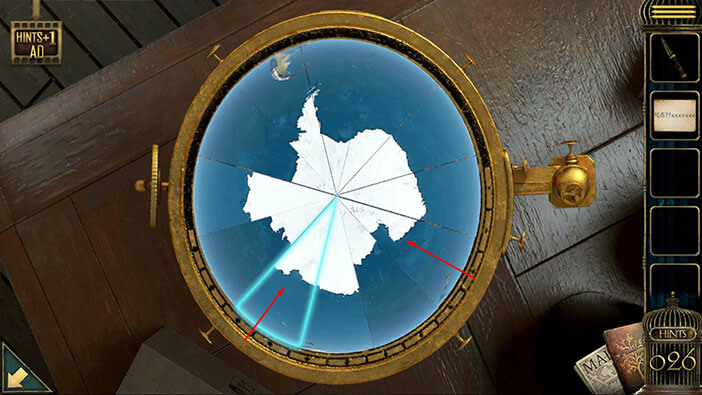
Step 12
Select the puzzle piece located at the 6 o’clock position, and swap it with the puzzle piece located at the 5 o’clock position.
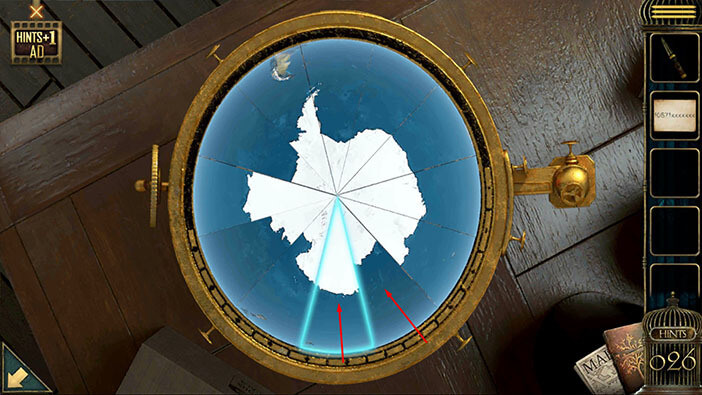
Step 13
Select the puzzle piece located at the 7 o’clock position, and swap it with the puzzle piece located at the 6 o’clock position.
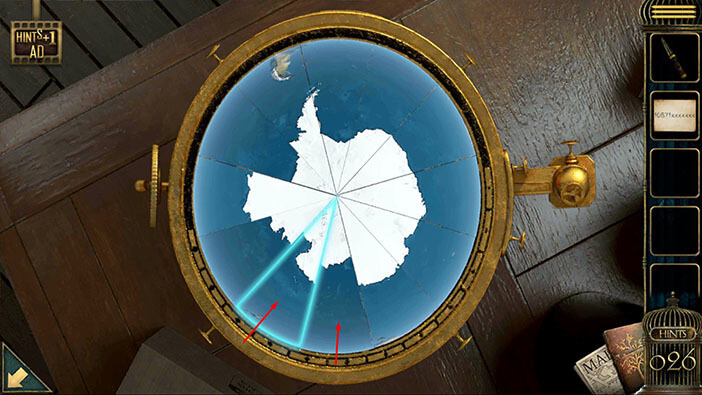
Step 14
Select the puzzle piece located at the 9 o’clock position, and swap it with the puzzle piece located at the 6 o’clock position.
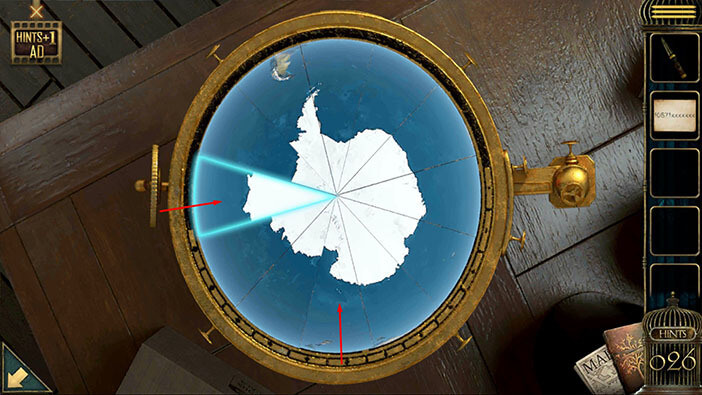
Step 15
Select the puzzle piece located at the 9 o’clock position, and swap it with the puzzle piece located at the 7 o’clock position.
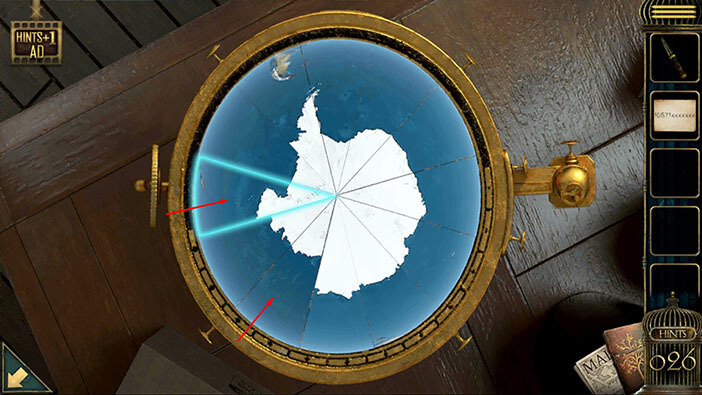
Step 16
Select the puzzle piece located at the 9 o’clock position, and swap it with the puzzle piece located at the 8 o’clock position.
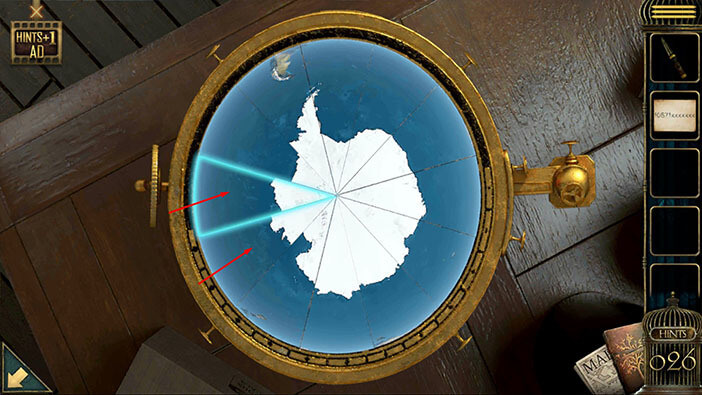
Step 17
Select the puzzle piece located at the 10 o’clock position, and swap it with the puzzle piece located at the 8 o’clock position.
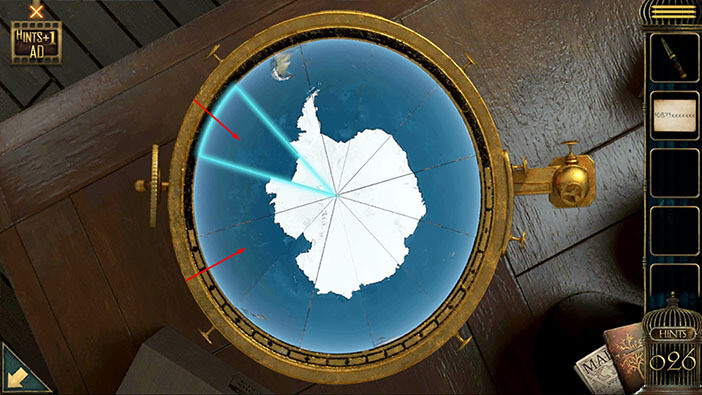
Step 18
Select the puzzle piece located at the 10 o’clock position, and swap it with the puzzle piece located at the 9 o’clock position.
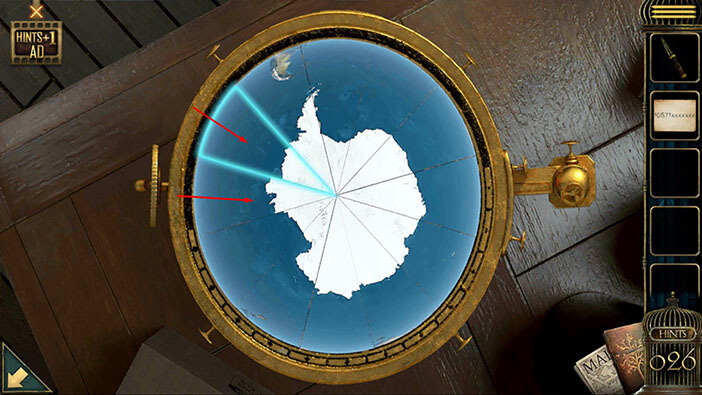
Step 19
Finally, select the puzzle piece located at the 6 o’clock position, and swap it with the puzzle piece located at the 5 o’clock position. With this last step, you will assemble the globe, and solve this puzzle.
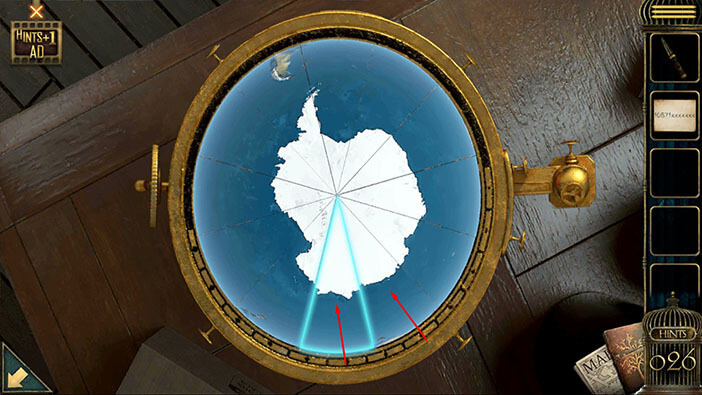
The globe will open as soon as you assemble it, and inside you will find another small globe. Tap on it to pick it up and “Planet models” will be added to your inventory.
After that, tap on the arrow in the lower left corner to go back.
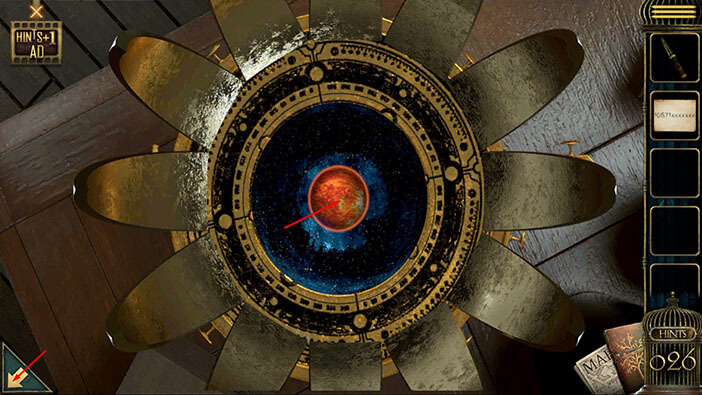
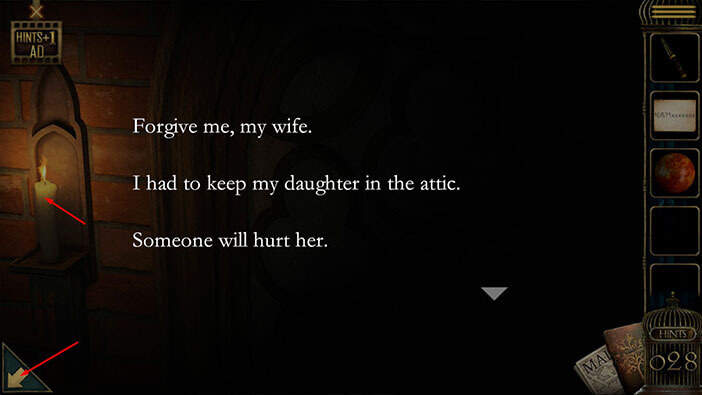
Tap on the candle on the left side of the door to take a closer look at it, then tap on it again to reveal another part of the story.
Here, we will find out that Jason used to lock his daughter in the attic because he wanted to protect her. He was certain that someone wanted to hurt her, and this was his solution to keep her safe.
Tap on the arrow in the lower left corner to go back.
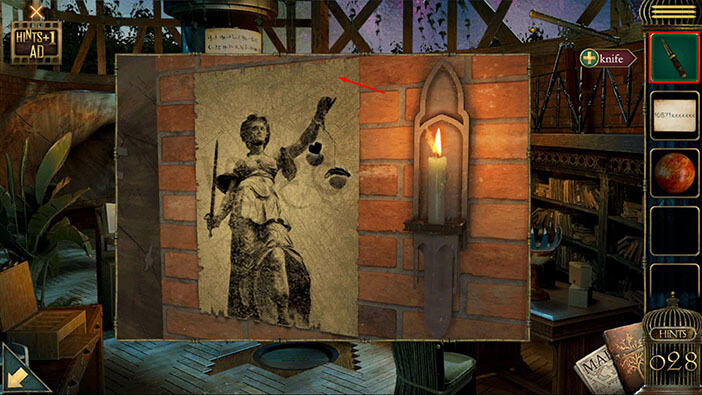
Next, select the “Knife” from the inventory and use it to remove the poster, located just to the left of the candle.
“Paper with tips (poster)” will be added to your inventory and you will also reveal a wall safe that requires a five-letter password. We will come back to this safe later in the walkthrough. Also, if you tap on the poster in your inventory and look at its backside you will discover some numbers. These numbers also represent a hint for one of the puzzles that we will tackle later in this walkthrough.
For now, tap on the arrow in the lower left corner to go back.
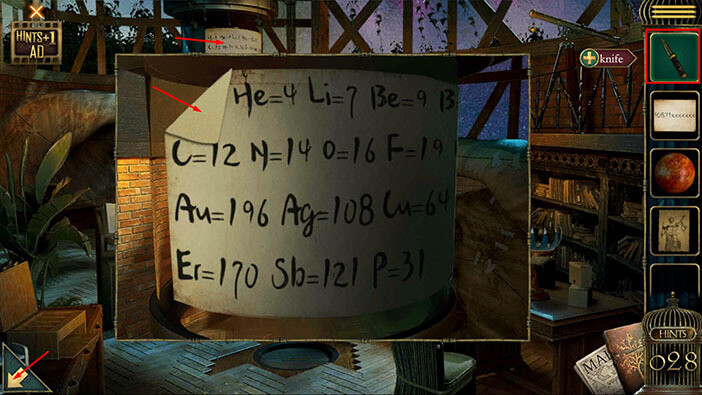
Next, tap on the paper located on the column near the ceiling, to take a closer look at it.
Select the “Knife” from the inventory and use it to remove the paper from the column. A “Periodic table of elements” will be added to your inventory.
After that, tap on the arrow in the lower left corner to go back.
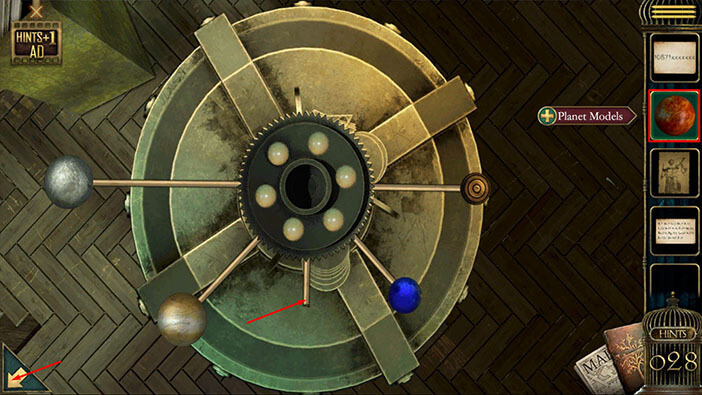
Let’s proceed to the next puzzle. Next, tap on the machine with planets, located on the column on the left, to take a closer look at it.
Select the “Planet Model” from the inventory and attach it to the pipe at the bottom. Our next task will be to arrange the planets in the correct order, and we will discover the correct order of the planet by following the instructions in the book.
Tap on the arrow in the lower left corner to go back, and let’s look at the instructions.
Let’s take another look at the open book on the left. Tap on the book again to examine the instructions.
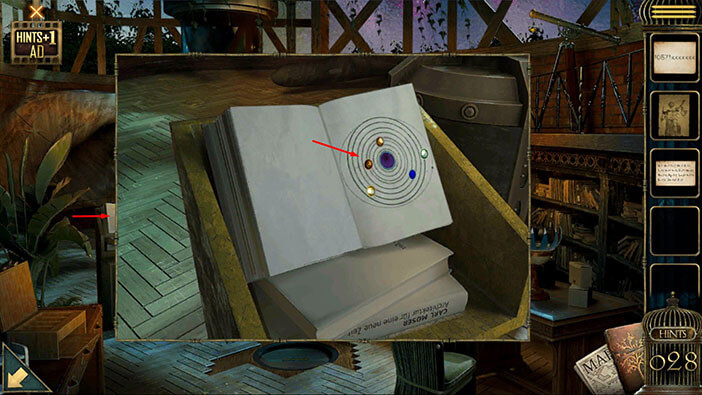
Here, we can see the positions of the planets. Let’s memorize/write down this information because our next task will be to set the planet on the machine at the same positions as the planets in the picture.
The White planet – should be at the 3 o’clock position
The Yellow planet – should be at the 7 o’clock position
The Blue planet – should be at the 4 o’clock position
The Red planet – should be at the 12 o’clock position
The Brown planet – should be at the 9 o’clock position
Once you’re done, tap on the arrow in the lower left corner to go back.
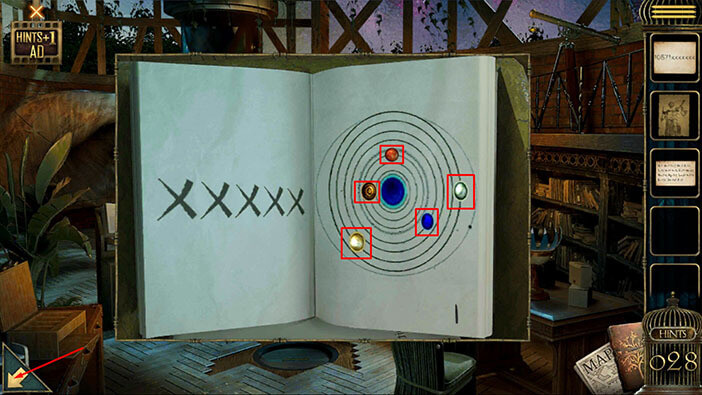
Tap on the machine with the globes again to start the interaction.
Let’s start by dragging the “White planet” to a 3 o’clock position. The pipe of the “Red planet” is attached to the pipe of the “White planet” so by setting the “White planet” we will also set the “Red planet” to the 12 o’clock position.
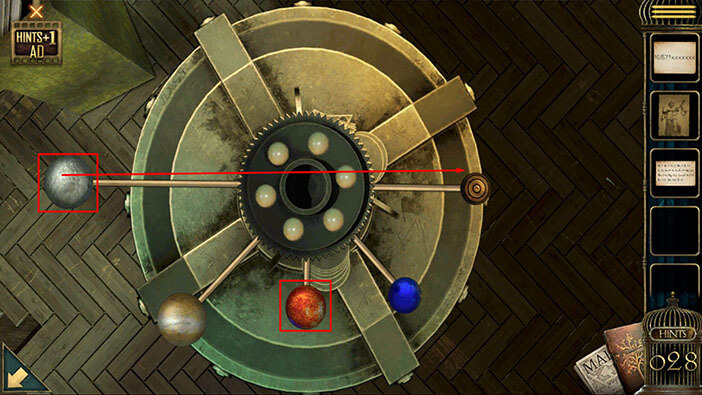
The “Blue planet” and the “Yellow planet” are already at the correct positions (4 o’clock and 7 o’clock). So, we just need to set the “Brown planet” to the 9 o’clock position.
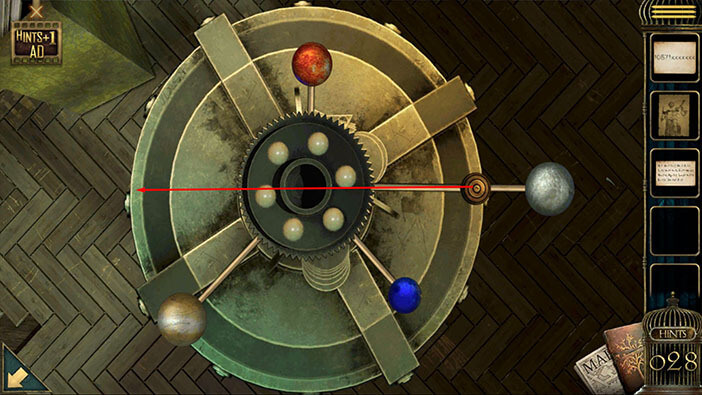
The new image of the planets will appear as soon as we set the correct order of the planets on the machine. In the center of the system, you will notice the letter “A”. Memorize/ write down this letter because this is the first letter of six letter password for the floor safe.
So, we will have to go through the pictures in the book and set the positions of the planets six more times in order to discover the entire password. Once you’re done, tap on the arrow in the lower left corner to go back.
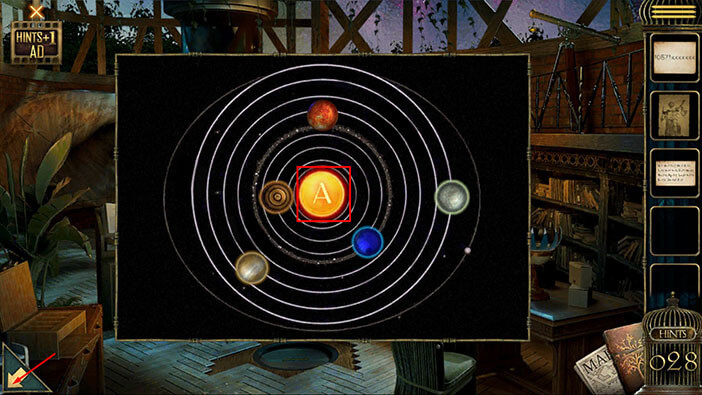
Let’s go back to the open book and examine the next picture. Tap on page number “1” to take a look at the next page.
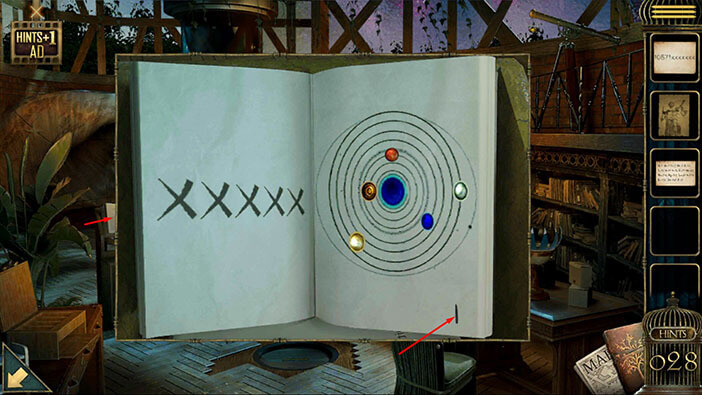
We can see that the planets in this image are at different positions, so let’s memorize/ write down these positions.
The White planet – should be at the 12 o’clock position
The Yellow planet – should be at the 7 o’clock position (unchanged)
The Blue planet – should be at the 4 o’clock position (unchanged)
The Red planet – should be at the 9 o’clock position
The Brown planet – should be at the 6 o’clock position
Once you’re done, tap on the arrow in the lower left corner to go back.
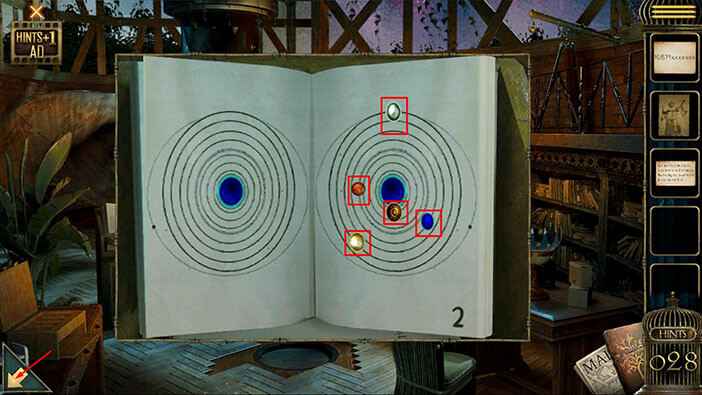
Tap on the machine with the globes again to start the interaction. You will notice that the first of the six green lights have been turned on (because we set the planets to the positions shown on the first page of the book).
Let’s set the position of the planets following the instructions from the second page of the book.
We will start by dragging the “White planet” to a 12 o’clock position. The pipe of the “Red planet” is attached to the pipe of the “White planet” so by setting the “White planet” we will also set the “Red planet” to the 9 o’clock position.
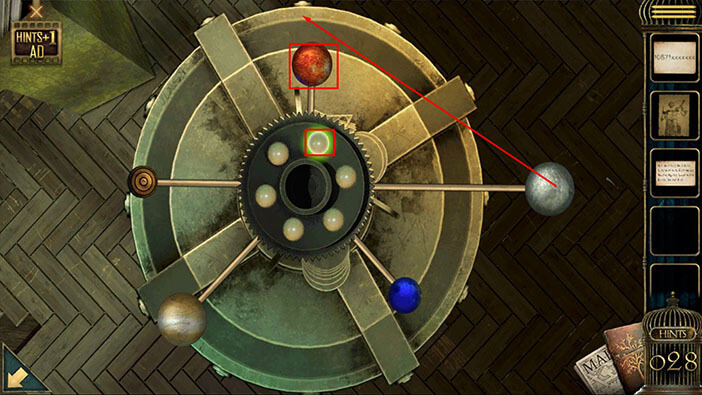
The “Blue planet” and the “Yellow planet” are already at the correct positions (4 o’clock and 7 o’clock). So, we just need to set the “Brown planet” to the 6 o’clock position.
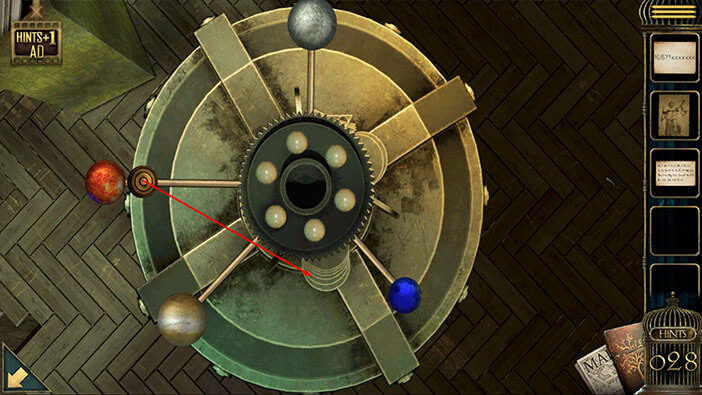
The new image of the planets will appear and in the center of the system, you will now see the letter “V”. Memorize/ write down this letter because this is the second letter of six letter password for the floor safe.
Once you’re done, tap on the arrow in the lower left corner to go back.
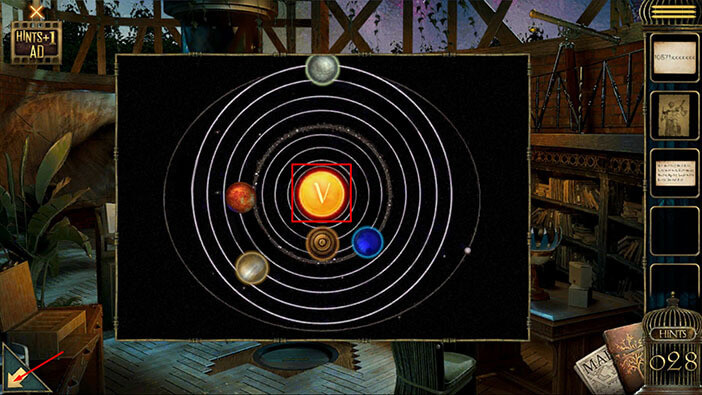
Let’s go back to the open book and examine the next picture. Tap on page number “2” to take a look at the next page.
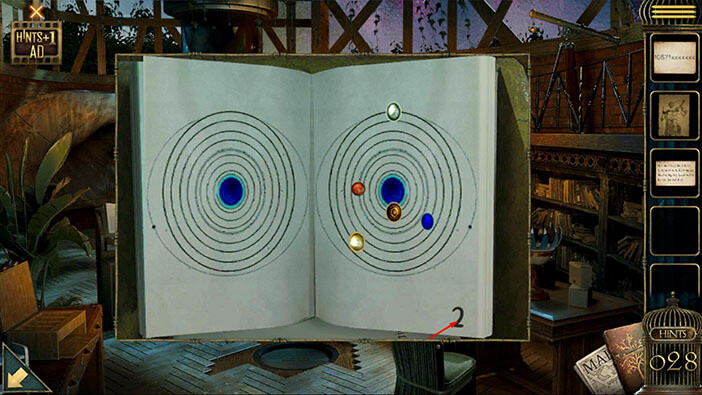
We can see that the planets in the third image are at different positions, so let’s memorize/ write down these positions.
The White Planet – should be at the 6 o’clock position
The Yellow Planet – should be at the 1 o’clock position
The Blue Planet – should be at the 11 o’clock position
The Red Planet – should be at the 9 o’clock position
The Brown Planet – should be at the 12 o’clock position
Once you’re done, tap on the arrow in the lower left corner to go back.
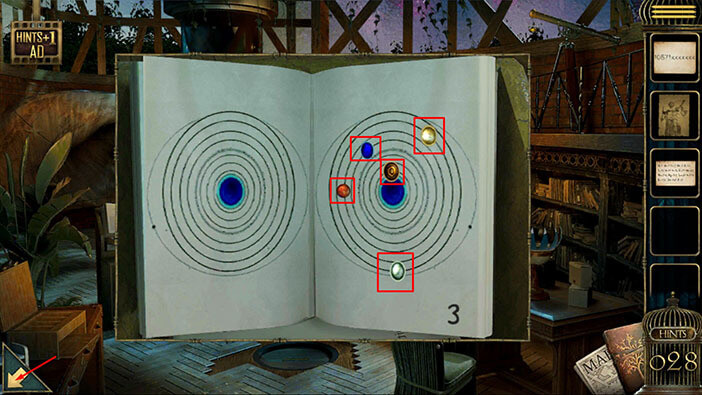
Tap on the machine with the globes again to start the interaction. You will notice that the second green light has been turned on.
Let’s set the position of the planets following the instructions from the third page of the book.
We will start by dragging the “White planet” to a 6 o’clock position. The pipe of the “Red planet” is attached to the pipe of the “White planet” so by setting the “White planet” at 6 o’clock we will also set the “Red planet” to the 3 o’clock position. This is not the correct position for the “Red Planet” but we can easily fix it in the next step.
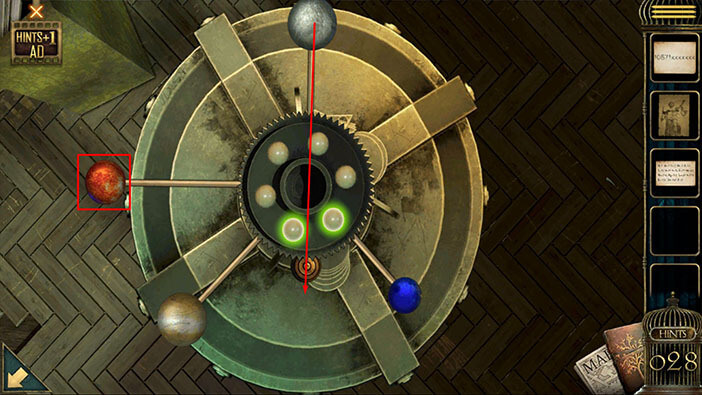
Let’s drag the “Yellow Planet” to a 1 o’clock position. The pipe of the “Red planet” is also attached to the pipe of the “Yellow planet” so by setting the “Yellow planet” at 1 o’clock we will also set the “Red planet” to the 9 o’clock position (correct position).
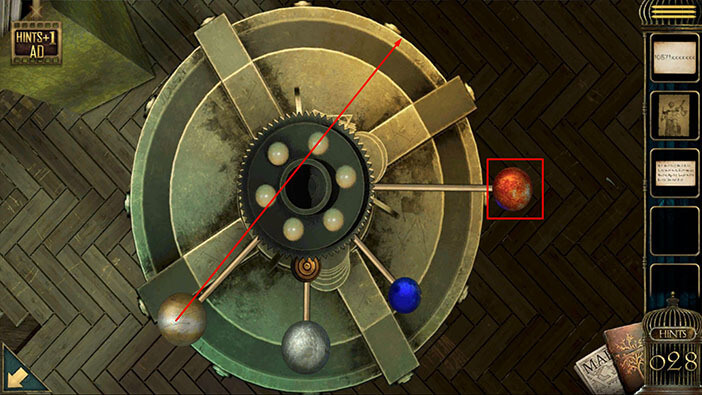
Next, drag the “Blue planet” to the 11 o’clock position.
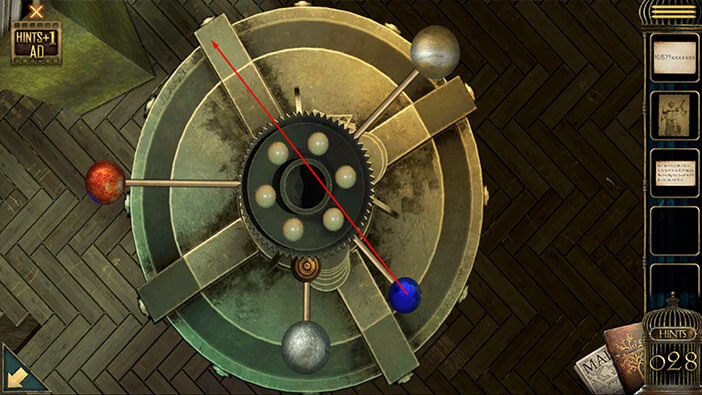
Lastly, drag the “Brown planet” to the 12 o’clock position.
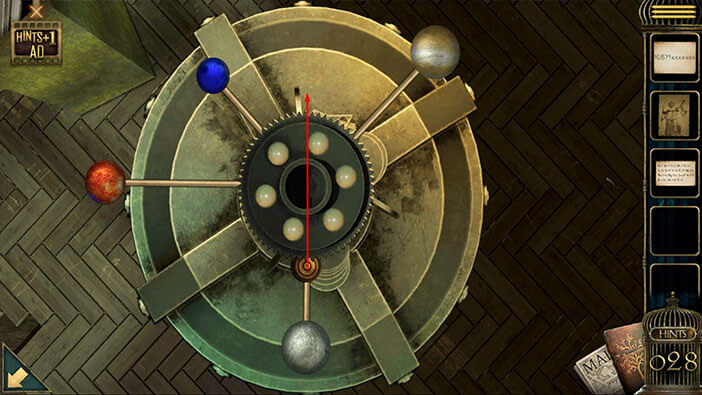
The new image of the planets will appear and in the center of the system, you will now see the letter “E”. Memorize/ write down this letter because this is the third letter of six letter password for the floor safe.
Once you’re done, tap on the arrow in the lower left corner to go back.
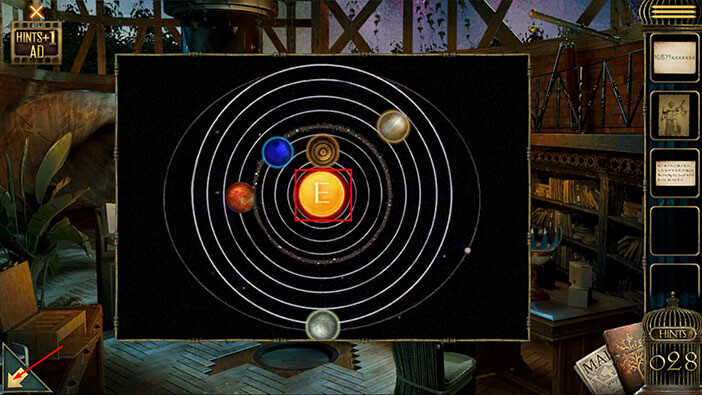
Let’s go back to the open book and examine the next picture. Tap on page number “3” to take a look at the next page.
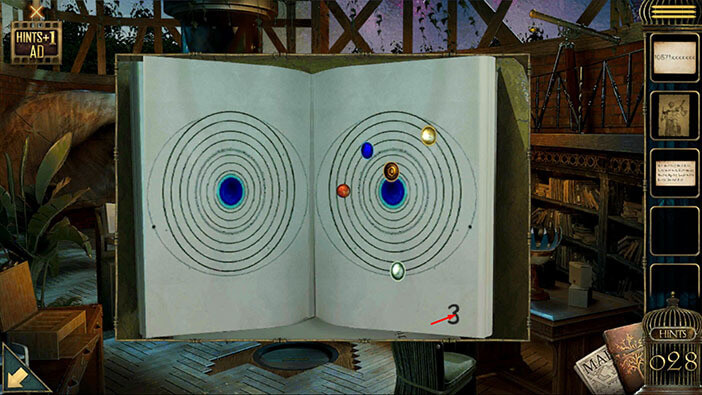
We can see that the planets in the fourth image are at different positions, so let’s memorize/ write down these positions.
The White planet – should be at the 6 o’clock position (unchanged)
The Yellow planet – should be at the 7 o’clock position
The Blue planet – should be at the 4 o’clock position
The Red planet – should be at the 3 o’clock position
The Brown planet – should be at the 12 o’clock position (unchanged)
Once you’re done, tap on the arrow in the lower left corner to go back.
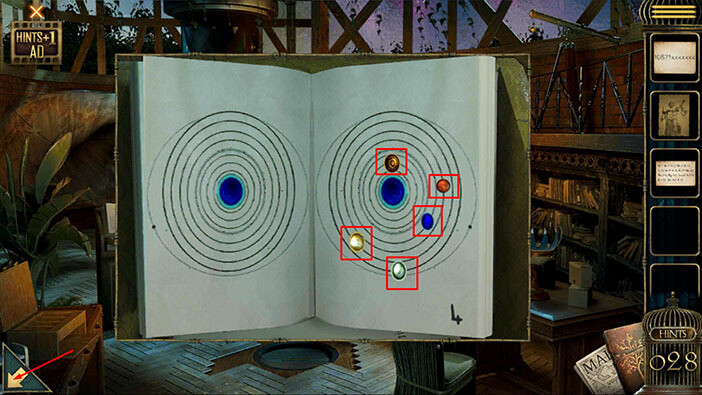
Tap on the machine with the globes again to start the interaction. You will notice that the third green light has been turned on.
Let’s set the position of the planets following the instructions from the fourth page of the book.
The “White planet” is already in the correct position. So, we will start by dragging the “Yellow planet” to a 7 o’clock position. The pipe of the “Red planet” is attached to the pipe of the “Yellow planet” so by setting the “Yellow planet” at 7 o’clock we will also set the “Red planet” to the 3 o’clock position (correct position).
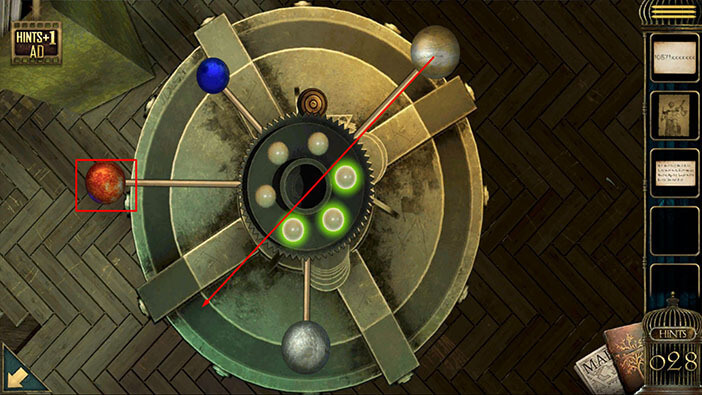
Next, drag the “Blue planet” to the 4 o’clock position.
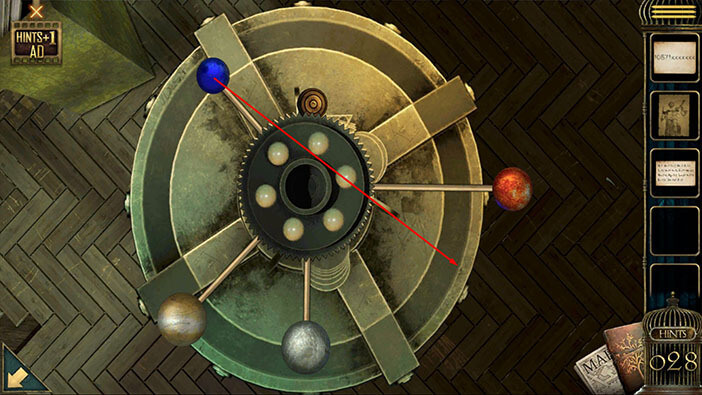
The new image of the planets will appear and in the center of the system, you will now see the letter “N”. Memorize/ write down this letter because this is the fourth letter of six letter password for the floor safe.
Once you’re done, tap on the arrow in the lower left corner to go back.
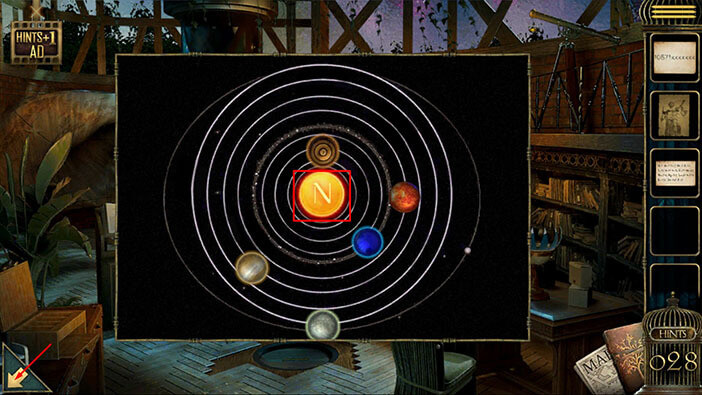
Let’s go back to the open book and examine the next picture. Tap on page number “4” to take a look at the next page.
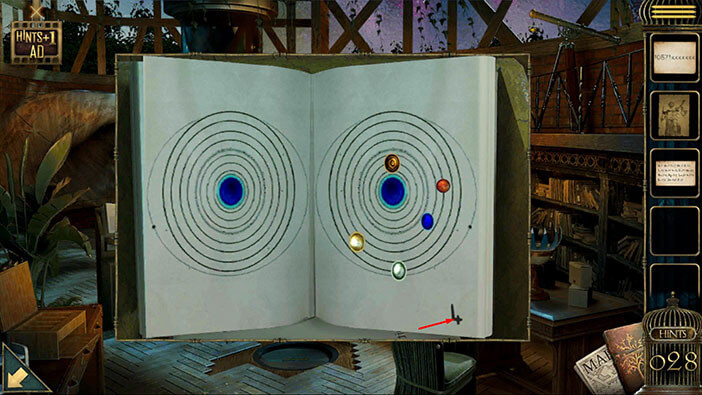
We can see that the planets in the fifth image are at different positions, so let’s memorize/ write down these positions.
The White Planet – should be at the 3 o’clock position
The Yellow Planet – should be at the 1 o’clock position
The Blue Planet – should be at the 11 o’clock position
The Red Planet – should be at the 6 o’clock position
The Brown Planet – should be at the 9 o’clock position
Once you’re done, tap on the arrow in the lower left corner to go back.
Tap on the machine with the globes again to start the interaction. You will notice that the fourth green light has been turned on.
Let’s set the position of the planets following the instructions from the fifth page of the book.
We will start by dragging the “White planet” to a 3 o’clock position. The pipe of the “Red planet” is attached to the pipe of the “White planet” so by setting the “White planet” at 3 o’clock we will also set the “Red planet” to the 12 o’clock position. This is not the correct position for the “Red Planet” but we can easily fix it in the next step.
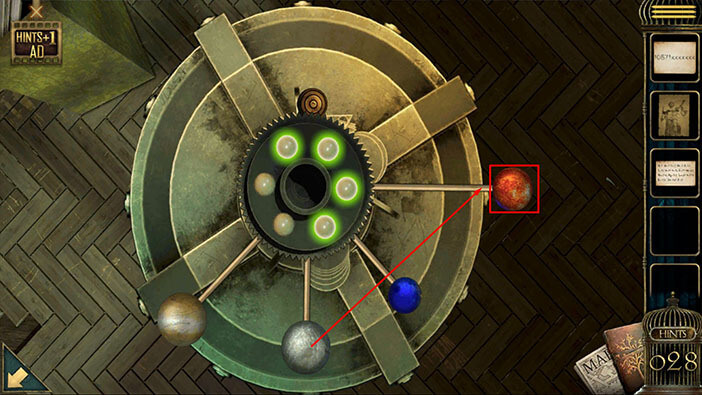
Let’s drag the “Yellow Planet” to a 1 o’clock position. The pipe of the “Red planet” is also attached to the pipe of the “Yellow planet” so by setting the “Yellow planet” at 1 o’clock we will also set the “Red planet” to the 6 o’clock position (correct position).
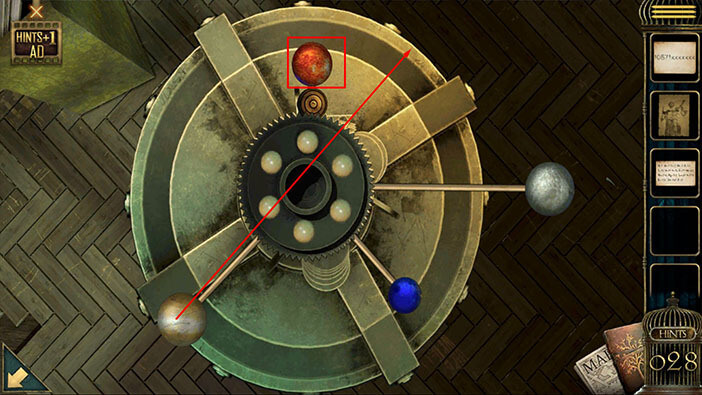
Next, drag the “Blue planet” to the 11 o’clock position.
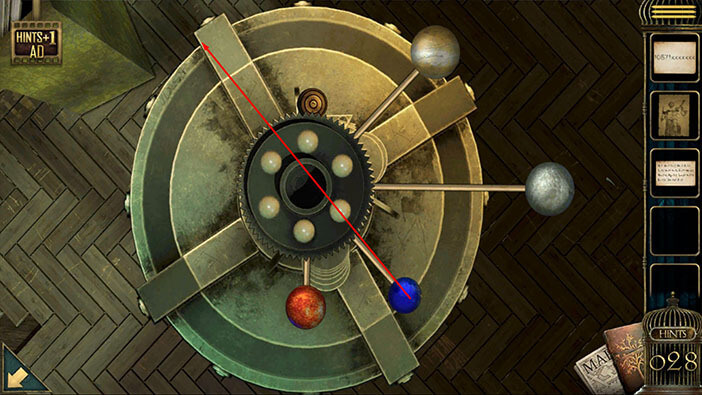
Lastly, drag the “Brown planet” to the 9 o’clock position.
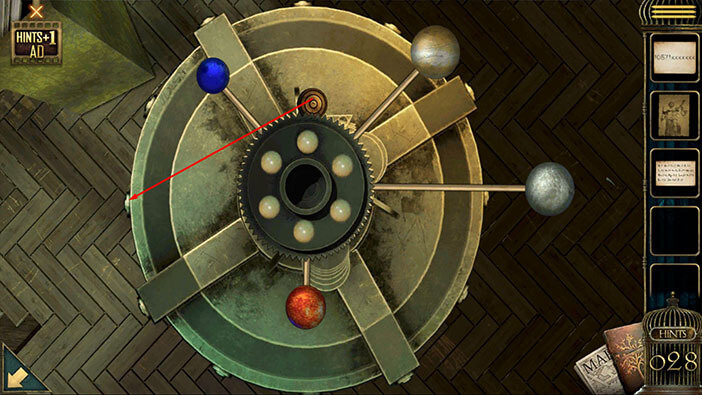
The new image of the planets will appear and in the center of the system, you will now see the letter “G”. Memorize/ write down this letter because this is the fifth letter of six letter password for the floor safe.
Once you’re done, tap on the arrow in the lower left corner to go back.
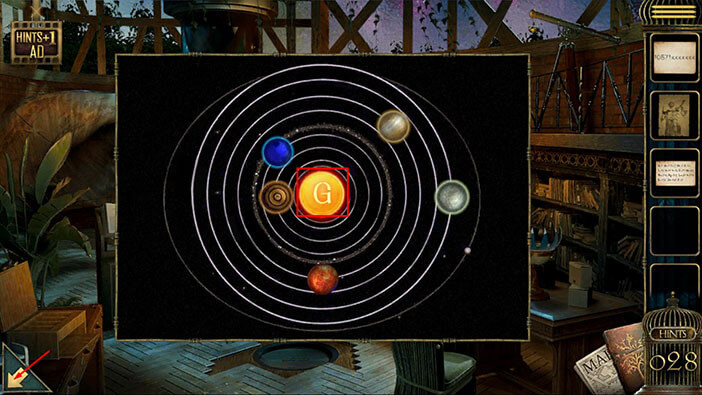
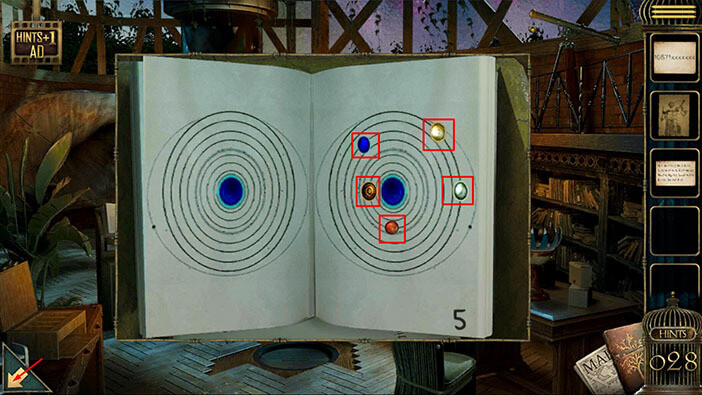
We are almost done. Just one more letter and we will have the password. Let’s go back to the open book and examine the last picture. Tap on page number “5” to take a look at the next page.
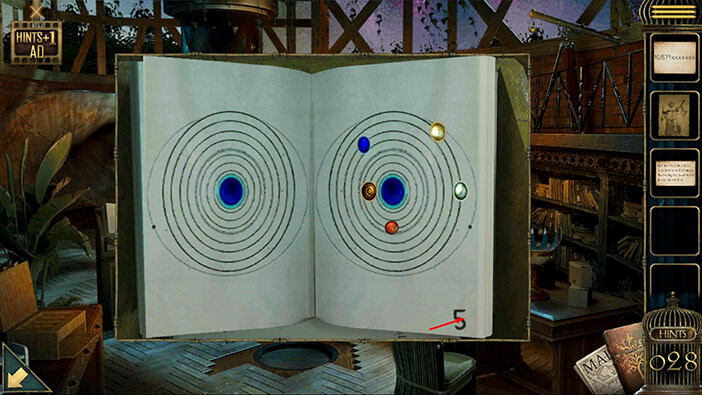
We can see that the planets in the sixth image are at different positions, so let’s memorize/ write down these positions.
The White planet – should be at the 1 o’clock position
The Yellow planet – should be at the 6 o’clock position
The Blue planet – should be at the ~3 o’clock position
The Red planet – should be at the ~9 o’clock position
The Brown planet – should be at the 7 o’clock position
Once you’re done, tap on the arrow in the lower left corner to go back.
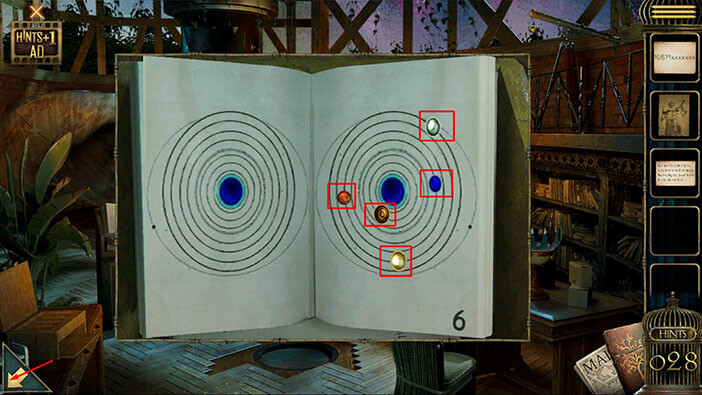
Tap on the machine with the globes again to start the interaction. You will notice that the fifth green light has been turned on.
Let’s set the position of the planets following the instructions from the sixth page of the book.
We will start by dragging the “White planet” to a 1 o’clock position. The pipe of the “Red planet” is attached to the pipe of the “White planet” so by setting the “White planet” at 1 o’clock we will also set the “Red planet” to the 5 o’clock position. This is not the correct position for the “Red Planet” but we can easily fix it in the next step.
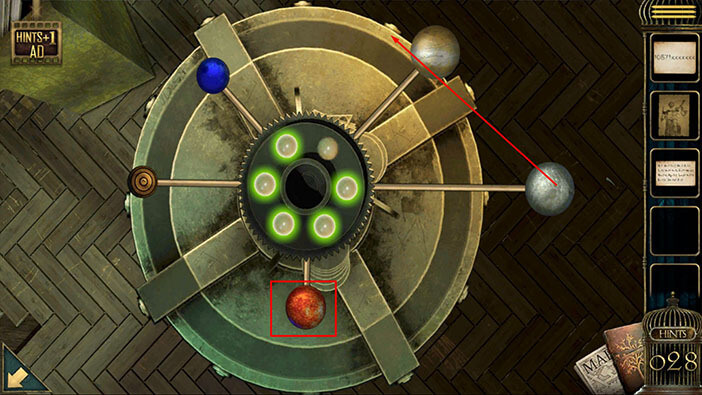
Let’s drag the “Yellow Planet” to a 6 o’clock position. The pipe of the “Red planet” is also attached to the pipe of the “Yellow planet” so by setting the “Yellow planet” at 6 o’clock we will also set the “Red planet” to the ~9 o’clock position (correct position).
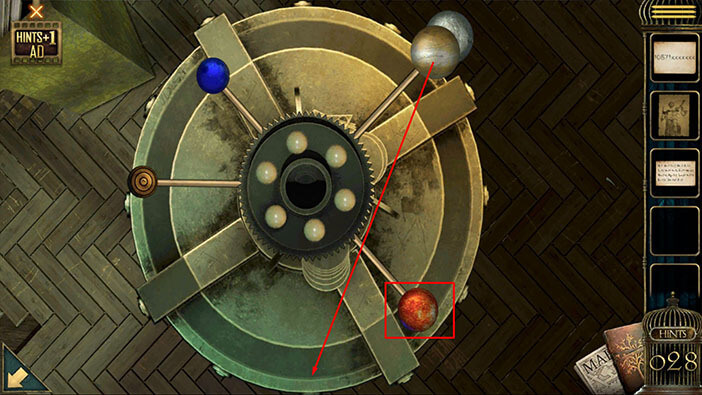
Next, drag the “Blue planet” to the ~3 o’clock position.
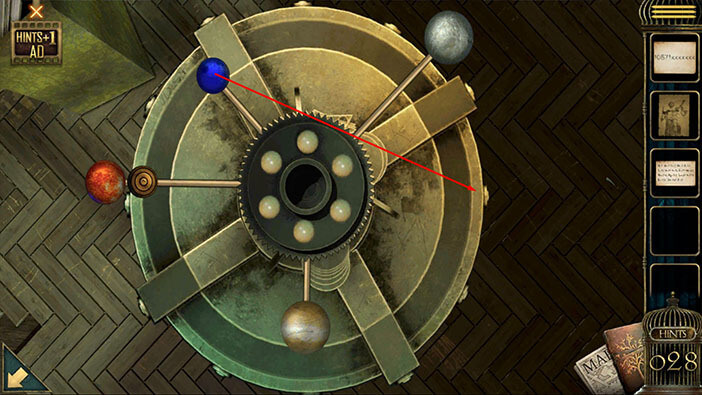
Lastly, drag the “Brown planet” to the 7 o’clock position.
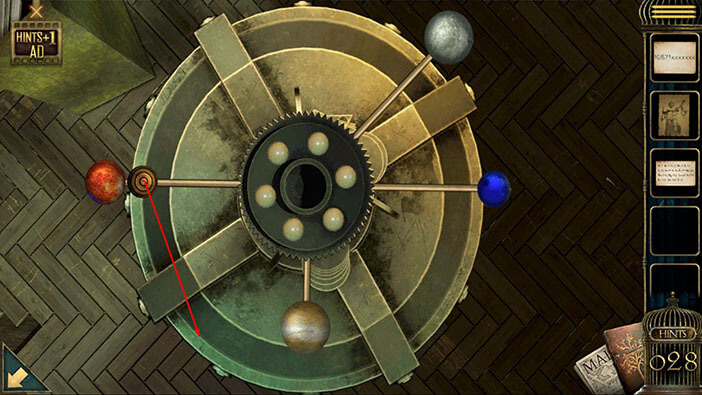
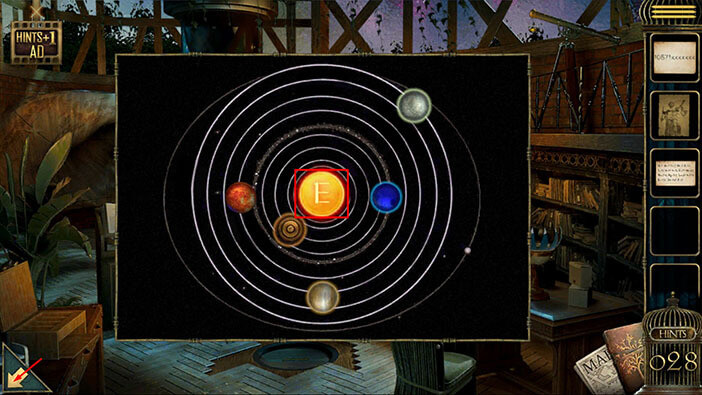
The new image of the planets will appear and in the center of the system, you will now see the letter “E”. Memorize/ write down this letter because this is the last letter of six letter password for the floor safe. When we put it all together, we will get the password “AVENGE”.
Once you’re done, tap on the arrow in the lower left corner to go back.
Tap on the hole in the floor to take a closer look at it, then tap on the floor safe to start the interaction.
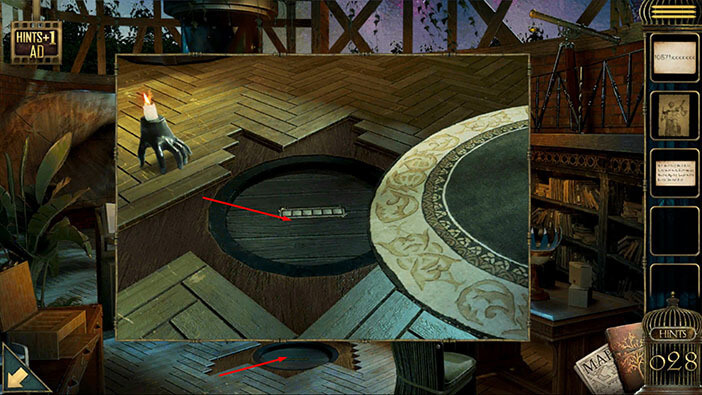
Enter the password “AVENGE”. We discovered this password by following the instructions in the open book and using them to rearrange the globes on the machine.
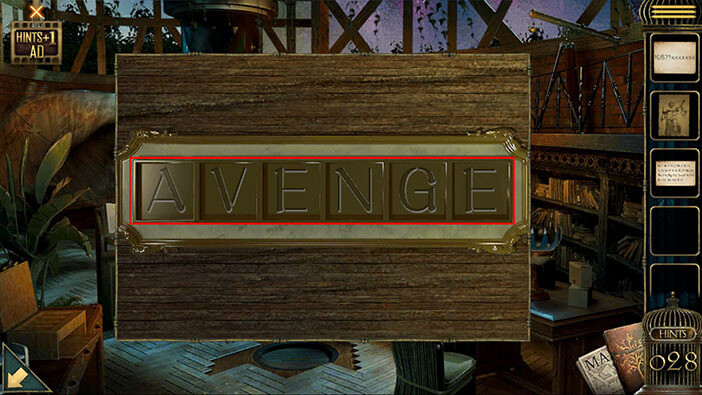
Looks like I was wrong and this wasn’t a floor safe, but a trapdoor. Anyway, a trapdoor will open as soon as you enter the correct password, so tap on the arrow to proceed to the next room.
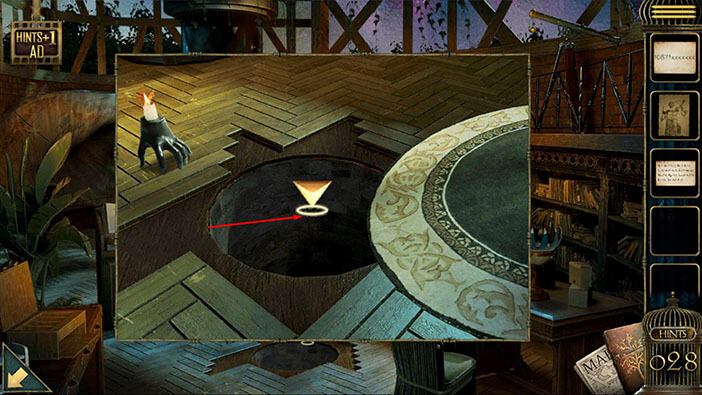
Well, looks like we’ve found another entrance to the hallway, so there’s no new room.
Tap on the chair on the right to take a closer look at it. Tap on the “Stethoscope” to pick it up – we will need it later. After that, tap on the arrow in the lower left corner to go back.
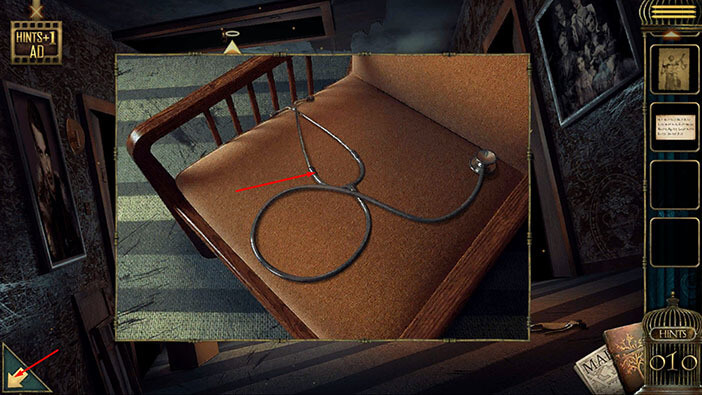
Tap on the arrow in the ceiling to go back to the previous room. Once we get there, we will start working on the next large puzzle.
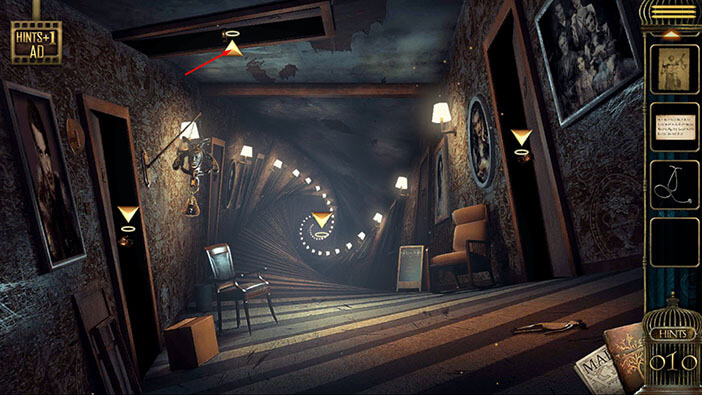
Ok, our next task is a bit complex, but I think we are ready to tackle this challenge. So, our next task is to discover one large number, and we will do this by discovering parts of the number that our scattered over several hints. Let’s begin.
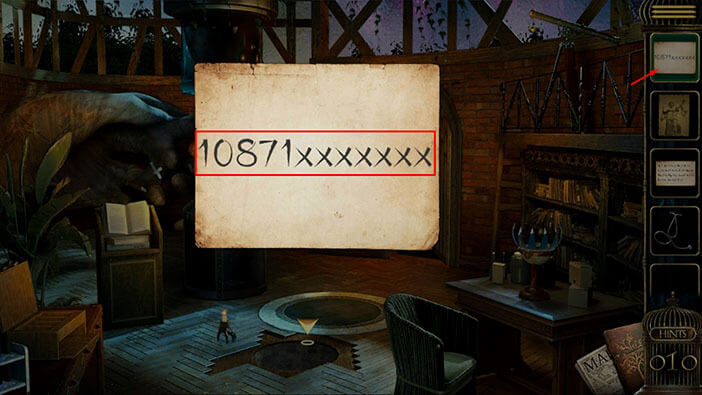
First, tap on the hint at the top of your inventory to take a closer look at it.
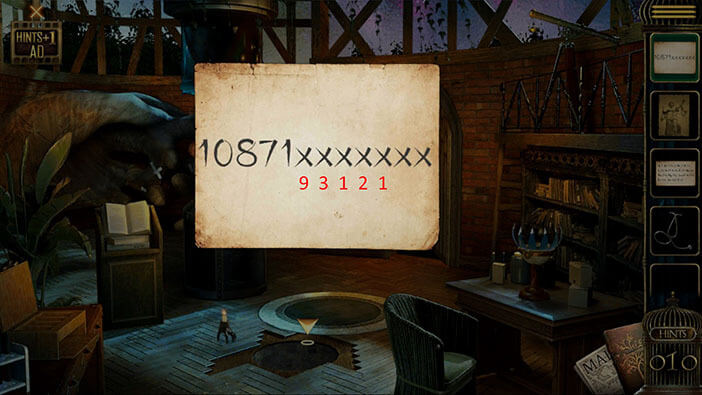
You will see the number “10871xxxxxxx”. So, here we have a 12-digit number. We know the first five digits, but the other seven digits are unknown.
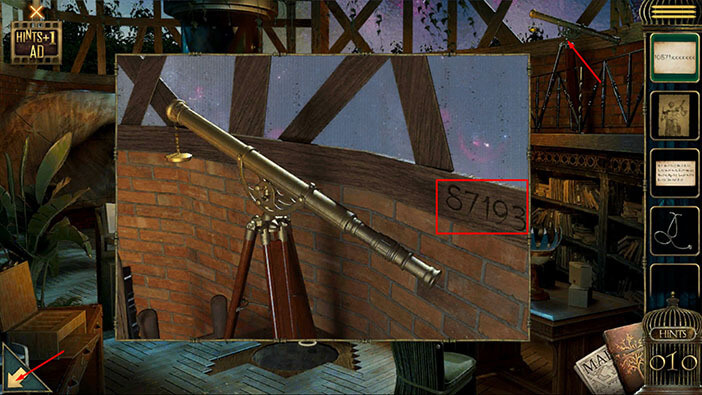
Next, tap on the telescope located in the top right corner of the room, to take a closer look at it.
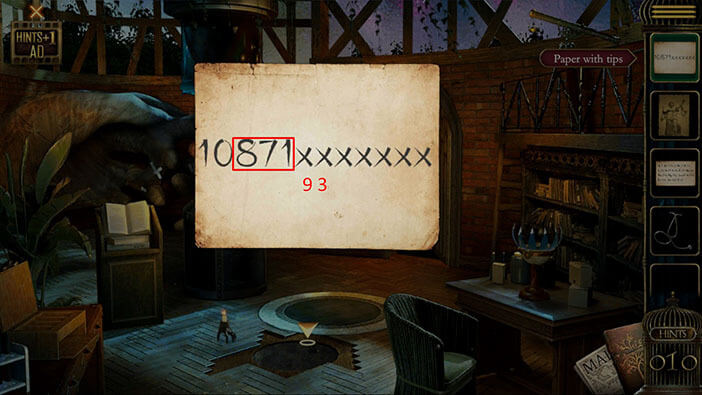
Here, we can see the number “87193”. So, the first five digits of the previous number (the number on the hint) were “10871”. The number “87193” represents the continuation of this number – the first three digits are the same as the three last digits.
So, we have just discovered two more digits, “93”. When we put it all together, we will get the number “1087193xxxxx” but we still do not know the last five digits. Memorize/write down this number.
Once you’re done, tap on the arrow in the lower left corner to go back.
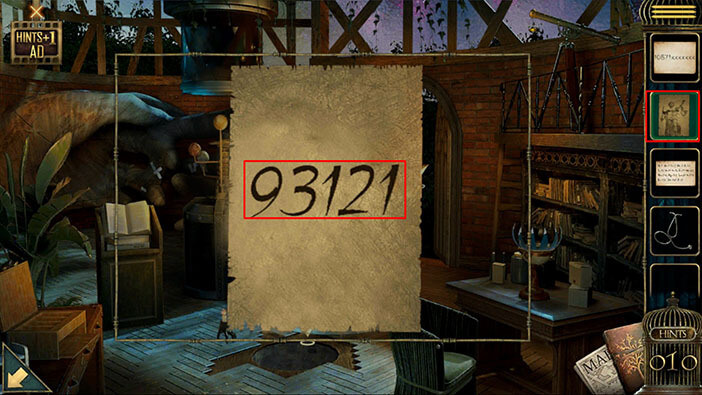
Next, tap on the other “Paper with tips (poster)” in your inventory, to take a closer look at it. Tap on the poster again to flip it over and you will discover another number.
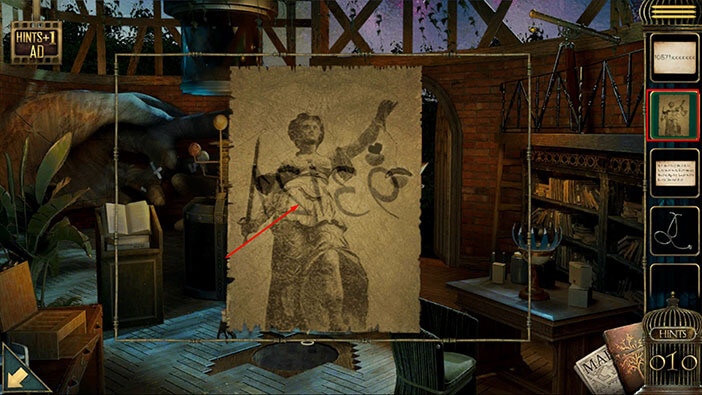
Here, we can see the number “93121”. The number that we discovered so far is “1087193xxxxx”. We can see that the first two digits of the number on the poster are the same as the last two known digits of our number (“93”).
So, we have just discovered three more digits, “121”. When we put it all together, we will get the number “1087193121xx” but we still do not know the last two digits. Memorize/write down this number.
Let’s look for the last two digits. Tap on the open white book on the left to take a closer look at it, and tap again to examine it.
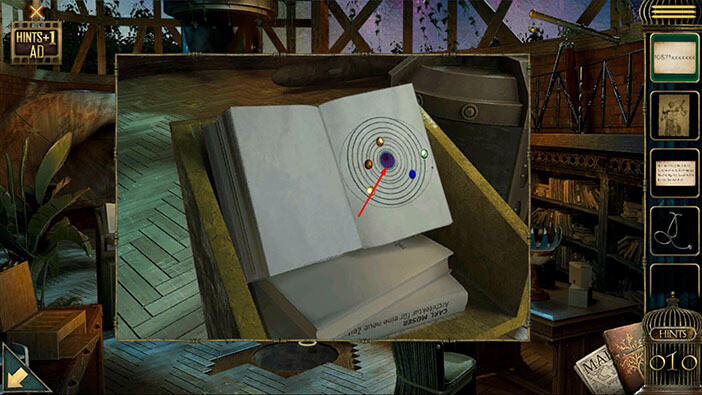
Tap on the number 6 on the last page with planets, to take a look at the next page, and here you will discover the last number.
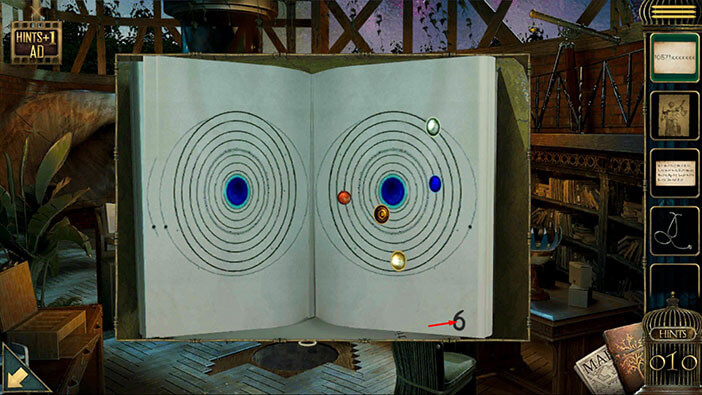
Here, we can see the number “12170”. The number that we discovered so far is “1087193121xx”. We can see that the first three digits of the number in the book are the same as the last three known digits of our number (“121”).
So, we have just discovered the last two digits, “70”. When we put it all together, we will get the number “108719312170”. Memorize/write down this number.
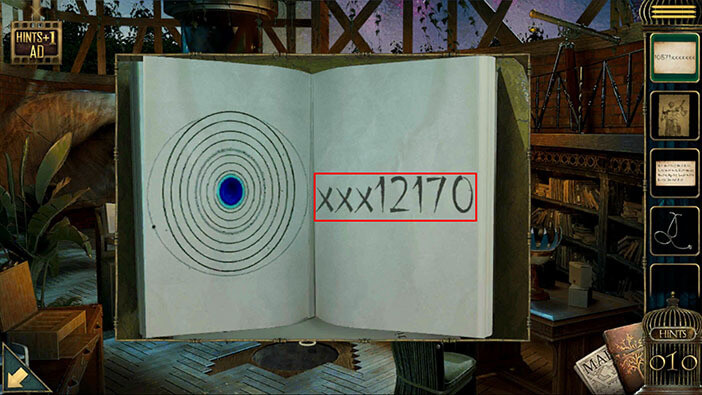
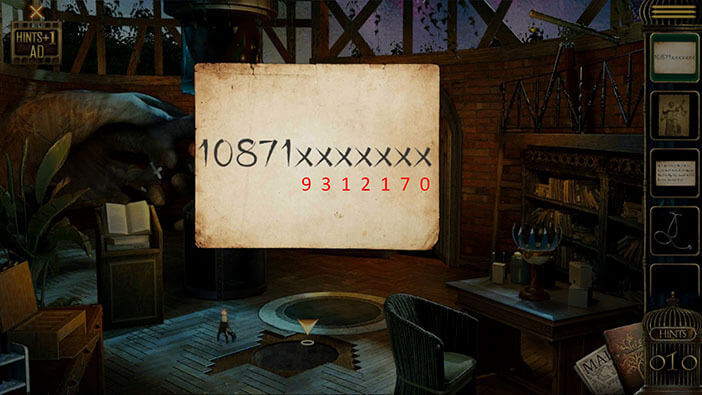
Ok, so we have discovered the entire number, and it is “108719312170”. But why have we gone through all this trouble to discover this number? Well, that’s the second part of the puzzle.
Tap on the “Periodic table of the elements” in your inventory to examine it.
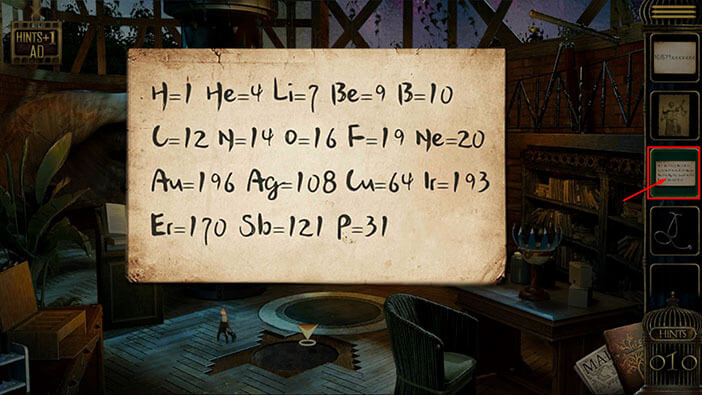
Ok, here we can see that each element has its numerical code. Our task is to find the combination of codes that could form the number that we discovered. As I mentioned earlier, this puzzle is a bit complex because it has several parts. So, we will divide this part into several steps. Let’s begin.
Step 1
Our number is “108719312170”. If we look at the elements, we will notice that the “Ag” code has the same first three digits as our number (108). So, the first element that we are looking for is “Ag”.
We are interested in the first letter of this element, “A”. Memorize/write down this letter, because the letters that we discover will form the password for the wall safe that we saw previously in this room.
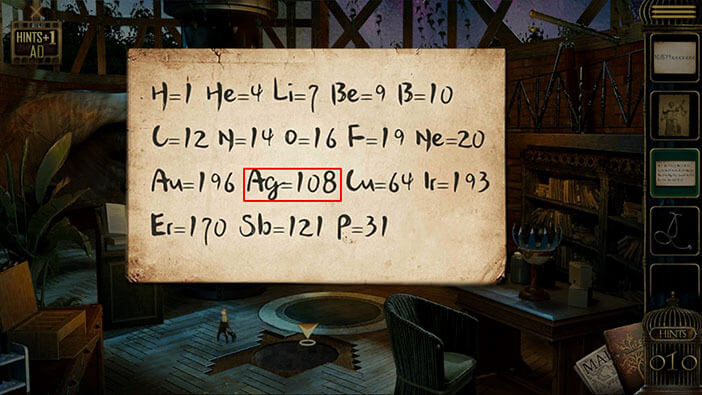
Step 2
The next digit of our number is “7” (“108 7 19312170”). The only element that starts with the number 7 is “Li”, so that’s our second element.
As before, we are interested in the first letter of this element, “L”. Memorize/write down this letter.
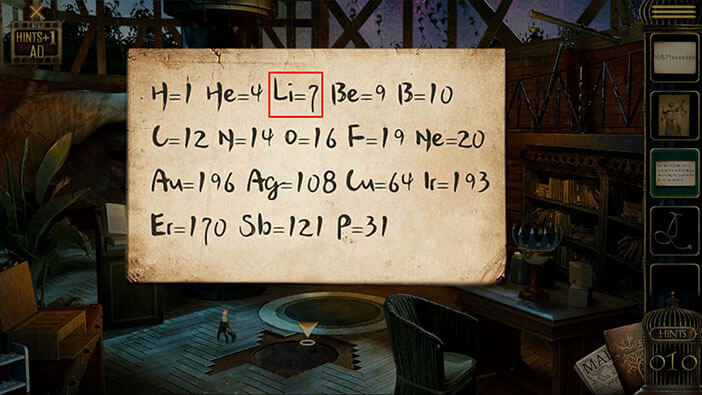
Step 3
The next three digits of our number are “193” (“108 7 193 12170”). The element “Ir” has the code “193”.
As before, we are interested in the first letter of this element, “I”. Memorize/write down this letter.
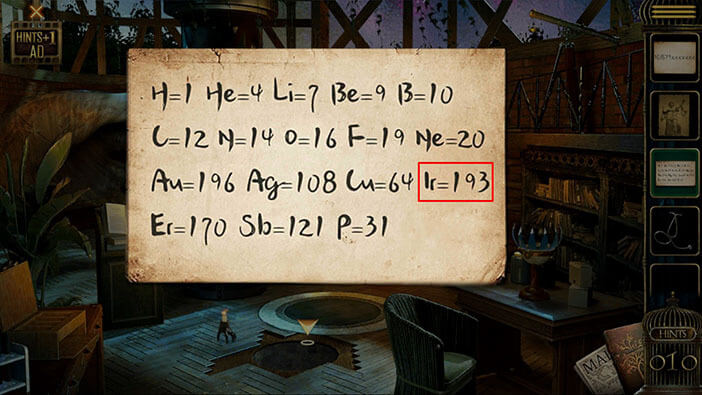
Step 4
The next two digits of our number are “12” (“108 7 193 12 170”). The element “C” has the code “12”.
NOTE: The “Sb” element has the code “121” and it could theoretically fit in as our next element. However, there is no element with the code “70” so we couldn’t assemble the whole number with the “Sb”. The point is that “Sb” fills the requirements for this step, but it is clearly the wrong choice since we couldn’t complete our number.
As before, we are interested in the first letter of this element, “C”. Memorize/write down this letter.
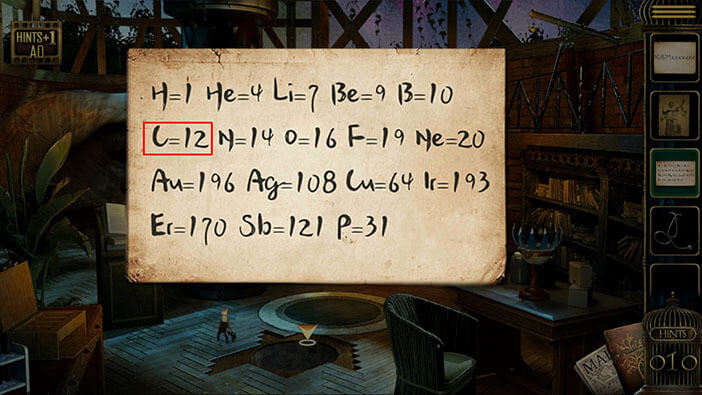
Step 5
The last three digits of our number are “170” (“108 7 193 12 170”). The element “Er” has the code “170”.
As before, we are interested in the first letter of this element, “E”. When we put it all together, we will get the password “ALICE”. Memorize/write down this password because we will need it for the next puzzle.
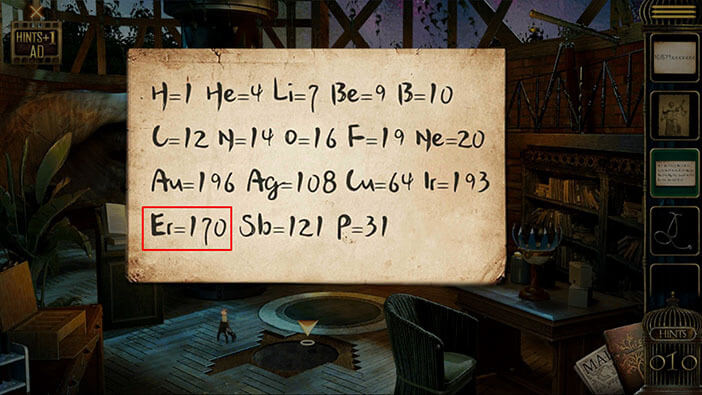
Tap on the wall safe, just to the left of the door, to take a closer look at it. Tap on it again to start the interaction.
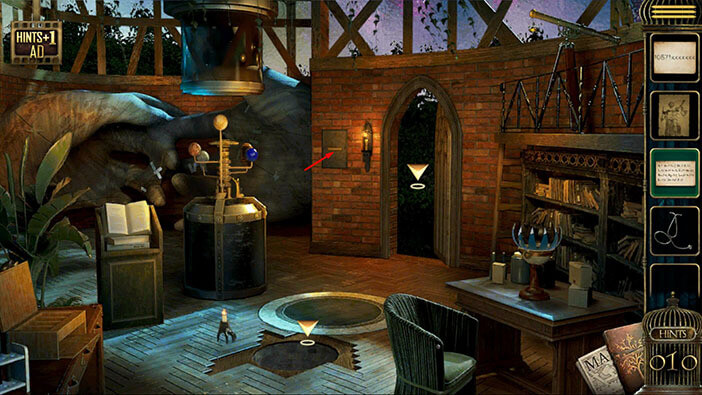
Enter the code “ALICE”. We discovered this code by completing several steps. First, we discovered the “secret” number. Then, we used this number to discover the elements with the codes that could form this number, by examining the “Periodic table of the elements”. Lastly, we used the first letter of each element to form the password “ALICE”.
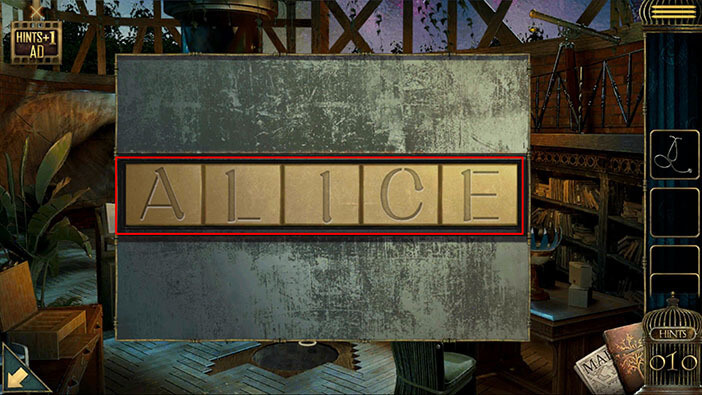
You will unlock the safe as soon as you enter the correct password, and inside you will find an “Arm”. Tap on it to pick it up.
After that, tap on the arrow in the lower left corner to go back.
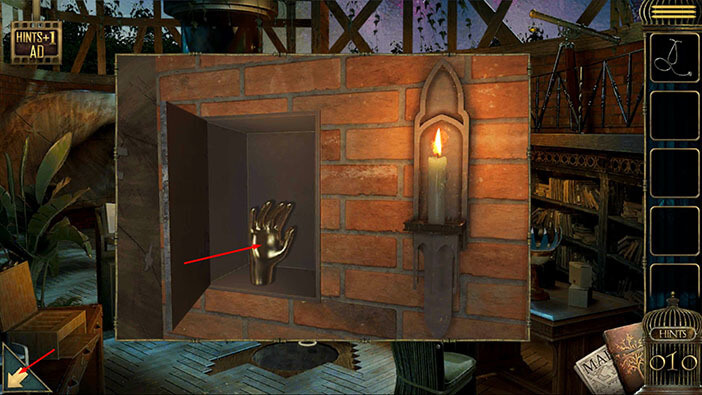
Ok, before we continue, we should go back to the room with the large heart, because I forgot to pick up the “Family badge piece (Jason)” that is located in this room.
Let’s tap on the map icon in the lower right corner of the screen. After that, tap on the room on the right in the top row.
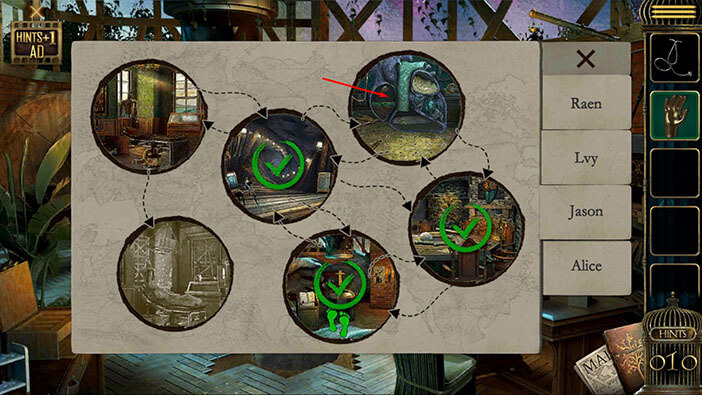
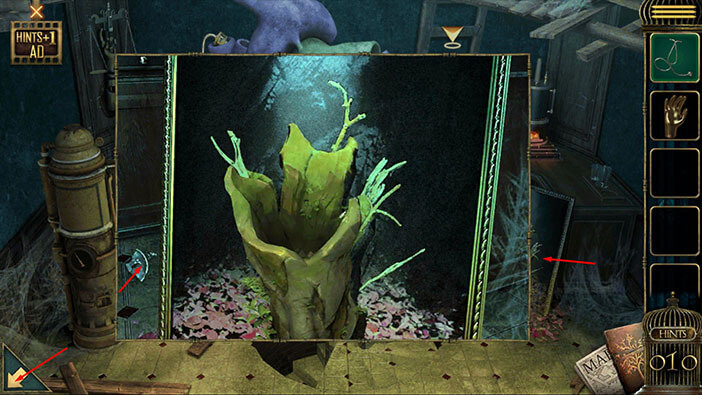
Next, tap on the picture of the tree trunk on the right to take a closer look at it.
Just to the left of the picture, you will notice the fourth “Family badge piece (Jason)”. Tap on it to pick it up.
After that, tap on the arrow in the lower left corner to go back.
Next, we should go back to the mannequin in the first room. Again, let’s tap on the map icon in the lower right corner of the screen. After that, tap on the room on the left in the top row.
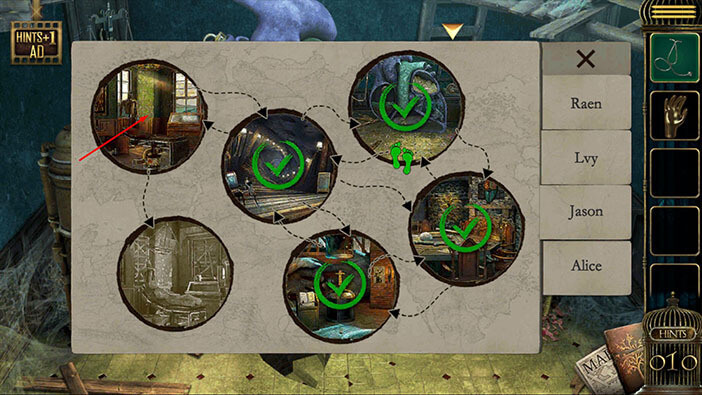
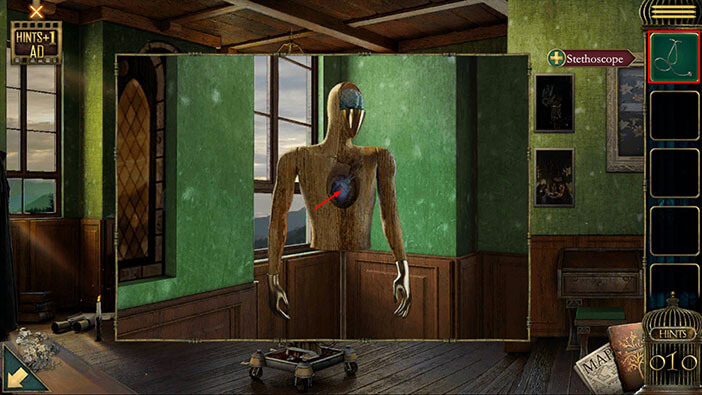
Tap on the mannequin to take a closer look at it.
You will notice that one of its hands is missing. So, select the “Arm” from the inventory and attach it to the mannequin.
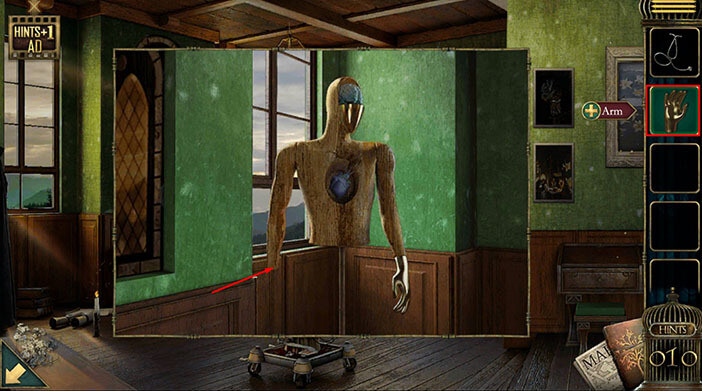
Next, select the “Stethoscope” from the inventory and use it to listen to the heart.
The room will change, it will become much darker and creepier. You will also notice that, now, there is a doll chained to the chair in the middle of the room.
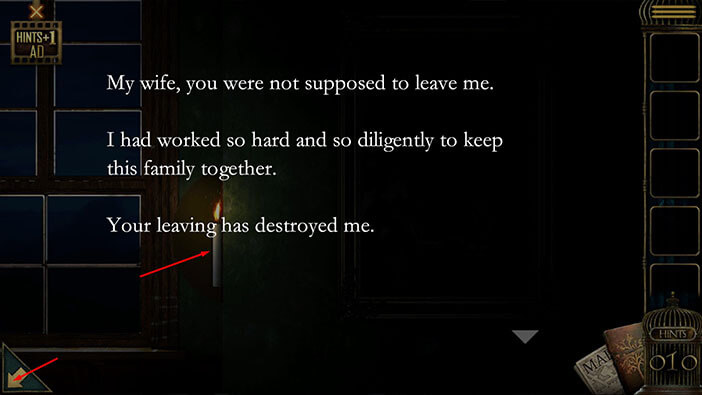
Let’s tap on the candle located on the left side of the room, next to the window, to discover another part of the story.
Here, we can see that Jason’s wife decided to leave him at some point. Jason was devastated when she left, because he placed his family above anything else, and worked hard to keep it together.
Tap on the arrow in the lower left corner to go back.
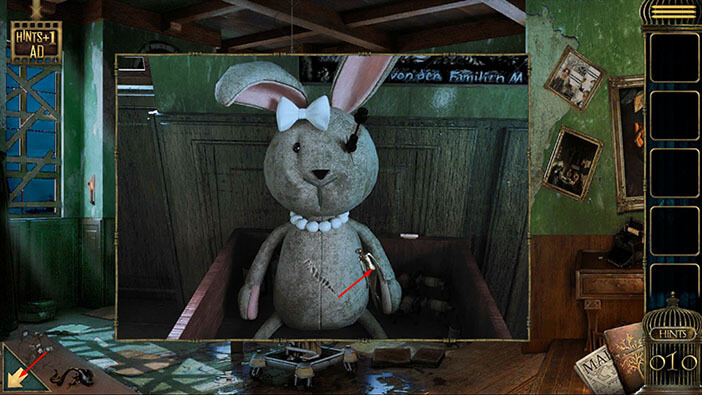
Next, tap on the bunny, located on the left side of the room (just to the right from the candle) to take a closer look.
Tap on the “Little Man Golden Sculpture” to pick it up. After that, tap on the arrow in the lower left corner to go back.
Next, tap on the small box located next to the window on the right side of the room, to take a closer look at it.
Just to the left of the box, you will see a “Knife”. Tap on it to pick it up.
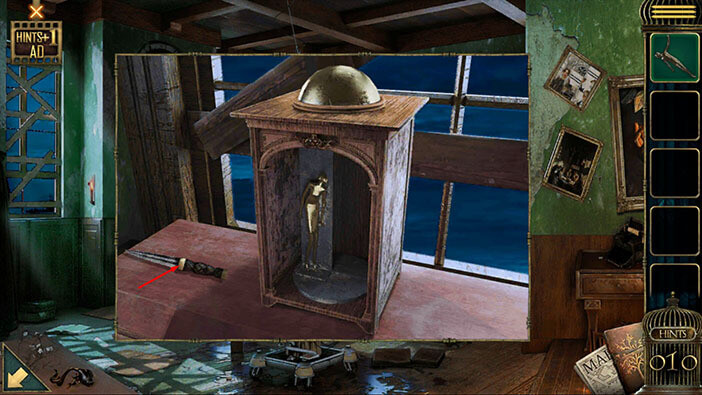
If you pay attention to the box, you will notice one statue, but the other one is missing. So, select the “Little Man Golden Sculpture” from the inventory and insert it into the box.
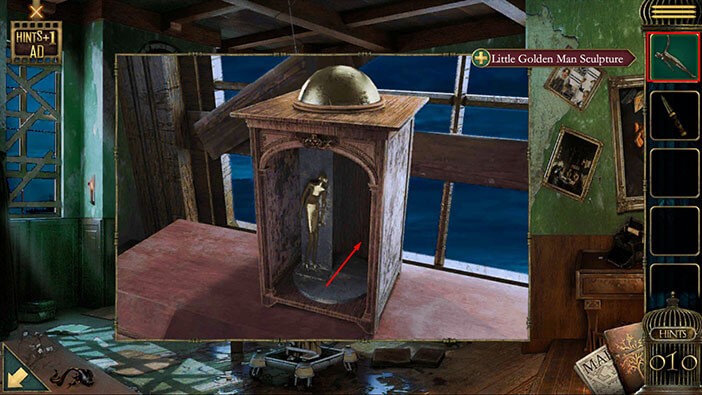
The top of the box will open as soon as you insert the small statue, and you will find a “Button”. Tap on it to pick it up.
After that, tap on the arrow in the lower left corner to go back.
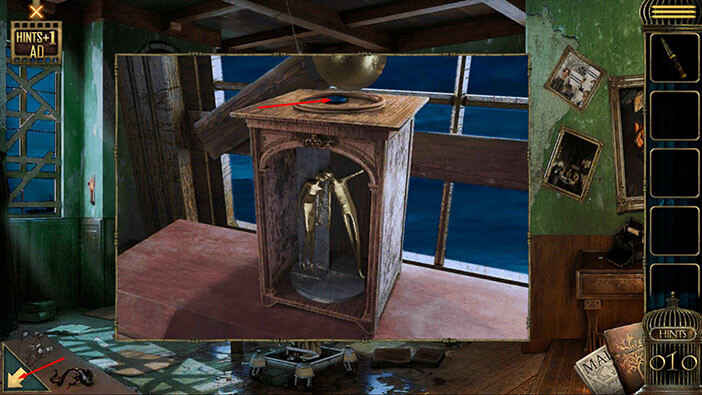
Next, tap on the small shelf, located just to the right of the chair, to take a closer look at it.
On the bottom shelf, you will find the fifth “Family badge piece (Jason)”, so let’s tap on it to pick it up.
After that, tap on the white panel at the bottom of the shelf to start the interaction.
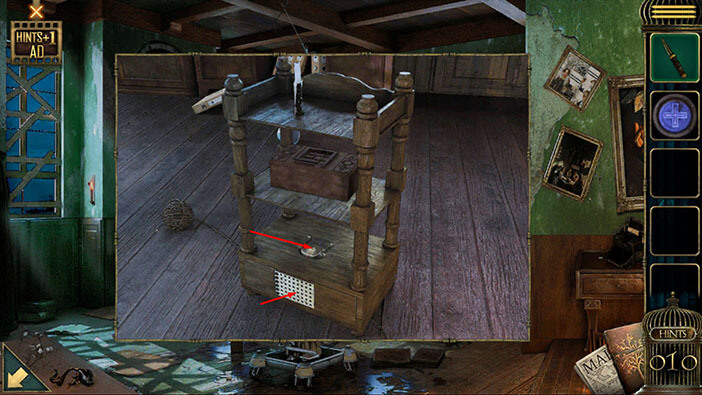
You will notice that the first button in the column on the left is missing. So, select the “Button” from the inventory and insert it into the empty slot.
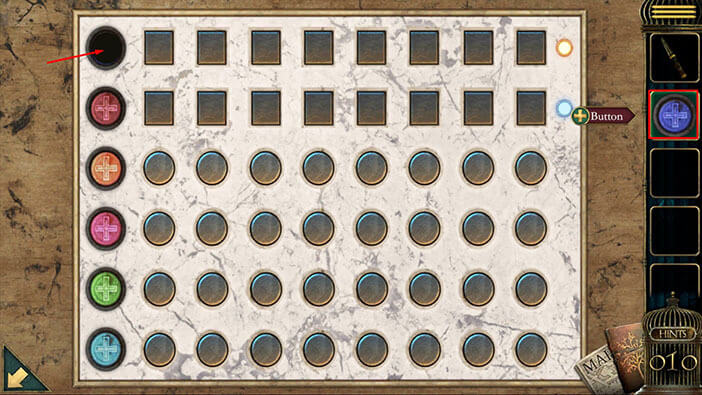
Next, tap on the “Question Mark” in the top right corner of the screen to view the instructions for the next minigame.
Basically, our task is to guess the correct combination of colors and their position. If we tap on of the colors in the column on the left, it will be displayed in the first empty slot in the round slots.
The first two rows have square slots. The slot in the first row will display the number of correct colors that are also placed into the correct position.
The slot in the second row will only display the number of correct colors (disregarding their position).
So, we have 6 colors, and our task is to find the correct combination that consists of four of these colors. Let’s do that.
Tap on the text to turn off the instructions.
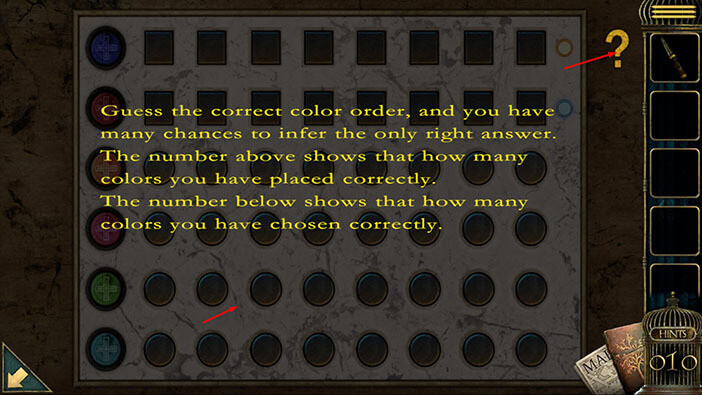
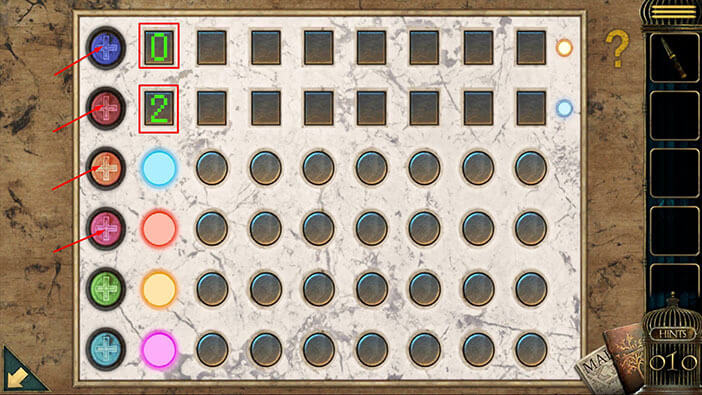
Let’s tap on the first four colors (top to bottom), and see how this system works.
In the slot in the top row, we can see the number 0. So, there are 0 correct colors that are also at the correct position.
In the slot in the bottom row, we can see the number 2. So, 2 of the colors that we entered are correct, but they aren’t in the correct position.
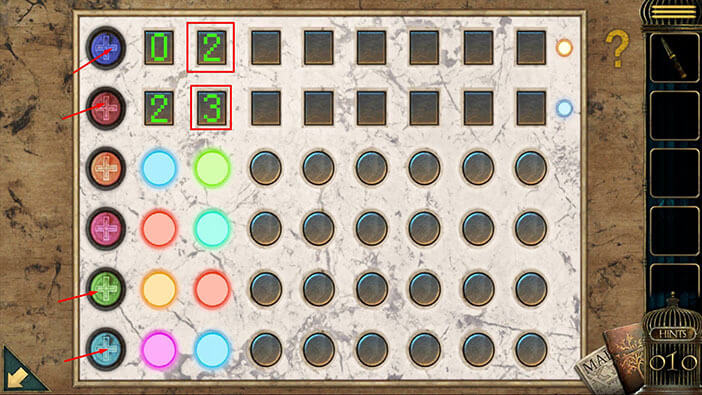
So, let’s presume that the two correct colors were blue and red and try this again. This time, we will place these two colors in different positions.
This time we will first tap on the last two colors, green and light blue. These two colors should be part of the solution because we already entered the first 4 colors, but only 2 were correct.
Then, we will enter the Red color in the third slot. Lastly, we will enter the Blue color in the fourth slot.
So, we have correctly guessed 3 colors, and two of them are in the correct position. Next, we know that green and blue are the correct colors. So, only one of the other two colors is correct (blue or red). That also means that either orange or pink is the correct choice.
Let’s make another guess.
Let’s say that the color green was in the correct position, so let’s place it into the first slot.
Next, between orange and pink, let’s choose orange and place it in the second slot.
Next, let’s presume that the light blue was in the wrong position, so let’s place it in the third slot.
Lastly, we will presume that the blue was in the correct position, so let’s put it again in the fourth slot.
This is the correct combination and you will solve the puzzle.
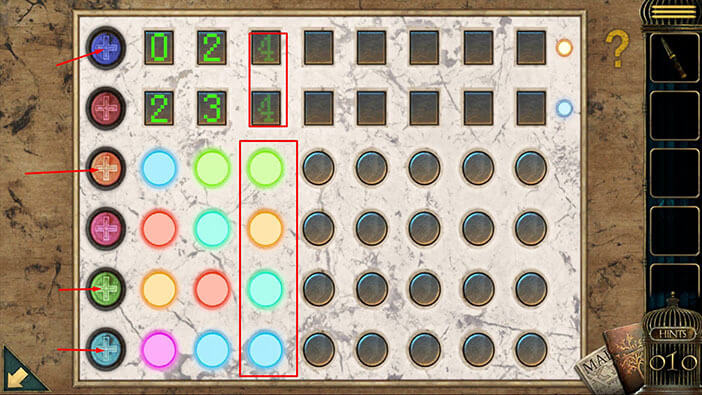
You will unlock the drawer as soon as you solve the puzzle, and inside you will find a “Box”. Tap on it to pick it up.
After that, tap on the arrow in the lower left corner to go back.
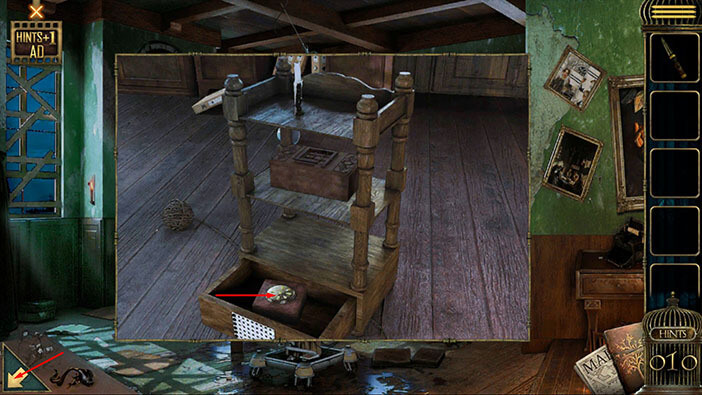
Tap on the “Box” in your inventory to examine it. Tap on the “Box” again to start the interaction.
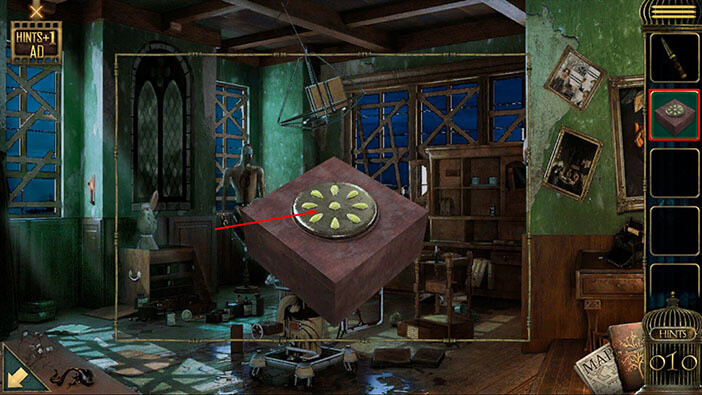
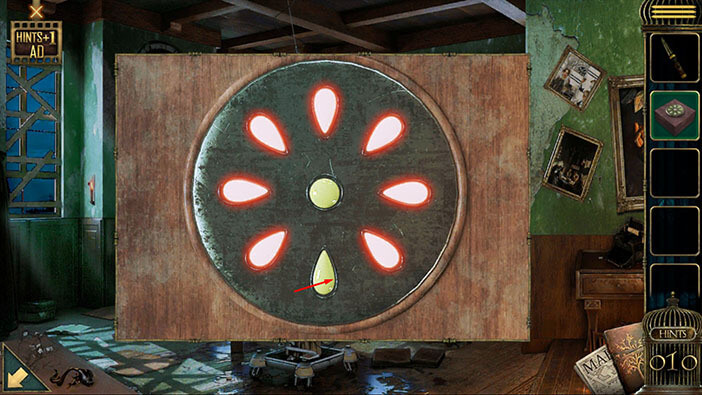
Here, we have another minigame. Our task is very simple. We just need to press the buttons in the correct order. However, pressing the wrong button will reset our entire progress.
This is one of the randomized puzzles, as far as I noticed it is the first one in this game. So, we can’t provide you with a correct solution. But this puzzle can be easily solved through trial and error. Whenever you press the correct button, it will be turned on, and it will glow red. So, just memorize the order in which you pressed the buttons.
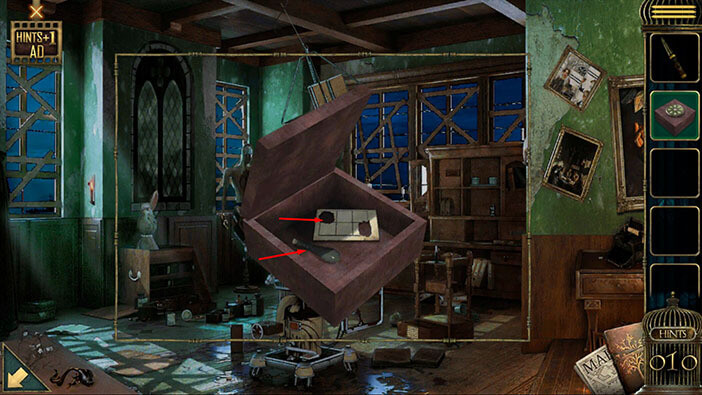
As soon as you tap on the button in the correct order the box will open. Inside you will find a “Potion bottle” and a “Card”. Tap on these two items to pick them up.
Next, let’s take another look at the rabbit on the left.
You will notice that the rabbit was previously cut and patched up. So, select the “Knife” from the inventory and use it to cut it open at the patched spot.
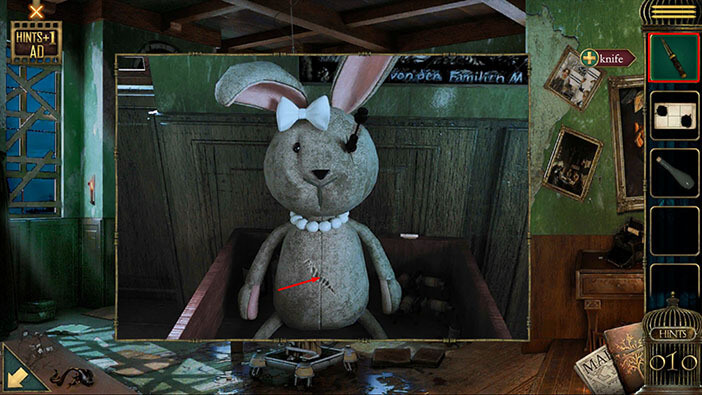
You will find a “Key” hidden inside the rabbit, so let’s tap on it to pick it up. After that, tap on the arrow in the lower left corner to go back.
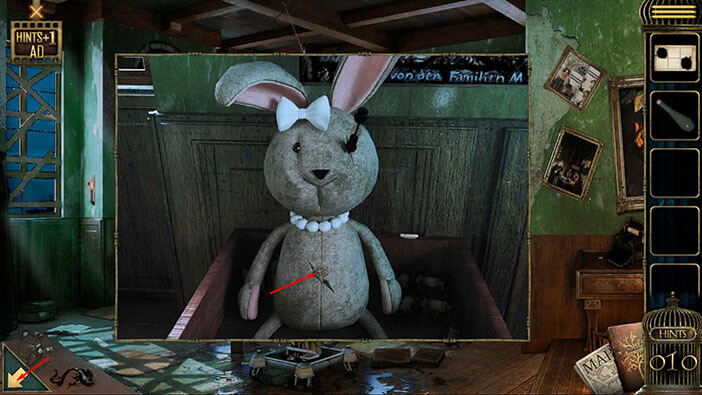
Next, tap on the chained doll on the table to take a closer look at it.
Instead of the eyes, the doll has one button with the letter “M”. Tap on it to pick it up, and “Button” will be added to your inventory.
After that, tap on the padlock to start the interaction.
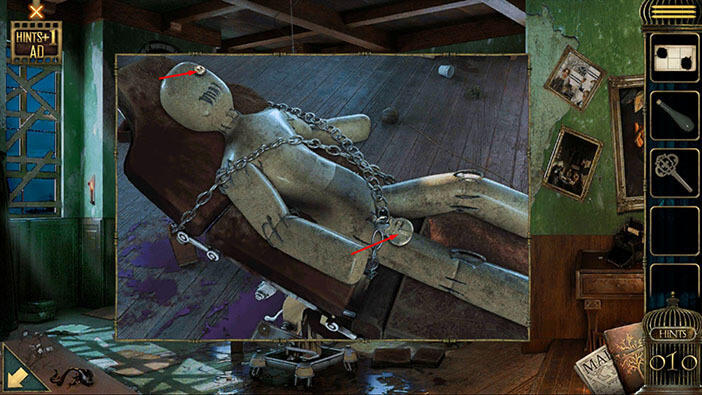
Select the “Key” from the inventory and use it to unlock the padlock.
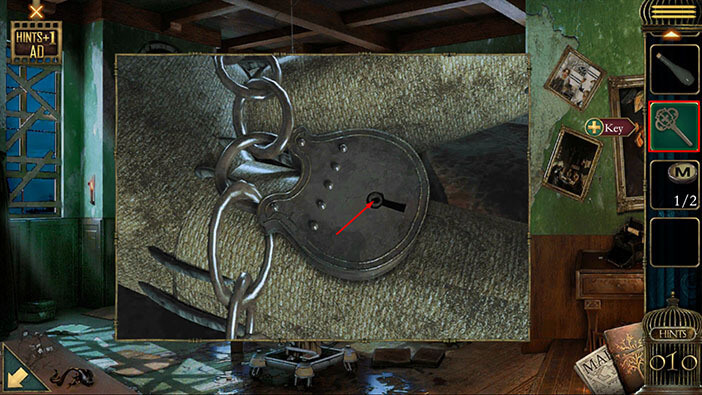
The doll will move to the side as soon as you unchain it, and you will find another “Button” that was previously hidden below it. Tap on the “Button” to pick it up.
After that, tap on the arrow in the lower left corner to go back.
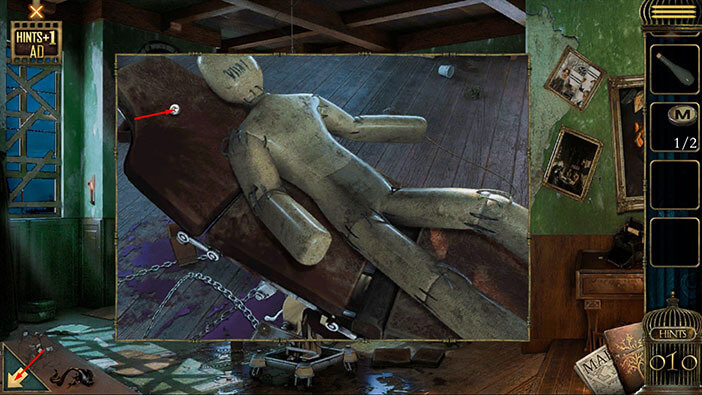
Tap on the typewriter in the right corner of the room to take a closer look at it.
Just to the left of the typewriter, you will notice a “Puzzle”. Tap on it to pick it up.
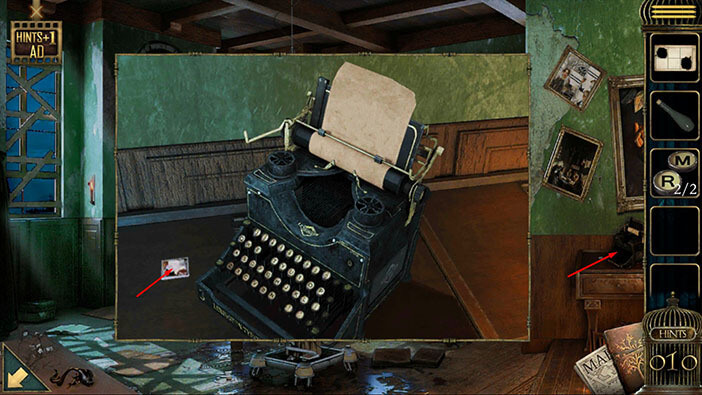
We are not done with the typewriter. Select the “Potion bottle” from the inventory and use it on the paper that is sticking out of the typewriter.
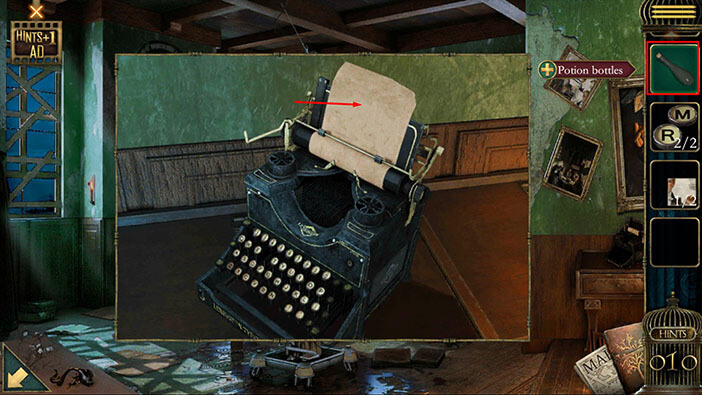
Some letters will appear on the paper when you use the potion bottle. However, you will also notice that the letters are upside down. So, we can conclude that the word “MURDER” is written on the paper. Memorize/write down this word because we will need it for the next puzzle.
After that, tap on the buttons on the typewriter to start the interaction.
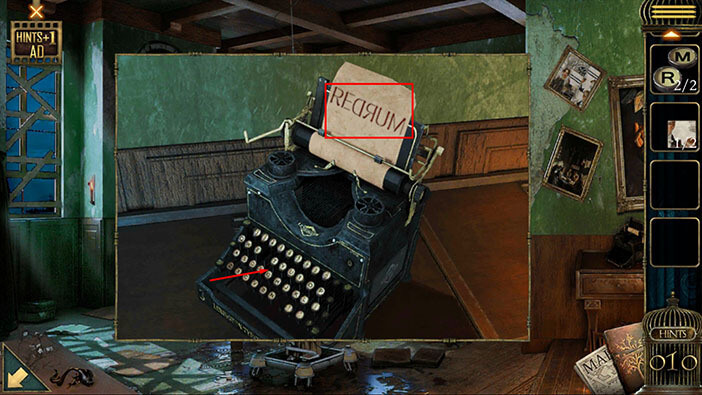
You will probably notice that the two buttons are missing. So, select the buttons from the inventory and place them into the empty slots.
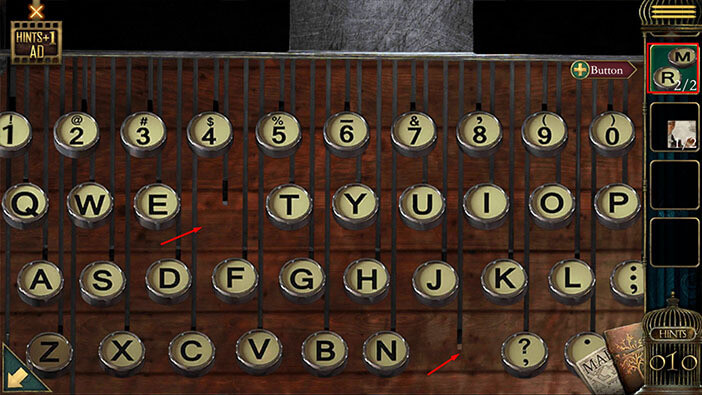
Enter the word “Murder” that we saw on the paper.
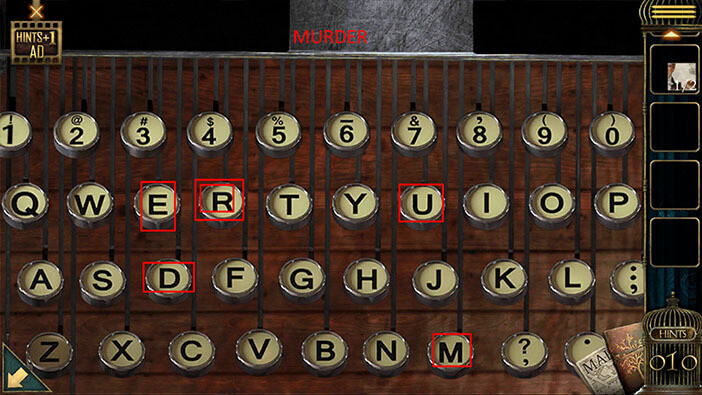
Another paper will come out of the typewriter as soon as you enter the word “Murder”.
Tap on the “Paper with tips” to pick it up. After that, tap on the arrow in the lower left corner to go back.
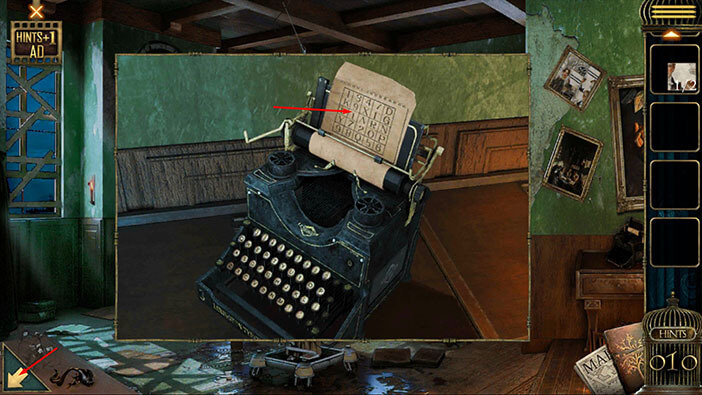
Next, you will notice a large cabinet below the three windows in this room. Tap on the top left compartment of this cabinet to take a closer look at it.
You will notice that we need a four-letter password to open this compartment. Above the letters, you will also notice four numbers and four arrows. Let’s memorize/write down these numbers and arrows. Starting from left to right we have,
1 Up
8 Left
9 Right
3 Down
Once you’re done, tap on the arrow in the lower left corner to go back.
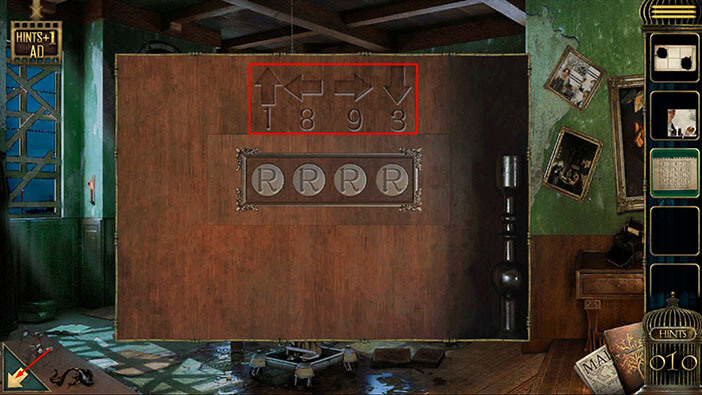
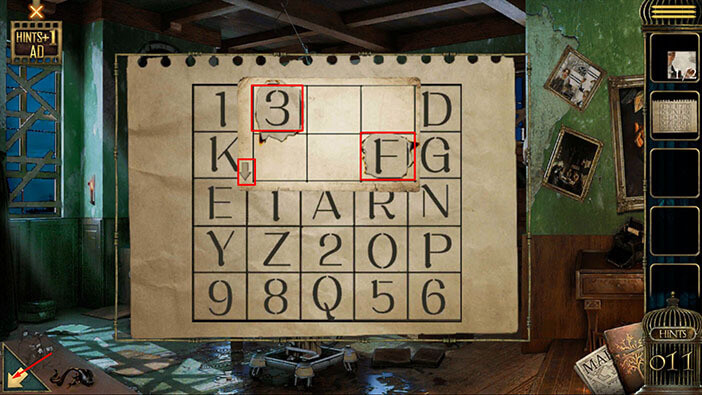
Next, tap on the “Paper with tips” in your inventory to bring it up. After that, select the “Card” from the inventory and place it on the “Paper with tips”.
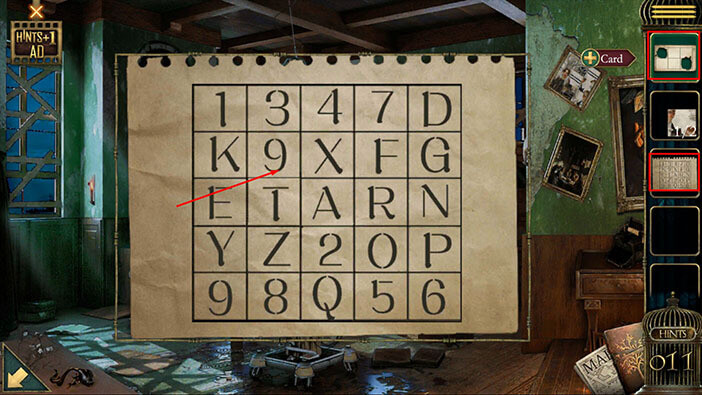
When you place down the card, you will notice an arrow in its lower right corner, and the arrow is currently pointing down. You will also notice two holes in the card.
So, let’s define our task. Previously, we saw the pairs of numbers and arrows above the safe. The first pair was number 1 and the “Up” arrow. The card on the paper with tips should match these values.
So, we should tap on the card twice to rotate it and the arrow on the card will then point up. After that, we should drag the card until we line up one of the holes with the number 1.
As soon as you do that, you will see the letter “X” in the other hole. Memorize/write down this letter because it represents the first letter of the password.
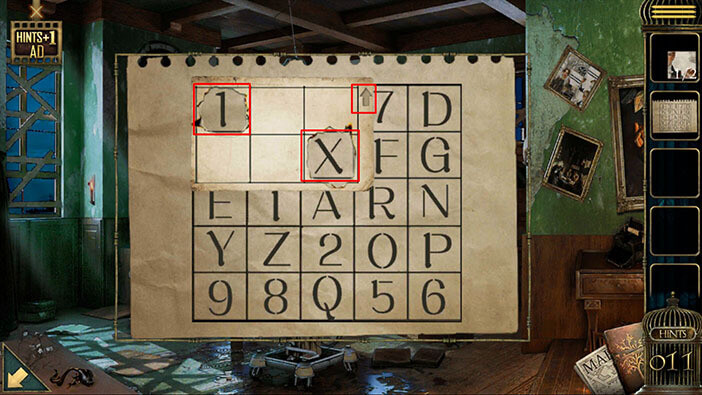
The second pair was 8 and the “Left” arrow. So, tap once on the “Card” to rotate it, and the arrow on the card will then point left.
Next, we should drag the card until we line up one of the holes with the number 8.
As soon as you do that, you will see the letter “A” in the other hole. Memorize/write down this letter because it represents the second letter of the password.
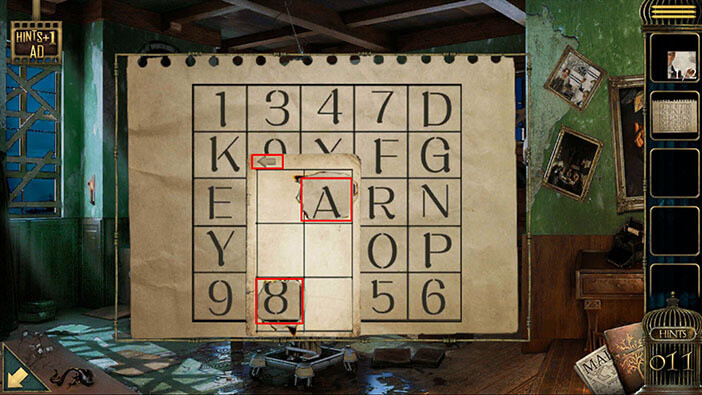
The third pair was 9 and the “Right” arrow. So, tap twice on the “Card” to rotate it, and the arrow on the card will then point right.
Next, we should drag the card until we line up one of the holes with the number 9.
As soon as you do that, you will see the letter “T” in the other hole. Memorize/write down this letter because it represents the third letter of the password.
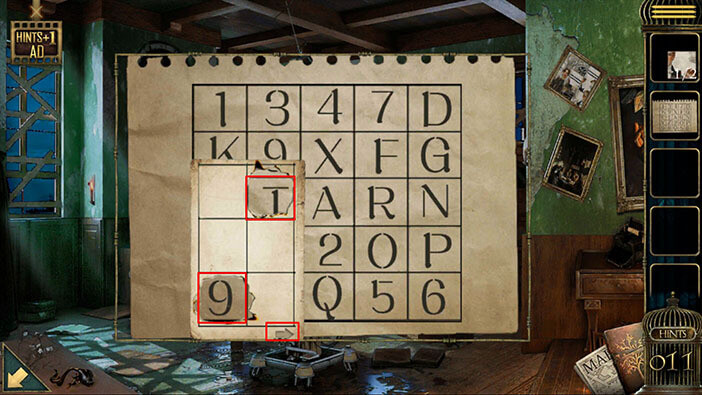
The fourth pair was 3 and the “Down” arrow. So, tap three times on the “Card” to rotate it, and the arrow on the card will then point down.
Next, we should drag the card until we line up one of the holes with the number 3.
As soon as you do that, you will see the letter “F” in the other hole. This is the fourth letter of the password.
When we put it all together, we will get the password “XATF”. Memorize/write down this password.
Once you’re done, tap on the arrow in the lower left corner to go back.
Let’s go back to the safe. Tap on the top left compartment of the large cabinet located below the three windows in this room.
Enter the password “XATF”.
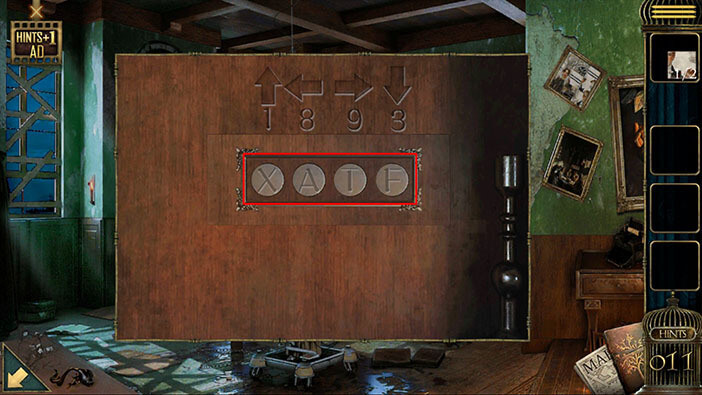
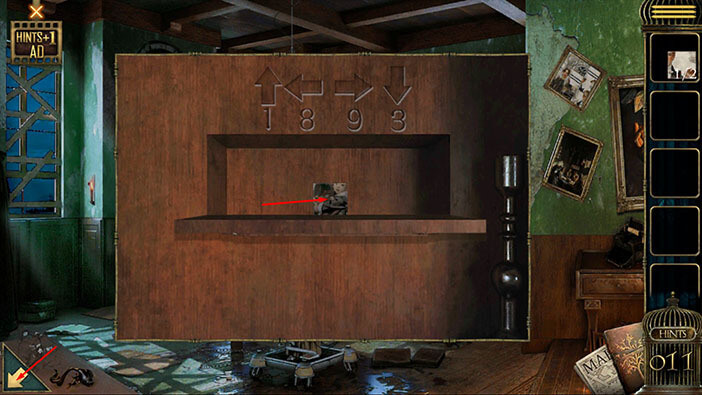
You will open the safe as soon as you enter the correct password and inside you will find another “Puzzle”. Tap on it to pick it up.
After that, tap on the arrow in the lower left corner to go back.
Next, let’s tap again on the small shelf located just to the right of the chair, to take a closer look at it. After that, tap twice on the box on the middle shelf to start the interaction.
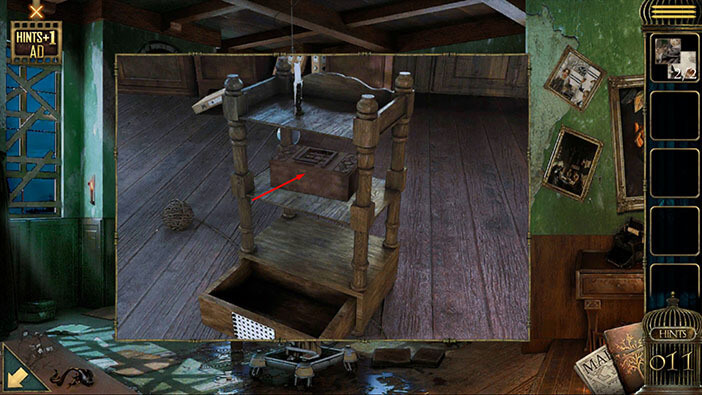
Here, we can see 7 puzzle pieces, but you will notice that two pieces are missing. So, select the “Puzzle” from the inventory and insert it into the empty slots.
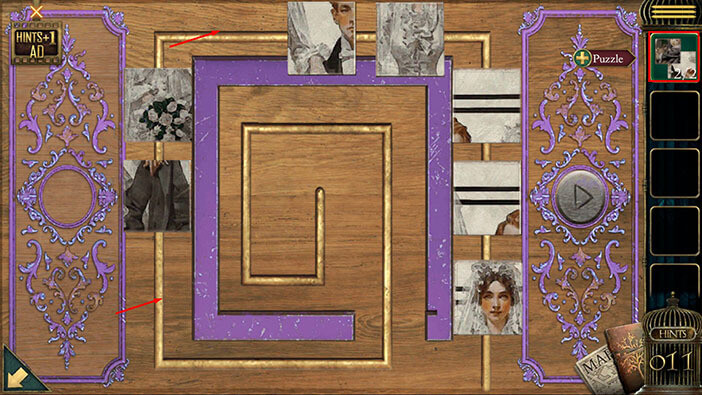
Next, let’s tap on the “Play” button on the right. The puzzle pieces will begin to move down the line and once they stop, they will form a picture. However, you will immediately notice that the pieces in this picture are in the wrong positions.
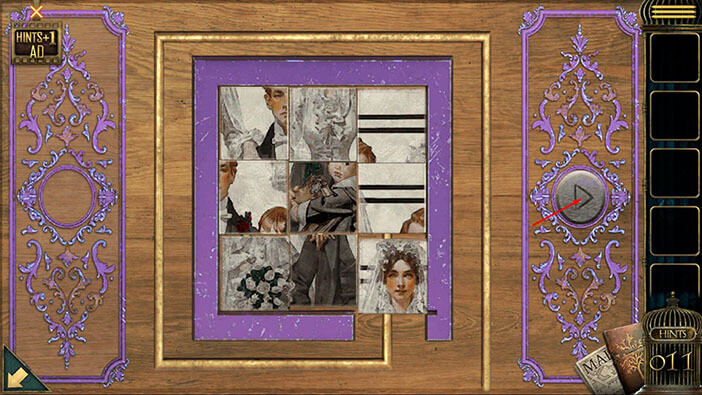
Ok, our next task is pretty straightforward. We should rearrange the pieces of the puzzle, and once we hit on the play button, the pieces should form a picture.
We will do this puzzle in several steps. Let’s begin.
Step 1
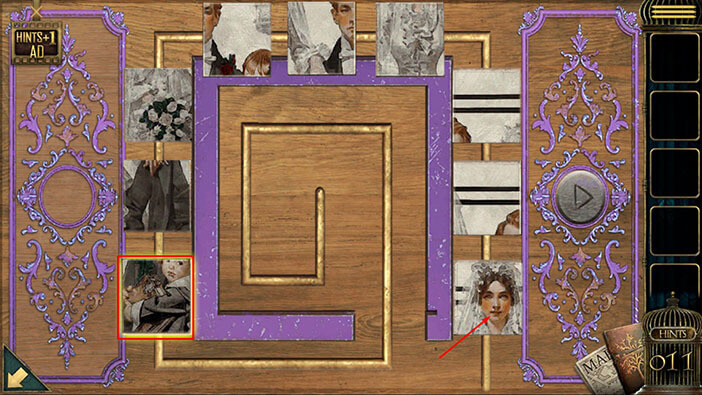
Select the third piece (top to down) in the column on the left, then tap on the third piece in the column on the right to swap their positions.
Step 2
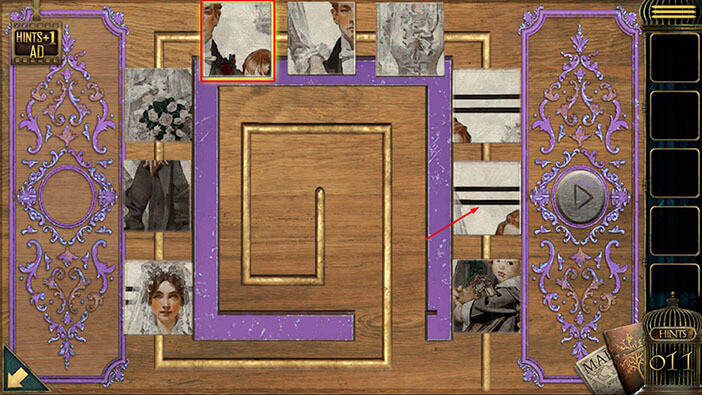
Select the first piece (left to right) in the top row, then tap on the second piece in the column on the right to swap their positions.
Step 3
Select the first piece in the top row, then tap on the third piece in the top row to swap their positions.
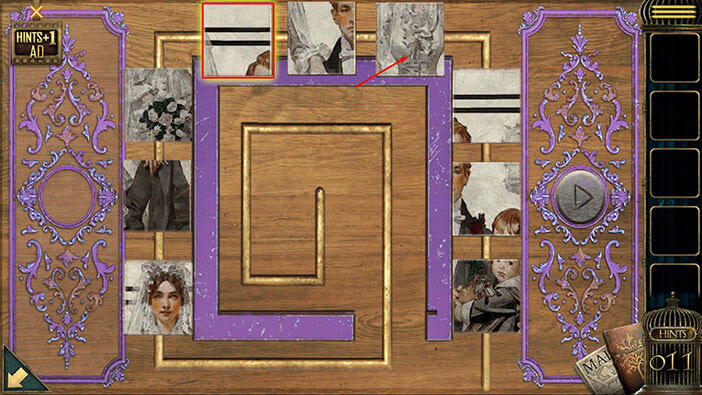
Step 4
Select the second piece in the top row, then tap on the third piece in the column on the left to swap their positions.
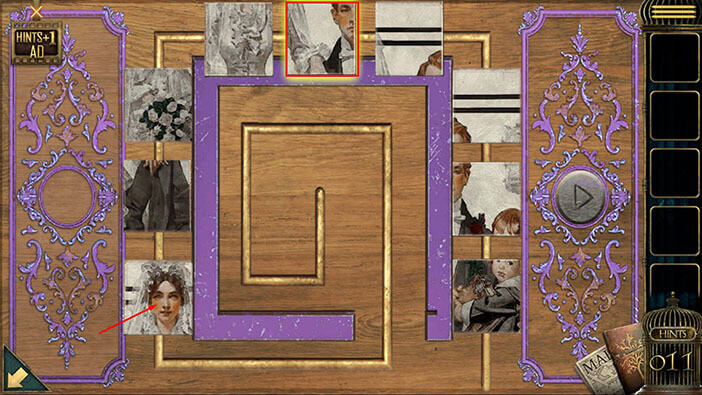
Step 5
All the pieces should be in the correct positions, so let’s tap on the “Play” button.
Once all the pieces reach the end of the line, they will form the picture.
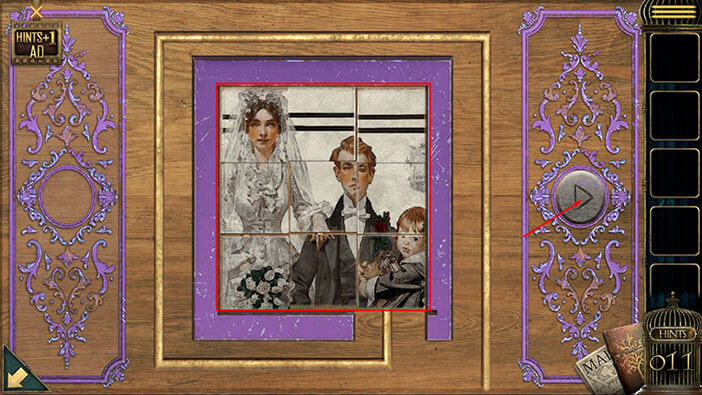
The box will open as you solve the puzzle, and inside you will find a “Lantern”. Tap on it to pick it up.
After that, tap on the arrow in the lower left corner to go back.
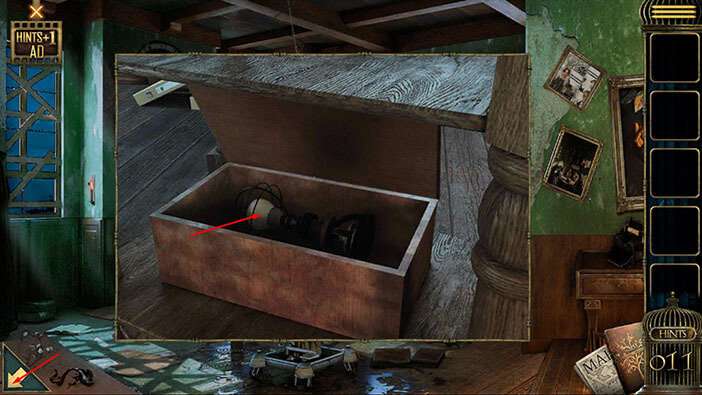
Next, tap on the “Lantern” in your inventory to bring it up. After that, tap on the top of the “Lantern” to turn it on.
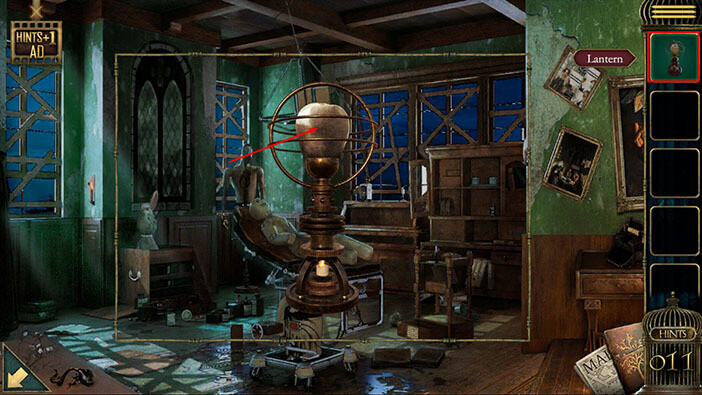
Just like before, we will create an “Apple” at it will float above the lantern. Tap on the “Apple” to pick it up.
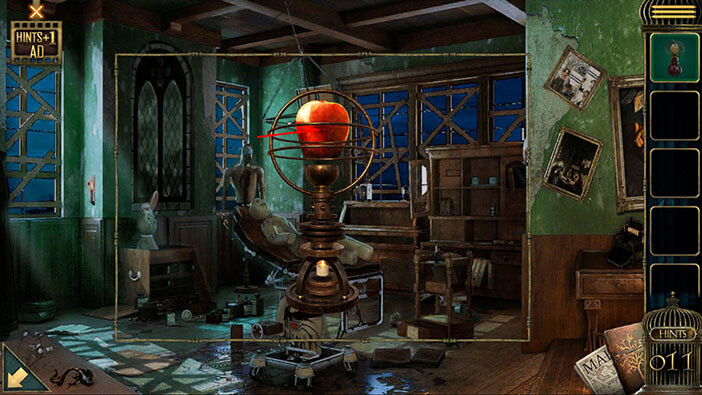
Next, you will notice the picture of a hand reaching toward a branch on the right side (at the right edge of the screen). Tap on the picture to take a closer look at it.
Select the “Apple” from your inventory and attach it to the branch.
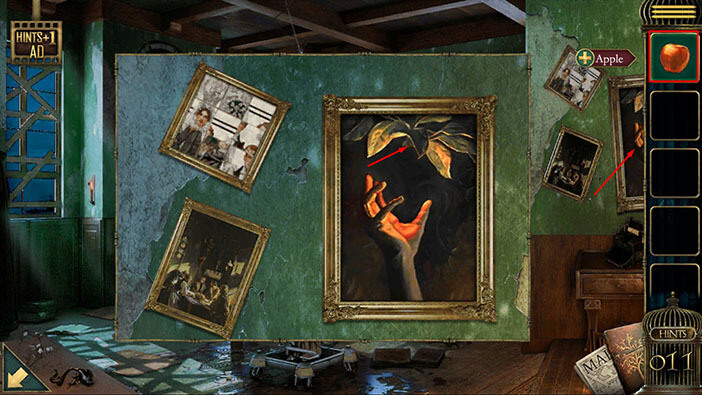
After his wife left him, Jason felt like he has been shattered into a thousand pieces. He couldn’t sleep and felt like he was suffocating in his dreams.
He wasn’t afraid of anything, not anymore. With that thought in mind, he picked up a dagger and went to settle the score with the two madmen. I think that he blamed his parents for everything, and we already know that he thought that they were dangerous. So, the “two madmen” that he mentions are probably his parents (we also know that her parents were afraid of him, so this is one very strange situation).
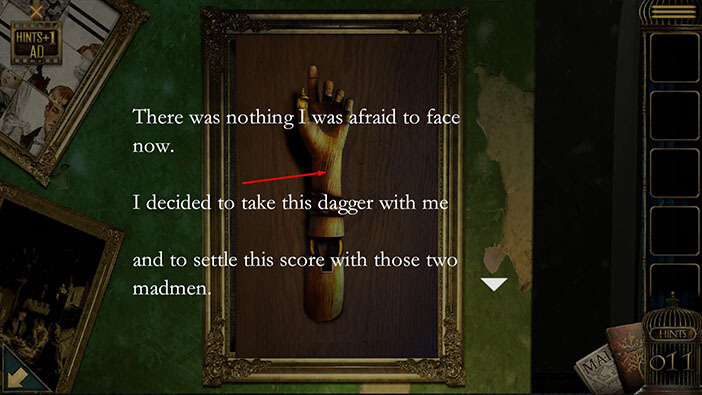
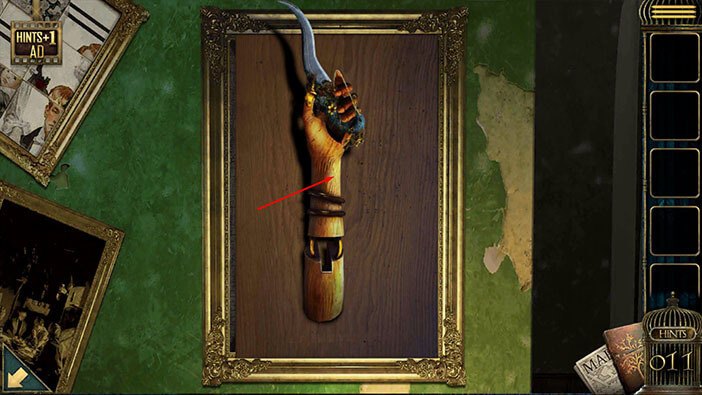
Tap on the hand, several times, and the dagger will appear. In the next scene, the hand will try to stab you. We will see the same scene as the ones that we did at the end of the previous two chapters.
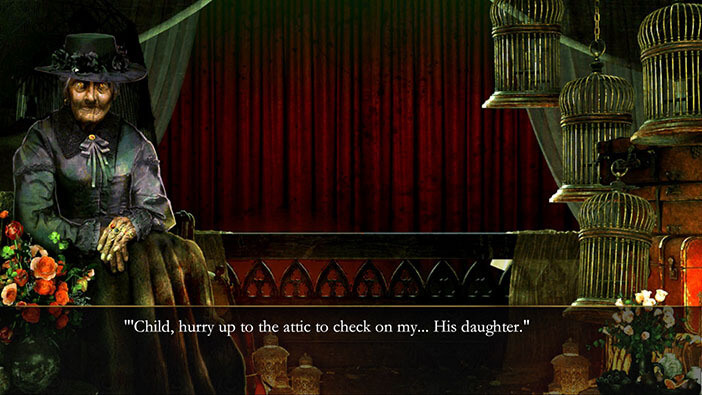
You will find yourself in the carriage with an old lady again and she will speak to you.
She will say that she’s sorry. The old lady will also say that you are Jason and that you should hurry up to the attic and check on your daughter. So, we now know the identity of our character.
The old lady will accidentally say that the girl in the attic is her daughter. That would mean that this old lady is Jason’s (our character’s) ex-wife.
With this, we have come to the end of the third chapter. Tap on the “Next part” button to go to the next part of the walkthrough.
Thank you for reading.