Detective – Escape Room Games | Chapter 2: Breadcrumbs
Hello everyone and welcome to the walkthrough for Chapter 2 of the “Detective: Escape Room Games”. At the beginning of the second chapter, we are back in the present time, and it’s been one year since Hank’s death. Detective Andrew receives a phone call and goes out to investigate another case. This one is about an ancient figurine that has been stolen from the bank.
Our character was remembering the events from the past, and hoped that he would get the case regarding the “Collector”. However, it seems that this is a completely unrelated case. In the next scene, we can see that our character reached the crime scene. After a short conversation with the police officer, he went into the bank to conduct the investigation.
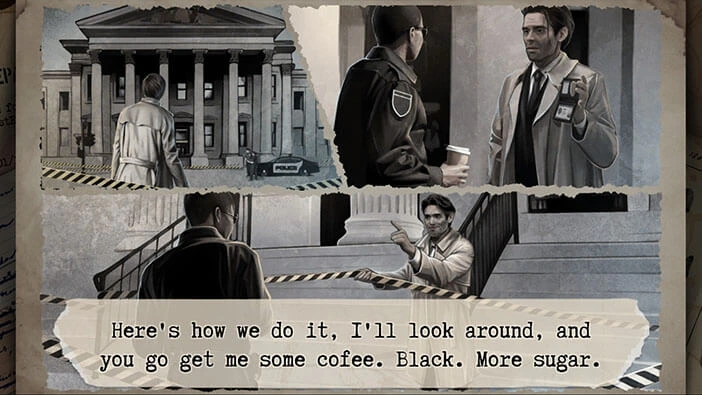
Let’s begin the investigation. On the desk in front of you, you will notice a red “Pencil”. Tap on it to pick it up.
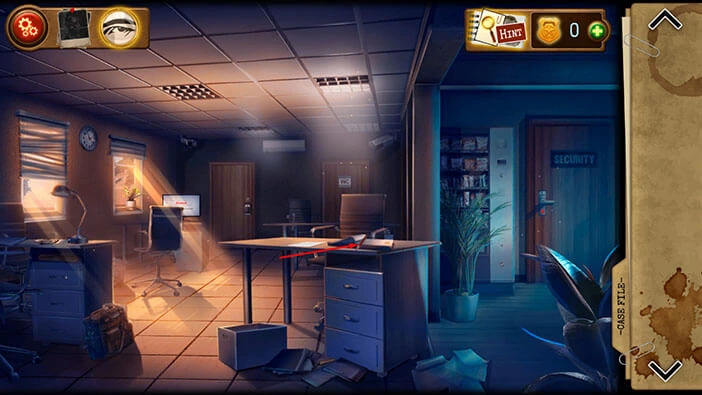
Next, you will notice some notebooks on the floor, just below the desk. Tap on them to take a closer look.
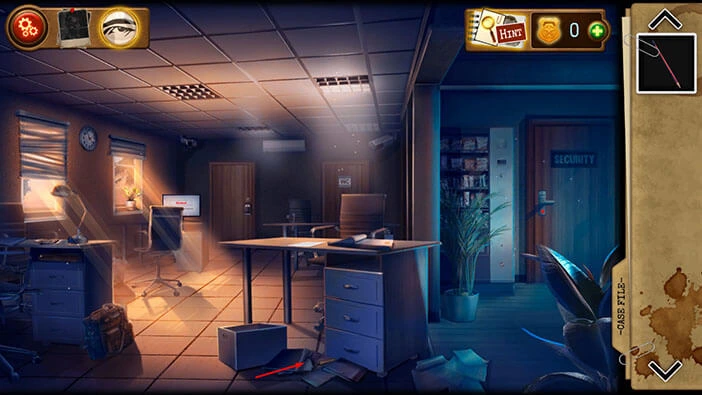
Drag the notebooks away, until you remove them from the screen.
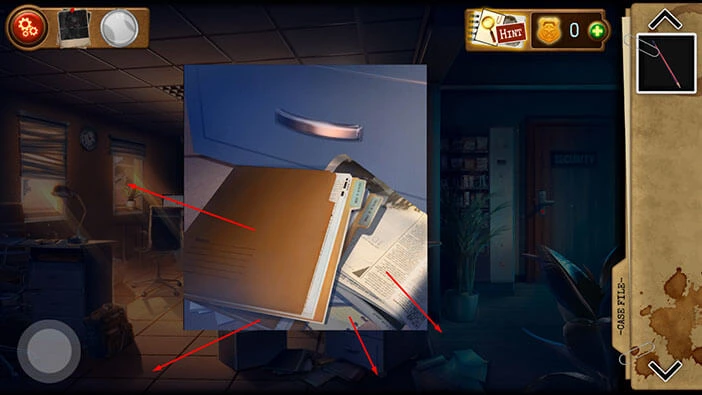
You will find a “Garden Trowel” hidden below the notebooks and envelopes. Tap on it to pick it up.
After that, tap on the button in the bottom left corner of the screen to go back.
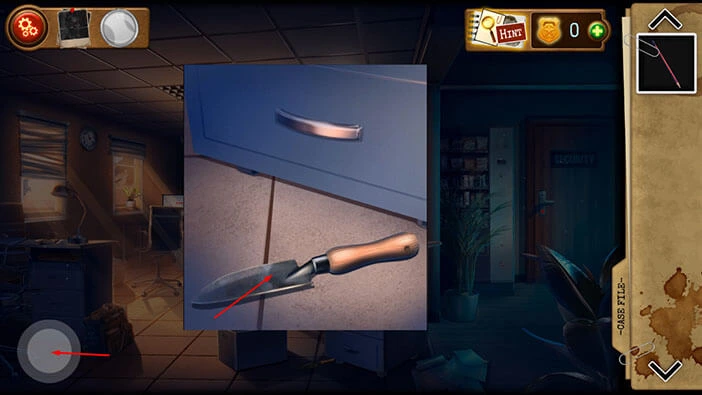
Next, tap on the vase with the plant on the right to take a closer look at it.
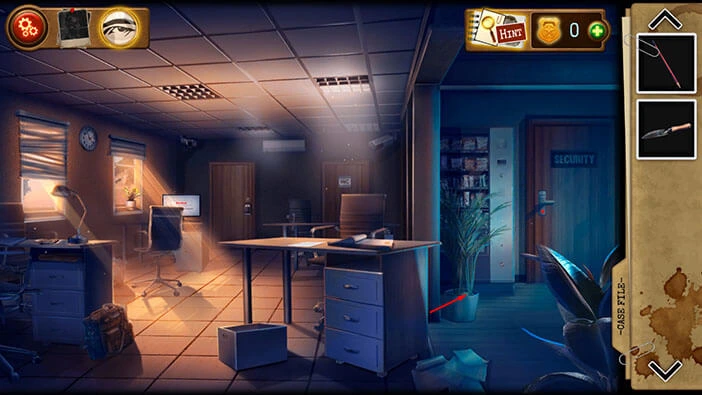
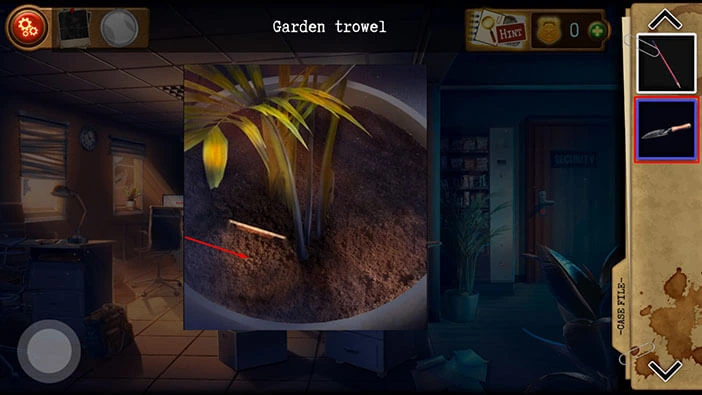
You will notice that there is something sticking out from the dirt. So, select the “Garden Trowel” from the inventory and use it to dig up this item.
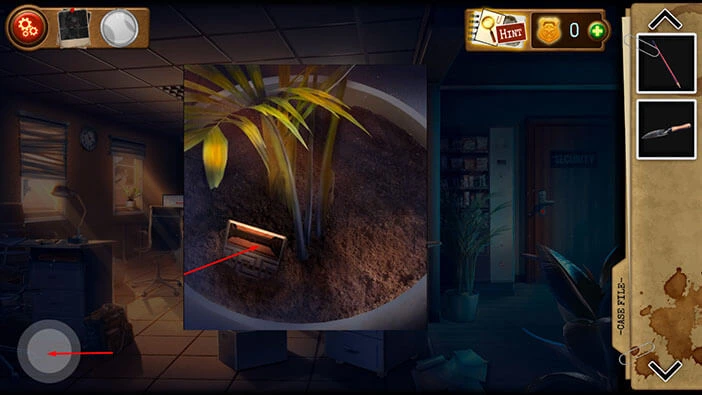
You will discover a “Puzzle piece”. Tap on it to pick it up. After that, tap on the button in the bottom left corner of the screen to go back.
Next, tap on the desk on the left to take a closer look at it.
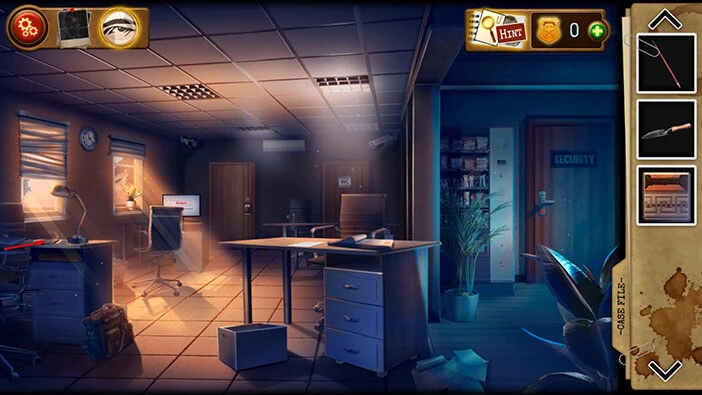
Drag the photos to move them away from the screen.
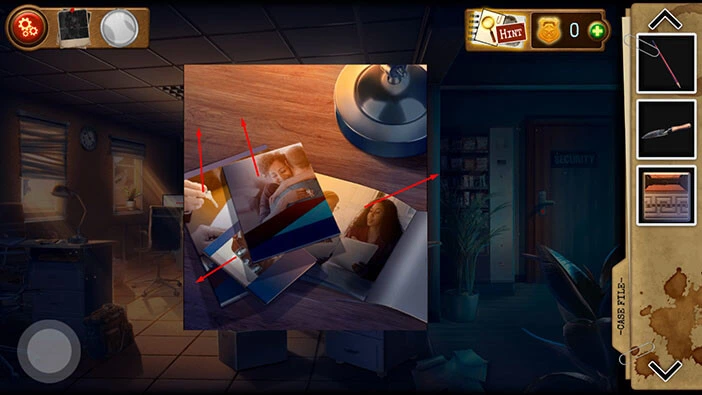
You will discover a key hidden below the photos. Tap on the key to pick it up, and “Matthew’s locker key” will be added to your inventory.
Once you’re done, tap on the button in the bottom left corner of the screen to go back.
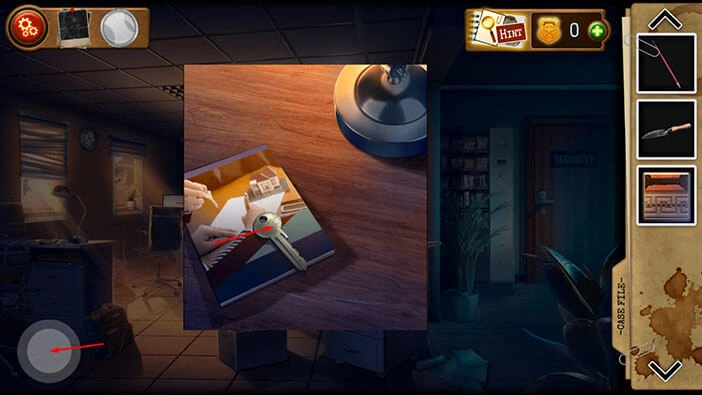
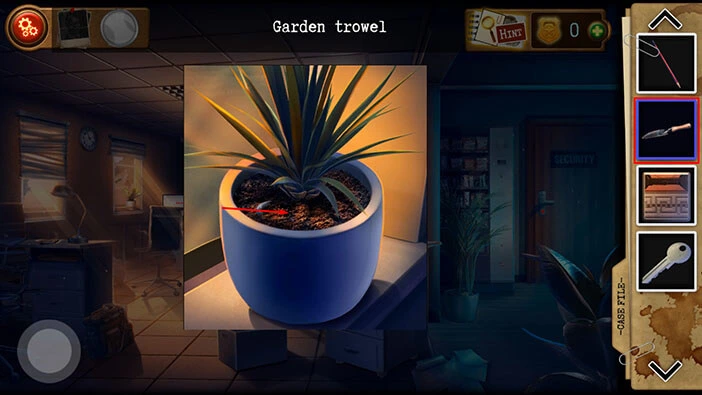
Next, on the window on the left side of the room, you will notice a vase. Tap on it to take a closer look.
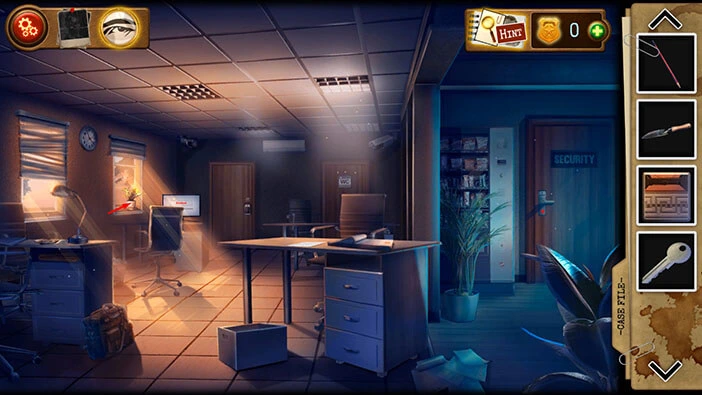
Here, you will also notice that there is some item sticking out from the ground. So, let’s do the same thing as before. Select the “Garden Trowel” from the inventory and use it to dig up this item.
You will discover a key. Tap on it to pick it up and “Locker Key number 2” will be added to your inventory.
After that, tap on the button in the bottom left corner of the screen to go back.
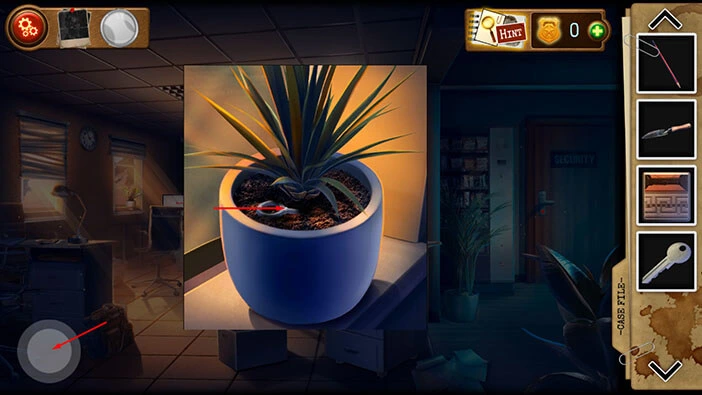
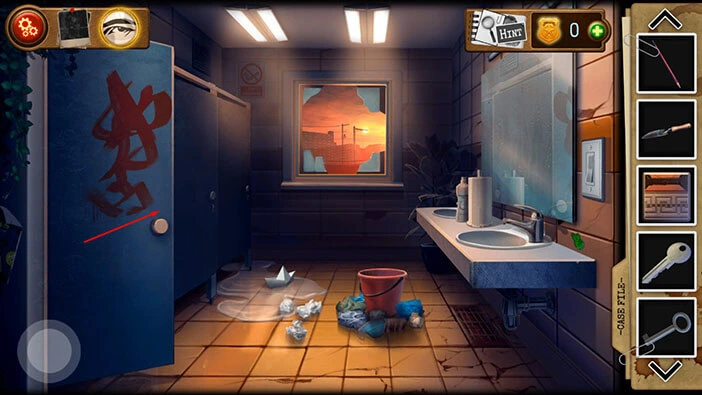
If you take a look at the three doors in this room, you will notice a “WC” sign on the door on the left. Tap on this door to proceed to the next room.
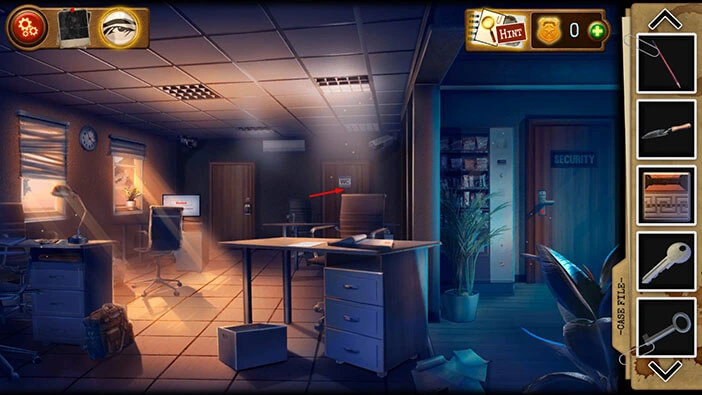
Tap on the red trash can to take a closer look at it.
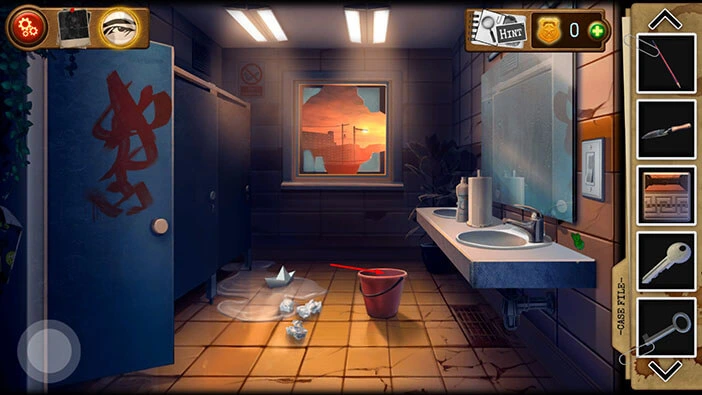
Drag the trash to remove it from the trash can.
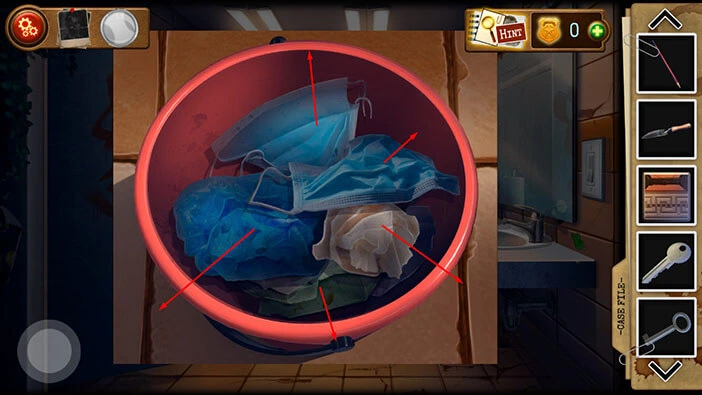
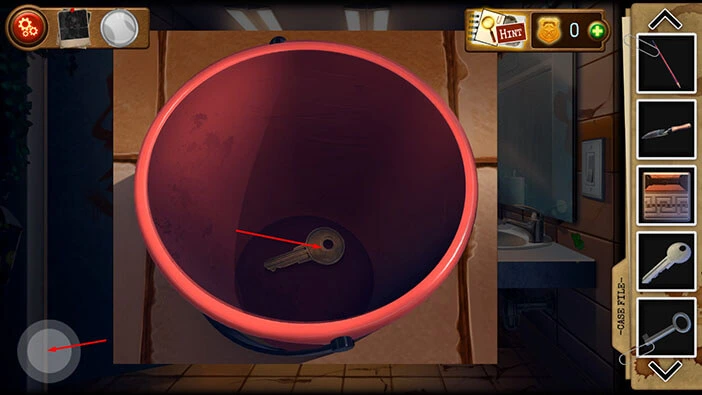
Below the trash, you will find a key. Tap on it to pick it up. “Sallivan’s locker key” will be added to your inventory.
Once you’re done, tap on the button in the bottom left corner of the screen to go back.
Next, tap on the first door on the left to look inside.
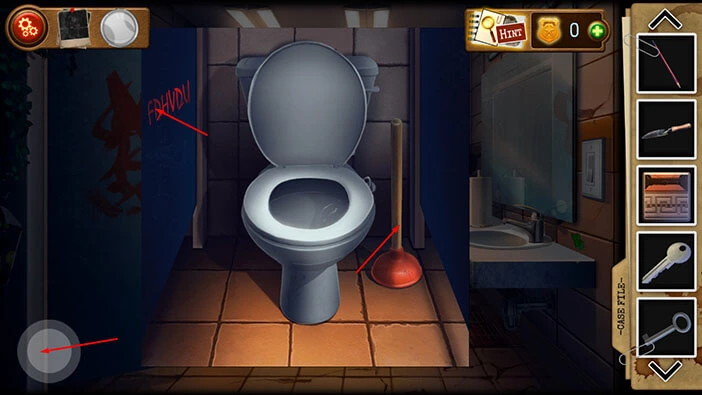
On the right, you will see a “Plunger”. Tap on it to pick it up.
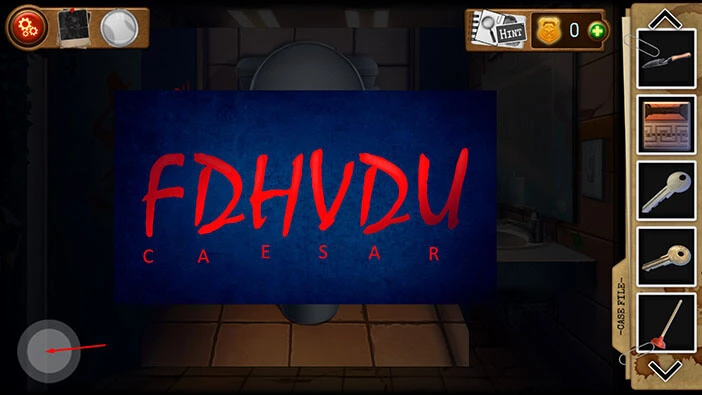
On the wall on the left, you will notice some red letters. Tap on them to take a closer look. Here, we can see the letters “FDHVDU”. Memorize/write down these letters because we will need this information for one of the next puzzles.
Once you’re done, tap on the button in the bottom left corner of the screen to go back.
Next, tap on the switch on the wall on the right (next to the mirror).
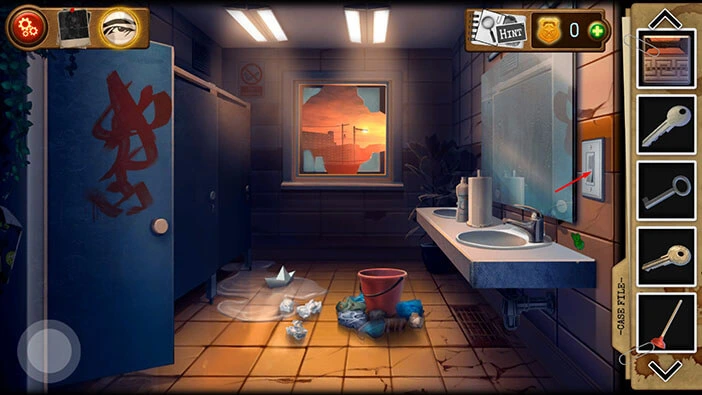
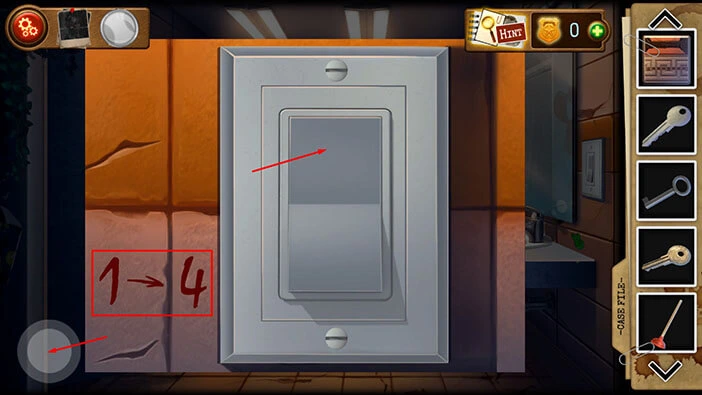
Tap on the switch to turn off the light.
Also, on the left, you will notice “1 -> 4”. Memorize/write down this information because we will need it in order to solve one of the puzzles later in the walkthrough.
Once you’re done, tap on the button in the bottom left corner of the screen to go back.
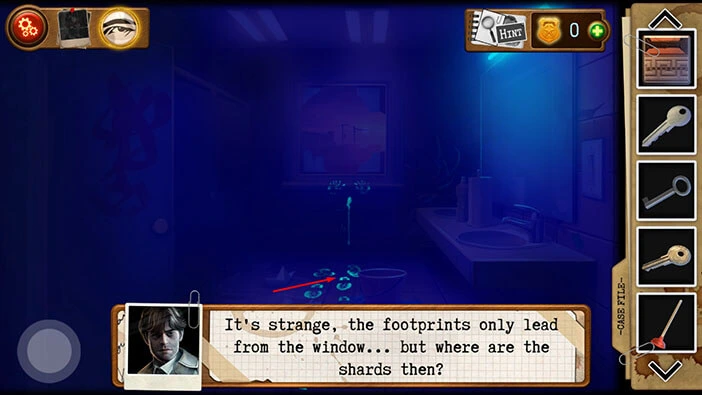
We can now see footprints on the ground, so let’s tap on them to examine them.
Our character will notice that the footprints are leading from the open window to the bathroom exit. However, although the window has been broken, our character can’t locate the shards of broken glass.
Tap on the button in the button left corner of the screen to go back.
Let’s turn the light back on. Tap on the switch on the right to take a closer look at it, then tap again to turn on the light. After that, tap on the button in the bottom left corner of the screen to go back.
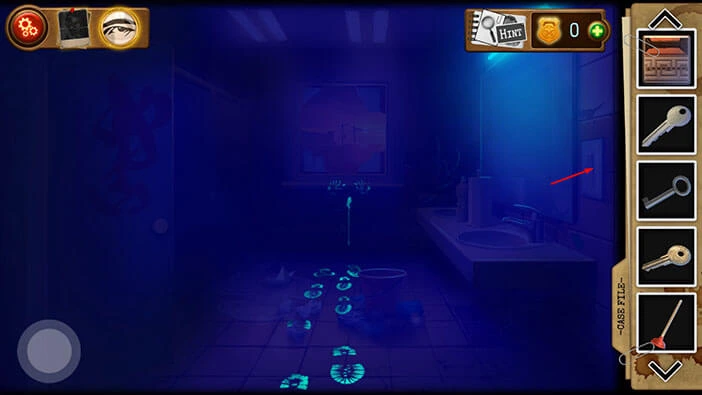
Looks like we collected our first piece of evidence. Tap on the photo in the top left corner of the screen next to the settings icon.
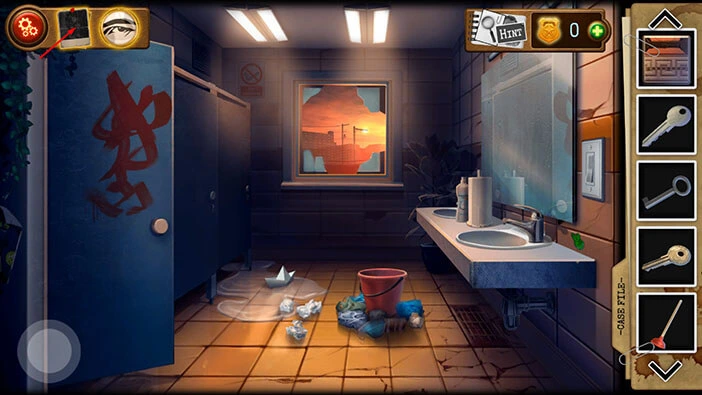
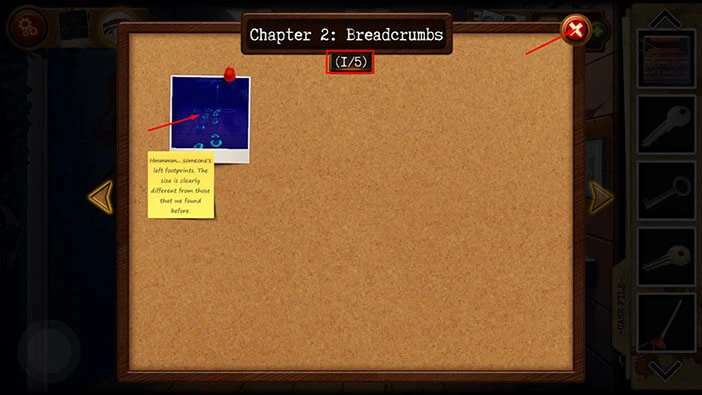
If you look just below the “Chapter 2: Breadcrumbs” at the top of the screen, you will notice (1/5). So, we selected our first piece of evidence.
Let’s take a look at this evidence. Tap on the photo on the board. Our character will notice that the size of the footprints is different compared to the footprints that they found before.
Once you’re done, tap on the “X” button in the top right corner of the board to go back.
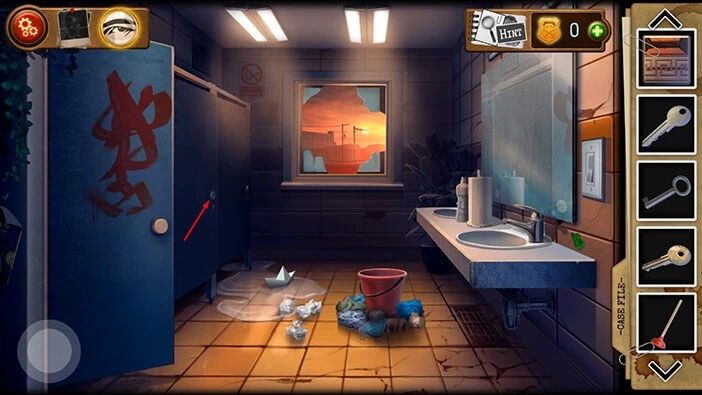
Next, tap on the second door on the left to take a closer look.
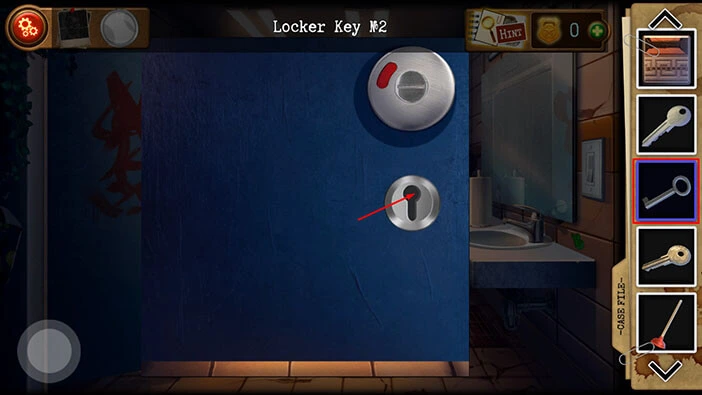
You will notice that the door is locked. So, select “Locker Key No.2” from the inventory and use it to unlock the door (So, this is actually a bathroom stall key, not really a locker key. Just wanted to point out this little mistake).
On the floor, you will find a “Key Card”. Tap on it to pick it up.
After that, tap on the button in the bottom left corner of the screen to go back.
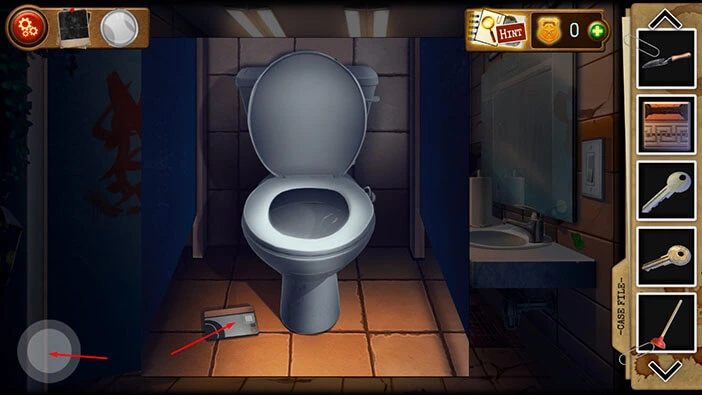
Let’s go back to the first room. Tap on the button in the bottom left corner of the screen.
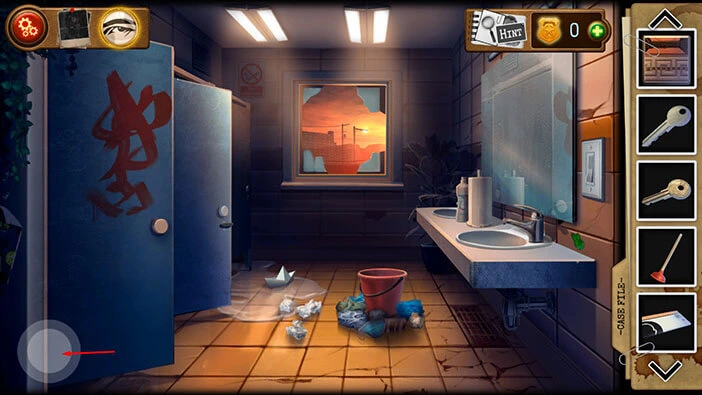
On the right, you will notice a door with the label “Security”. Select the “Key Card” (that we found in the bathroom) from the inventory and use it to unlock this door.
After that, tap on the door to proceed to the next room.
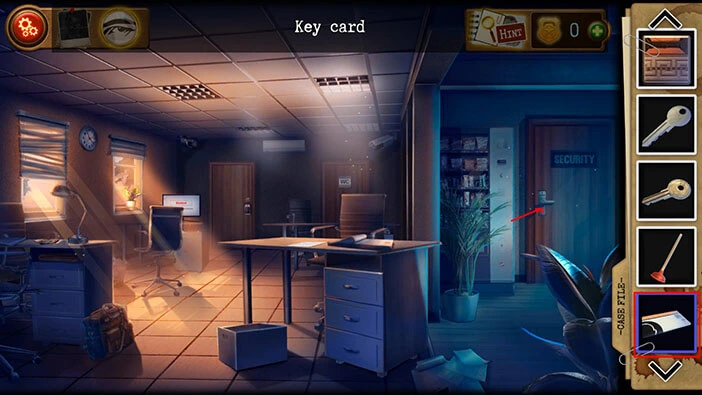
Tap on the trash can on the left (next to the desk) to flip it over. After that, tap on the trash to take a closer look at it.
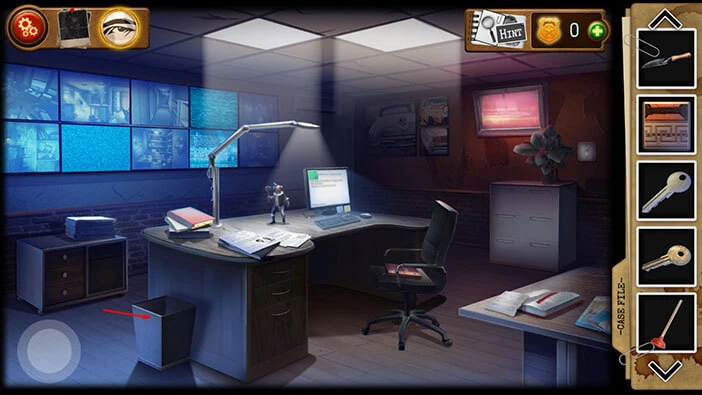
Drag left/right to remove the trash.
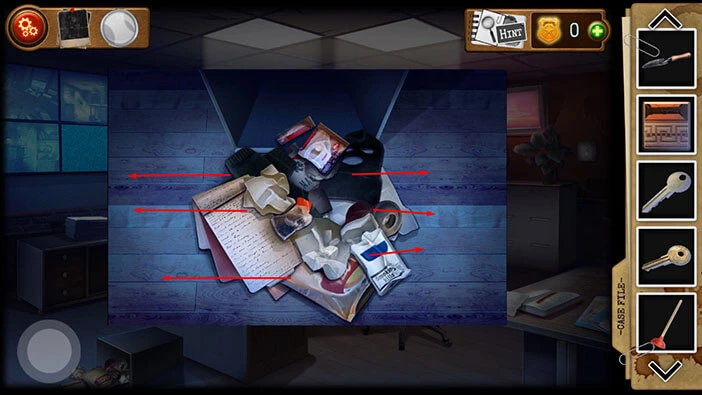
Below all that trash, you will find several pieces of glass. So, whoever broke into the building by smashing the window, decided to take the glass shards and hide them in the trash can.
Tap on the glass shards to take a photo, and our character will file it as evidence. After that, tap on the button in the bottom left corner of the screen to go back.
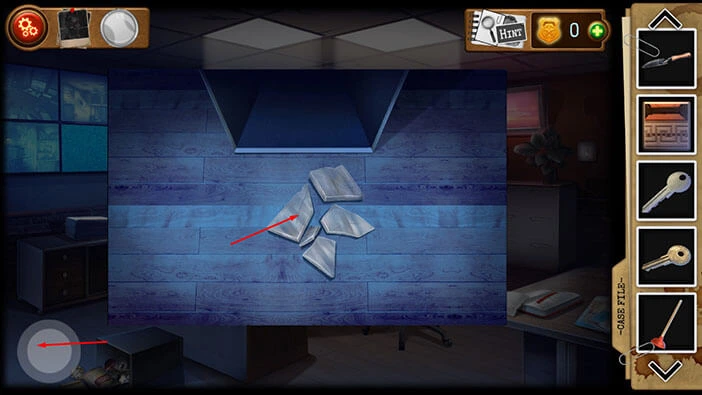
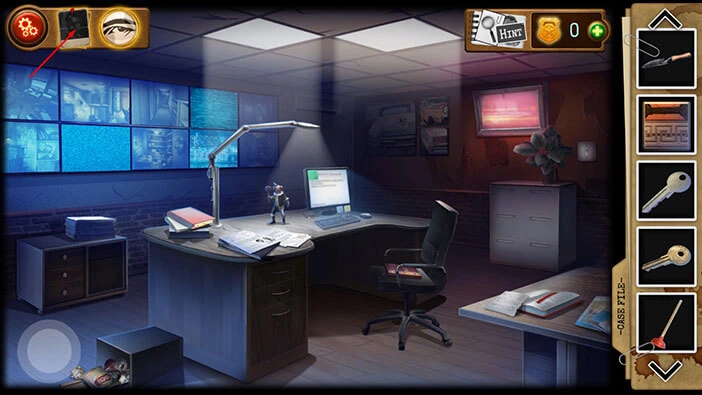
Tap on the photo in the top left corner of the screen to take a look at the evidence.
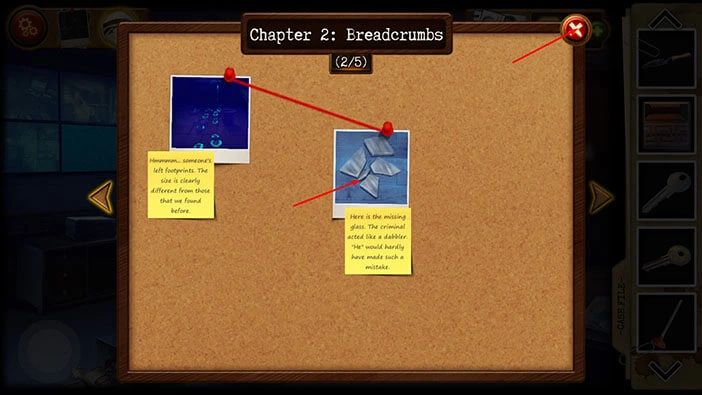
We now have 2/5 pieces of evidence. Tap on the glass shards to examine this evidence. Our character thinks that whoever planned this crime was an amateur. Also, our character is certain that the “Collector” wouldn’t be so careless. So, this investigation is probably unrelated to the death of our character’s partner.
Once you’re done, tap on the “X” button in the top right corner to go back.
Next, you will notice some files on the left side of the desk. Tap on these files to take a closer look, then tap again to examine the files.
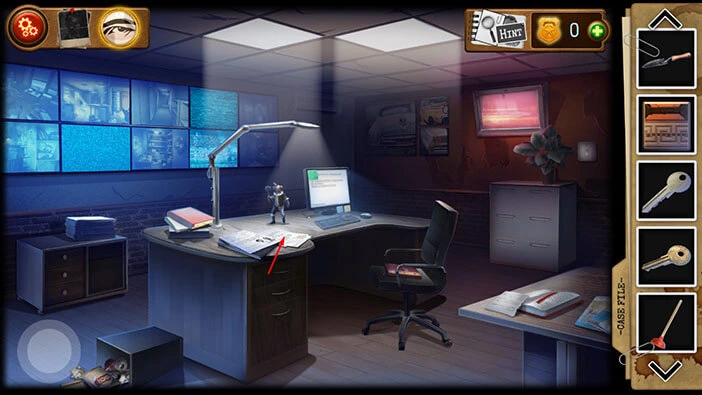
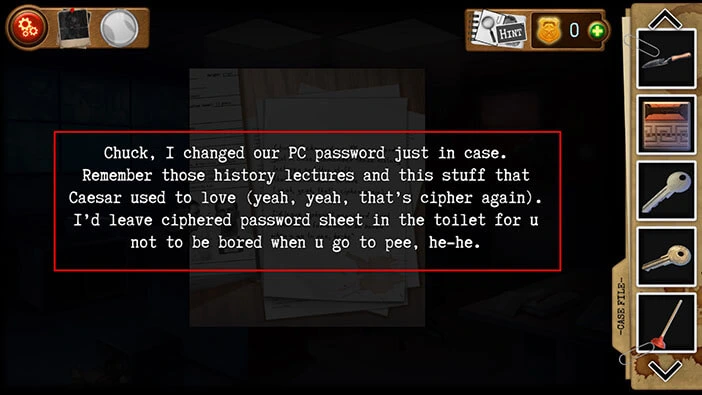
This is a note for Chuck. Apparently, his colleague used Caesar’s cipher to change the PC password, and he left the hint ciphered password in the bathroom. So, one of our next tasks would be deciphering the password. Let’s go back.
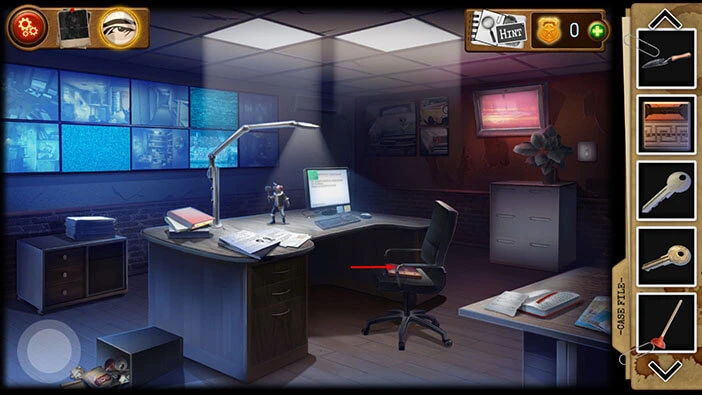
You will notice a notebook on the chair. Tap on it to take a closer look.
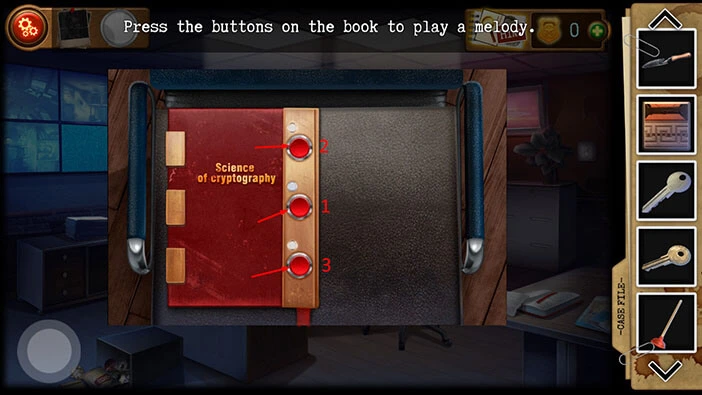
In order to open the book, we have to solve another puzzle. Our next task is to press the 3 buttons in the correct order, and every time you tap on one of these buttons it will play a certain sound. So, our goal is to play a certain melody.
Let’s do that.
First, tap on the middle button.
Second, tap on the button at the top.
Third, tap on the button at the bottom.
Once you solve the puzzle, you will open the book. Tap on the first page of the book to examine it.
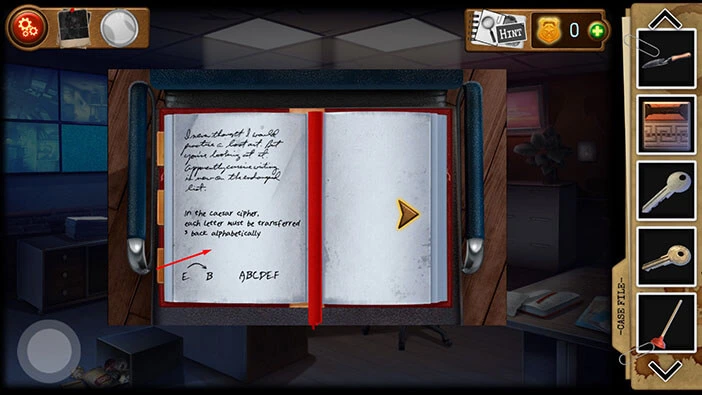
So, to decipher the password, we should move every letter 3 position back in alphabetical order.
Tap anywhere on the screen to look at the page again.
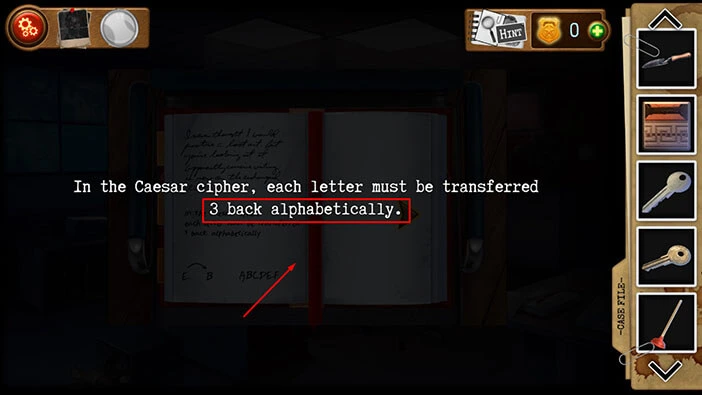
We can see a hint in the bottom left corner of the page. So, the letter “E” once deciphered is the letter “B” (three positions back).
I also, pointed out another example, the letter “D” would be the letter “A” once deciphered. Memorize/write down the information regarding deciphering.
With this knowledge, we can decipher the password. We already saw a ciphered password in the toilet, but, in case you didn’t write it down, let’s go back to the toilet and take another look at it.
Tap on the button in the bottom left corner of the screen to go back.
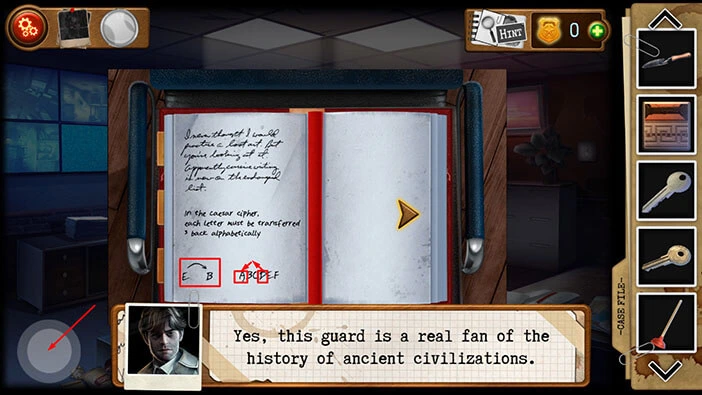
Let’s go back to the toilet. Tap on the button in the bottom left corner of the screen to go back to the first room. After that, tap on the “WC” door on the left to proceed inside.
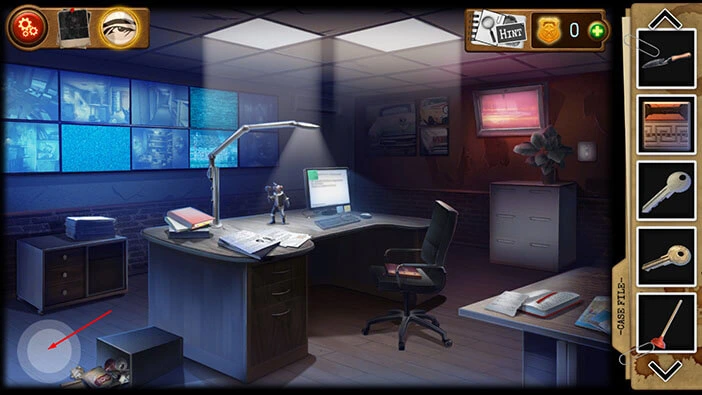
Tap on the door on the left to take a look inside.
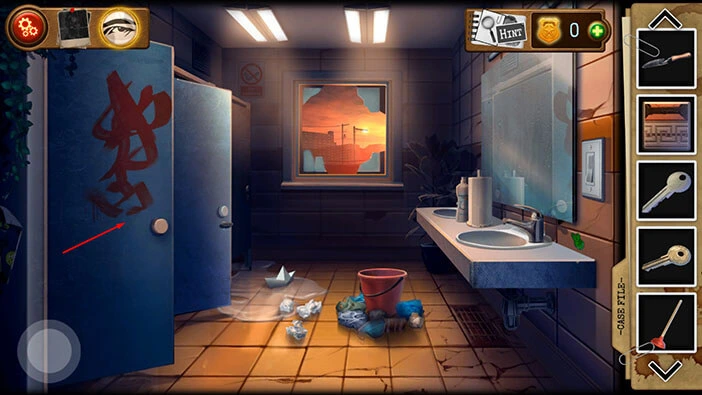
On the left side of the wall, you will notice red letters. Let’s tap on the letters to examine them.
Ok, let’s decipher this password.
The first letter = F. If we move this letter three positions back we will get the letter “C”.
Second letter = D. If we move this letter three positions back we will get the letter “A”.
The third letter = H. If we move this letter three positions back we will get the letter “E”.
The fourth letter = V. If we move this letter three positions back we will get the letter “S”.
Fifth letter = D. If we move this letter three positions back we will get the letter “A”.
The sixth letter = U. If we move this letter three positions back we will get the letter “R”.
When we put it all together, we will get the password “CAESAR”. Nice. Memorize/write down this password.
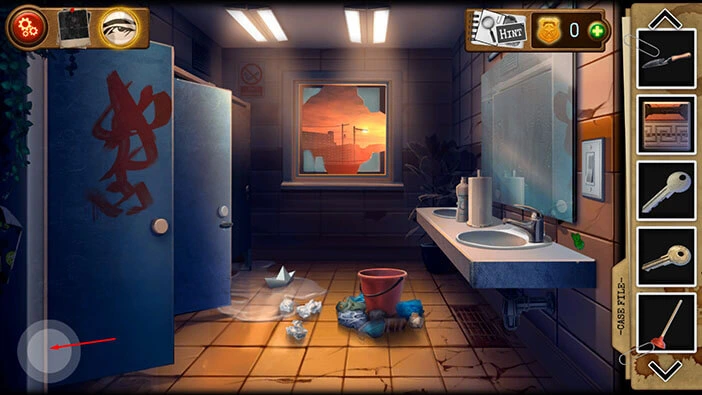
Once you’re done, tap on the button in the bottom left corner of the screen to go back.
Let’s go back to the “Security” room and unlock the PC. Tap on the button in the bottom left corner of the screen to go back. After that, tap on the door with the label “Security” on the right side to proceed inside.
Tap on the PC screen to take a closer look at it, and tap again to start the interaction.
Enter the password “CAESAR” to unlock the PC.
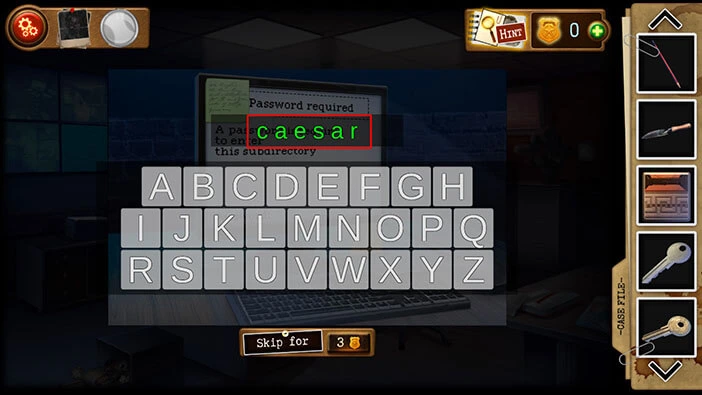
Once you enter the correct password, you will see a red “UNLOCK” button on the screen. Tap on this button and it will turn green, indicating that we unlocked something.
Once you’re done, tap on the button in the bottom left corner of the screen to go back.
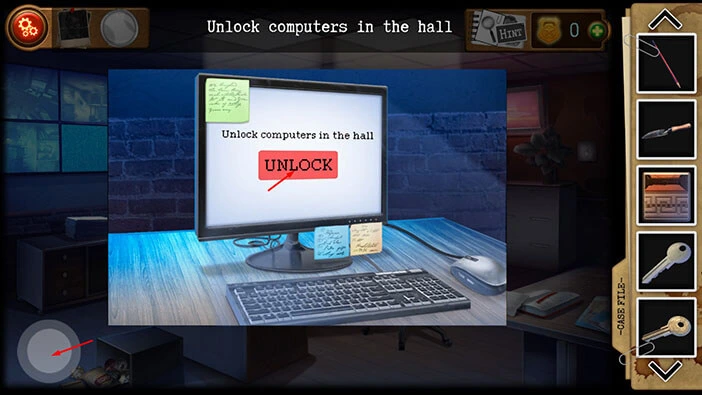
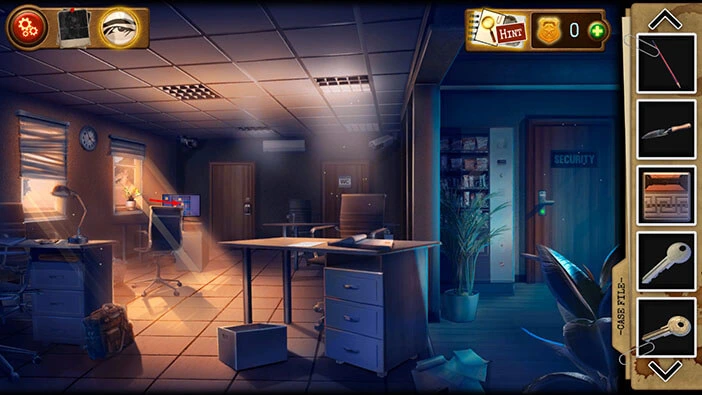
Let’s go back to the first room. Tap on the button in the bottom left corner of the screen.
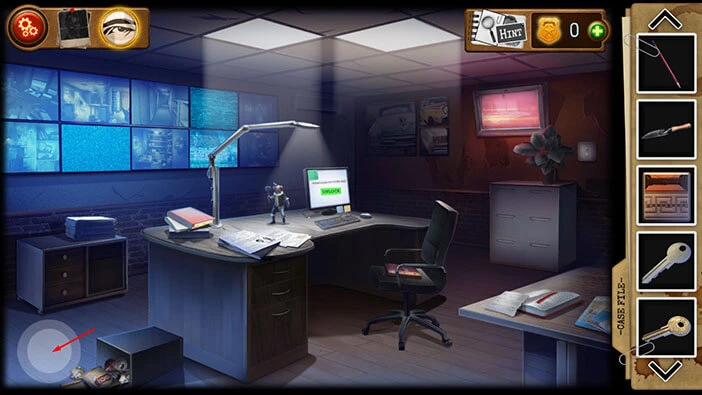
In the top left corner of the room, you will notice another screen. Tap on it to take a closer look.
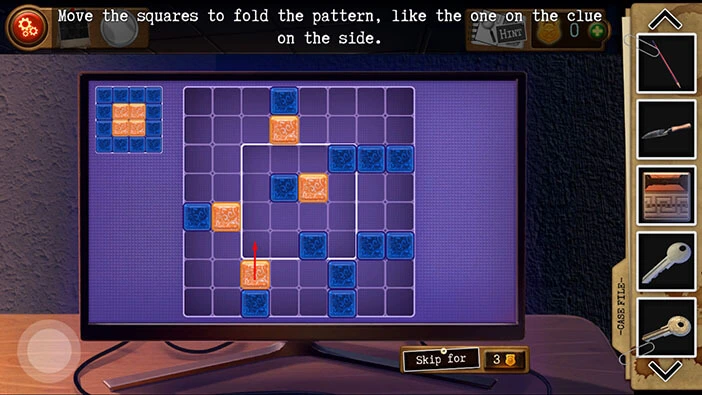
Here, we have another puzzle. Our task is to form the pattern located in the top left corner of the screen. We should place this pattern in the middle of the grid. We will solve this puzzle in several steps. Let’s begin.
Step 1
Take the yellow square located in the third slot in the seventh row and drag it to the third slot in the sixth row.
Step 2
Take the yellow square located in the second slot in the fifth row and drag it to the third slot in the fifth row.
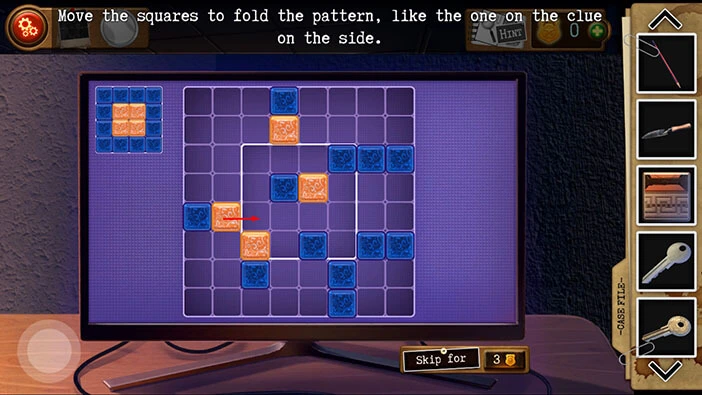
Step 3
Take the yellow square located in the fourth slot in the second row and drag it to the fifth slot in the second row.
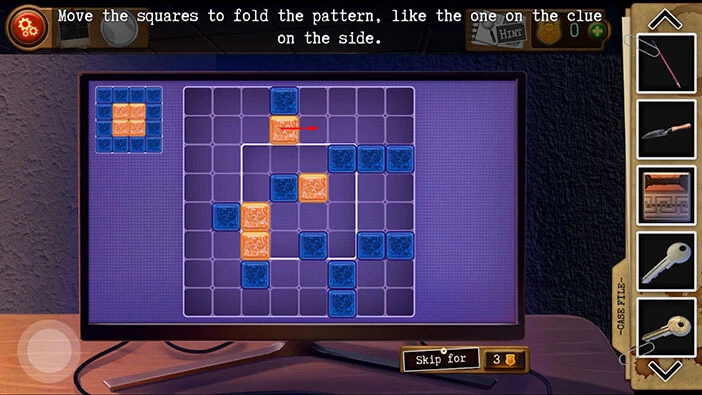
Step 4
Take the yellow square located in the fifth slot in the fourth row and drag it to the seventh slot in the fourth row.
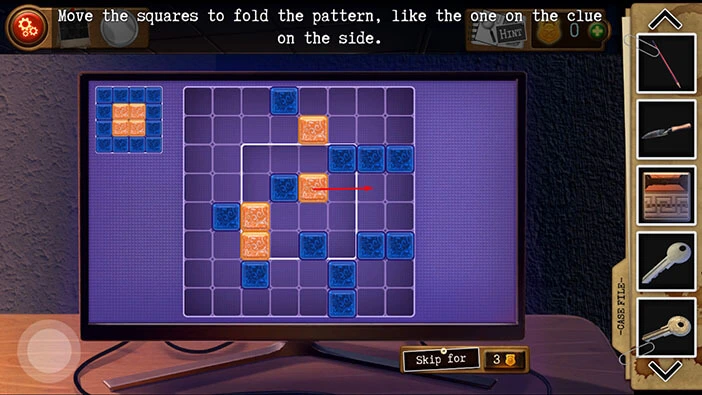
Step 5
Take the yellow square located in the third slot in the fifth row and drag it to the third slot in the fourth row.
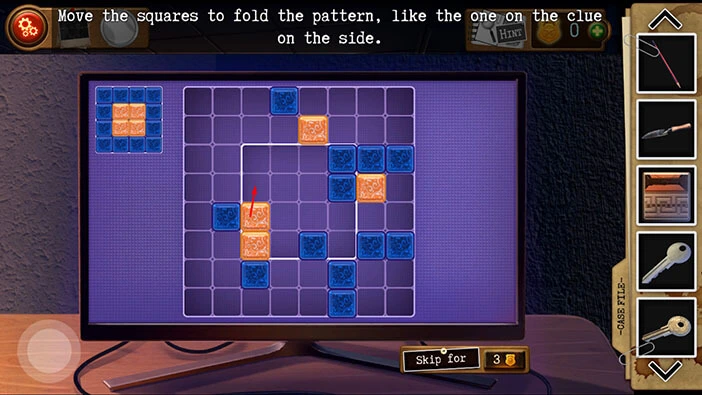
Step 6
Take the yellow square located in the third slot in the fifth row and drag it to the fourth slot in the fifth row.
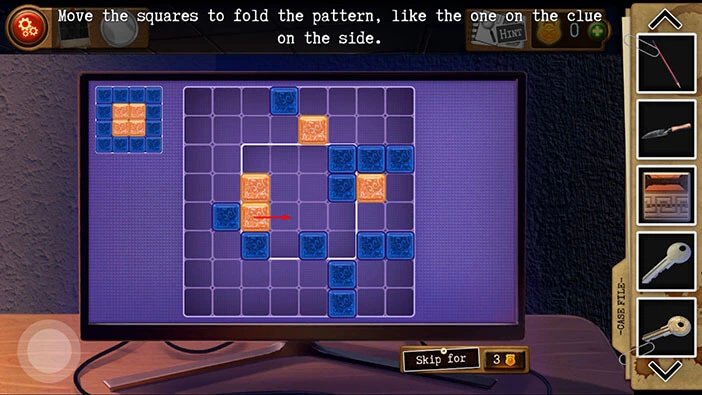
Step 7
Take the yellow square located in the seventh slot in the fourth row and drag it to the eighth slot in the fourth row.
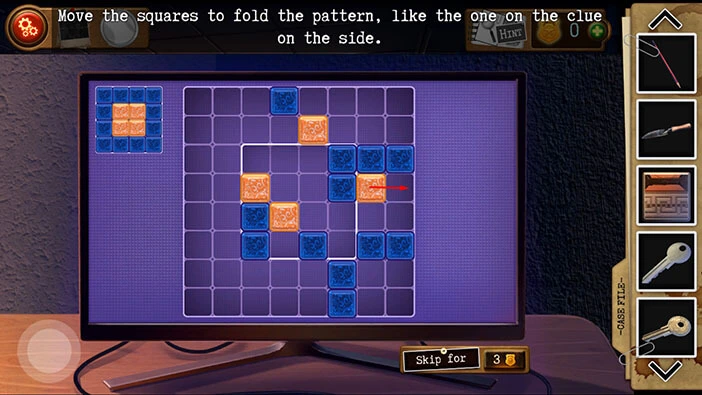
Step 8
Take the yellow square located in the eighth slot in the fourth row and drag it to the eighth slot in the third row.
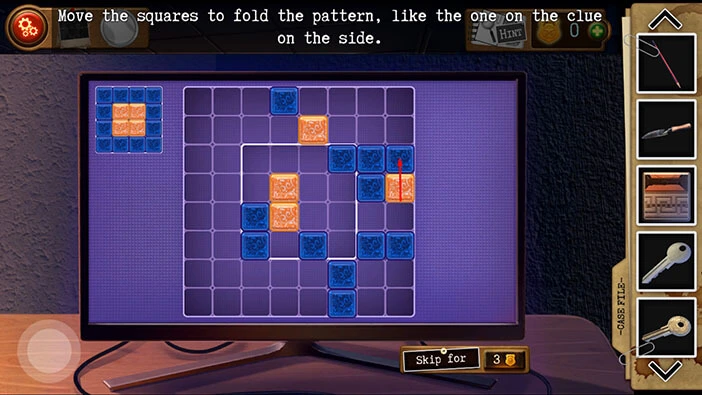
Step 9
Take the blue square located in the seventh slot in the third row and drag it to the seventh slot in the first row.
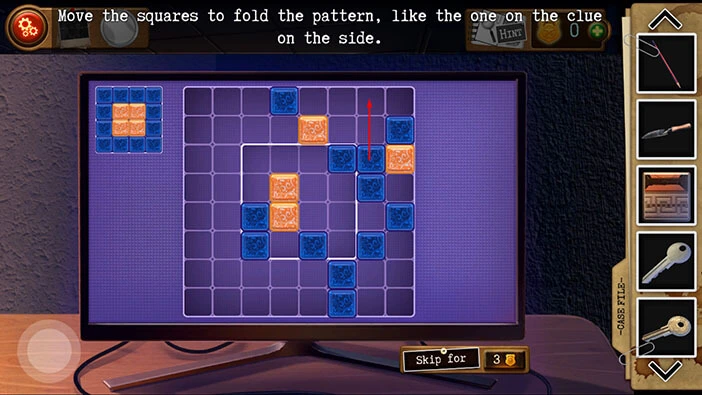
Step 10
Take the blue square located in the sixth slot in the third row and drag it to the sixth slot in the second row.
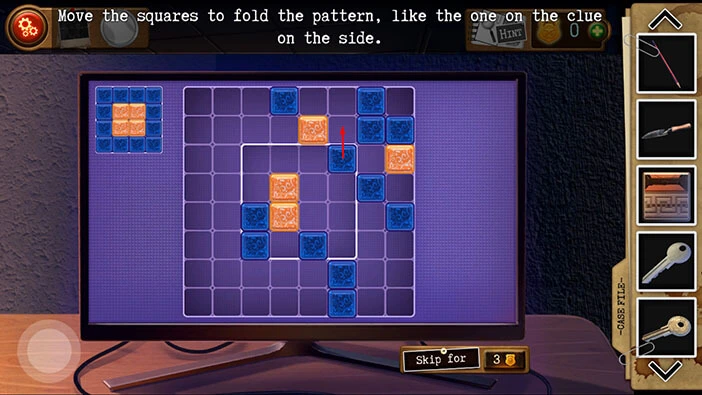
Step 11
Take the yellow square located in the eighth slot in the third row and drag it to the fifth slot in the third row.
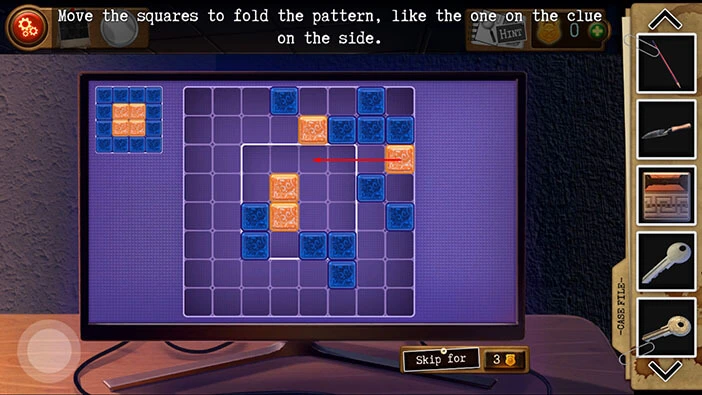
Step 12
Take the blue square located in the sixth slot in the sixth row and drag it to the seventh slot in the sixth row.
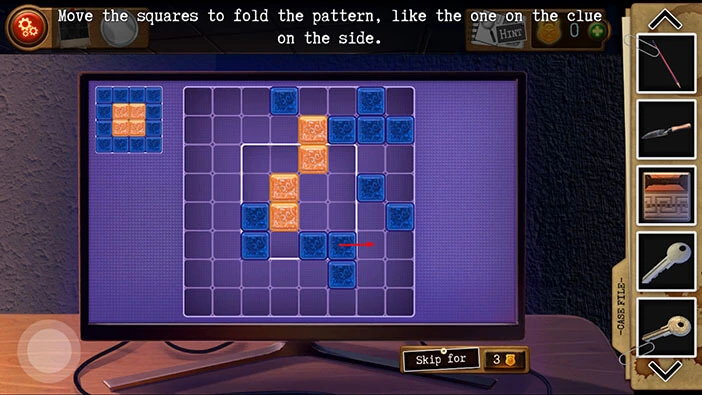
Step 13
Take the yellow square located in the fifth slot in the third row and drag it to the fifth slot in the fifth row.
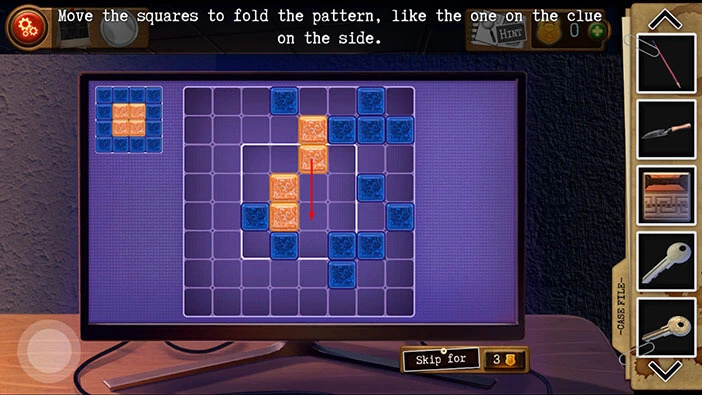
Step 14
Take the blue square located in the fourth slot in the sixth row and drag it to the first slot in the sixth row.
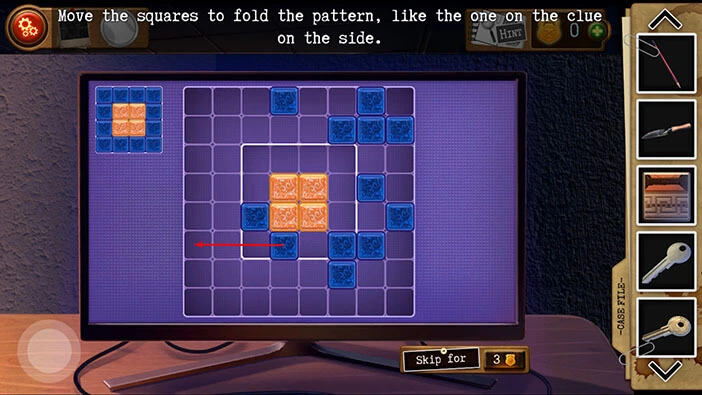
Step 15
Take the blue square located in the first slot in the sixth row and drag it to the first slot in the seventh row.
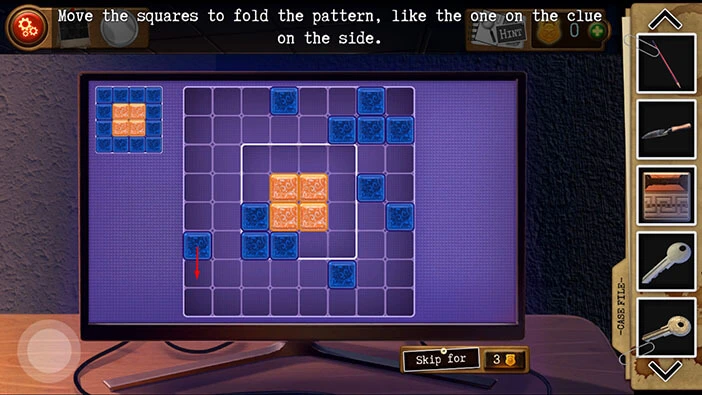
Step 16
Take the blue square located in the third slot in the sixth row and drag it to the second slot in the sixth row.
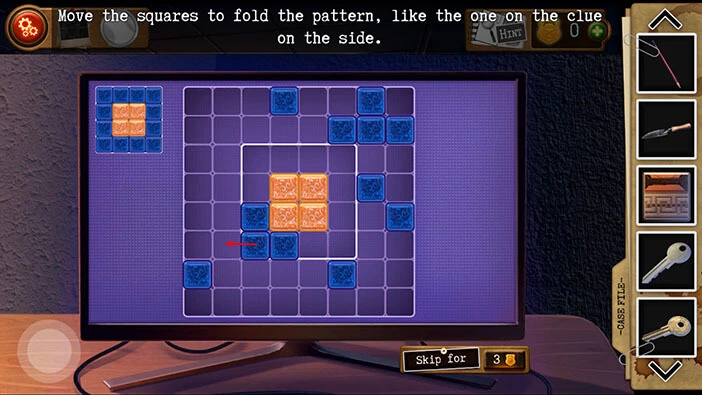
Step 17
Take the blue square located in the first slot in the seventh row and drag it to the first slot in the sixth row.
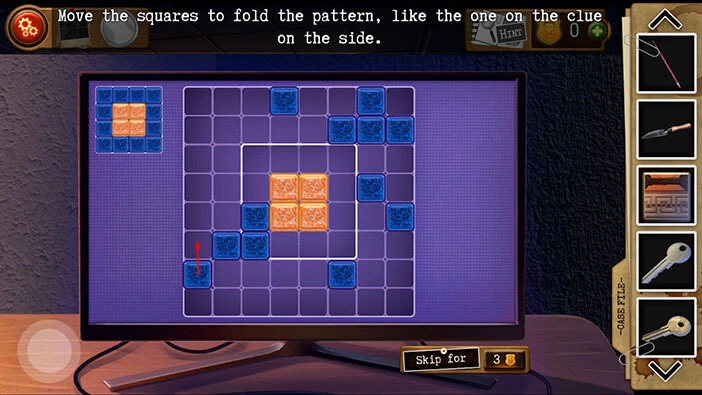
Step 18
Take the blue square located in the third slot in the sixth row and drag it to the sixth slot in the sixth row.
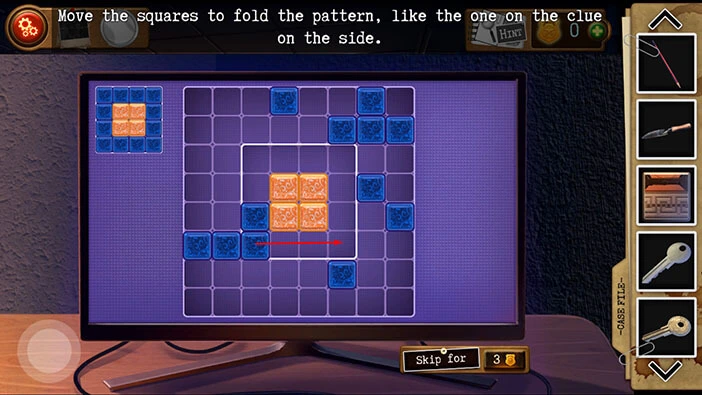
Step 19
Take the blue square located in the third slot in the fifth row and drag it to the third slot in the sixth row.
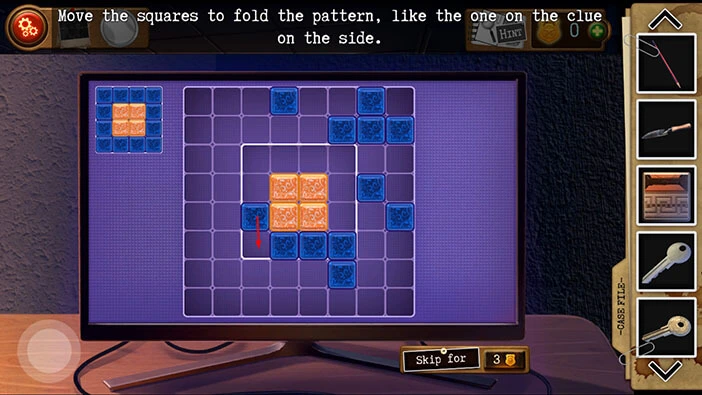
Step 20
Take the blue square located in the sixth slot in the second row and drag it to the first slot in the second row.
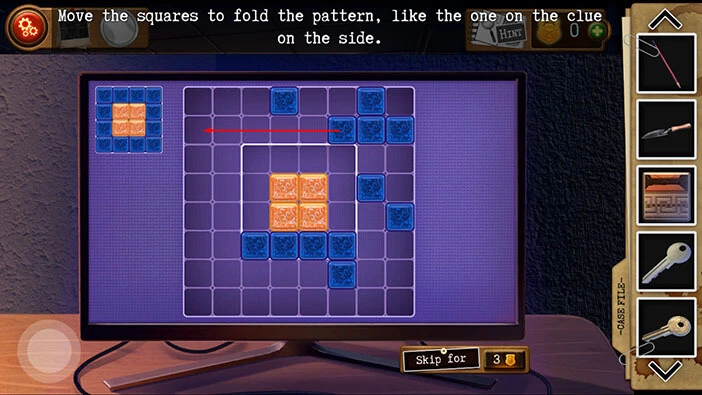
Step 21
Take the blue square located in the sixth slot in the sixth row and drag it to the seventh slot in the sixth row.
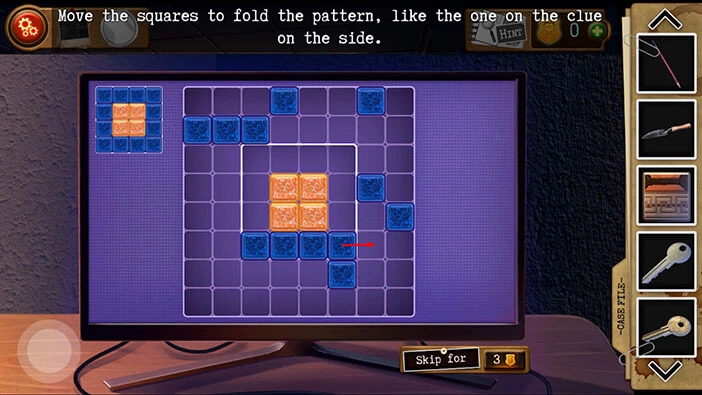
Step 22
Take the blue square located in the third slot in the second row and drag it to the third slot in the fifth row.
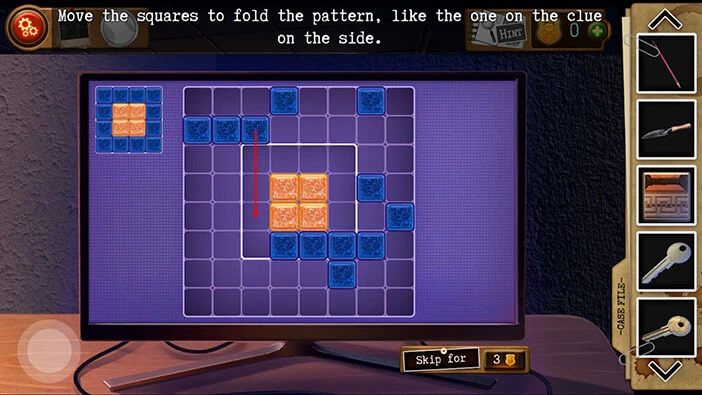
Step 23
Take the blue square located in the second slot in the second row and drag it to the third slot in the second row.
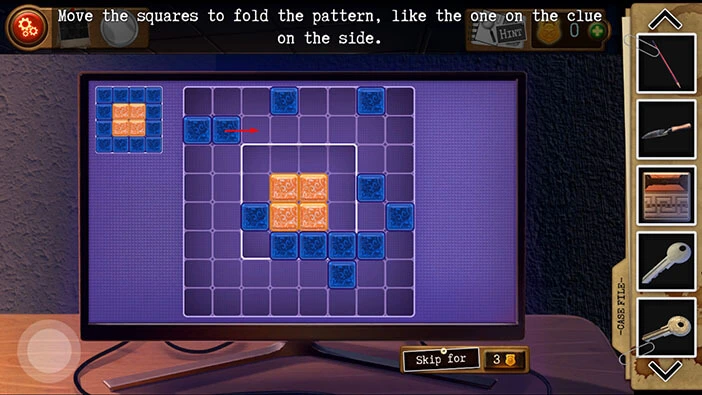
Step 24
Take the blue square located in the third slot in the fifth row and drag it to the third slot in the seventh row.
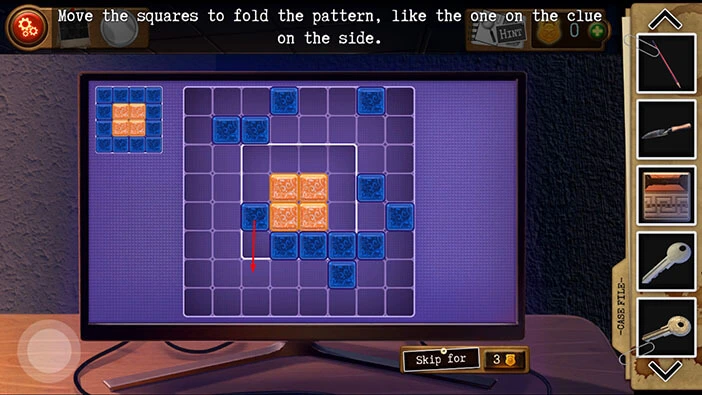
Step 25
Take the blue square located in the seventh slot in the fourth row and drag it to the eighth slot in the fourth row.
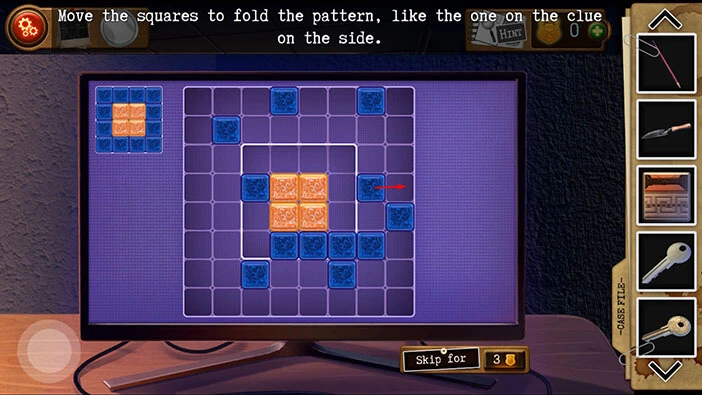
Step 26
Take the blue square located in the third slot in the seventh row and drag it to the third slot in the fifth row.
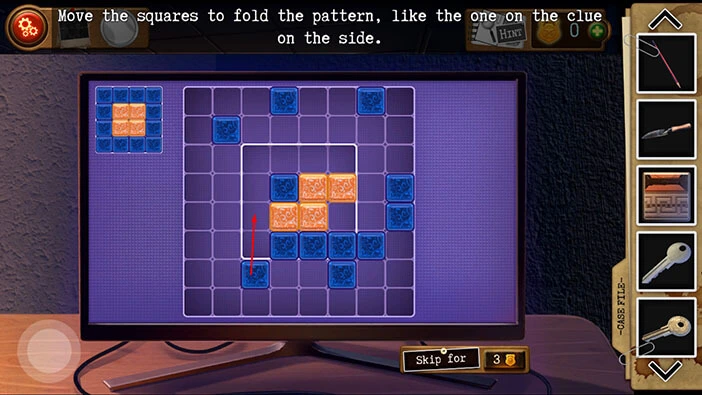
Step 27
Take the blue square located in the second slot in the second row and drag it to the third slot in the second row.
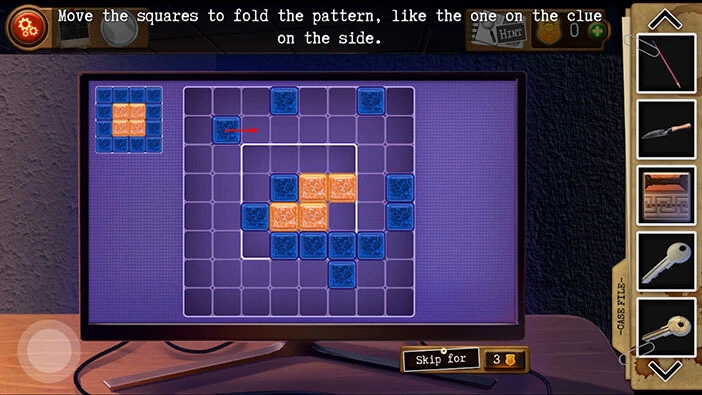
Step 28
Take the blue square located in the third slot in the fifth row and drag it to the third slot in the sixth row.
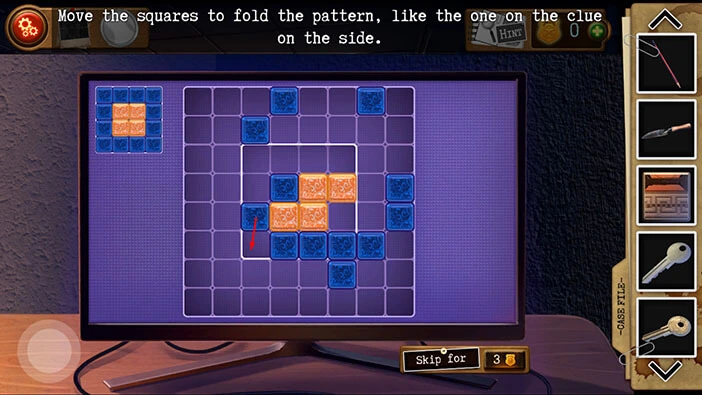
Step 29
Take the blue square located in the third slot in the third row and drag it to the fourth slot in the third row.
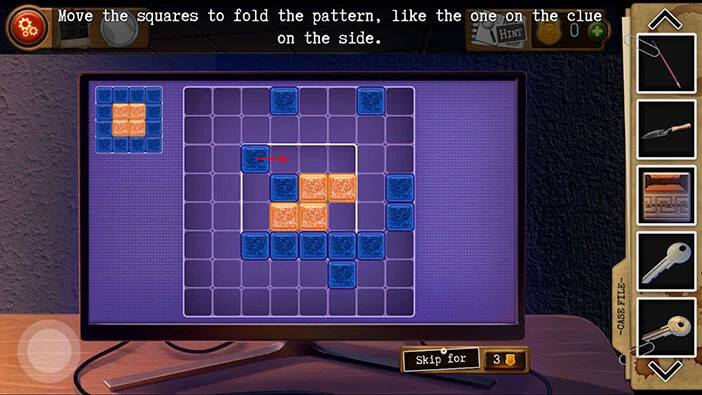
Step 30
Take the blue square located in the third slot in the sixth row and drag it to the third slot in the fifth row.
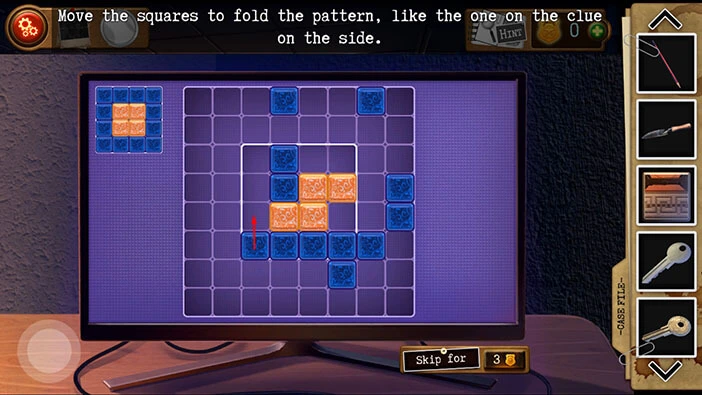
Step 31
Take the blue square located in the fourth slot in the sixth row and drag it to the second slot in the sixth row.
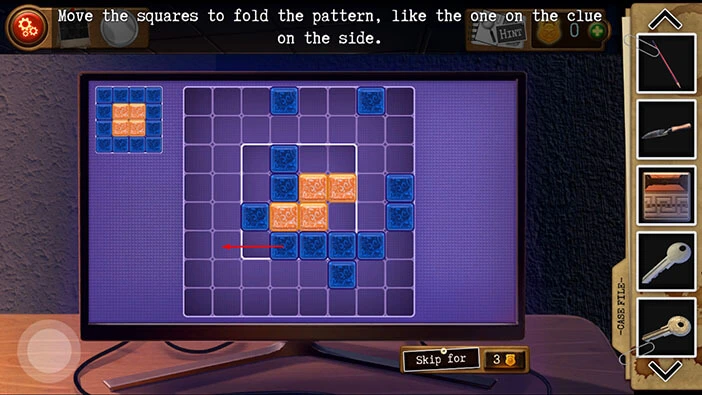
Step 32
Take the blue square located in the fourth slot in the fourth row and drag it to the third slot in the fourth row.
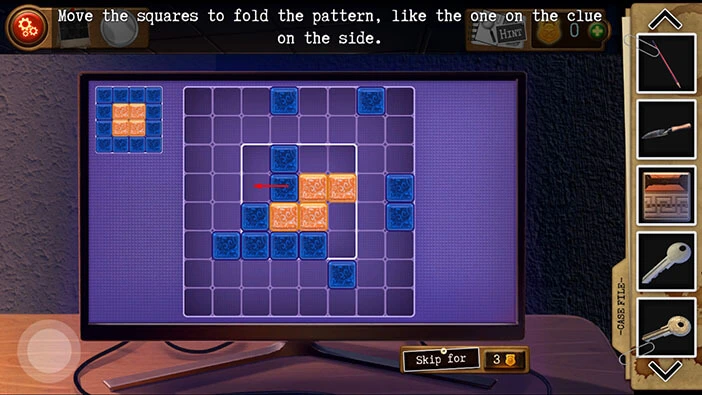
Step 33
Take the blue square located in the fourth slot in the third row and drag it to the third slot in the third row.
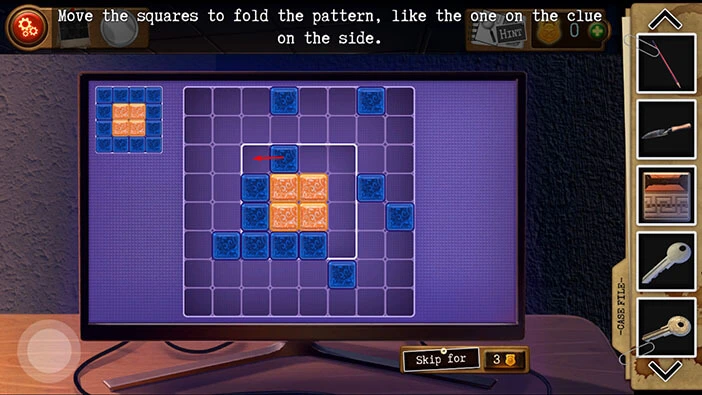
Step 34
Take the blue square located in the sixth slot in the seventh row and drag it to the sixth slot in the third row.
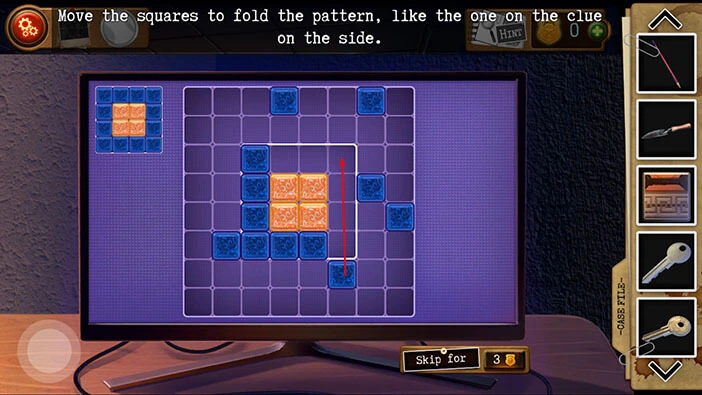
Step 35
Take the blue square located in the eighth slot in the fifth row and drag it to the eighth slot in the eighth row.
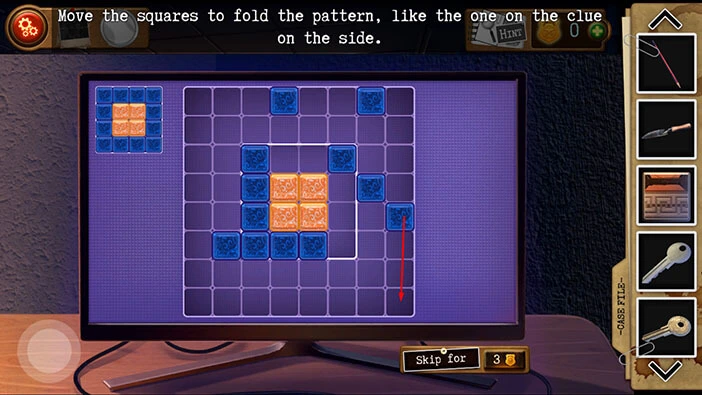
Step 36
Take the blue square located in the eighth slot in the eighth row and drag it to the sixth slot in the eighth row.
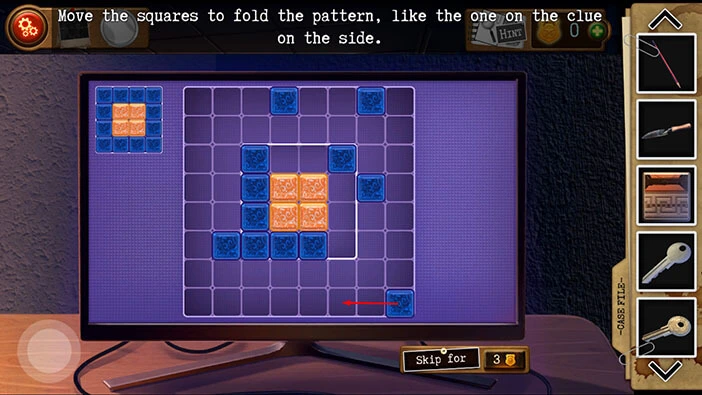
Step 37
Take the blue square located in the sixth slot in the third row and drag it to the sixth slot in the first row.
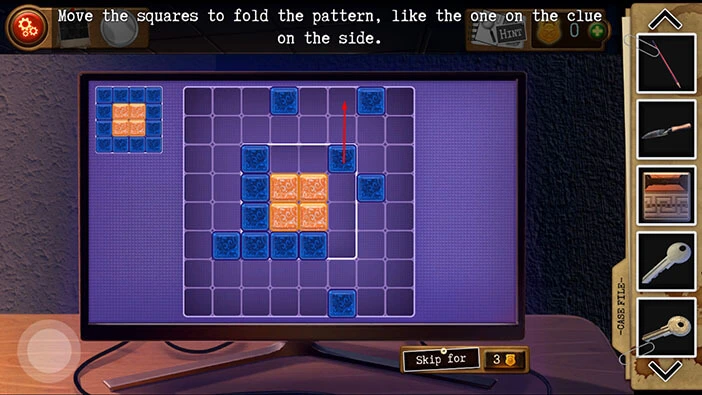
Step 38
Take the blue square located in the sixth slot in the sixth row and drag it to the seventh slot in the sixth row.
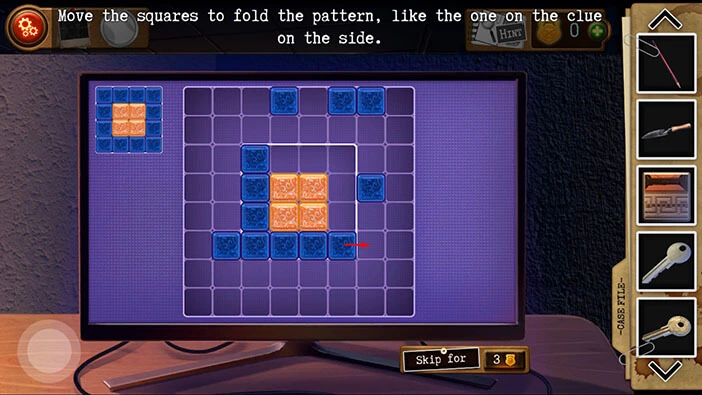
Step 39
Take the blue square located in the seventh slot in the fourth row and drag it to the eighth slot in the fourth row.
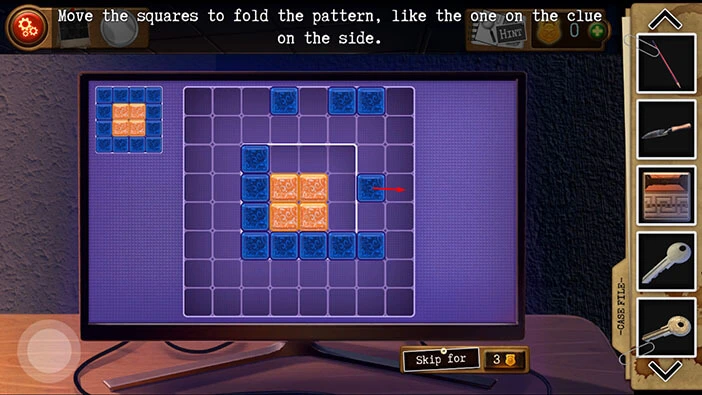
Step 40
Take the blue square located in the fourth slot in the first row and drag it to the third slot in the first row.
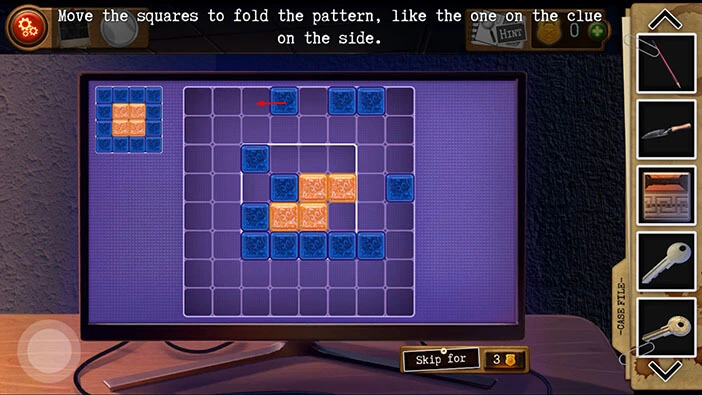
Step 41
Take the blue square located in the eighth slot in the fourth row and drag it to the seventh slot in the fourth row.
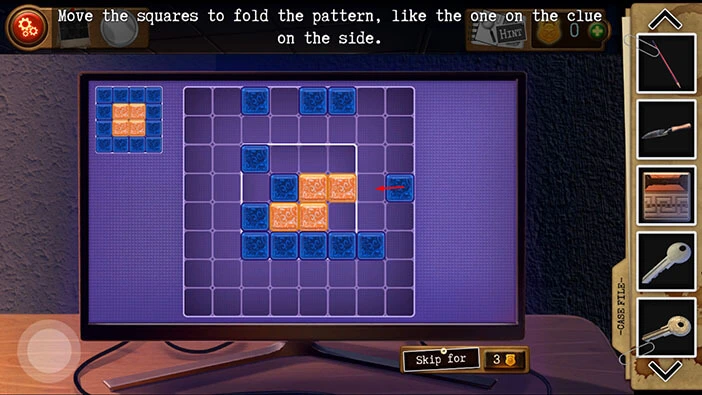
Step 42
Take the blue square located in the seventh slot in the sixth row and drag it to the seventh slot in the seventh row.
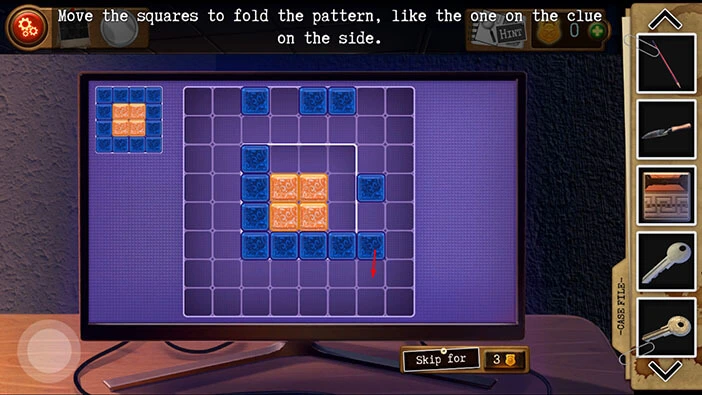
Step 43
Take the blue square located in the seventh slot in the seventh row and drag it to the sixth slot in the seventh row.
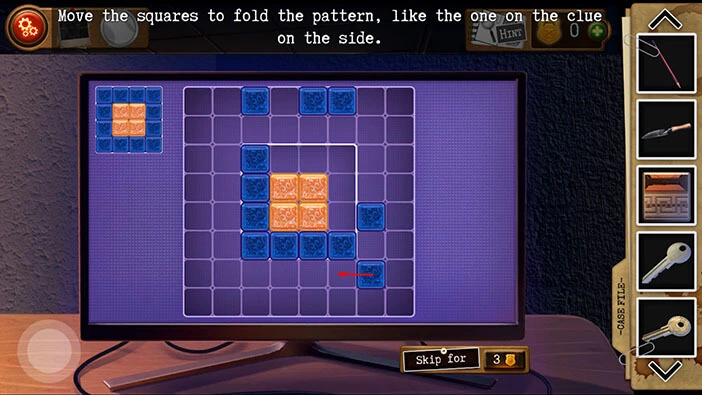
Step 44
Take the blue square located in the seventh slot in the fifth row and drag it to the seventh slot in the eighth row.
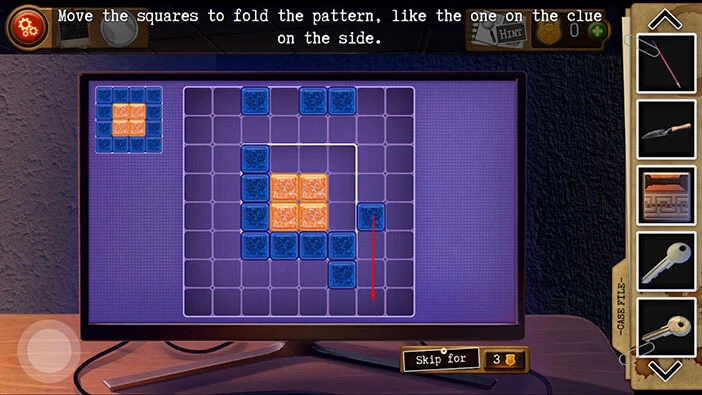
Step 45
Take the blue square located in the seventh slot in the eighth row and drag it to the sixth slot in the eighth row.
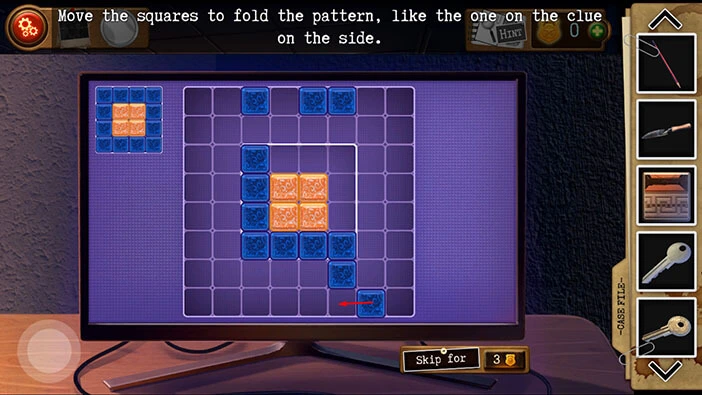
Step 46
Take the blue square located in the sixth slot in the first row and drag it to the eighth slot in the first row.
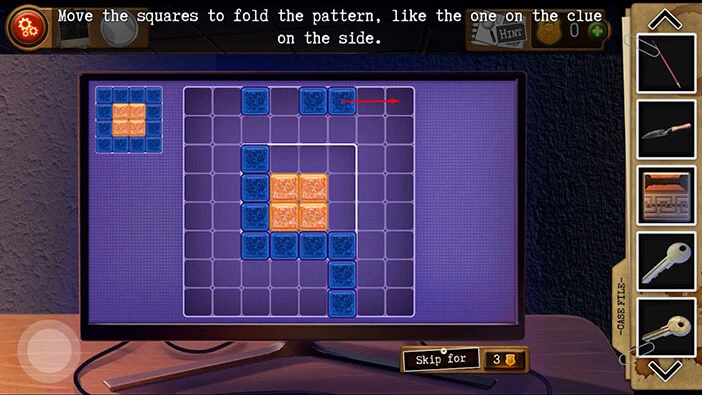
Step 47
Take the blue square located in the seventh slot in the first row and drag it to the seventh slot in the eighth row.
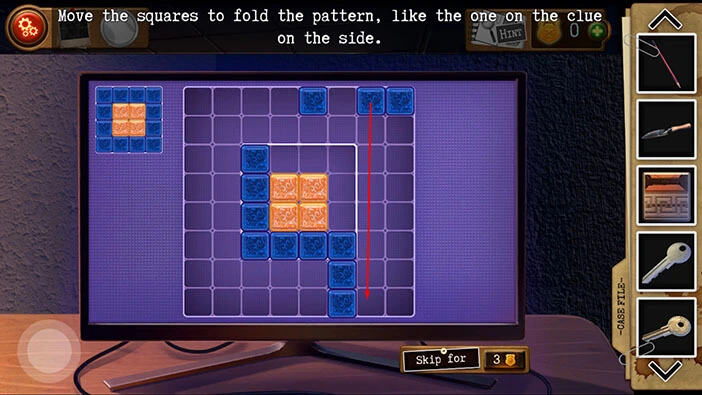
Step 48
Take the blue square located in the sixth slot in the sixth row and drag it to the sixth slot in the fourth row.
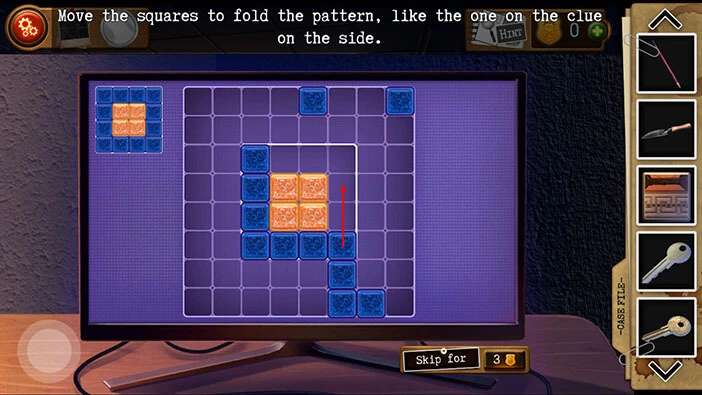
Step 49
Take the blue square located in the seventh slot in the eighth row and drag it to the seventh slot in the seventh row.
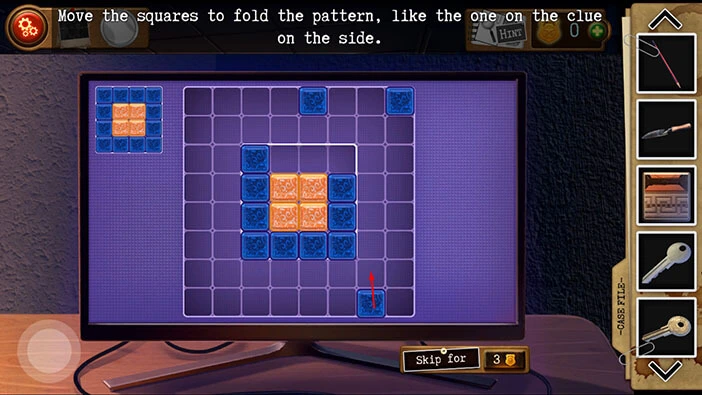
Step 50
Take the blue square located in the seventh slot in the seventh row and drag it to the sixth slot in the seventh row.
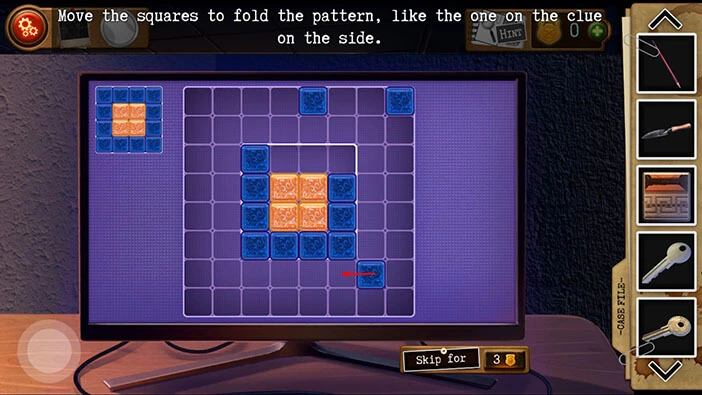
Step 51
Take the blue square located in the sixth slot in the fourth row and drag it to the sixth slot in the third row.
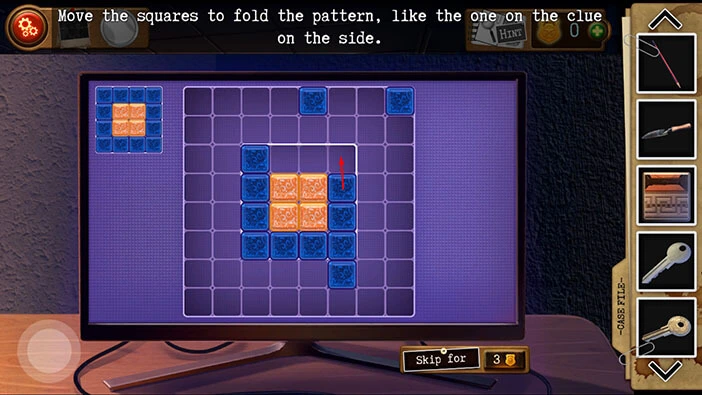
Step 52
Take the blue square located in the eighth slot in the first row and drag it to the eighth slot in the second row.
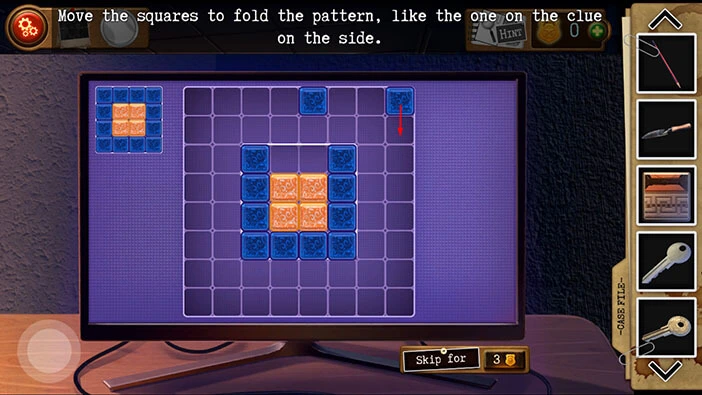
Step 53
Take the blue square located in the eighth slot in the second row and drag it to the seventh slot in the second row.
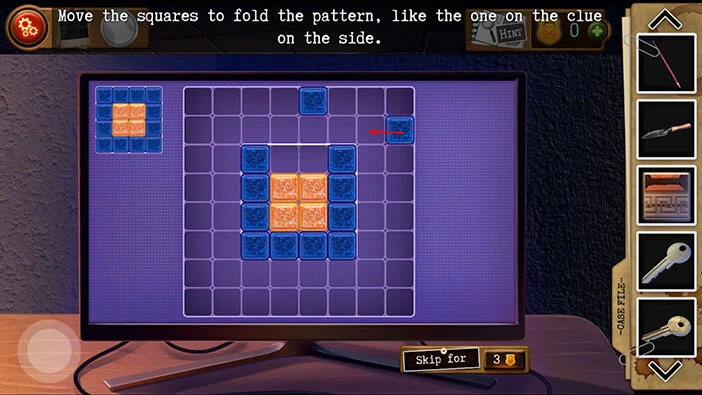
Step 54
Take the blue square located in the sixth slot in the sixth row and drag it to the sixth slot in the seventh row.
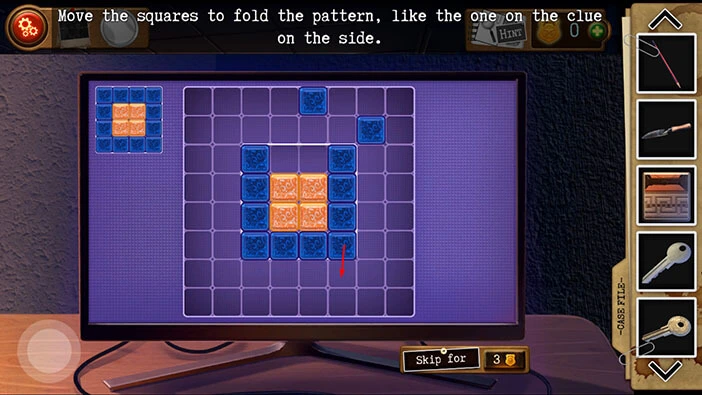
Step 55
Take the blue square located in the seventh slot in the second row and drag it to the seventh slot in the third row.
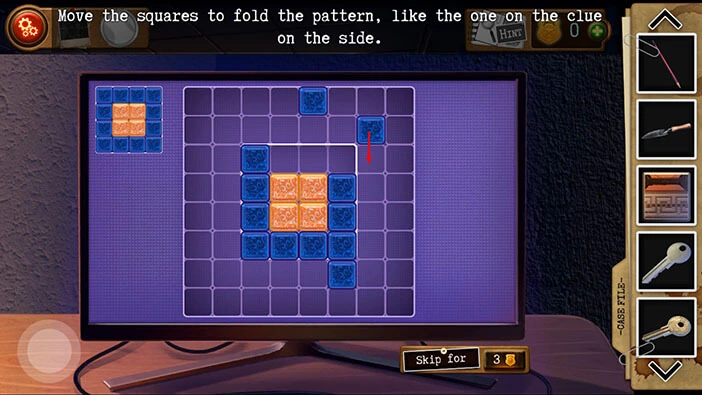
Step 56
Take the blue square located in the third slot in the sixth row and drag it to the third slot in the seventh row.
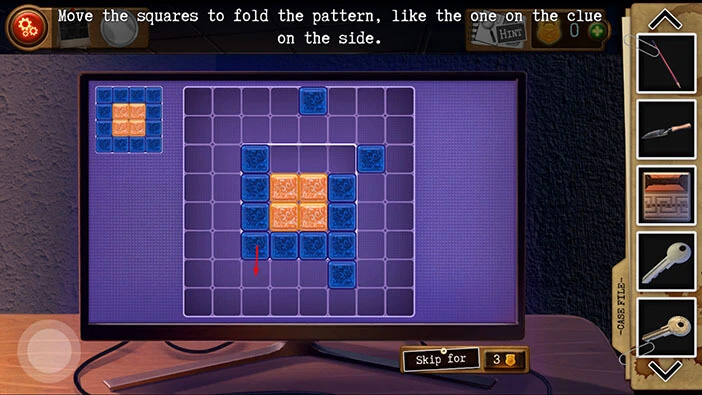
Step 57
Take the blue square located in the seventh slot in the third row and drag it to the fourth slot in the third row.
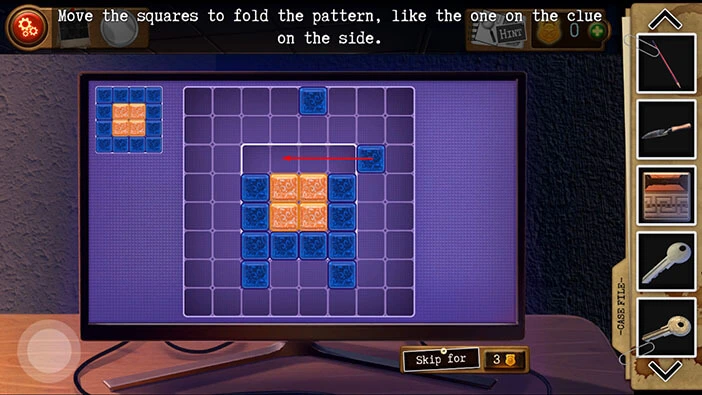
Step 58
Take the blue square located in the fifth slot in the first row and drag it to the seventh slot in the first row.
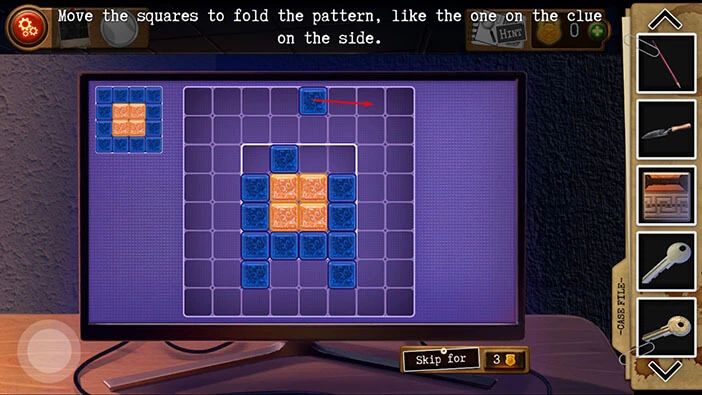
Step 59
Take the blue square located in the seventh slot in the first row and drag it to the seventh slot in the third row.
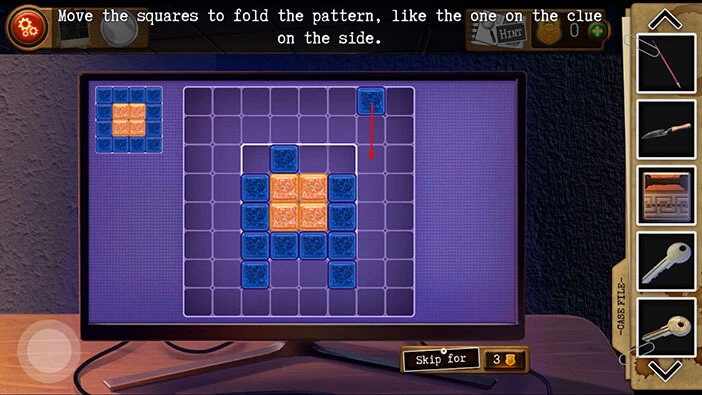
Step 60
Take the blue square located in the fourth slot in the sixth row and drag it to the fourth slot in the eighth row.
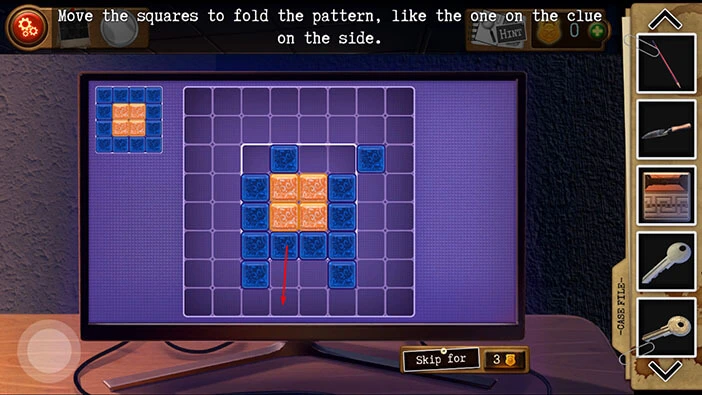
Step 61
Take the blue square located in the seventh slot in the third row and drag it to the fifth slot in the third row.
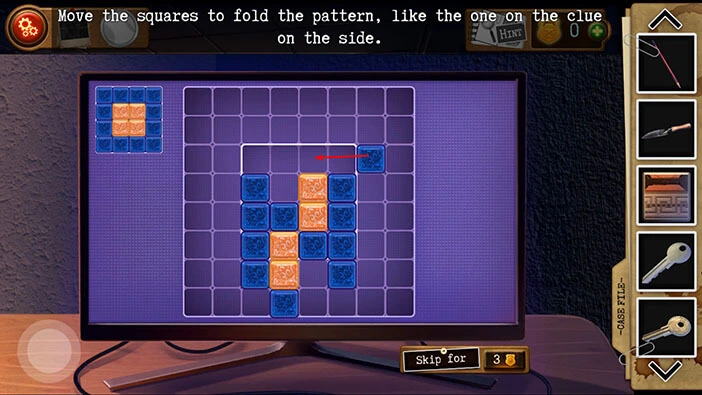
Step 62
Take the blue square located in the fourth slot in the fifth row and drag it to the fourth slot in the third row.
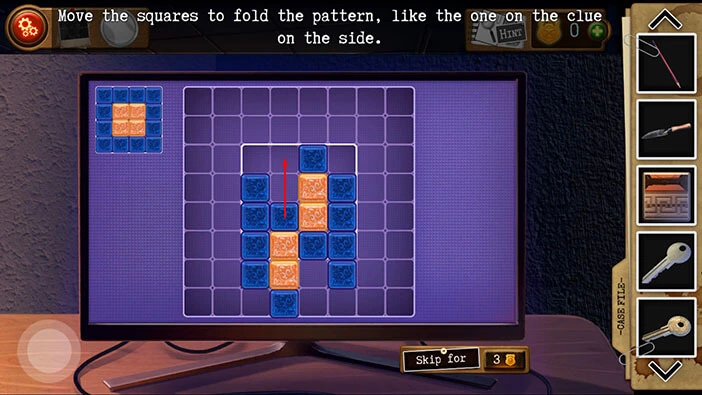
Step 63
Take the blue square located in the third slot in the fourth row and drag it to the third slot in the third row.
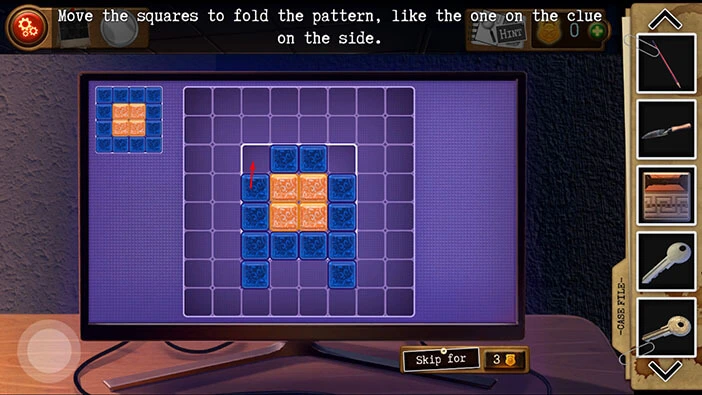
Step 64
Finally, take the blue square located in the sixth slot in the fourth row and drag it to the sixth slot in the third row.
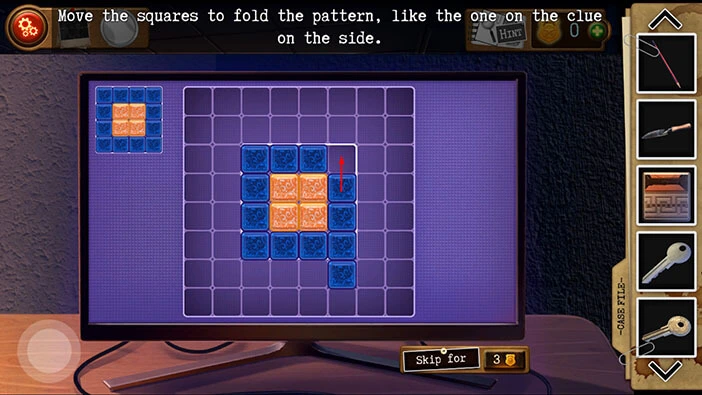
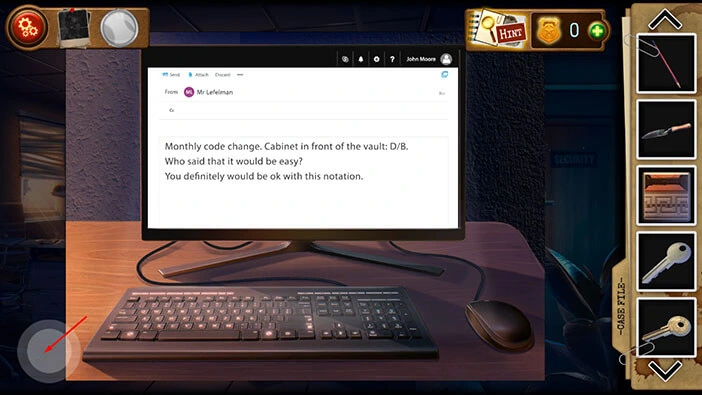
Tap on the screen to examine the message. Well, the message refers to the cabinet in front of the vault, and that opening it won’t be a simple task. D/B is the hint for decoding the next puzzle.
Tap on the button in the bottom left corner of the screen to go back.
Let’s go back to the security room and take a look at the notebook one more time. Tap on the “Security” door on the right.
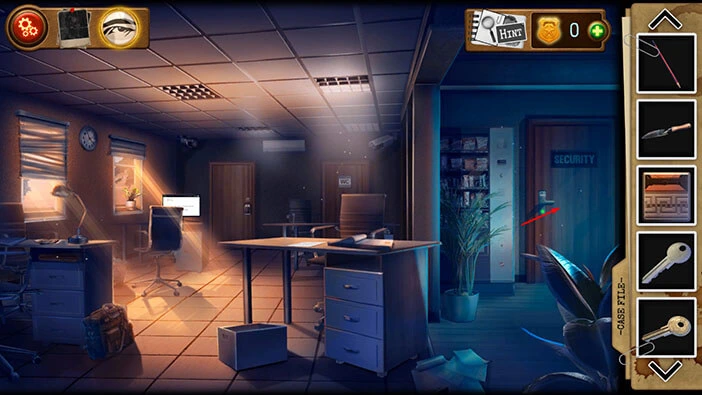
Tap on the notebook on the chair to take a closer look at it. After that, tap on the arrow on the right to take a look at the next page.
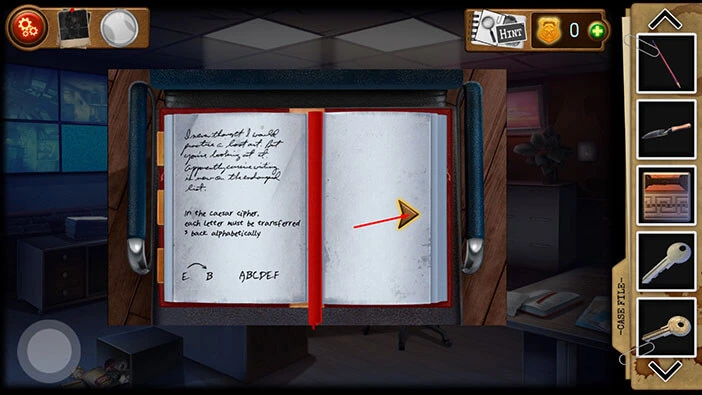
Decoding the hexadecimal code is quite easy. The letter “A” is represented by the number 10, for each next letter in the alphabet just add +1 (B = 11, C = 12, D = 13, etc.)
Previously, we saw a hint D/B. So, if we change these two letters into numbers, we will get “1311”. Memorize/write down this number because we will need it for the next puzzle.
Once you’re done, tap on the button in the bottom left corner of the screen to go back.
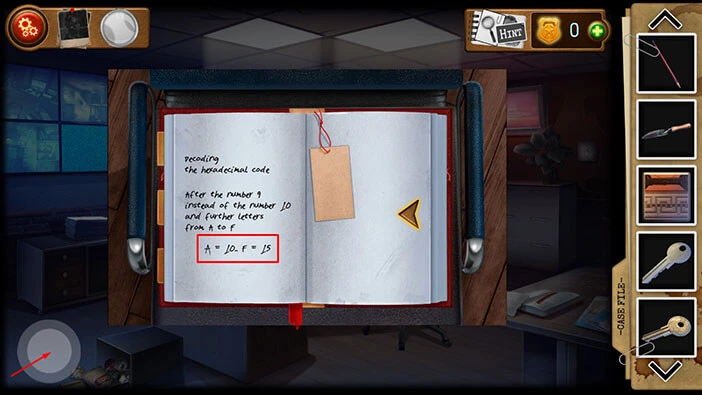
Let’s go back to the first room. Tap on the button in the bottom left corner of the screen.
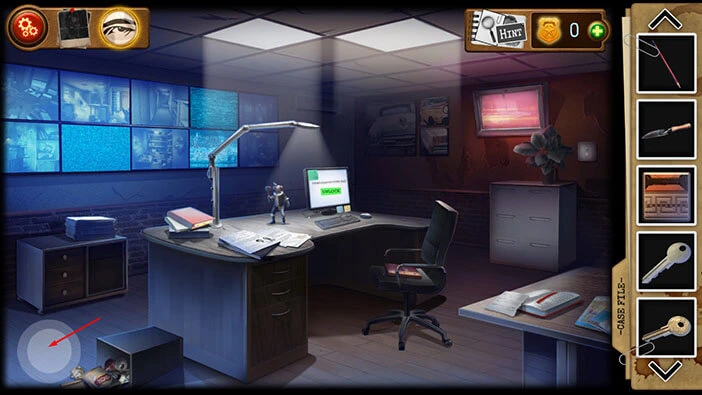
Next, tap on the door on the left to start the interaction.
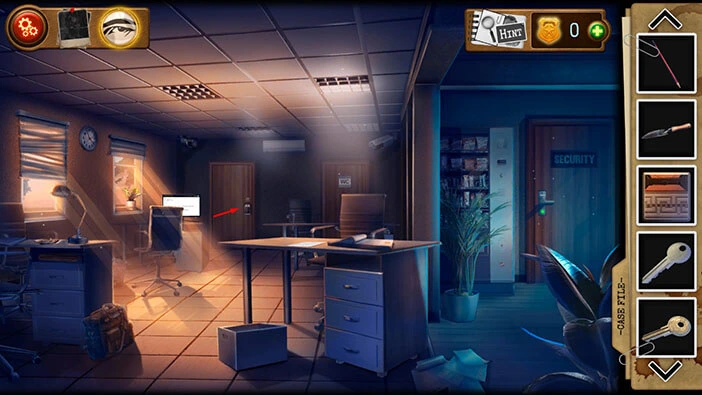
Enter the code “1311” to unlock the door. After that, tap on the door again to proceed to the next room.
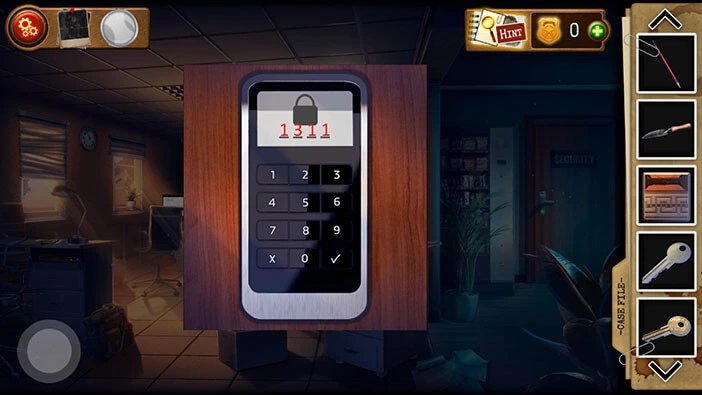
On the table, you will notice a coffee cup. Tap on it to take a closer look.
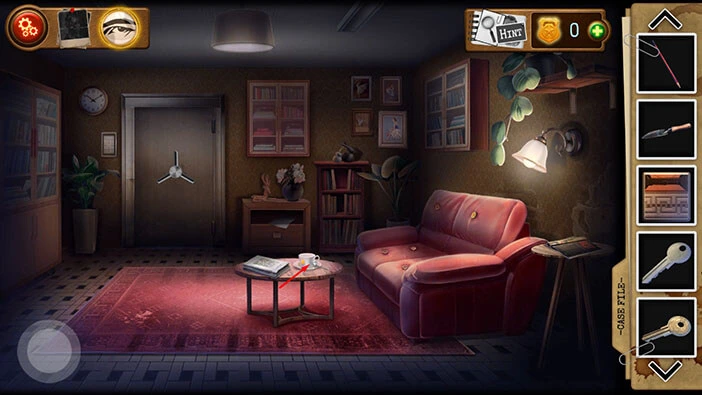
Drag the coffee cup to the right to remove it.
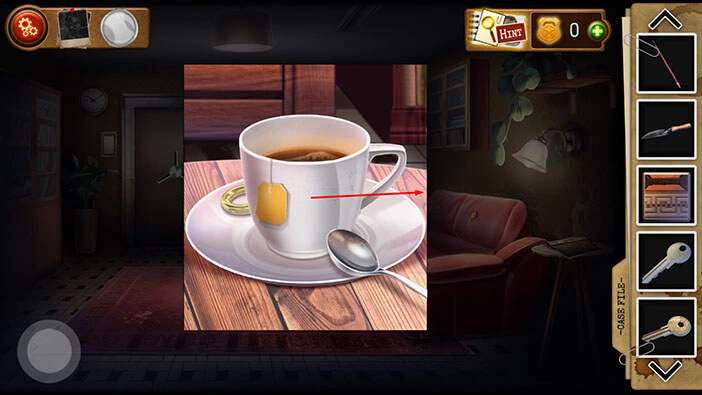
Tap on the key to pick it up, and “Locker key No.3” will be added to your inventory. After that, tap on the button in the bottom left corner of the screen to go back.
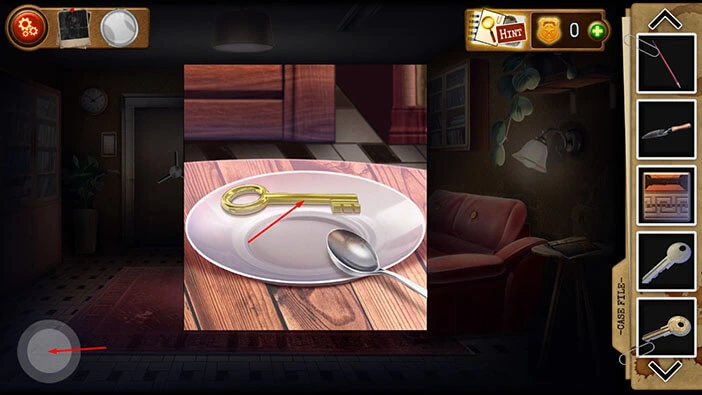
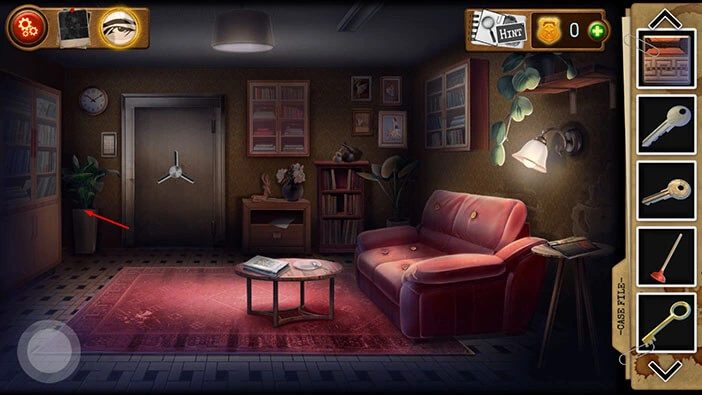
Next, tap on the plant in the top left corner of the room to take a closer look at it.
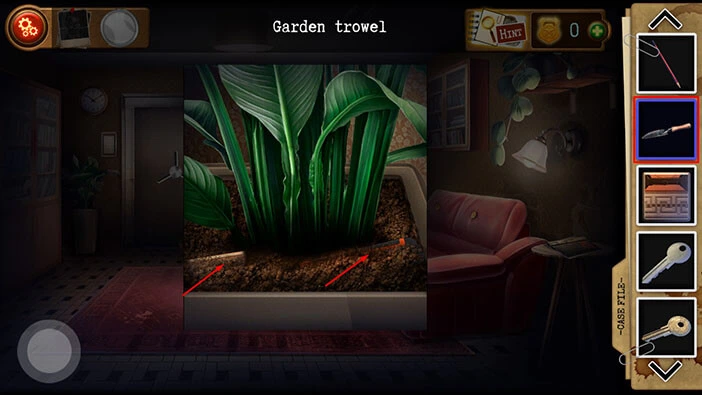
Here, we can see that there are two items buried in the dirt. So, select the “Garden Trowel” from the inventory and dig up these two items.
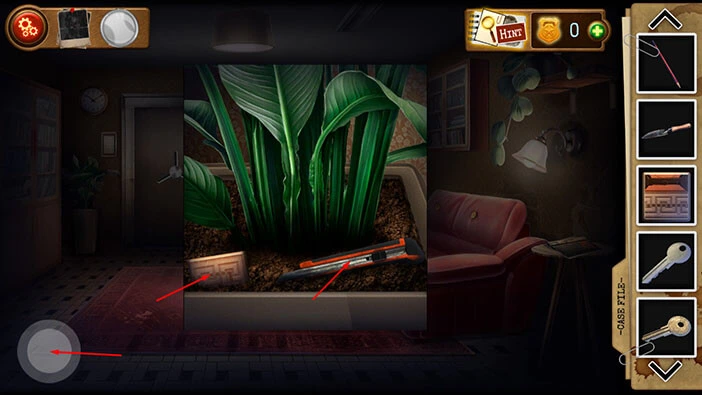
Tap on these two items to pick them up. Another “Puzzle Piece” and a “Box Cutter” will be added to your inventory.
Once you’re done, tap on the button in the bottom left corner of the screen to go back.
Next, tap on the couch on the right to take a closer look at it.
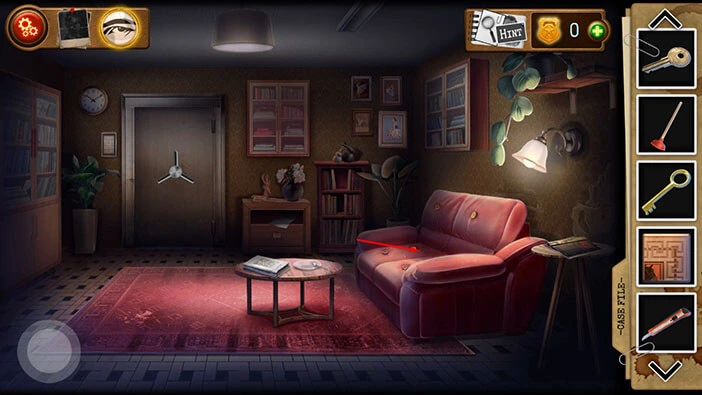
Next, select the “Box Cutter” from the inventory and use it to cut open the couch.
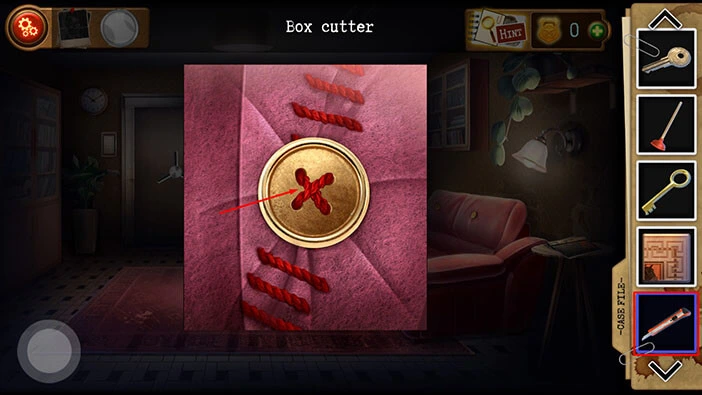
On the couch, you will find a “USB Flash Drive”. Tap on it to pick it up.
After that, tap on the button in the bottom left corner of the screen to go back.
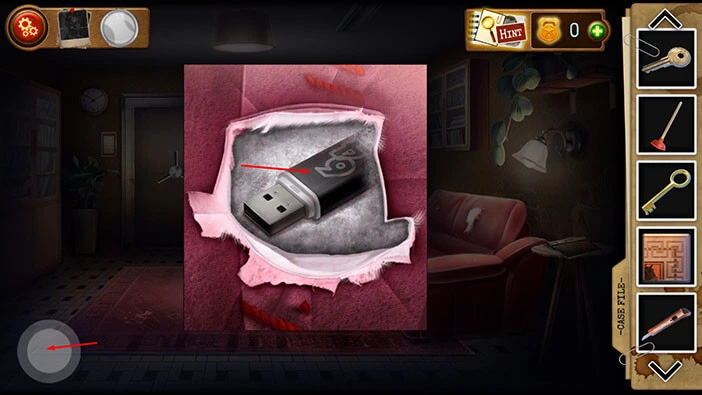
Next, you will see four pictures in the top right corner of the wall in front of you. Tap on the picture in the bottom right corner to take it down.
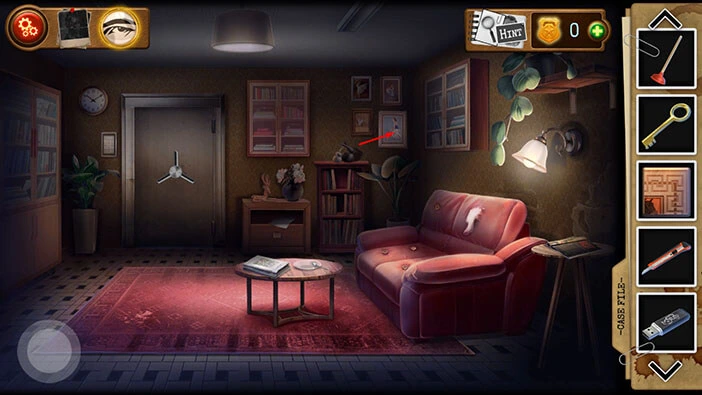
You will notice that there is something hidden behind wallpapers. So, select the “Box Cutter” from the inventory and use it to cut off the piece of wallpaper.
Behind the wallpaper, you will discover a hidden server. Tap on it to take a photo, and our character will add this photo and file it as evidence.
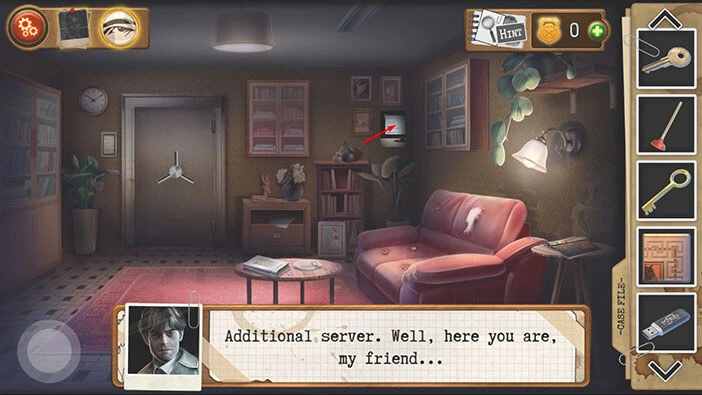
Next, tap on the photo in the top left corner of the screen to take a look at the evidence.
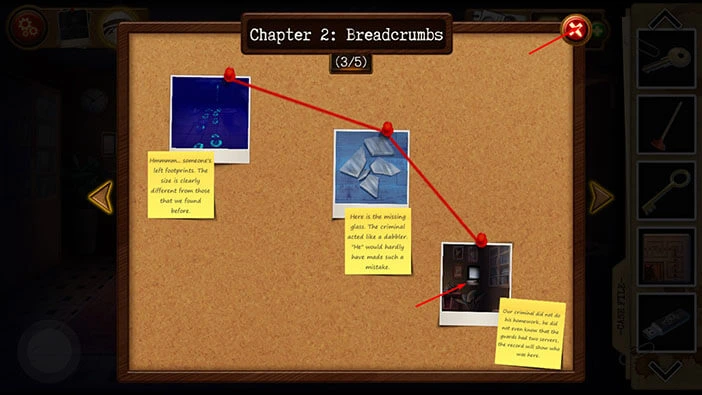
You will notice that we have gathered 3/5 pieces of evidence. Let’s tap on the third piece of evidence to examine it. Well, it looks like the criminal didn’t know about the hidden server, so he was probably caught on camera.
Tap on the red button in the top right corner of the screen to go back.
Next to the large safe door, you will notice a cabinet. You will also notice a note sticking out from the cabinet. Tap on the note to take a closer look at it.
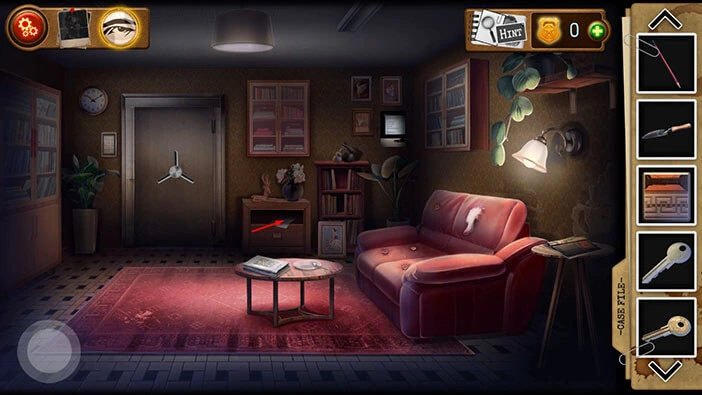
Here, we can see a Mathew NIV text. In the lower left corner of the note you will notice “_:30”. We do not know the first number. However, let’s memorize/write down the name of the text and the “_:30”.
Once you’re done, tap on the button in the bottom left corner of the screen to go back.
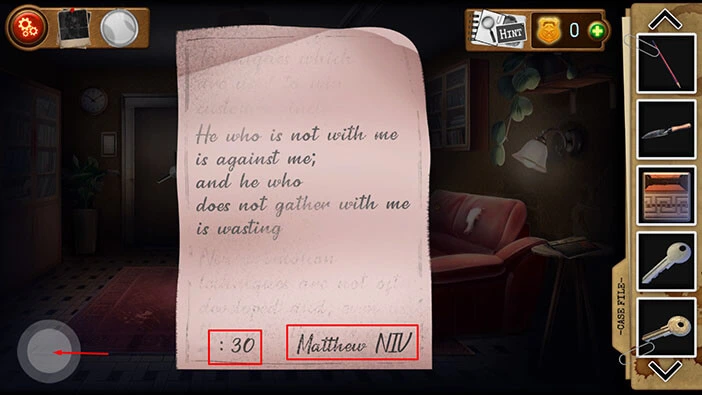
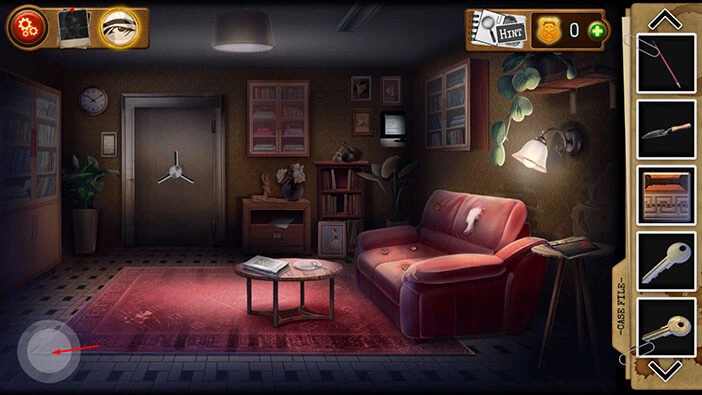
We can discover the first number in the “Security” room, so let’s go there. Tap on the button in the bottom left corner of the screen to go back.
After that, tap on the security room.
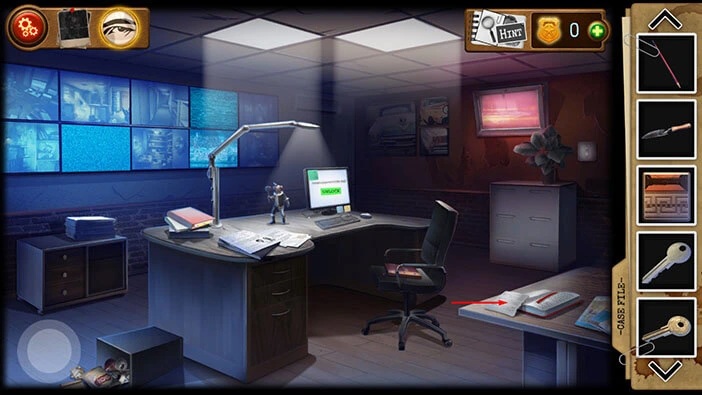
On the shelf on the right, you notice an open notebook. Tap on it to take a closer look.
You will notice that some of the text on the piece of paper on the left is missing, but our character thinks that he can restore it. Let’s do that.
Select the “Pencil” from the inventory, and tap on the paper to put down the pencil. Tap on the pencil, several times, and you will discover the missing chunk of text.
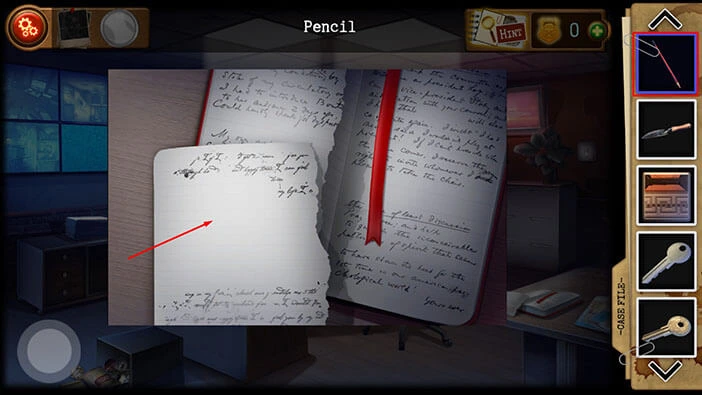
You will see the same text (Mathew NIV) and you will also discover the missing number “12:_”. So, when we put those numbers together, we will get “12:30”. Memorize/write down this information, because we will need it in order to open a large safe door.
Once you’re done, tap on the button in the bottom left corner of the screen to go back.
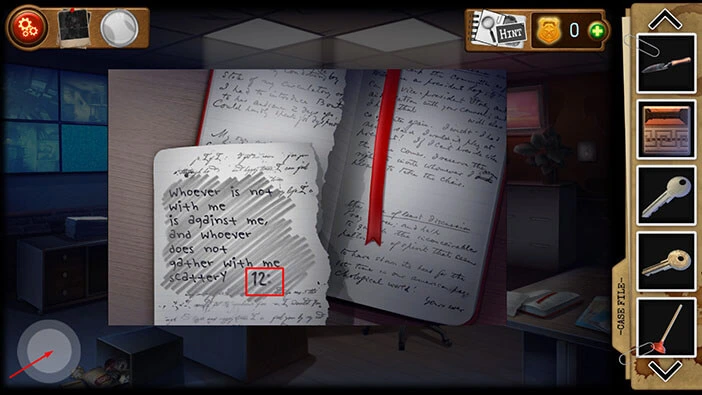
Let’s go back to the room with the safe door. Tap on the button in the bottom left corner of the screen to go back to the first room. After that, tap on the door on the left.
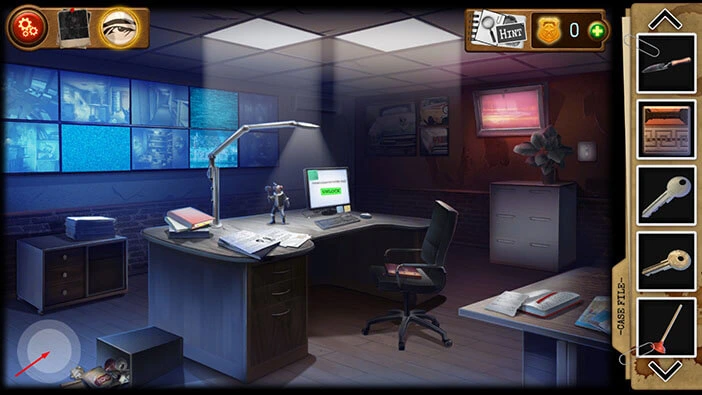
Next, tap on the keypad, located to the left of the safe door, to start the interaction.
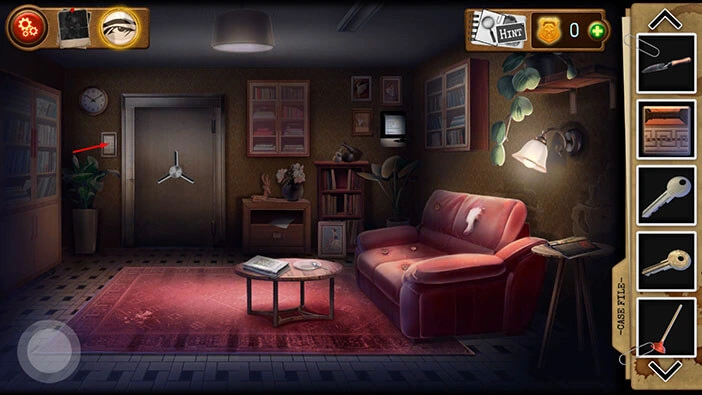
Enter the number “12:30” that we discovered previously and you will unlock the door. After that, tap on the door again to proceed to the next room.
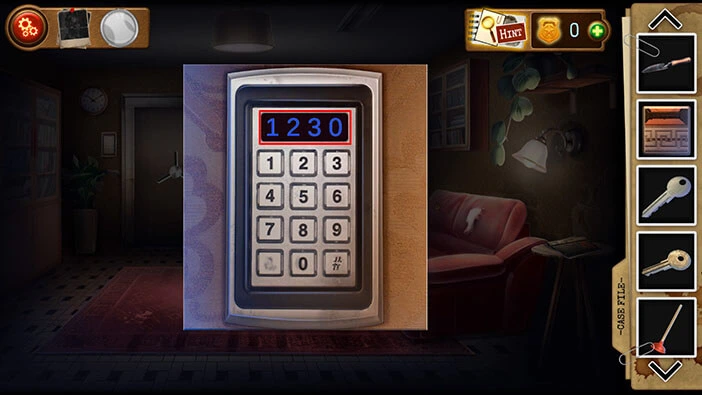
As soon as you enter the room, the door will close and lock behind you. So, let’s explore this room, and try to find a way out.
On the floor, just to the left of the rug, you will notice a “Knife”. Tap on it to pick it up.
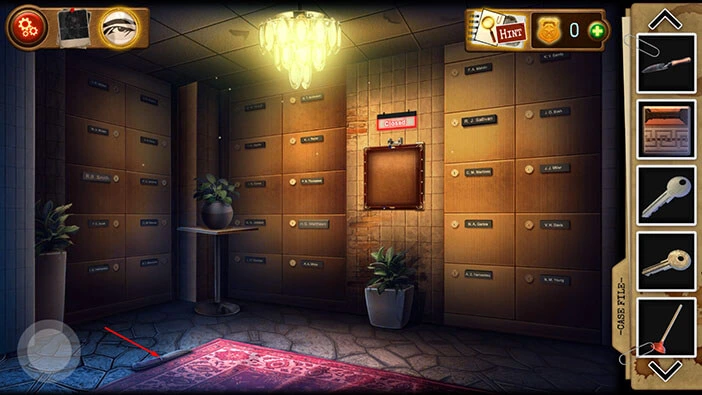
Next, you will notice several rows of wall safes, and you will also see a panel between them. Let’s remove this panel. Select the “Knife” from the inventory then tap on the panel.
Once you remove the panel, you will notice some blue and red wires. Tap on them to start the interaction.
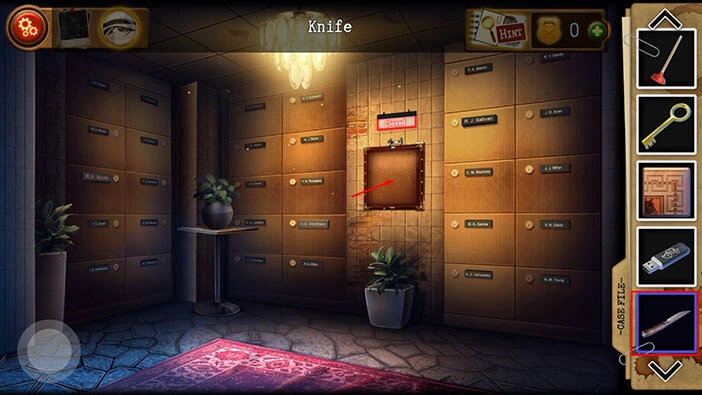
Our next task is to connect the red wire at the top with the red wire at the bottom, and while doing that we should use all the red pieces of wire. We should do the same with the blue wires.
We will do this puzzle in several steps. Let’s begin.
Step 1
It would be very difficult to describe this puzzle with words, but you can find the solution in the images below.
We will start with the red wires. So, let’s begin by moving all the pieces of the blue wires to the top left corner, so we can have some space.
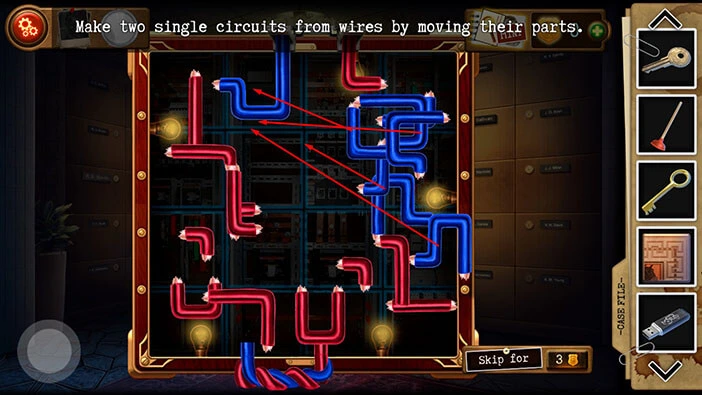
Step 2
Take the “L” piece of the red wire, located at the bottom (above the end of the blue wire), and attach it to the start of the red wire at the top.
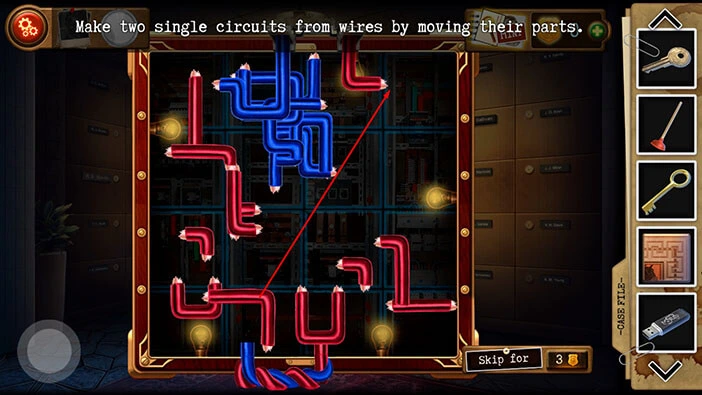
Step 3
Take the “U” piece of the red wire, located at the bottom (above the end of the red wire) and attach it to the red wire at the top.
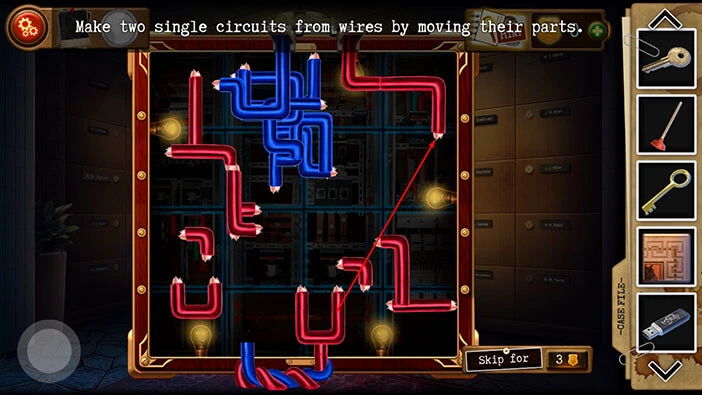
Step 4
Take the small “L” piece of the red wire and attach it to the large wire that we’re assembling.
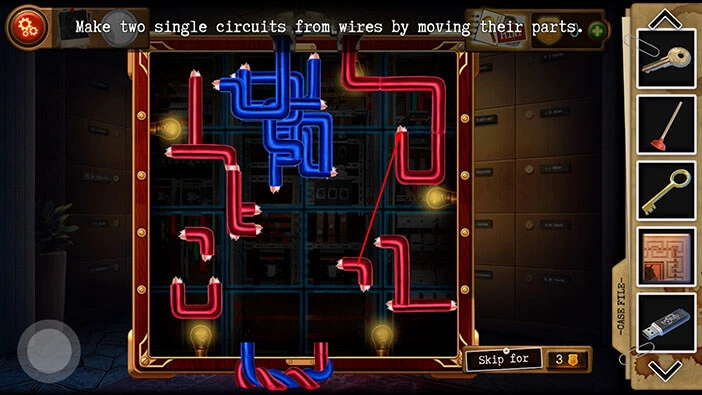
Step 5
Take the other small “L” piece of the red wire and attach it to the large wire that we’re assembling.
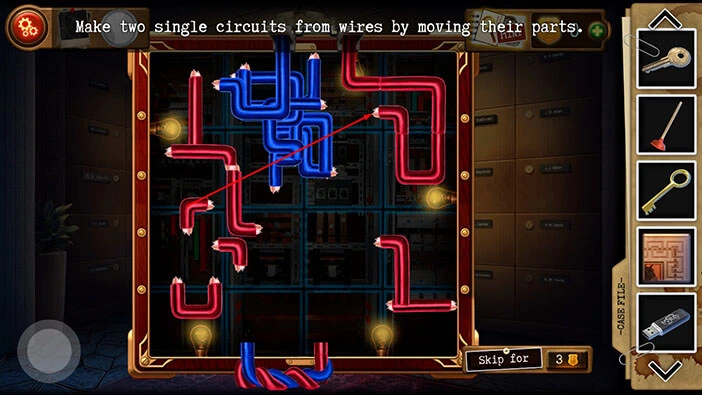
Step 6
Take the large “L” piece of wire and attach it to the large wire that we’re assembling.
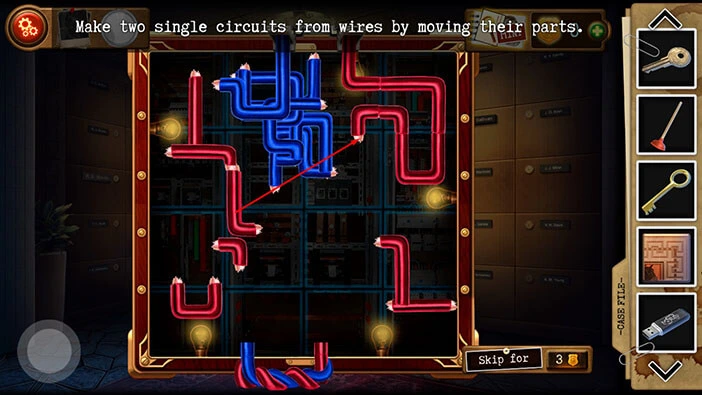
Step 7
Take the next piece of the red wire and attach it to the large wire that we’re assembling.
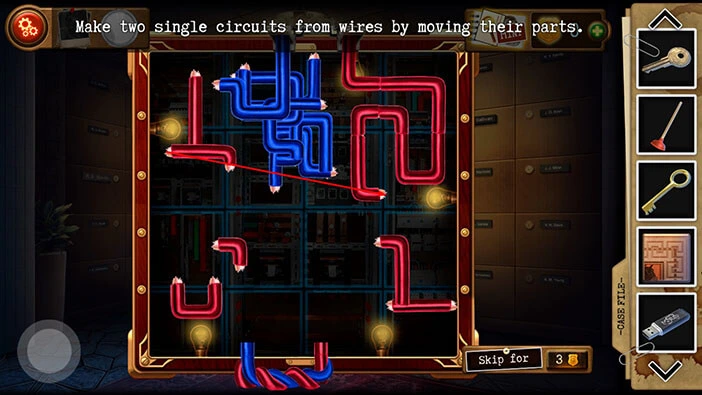
Step 8
Take the larger straight piece of the red wire and attach it to the large wire that we’re assembling.
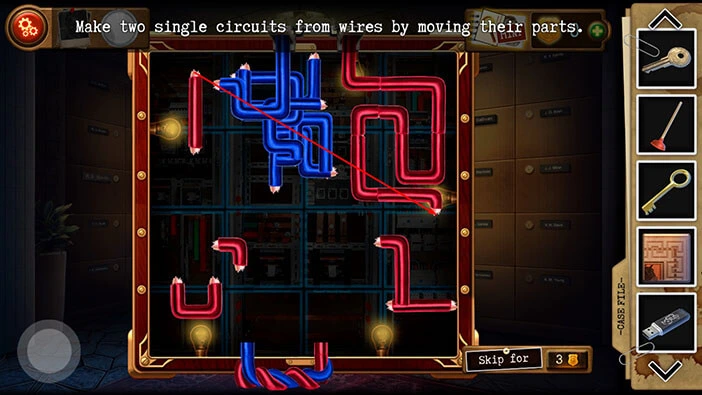
Step 9
Next, there are two pieces of the red wire that are currently on the right, so let’s move them to the left.
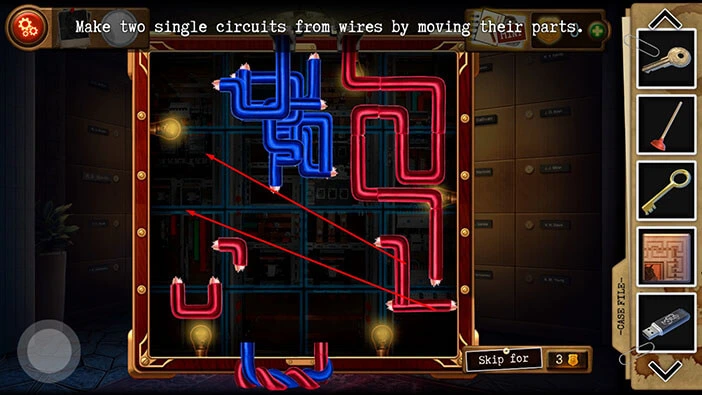
Step 10
Take the “U” shaped piece of the red wire and attach it to the large wire that we’re assembling.
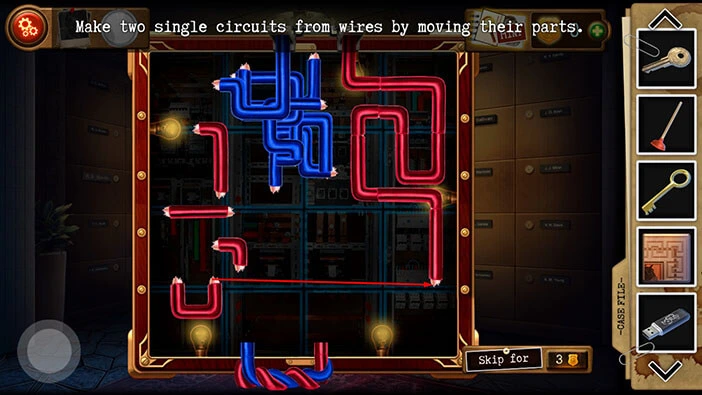
Step 11
Take the small “L” piece of the red wire and attach it to the large wire that we’re assembling.
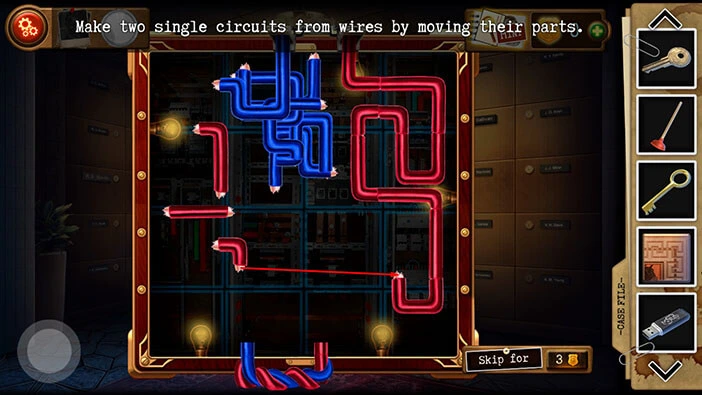
Step 12
Next, let’s rotate one of the two remaining pieces of the red wire and attach it to the large wire that we’re assembling.
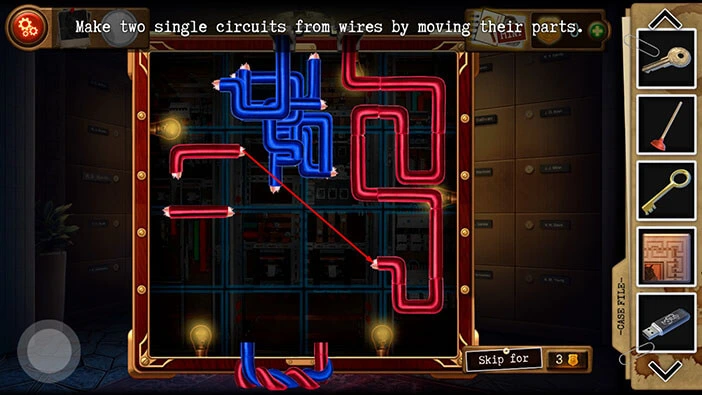
Step 13
Lastly, let’s rotate the last piece of the red wire to the vertical position, and use it to connect the two ends of the red wire.
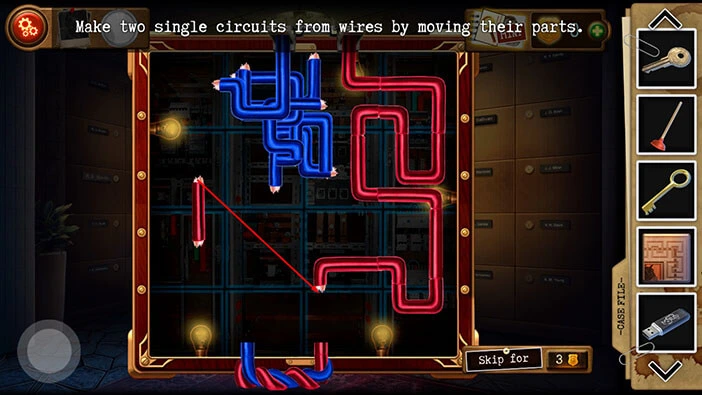
Let’s assemble the blue wire.
Step 1
First, let’s move all the pieces of the blue wire to the right because right now it’s a mess.
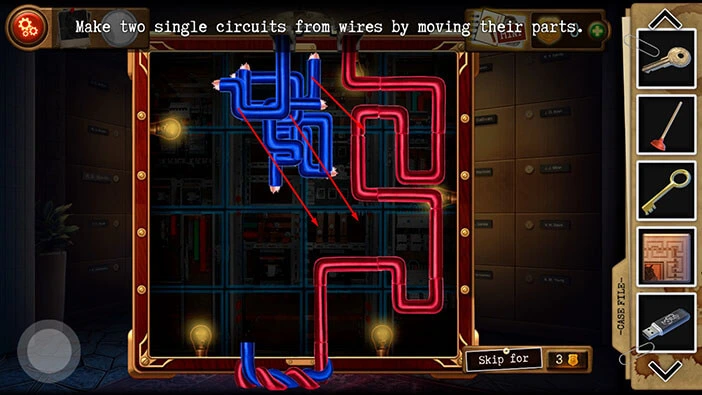
Step 2
Let’s rotate the first “L” shaped blue piece of wire and attach it to the end (bottom) of the blue wire.
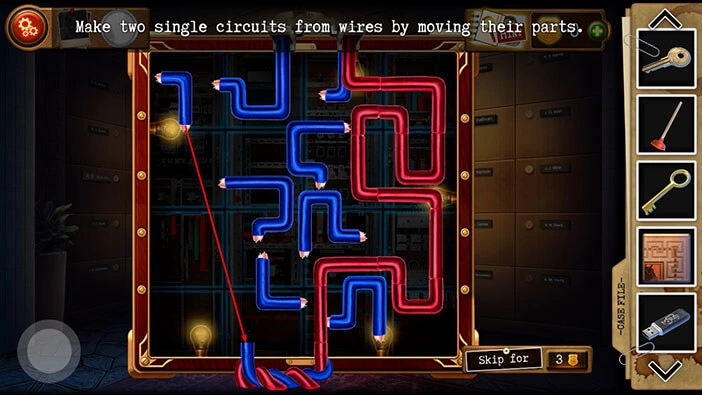
Step 3
Let’s rotate the next piece of the blue wire and attach it to the bottom of the blue wire.
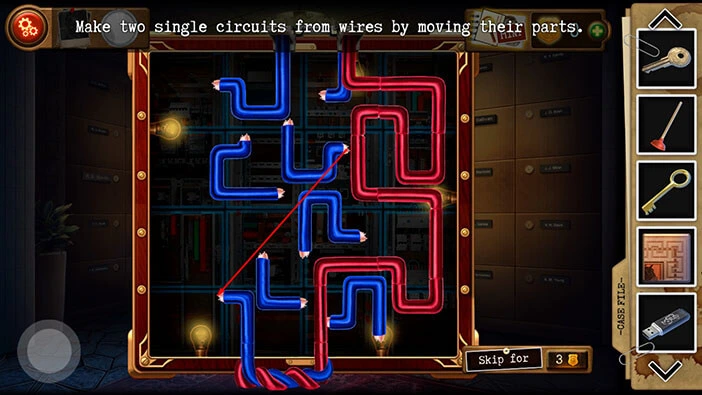
Step 4
Let’s rotate the next piece of the blue wire and attach it to the bottom of the blue wire.
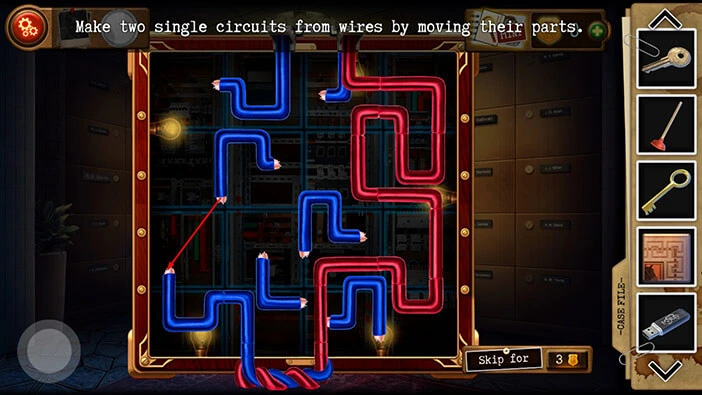
Step 5
Let’s rotate the next piece of the blue wire (that looks like a question mark) and attach it to the top of the blue wire.
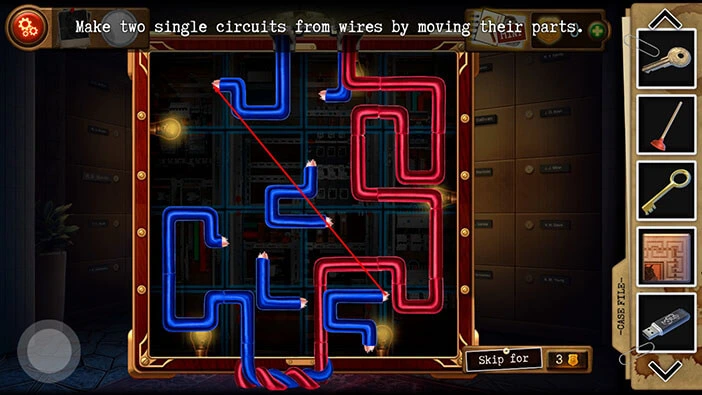
Step 6
Let’s rotate the next piece of the blue wire (that looks like a question mark) and attach it to the top of the blue wire.
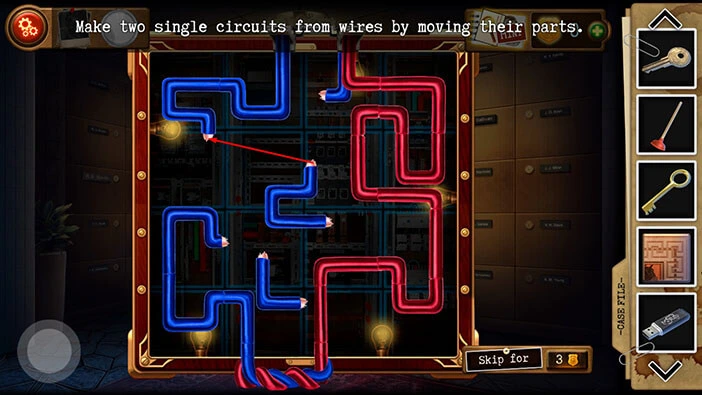
Step 7
Let’s rotate the next piece of the blue wire and attach it to the top of the blue wire.
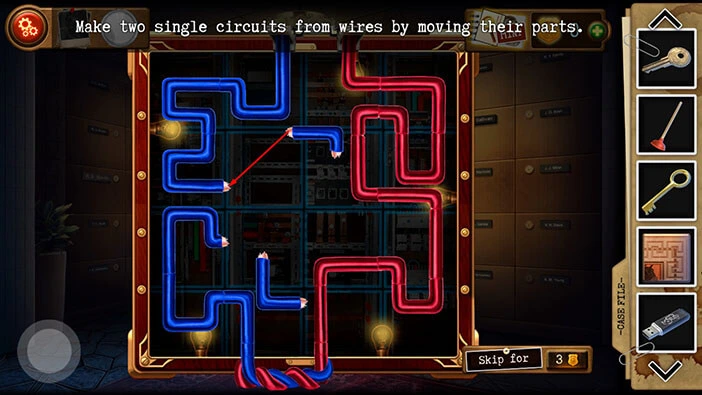
Step 8
Let’s rotate the last piece of the blue wire, and connect the two ends. With this, we will solve the puzzle, and we will unlock the safe door. Also, we can now access the computer in the first room. But, before we do that, let’s check the lockers in this room.
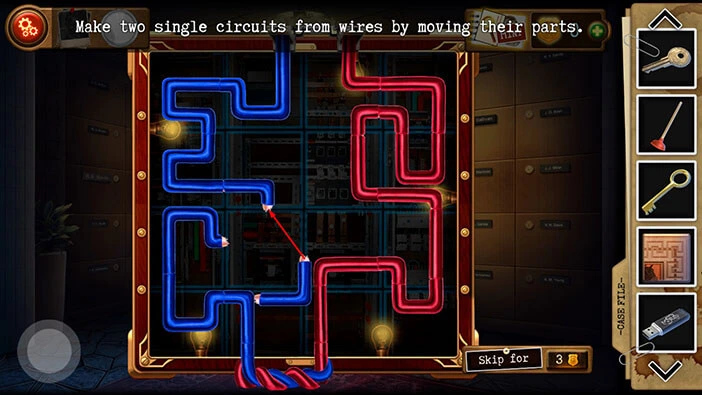
Select the “Sallivan’s locker key” from the inventory and use it to unlock the locker with the label “R. J. Sallivan”. After that, tap on this locker to look inside.
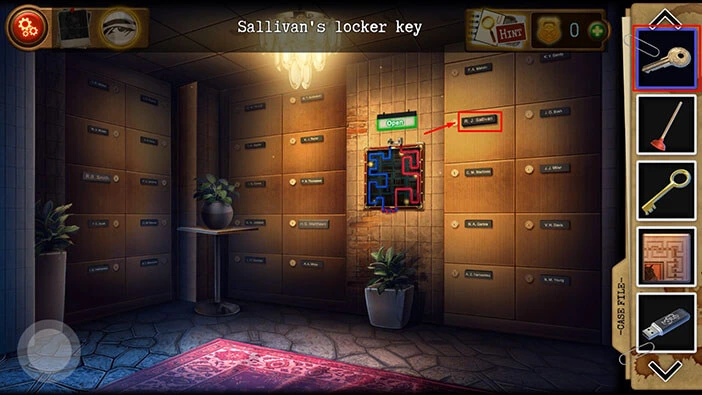
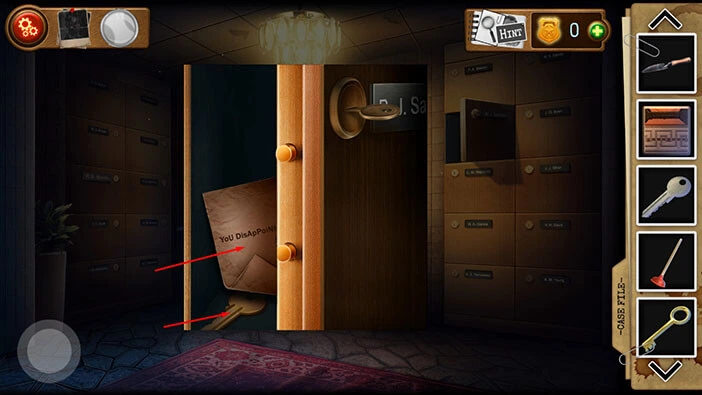
In the locker, you will find a key and a note. First, tap on the key to pick it up, and “Smith’s locker key” will be added to your inventory.
After that, tap on the note to take a closer look at it, and our character will file it as evidence.
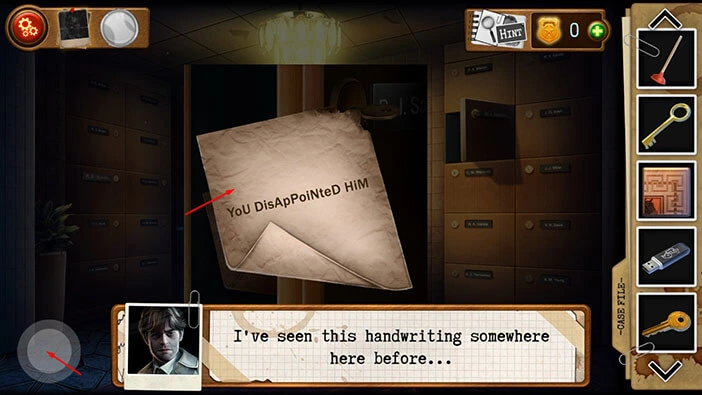
Tap on the note again to start the interaction and our character will comment that he saw this handwriting before. Interesting. This might be the “Collector’s” handwriting.
Tap on the button in the bottom left corner of the screen to go back.
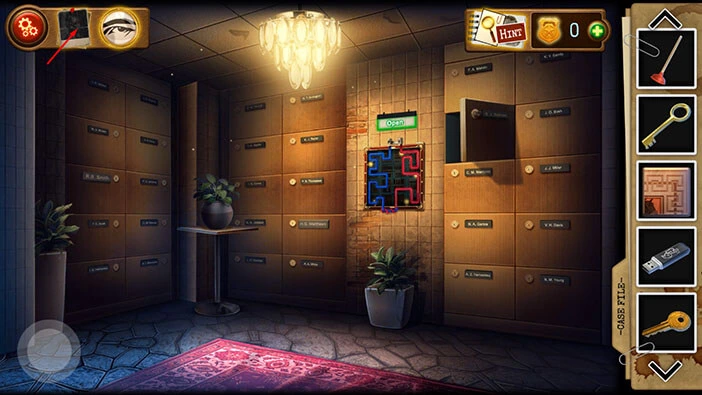
Let’s look at the evidence. Tap on the photo in the top left corner of the screen.
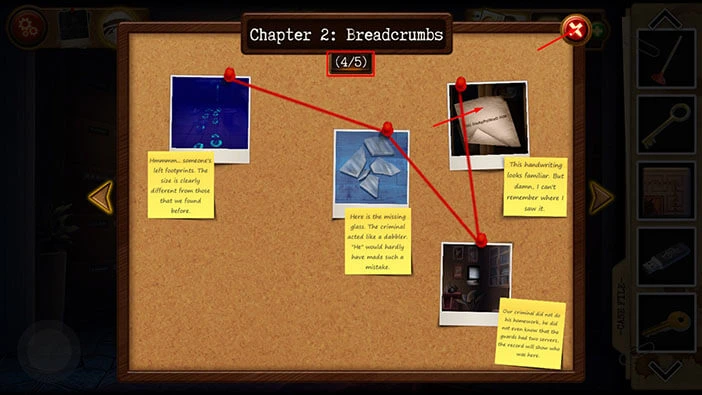
You will notice that we now have 4/5 pieces of evidence. Tap on the fourth piece of evidence (the note) to examine it.
Once you’re done, tap on the “X” button in the top right corner of the screen to go back.
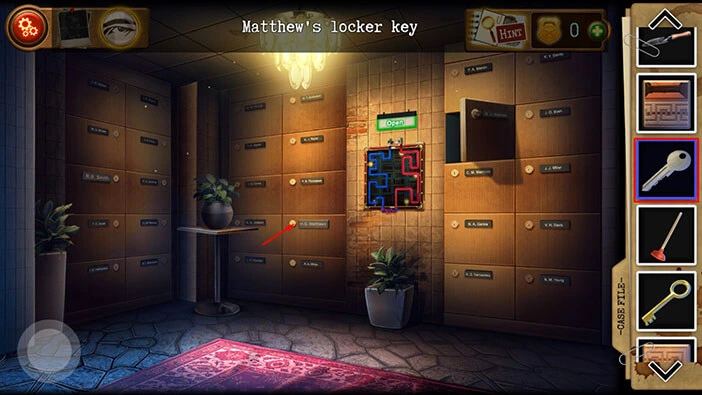
If you take a look at the locker located down and to the left of the wires, you will notice a label “H.G. Mathews”. Previously, we found the key with the same label, so let’s unlock this locker.
Select the “Mathew’s locker key” from the inventory and tap on this locker to unlock it. After that, tap on the locker to look inside.
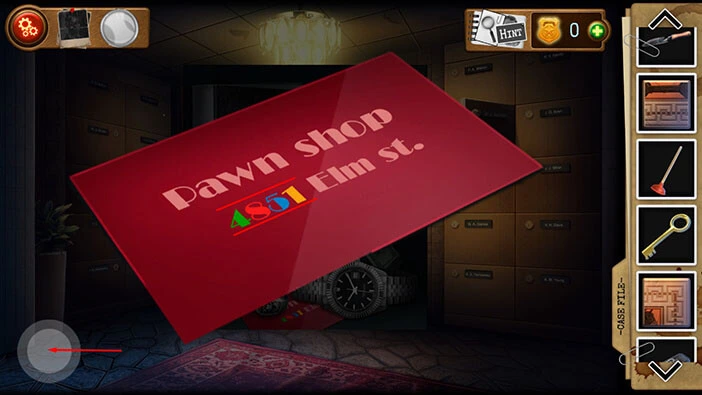
Tap on the red card in the locker to take a closer look at it. Here, we can see the address of the pawn shop. However, we are interested in the numbers on the card, and their color. So, let’s memorize/write down this information because we will need it in order to solve one of the puzzles later in the walkthrough.
Green = 4
Red = 8
Blue = 5
Yellow = 1
Once you’re done, tap on the button in the lower-left corner of the screen to go back.
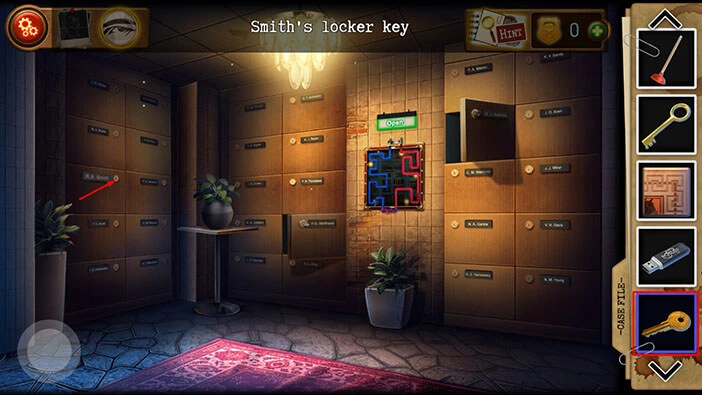
We have one more locker key. If you take a look at the column of lockers in the left corner, you will notice a label R.B. Smith on the middle locker. So, select the “Smith’s locker key” and use it to unlock this locker. After that, tap on the locker to look inside.
Here, we can see a puzzle, but the three pieces of the puzzle are missing. So, select the first and second puzzle pieces from the inventory, and insert them into the empty slots.
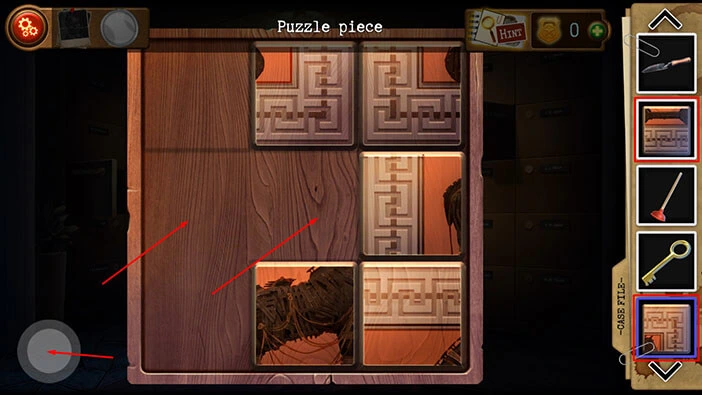
Unfortunately, we still haven’t found the third piece. So, let’s go back to this problem once we have all three pieces.
For now, tap twice on the button in the bottom left corner of the screen to go back to the first room (main room).
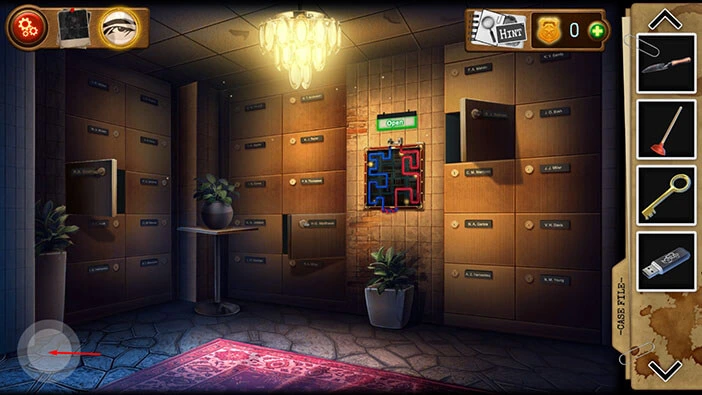
Tap on the WC door to proceed inside.
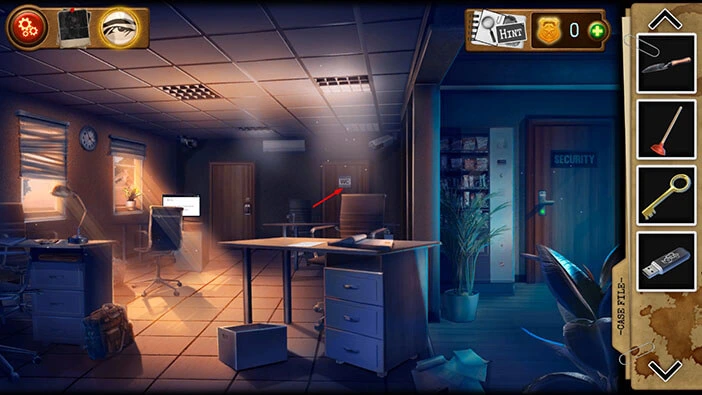
Next, tap on the third door to take a closer look.
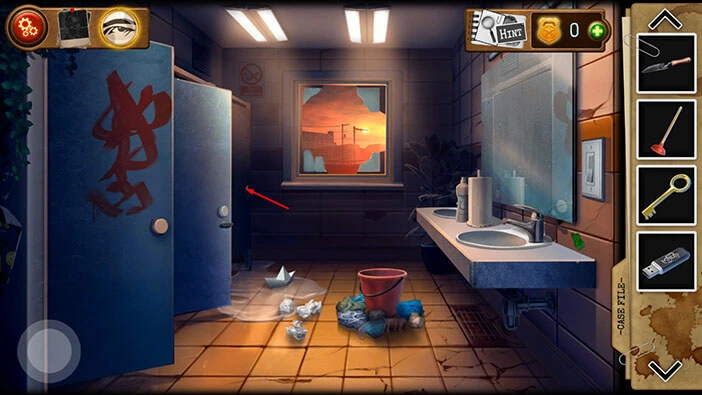
Let’s unlock this door. Select the “Locker key No.3” from the inventory and use it to unlock the door.
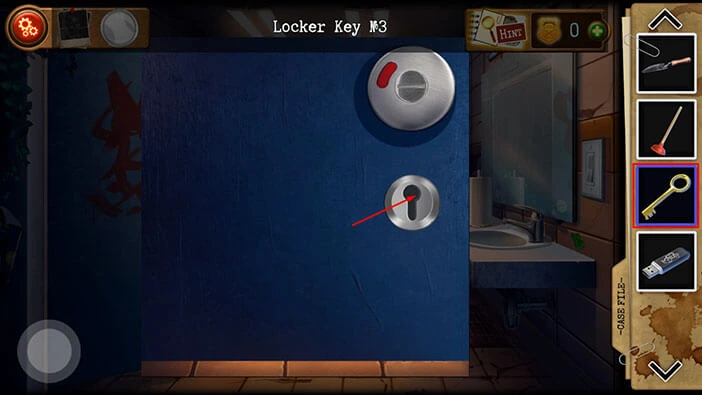
Tap on the cleaning mop to remove it. Our character will notice that the criminal probably used the mop to cover up his tracks. However, he clogged the toilet in the process.
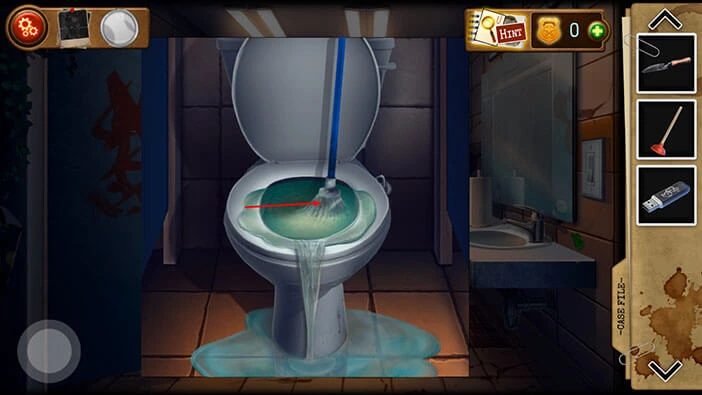
Next, let’s unclog the toilet. Select the “Plunger” from the inventory and tap on the toilet.
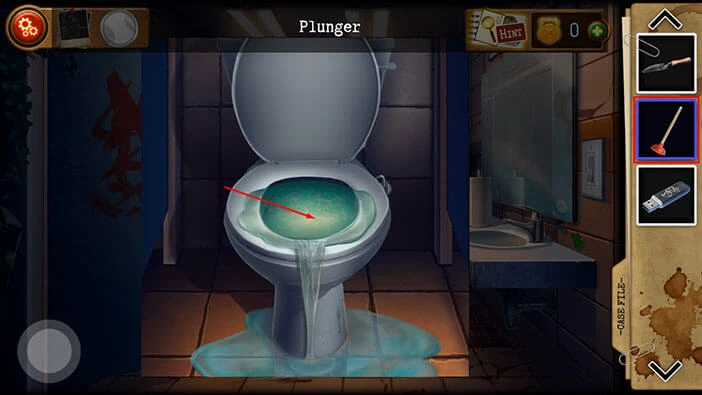
Once you unclog the toilet, you will see a plastic bag. Tap on it to open it, and inside you will find a note. Tap on the note to examine it.
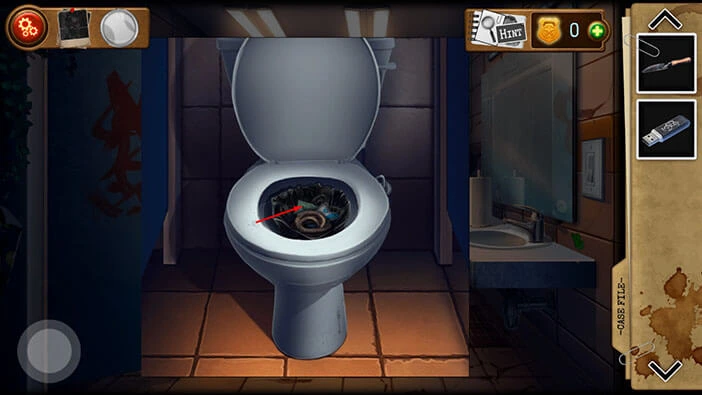
You will see “4 -> 2”. Memorize/write down this information. As a reminder, previously, next to the switch here in the bathroom, we saw a hint 1 -> 4.
Once you’re done, tap twice on the button in the bottom left corner of the screen to go back.
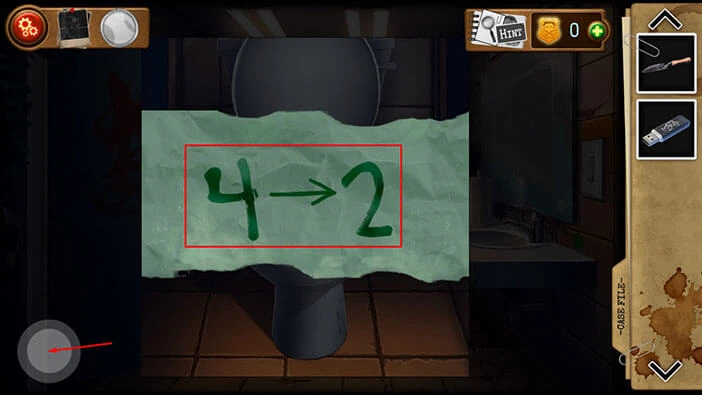
You can see a hint that I mentioned if you tap on the switch on the right. Let’s go back to the first room. Tap on the button in the lower-left corner of the screen to go back.
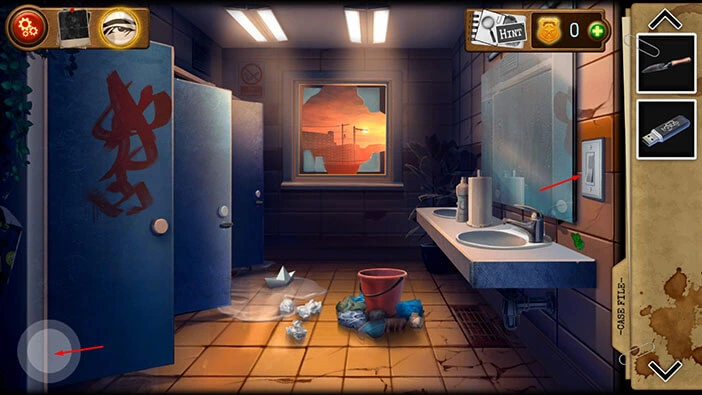
Next, let’s go back to the “Security” room and look for the missing puzzle piece. Tap on the door on the right.
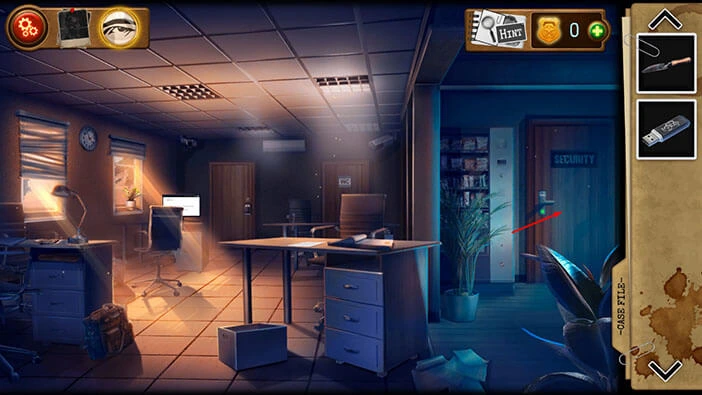
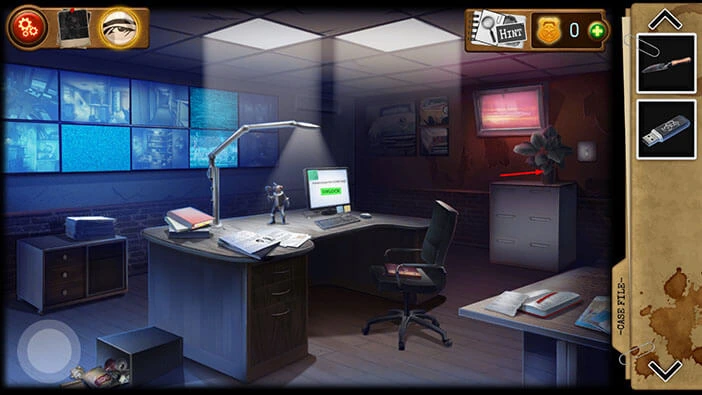
You will notice a plant on the cabinet on the right. Tap on it to take a closer look.
You will notice something sticking out from the dirt. So, as before, let’s select the “Garden Trowel” from the inventory and use it to dig up this item.
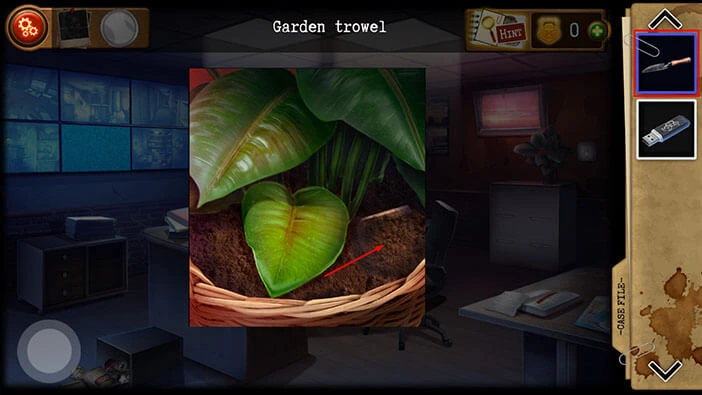
You will dig up the last “Puzzle piece”. Tap on it to pick it up.
After that, tap on the button in the bottom left corner of the screen to go back.
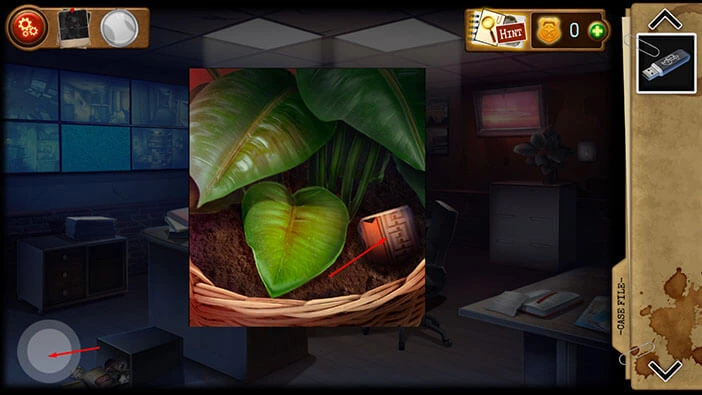
We found the last puzzle piece, so let’s go back to the room with lockers because we can now solve the puzzle that we saw previously.
To get there, tap on the button in the bottom left corner of the screen to go back to the first room. After that, tap on the door on the left to proceed to the next room. Once you get there, tap on the large metal door and you will reach the room with lockers.
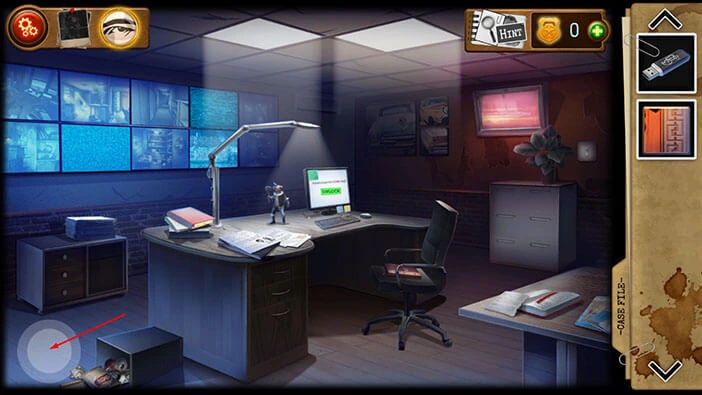
Tap on the locker on the left (Smith’s locker) to look inside.
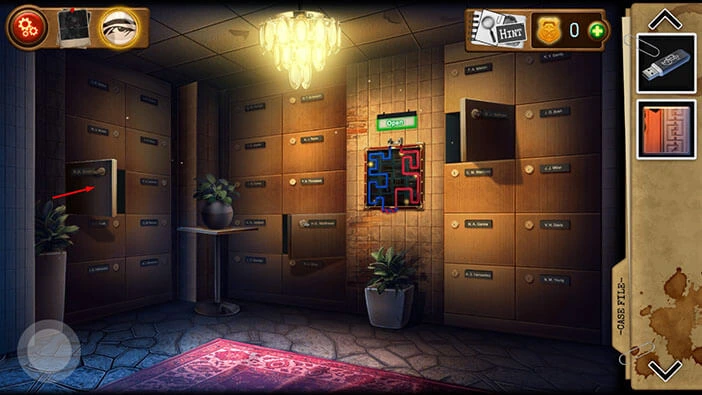
Tap on the puzzle to start the interaction. Select the “Puzzle piece” from the inventory and insert it into the empty slot.
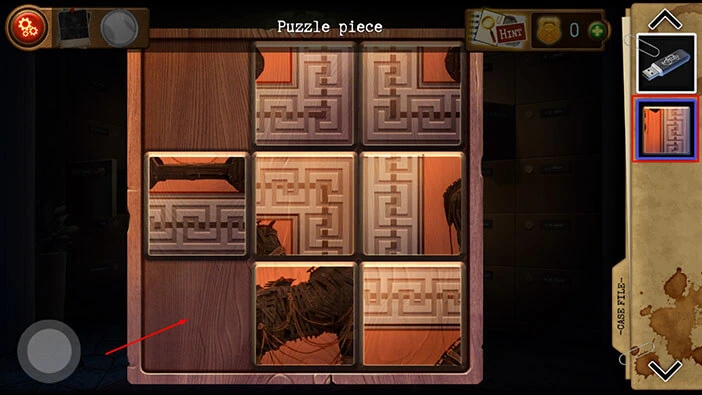
In this puzzle, our task is to shuffle the puzzle pieces and assemble the picture. We will do this in multiple steps. Let’s begin.
Step 1
Tap on the second piece (left to right) in the first row to move it to the left, then tap on the second piece in the second row to move it up.
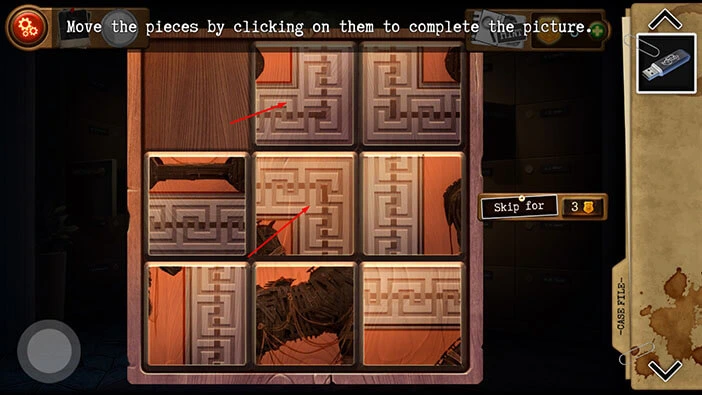
Step 2
Tap on the third piece in the second row to move it to the left, then tap on the third piece in the third row to move it up.
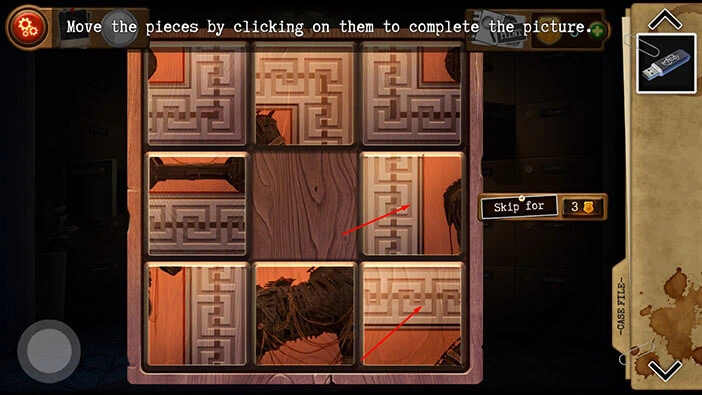
Step 3
Tap on the second piece in the third row to move it to the right, then tap on the first piece in the third row to move it to the right.
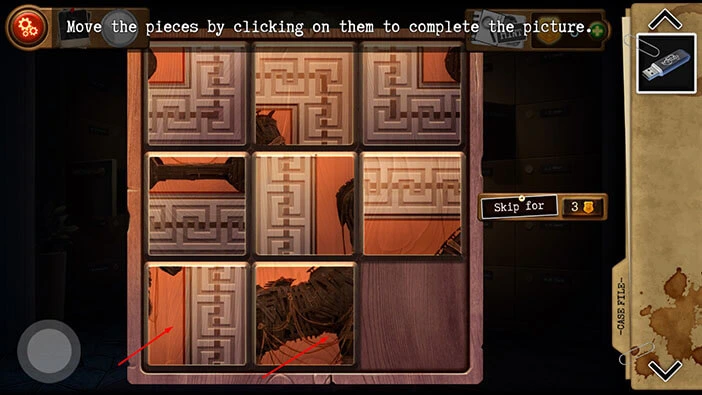
Step 4
Tap on the first piece in the second row to move it down, then tap on the first piece in the first row to move it down.
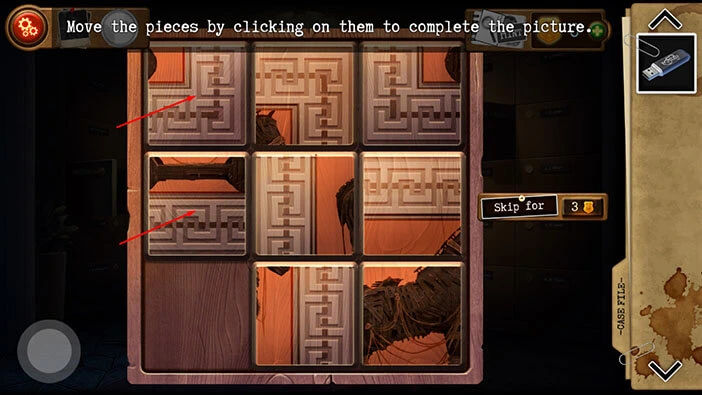
Step 5
Tap on the second piece in the first row to move it to the left, then tap on the second piece in the second row to move it up.
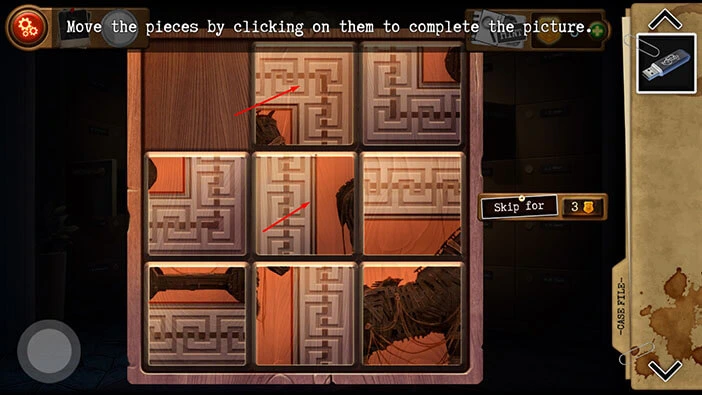
Step 6
Tap on the third piece in the second row to move it to the left, then tap on the third piece in the third row to move it up.
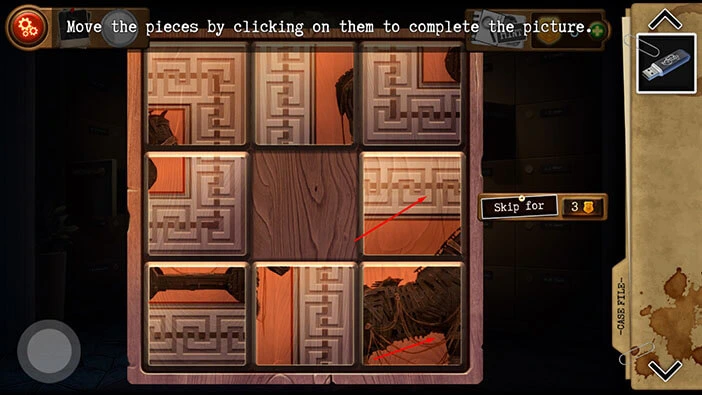
Step 7
Tap on the second piece in the third row to move it to the right, then tap on the first piece in the third row to move it to the right.
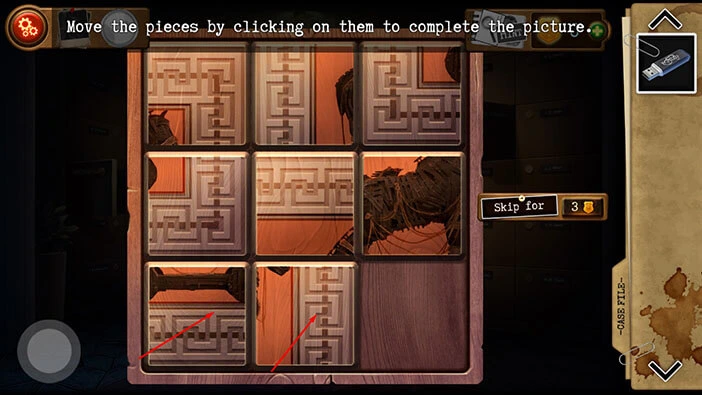
Step 8
Tap on the first piece in the second row to move it down, then tap on the second piece in the second row to move it to the left.
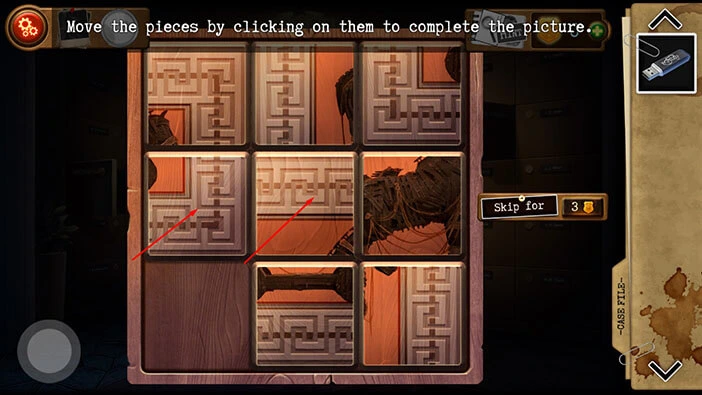
Step 9
Tap on the third piece in the second row to move it to the left, then tap on the third piece in the first row to move it down.
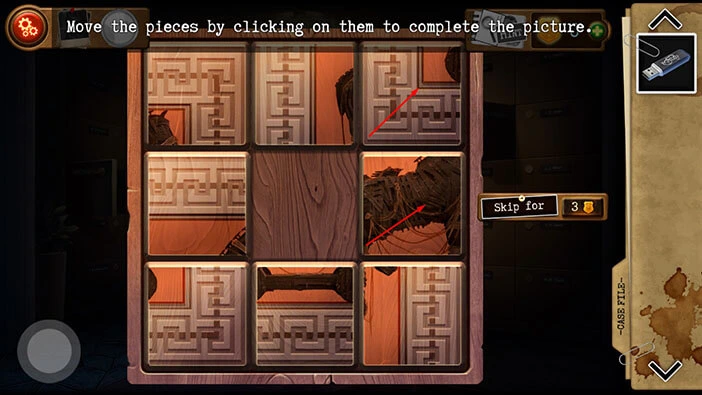
Step 10
Tap on the second piece in the first row to move it to the right, then tap on the first piece in the first row to move it to the right.
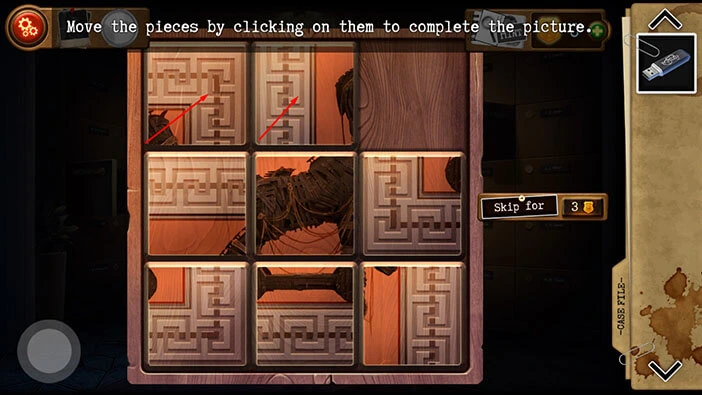
Step 11
Tap on the first piece in the second row to move it up, then tap on the second piece in the second row to move it to the left.
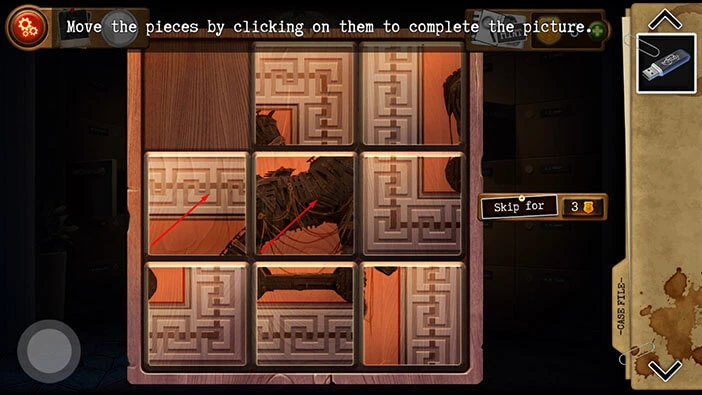
Step 12
Tap on the third piece in the second row to move it to the left, then tap on the third piece in the first row to move it down.
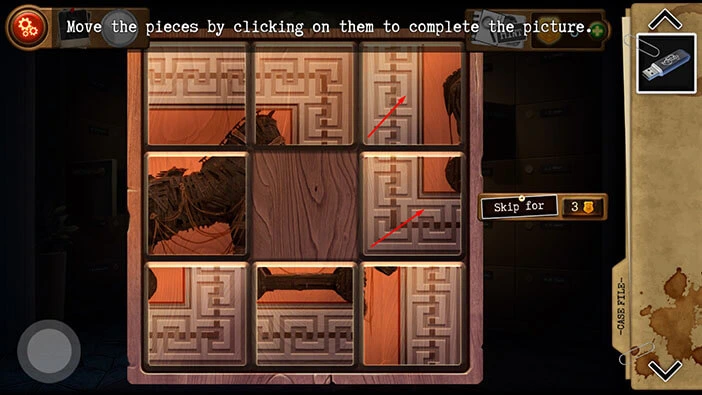
Step 13
Tap on the second piece in the first row to move it to the right, then tap on the first piece in the first row to move it to the right.
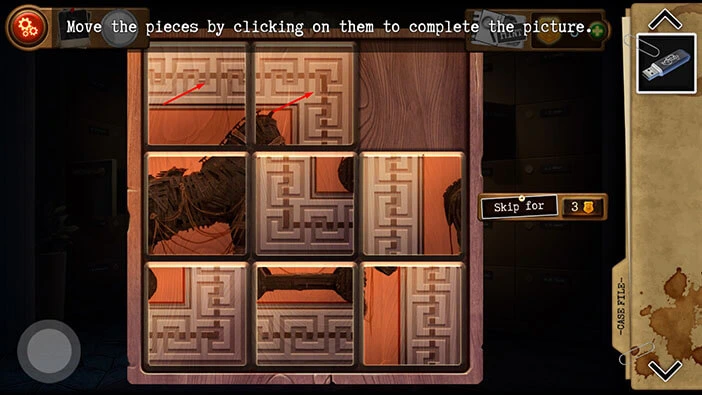
Step 14
Tap on the first piece in the second row to move it up, then tap on the second piece in the second row to move it to the left.
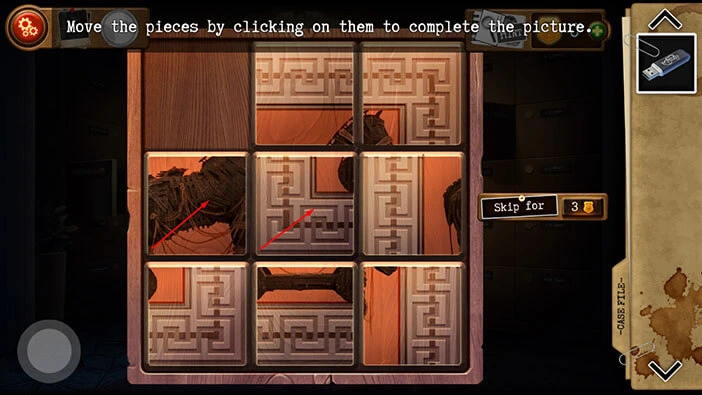
Step 15
Tap on the third piece in the second row to move it to the left, then tap on the third piece in the third row to move it up.
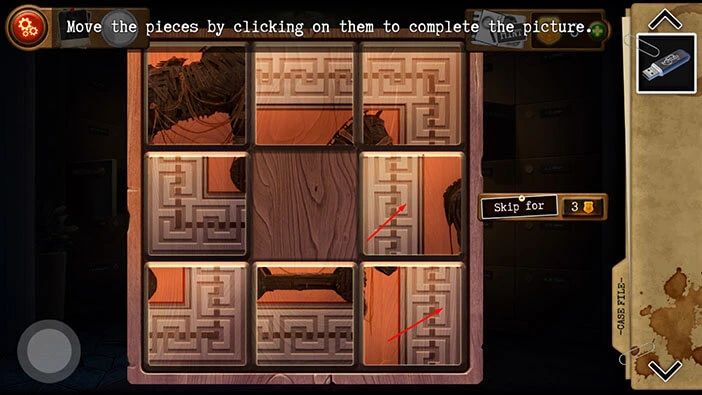
Step 16
Tap on the second piece in the third row to move it to the right, then tap on the first piece in the third row to move it to the right.
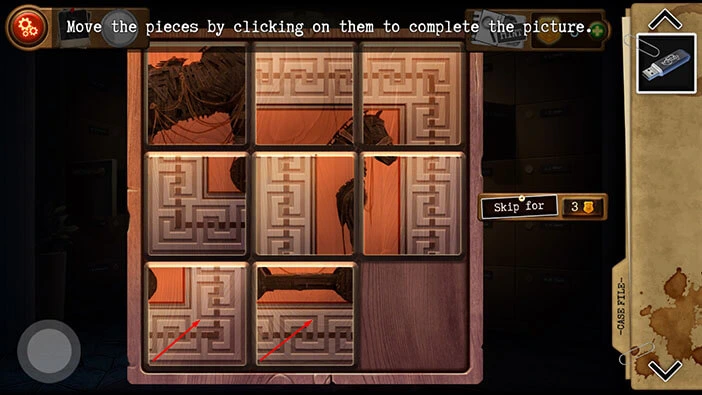
Step 17
Tap on the first piece in the second row to move it down, then tap on the first piece in the first row to move it down.
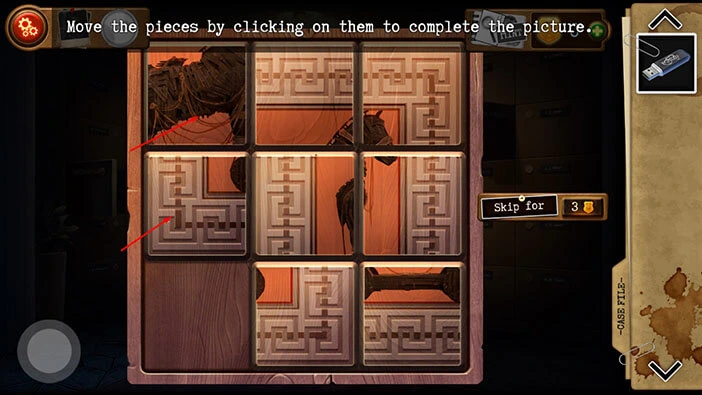
Step 18
Tap on the second piece in the first row to move it to the left, then tap on the third piece in the first row to move it to the left.
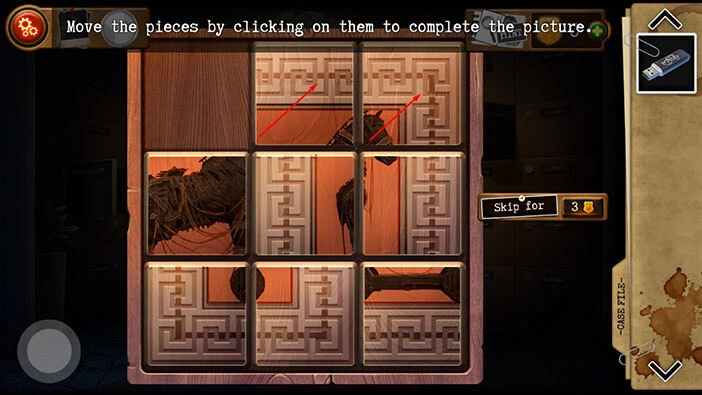
Step 19
Tap on the third piece in the second row to move it up, then tap on the third piece in the third row to move it up.
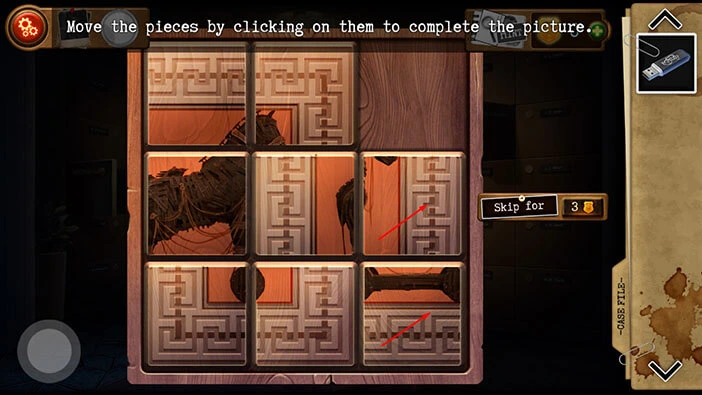
Step 20
Tap on the second piece in the third row to move it to the right, then tap on the first piece in the third row to move it to the right.
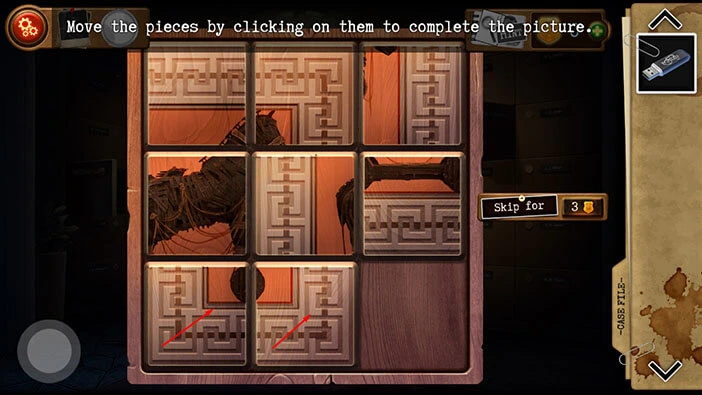
Step 21
Tap on the first piece in the second row to move it down, then tap on the second piece in the second row to move it to the left.
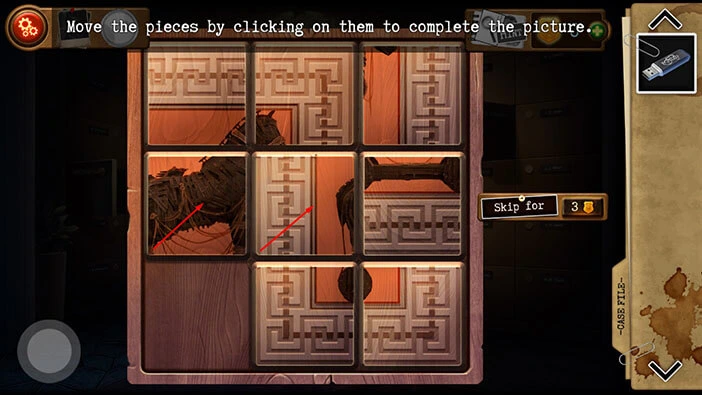
Step 22
Tap on the third piece in the second row to move it to the left, then tap on the third piece in the first row to move it down.
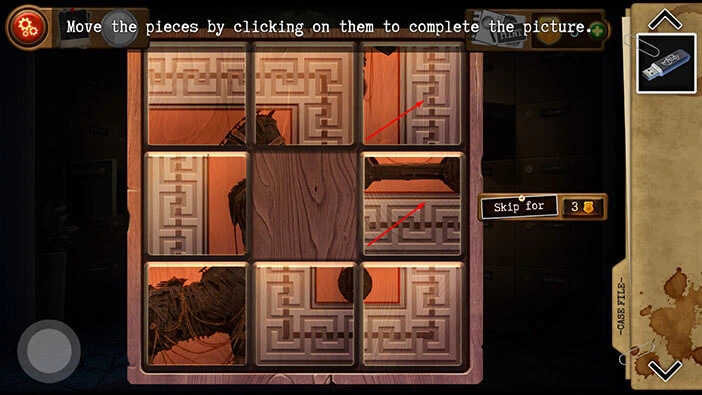
Step 23
Tap on the second piece in the first row to move it to the right, then tap on the first piece in the first row to move it to the right.
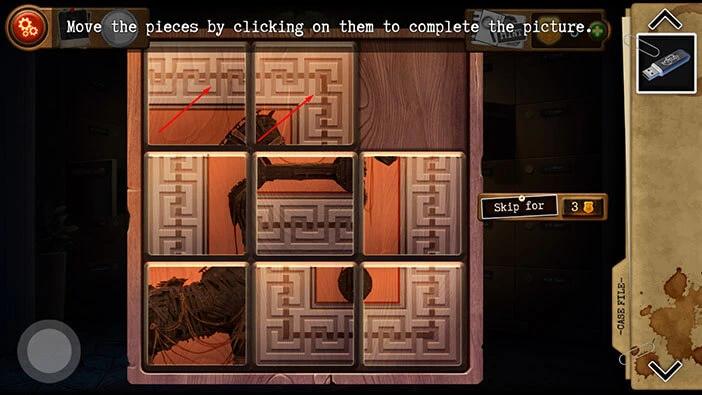
Step 24
Tap on the first piece in the second row to move it up, then tap on the first piece in the third row to move it up.
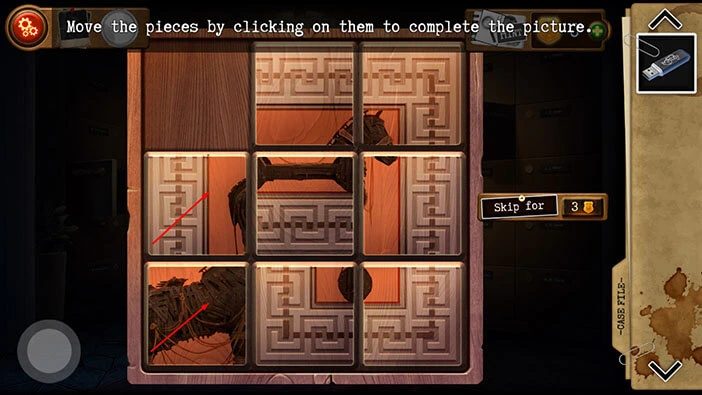
Step 25
Tap on the second piece in the third row to move it to the left, then tap on the second piece in the second row to move it down.
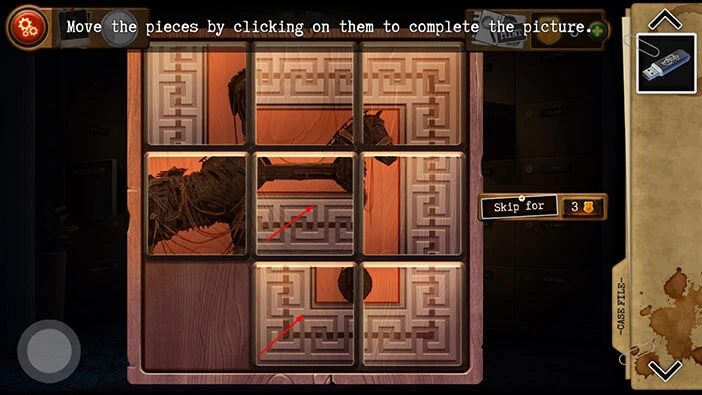
Step 26
Finally, tap on the first piece in the second row to move it to the right, then tap on the first piece in the first row to move down. When you complete the last step you will solve this puzzle.
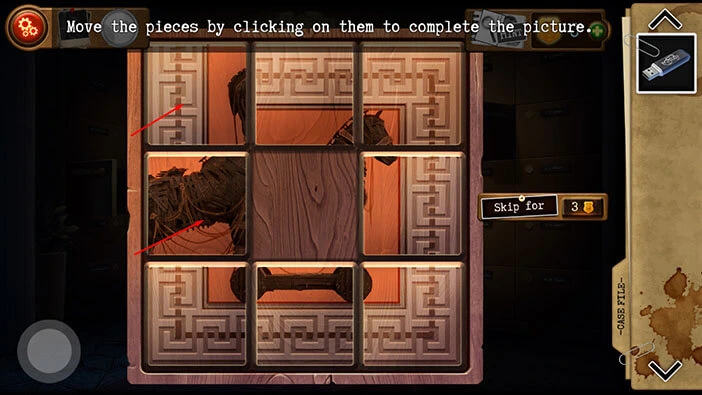
As soon as you solve the puzzle, the puzzle box will open and inside you will find a “Screwdriver”. Tap on it to pick it up.
After that, tap on the button in the bottom left corner of the screen to go back.
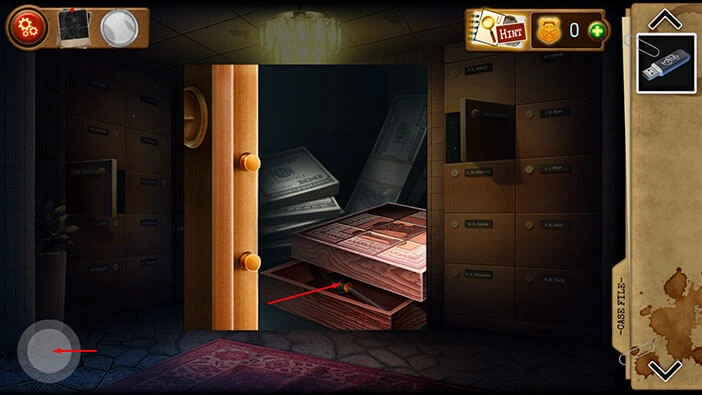
Let’s go back to the toilet. To get there, tap twice on the button in the bottom left corner of the screen to go back to the first room. After that, tap on the door with the “WC” label to proceed to the next room.
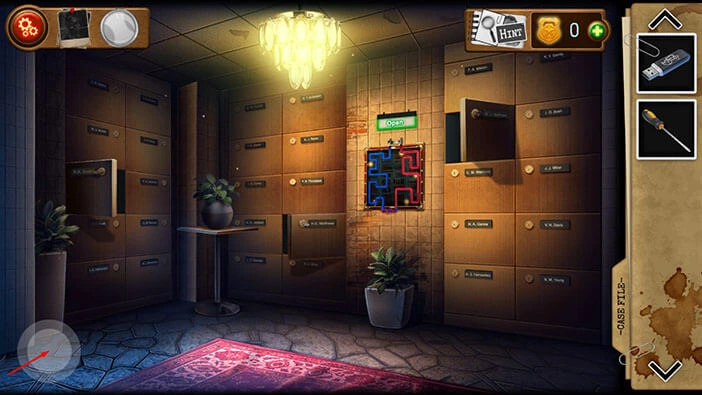
Tap on the switch on the right to take a closer look at it.
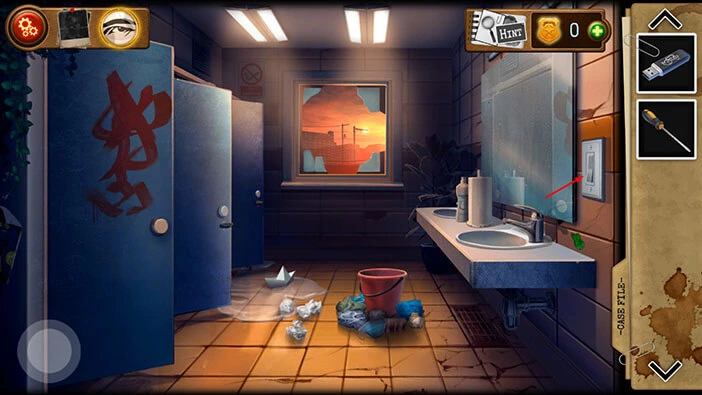
Next, select the “Screwdriver” from the inventory and use it to remove the switch.
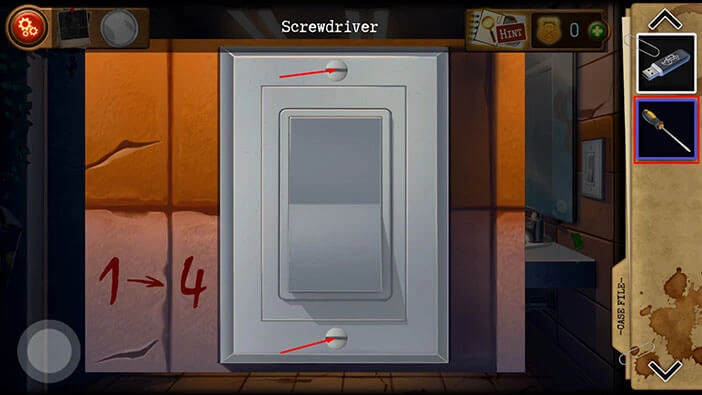
Here, we can see a hint of “1 -> 4” and we previously saw a hint of “4 -> 2”. Our next task is to connect the wires, and we can use these two hints to solve this problem. So, let’s do that.
Step 1
First, we will follow a hint “1 -> 4”. So, let’s take the first cable (looking from top to bottom) on the right and let’s attach it to the fourth node on the left.
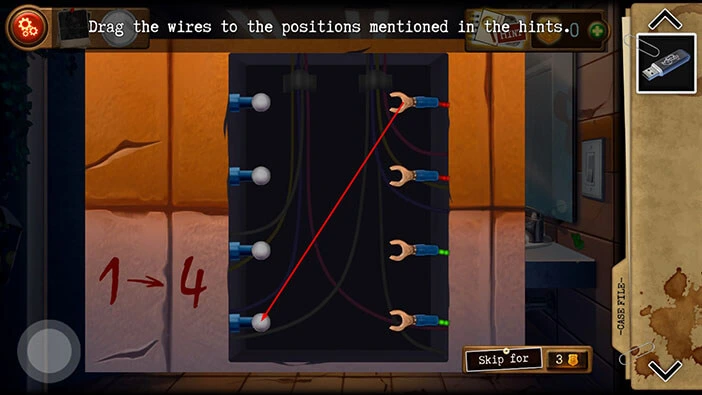
Step 2
The next hint is “4 -> 2”. So, let’s take the fourth cable on the right and attach it to the second node on the left.
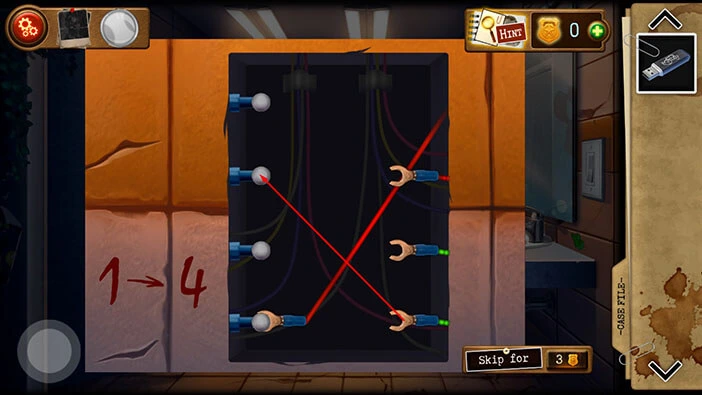
Step 3
We don’t have a hint for the last two cables, so we will have to guess. So, let’s take the third cable on the right and attach it to the first node on the left.
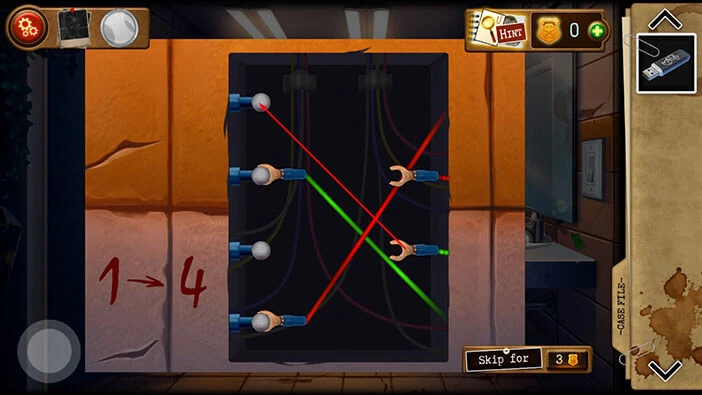
Step 4
Lastly, let’s take the second cable on the right and attach it to the third node on the left.
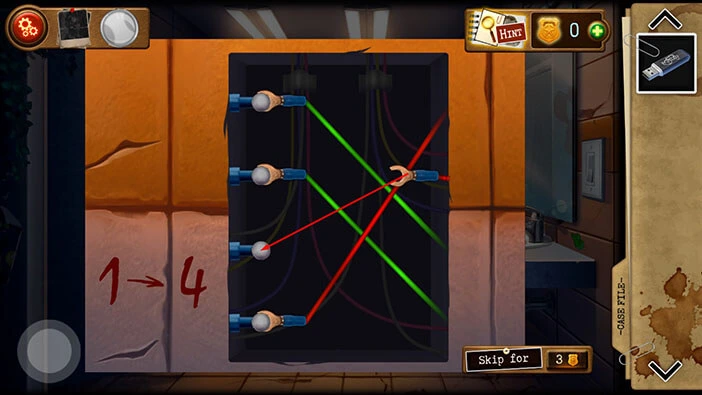
Next, tap on the wall safe located between the two mirrors, to take a closer look at it.
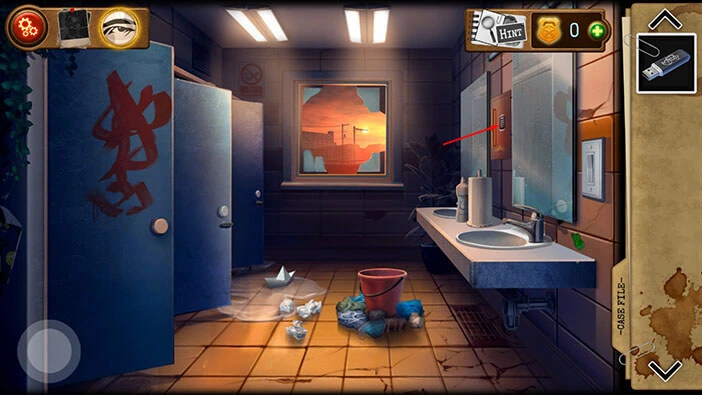
Here, we can see a keypad, and above it a picture of a rainbow. If you examine the colors of the rainbow, you will notice that they match the colors of the numbers that we saw on the pawn shop card (we found this card in one of the lockers in the locker room). On this card, we saw,
Green number 4, Red number 8, Blue number 5, and Yellow number 1.
Well, the colors of the rainbow represent the order of the numbers. If we look at the colors starting from the top, we will see Red, Yellow, Green, and Blue. So, to find the correct combination for the safe, we just have to replace the colors with the numbers that we saw on the pawnshop card. Let’s do that.
Red = 8 (red number 8 on the card). This is our first number.
Yellow = 1 (yellow number 1 on the card). This is our second number.
Green = 4 (green number 4 on the card). This is our third number.
Blue = 5 (blue number 5 on the card). This is our fourth number.
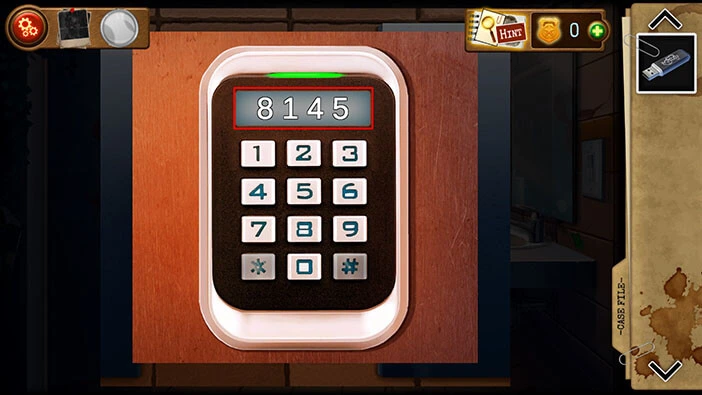
When we put this information together, we will get “8145”. Memorize/write down this number. After that, tap on the keypad to start the interaction.
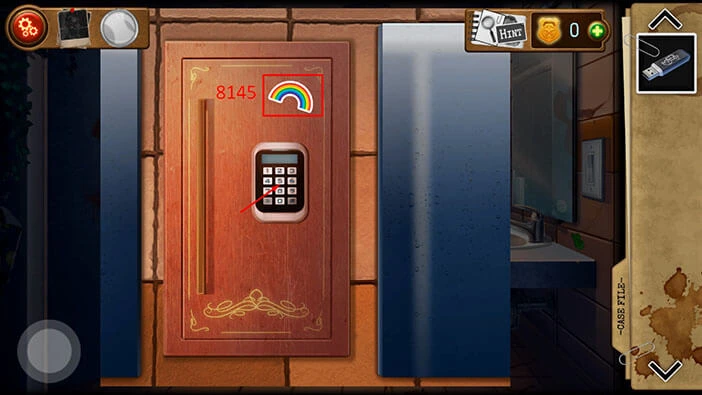
Enter the code “8145” and you will unlock the safe.
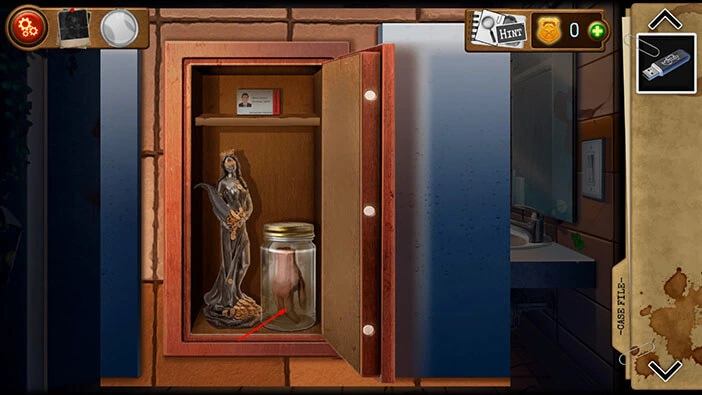
In the safe, you will discover a severed hand in the jar. Tap on it, and our character will take a photo, and file it as evidence.
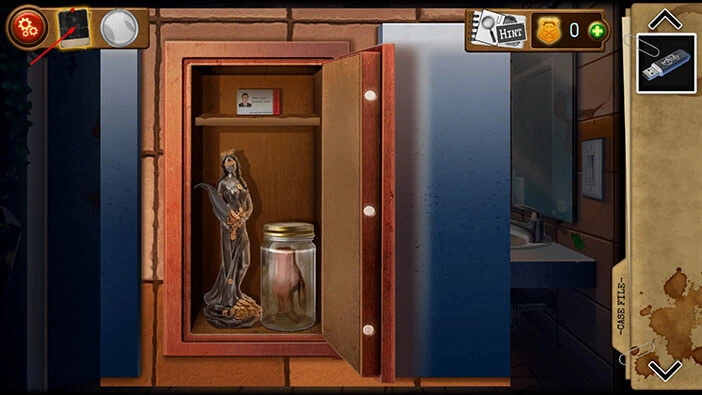
Next, tap on the photo in the top left corner of the screen to look at the evidence.
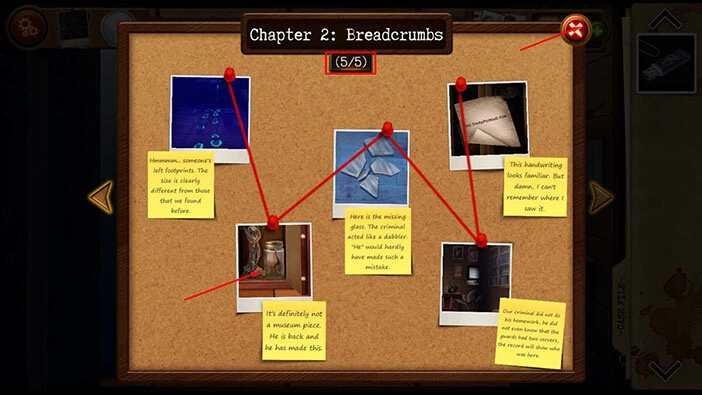
We have now gathered 5/5 pieces of evidence. Tap on the photo of the new evidence to examine it. Our character ironically concluded that this was not a museum piece. Interestingly, he thinks that the “Collector” did this (because he also kept body parts in the jar).
So, looks like we’re on his trail. Tap on the “X” button in the top right corner to go back.
Next, on the top shelf, you will notice an ID card. Tap on it to take a closer look.
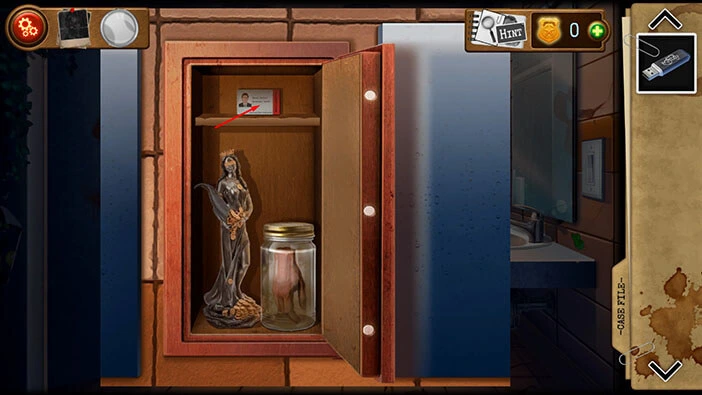
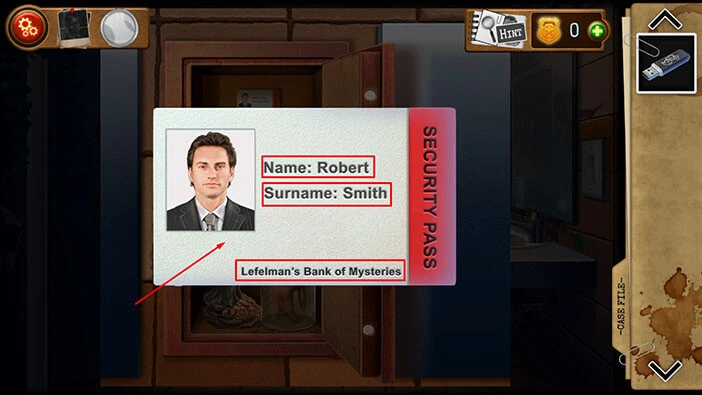
We can see that the security card belongs to Robert Smith and he is an employee of Lefelman’s Bank of Mysteries (this building). So, it looks like this is our suspect, and he is employed here. Tap on the security card again to start the interaction.
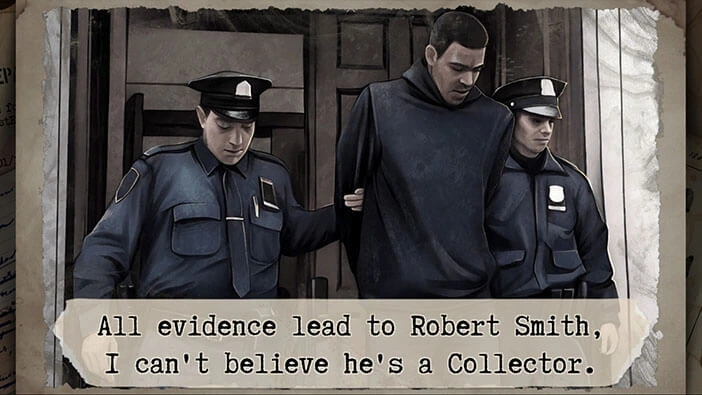
Our character will walk out of the building, and he will jokingly say to a security guard (who brought him a coffee) to bring him a donut because the guard is the primary suspect.
All evidence pointed to the security guard, Robert Smith. However, our character can’t believe that he is the “Collector”. Well, this was too easy, and I doubt that the “Collector” would make so many obvious mistakes (like leaving his ID next to a severed hand in the jar). So, it’s very likely that the “Collector” used Robert Smith as a scapegoat, and set him up for a murder. We shall see…
We reached the end of the second chapter of the walkthrough. You can check out the walkthrough for the third chapter, “God is not there”, by tapping on the “Next Part” button.
Thank you for reading.