Can you escape the 100 room 17 | Levels 21-24
Hello everyone and welcome to the sixth part of the walkthrough for “Can you escape the 100 room 17”. In the sixth part of the walkthrough, we will cover levels 21 to 24.
Level 21
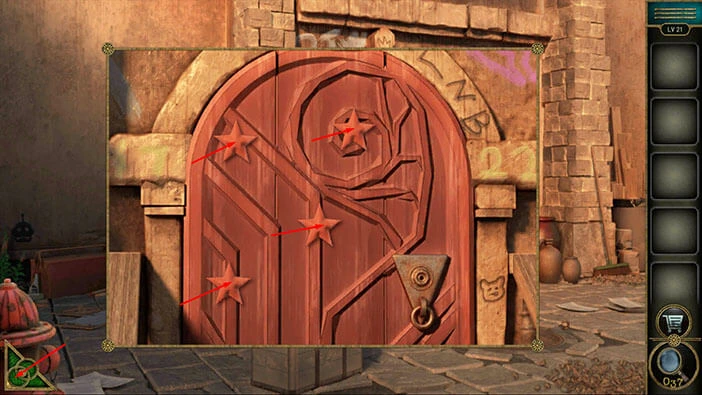
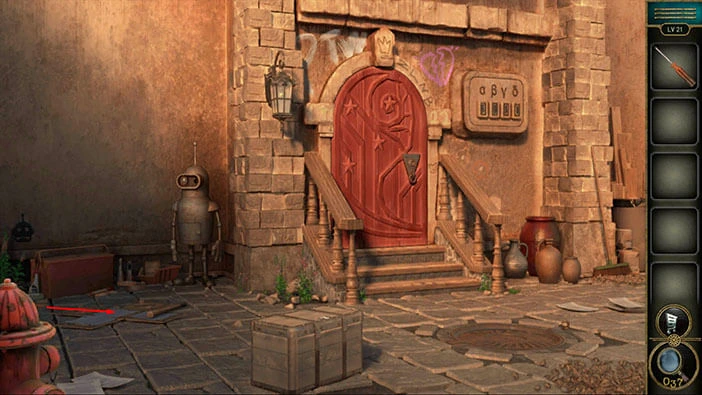
Let’s explore the twenty-first level. Let’s tap on the door on the left to take a closer look at it.
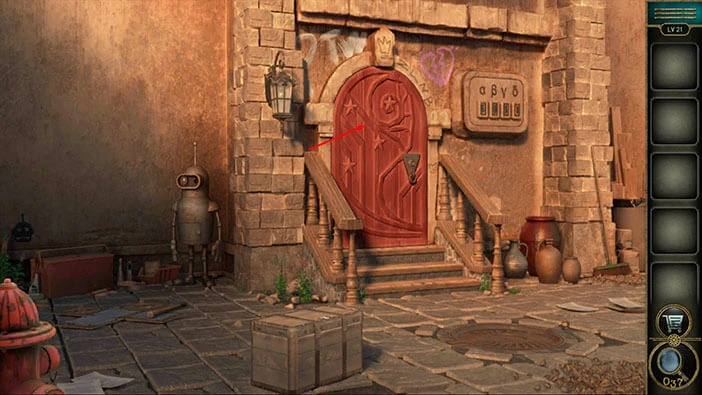
Here, you will notice four stars. Let’s tap on all stars, several times, starting from the start at the top and working our way down.
When you tap on the stars several times you will find an “Achievement star”. Let’s continue. Tap on the green button in the bottom left corner of the screen to go back.
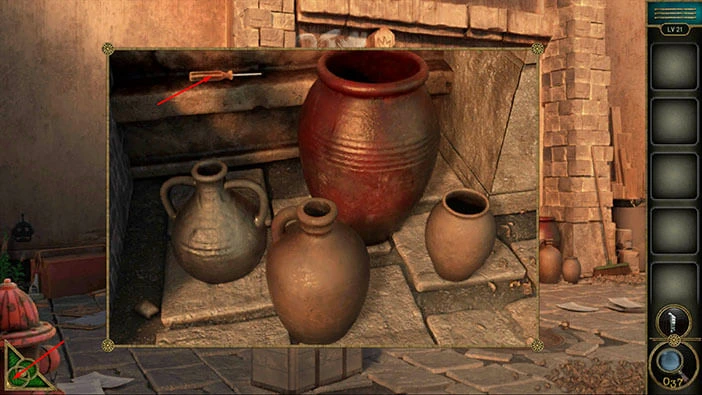
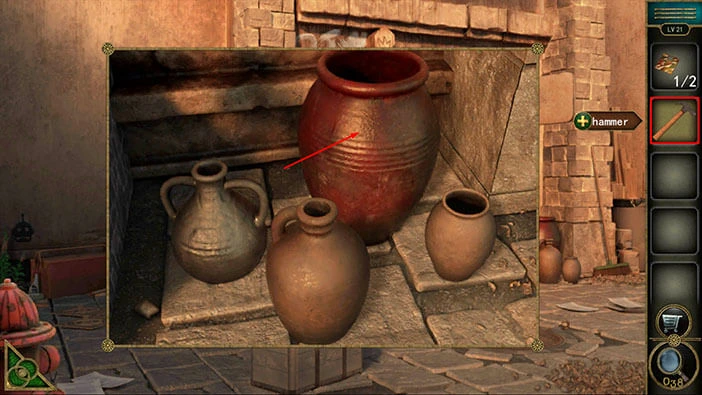
Next, tap on the pottery on the left to take a closer look at it.
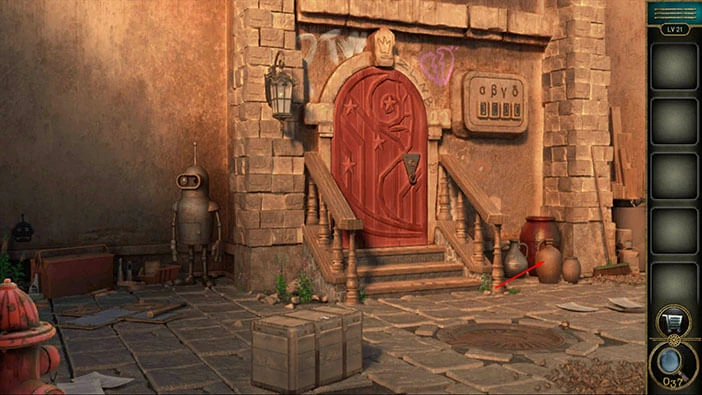
On the low wall, above the pottery, you will find a “Screwdriver”. Tap on it to pick it up.
After that, tap on the green button in the bottom left corner of the screen to go back.
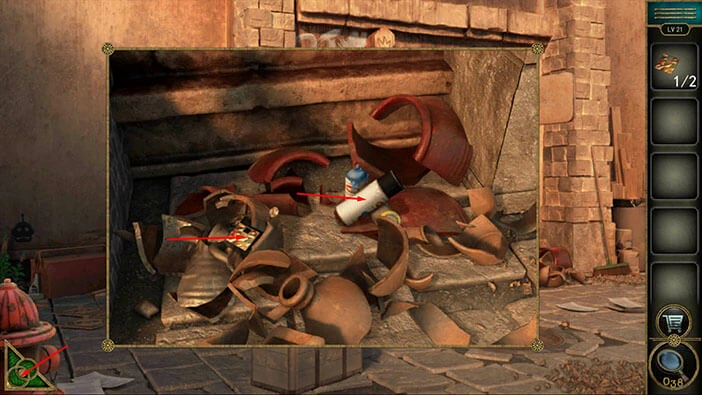
Next, tap on the puzzle on the floor on the left to take a closer look at it.
Here, we will find a “Hammer handle” so let’s tap on it to pick it up.
Next, select the “Screwdriver” from the inventory and use it to remove the three panels on the puzzle.

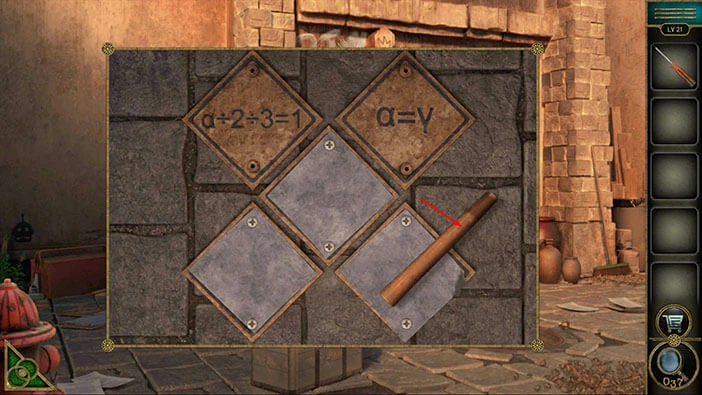
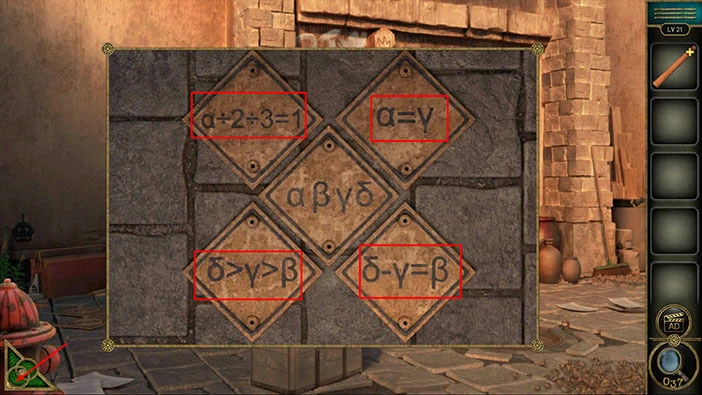
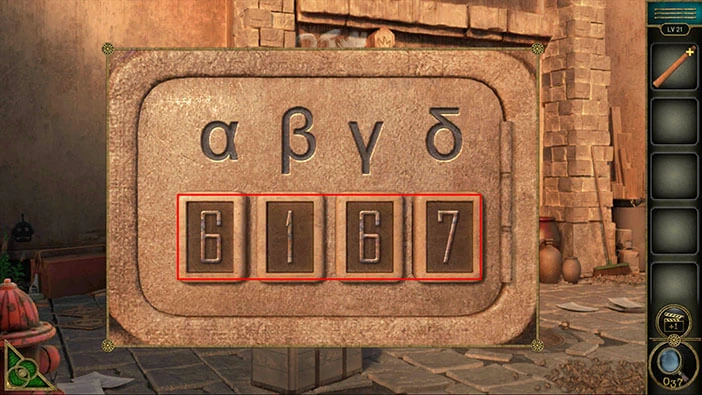
Here, we can see the hint for the next puzzle. Our task is to discover four values, α, y, β, δ. Let’s do that.
First, we can see: α ÷ 2 ÷ 3 = 1. So, α = 6. (6 ÷ 2 ÷ 3 = 1)
Next, we have y = α. So, y = 6.
Discovering the value for the last two symbols is a bit more complicated.
We can see that δ > y > β. We can also see δ – y = β.
So, δ is greater than 6 (max 9), and β = δ – 6. (in other words β + 6 = δ).
With that said, δ is either 7, 8, or 9.
β is either 1, 2, 3 (if δ = 7, β = 1, etc.)
Memorize/write down this information because we will need it for the next puzzle. Once you’re done, tap on the green button in the bottom left corner of the screen to go back.
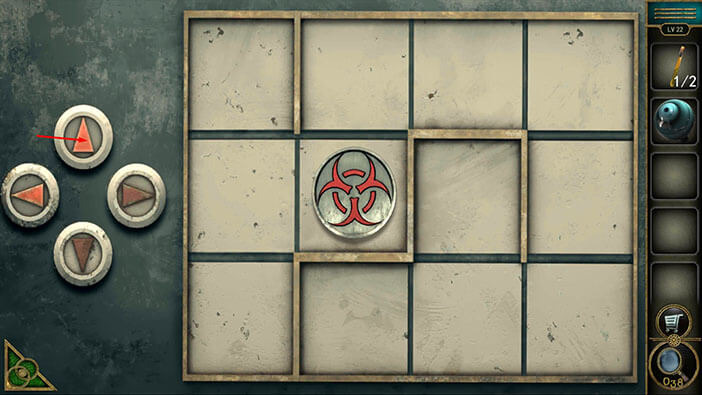
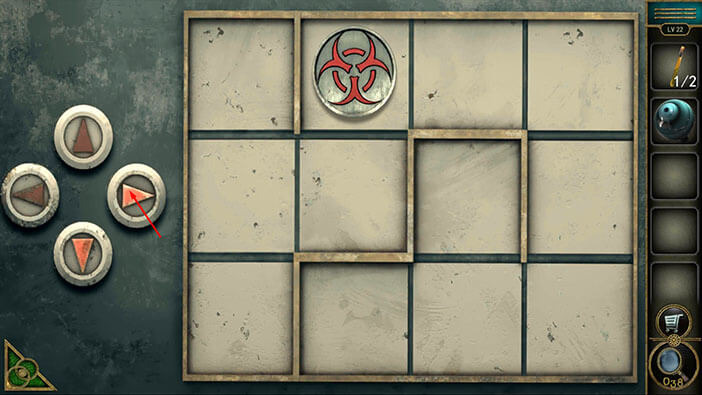
Next, let’s tap on the symbols on the wall, just to the right of the door, to take a closer look at it.
Let’s enter the first two values that we know, α = 6 and y = 6.
Next, let’s presume that β = 1. In that case δ = 7 (β +6).
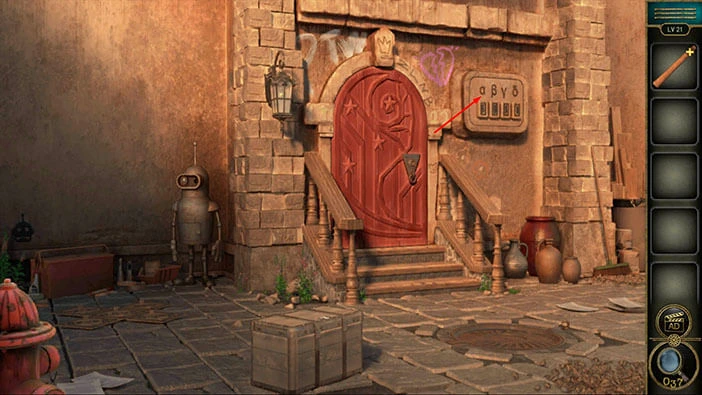
Well, it looks like we managed to find the correct code, and with that, we opened the secret compartment.
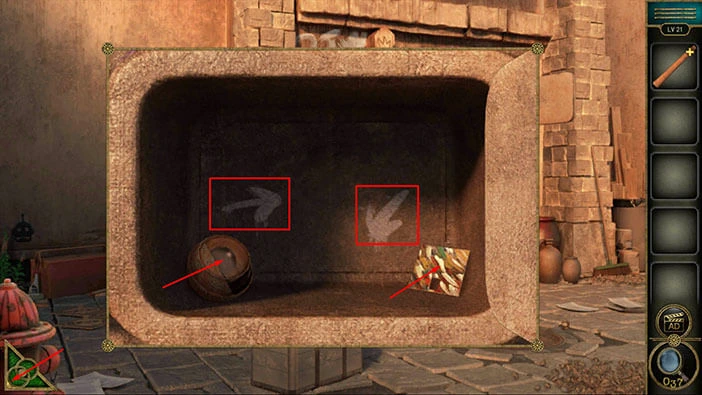
Inside you will find two items. Tap on them to pick them up, and you will get an “Eye” and the “Puzzle piece”.
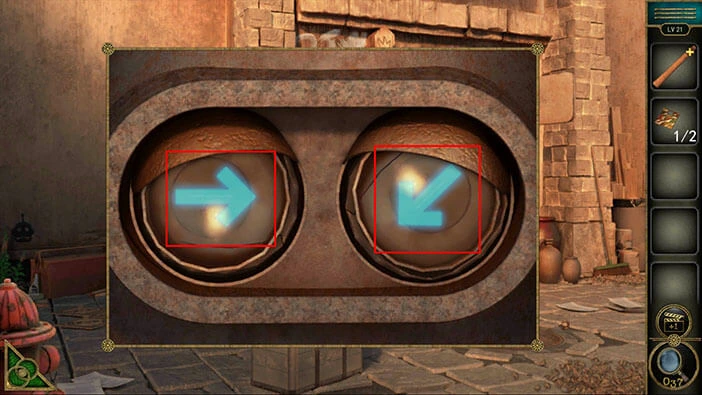
Also, let’s pay attention to the two arrows at the back wall. The arrow on the left is pointing to the right. The arrow on the right is pointing down and to the left. Memorize/write down this information because we will need it for the next puzzle.
Once you’re done, tap on the green button in the bottom left corner of the screen to go back.
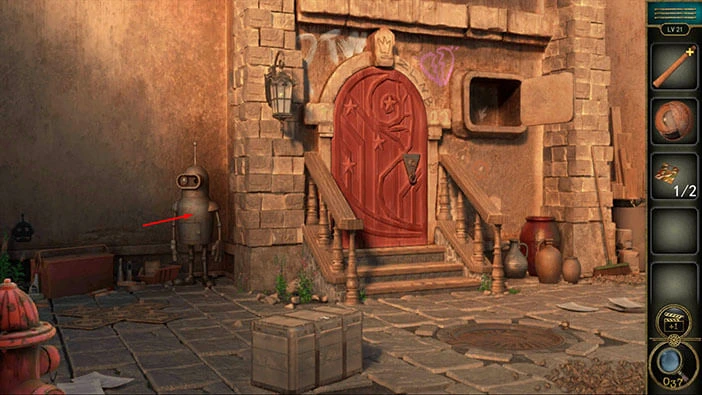
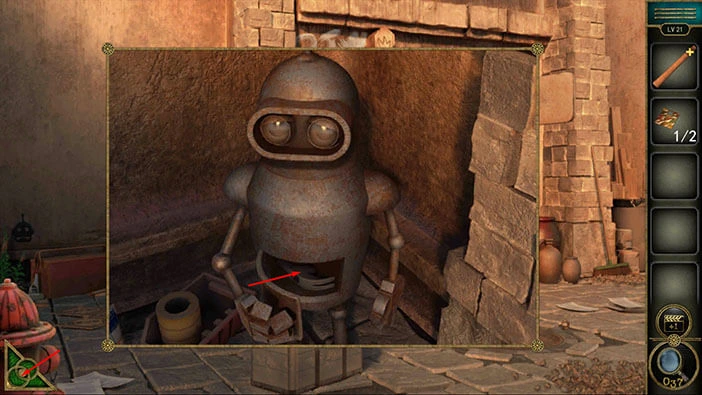
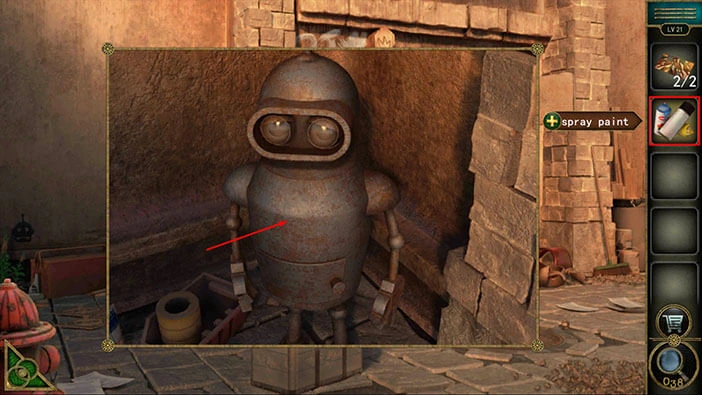
Next, let’s tap on the robot to take a closer look at it, and tap again to start the interaction.
You will notice that the robot is missing an eye, so let’s select the “Eye” from the inventory and insert it into the empty slot.
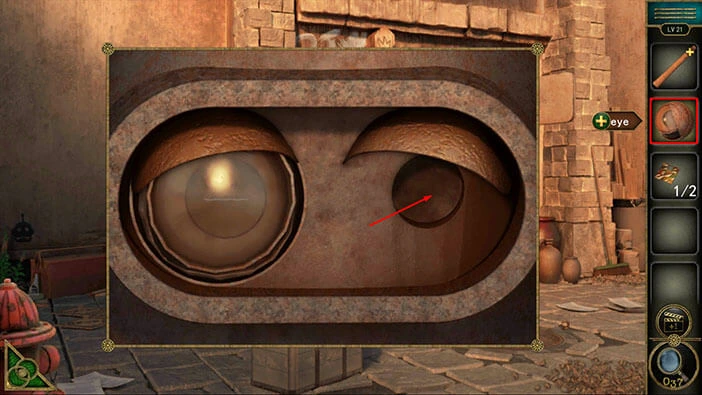
Two arrows will appear, one in each eye, and our task is to set the direction of the arrows. We already discovered the correct direction of the arrows, when we examined the previous puzzle. So,
The Eye on the left = arrow should point to the right
The Eye on the right = the arrow should point down and to the left
As soon as you set the arrows in the correct direction, the belly of the robot will open, and inside you will find a “Hammerhead”. Tap on it to pick it up.
After that, tap on the green button in the bottom left corner of the screen to go back.
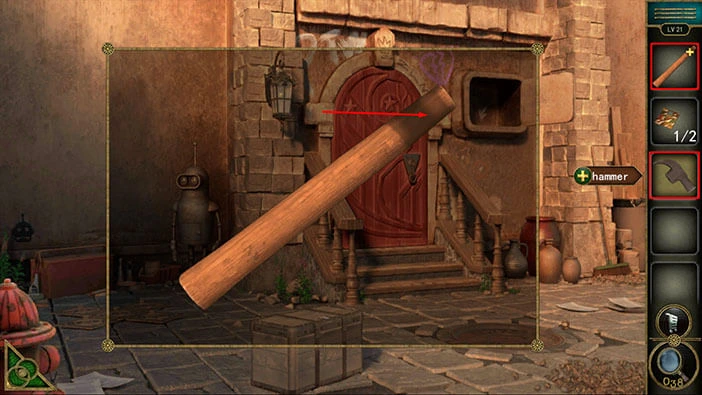
Let’s assemble the hammer. Select the “Hammer handle” from the inventory, and it will appear in the middle of the screen. After that, select the “Hammer” from the inventory, and attach it to the “Hammer handle”.
Next, tap on the pottery on the left to take a closer look at it.
Select the “Hammer” from the inventory and use it to smash the pottery.
Here, you will find a “Spray paint” and another “Puzzle piece”. Tap on them to pick them up.
After that, tap on the green button in the bottom left corner of the screen to go back.
Next, tap on the robot again to take a closer look at it.

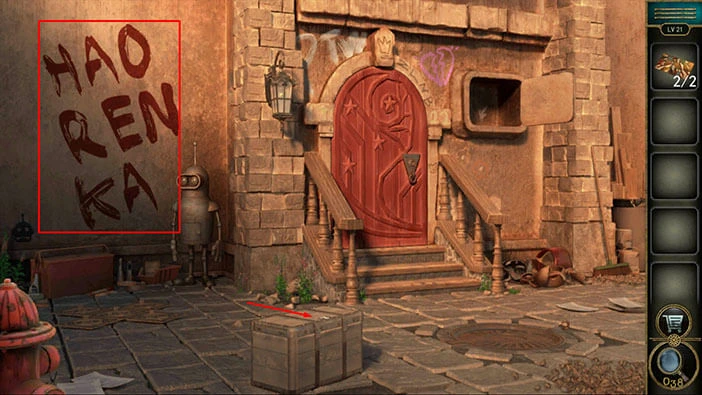
Select the “Spray paint” from the inventory and give it to the robot.
The robot will write down some letters on the wall. Let’s memorize/write down these letters because they represent a hint for the next puzzle.
In the first row, we have “HAO”
In the second row, we have “REN”
In the third row, we have “KA”
Once you’re done, tap on the large wooden chest in front of you to take a closer look at it, and tap again to start the interaction.
You will notice that two puzzle pieces are missing. So, let’s select the “Puzzle pieces” from the inventory and insert them into the empty slots.
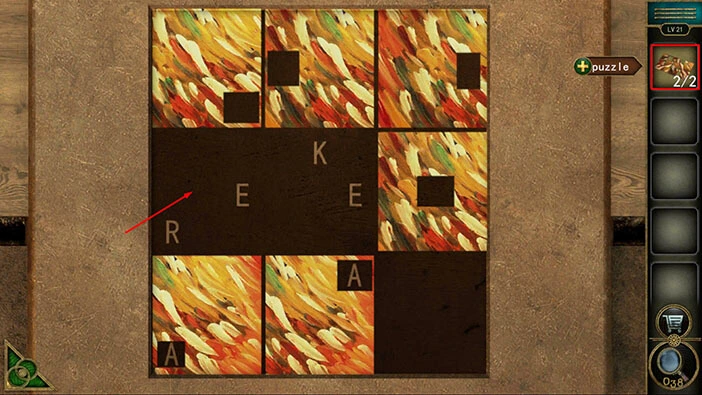
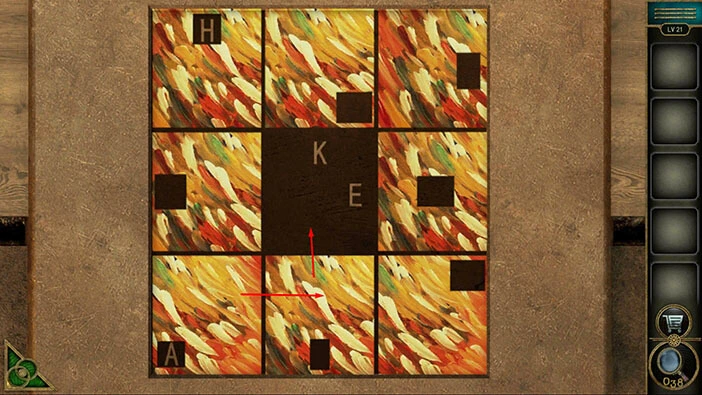
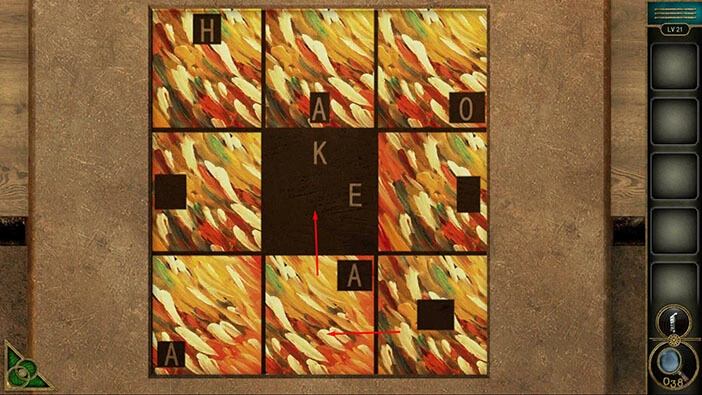
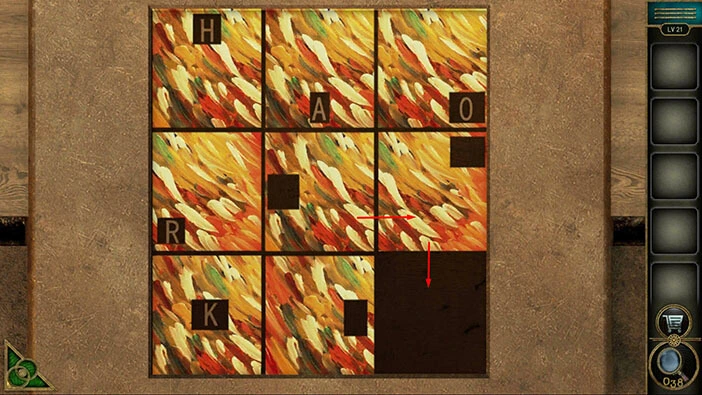
Let’s examine this puzzle. If you take a look at the puzzle pieces, you will notice that there are one or two square-shaped holes in each puzzle piece. Also, on each slot, there are several letters.
If you take a look at the first and the second puzzle pieces in the third row, you will notice two letters “A” and we can see them through the holes in the puzzle pieces. So, our task is to shuffle the puzzle pieces and form the letters that we saw on the wall (the letters that the robot wrote down on the wall). As a reminder, on the wall, we saw
In the first row, we have “HAO”
In the second row, we have “REN”
In the third row, we have “KA”
We will do this puzzle in several steps. Let’s begin.
Step 1
Tap on the second puzzle piece in the third row to move it to the right. After that, tap on the second puzzle piece in the second row to move it down.
Step 2
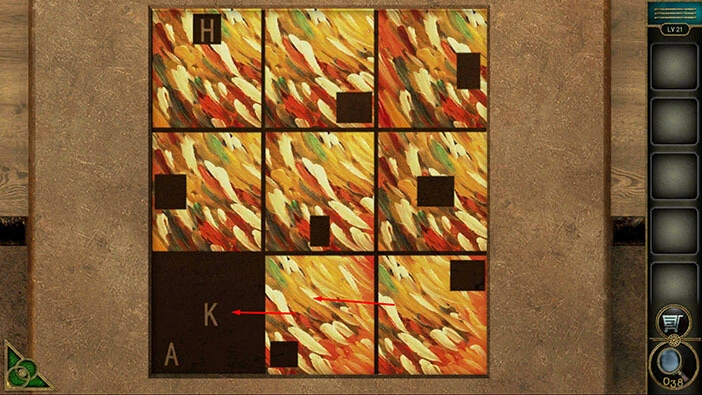
Tap on the second puzzle piece in the first row to move it down. After that, tap on the first puzzle piece in the first row to move it down.
Step 3
Tap on the first puzzle piece in the second row to move it up. After that, tap on the second puzzle piece in the second row to move it to the left.
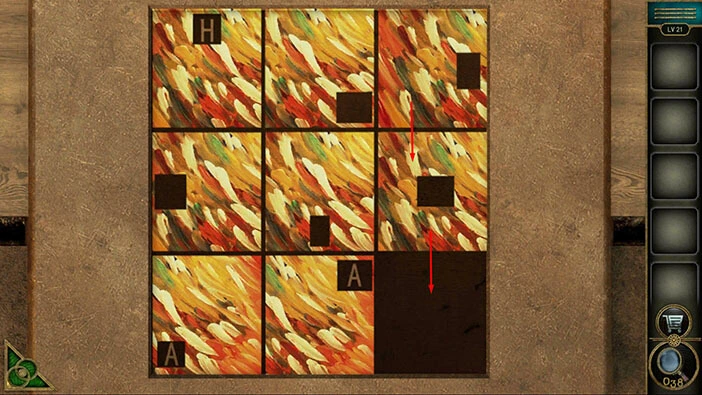
Step 4
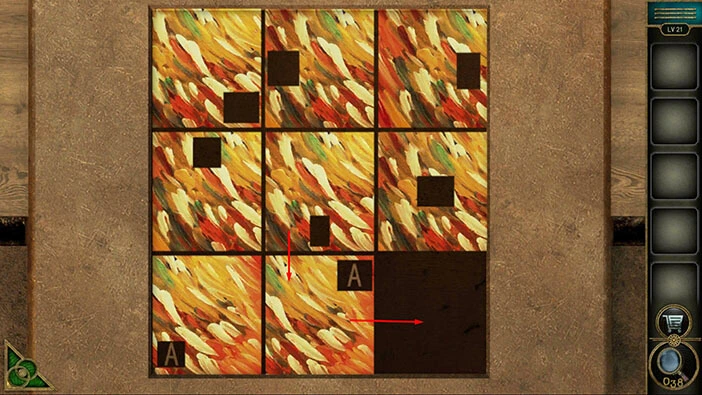
Tap on the second puzzle piece in the third row to move it up. After that, tap on the first puzzle piece in the third row to move it to the right.
Step 5
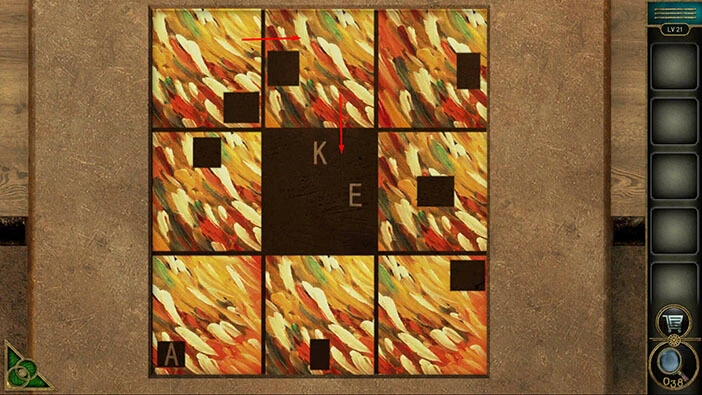
Tap on the second puzzle piece in the third row to move it to the left. After that, tap on the third puzzle piece in the third row to move it to the left.
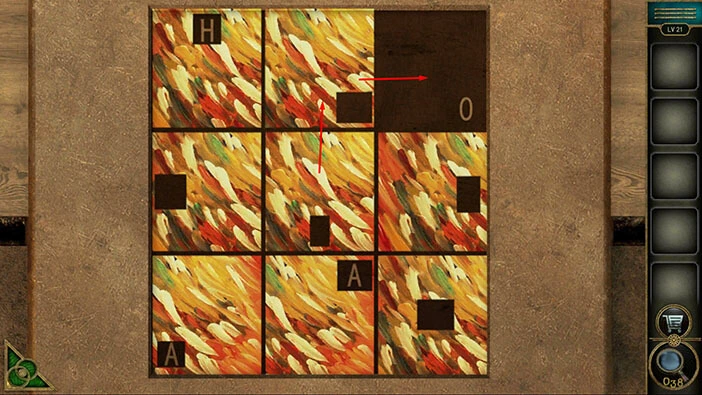
Step 6
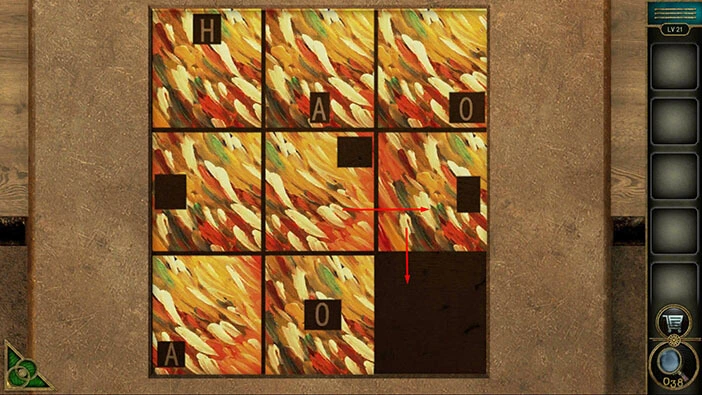
Tap on the third puzzle piece in the second row to move it to the right. After that, tap on the third puzzle piece in the first row to move it down.
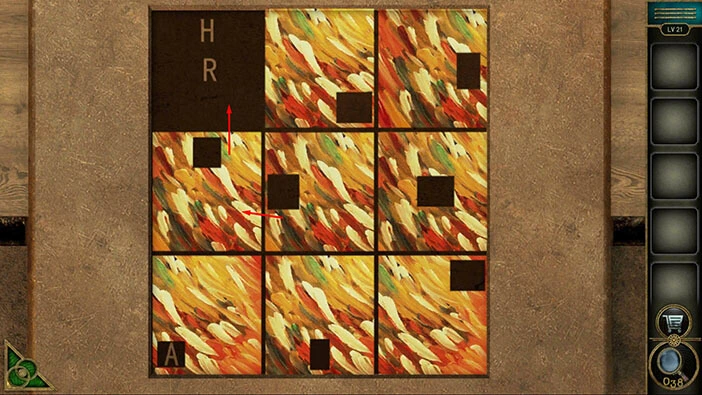
Step 7
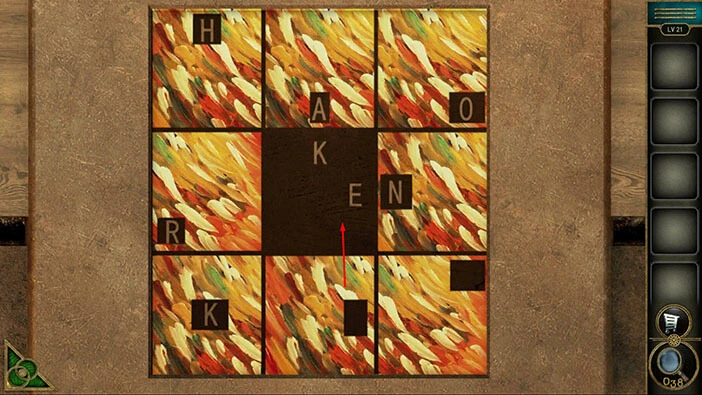
Tap on the second puzzle piece in the first row to move it to the right. After that, tap on the second puzzle piece in the second row to move it up. With that, you will have the letters “HAO” in the first row.
Step 8
Tap on the second puzzle piece in the third row to move it up. After that, tap on the third puzzle piece in the third row to move it to the left.
Step 9
Tap on the third puzzle piece in the second row to move it down. After that, tap on the second puzzle piece in the second row to move it to the right.
Step 10
Tap on the first puzzle piece in the second row to move it to the right. After that, tap on the first puzzle piece in the third row to move it up.
Step 11
Tap on the second puzzle piece in the third row to move it to the left. After that, tap on the third puzzle piece in the third row to move it to the left.
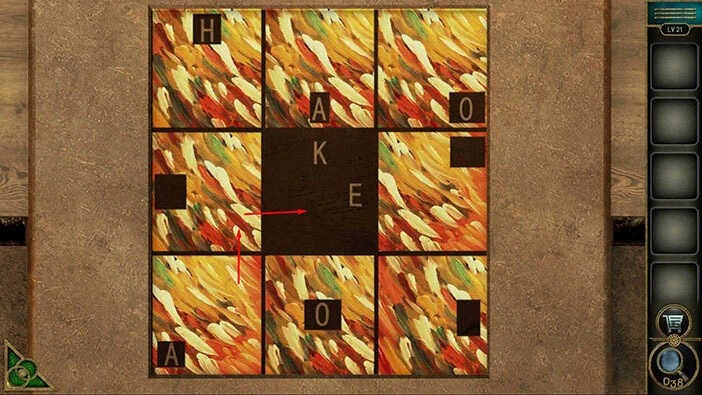
Step 12
Tap on the third puzzle piece in the second row to move it down. After that, tap on the second puzzle piece in the second row to move it to the right.
Step 13
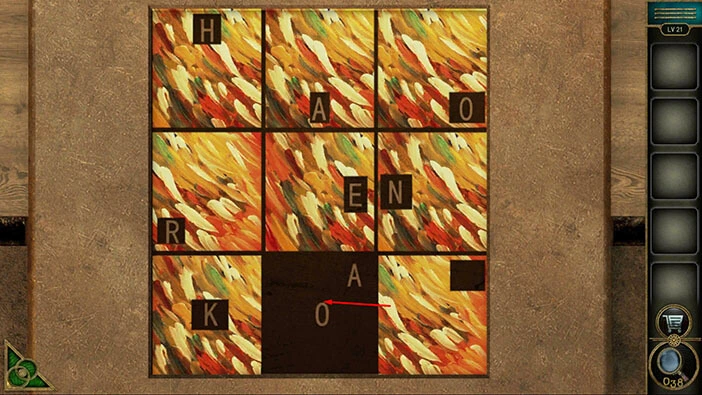
Tap on the second puzzle piece in the third row to move it up. With that, you will have the letters “REN” in the second row.
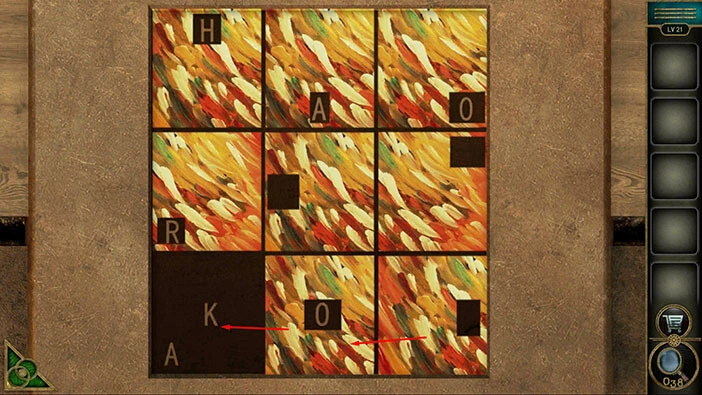
Step 14
Tap on the third puzzle piece in the third row to move it to the left. With that, we will have the letters “KA” in the third row, and we will solve this puzzle.
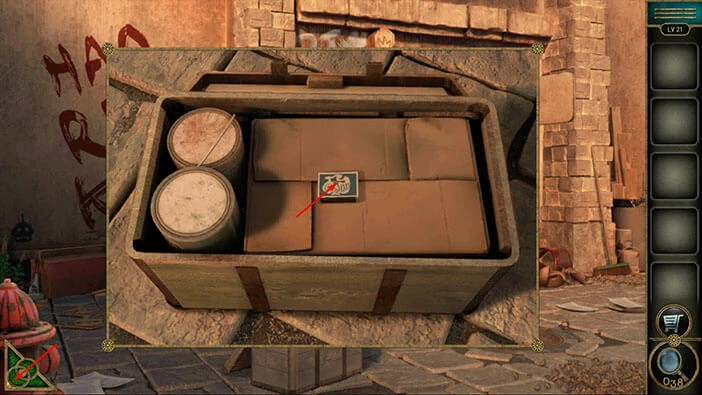
As soon as you solve the puzzle, you will unlock and open the chest. Inside you will find “Matches” so let’s tap on them to pick them up.
After that, tap on the green button in the bottom left corner of the screen to go back.
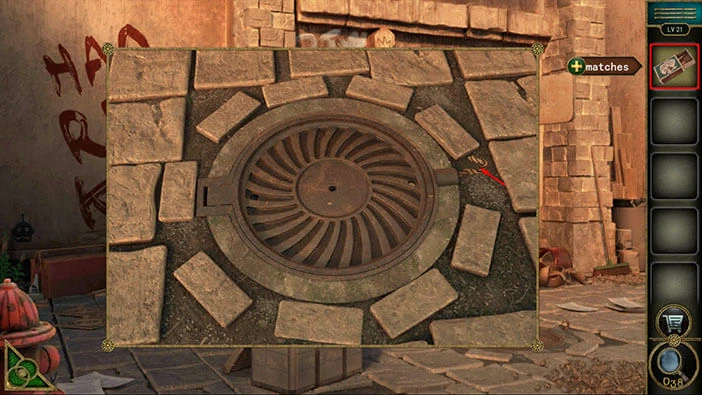
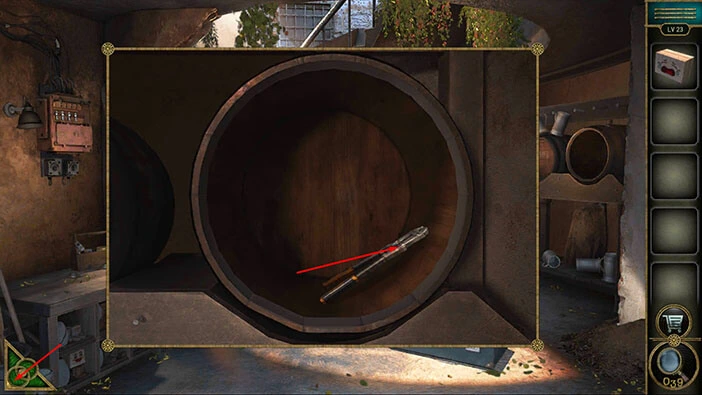
On the right side of the floor, you will notice a grey, round object. Tap on it to take a closer look at it.
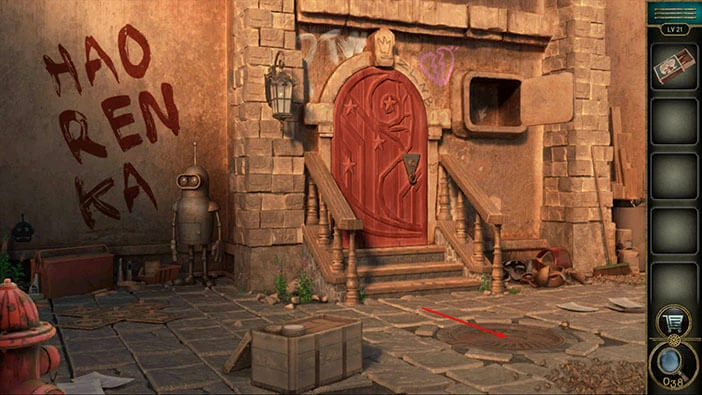
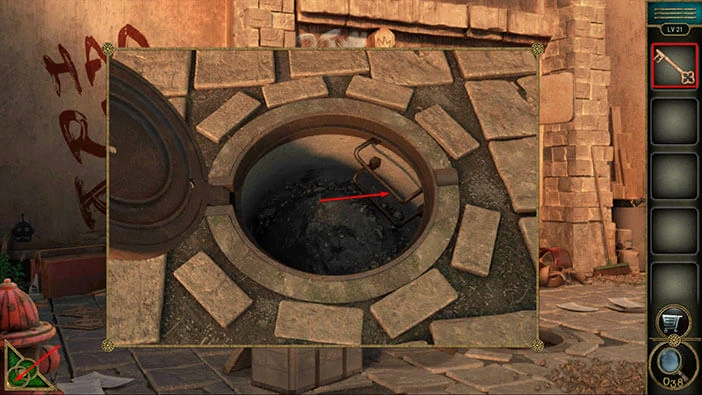
You will notice that this object is actually a mine, and on the right, we can see a fuse. So, let’s select the “Matches” from the inventory and use it to light the fuse.
Our character will blow a hole in the ground. Let’s tap on the hole to look inside. Here, you will find a “Key”. Tap on it to pick it up.
After that, tap on the green button in the bottom left corner of the screen to go back.
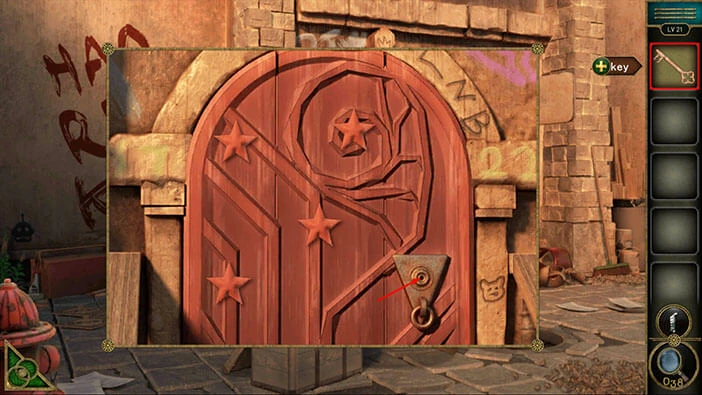
Next, tap on the door to take a closer look at it. Select the “Key” from the inventory and use it to unlock the door. After that, tap on the door to proceed to the next level.
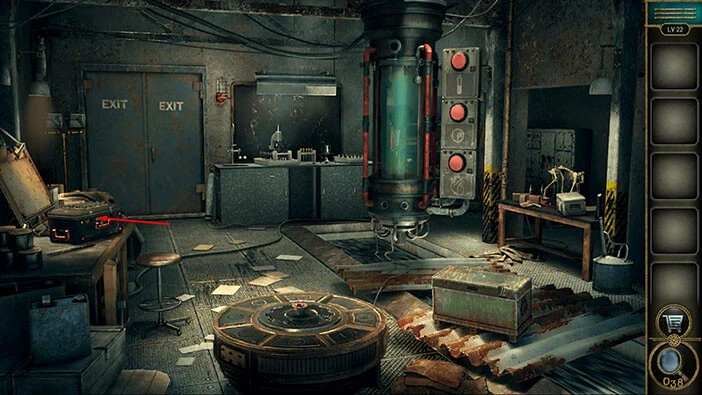
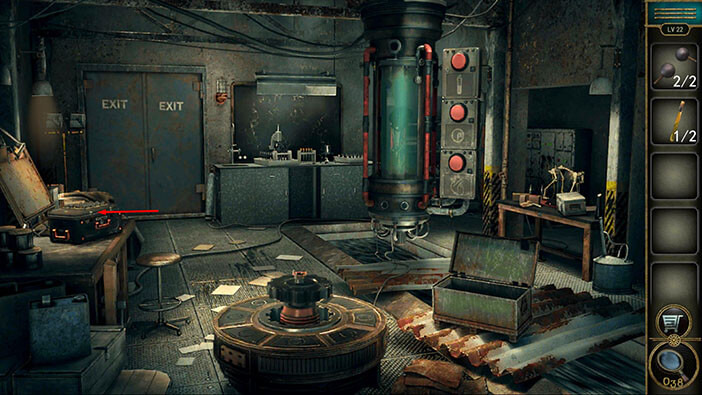
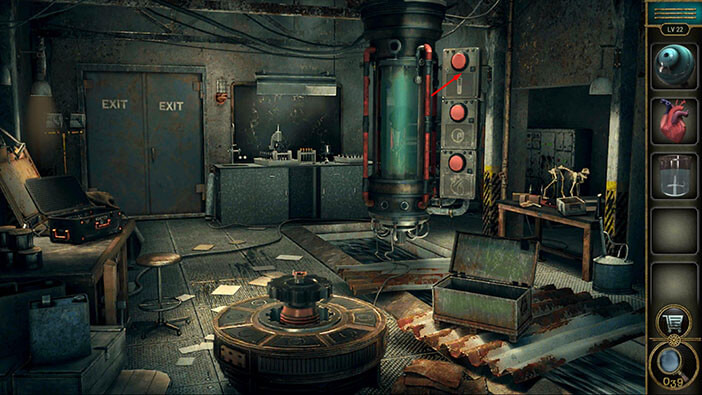
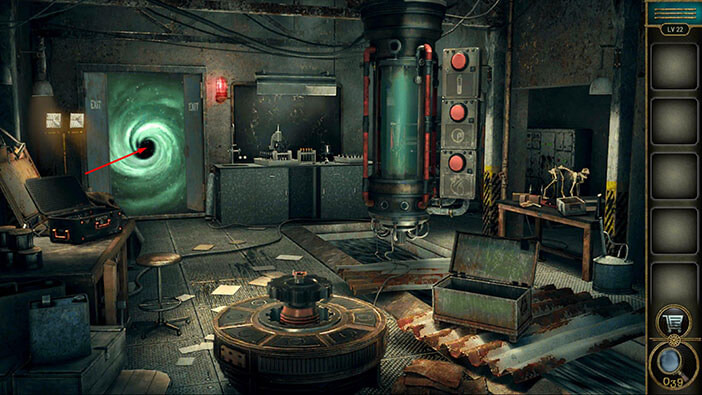
Level 22
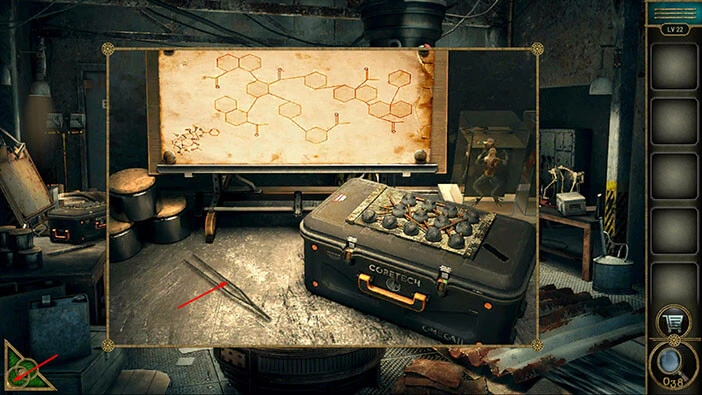
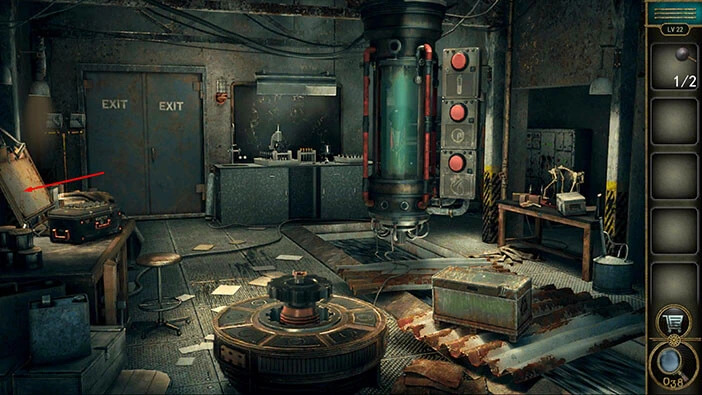
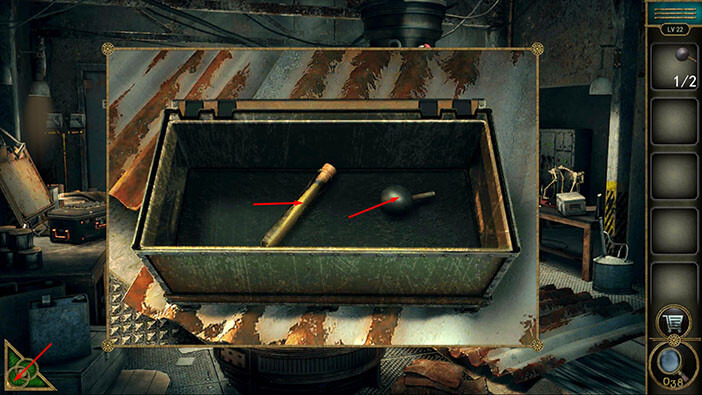
Let’s explore the twenty-second level. On the table on the left, you will notice a large box. Let’s tap on it to take a closer look.
Just to the left of the box, you will notice “Tweezers”. Tap on them to pick them up.
After that, tap on the green button in the bottom left corner of the screen to go back.
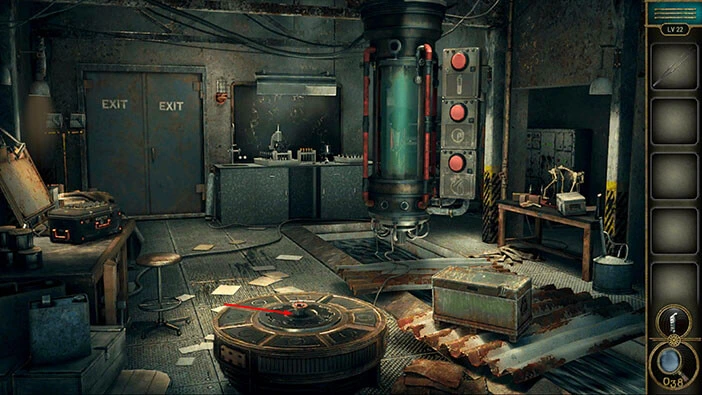
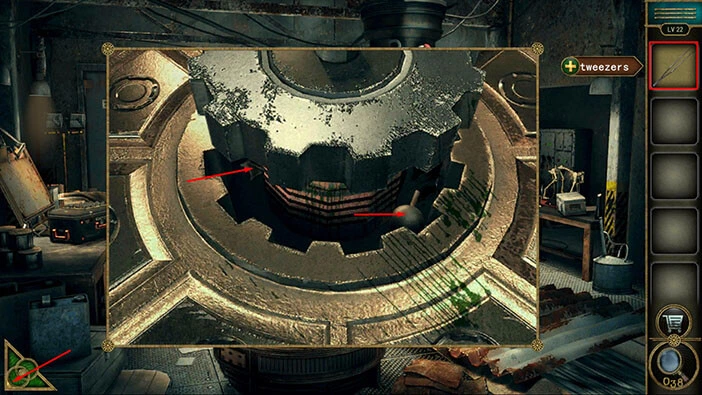
Next, tap on the large wheel in front of you to take a closer look at it.
Tap on the gear in the middle to pull it up.
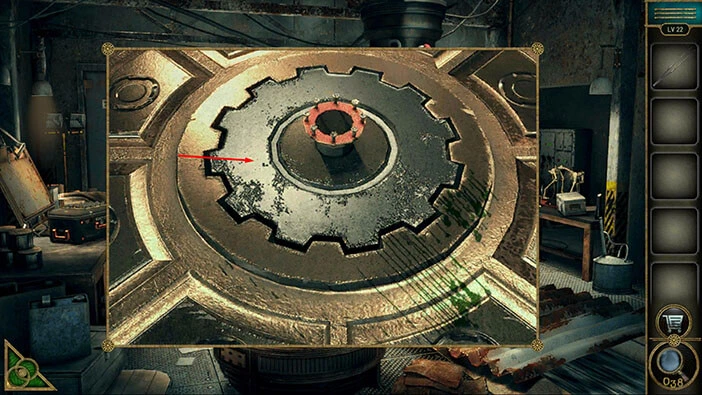
Here, you will notice a “Metal ball” but our character can’t reach it. So, let’s select the “Tweezers” from the inventory and use them to grab the “Metal ball”.
On the left, you will also notice an “Achievement star”. Let’s tap on it to pick it up.
Once you’re done, tap on the green button in the bottom left corner of the screen to go back.
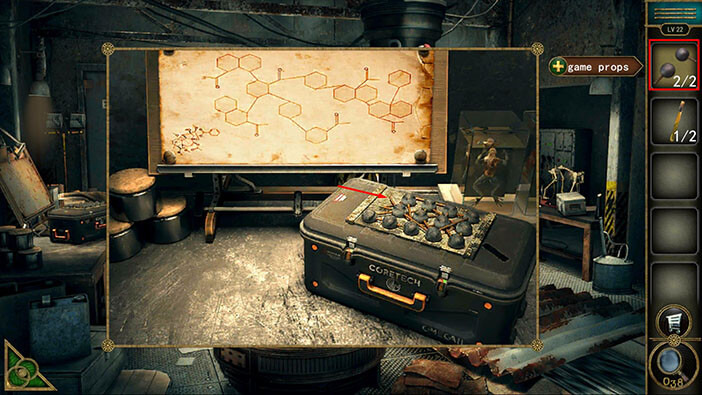
Next, tap on the box on the left again to take a closer look at it, and you will notice a schematic on the board, just above the box. Let’s tap on the schematic to examine it.
Let’s examine the schematic. Here, we are interested in the six “sticks”. There are three of them in the top row and three in the bottom row. These “sticks” represent the correct positions of the six switches that are used for unlocking the box. So, let’s memorize/write down the position of the switches.
In the top row (looking from left to right), we have, Down/Up/Up
In the bottom row, we have, Down/Up/Down
Once you’re done, tap on the green button in the bottom left corner of the screen to go back.

On the right, you will notice a green, metal box. Let’s tap on it to take a closer look, and tap again to start the interaction.

Here, we can see six switches, three in the top, and three in the bottom row. So, let’s set the switches into the positions that we previously discovered.
The switches in the top row = Down/Up/Up
The switches in the bottom row = Down/Up/Down
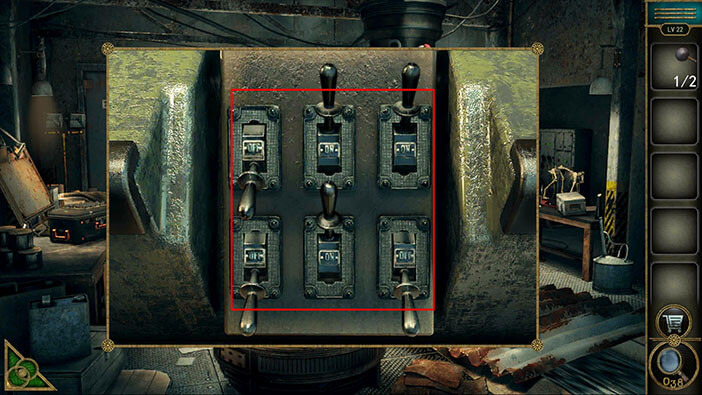
As soon as you set the switches, you will unlock and open the box. Inside you will find, another “Metal ball” and a “Stick”. Tap on them to pick them up.
After that, tap on the green button in the bottom left corner of the screen to go back.
Next, let’s go back to the green box on the table on the left.
Here, you will notice a bunch of metal balls, but the of the metal balls are missing. So, let’s select the “Game props” from the inventory and insert them into the empty slots.
After that, tap on this puzzle to start the interaction.
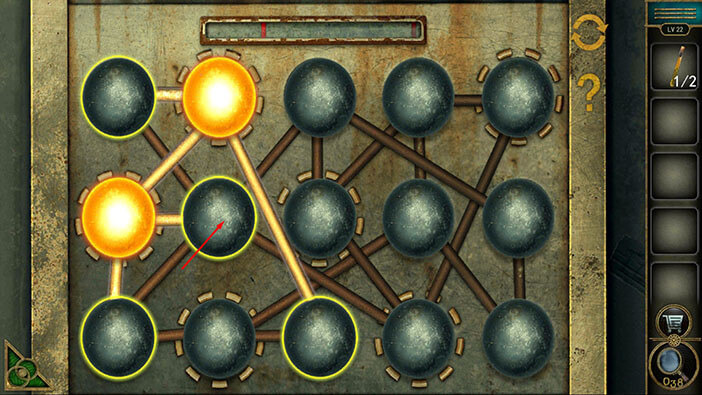
Here, you will see 15 metal balls, but only six of them are outlined. Our task is to activate these six metal balls. Also, we can see the connections between the metal balls. At the top, you will notice an energy bar. Every time you activate one of the metal balls, the bar will move to the right. So, we will have to carefully choose which balls to activate.
We will do this puzzle in several steps. Let’s begin.
Step 1
The first metal ball in the second row is our starting point. So, let’s tap on it to activate it.
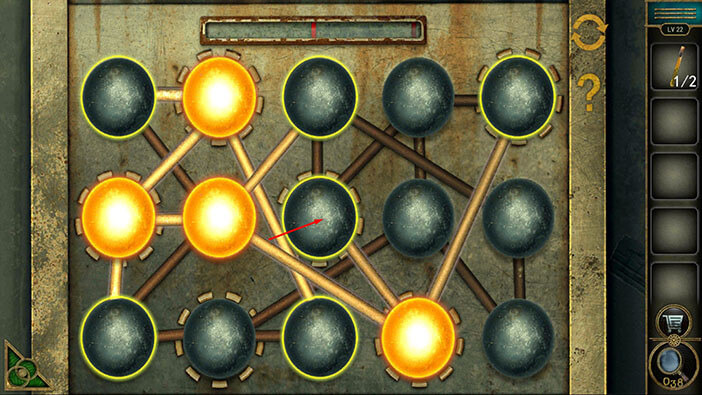
Step 2
You will notice that three more balls have a yellow outline around them. Let’s tap on the second ball in the first row to activate it.
Step 3
Let’s tap on the second ball in the second row to activate it.
Step 4
Let’s tap on the fourth ball in the third row to activate it.

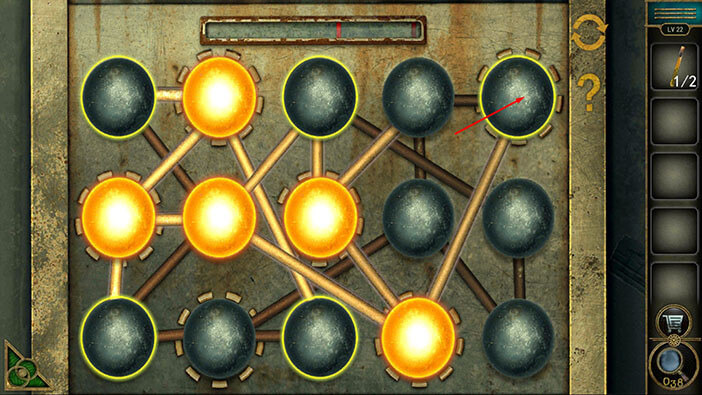
Step 5
Let’s tap on the third ball in the second row to activate it.
Step 6
Let’s tap on the fifth ball in the first row to activate it.
Step 7
Let’s tap on the first ball in the third row to activate it.
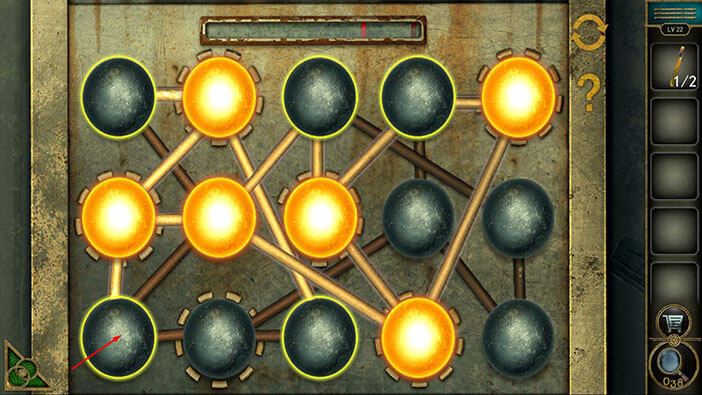
Step 8
Lastly, let’s tap on the second ball in the third row to activate it.
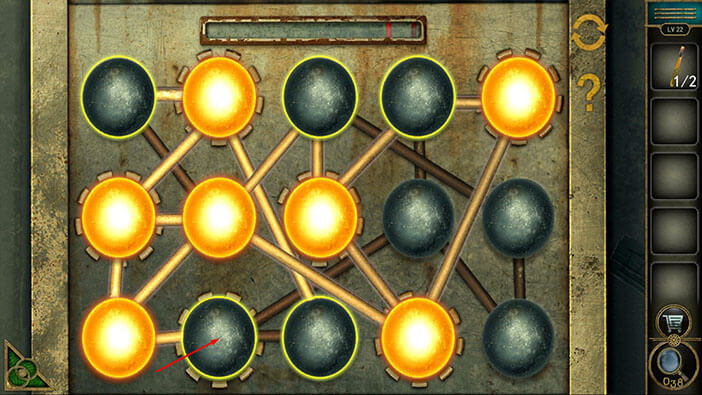
As soon as you solve the puzzle, the box will open. Inside you will find a “Skull” and an “Artificial eyeball”. Tap on them to pick them up.
Once you’re done, tap on the green button in the bottom left corner of the screen to go back.
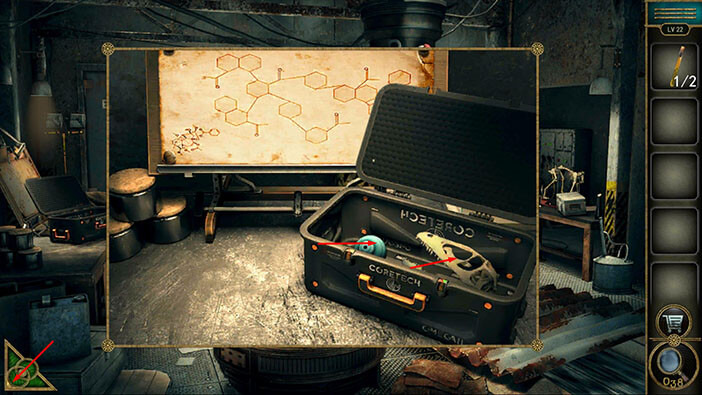
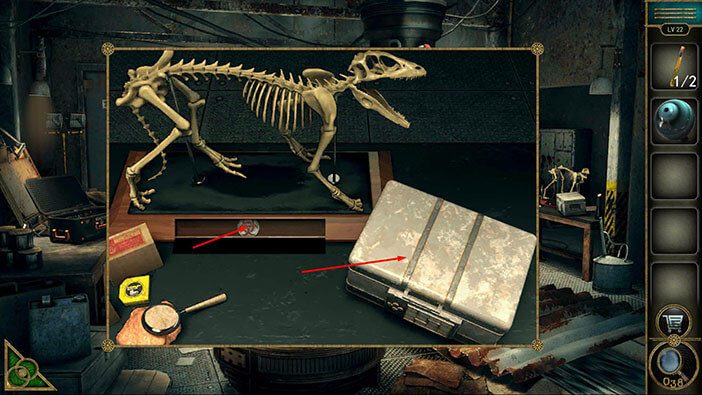
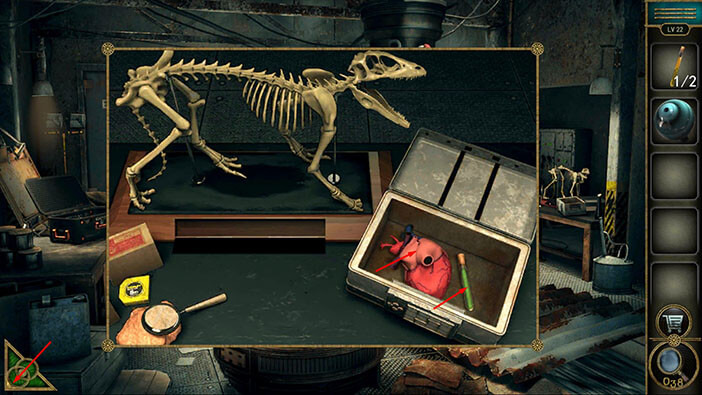
On the table on the right, you will notice an animal skeleton. Let’s tap on it to take a closer look.

You will notice that the head of the skeleton is missing. So, let’s select the “Skull” from the inventory and attach it to the skeleton.
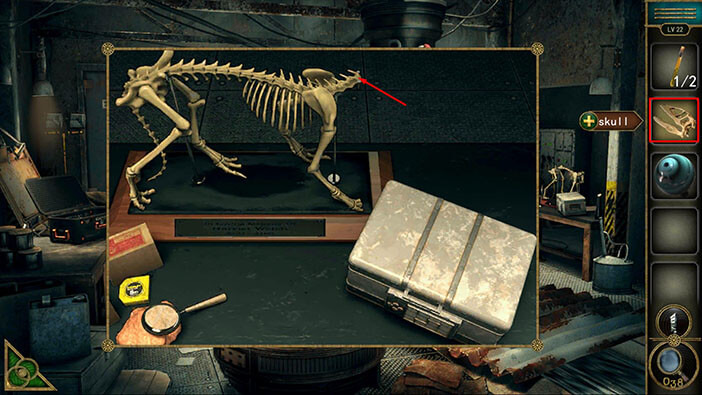
As soon as you attach the head, the drawer below the skeleton will open. Inside you will find a “Badge”. Tap on it to pick it up.
After that, tap on the suitcase on the right to start the interaction.
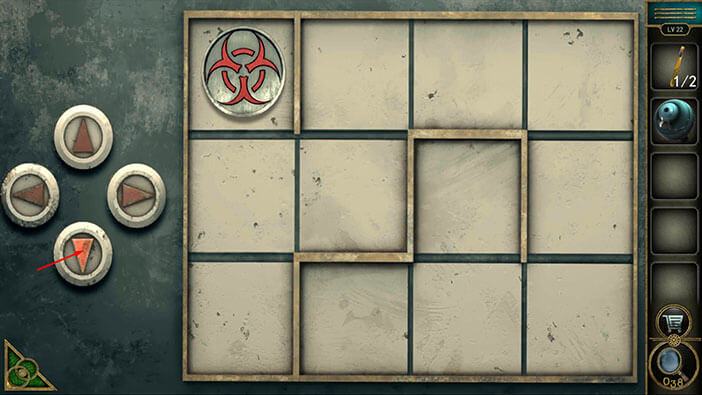
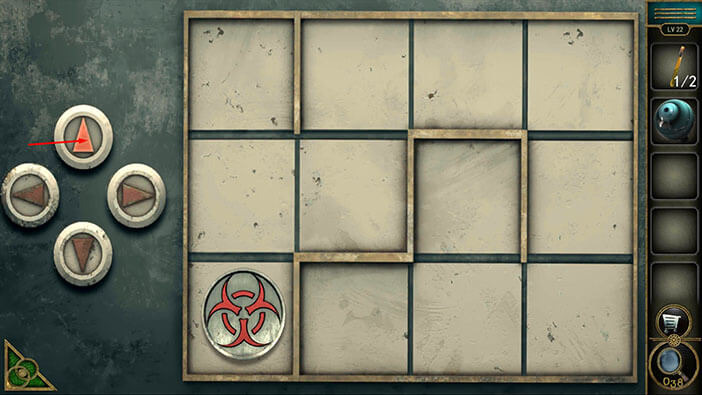
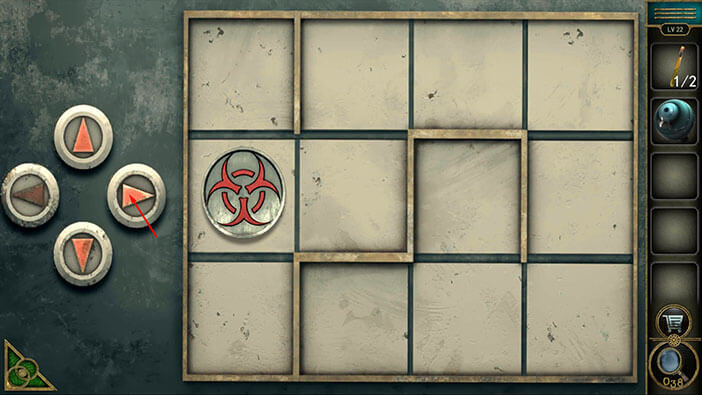
Here, we have another puzzle. Select the “Badge” from the inventory and tap on the grid to insert it.
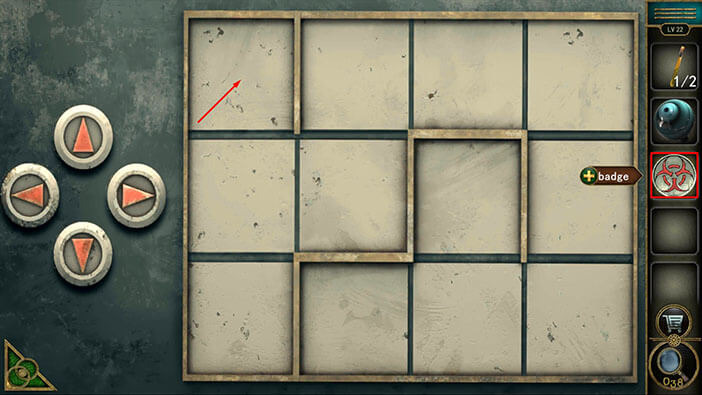
Our task is very simple. We should move the badge through this maze/grid by tapping on the arrows on the left. The goal is to get the badge to the third slot in the second row.
We will do this puzzle in several steps. Let’s begin.
Step 1
Tap on the down arrow to move the badge down.
Step 2
From this point it should be logical to go right, however, we will lose if we do that. So, let’s tap on the down arrow to move the badge down.

Step 3
Tap on the up arrow to move the badge up.
Step 4
Tap on the right arrow to move the badge to the right.
Step 5
Tap on the up arrow to move the badge up.
Step 6
Tap twice on the right arrow to move the badge two slots to the right.
Step 7
Tap twice on the down arrow to move the badge two slots down.
Step 8
Tap twice on the left arrow to move the badge two slots to the left.
Step 9
Tap on the right arrow to move the badge to the right.
Step 10
Lastly, tap on the up arrow to move the badge up.
With that, you will solve the puzzle, and the suitcase will open. Inside you will find a “Reagent” and an “Artificial heart”.
Once you’re done, tap on the green button in the bottom left corner of the screen to go back.
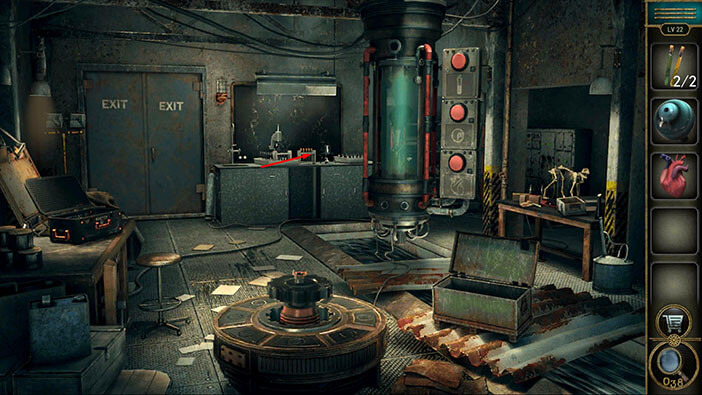
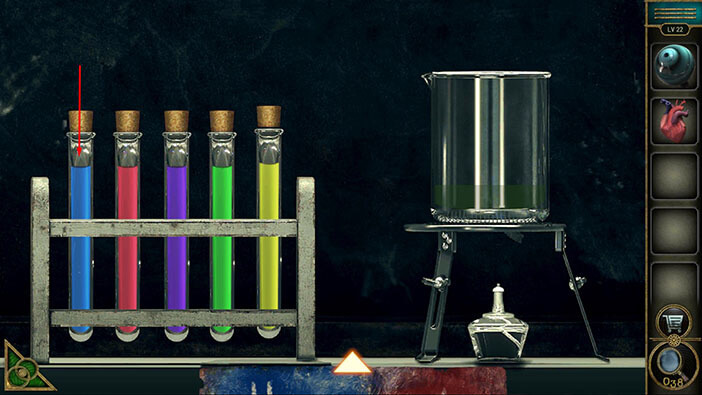
Next, you will notice laboratory equipment on the table in front of you. Let’s tap on it to take a closer look.
On the left, you will see three test tubes, but the other two slots are empty. So, let’s select the “Reagent” from the inventory and insert them into the empty slots.
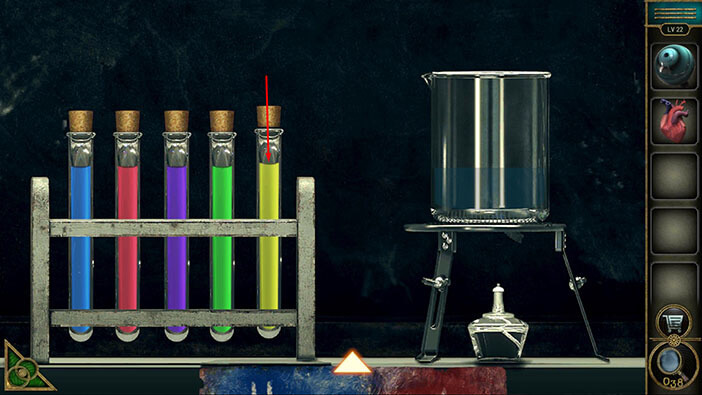
You will notice a shiny arrow at the bottom of the screen. Let’s tap on it to start the interaction.

Here, we can see a hint for this puzzle. The colors and the lines on the colors represent how many units of each reagent we should use. Let’s memorize/write down this information.
Red = 1 unit
Green = 2 units
Blue = 2 units
Yellow = 3 units
Purple = 4 units
Once you’re done, tap on the arrow at the bottom to put down the note.
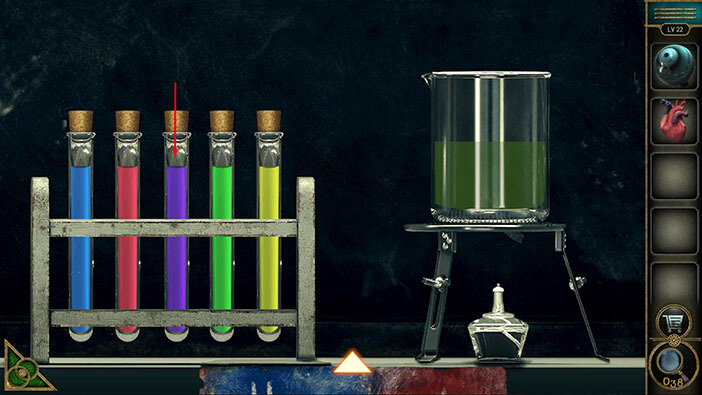
Let’s create the correct mixture. We will do this in several steps. Let’s begin.
Step 1
Tap once on the red test tube to add one unit of reagent.
Step 2
Tap twice on the green test tube to add two units of reagent.
Step 3
Tap twice on the blue test tube to add two units of reagent.
Step 4
Tap three times on the yellow test tube to add three units of reagent.
Step 5
Tap four times on the purple test tube to add four units of reagent.
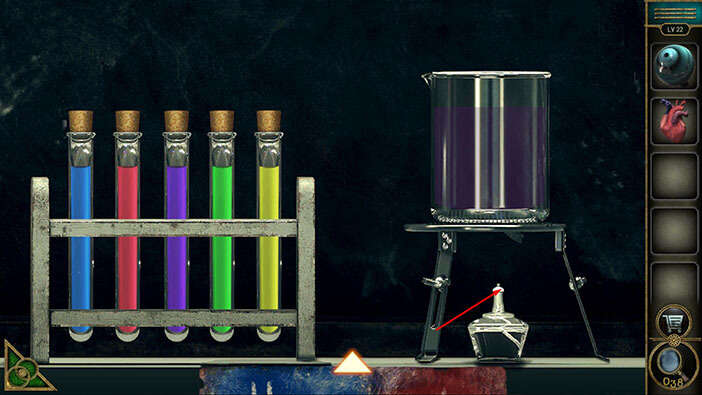
Next, tap on the small bottle to start the fire, and you will complete the experiment. Once you do that, “Growth fluid” will be automatically added to your inventory.
Let’s go back. Tap on the green button in the bottom left corner of the screen.
Next, let’s tap on the three, large red buttons to take a closer look at them.
In the glass container, we can see a strange creature. Our task is to revive it. Below each button, you will see a drawing.
Let’s start from the bottom. Tap on the third button to open the container below it. Here, we can see a drawing of a heart. So, let’s select the “Artificial heart” from the inventory and put it into the container.
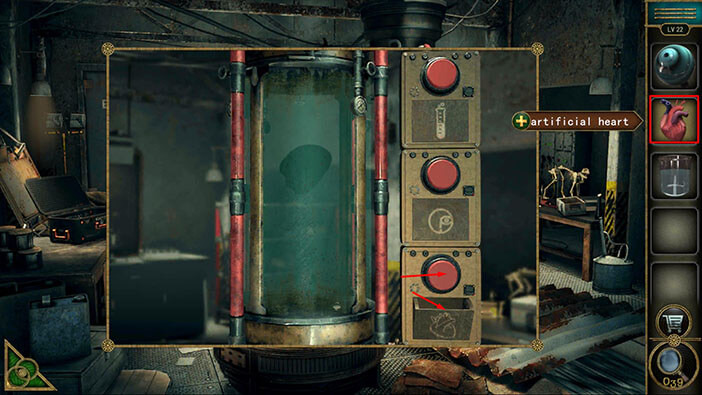
Next, tap on the middle button to open the container below it. Here, we can see a drawing of an eye. So, let’s select the “Artificial eyeball” from the inventory and put it into the container.
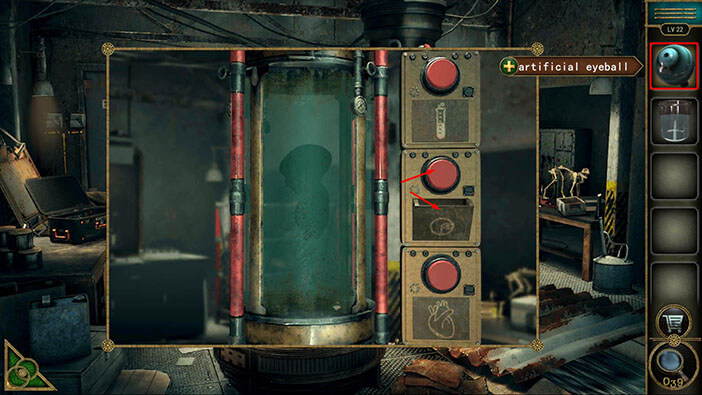
Lastly, let’s tap on the first button to open the container below it. Here, we can see a drawing of a test tube. So, let’s select the “Growth fluid” from the inventory and put it into the container.
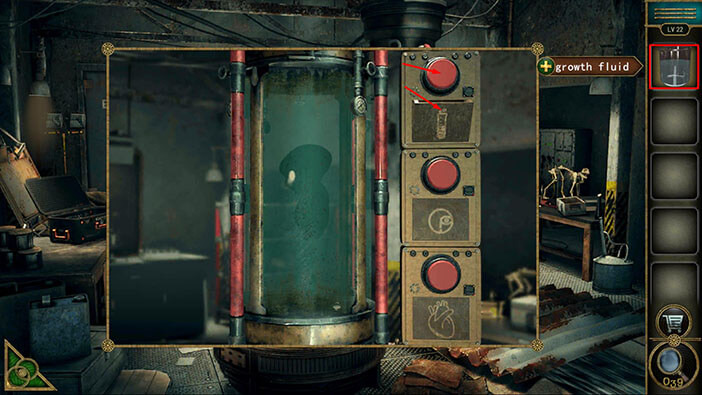
With that, the alien creature in the glass container will come to life, and it will try to escape from its prison. The alarm will activate, and the door will open. Tap on the door to proceed to the next level.
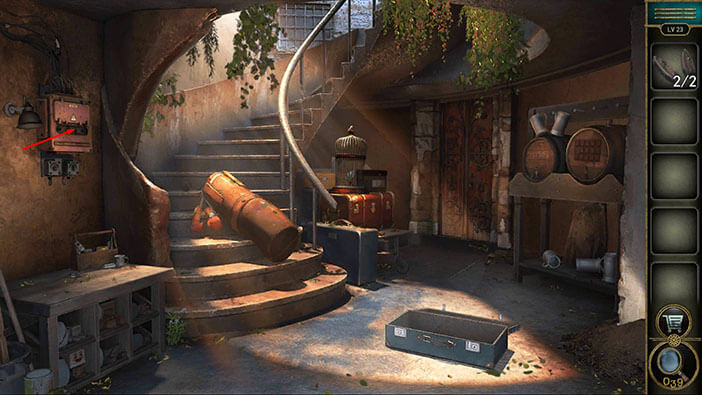
Level 23
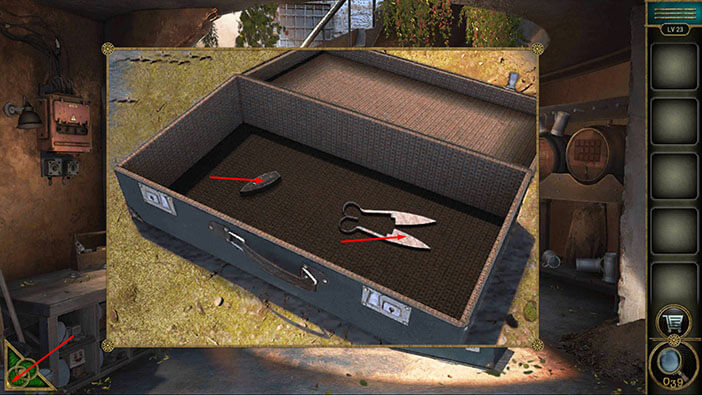
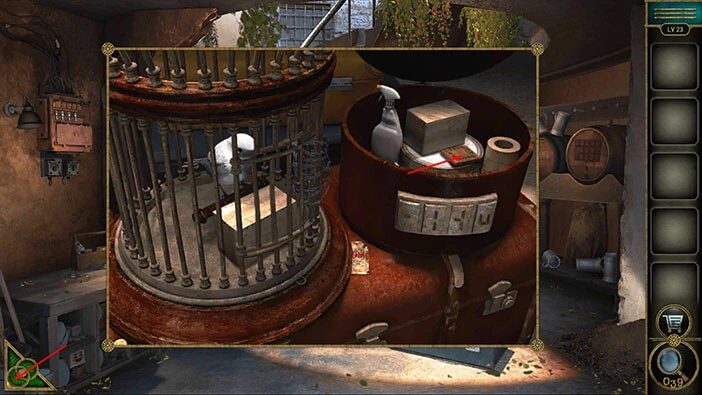
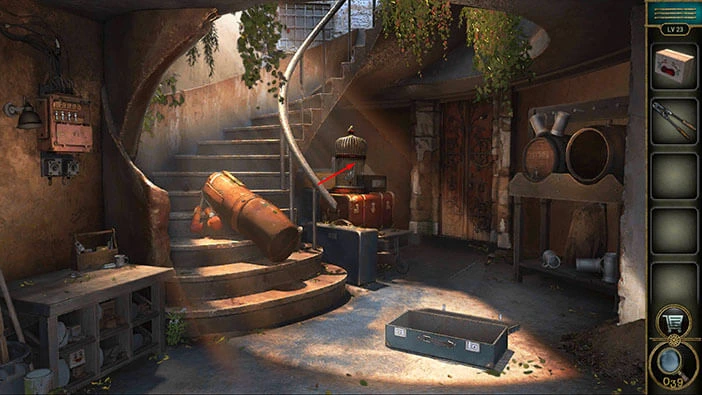
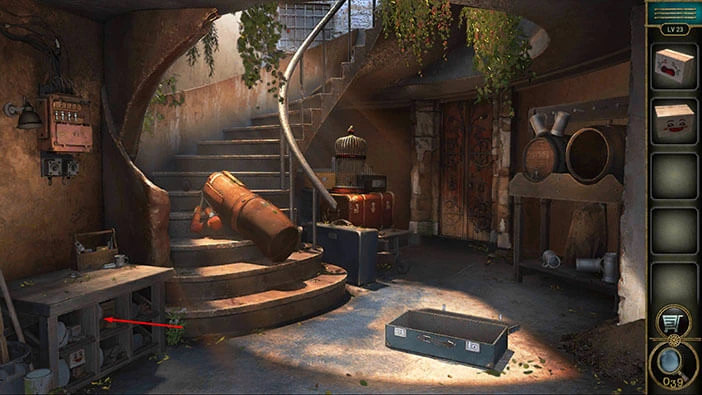
Let’s explore the twenty-third level. Tap on the suitcase on the floor in front of you, and tap again to open it.

In the suitcase, you will find “Scissors” and “Control knob”. Tap on them to pick them up.
After that, tap on the green button in the bottom left corner of the screen to go back.
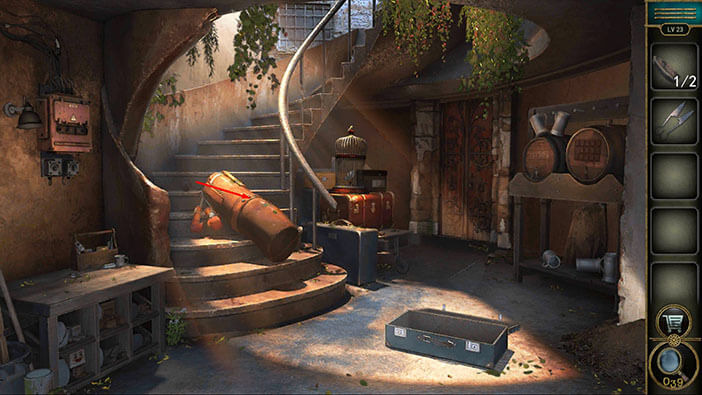
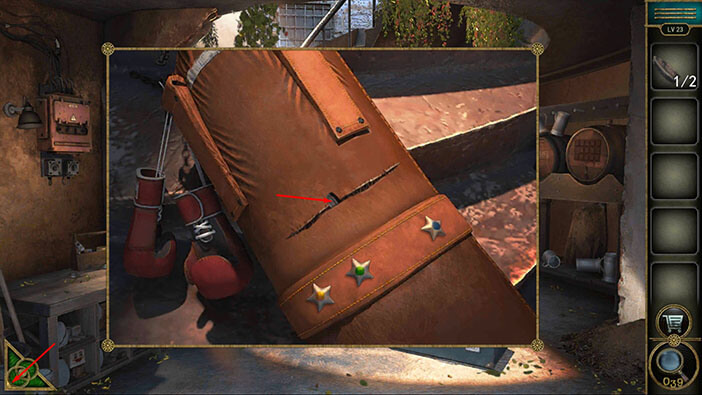
Next, tap on the boxing bag on the stairs to take a closer look at it.
Tap on the purple start, and you will discover another “Achievement star”.

Next, you will notice that the bag was patched. So, let’s select the “Scissors” from the inventory and use it to cut open the bag.
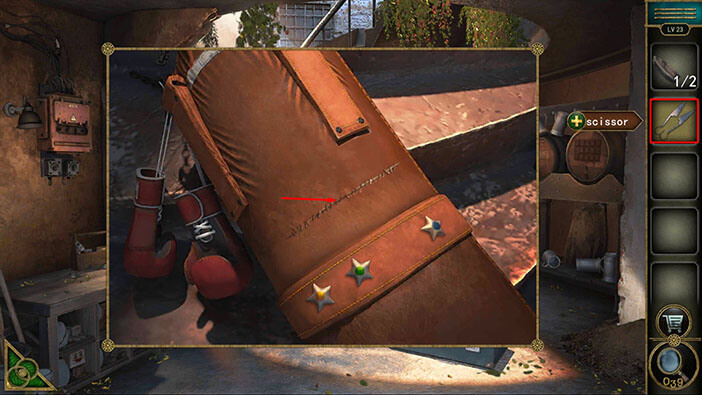
Inside the boxing bag, you will find another “Control knob”. Let’s tap on it to pick it up.
After that, tap on the green button in the bottom left corner of the screen to go back.
Next, let’s tap on the control panel on the wall on the left to take a closer look at it.
You will notice that two “Control knobs” are missing. So, let’s select the “Control knobs” from the inventory and insert them into the empty slots.
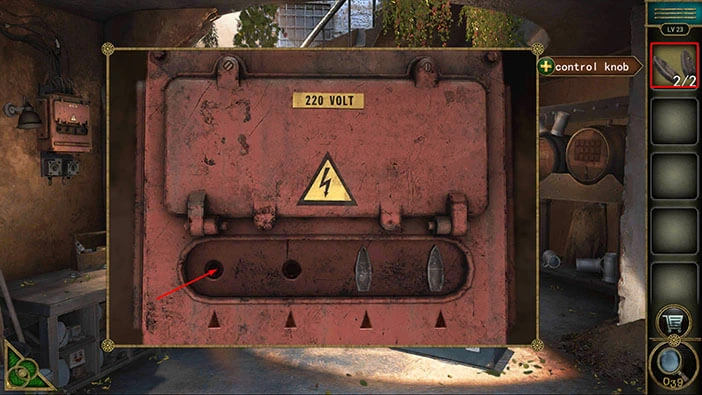
Here, we have another puzzle. You will notice that two control knobs on the left are pointing left. Below the control knobs, you will see four arrows and all of them are pointing up. So, our goal is to turn the knobs, until they are pointing up.
We will do this puzzle in several steps. Let’s begin.
Step 1
Tap on the first control knob (looking from left to right) to turn it. The third knob will also turn.

Step 2
Tap on the second control knob to turn it. The other three knobs will also turn.

Step 3
Tap on the third control knob to turn it.

Step 4
Tap on the first control knob to turn it. The third knob will also turn.
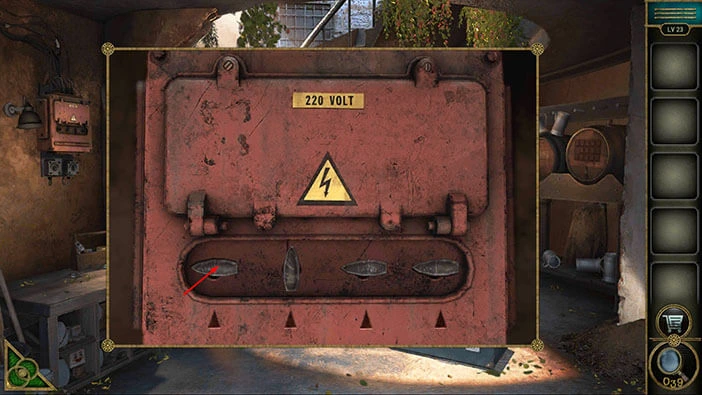
Step 5
Tap on the fourth control knob to turn it. The first and the third knob will also turn.

Step 6
Tap on the third control knob to turn it.

Step 7
Tap on the second control knob to turn it. The other three knobs will also turn.

Step 8
Tap on the fourth control knob to turn it. The first and the third knob will also turn.
Step 9
Tap on the first control knob to turn it. The third knob will also turn.

Step 10
Tap on the second control knob to turn it. The other three knobs will also turn.

Step 11
Tap on the first control knob to turn it. The third knob will also turn.

Step 12
Tap on the third control knob to turn it.

Step 13
Tap on the fourth control knob to turn it. The first and the third knob will also turn.

Step 14
Lastly, tap on the first control knob to turn it. The third knob will also turn, and all knobs will point up.

You will open the control panel as soon as you solve the puzzle. Let’s tap on it to take a closer look.
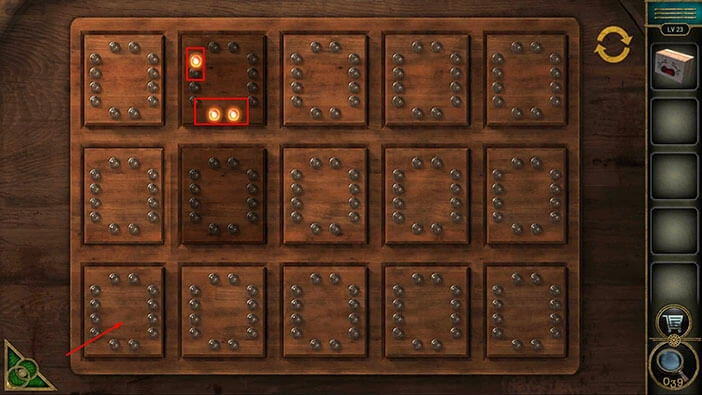
Our next task is very simple. Tap on the lights at the top, and some lines will appear on the objects below them. Our task is to memorize/write down these lines. So, let’s tap on the first light at the top, and we will activate all other lights.
First object = line in the middle
Second object = line in the top left, and the line in the bottom left
Third object = line in the middle, line in the top right, and the line in the bottom right
Fourth object = line at the bottom, line in the bottom left, and the line in the bottom right
Take a look at the image below to examine the lines. Once you’re done, tap on the green button in the bottom left corner of the screen to go back.
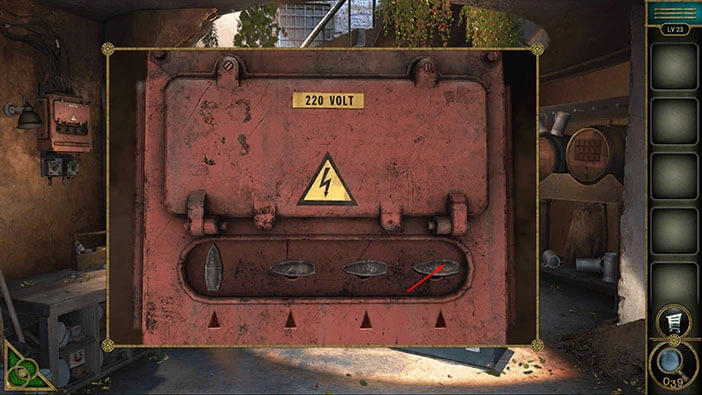
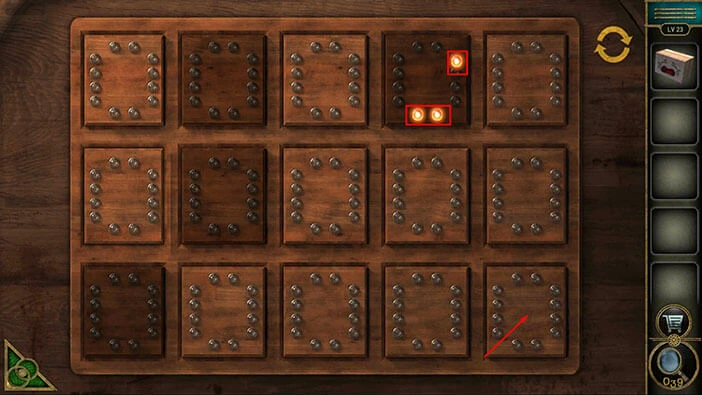
Next, you will notice a round box on the right, next to the bird cage. Let’s tap on this box to take a closer look at it, and tap again to start the interaction.

Here, we can see the middle line in all four slots, so our task is to set the lines to match the lines below the lights that we saw on the control panel. Let’s do that.
First slot = line in the middle
Second slot = line in the top left, and the line in the bottom left
Third slot = line in the middle, line in the top right, and the line in the bottom right
Fourth slot = line at the bottom, line in the bottom left, and the line in the bottom right
The round box will open and inside you will find a “Box” and “Game props”. Tap on them to pick them up.
After that, tap on the green button in the bottom left corner of the screen to go back.
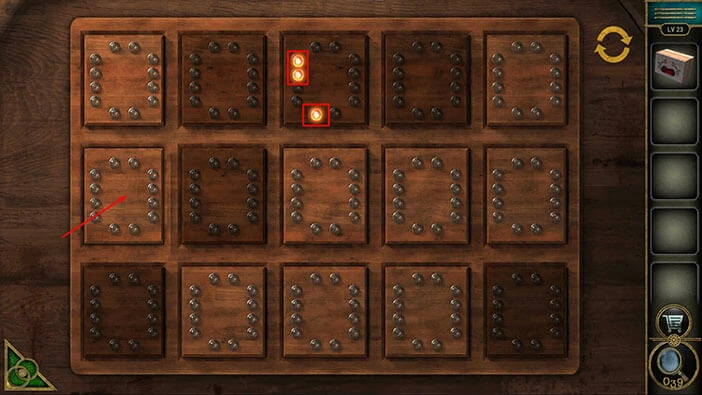
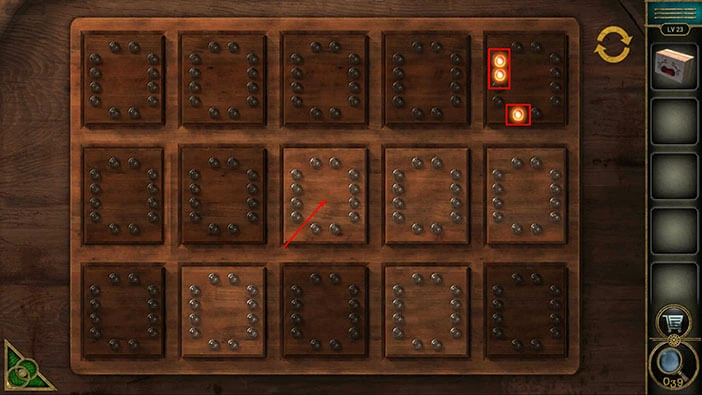
Next, you will notice a grid on the barrel on the right. Let’s tap on this grid to take a closer look at it.
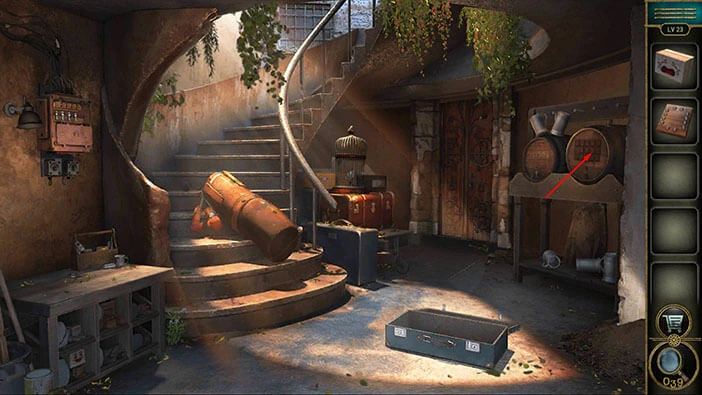
Here, you will notice fourteen game props arranged in three rows with five slots per row. However, the first game prop in the second row is missing. So, let’s select the “Game prop” from the inventory and insert it into the empty slot.
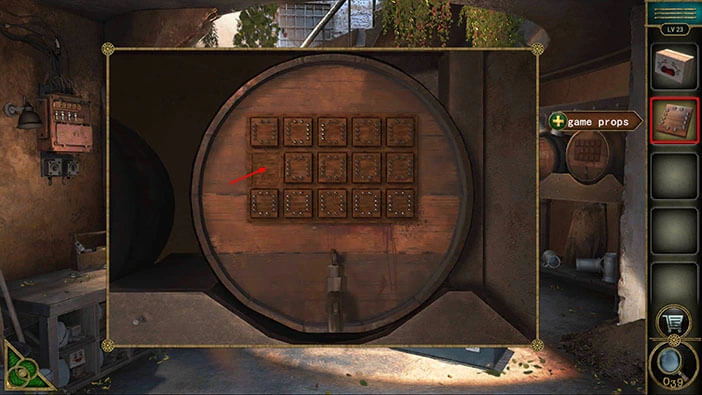
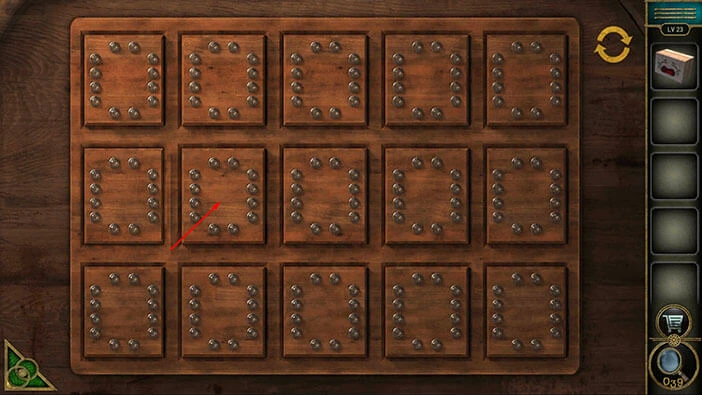
Here, we have another puzzle. Our task is to activate one of the game props. Once we do that, a certain number of lights will activate on one or two sides of the game prop. The number of lights, and their position will give us a hint as to which game prop should be activated next.
This puzzle is very simple once you begin to work on it, so let’s do that. We will do this puzzle in several steps. Let’s begin.
Step 1
Let’s start by activating the second prop in the second row by tapping on it.
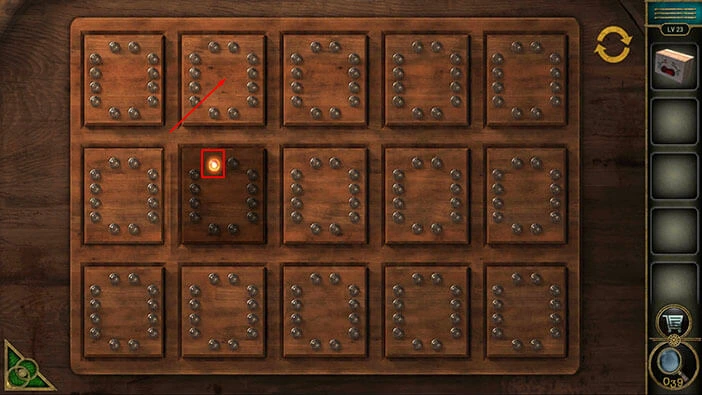
Step 2
Once we activate the second prop in the second row, we will see one light at the top of the prop. So, the next prop that we should activate is one slot above this one.
With that said, let’s tap on the second prop in the first row to activate it.
NOTE: This is one of the randomized puzzles, so the lights might be in different positions in your game.
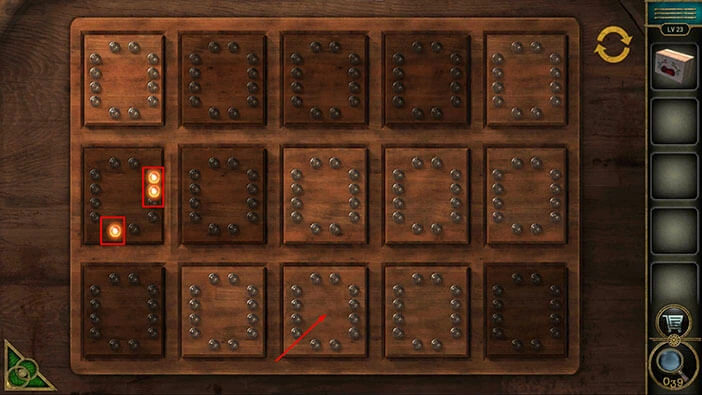
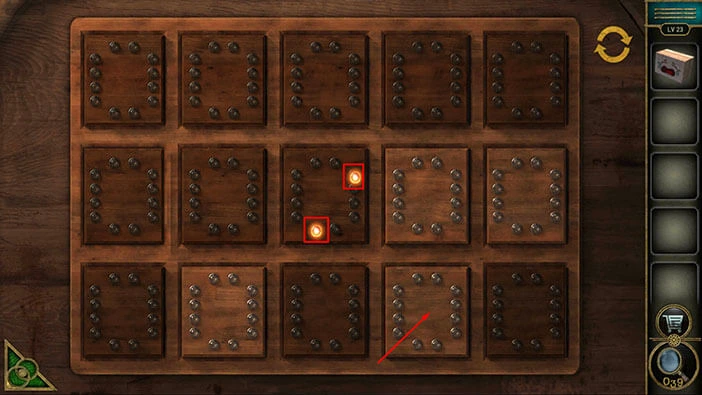
Step 3
Once we activate the second prop in the first row, we will see one light on the left side, and two lights at the bottom. So, the next prop that we should activate is two slots below this one and one slot to the left.
With that said, let’s tap on the first prop in the third row to activate it.
Step 4
Once we activate the first prop in the third row, we will see three lights on the right side and two lights at the top. So, the next prop that we should activate is two slots above this one and three slots to the right.
With that said, let’s tap on the fourth prop in the first row to activate it.
Step 5
Once we activate the fourth prop in the first row, we will see one light on the right side and two lights at the bottom. So, the next prop that we should activate is two slots below this one and one slot to the right.
With that said, let’s tap on the fifth prop in the third row to activate it.
Step 6
Once we activate the fifth prop in the third row, we will see two lights on the left side and two lights at the top. So, the next prop that we should activate is two slots above this one and two slots to the left.
With that said, let’s tap on the third prop in the first row to activate it.
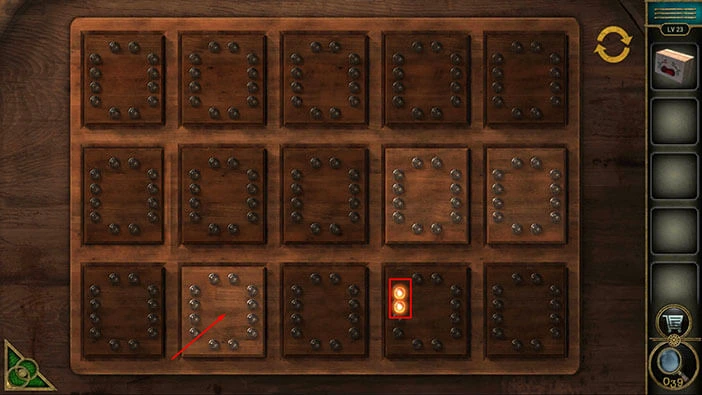
Step 7
Once we activate the third prop in the first row, we will see two lights on the left side and one light at the bottom. So, the next prop that we should activate is one slot below this one and two slots to the left.
With that said, let’s tap on the first prop in the second row to activate it.
Step 8
Once we activate the first prop in the second row, we will see two lights on the right side and one light at the bottom. So, the next prop that we should activate is one slot below this one and two slots to the right.
With that said, let’s tap on the third prop in the third row to activate it.
Step 9
Once we activate the third prop in the third row, we will see two lights on the left side and two lights at the top. So, the next prop that we should activate is two slots above this one and two slots to the left.
With that said, let’s tap on the first prop in the first row to activate it.
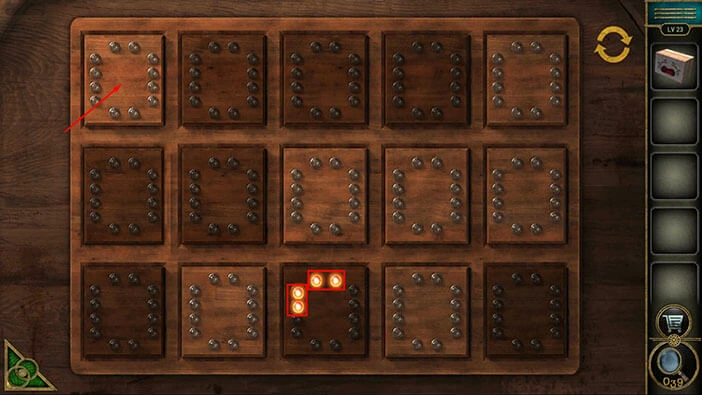
Step 10
Once we activate the first prop in the first row, we will see four lights on the right side. So, the next prop that we should activate is four slots to the right from this one.
With that said, let’s tap on the fifth prop in the first row to activate it.
Step 11
Once we activate the fifth prop in the first row, we will see two lights on the left side and one light at the bottom. So, the next prop that we should activate is one slot below this one and two slots to the left.
With that said, let’s tap on the third prop in the second row to activate it.
Step 12
Once we activate the third prop in the second row, we will see one light on the right side and one light at the bottom. So, the next prop that we should activate is one slot below this one and one slot to the right.
With that said, let’s tap on the fourth prop in the third row to activate it.
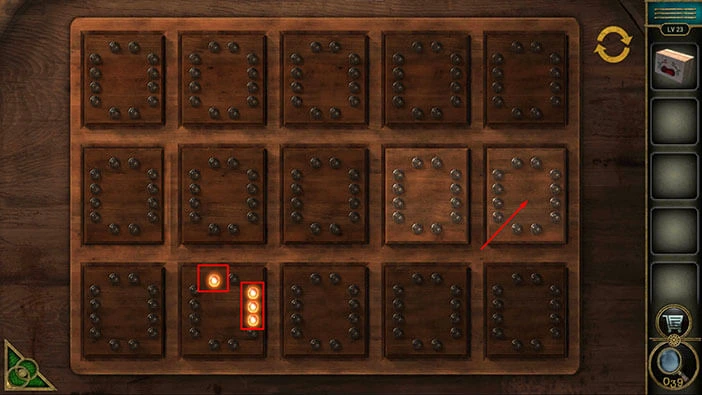
Step 13
Once we activate the fourth prop in the third row, we will see two lights on the left side. So, the next prop that we should activate is two slots to the left of this one.
With that said, let’s tap on the second prop in the third row to activate it.
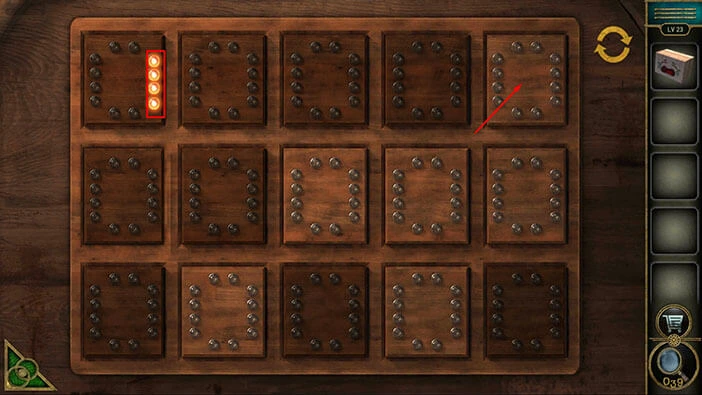
Step 14
Once we activate the second prop in the third row, we will see three lights on the right side and one light at the top. So, the next prop that we should activate is one slot above this one and three slots to the right.
With that said, let’s tap on the fifth prop in the second row to activate it.
Step 15
We activated all the props except one just to the left of the previous one, so let’s tap on it to complete this puzzle.

Once you solve the puzzle, the top of the barrel will open. In the barrel, you will find “Pliers”. Tap on them to pick them up.
After that, tap on the green button in the bottom left corner of the screen to go back.
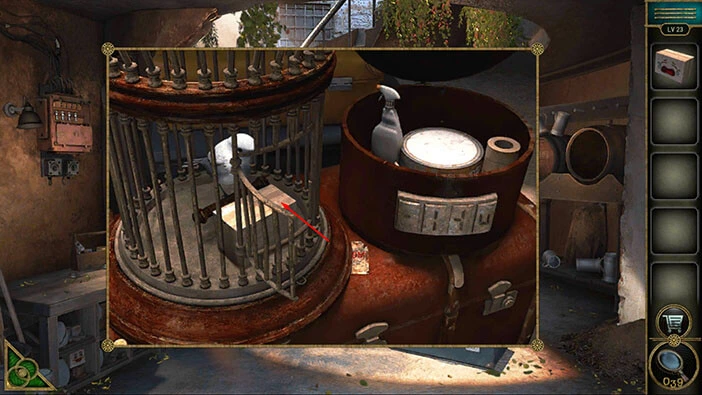
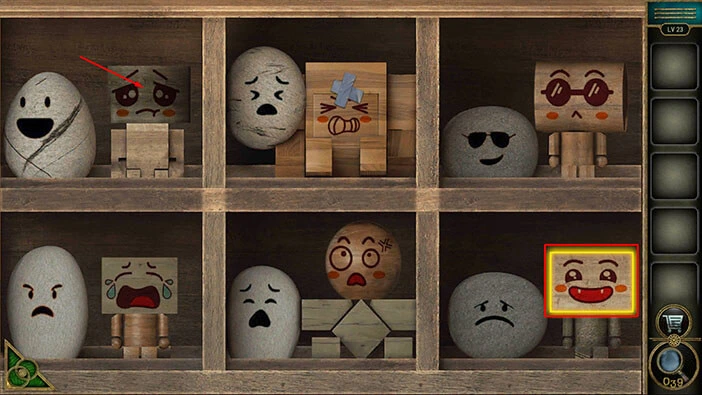
Next, let’s tap on the birdcage on the right to take a closer look at it.
You will notice that the birdcage door is tied by the barbed wire. So, let’s select the “Pliers” from the inventory and use them to cut the barbed wire.
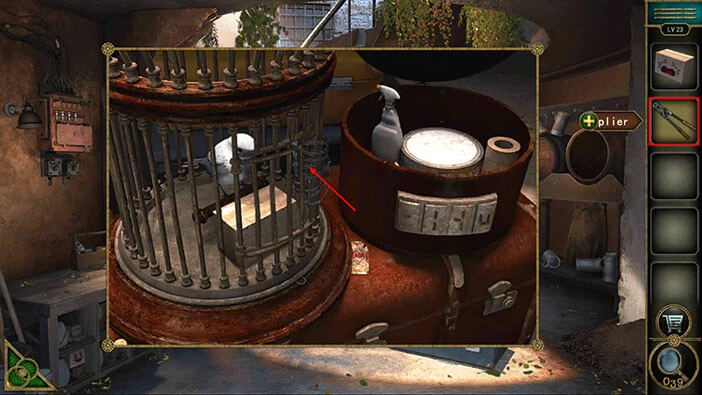
In the bird cage, you will find another “Box”. Let’s tap on it to pick it up.
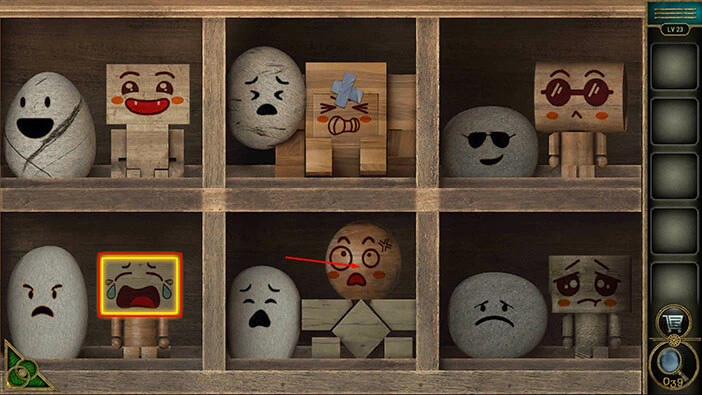
Next, let’s tap on the compartments below the table on the left to examine them.
Here, we will notice six compartments, and there is a stone with a face in each compartment. There are also four boxes inside the compartments, but two of the boxes are missing.
So, let’s select the two boxes from the inventory and place them into the two empty compartments.
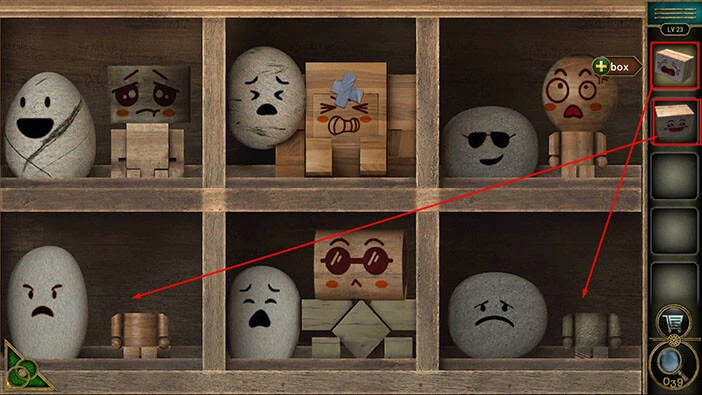
Our next task is simple. The faces on the boxes should match the faces on the stones. So, let’s rearrange the boxes.
We will do this in several steps. Let’s begin.
Step 1
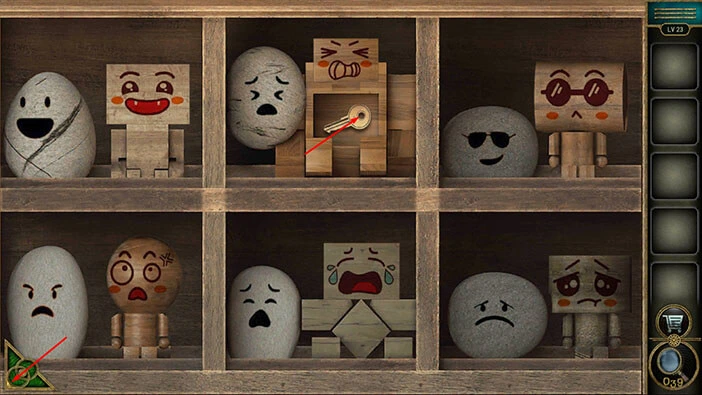
Select the second box in the second row and swap it with the third box in the first row.
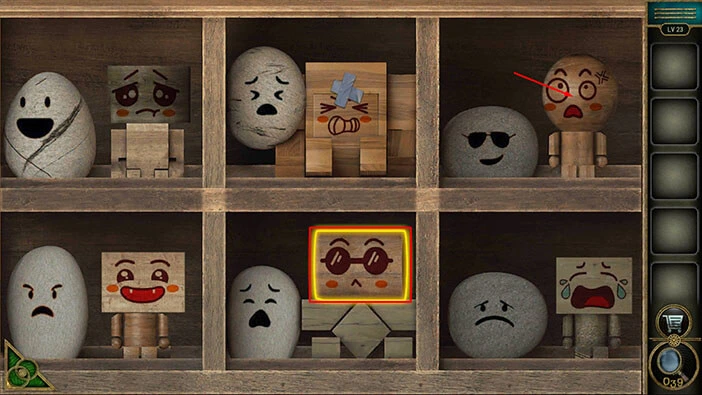
Step 2
Select the third box in the second row and swap it with the first box in the second row.
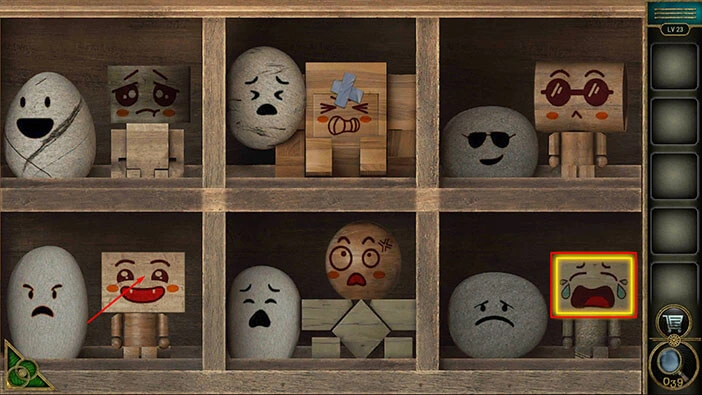
Step 3
Select the third box in the second row and swap it with the first box in the first row.
Step 4
Lastly, select the first box in the second row and swap it with the second box in the second row.
As soon as you solve the puzzle, the second box in the first row will open. Inside you will find a “Key”. Tap on it to pick it up.
After that, tap on the green button in the bottom left corner of the screen to go back.
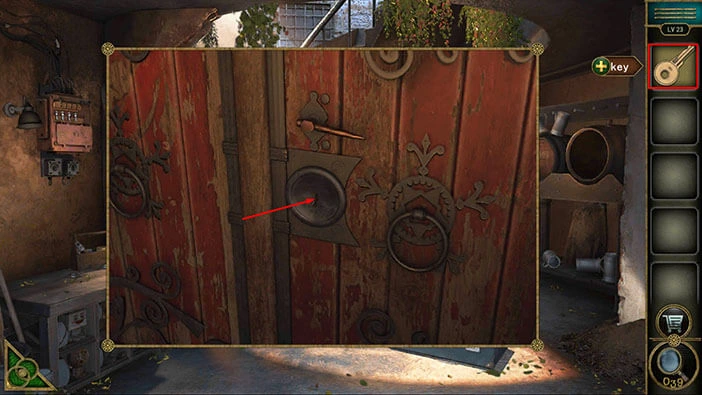
Next, let’s tap on the door on the right to take a closer look at it.
Select the “Key” from the inventory and use it to unlock the door. After that, tap on the door to proceed to the next level.
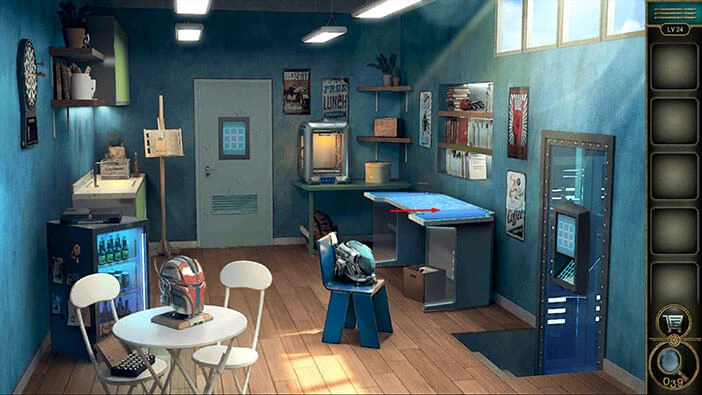
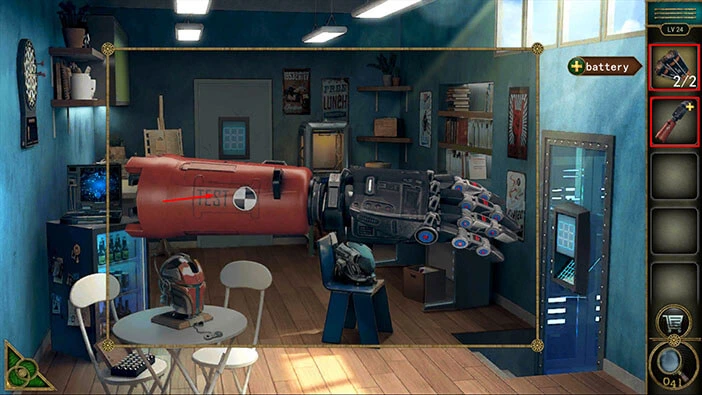
Level 24
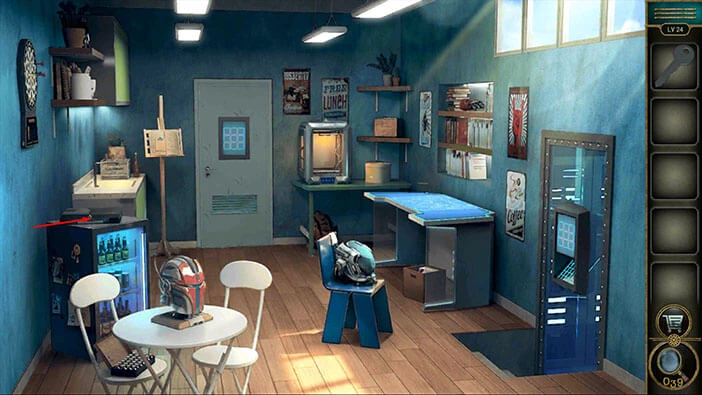
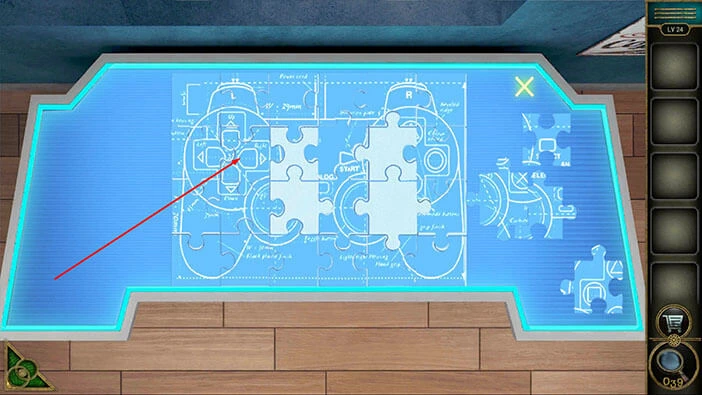
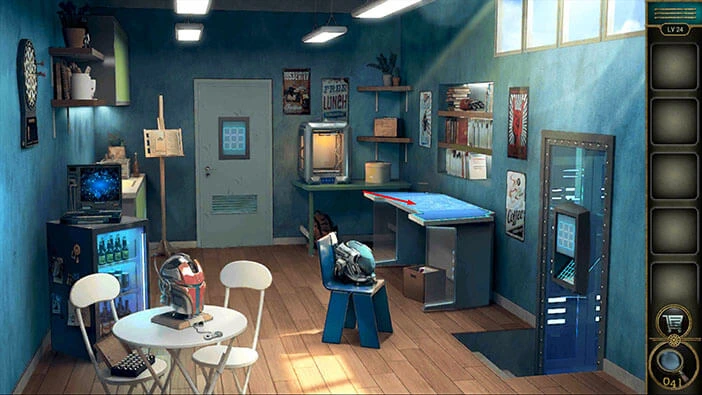
Let’s explore the twenty-fourth level. Tap on the blue table on the right to take a closer look at it.
Here, you will find a “Key”. Tap on it to pick it up. After that, tap on the green button in the bottom left corner of the screen to go back.

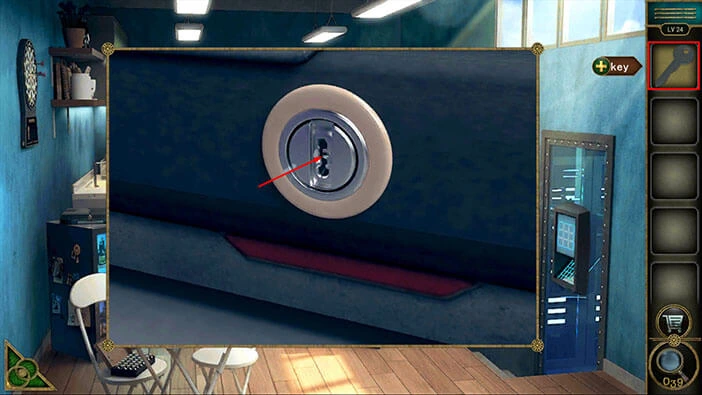
Next, let’s tap on the laptop, located on the fridge on the left, to take a closer look at it, and tap again to start the interaction.
Select the “Key” from the inventory and use it to unlock the laptop. After that, tap on the laptop to start the interaction.
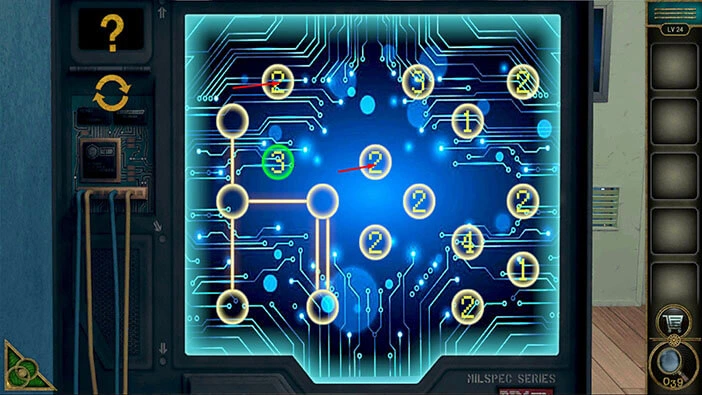
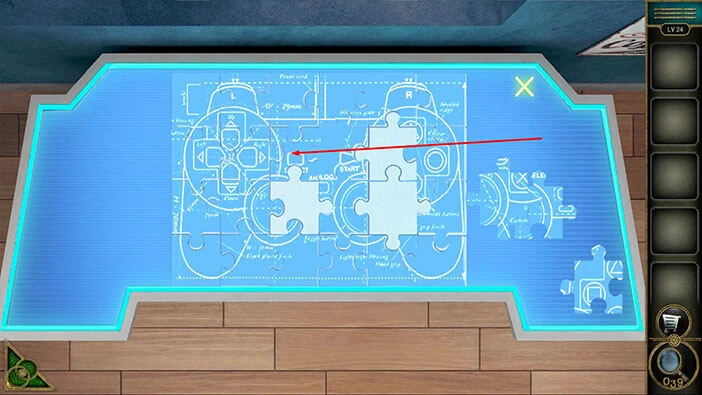
Here, we can see several nodes with numbers inside them. The nodes are arranged in seven rows. The number inside the node represents the number of connections that the node should have with the neighboring nodes. Our task is to create these connections.
We will do this puzzle in several steps. Let’s begin.
Step 1
Tap on the first node in the fourth row (the node on the left) to select it. After that, tap on the first node in the fourth row, the first node in the seventh row, and the second node in the fourth row to create the connections.
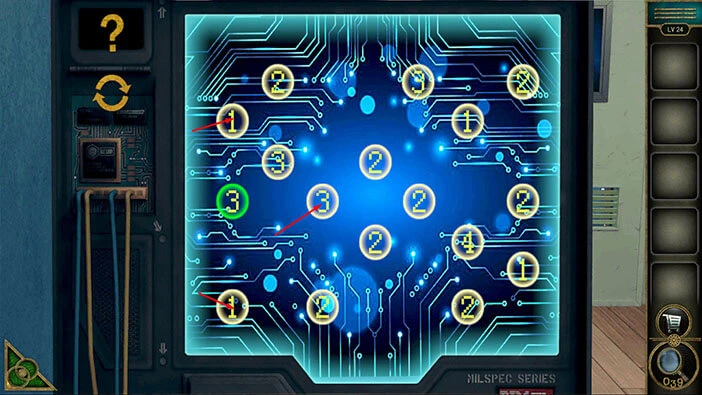
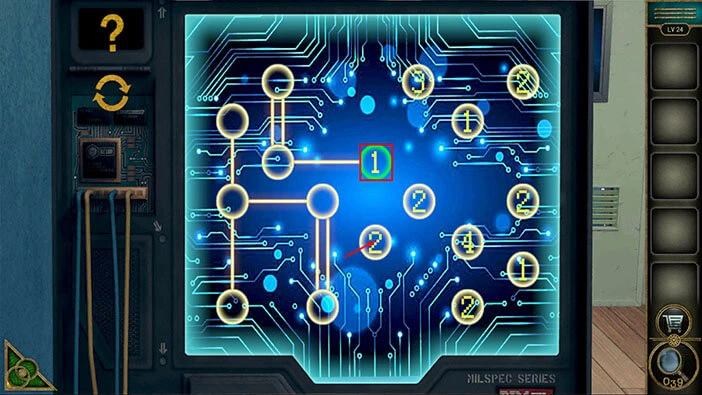
Step 2
Tap on the second node in the fourth row to select it. After that, tap twice on the second node in the seventh row, to create two connections.

Step 3
Tap on the first node in the third row to select it. After that, tap on the second node in the third row to create the connection. Next, tap twice on the first node in the first row to create a double connection.
Step 4
Tap on the second node in the third row to select it. After that, tap on the first node in the fifth row to create the connection.
Step 5
Tap on the second node in the fifth row to select it. After that, tap twice on the third node in the seventh row, the first node in the fifth row, and the second node in the second row to create the four connections.
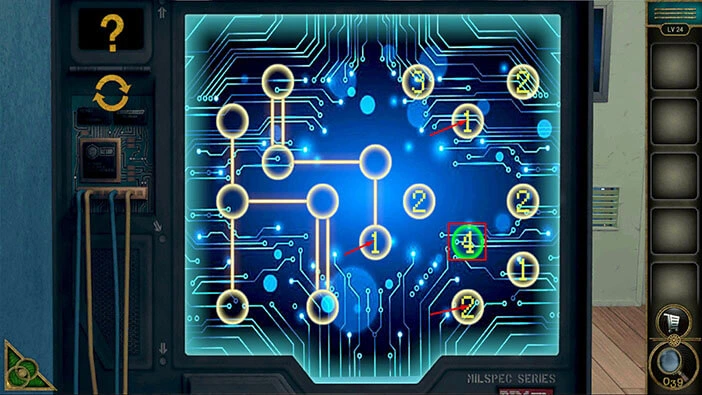
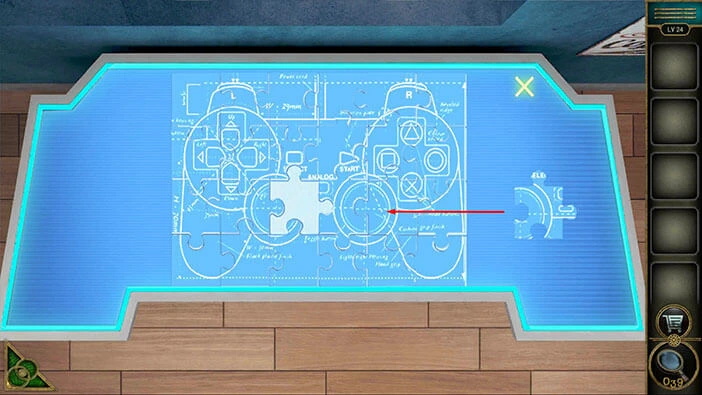
Step 6
Tap on the fourth node in the fourth row to select it. After that, tap on the first node in the sixth row, and the third node in the first row to create the connections.
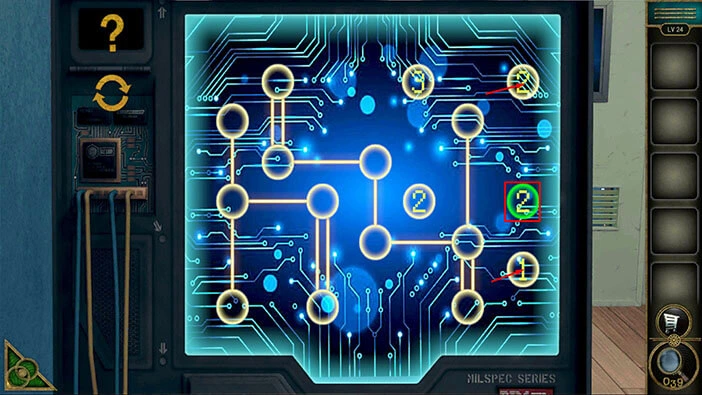
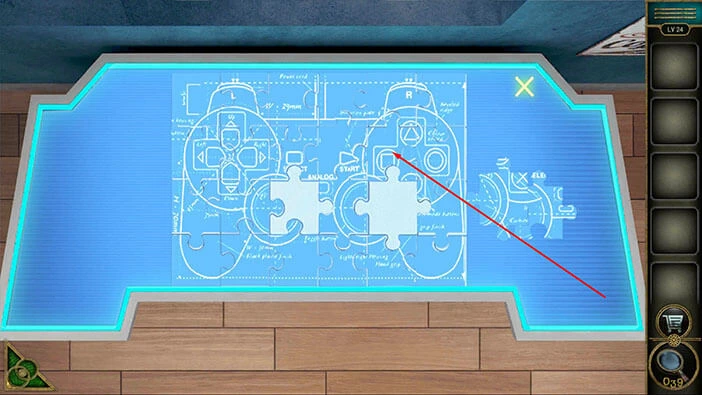
Step 7
Tap on the second node in the first row to select it. After that, tap on the third node in the first row, then tap twice on the third node in the fourth row to create the connections. With that, you will create all connections, and you will solve this puzzle.
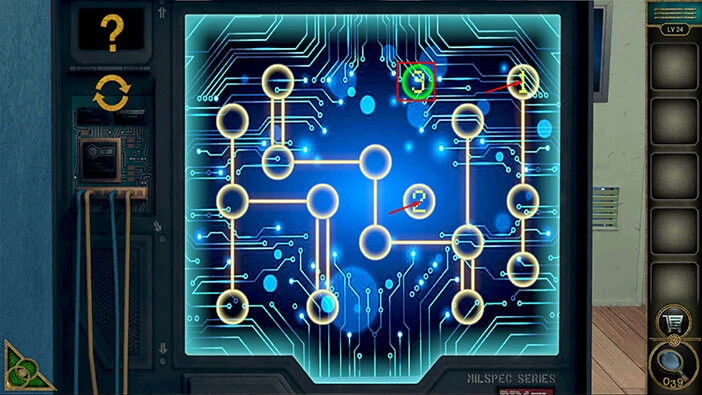
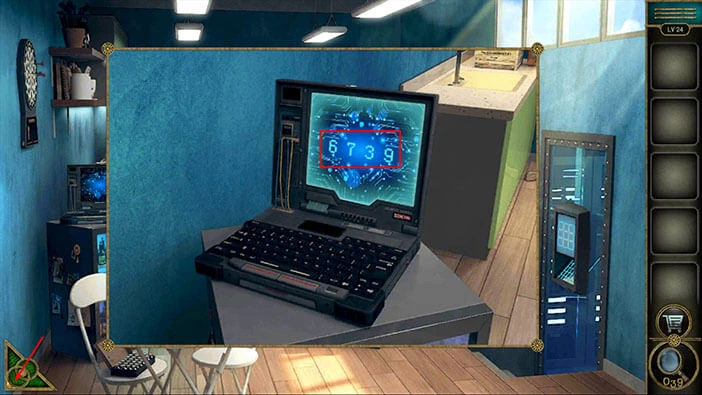
As soon as you solve the puzzle, the number “6739” will appear on the laptop screen. Let’s memorize/write down this number because we will need it for the next puzzle.
Once you’re done, tap on the green button in the bottom left corner of the screen to go back.
Next, let’s go back to the blue table on the right.

Let’s enter the code “6739” that we discovered by solving the previous puzzle.
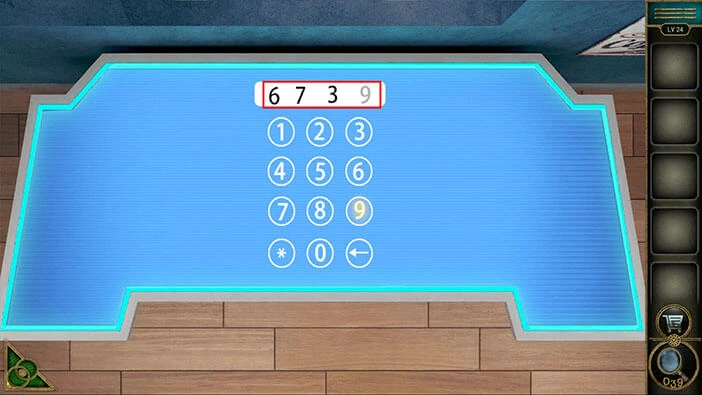
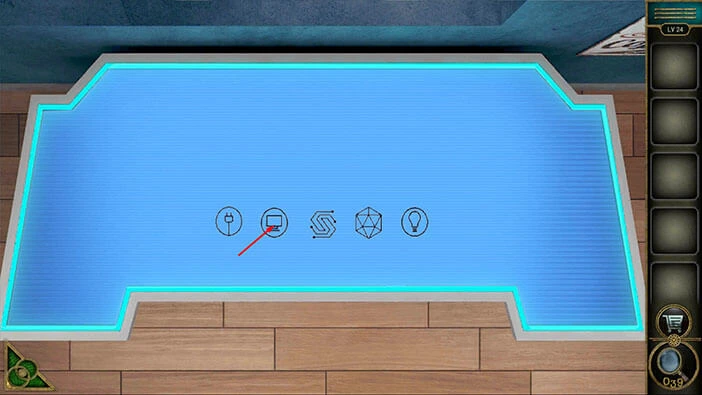
Next, let’s tap on the second icon (looking from left to right) to start the interaction.
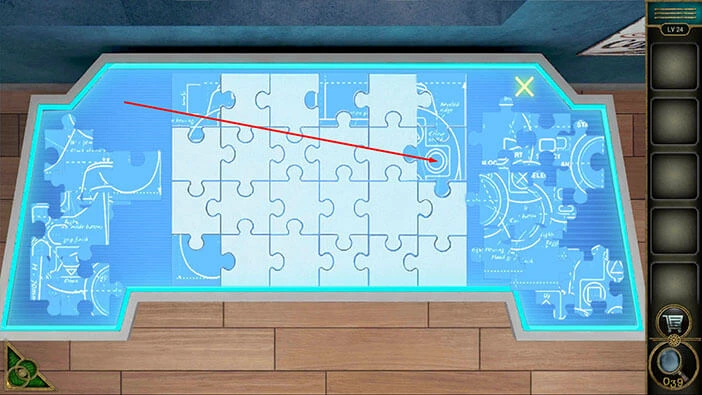
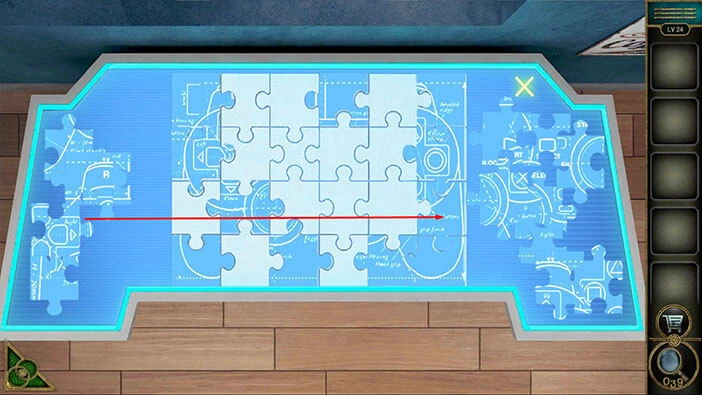
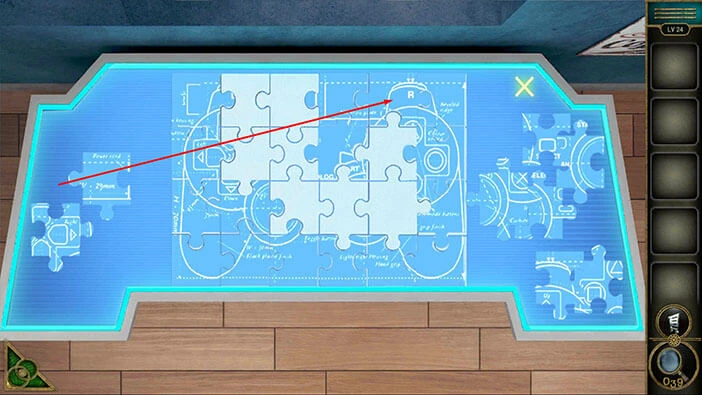
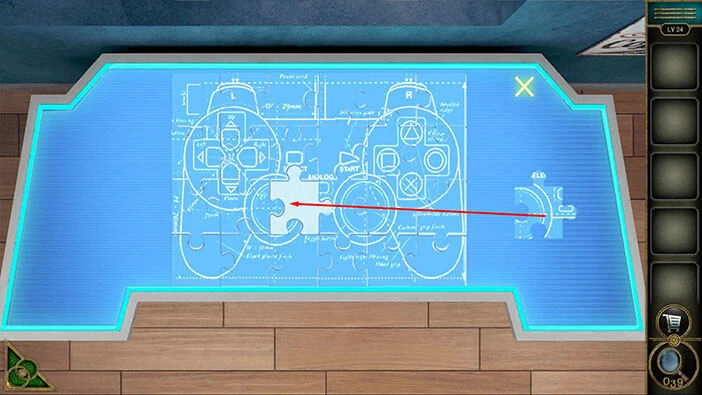
Our next task is to assemble the puzzle. We will do this in several steps. Let’s begin.
Step 1
On the right side, you will notice a puzzle piece with two straight sides, left and top. So, let’s drag this puzzle piece and place it into the first slot in the first row (top left corner of the puzzle).
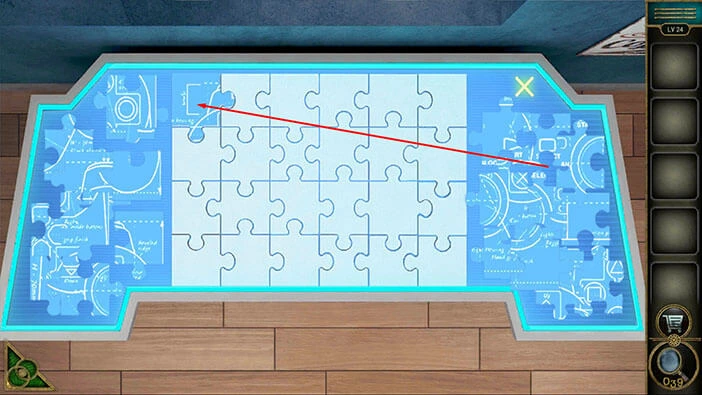
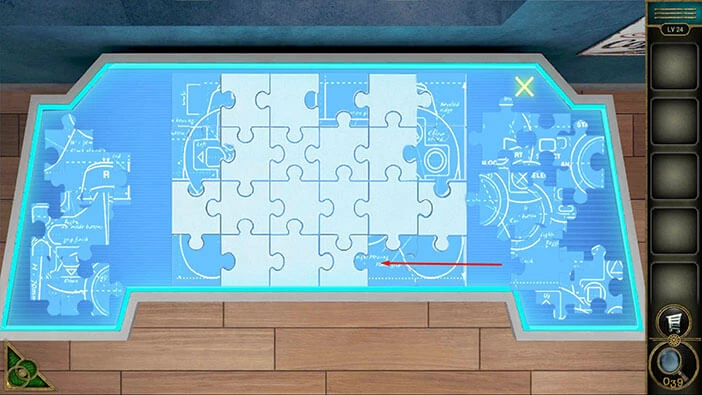
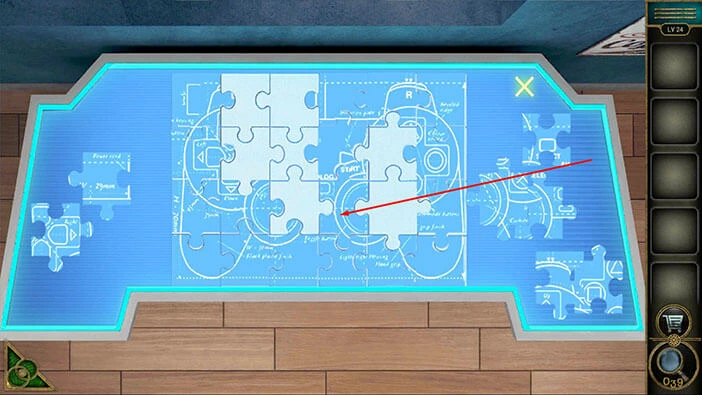
Step 2
On the left side, you will notice a puzzle piece with two straight sides, left and bottom. So, let’s drag this puzzle piece and place it into the first slot in the fourth row (bottom left corner of the puzzle).
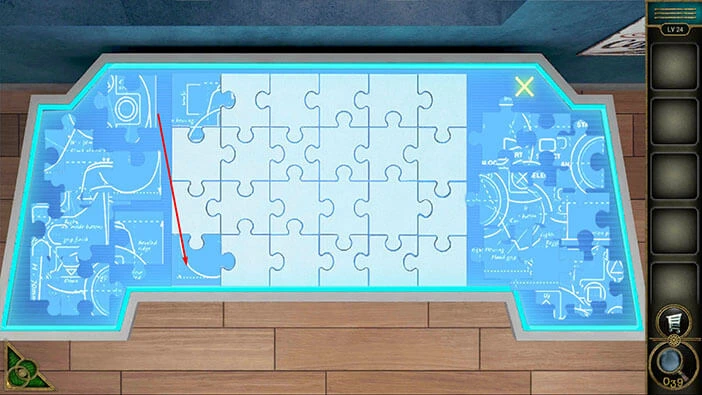
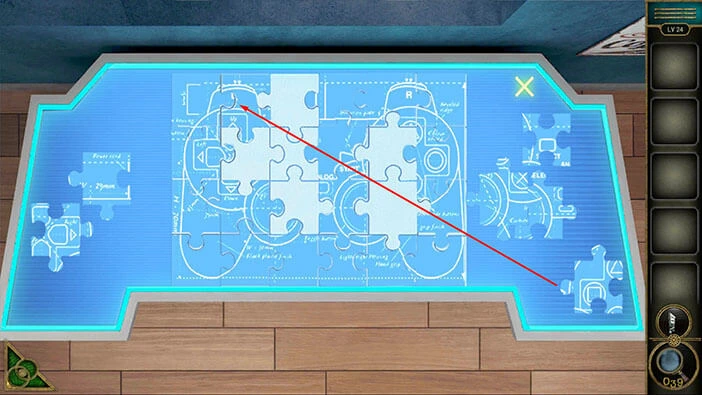
Step 3
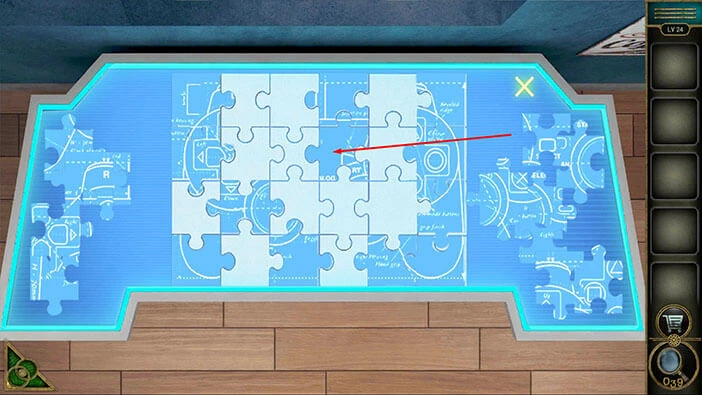
On the left side, you will notice a puzzle piece with two straight sides, right and top. So, let’s drag this puzzle piece and place it into the sixth slot in the first row (top right corner of the puzzle).
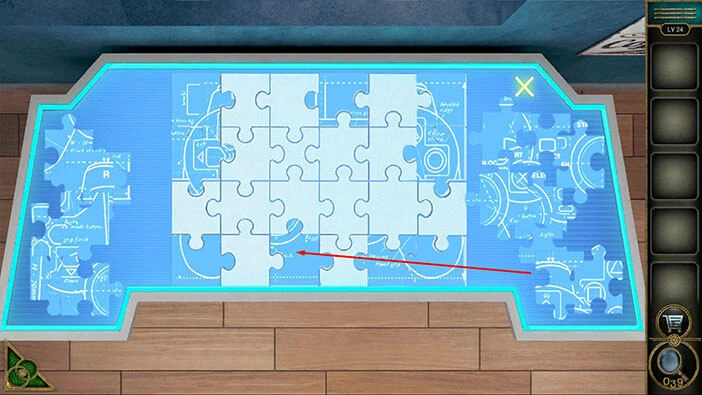
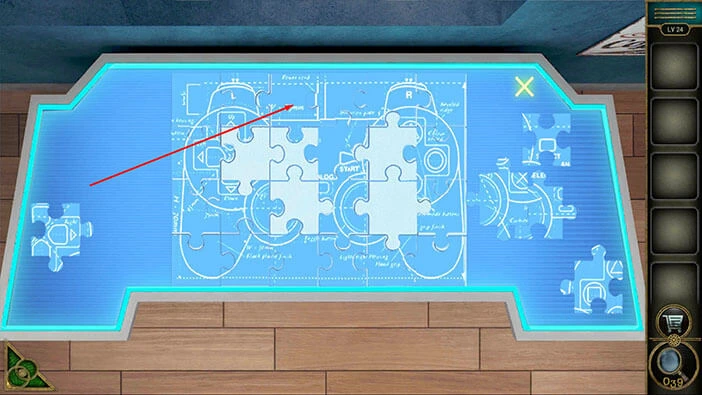
Step 4
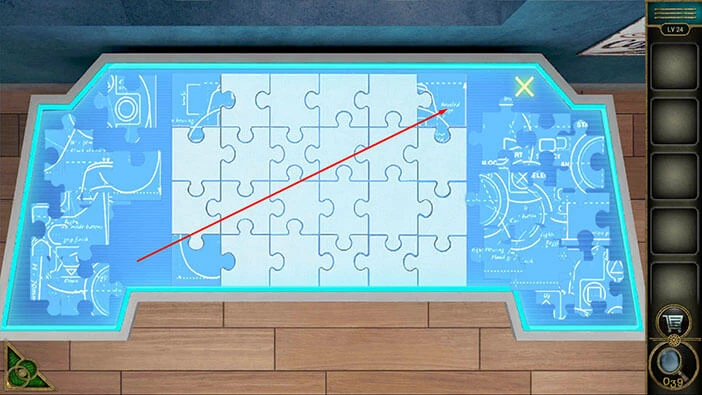
On the right side, you will notice a puzzle piece that would perfectly fit into the fourth slot in the first row. So, let’s drag it into this slot (look at the image below).
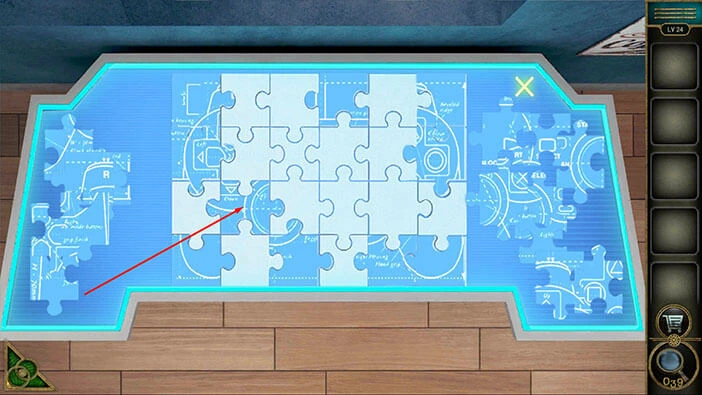
Step 5
On the left side, you will notice a puzzle piece that would perfectly fit into the sixth slot in the second row. So, let’s drag it into this slot (look at the image below).
Step 6
On the right side, you will notice a puzzle piece that would perfectly fit into the first slot in the second row. So, let’s drag it into this slot (look at the image below).

Step 7
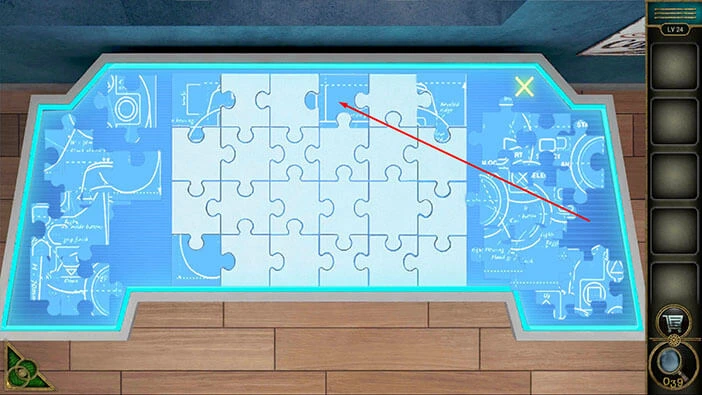
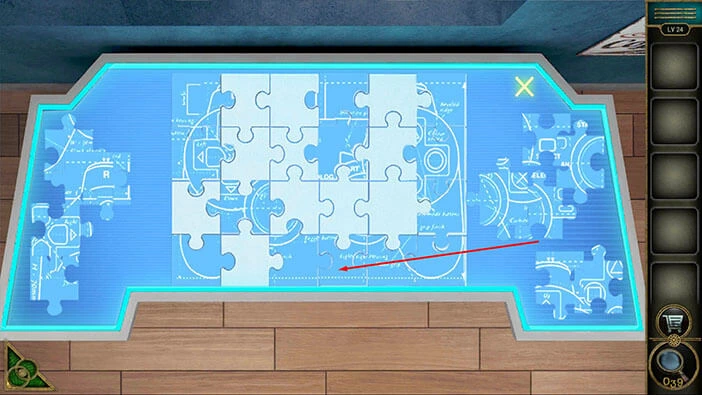
On the left side, you will notice a puzzle piece that would perfectly fit into the sixth slot in the fourth row. So, let’s drag it into this slot (look at the image below).

Step 8
On the right side, you will notice a puzzle piece that would perfectly fit into the fifth slot in the fourth row. So, let’s drag it into this slot (look at the image below).
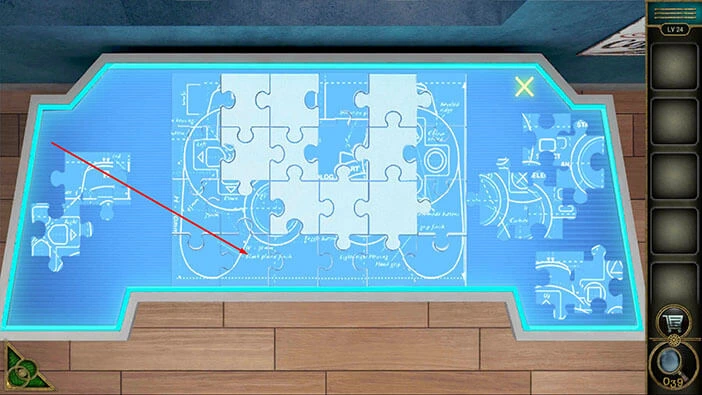
Step 9
On the right side, you will notice a puzzle piece that would perfectly fit into the third slot in the fourth row. So, let’s drag it into this slot (look at the image below).
Step 10
On the left side, you will notice a puzzle piece that would perfectly fit into the second slot in the third row. So, let’s drag it into this slot (look at the image below).
Step 11
On the left side, you will notice a puzzle piece that would perfectly fit into the sixth slot in the third row. So, let’s drag it into this slot (look at the image below).
Step 12
On the right side, you will notice a puzzle piece that would perfectly fit into the fourth slot in the second row. So, let’s drag it into this slot (look at the image below).
Step 13
On the right side, you will notice a puzzle piece that would perfectly fit into the fourth slot in the third row. So, let’s drag it into this slot (look at the image below).
Step 14
On the left side, you will notice a puzzle piece that would perfectly fit into the first slot in the third row. So, let’s drag it into this slot (look at the image below).

Step 15
On the left side, you will notice a puzzle piece that would perfectly fit into the second slot in the fourth row. So, let’s drag it into this slot (look at the image below).
Step 16
On the left side, you will notice a puzzle piece that would perfectly fit into the fifth slot in the first row. So, let’s drag it into this slot (look at the image below).
Step 17
On the right side, you will notice a puzzle piece that would perfectly fit into the fourth slot in the third row. So, let’s drag it into this slot (look at the image below).
Step 18
On the right side, you will notice a puzzle piece that would perfectly fit into the second slot in the first row. So, let’s drag it into this slot (look at the image below).
Step 19
On the left side, you will notice a puzzle piece that would perfectly fit into the third slot in the first row. So, let’s drag it into this slot (look at the image below).
Step 20
On the left side, you will notice a puzzle piece that would perfectly fit into the second slot in the second row. So, let’s drag it into this slot (look at the image below).
Step 21
On the right side, you will notice a puzzle piece that would perfectly fit into the third slot in the second row. So, let’s drag it into this slot (look at the image below).
Step 22
On the right side, you will notice a puzzle piece that would perfectly fit into the fifth slot in the second row. So, let’s drag it into this slot (look at the image below).
Step 23
On the right side, you will notice a puzzle piece that would perfectly fit into the fifth slot in the third row. So, let’s drag it into this slot (look at the image below).
Step 24
Finally, let’s take the last puzzle piece and place it into the third slot in the third row.
As soon as you solve the puzzle, you will activate the machine in the back of the room. Let’s tap on this machine to take a closer look at it.

In the machine, you will find a “Gamepad”. Tap on it to pick it up. After that, tap on the green button in the bottom left corner of the screen to go back.

On the table in front of you, you will notice a robot’s head. Let’s tap on it to take a closer look.
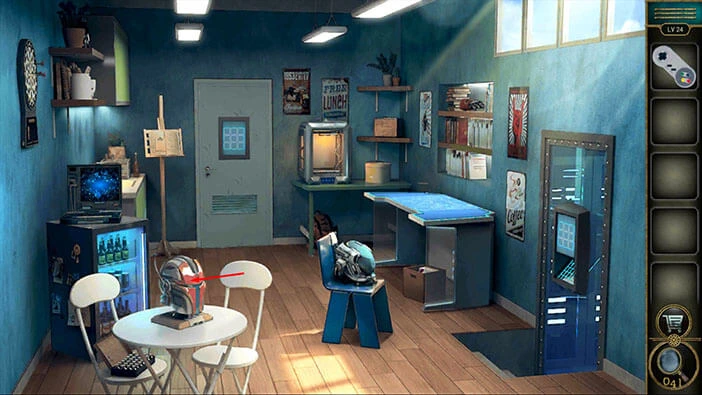
Select the “Gamepad” from the inventory and plug it in.
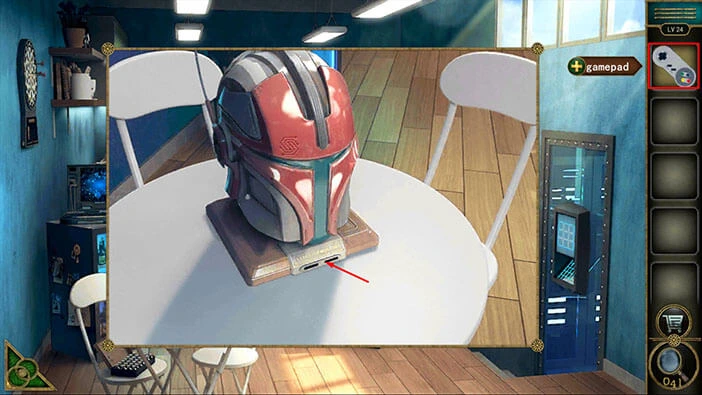
If you take a look at the left side of the robot’s head, you will notice a certain symbol. We should try to memorize the general shape of this symbol, but you don’t have to write it down.
Once you’re done, tap on the green button in the bottom left corner of the screen to go back.
Next, let’s go back to the blue table on the right.
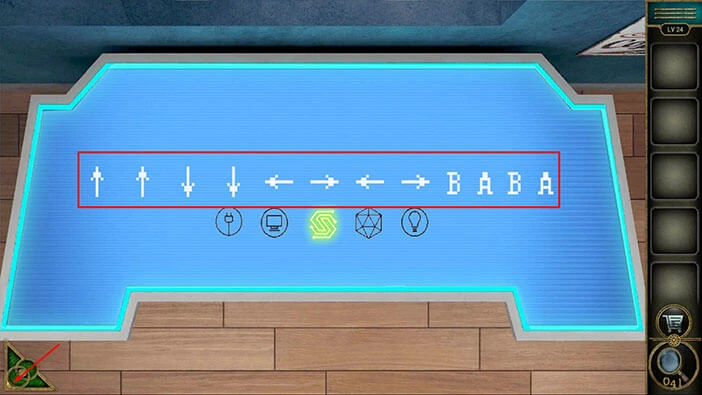
You will notice that the third symbol is the same as the symbol on the robot’s head. Let’s tap on this symbol to start the interaction.

The arrows and several letters will appear on the screen. This represents the hint for the next puzzle, so let’s memorize/write down this information.
Up/Up/Down/Down/Left/Right/Left/Right/”BABA”.
Once you’re done, tap on the green button in the bottom left corner of the screen to go back.
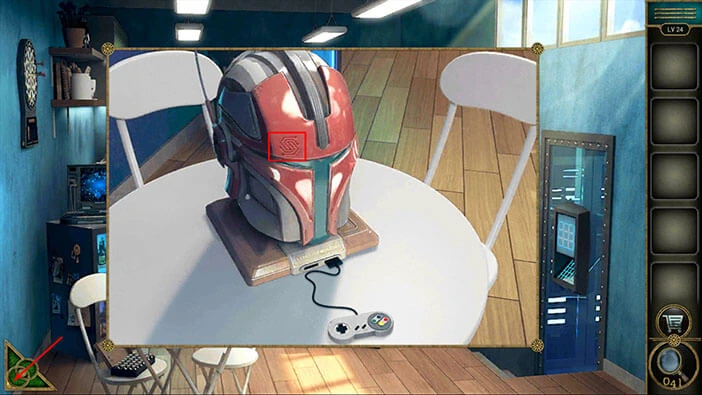
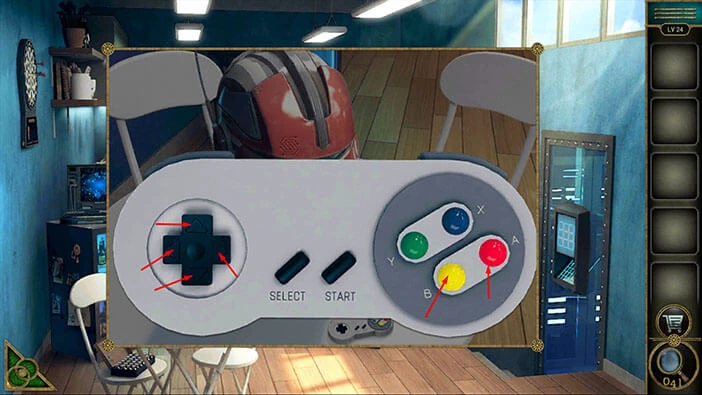
Next, let’s go back to the robot’s head, after that, tap on the “Gamepad” to start the interaction.

On the gamepad, we can see the four arrows, and four buttons “ABYX”. Let’s tap on the buttons that we previously saw. So, let’s tap on the,
Up Arrow/Up Arrow /Down Arrow /Down Arrow /Left Arrow /Right Arrow /Left Arrow /Right Arrow/B button/A button/B button/A button.
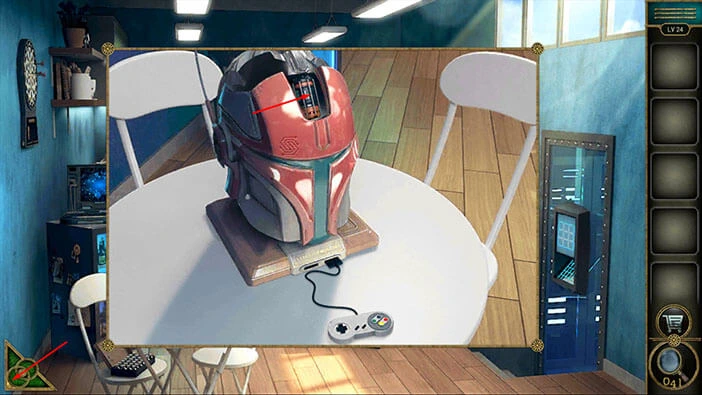
As soon as you enter the correct password, the robot’s head will open and inside you will find a “Battery”. Tap on it to pick it up.
After that, tap on the green button in the bottom left corner of the screen to go back.
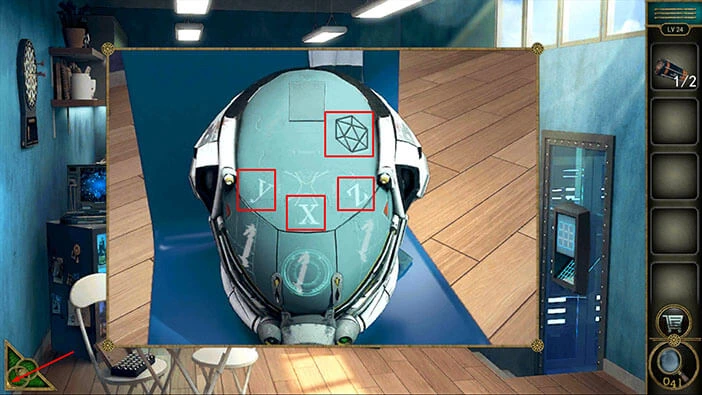
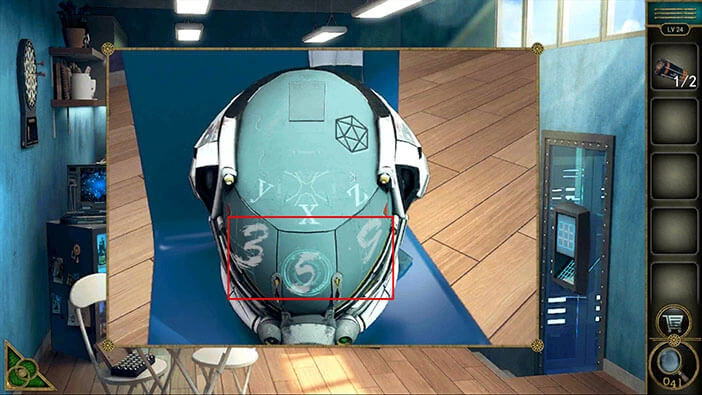
Next, let’s tap on the blue helmet, located on the chair in front of you, to take a closer look at it.

Here, you will notice another symbol on the helmet. Let’s memorize it because we saw the same symbol on the display screen (blue table).
Also, here you will notice three letters Y, X, and Z. Below the letters, we can see slots for the three numbers. Our next task is to discover the values of these letters.
Let’s go back. Tap on the green button in the bottom left corner of the screen to go back.
Next, let’s tap on the blue table on the right to take a closer look at it.

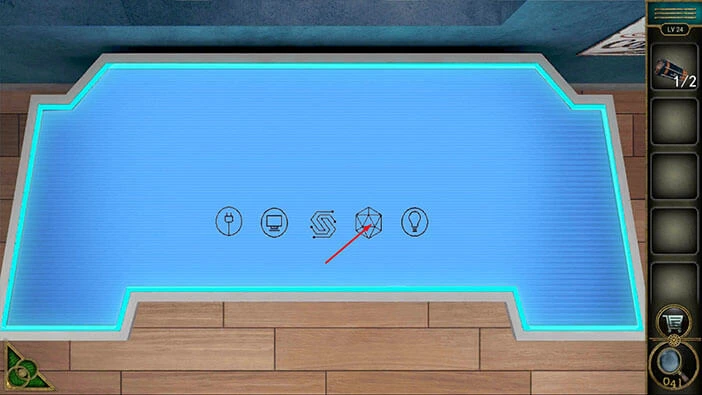
The fourth symbol matches the symbol that we saw on the helmet. So, let’s tap on the fourth symbol to start the interaction.
As soon as you press the button, some symbols will appear on the screen, but they will change every second or so.
Here, you will see,
Y = 3.
We will also see,
Z = Y +6. So, Z = 3 + 6 = 9.
Memorize/write down this information, and let’s take another look at the screen because we still need to discover the value of the letter “X”.
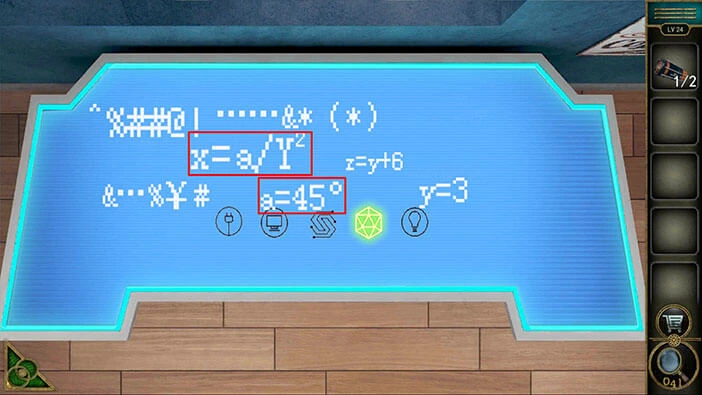
Here, we can see the value of the letter a.
a = 45
We can also see,
X = a / Y2. So, X = 45 / 9 (3×3).
So, X = 5.
Memorize/ write down this information. Once you’re done, tap on the green button in the bottom left corner of the screen to go back.
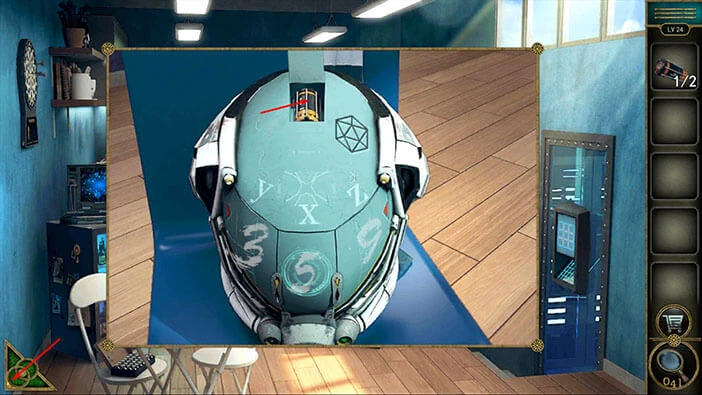
Next, let’s tap on the blue helmet to take a closer look at it.

Let’s enter the values that we discovered.
Y = 3
X = 5
Z = 9
Once you enter the correct combination the helmet will open, and inside you will find a “Battery”. Tap on it to pick it up.
After that, tap on the green button in the bottom left corner of the screen to go back.
Next, let’s tap on the wall shelf, located on the right side of the room above the blue table, to take a closer look at it.
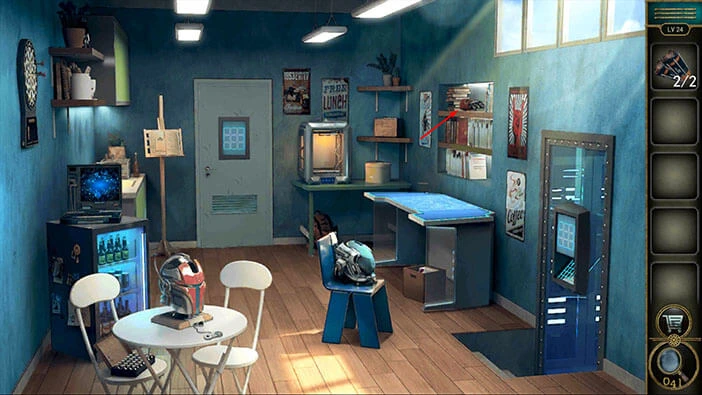
Here, you will discover a “Robot arm”. Let’s tap on it to pick it up.
After that, tap on the green button in the bottom left corner of the screen to go back.
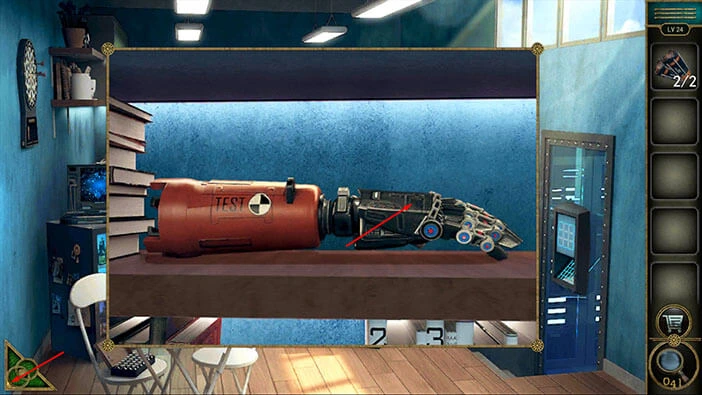
Let’s tap on the “Robot arm” in our inventory to select it, and it will appear in the middle of the screen. After that, select “Batteries” from the inventory and insert them into the robot arm.
Once you’re done, tap on the green button in the bottom left corner of the screen to go back.
Next, let’s tap on the glass door on the right to take a closer look at it.

Here, you will discover an “Achievement star”. Tap on it to pick it up.
Select the “Robot arm” from the inventory and place it on the drawing of the hand.
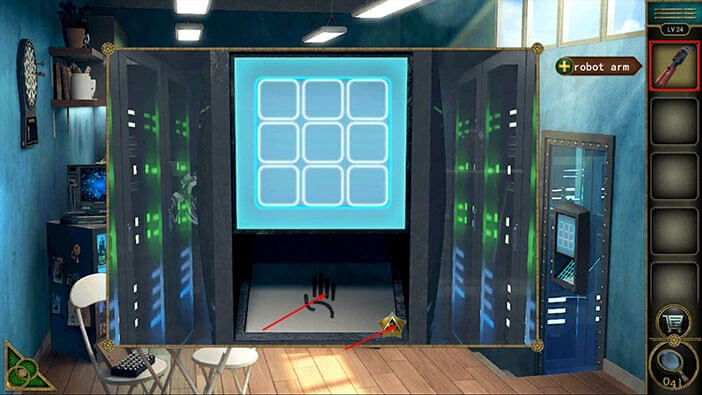
Here, we can see a 3×3 grid. Once you place down the “Robot arm”, the slots on the grid will activate in a certain order, and our task is to memorize/write down this information. Let’s do that.
First = second slot in the second row,
Second = second slot in the first row,
Third = first slot in the first row,
Fourth = first slot in the second row,
Fifth = first slot in the third row,
Sixth = second slot in the third row,
Seventh = third slot in the third row,
Eighth = third slot in the second row,
Ninth = third slot in the first row.
Once you’re done, tap on the green button in the bottom left corner of the screen to go back.
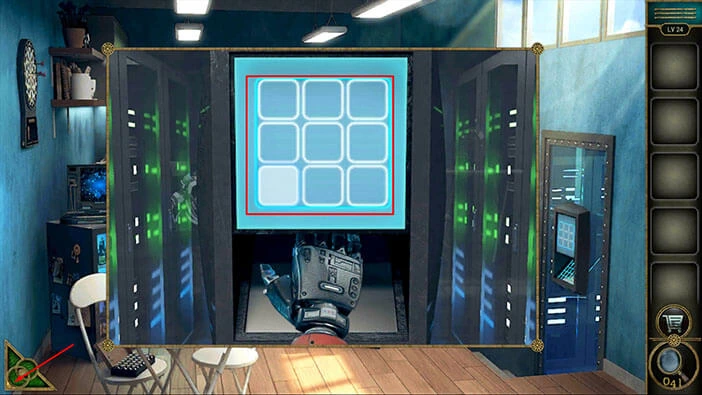
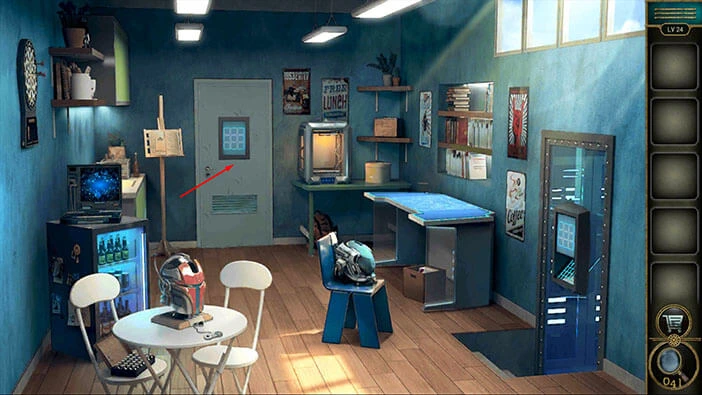
Next, tap on the door in front of you to take a closer look.
Here, we can also see a 3×3 grid. Our task is to activate the slots in the order that matches the order that we saw on the previous grid. So, we had,
First = second slot in the second row,
Second = second slot in the first row,
Third = first slot in the first row,
Fourth = first slot in the second row,
Fifth = first slot in the third row,
Sixth = second slot in the third row,
Seventh = third slot in the third row,
Eighth = third slot in the second row,
Ninth = third slot in the first row.
As soon as you activate the slots in the correct order, the door will open. Let’s tap on the door to proceed to the next level.
With that, we have reached the end of the sixth part of the walkthrough. If you want to see the seventh part, tap on the next part button. In the seventh part of the walkthrough, we will cover levels 25-28.
Thank you for reading.