Can you escape the 100 room 17 | Levels 17-20
Hello everyone and welcome to the fifth part of the walkthrough for “Can you escape the 100 room 17”. In the fifth part of the walkthrough, we will cover levels 17 to 20.
Level 17
Let’s explore the seventeenth level. This time we are in the military warehouse. Let’s explore it. Tap on the table on the left to take a closer look at it.

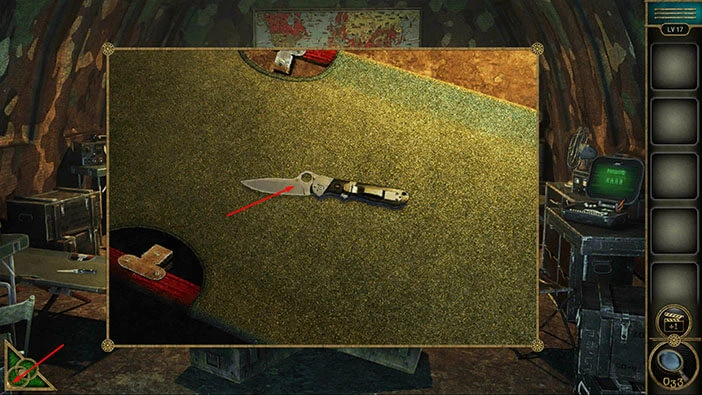
Here, you will find a “Saber”. Tap on it to pick it up. After that, tap on the green button in the bottom left corner of the screen to go back.
Next, tap on the large backpack, located in the top right corner of the room, to take a closer look at it.

Select the “Saber” from the inventory and use it to cut open the backpack.
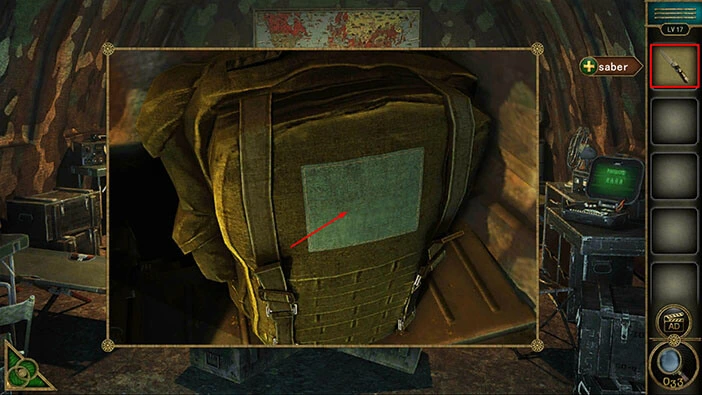
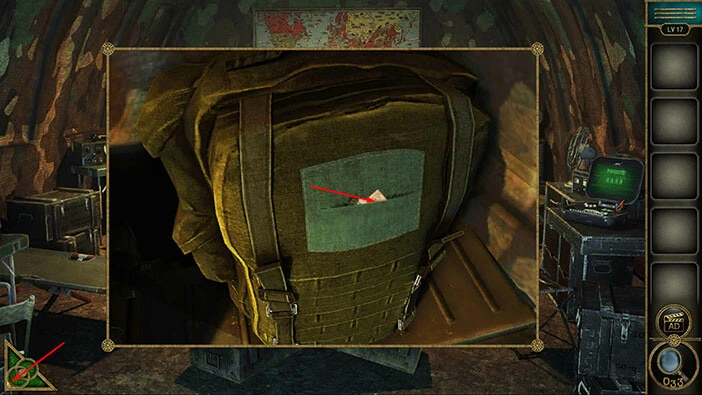
In the backpack, you will find two items. Tap on them to pick them up. “USB” and “Morse code” will be added to your inventory.
Once you’re done, tap on the green button in the bottom left corner of the screen to go back.
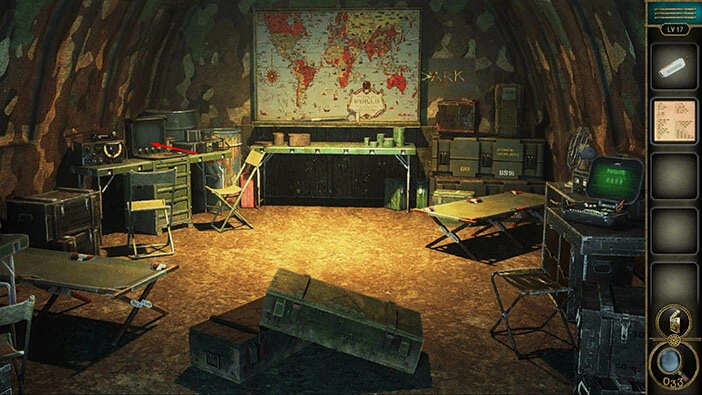
Next, tap on the laptop, located on the table on the left, to take a closer look at it.
Select the “USB” from the inventory and connect it to the laptop. After that, tap on the laptop screen to start the interaction.
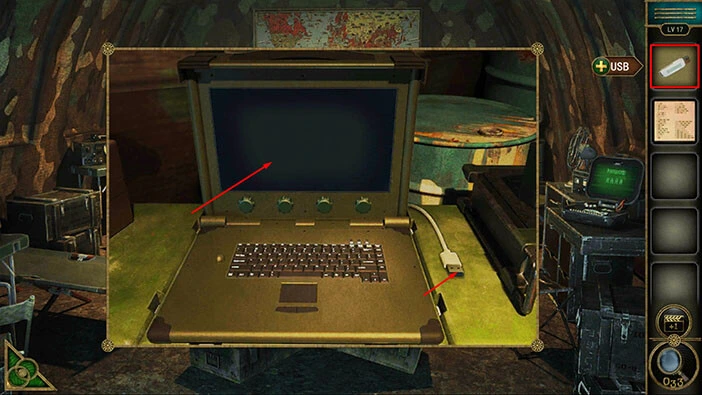
Our next task is to connect the wavy, green lines on the monitor. We can do that by tapping on the four round switches below the screen.
We will do this puzzle in several steps. Let’s begin.
Step 1
When you see this part of the signal (take a look at the image below), tap three times on the first switch (looking from left to right) to fix the signal.
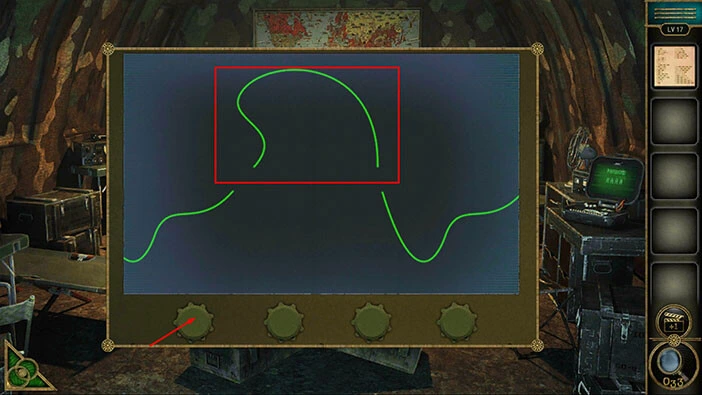
Step 2
When you see the next part of the signal (take a look at the image below), tap two times on the second switch to fix the signal.
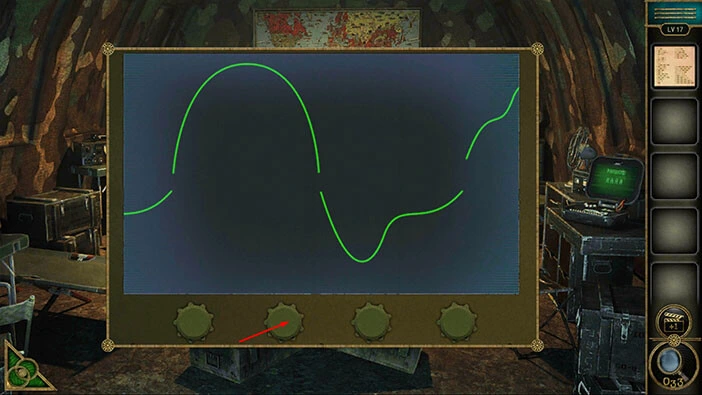
Step 3
When you see the next part of the signal (take a look at the image below), tap once on the third switch to fix the signal.
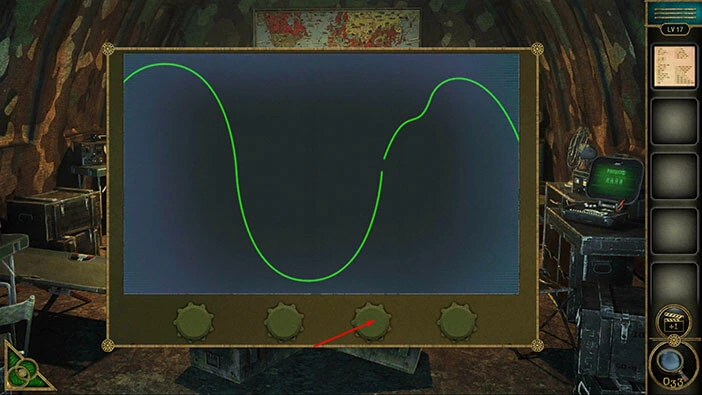
Step 4
Lastly, when you see the next part of the signal (take a look at the image below), tap twice on the fourth switch to fix the signal.
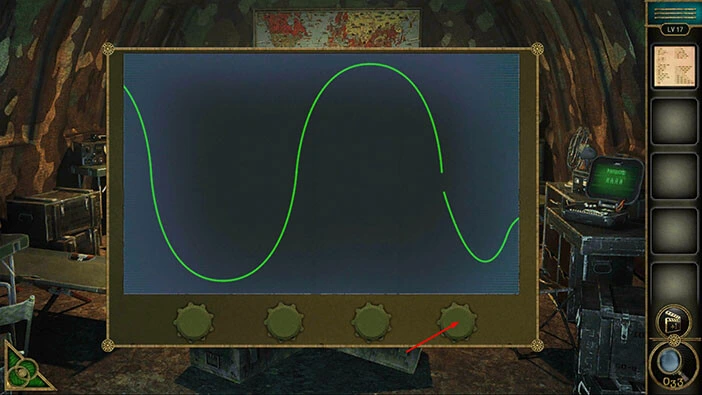
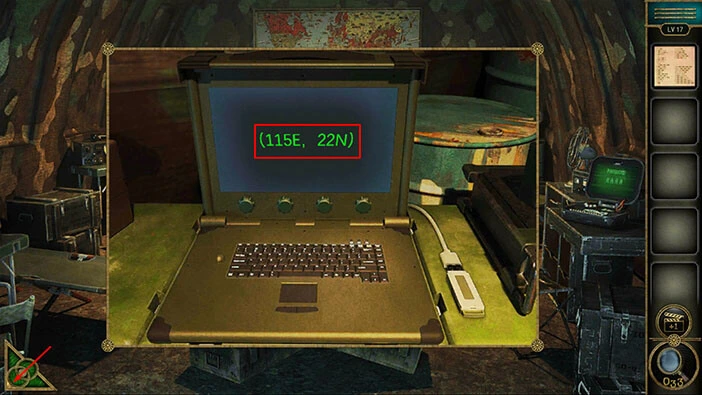
As soon as you realign the lines, you will see the message “(115E, 22N)”. This message represents the coordinates that we will need in order to solve the next puzzle. So let’s memorize/write down these coordinates (115E, 22N).
Once you’re done, tap on the arrow at the bottom left corner of the screen to go back.
In front of you, you will notice a large map. Let’s tap on it to examine it.
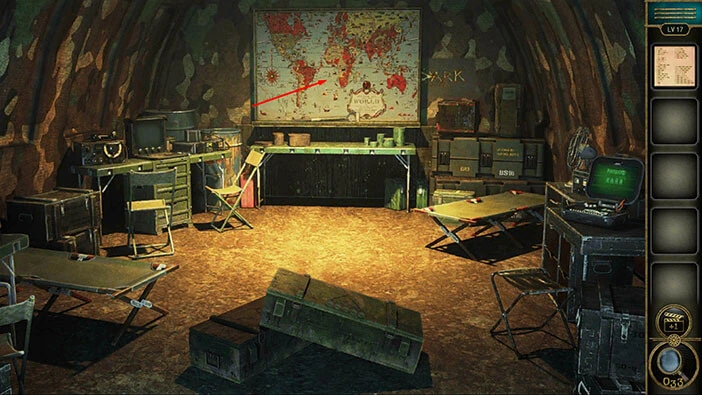
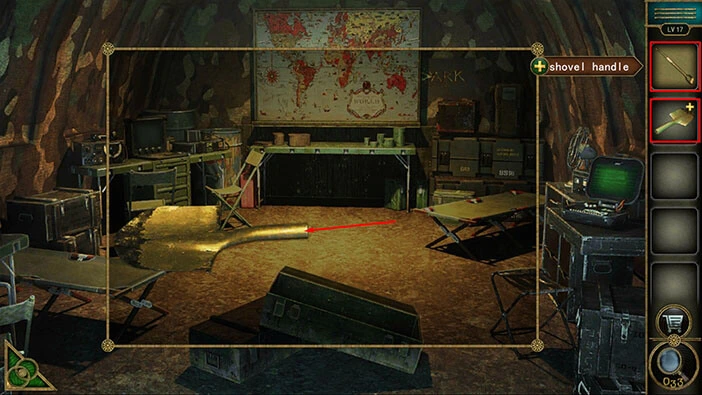
At the bottom of the map, you will find “Shovel handle”. Tap on it to pick it up. Before we proceed we should take a look at the map.
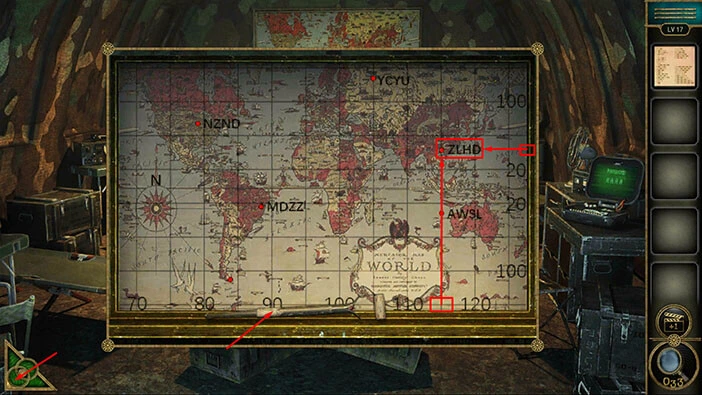
Here, we are looking for the coordinates (115E, 22N). The numbers on the horizontal line at the bottom of the map, represent West to East coordinates, and the numbers on the vertical numbers represent South to North coordinates.
When you find the coordinates 115E and 22N on the map, you will discover a red point on the map and it is marked with the letters “ZLHD”. These letters represent the password for the next puzzle, so let’s memorize/write down this information.
Once you’re done, tap on the green button in the bottom left corner of the screen to go back.
Next, on the table on the right, you will notice another laptop. Tap on it to take a close look, and tap again to start the interaction.
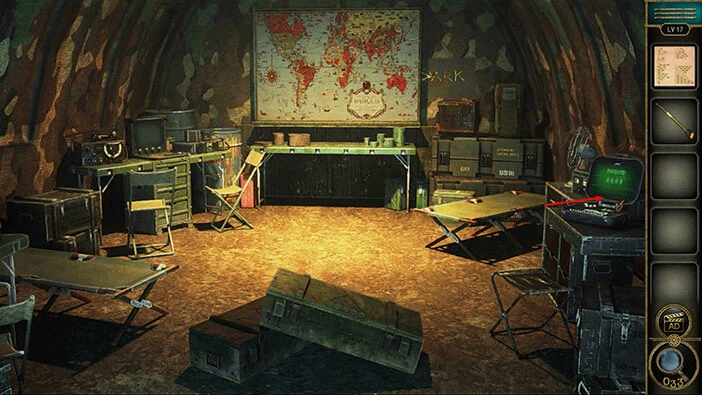
Let’s enter the code “ZLHD” that we discovered by examining the coordinates on the map.
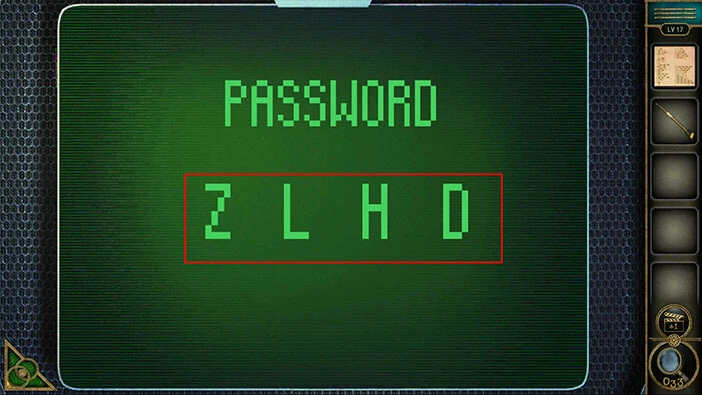
As soon as you enter the correct password, you will start another minigame. We can see the large grid. In the top right corner of the grid, we can see the yellow bird. Here, we can also see three symbols, yellow, green, and blue one. Below the grid, we can see 8 buttons, and inside each button, we can see four smaller squares. There is also one smaller square with the “Play” button in each button. We can use these buttons to move the yellow bird, and the squares represent the movement pattern, and the play button represents the start of the movement.
So, our task is to get the yellow bird to the yellow symbol. We will do this in several steps. Let’s begin.
Step 1
Let’s tap on the third button (looking from left to right) and we will move the bird two slots to the left and one slot down.
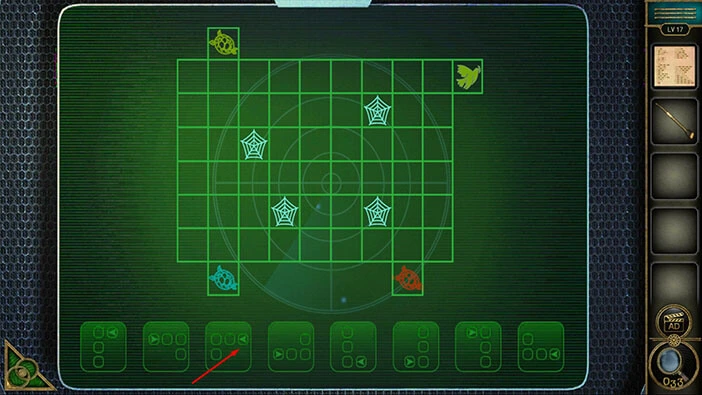
Step 2
Let’s tap on the seventh button and we will move the bird one slot to the right and two slots down.
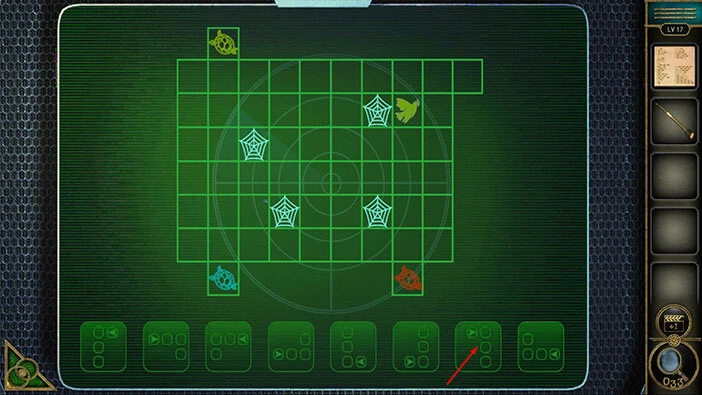
Step 3
Let’s tap on the eighth button and we will move the bird two slots to the left and one slot up.
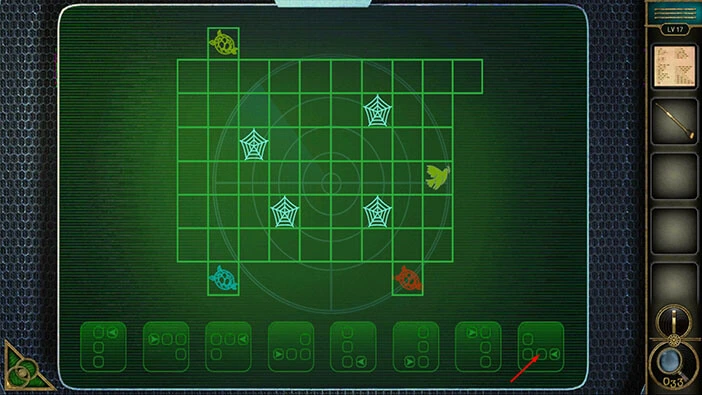
Step 4
Let’s tap on the eighth button again, and we will move the bird two slots to the left and one slot up.

Step 5
Let’s tap on the eighth button and we will move the bird two slots to the left and one slot up.
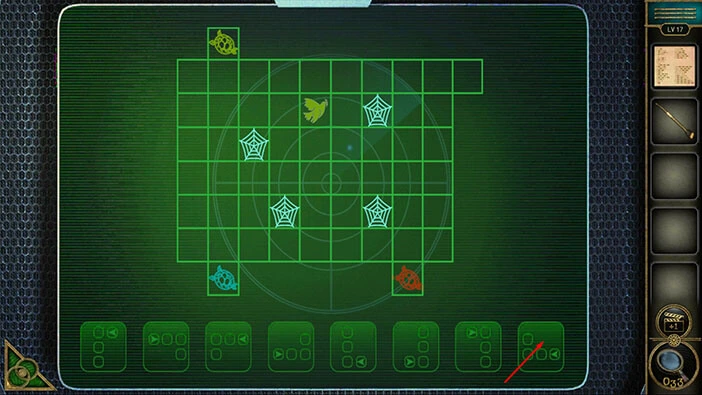
Step 6
Let’s tap on the third button and we will move the bird two slots to the left and one slot down.
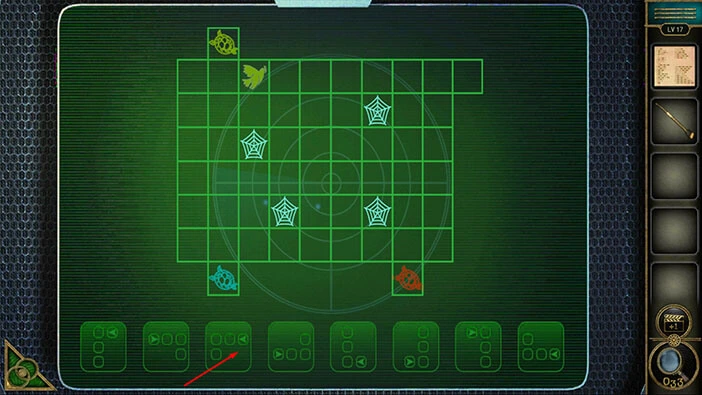
Step 7
Lastly, let’s tap on the sixth button and we will move the bird one slot to the right and two slots up. With that, we will get the bird to the yellow symbol.
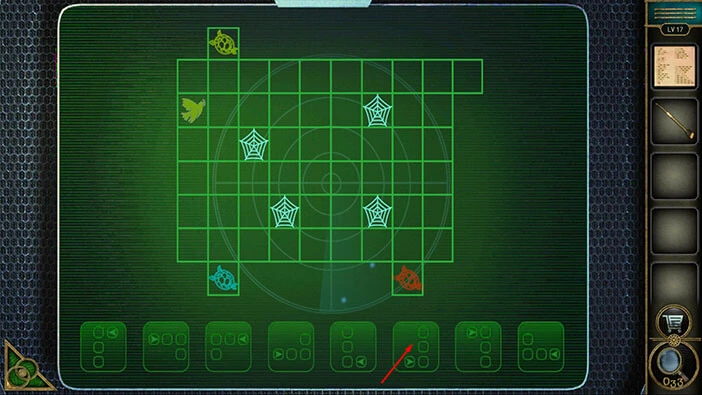
Once you get the yellow bird to the yellow symbol, the bird will disappear. Instead of it, a blue bird will spawn, right under the yellow symbol. So, we should now get the blue bird to the blue symbol.
Step 1
Let’s tap on the second button and we will move the bird two slots to the right and one slot down.
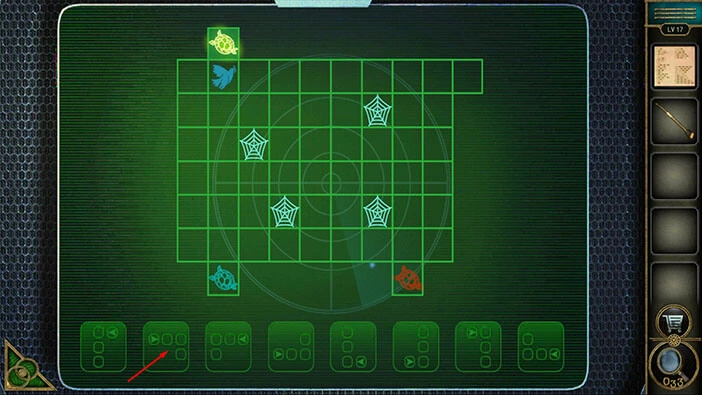
Step 2
Let’s tap on the seventh button and we will move the bird one slot to the right and two slots down.
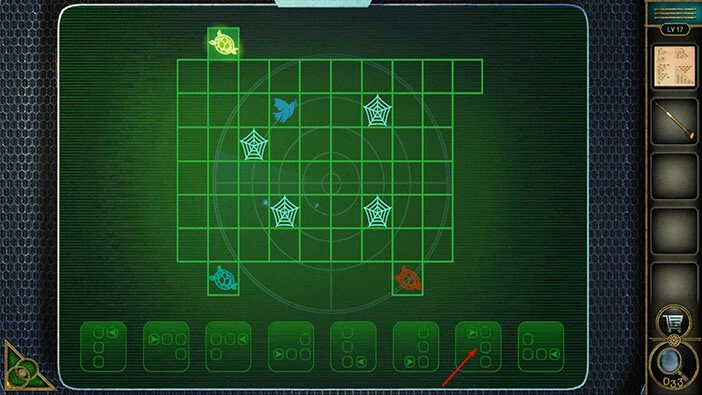
Step 3
Let’s tap on the third button and we will move the bird two slots to the left and one slot down.
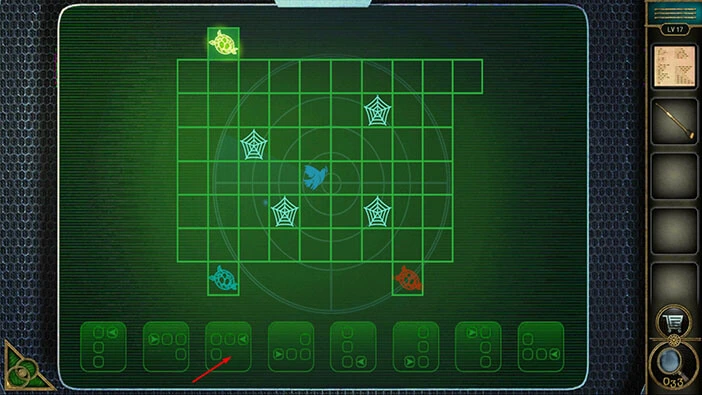
Step 4
Lastly, let’s tap on the first button and we will move the bird one slot to the left and two slots down. With that, we will get the bird to the blue symbol.
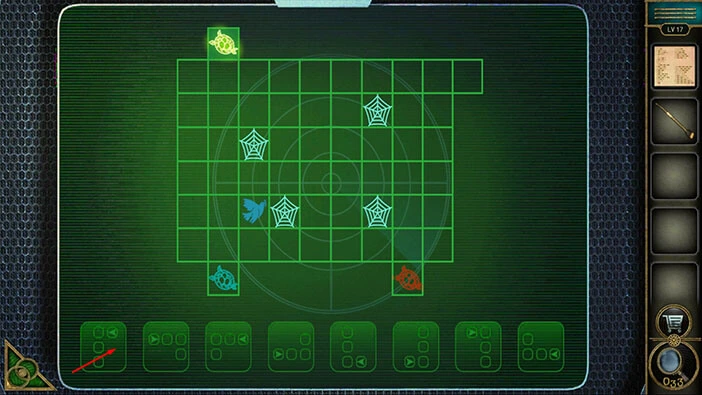
Once you get the blue bird to the blue symbol, the bird will disappear. Instead of it, a red bird will spawn, right above the blue symbol. So, we should now get the red bird to the red symbol.
Step 1
Let’s tap on the sixth button and we will move the bird one slot to the right and two slots up.
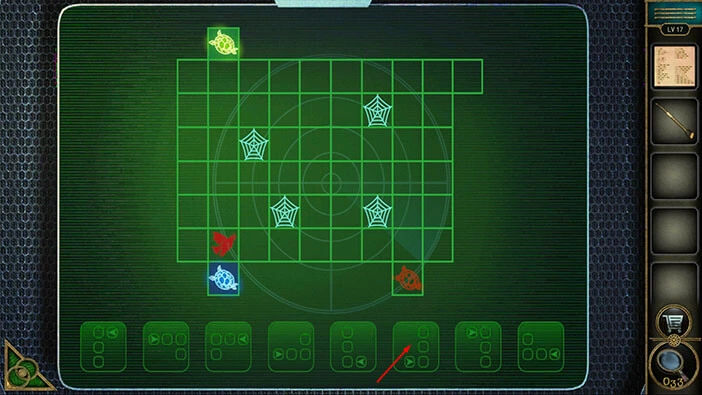
Step 2
Let’s tap on the fourth button and we will move the bird two slots to the right and one slot up.
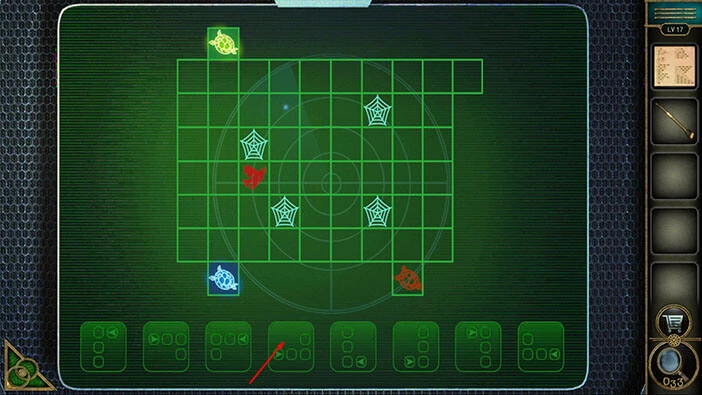
Step 3
Let’s tap on the second button and we will move the bird two slots to the right and one slot down.

Step 4
Let’s tap on the second button again, and we will move the bird two slots to the right and one slot down.
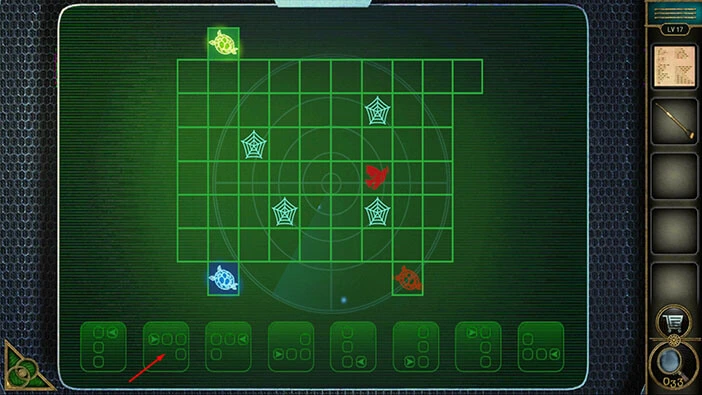
Step 5
Lastly, let’s tap on the first button and we will move the bird one slot to the left and two slots down. With that, we will get the bird to the red symbol.
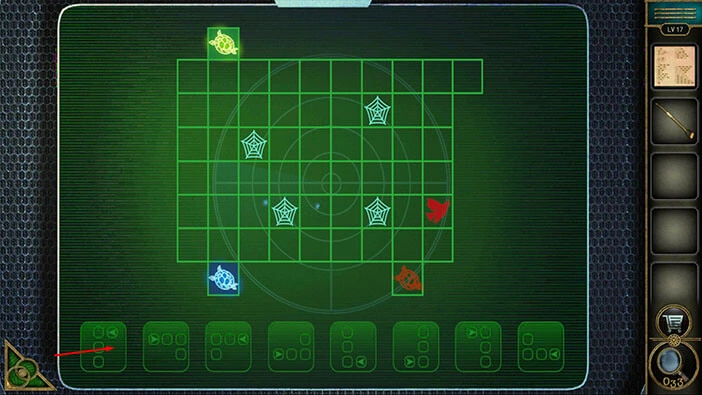
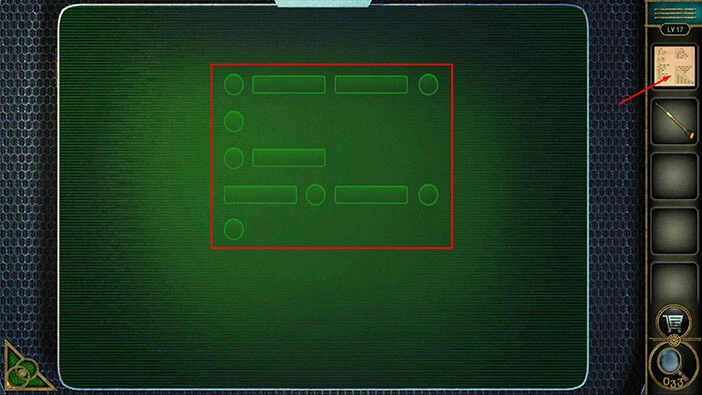
As soon as you get the red bird to the red symbol, you will solve this puzzle. However, some lines and dots will appear on the screen. These lines and dots are actually letters written in Morse’s code, and by deciphering these letters we will get the solution for the next puzzle.
So, let’s memorize/write down these symbols.
First letter = Dot/Line/Line/Dot
Second letter = Dot
Third letter = Dot/Line
Fourth letter = Line/Dot/Line/Dot
Fifth letter = Dot (Again)
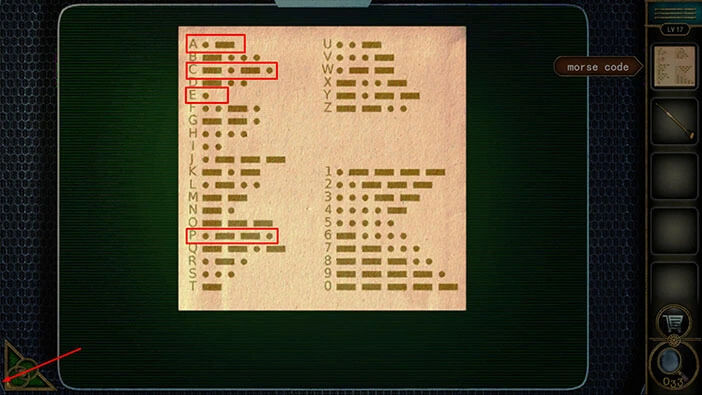
Once you’re done, tap on the “Morse code” to examine it.
Let’s decipher the code. We had,
First letter = Dot/Line/Line/Dot = “P”
Second letter = Dot = “E”
Third letter = Dot/Line = “A”
Fourth letter = Line/Dot/Line/Dot = “C”
Fifth letter = “E” (again)
When we put all these letters together, we will get the word “PEACE”. Memorize/write down this information. Once you’re done, tap on the green button in the bottom left corner of the screen to go back.
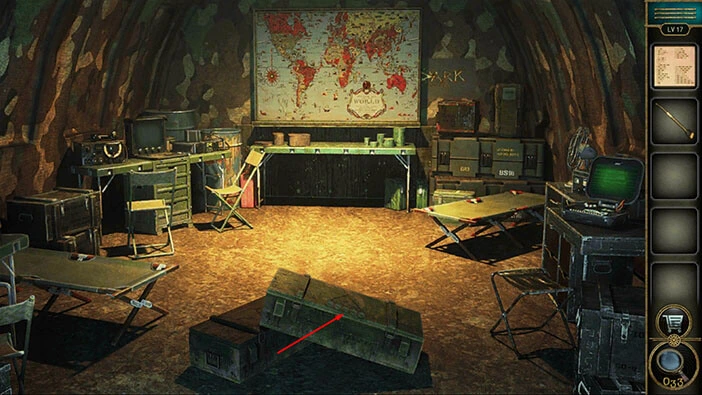
Next, tap on the large box in front of you to take a closer look at it, and tap again to start the interaction.
Let’s enter the code, “PEACE” that we discovered by deciphering Morse’s code.
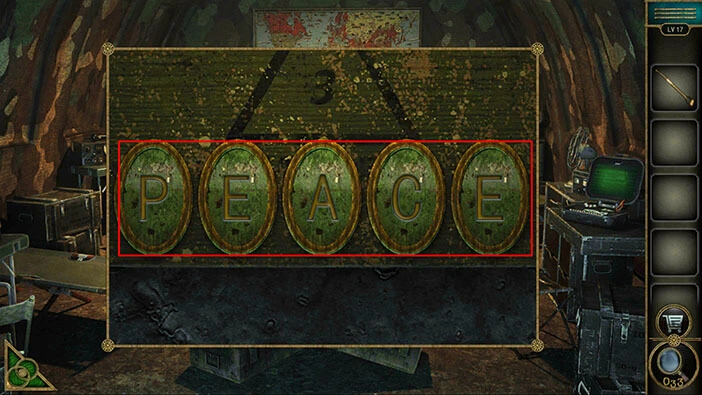
Tap on the gun to pick it up, and you will discover another “Achievement star”. After that, tap on the “Shovel” to pick it up.
Once you’re done, tap on the green button in the bottom left corner of the screen to go back.
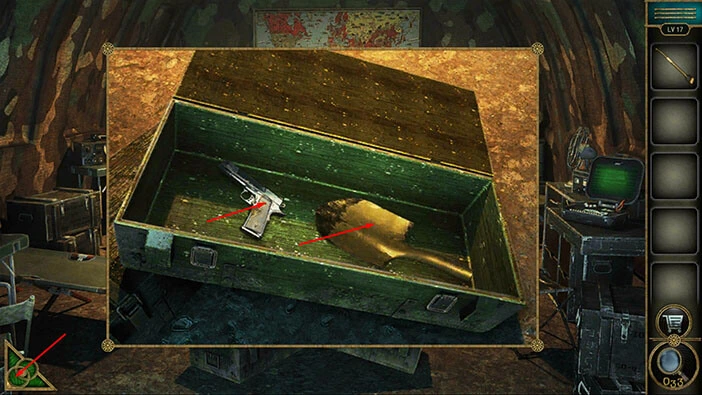
Next, let’s assemble the shovel. Select the “Shovel” from the inventory, and it will appear in the middle of the screen. After that, select the “Shovel handle” and attach it to the “Shovel”.
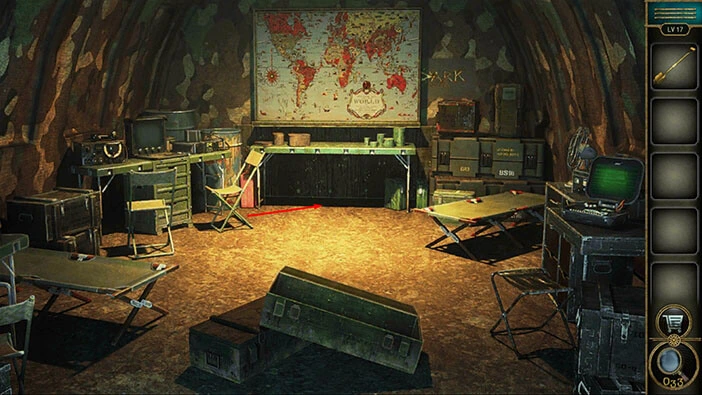
Next, tap on the ground under the table to take a closer look at it.
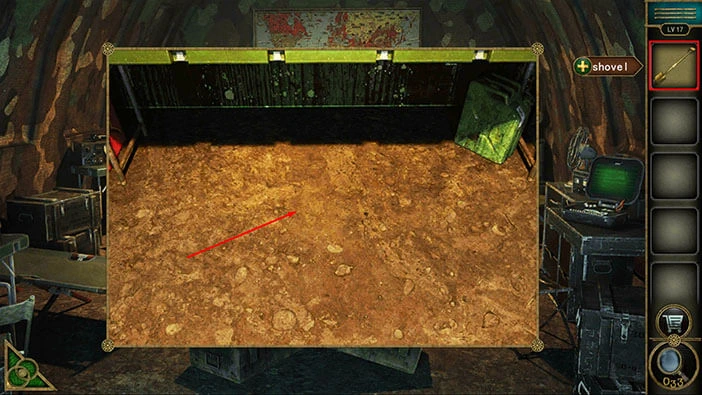
Select the “Shovel” from the inventory and use it to dig the tunnel. Once you’re done, tap on the tunnel to proceed to the next level.
Level 18
Let’s explore the eighteenth level. This time we are in the office. Let’s explore it. Tap on the PCs on the first desk to take a closer look at them.
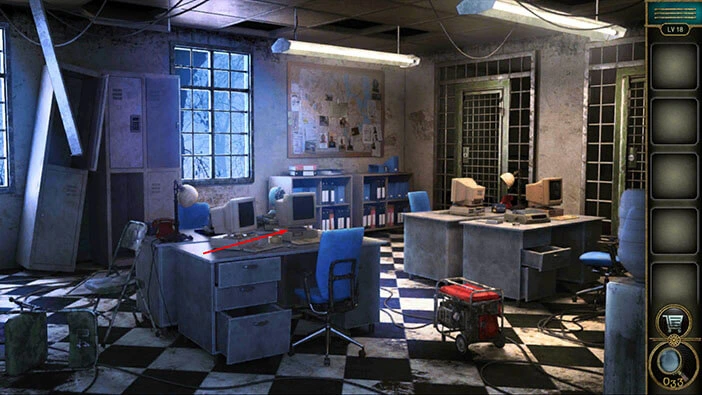
Here, you will find “Tape” and a “Brush”. Tap on them to pick them up.
After that, tap on the green button in the bottom left corner of the screen to go back.
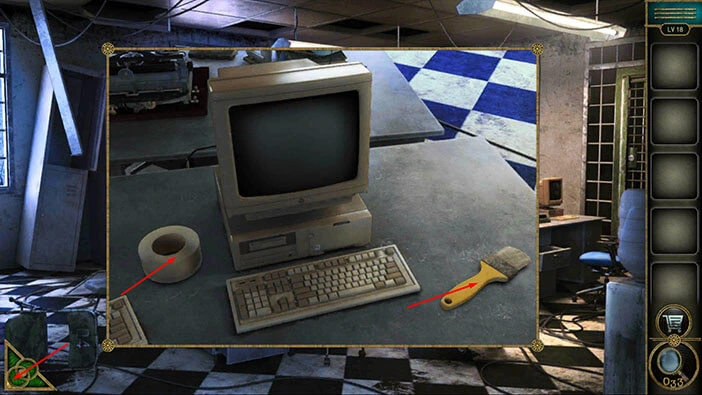
Next, let’s tap on the PCs on the other desk to take a closer look.

Here, you will find a “Toner” and a “Pull ring”. Tap on them to pick them up.
After that, tap on the green button in the bottom left corner of the screen to go back.
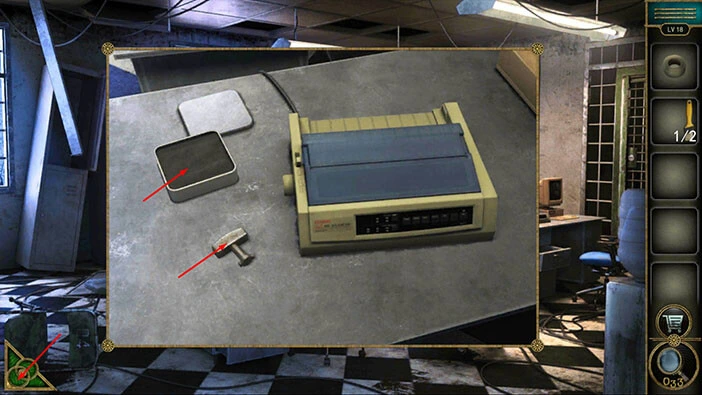
Next, tap on the keypad located on the locker on the left, to take a closer look at it.

In order to discover the password, we will have to extract the fingerprints from the keypad. Let’s do that. Select the “Toner” from the inventory and use it on the keypad.
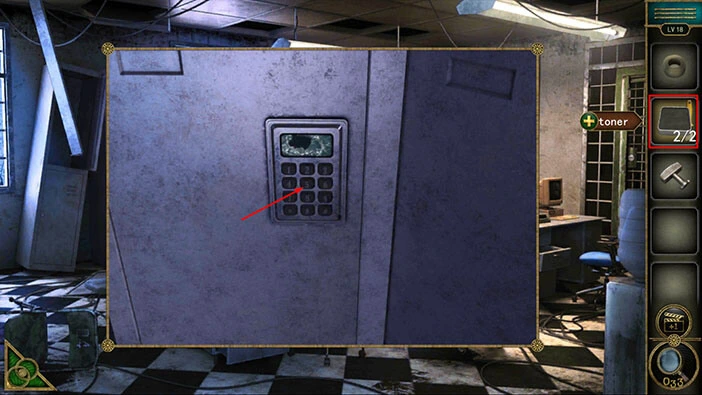
Next, select the “Tape” from the inventory and use it to extract the fingerprints.
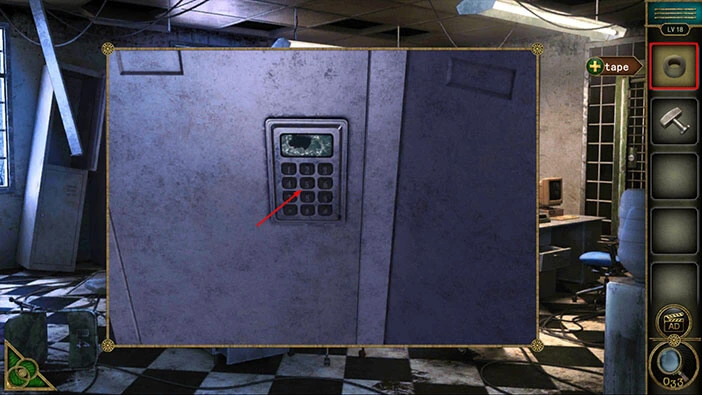
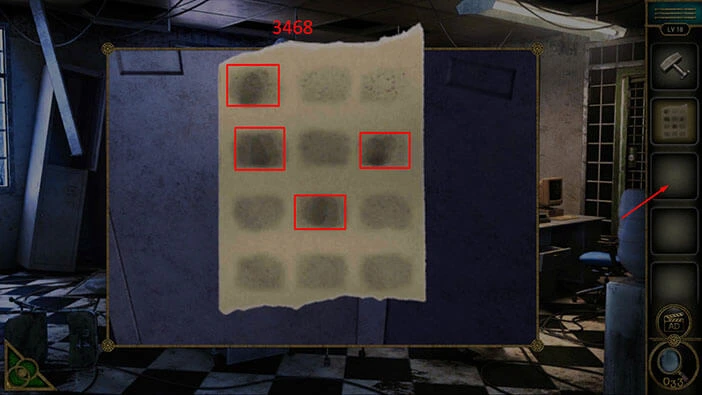
Here, we can see four stains are darker. However, the fingerprints on the tap are mirrored. The four darker fingerprints represent the number “3468”. Memorize/write down this information, then tap on the inventory slot to put down the tape with fingerprints.
Tap on the keypad to start the interaction, and enter the code “3468” that we just discovered.
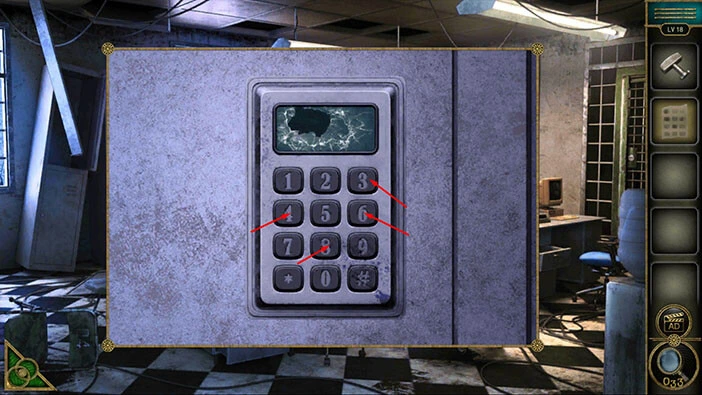
As soon as you enter the correct password, you will unlock the locker. Inside you will find “Diesel fuel” so let’s tap on it to pick it up.
After that, tap on the green button in the bottom left corner of the screen to go back.
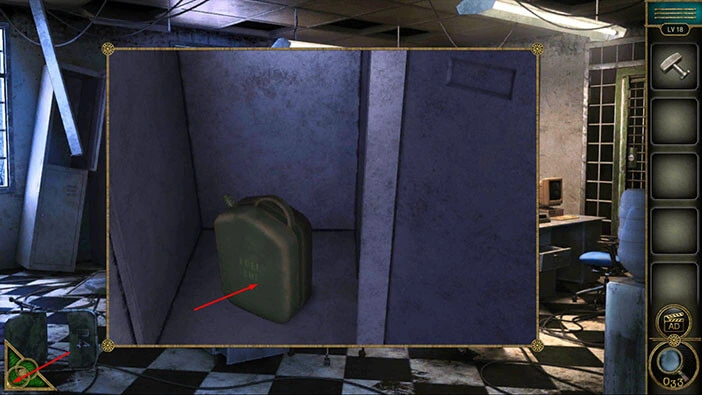
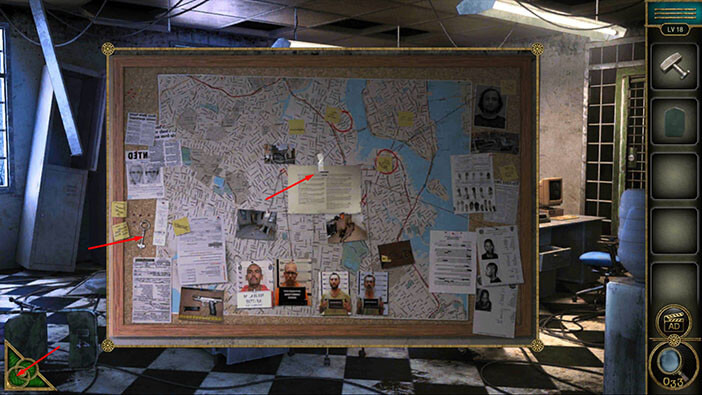
Next, tap on the map on the wall on the left to take a closer look at it.

On the left, you will notice a “Key”. Tap on it to pick it up. Also, let’s tap on the note in the center of the board to remove it. Below it, you will discover another puzzle, and we will need four symbols in order to solve it. We will come back to it a bit later.
Once you’re done, tap on the green button in the bottom left corner of the screen to go back.
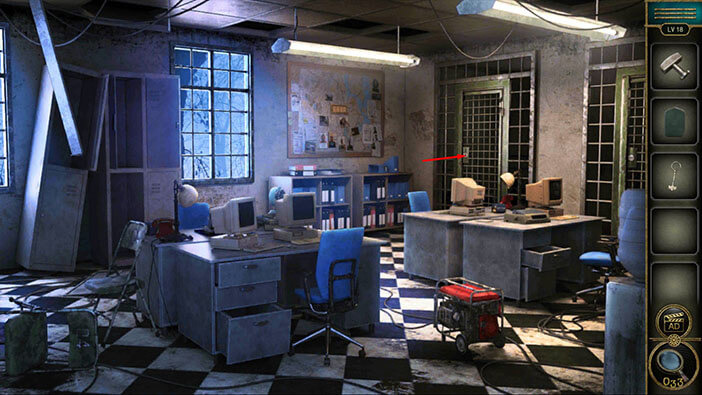
Next, tap on the door in the top left corner of the room to take a closer look at it.
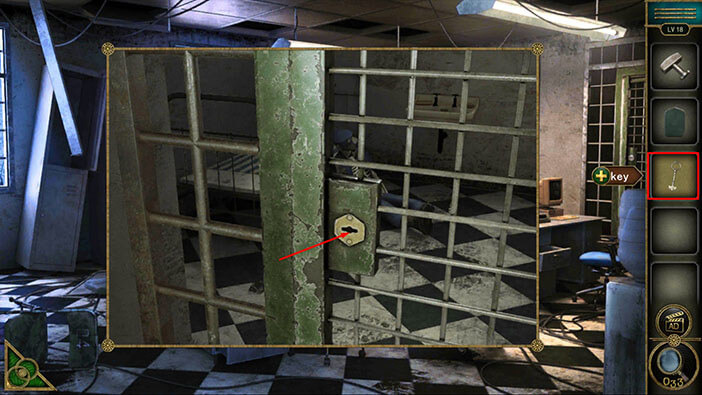
Select the “Key” from the inventory and use it to unlock the door. You will notice a police officer’s skeleton in the cell. It seems that someone locked him in the cell and left him there. Let’s tap on him to take a closer look.
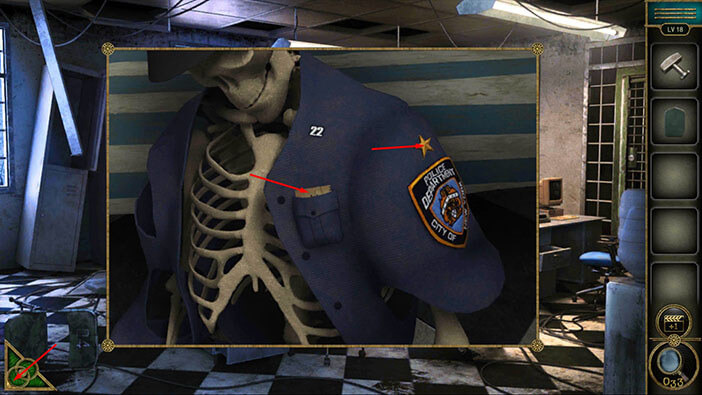
You will notice a “Note” in the police officer’s pocket. Tap on it to pick it up. Also, tap several times on the star on his shoulder, and you will get another “Achievement Star”.
Once you’re done, tap on the green button in the bottom left corner of the screen to go back.
Next, let’s tap on the red generator on the right to take a closer look at it.

Let’s start the generator. Select the “Pull ring” and attach it to the back of the generator.
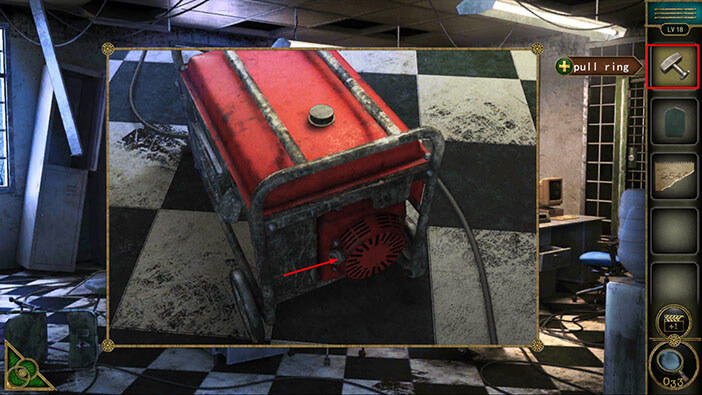
Next, select the “Diesel fuel” and use it to fill up the generator.

Lastly, tap on the “Pull ring” to start the generator. After that, tap on the green button in the bottom left corner of the screen to go back.

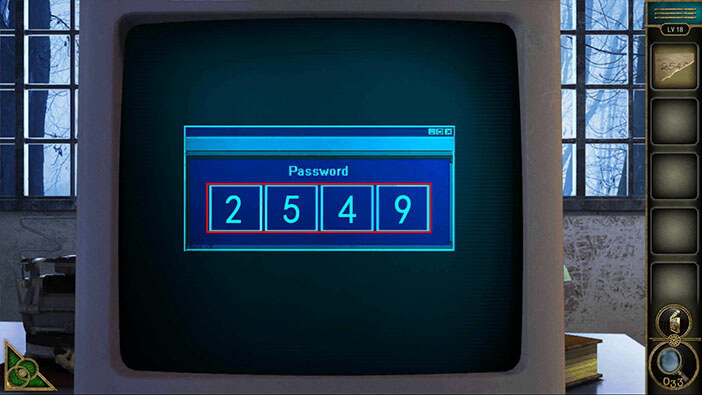
Next, tap on the Pc on the first table to take a closer look at it, and tap again to start the interaction.
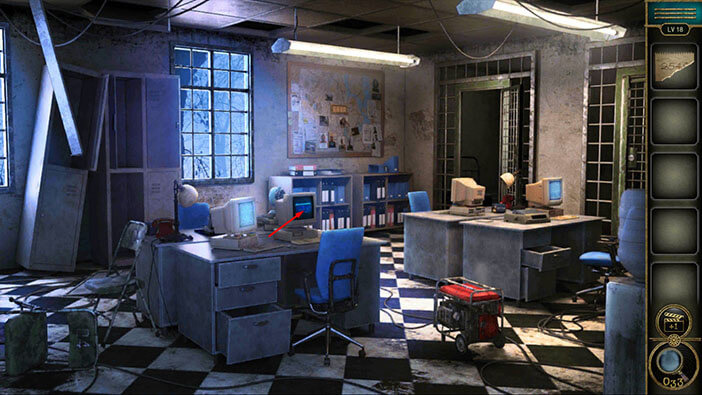
We will need a four-digit code in order to access the PC. Let’s tap on the “Note” in our inventory to take a closer look at it.
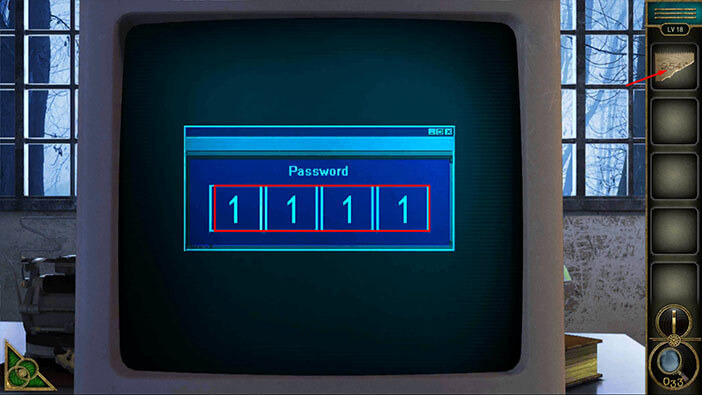
Here, we can see “254-“. The last number can be either 8 or 9. Let’s go with 9. So, let’s memorize/write down this information “2549”.
Once you’re done, tap on the inventory slot to put down the note.
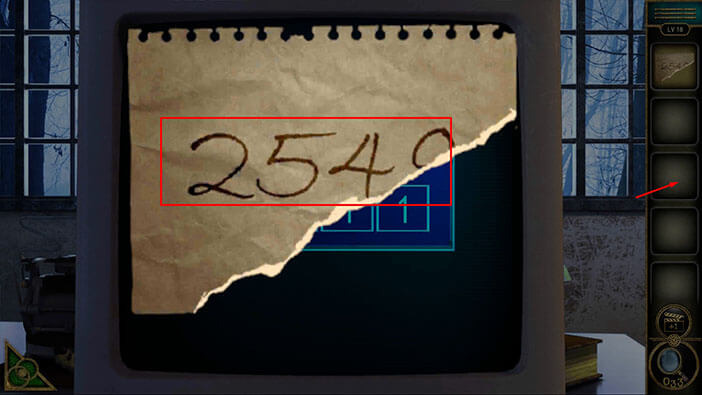
Enter the code “2549” and you will gain access to the PC. Tap on the PC to start the interaction.
Here, we have another puzzle. Our task is to draw the red and the green lines at the top of the screen. We can do that by connecting the nodes that are arranged in four by four grid. Sounds easy by this has to be done in one step.
Select the first node in the second row (this is the starting node) and connect it to the second node in the first row. You can see the rest of the path in the image below.
NOTE: This is one of the randomized puzzles and the shape of the lines might be different in your game.

Once you correctly connect the nodes, the two new lines will appear on the screen. So, we should repeat the process, and connect the nodes, once more. This time, we will start with the first node in the fourth row. You can see the solution in the image below.
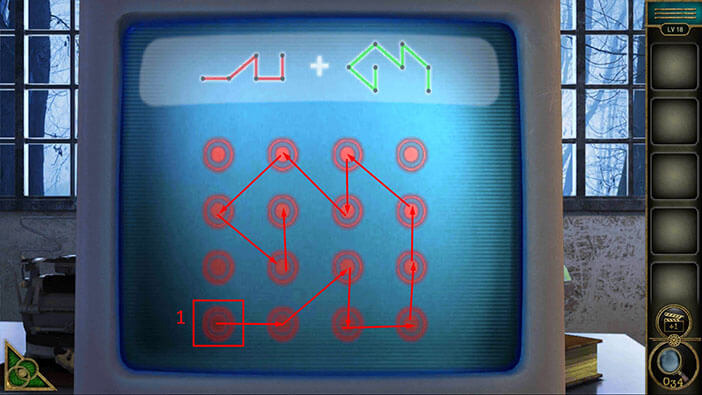
Once you correctly connect the nodes in the second part of the puzzle, two windows will appear on the PC screen. Let’s tap on the window on the left.
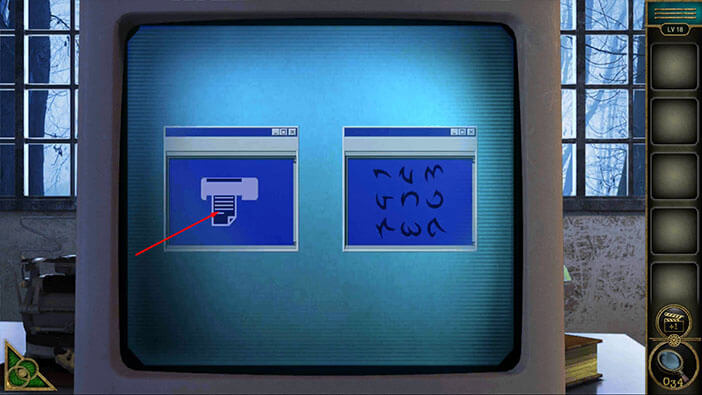
Our character will focus on the printer. Tap on the “Paper with hints” to pick it up. After that, tap on the green button in the bottom left corner of the screen to go back.
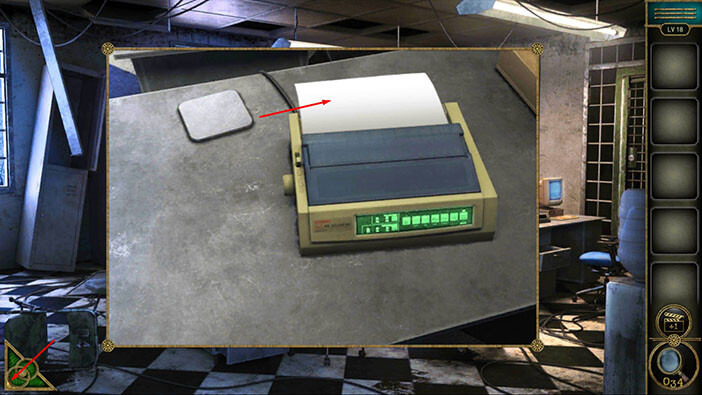
Next, let’s tap on the PC again to start the interaction. Let’s examine the symbols on the “Paper with hints”. The symbols on the hint will help us to identify the correct symbols. The lines of the symbols on the “Paper with hints” represent the border between the correct symbol and the other symbols.
With this information, we can determine the location of the symbols by examining the symbols on the right window of the PC screen. Sounds complicated, but everything should be understandable once you complete the first step. Let’s begin.
Step 1
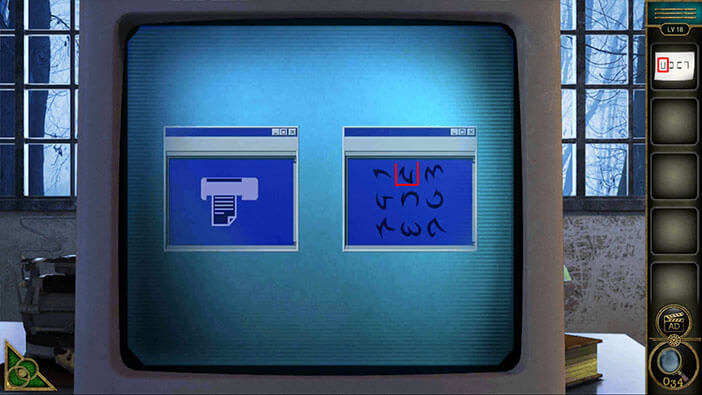
If you take a look at the first symbol on the paper with hints, you will notice that it has a border on the left, a border on the right, and a border at the bottom. So, it borders the other symbols on these three sides. If you look at the PC, you will notice that the second symbol in the first row matches these parameters. Let’s memorize/write down this symbol because it represents the first part of the solution for the next puzzle.
Step 2
If you take a look at the second symbol on the paper with hints, you will notice that it has a border on the right, a border at the top, and a border at the bottom. So, it borders the other symbols on these three sides. If you look at the PC, you will notice that the first symbol in the second row matches these parameters. Let’s memorize/write down this symbol because it represents the second part of the solution for the next puzzle.

Step 3
If you take a look at the third symbol on the paper with hints, you will notice that it has a border on the left, a border at the top, and a border at the bottom. So, it borders the other symbols on these three sides. If you look at the PC, you will notice that the third symbol in the second row matches these parameters. Let’s memorize/write down this symbol because it represents the third part of the solution for the next puzzle.

Step 4
If you take a look at the fourth symbol on the paper with hints, you will notice that it has a border on the right and a border at the top. So, it borders the other symbols on these two sides. If you look at the PC, you will notice that the first symbol in the third row matches these parameters. Let’s memorize/write down this symbol because it represents the fourth part of the solution for the next puzzle.
Once you’re done, tap on the green button in the bottom left corner of the screen to go back.
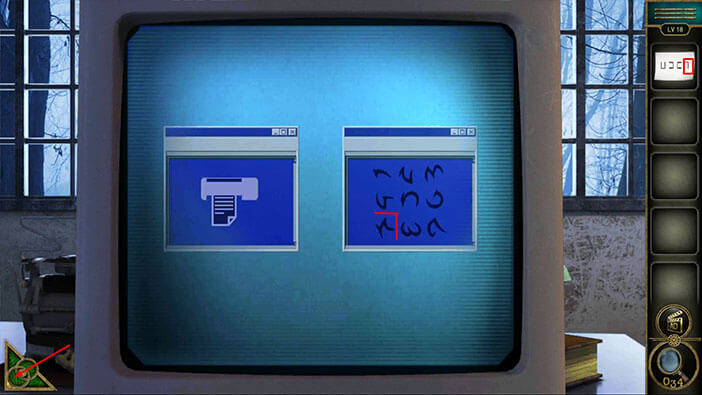
Next, we already saw these symbols when we looked at the map on the wall. So, let’s tap on the map to take a closer look at it, and tap again to start the interaction.
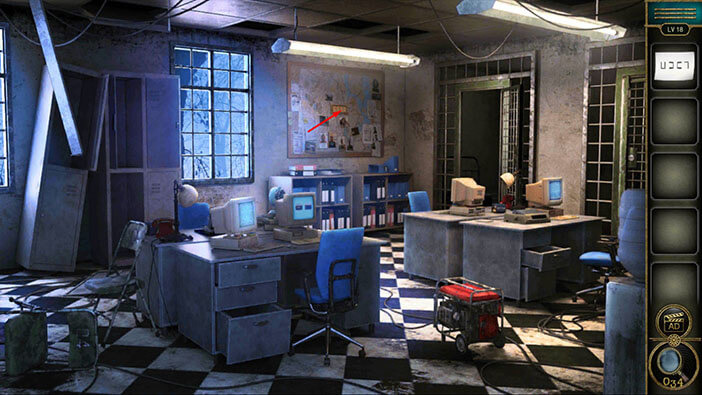
Let’s enter the four symbols that we discovered by solving the previous puzzle.
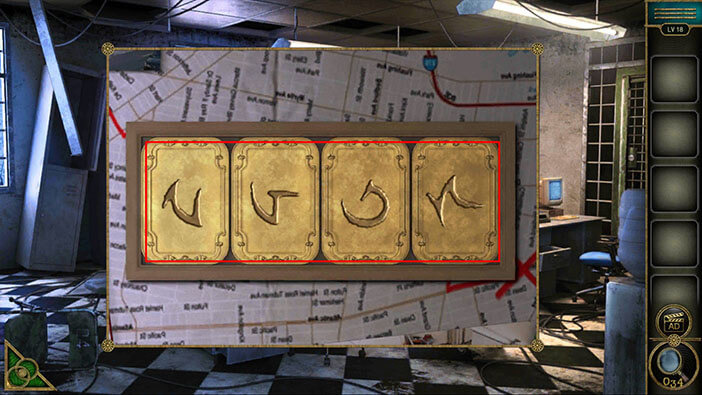
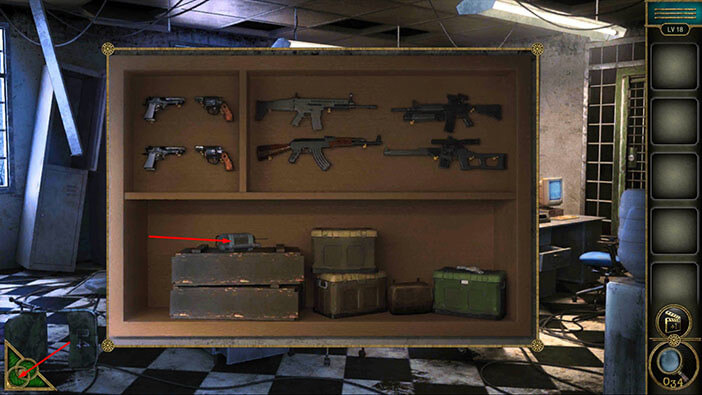
As soon as you enter the correct symbols, you will discover a hidden weapon stash. Tap on it to take a closer look.

On the boxes on the left, you will notice a “Bomb”. Tap on it to pick it up. After that, tap on the green button in the bottom left corner of the screen to go back.
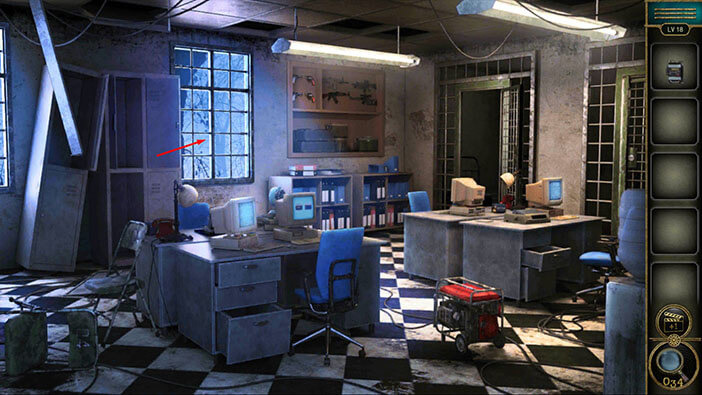
Next, let’s take a closer look at the window.
Lastly, select the “Bomb” from the inventory and attach it to the window.
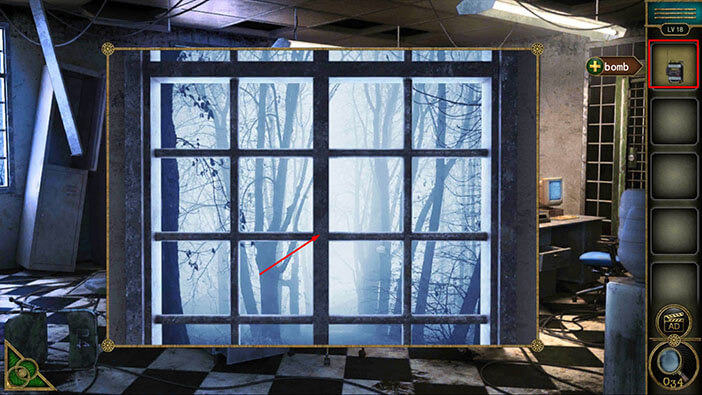
Well, our character blew up the window, and we now have an exit. Tap on the window to proceed to the next level.

Level 19
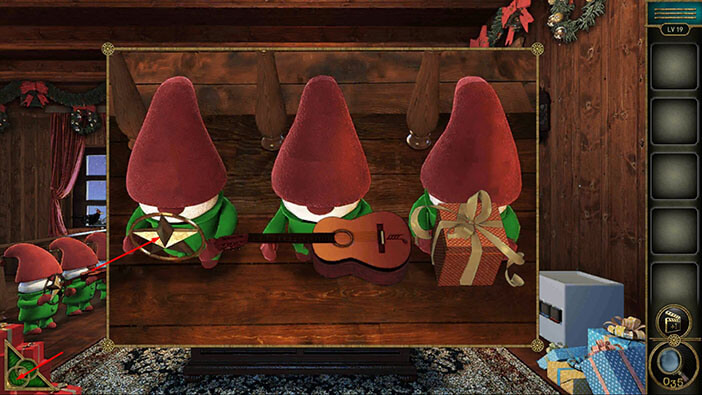
Let’s explore the nineteenth level. Let’s explore it. Tap on the three toys on the left to take a closer look at them.
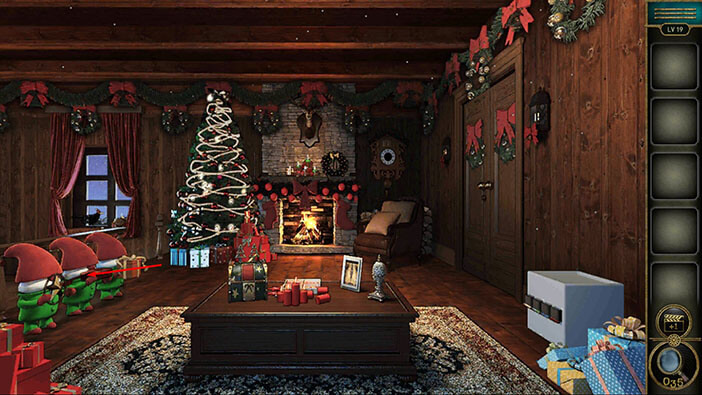
You will notice that the dwarf on the left is holding an “Achievement Star”. Tap on it to pick it up.
After that, tap on the green button in the bottom left corner of the screen to go back.
Next, let’s take a closer look at the candles above the fireplace.

Here, you will find two items, a “Candy” and a “Scissors”. Tap on them to pick them up.
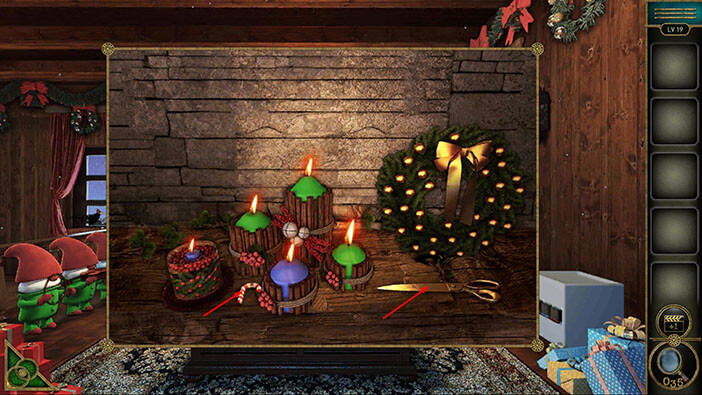
Before we continue, let’s take a look at the candles. Here, we can see three green and two blue candles. Let’s memorize/write down this information because we will need it for one of the puzzles that we will encounter later in the walkthrough.
Once you’re done, tap on the green button in the bottom left corner of the screen to go back.
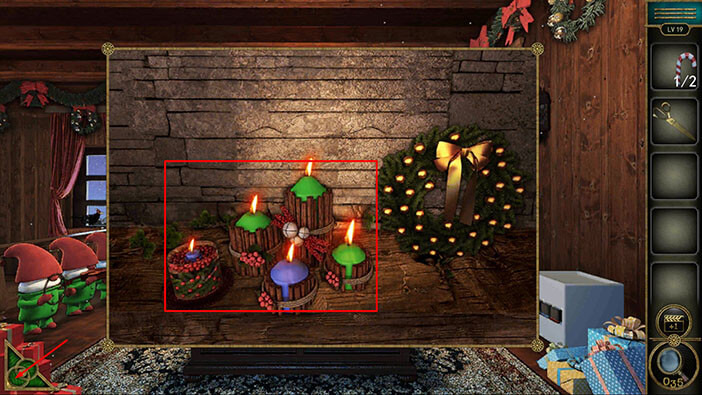
Let’s go back to the three toys on the left. Tap on them to take a closer look.
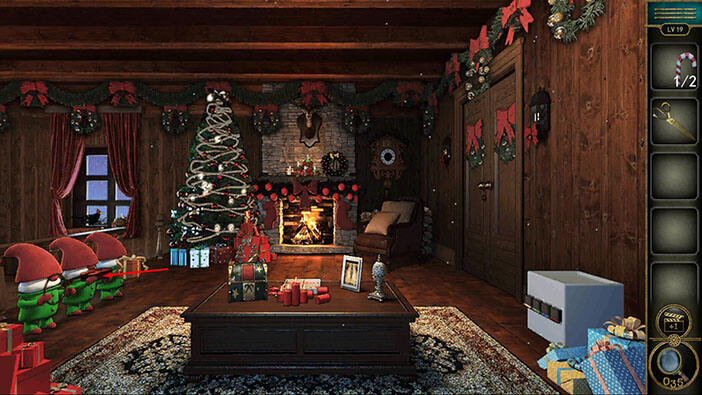
You will notice that the dwarf on the right is holding a present. Select the “Scissors” from the inventory and use them to open the present.
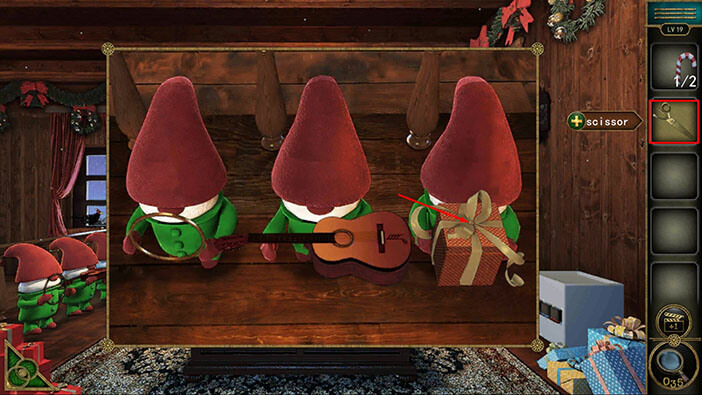
Tap on the present to open it. Inside you will find a “Pea” so let’s tap on it to pick it up. After that, tap on the green button in the bottom left corner of the screen to go back.
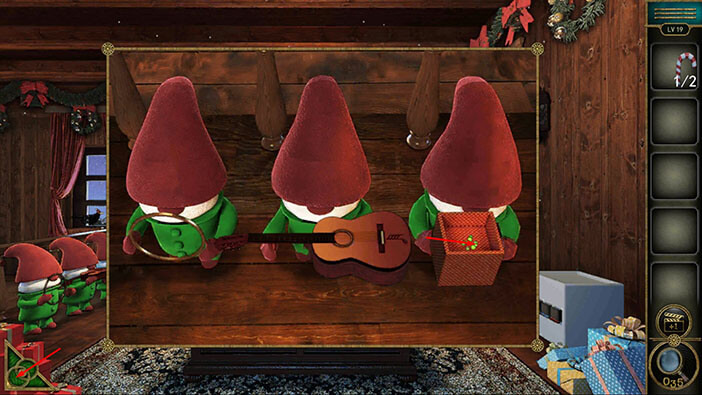
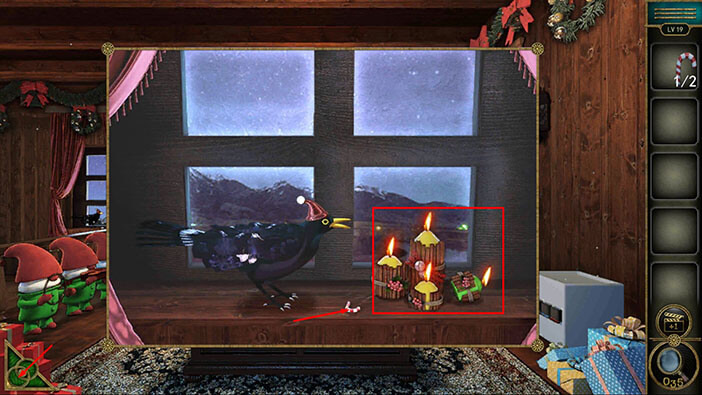
Next, tap on the bird located on the window on the left, to take a closer look at it.
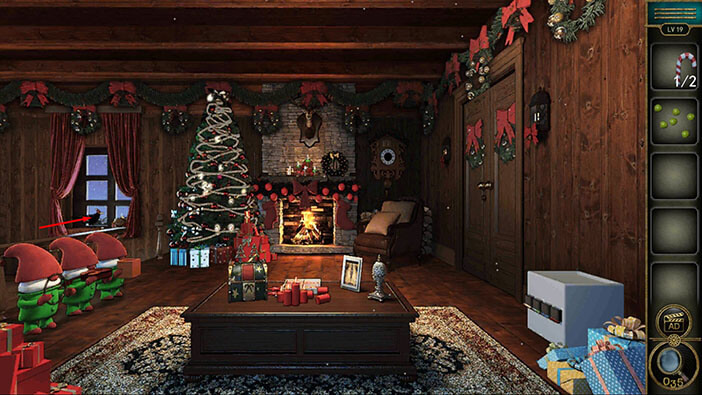
You will notice that the bird is holding another candy in its beak. So, let’s trick it into dropping the candy. Select the “Pea” from the inventory and give it to the bird.
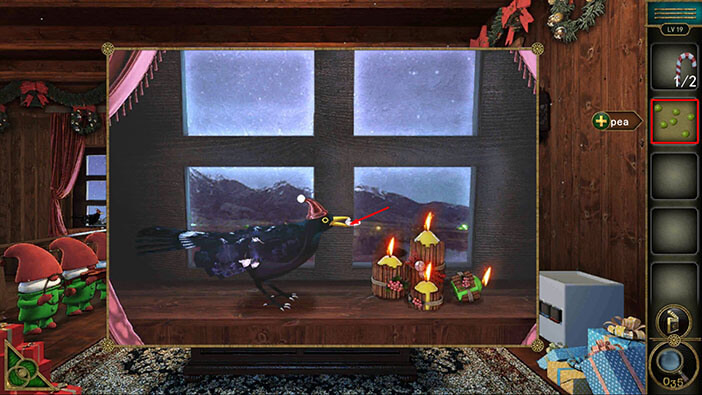
The bird will drop the “Candy”, so let’s tap on it to pick it up.
Before we continue, let’s take a look at the candles. Here, we have three yellow candles and one green candle. Previously, we saw three green candles and two blue candles.
So, in total, we have,
Three yellow candles, four green candles, and two blue candles. Memorize/write down this information because we will need it for the next puzzle.
Once you’re done, tap on the green button in the bottom left corner of the screen to go back.
Next, tap on the chest on the table in front of you to take a closer look at it, and tap again to start the interaction.

You will notice two slots shaped like candy. So, select the “Candy” from the inventory and insert it into the empty slots.
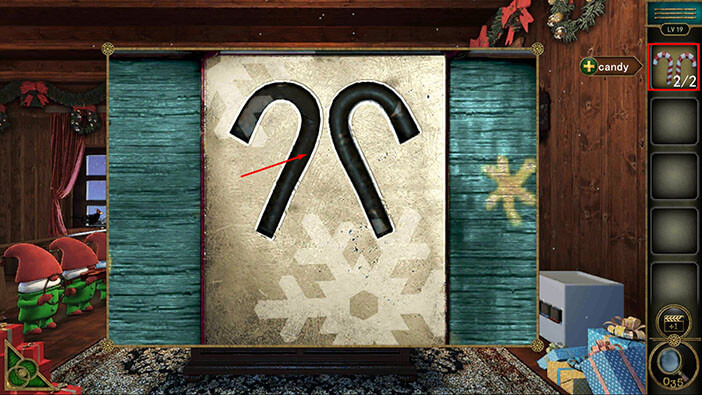
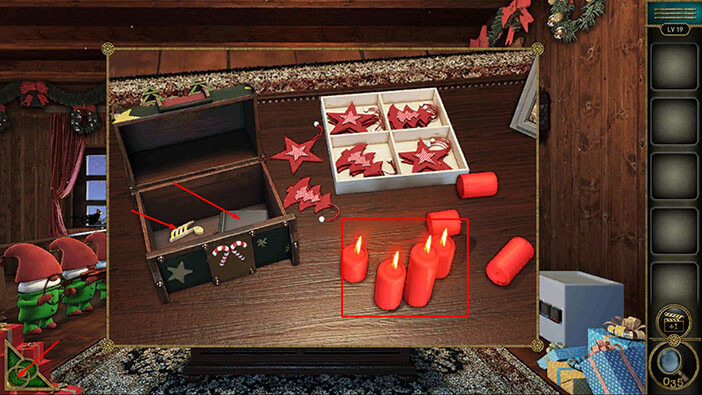
In the chest, you will find two items, a “Note”, and a “Book”. Tap on them to pick them up.
Before we continue, let’s take a look at the candles. Here, we have seven red candles. Memorize/write down this information because we will need it for the next puzzle.
Once you’re done, tap on the green button in the bottom left corner of the screen to go back.
Next, let’s tap on the three toys on the left to take a closer look at them.
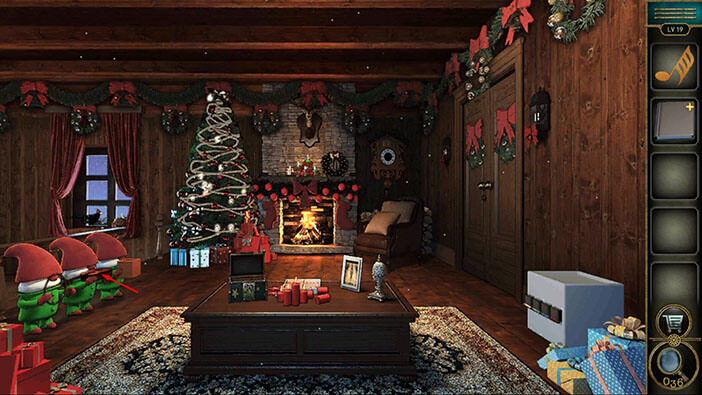
Tap on the violin to examine it, and you will notice an empty slot shaped like a note. So, let’s select the “Note” from the inventory and insert it into the empty slot.
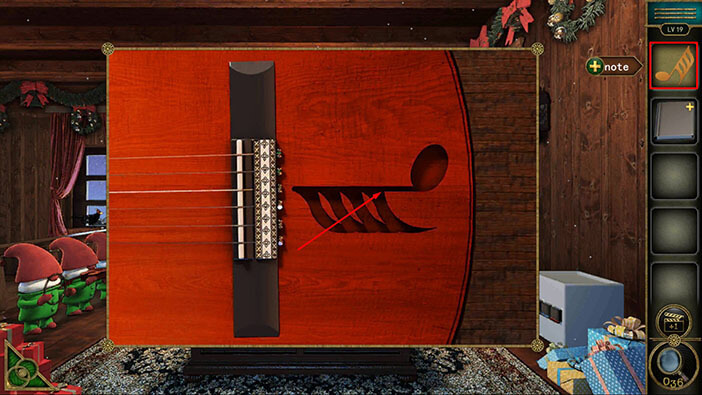
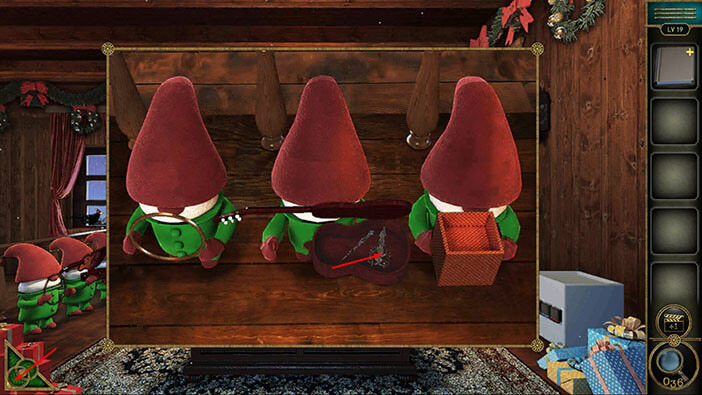
When you insert the note into the slot, you will open the violin, and inside you will find “Clock hands”. Tap on them to pick them up.
After that, tap on the green button in the bottom left corner of the screen to go back.
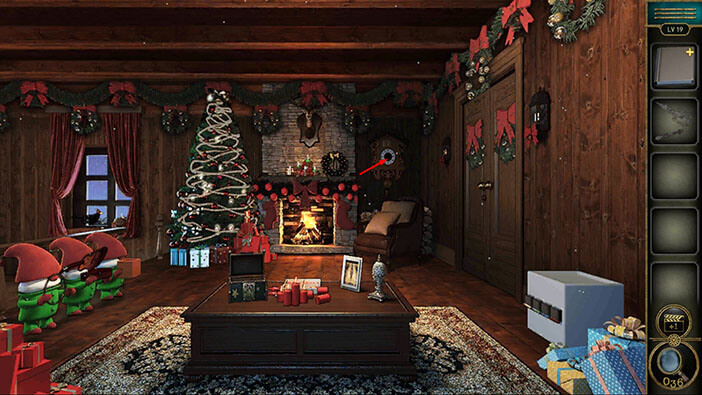
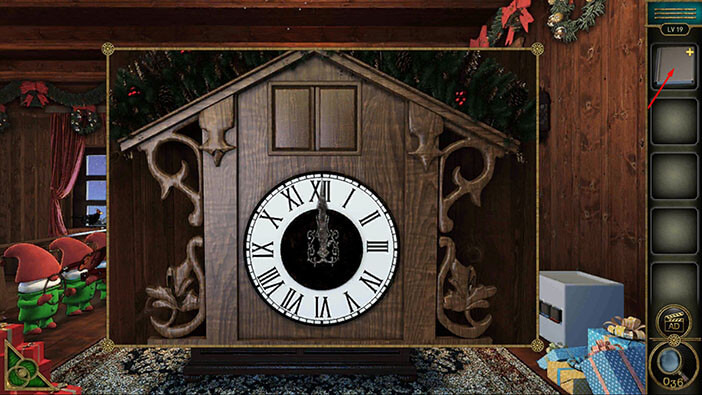
If you pay attention to the wall, just to the right of the fireplace, you will notice a clock. Tap on it to take a closer look.
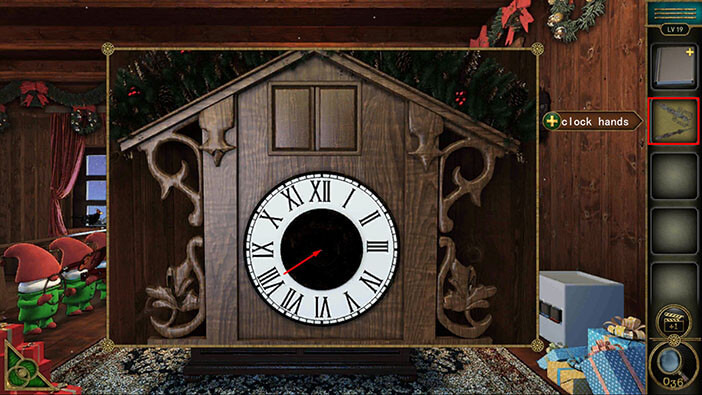
You will notice that the clock hands are missing. So, let’s select the “Clock hands” from the inventory and attach them to the clock.
Next, let’s tap on the “Notebook” in our inventory to examine it.
In the first picture, we can see that the minute hand is pointing at 12 o’clock, and its rotation is 0 degrees.
Let’s tap on the page on the right to take a look at the next image.
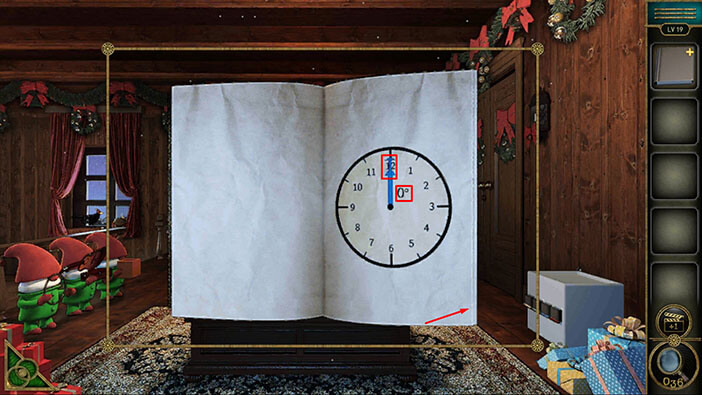
In the second picture, we can see that the minute hand is pointing at 3 o’clock, and its rotation is 30 degrees.
Let’s tap on the page on the right to take a look at the next image.

In the third picture, we can see that the minute hand is pointing at 7 o’clock, and its rotation is 210 degrees.
Let’s tap on the page on the right to take a look at the next image.
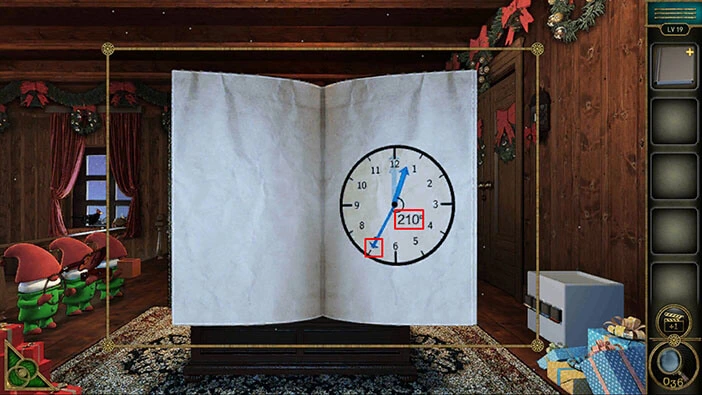
In the fourth picture, we can see that the minute hand is pointing at 9 o’clock, and its rotation is 270 degrees.
Let’s tap on the page on the right to take a look at the next image.
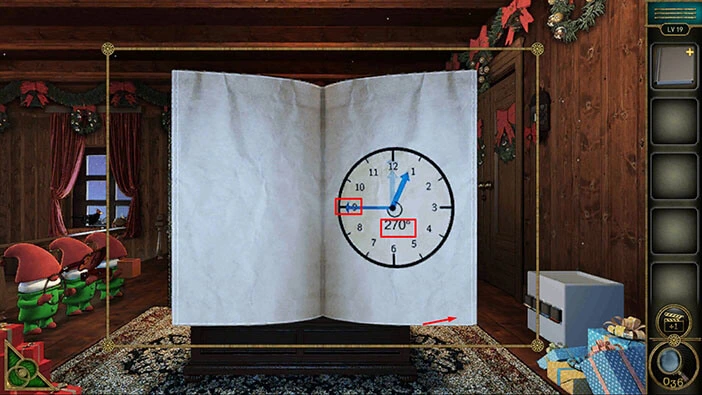
In the last image, we can see the hint for the next puzzle. The minute hand should be rotated 420 degrees.
By looking at the previous images, we can easily conclude that rotating the minute hand to the next number is equal to 30 degrees. So, we should rotate the minute hand one full circle (360 degrees) and then we should rotate it another 60 degrees (the minute hand should point to the number 2, and the hour hand should point to the number 1). Memorize/write down this information.
Once you’re done, tap on the green button in the bottom left corner of the screen to go back.

Tap on the clock again to take a closer look at it. Rotate the minute hand one full circle (360 degrees) and then we should rotate it another 60 degrees (the minute hand should point to the number 2, and the hour hand should point to the number 1).
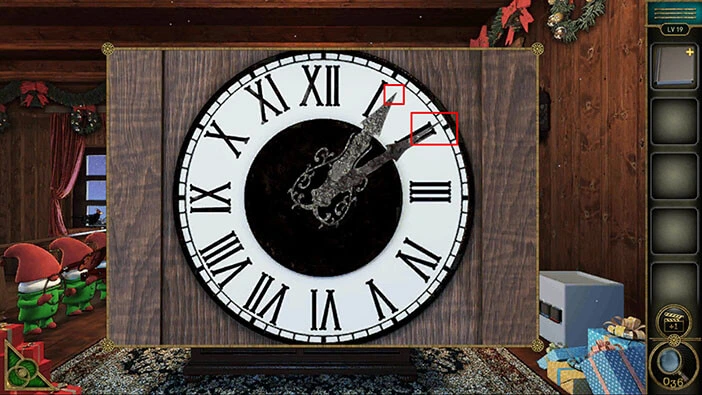
As soon as you set the minute hand, a Santa Claus toy will appear, and it is holding an item in its hand. Tap on this item to pick it up, and “Game props” will be added to your inventory.
Once you’re done, tap on the green button in the bottom left corner of the screen to go back.
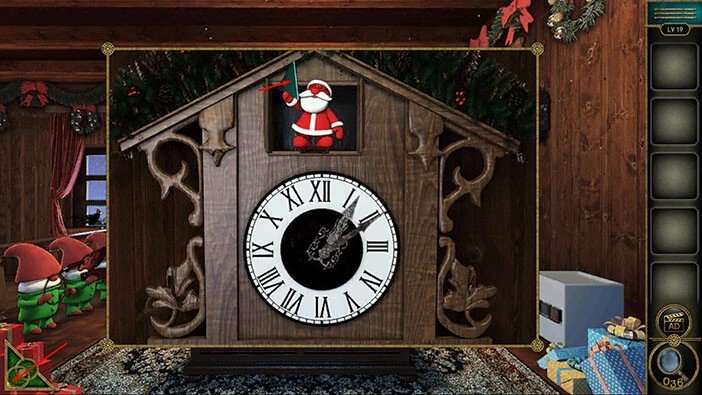
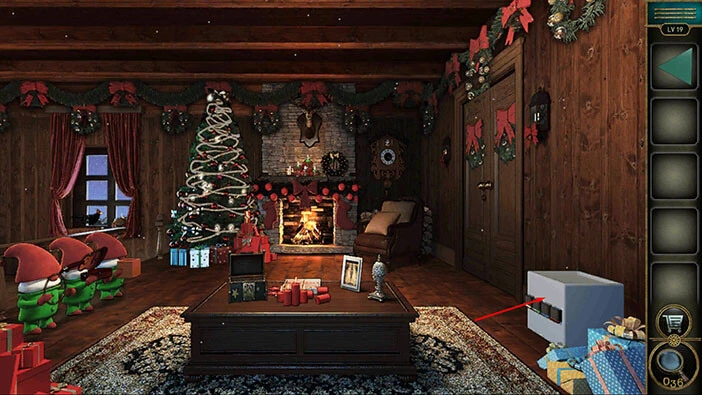
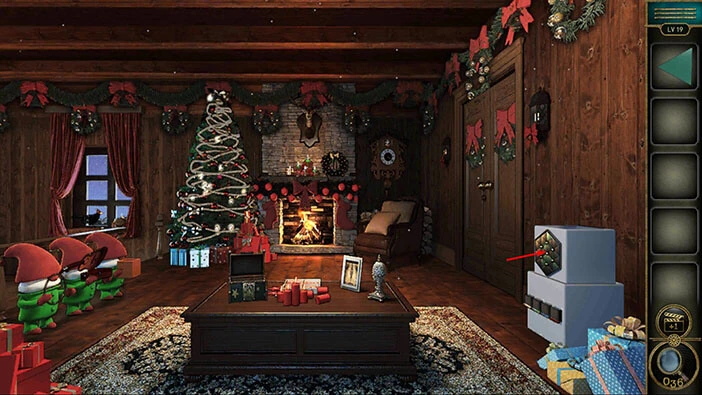
Next, let’s tap on the white box on the right to take a closer look at it.
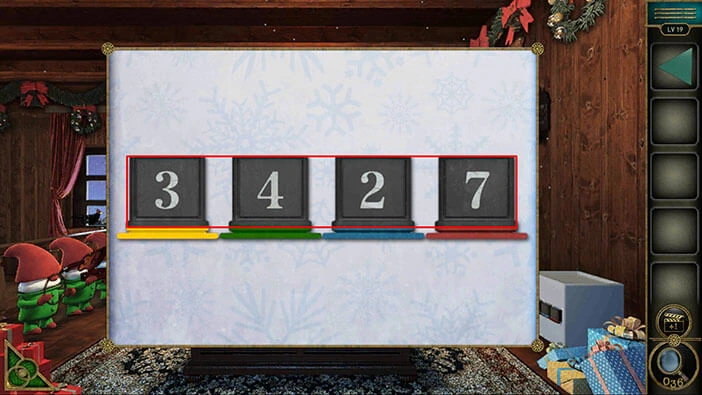
In order to unlock the box, we will need a four-digit code. Below each digit, you will notice one of the four colors, yellow, green, blue, and red. This puzzle is very simple. Previously, we found some candles, and they were in the same four colors. So, to solve this puzzle, we just need to enter the amount of candles that we discovered for each color.
Previously, we discovered three yellow candles, four green candles, two blue candles, and seven red candles. So, let’s enter these numbers. 3 (yellow candles), 4 (green candles), 2 (blue candles), and 7 (red candles).
As soon as you enter the correct code, another part of the box will emerge. Tap on it to take a closer look.
You will notice that one part of the puzzle is missing. So, let’s select the “Game props” from the inventory and insert it into the empty slot.
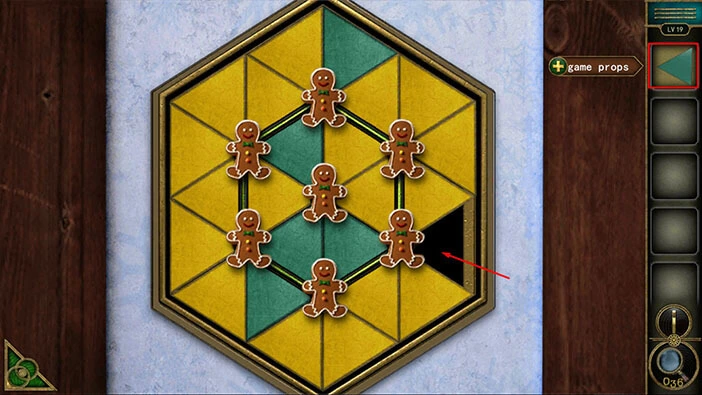
Here, we have another puzzle. Our next task is to place all green game props into the center of the puzzle. We can do that by rotating the game props around the six sticky men.
We will do this puzzle in several steps. Let’s begin.
Step 1
Tap once on the sticky man in the bottom right corner to rotate the game props.
Step 2
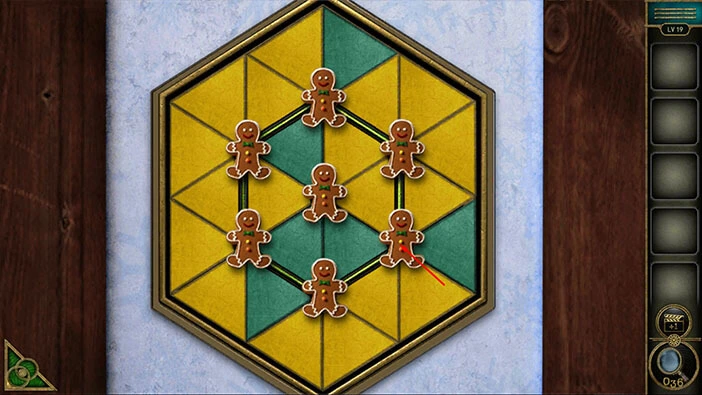
Tap once on the sticky man in the bottom left corner to rotate the game props.
Step 3
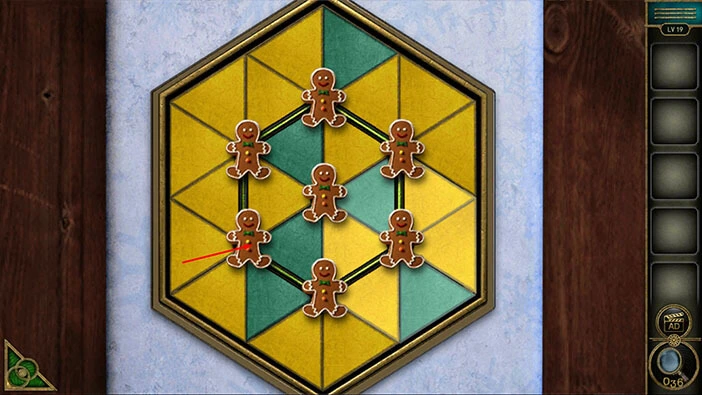
Tap once on the sticky man in the center to rotate the game props.
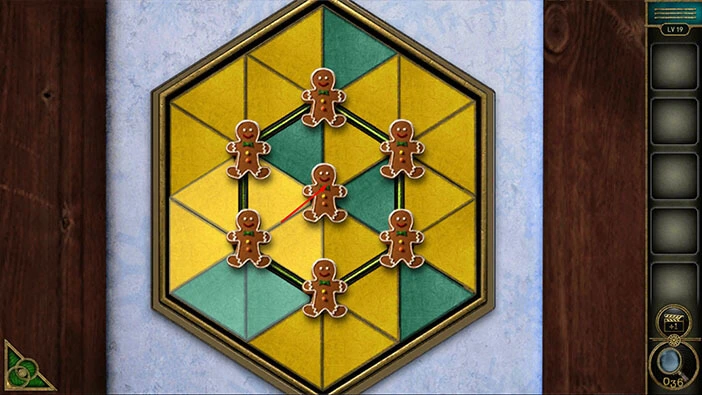
Step 4
Tap once on the sticky man in the bottom right corner to rotate the game props.
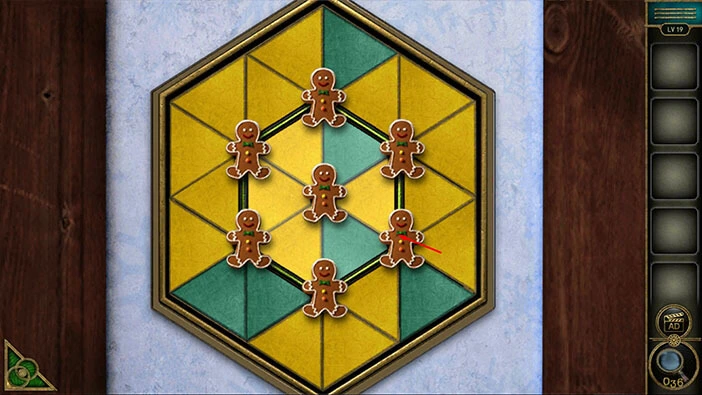
Step 5
Tap three times on the sticky man in the center to rotate the game props.
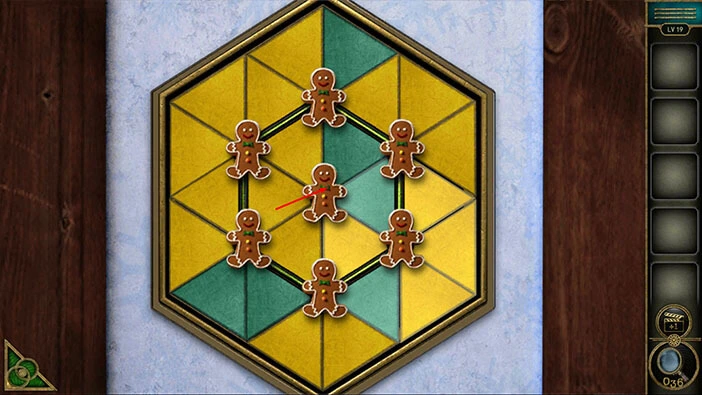
Step 6
Tap three times on the sticky man at the top to rotate the game props.
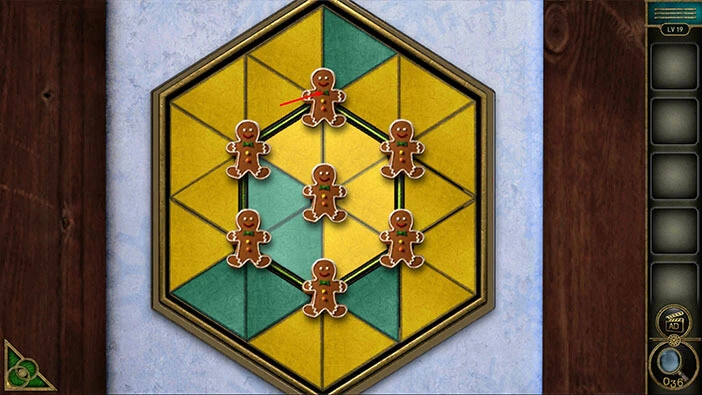
Step 7
Tap once on the sticky man in the center to rotate the game props.
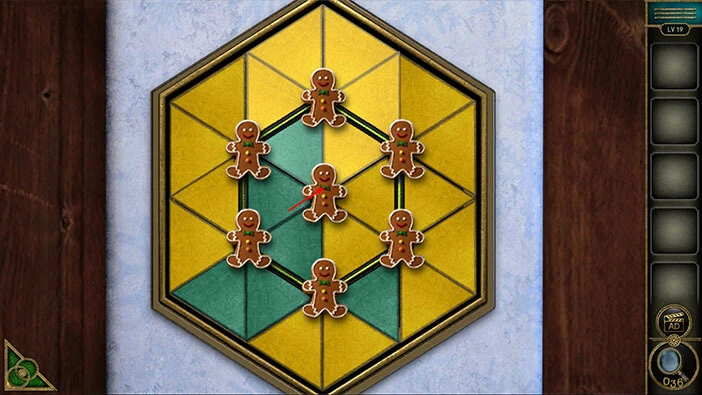
Step 8
Tap twice on the sticky man in the bottom right corner to rotate the game props.
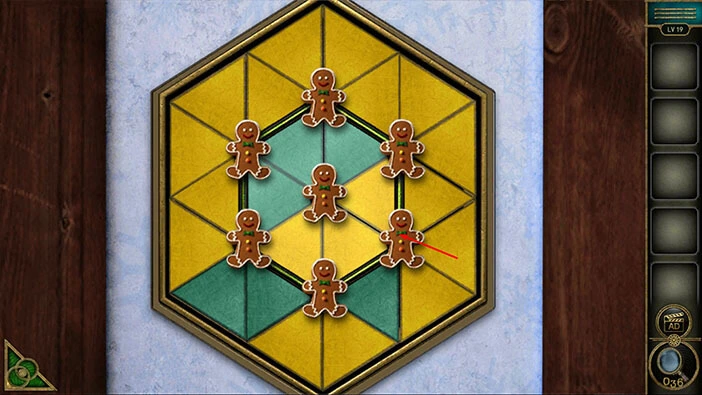
Step 9
Tap once on the sticky man at the bottom to rotate the game props.
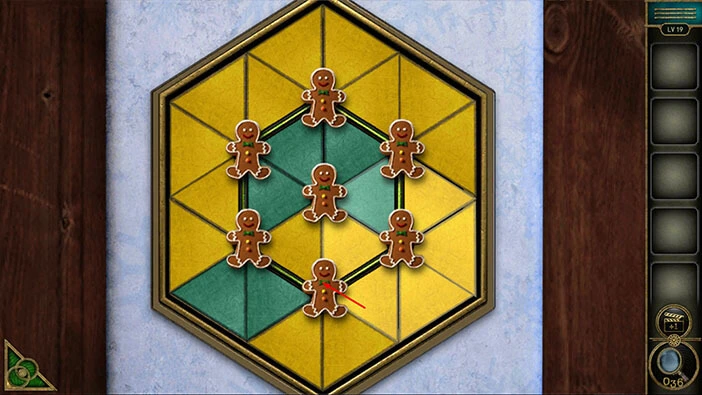
Step 10
Tap once on the sticky man in the center to rotate the game props.
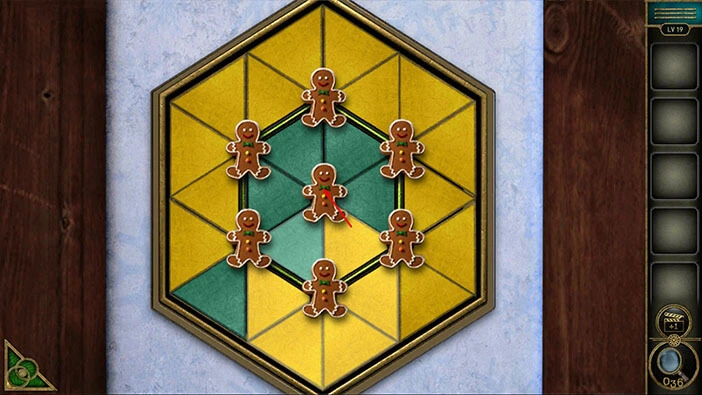
Step 11
Tap once on the sticky man in the bottom left corner to rotate the game props.
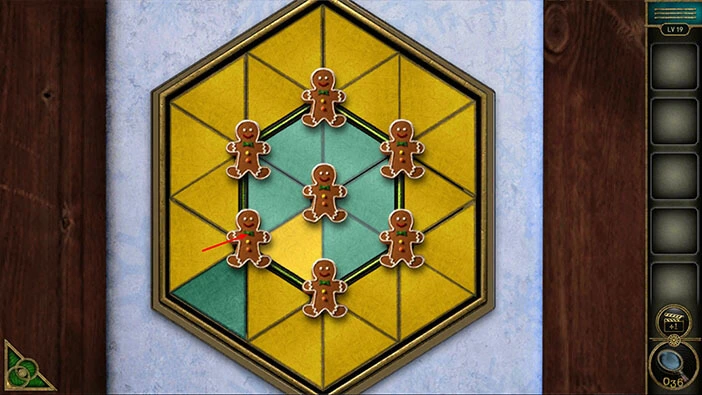
Step 12
Tap five times on the sticky man in the center to rotate the game props.
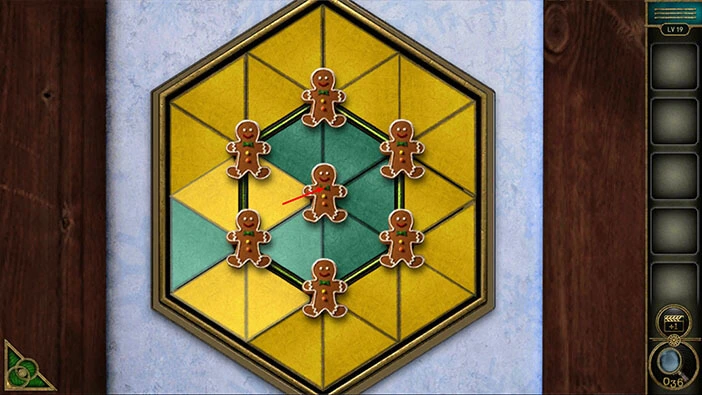
Step 13
Tap once on the sticky man in the bottom left corner to rotate the game props.
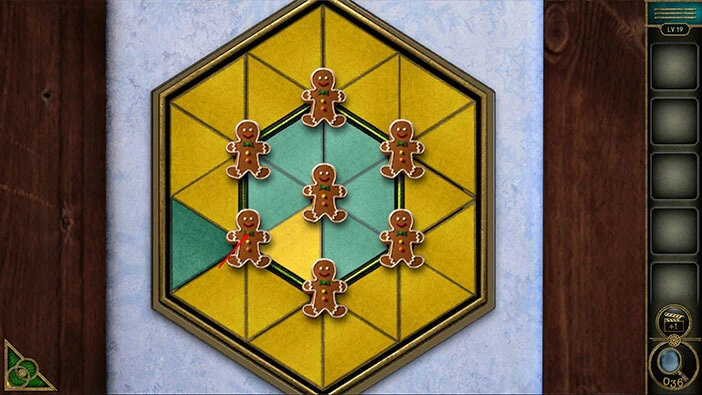
Step 14
Tap once on the sticky man in the center to rotate the game props.
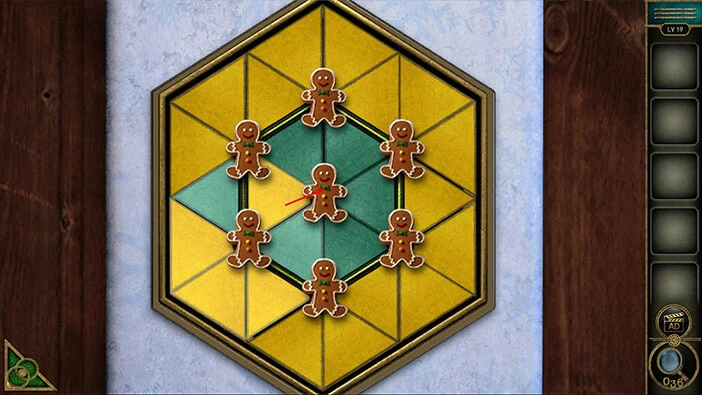
Step 15
Tap once on the sticky man at the bottom to rotate the game props.
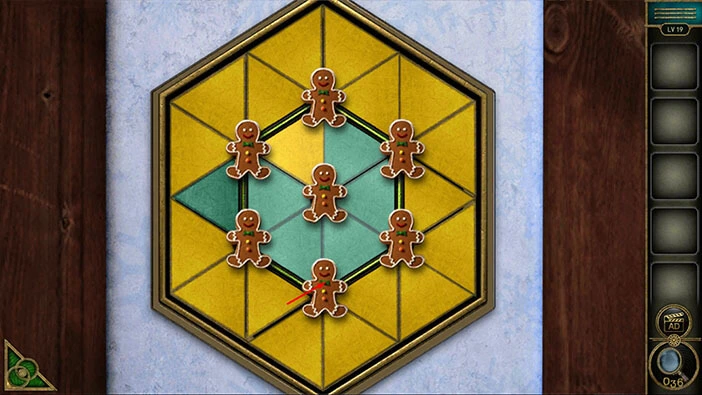
Step 16
Tap once on the sticky man in the bottom left corner to rotate the game props.
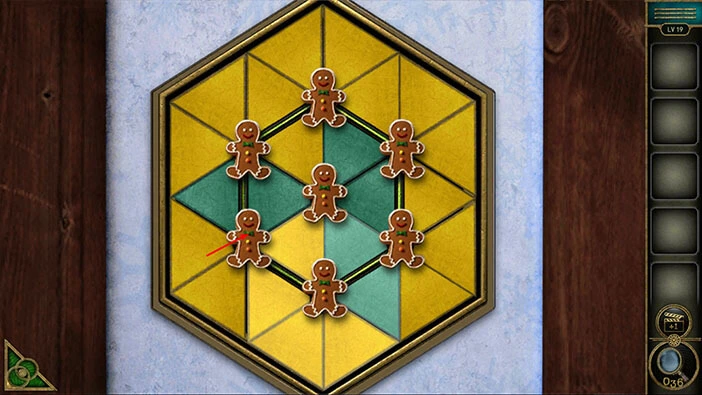
Step 17
Tap twice on the sticky man in the center to rotate the game props.
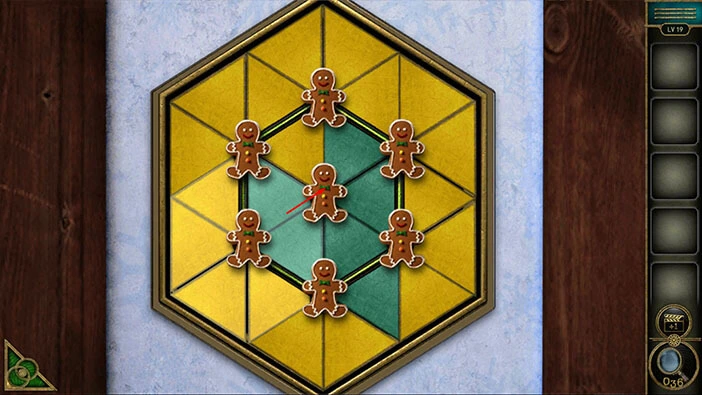
Step 18
Finally, tap once on the sticky man in the bottom right corner to rotate the game props, and you will place all green game props in the center of the puzzle.
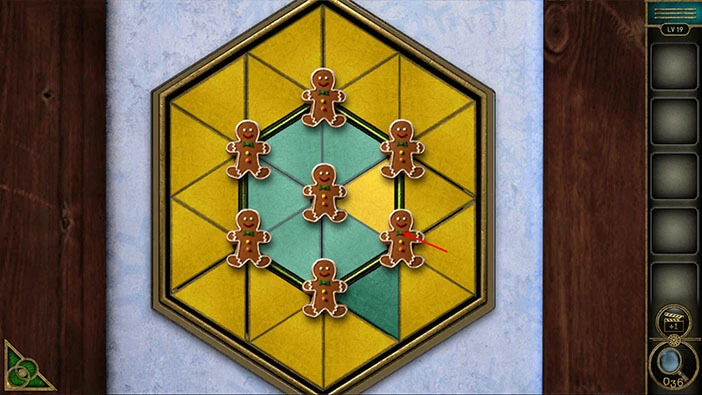
As soon as you solve the puzzle, another part of the box will emerge. Tap on it to take a closer look.
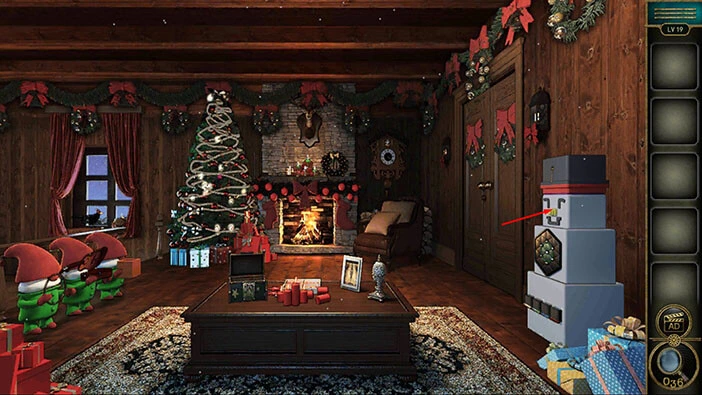
Here, you will find a “Key”. Tap on it to pick it up. After that, tap on the green button in the bottom left corner of the screen to go back.
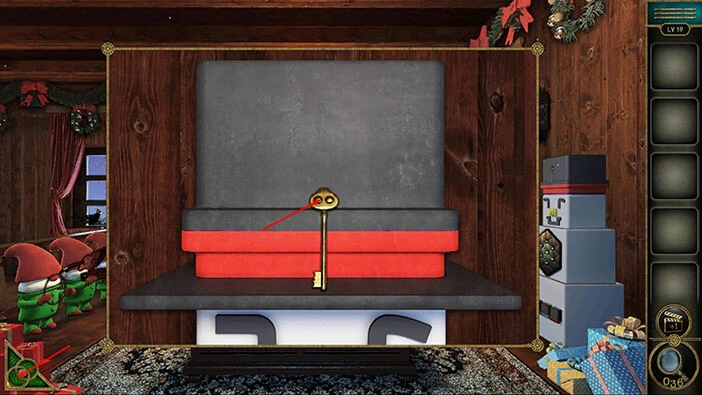
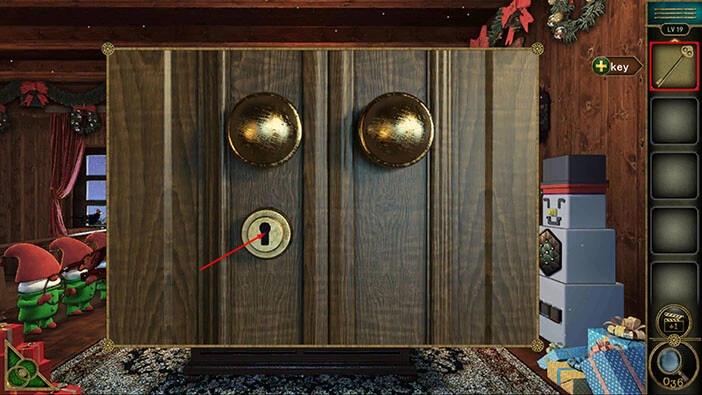
Tap on the door on the right to take a closer look at it. Select the “Key” from the inventory and use it to unlock the door.
After that, tap on the door to proceed to the next level.
Level 20
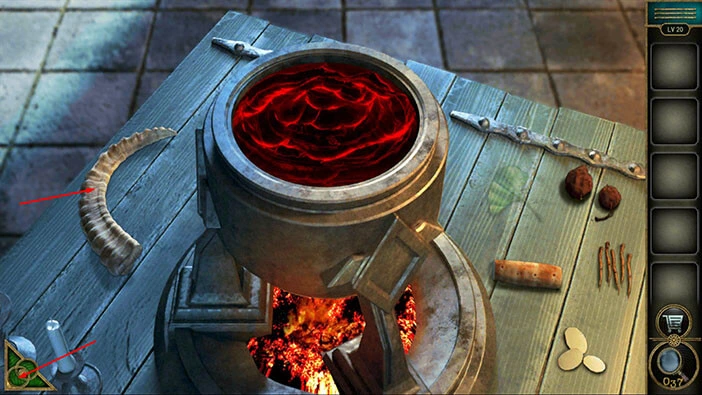
Let’s explore the twentieth level. Tap on the table in front of you to take a closer look at it.

Just to the left of the cauldron, you will find the “Horn”. Tap on it to take a closer look at it.
Next, tap on the chest on the desk on the right to take a closer look at it.

We can see another puzzle on the chest, but we will come back to it later. To the right of the chest, you will notice a hat and a feather. Tap on the feather to start the interaction.
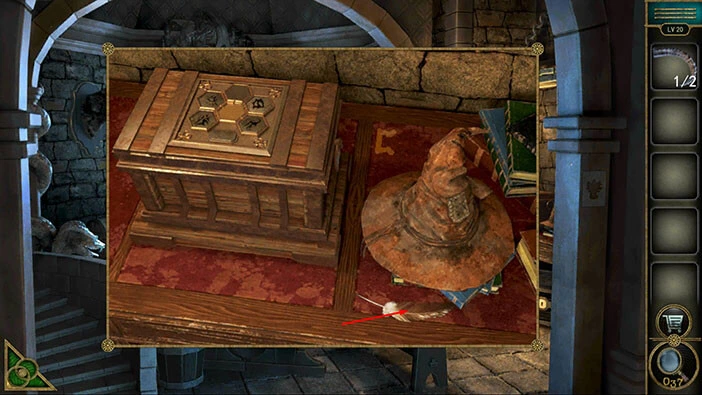
Our character will use the feather to activate the magical hat, and the hat will move to the right. Under the hat, you will find another “Achievement star” and a “Duct tape”. Tap on them to pick them up.
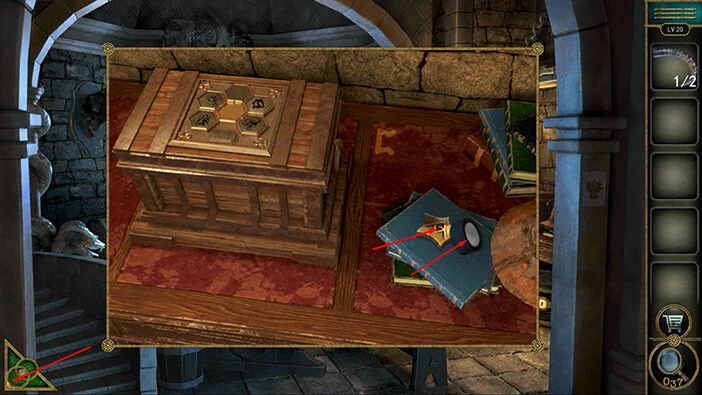
Next, tap on the hunting trophy on the wall on the left to take a closer look at it.
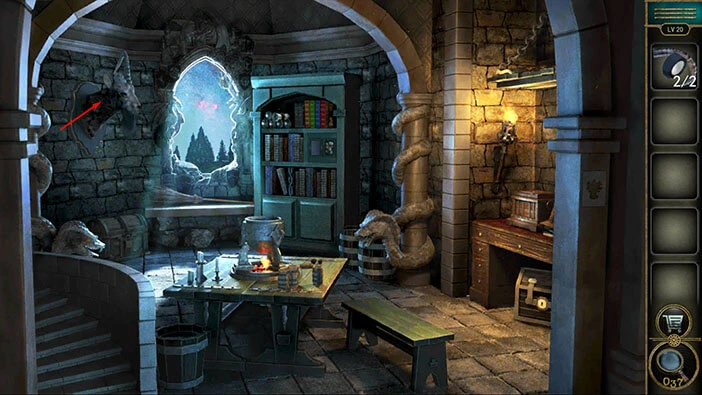
You will notice that one horn is broken. So, let’s select the “Bandages and ram’s horn” and reattach the horn. After that, tap on the trophy to start the interaction, and our character will move it aside.
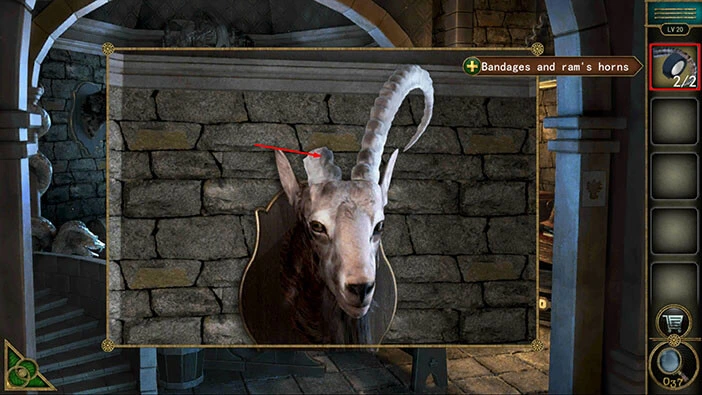
Behind the hunting trophy, you will discover a “Badge”. Tap on it to pick it up. Once you take the badge, you will discover a green “X” symbol that was previously hidden behind the badge. We will come back to it a bit later because it represents the hint for a puzzle that we will discover shortly.
Once you’re done, tap on the green button in the bottom left corner of the screen to go back.
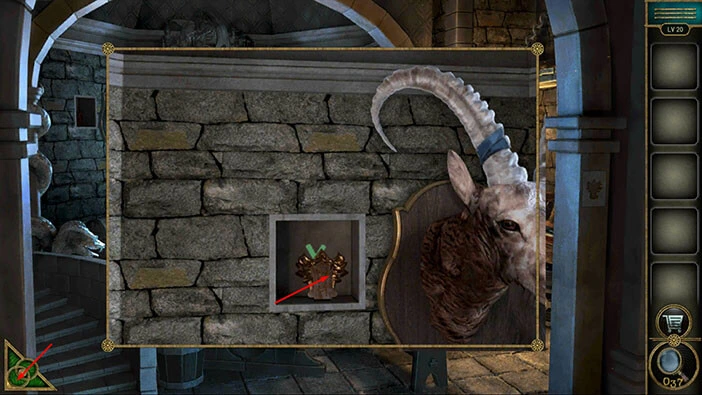
Next, let’s tap on the pillar on the right to take a closer look at it.

Here, you will discover an empty slot. So, let’s select the “Badge” from the inventory and insert it into the empty slot. Also, below the slot, you will notice the red letter “R”.
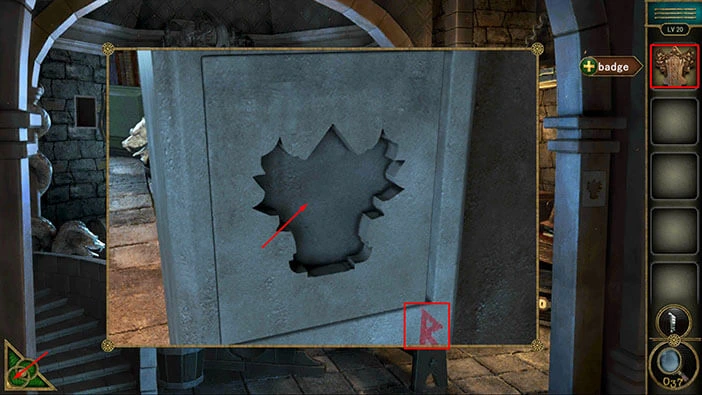
As soon as you insert the badge into the empty slot, you will open the secret compartment, and inside you will find a “Puzzle”. Tap on it to pick it up.
After that, tap on the green button in the bottom left corner of the screen to go back.
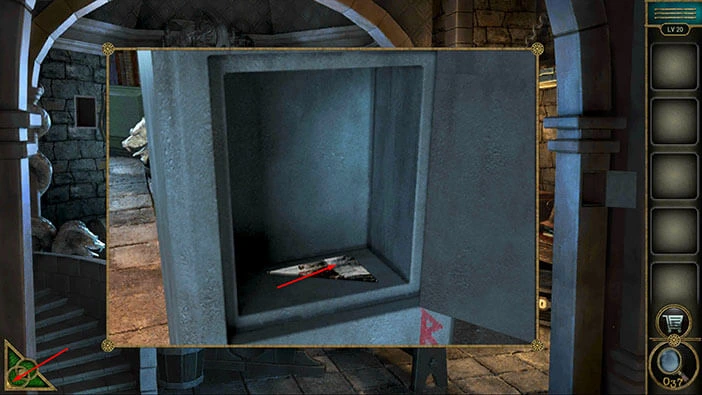
Next, let’s tap on the bookshelf on the right side of the room to take a closer look at it, and tap on it again to start the interaction.
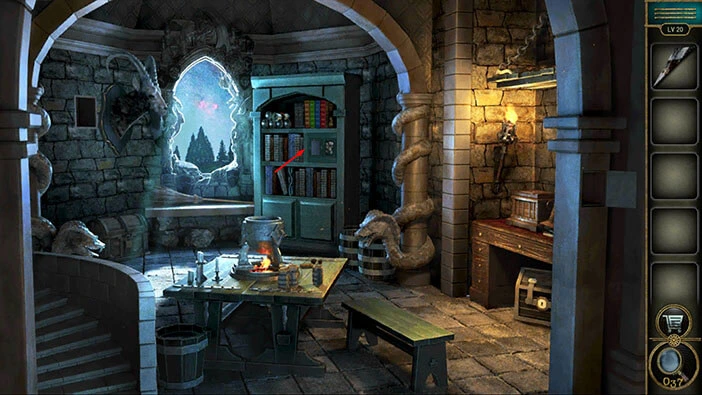
Let’s select the “Puzzle” from the inventory and insert it into the compartment on the right.
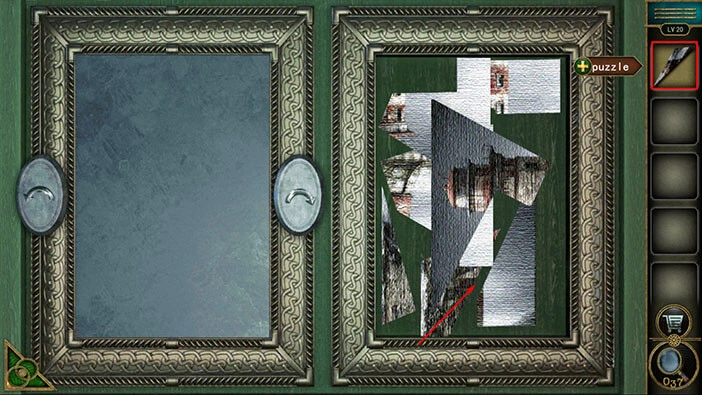
Our next task is to take the puzzle pieces from the compartment on the right and use them to assemble the puzzle in the compartment on the left.
We will do this puzzle in several steps. Let’s begin.
Step 1
Select the large piece of the puzzle located in the middle of the compartment on the right, then tap once on the arrow on the right to rotate the puzzle piece. After that, drag the puzzle piece and place it at the top of the compartment on the left.
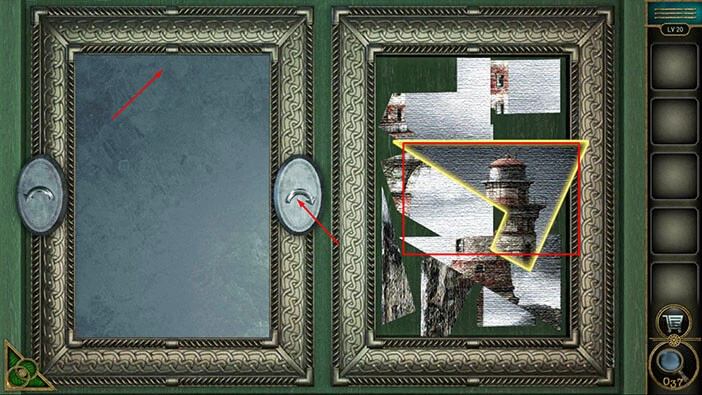
Step 2
Select the large piece of the puzzle located on the left side of the compartment on the right, then tap twice on the arrow on the right to rotate the puzzle piece. After that, drag the puzzle piece and place it into the bottom left corner of the compartment on the left.
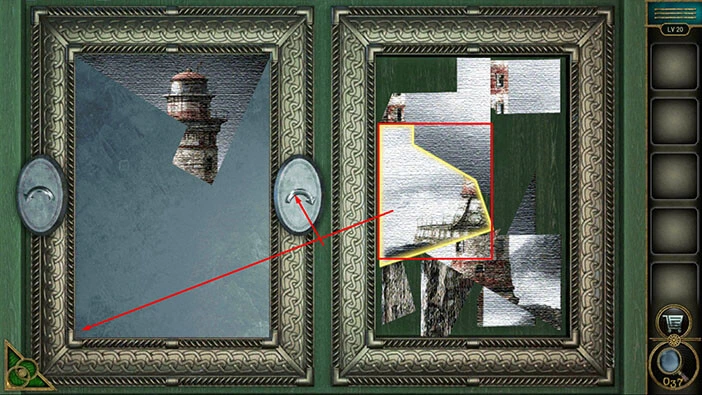
Step 3
Select the large piece of the puzzle located on the right side of the compartment on the right, and drag it next to the previous puzzle piece (these two pieces should form a straight line at the top).
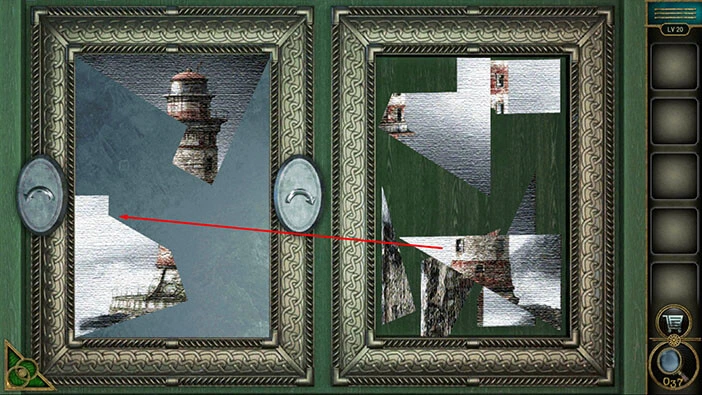
Step 4
Select the small piece of the puzzle located on the left side of the compartment on the right, then tap three times on the arrow on the right to rotate the puzzle piece. After that, drag the puzzle piece and place it into the bottom left corner of the compartment on the left.
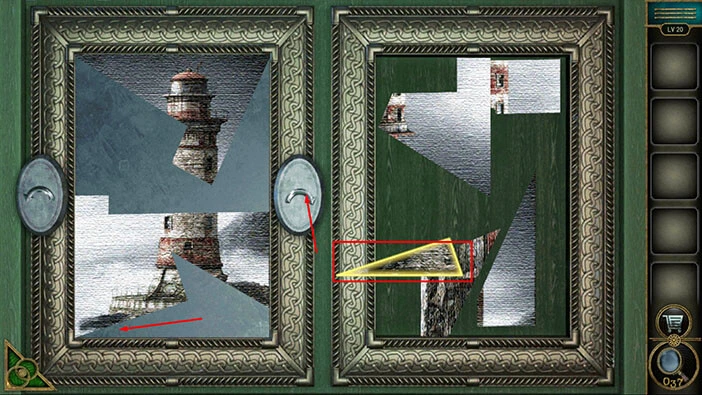
Step 5
Select the medium-sized piece of the puzzle located in the bottom right side of the compartment on the right, and drag it into the top right corner of the compartment on the left.
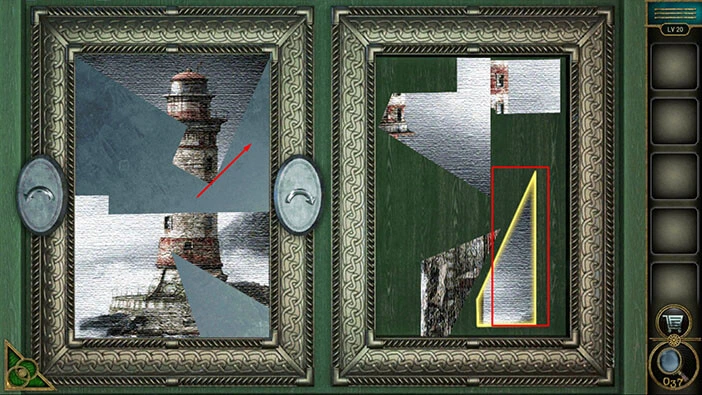
Step 6
Select the large piece of the puzzle located on the left side of the compartment on the right, then tap twice on the arrow on the right to rotate the puzzle piece. After that, drag the puzzle piece and place it into the top left corner of the compartment on the left.
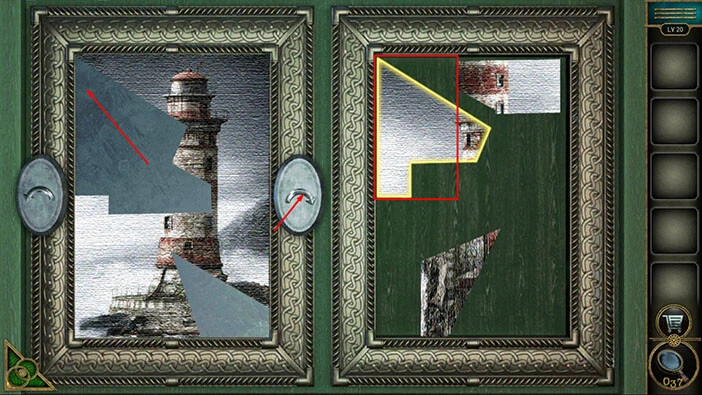
Step 7
Select the small piece of the puzzle located on the right side of the compartment on the right, then tap twice on the arrow on the right to rotate the puzzle piece. After that, drag the puzzle piece and place it into the middle of the compartment on the left.
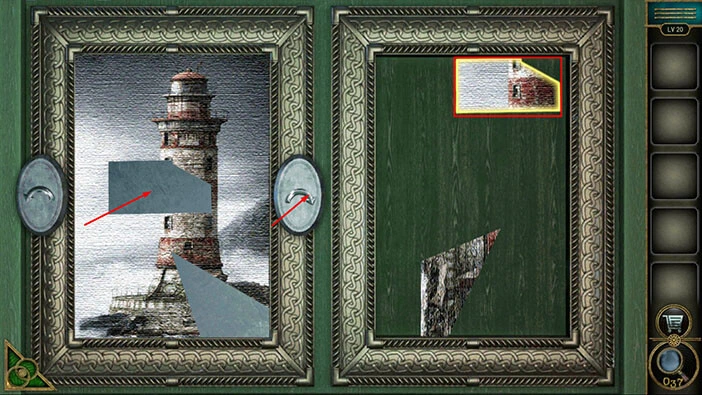
Step 8
Select the last piece of the puzzle from the compartment on the right, then tap three times on the arrow on the right to rotate the puzzle piece. After that, drag the puzzle piece and use it to complete the puzzle.
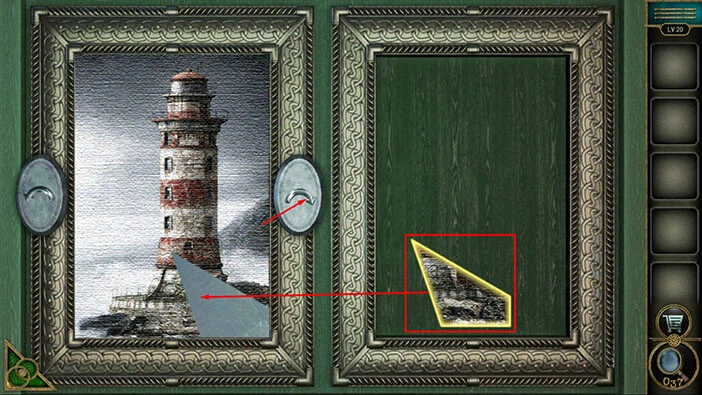
As soon as you solve the puzzle, the secret compartment in the bookshelf will open and inside you will find a “Prescription”. Tap on it to pick it up.
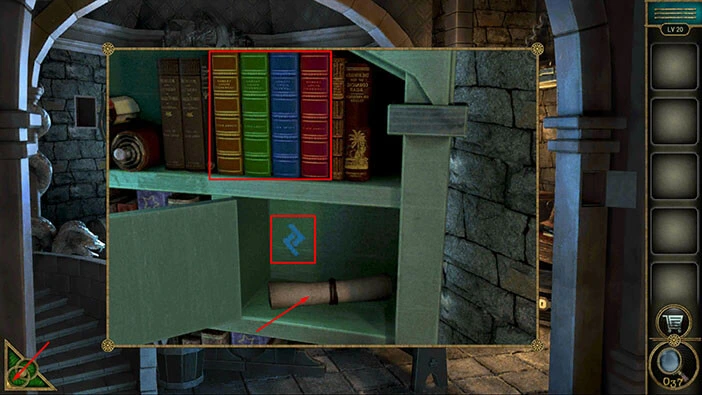
Before we continue, let’s take a look at the books above the secret compartment. Here, we have four books, and the order of the colors of the books represents the order of the symbols for the next puzzle. So, let’s memorize/write down the order of the books.
First = Yellow book
Second = Green book
Third = Blue book
Fourth = Red book
In the secret compartment, we can also see a blue symbol, that looks like two letters “L” (kind of). Let’s memorize/write down this symbol because it is the third (blue book is third) symbol of the password for the next puzzle.
Once you’re done, tap on the green button in the bottom left corner of the screen to go back.
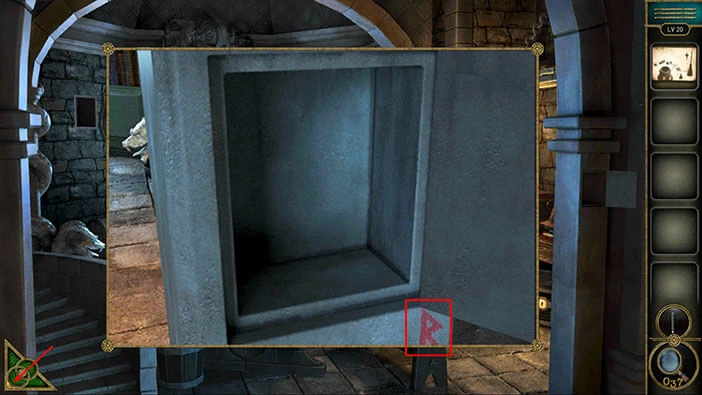
Let’s go back to other symbols, and memorize/write them down. Tap on the pillar on the right to take a closer look at it.

Here, we have a Red letter R. This is the fourth symbol because the red book was the fourth one on the bookshelf. Memorize/write down this information.
Once you’re done, tap on the green button in the bottom left corner of the screen to go back.
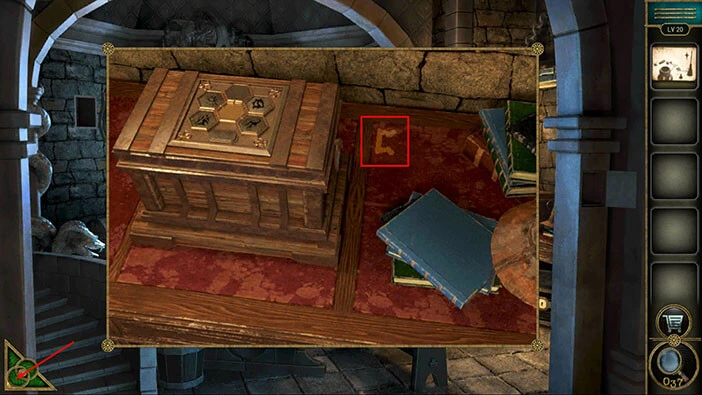
Next, let’s take a look at the chest on the desk on the right.

Just to the right of the chest, we can see a symbol that looks like the Yellow letter C. This is the first symbol because the yellow book was the first one on the bookshelf. Memorize/write down this information.
Once you’re done, tap on the green button in the bottom left corner of the screen to go back.
Lastly, let’s look at the compartment next to the hunting trophy.

Here, we can see a symbol that looks like the Green letter X. This is the second symbol because the green book was the second one on the bookshelf.
So, if we put all this information together, we will get, Yellow letter C, Green letter X, Two Blue letters L, Red letter R. Memorize/write down this information.
Once you’re done, tap on the green button in the bottom left corner of the screen to go back.
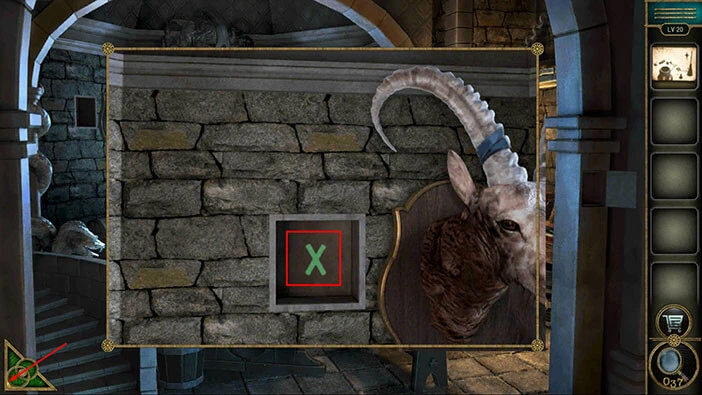
Next, let’s tap on the wooden chest in the top right corner of the room to take a closer look at it, then tap on the padlock to start the interaction.

Let’s enter the symbols that we discovered. We had, “C”, “X”, “Double L”, “R”.
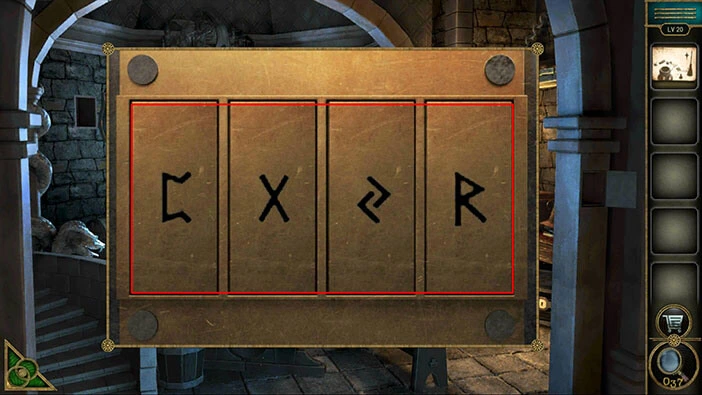
As soon as you enter the correct symbols, you will unlock and open the chest. In the chest, you will find a “Gem”. Tap on it to pick it up.
After that, tap on the green button in the bottom left corner of the screen to go back.
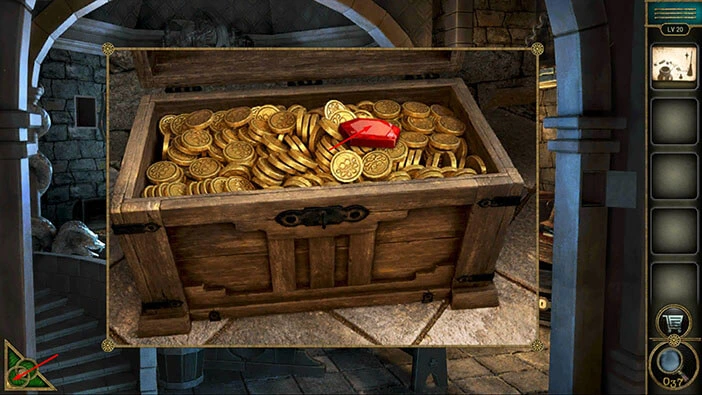
Next, let’s tap on the chest on the desk on the right to take a closer look at it, and tap again to start the interaction.
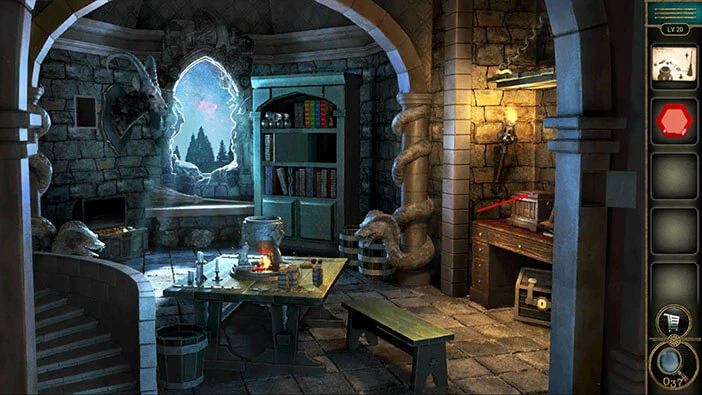
Here, we have another puzzle. You will notice that the slot in the middle is empty. So, let’s select the “Gem” from the inventory and insert it into the empty slot.
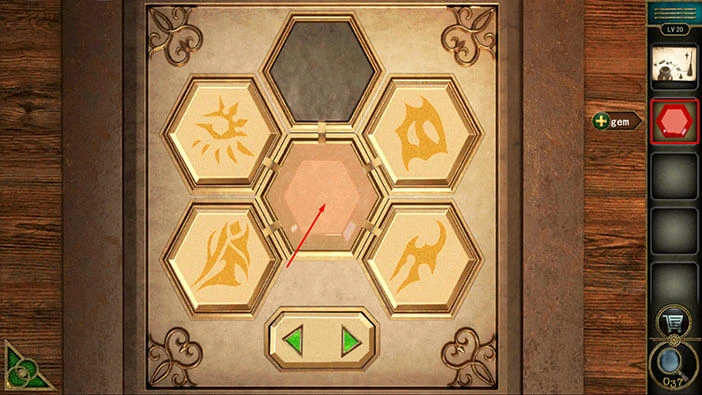
Below each puzzle piece, we have a picture, and this picture should match the picture on the puzzle piece. So, our task is to shuffle the puzzle pieces and place them into the slots that have the matching picture. Also, the three lines on the Gem represent the connections between the symbols.
We will do this in several steps. Let’s begin.
Step 1
Tap on the puzzle piece in the bottom left slot to move it to the slot at the top.

Step 2
Tap on the puzzle piece in the bottom right slot to move it to the bottom left slot.
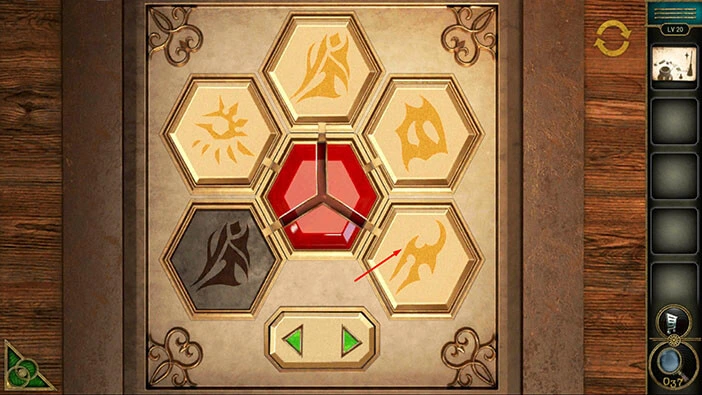
Step 3
Tap on the puzzle piece in the slot at the top to move it to the bottom right slot.
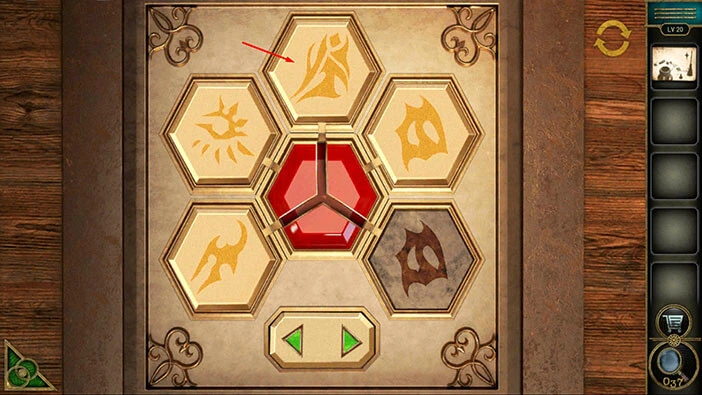
Step 4
Next, let’s tap on the green arrow on the right to change the connections between the slots.
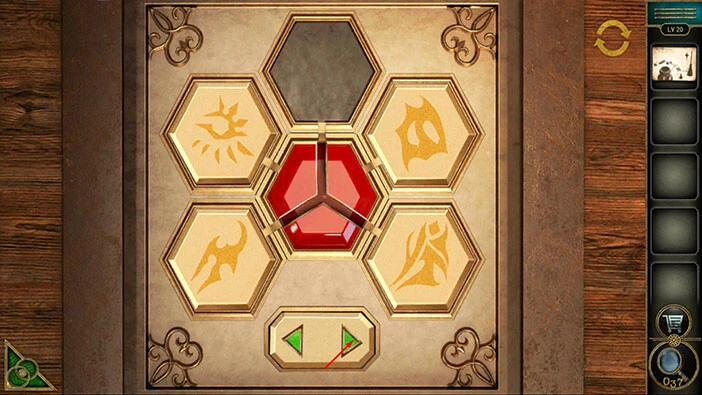
Step 5
Tap on the puzzle piece in the top right slot to move it to the slot at the top.
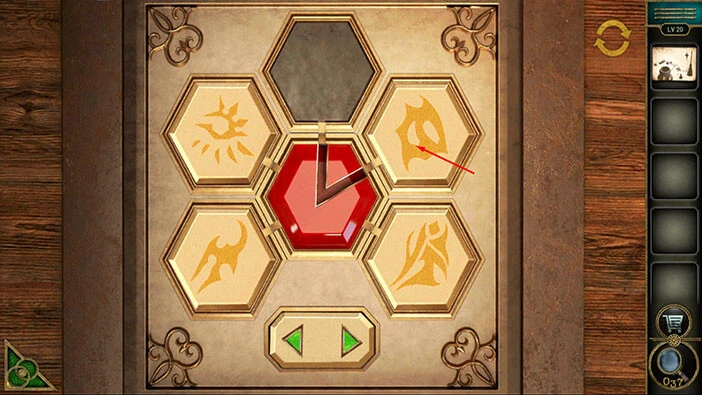
Step 6
Next, let’s tap twice on the green arrow on the right to change the connections between the slots.
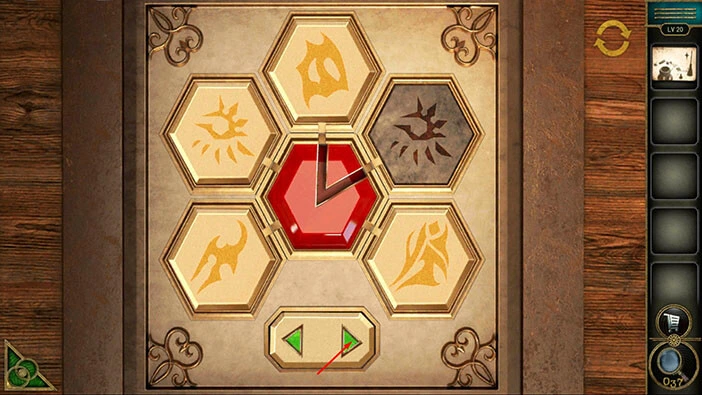
Step 7
Tap on the puzzle piece in the top left slot to move it to the top right slot.
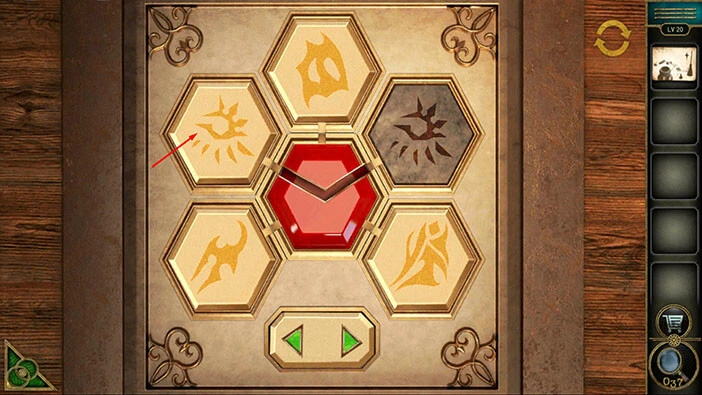
Step 8
Next, let’s tap on the green arrow on the left to change the connections between the slots.

Step 9
Tap on the puzzle piece in the bottom left slot to move it to the top left slot.
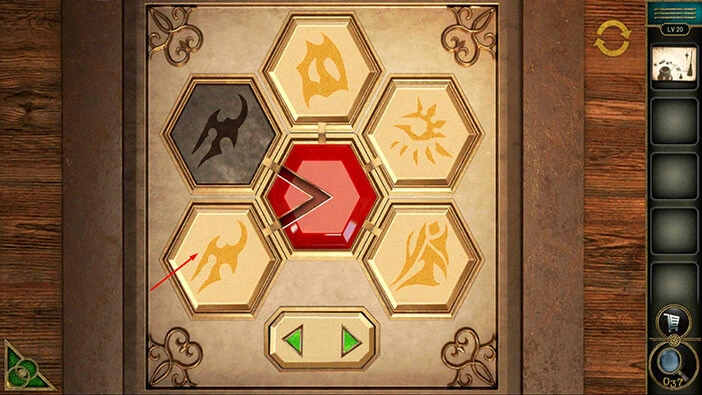
Step 10
Next, let’s tap twice on the green arrow on the right to change the connections between the slots.
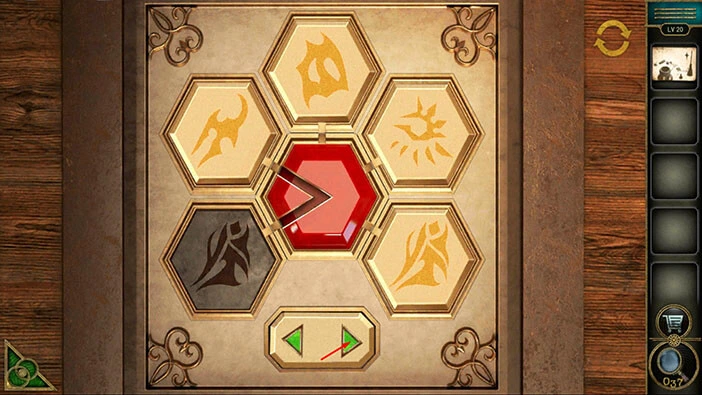
Step 11
Tap on the puzzle piece in the bottom right slot to move it to the bottom left slot.

Step 12
Lastly, tap on the puzzle piece in the top slot to move it to the bottom right slot. With that, you will correctly arrange all the puzzle pieces.
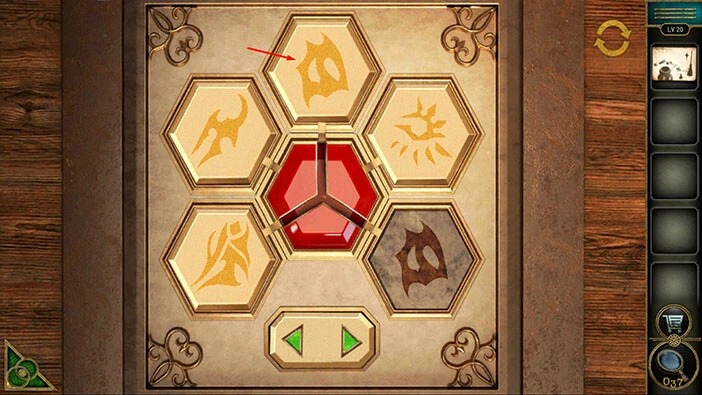
As soon as you solve the puzzle, you will unlock and open the small chest. Inside you will find, an “Empty Bottle” and “Herbs”. Tap on them to pick them up.
After that, tap on the green button in the bottom left corner of the screen to go back.
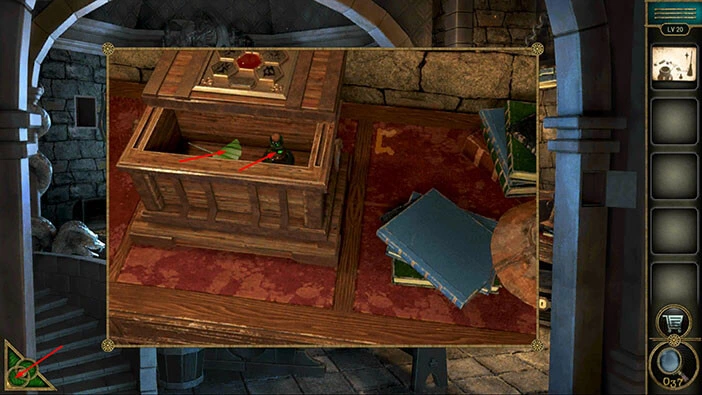
Next, let’s tap on the table to take a look at it, again.
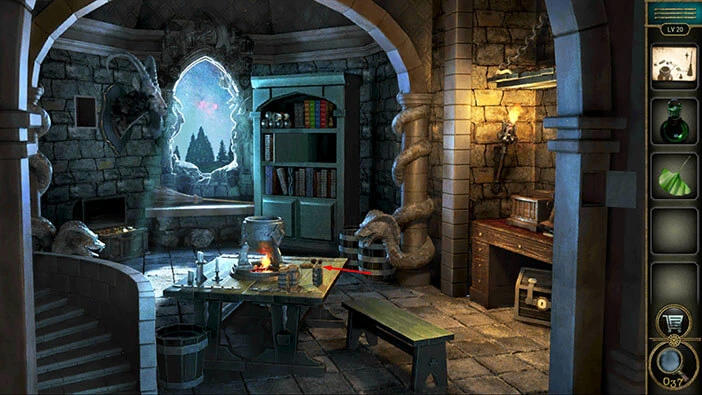
On the table, you will see a transparent image of “herbs”. So, let’s select the “Herbs” from the inventory and put them on the table. After that, tap on the “Prescription” to examine it.
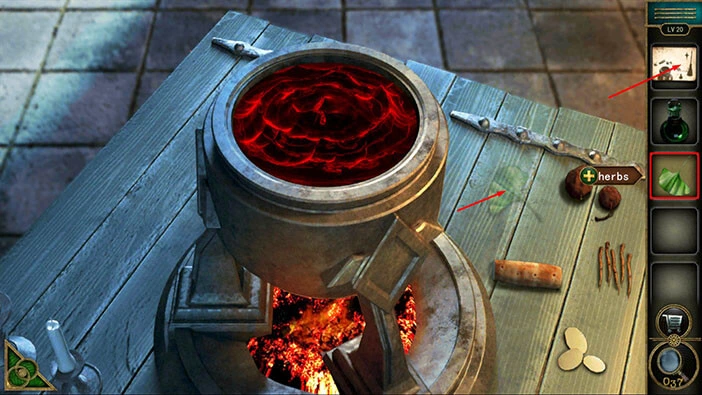
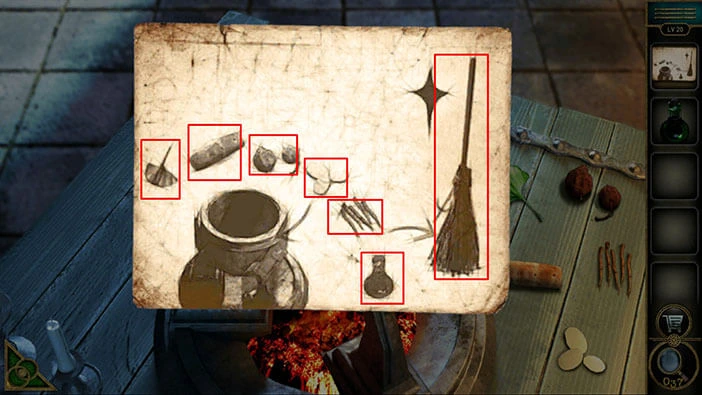
Here, we can see the instructions for the next puzzle. We can discover the correct order of the ingredients, by looking at them from left to right. We should put ingredients into the cauldron in this order. After that, we should use the “Empty bottle” and fill it up with the potion. Lastly, we should use the potion on the broom.
So, first, let’s look at the order of the ingredients.
The first ingredient = Herbs (that we just placed on the table)
The second ingredient = Shaped like a carrot (kind of)
The third ingredient = Two round vegetables
The fourth ingredient = Three oval vegetables
The fifth ingredient = Several sticks
Memorize/write down this information, then tap on the inventory slot to put down the “Prescription”.
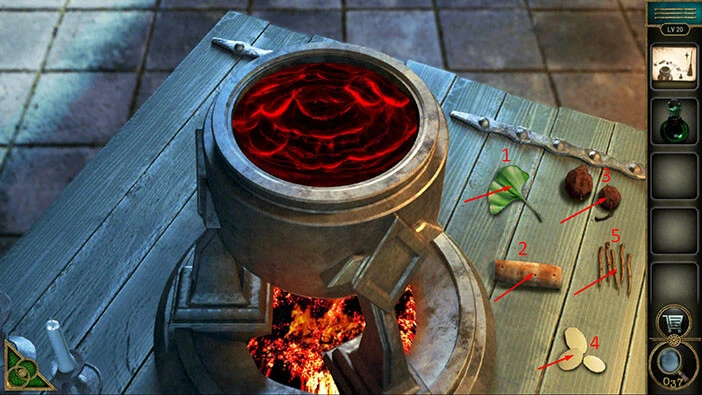
Let’s follow the instructions and add the ingredients in the correct order.
First, tap on the “Herbs” to put them into the cauldron.
Second, tap on the carrot-shaped ingredient to put it into the cauldron.
Third, tap on the two round vegetables to put them into the cauldron.
Fourth, tap on the three oval vegetables to put them into the cauldron.
Fifth, tap on the Several sticks to put it into the cauldron.
As soon as you add all the ingredients in the correct order, you will create a magic potion. Let’s continue. Select the “Empty bottle” from the inventory and fill it up with potion. “Enchanting potion” will be added to your inventory.
After that, tap on the green button in the bottom left corner of the screen to go back.
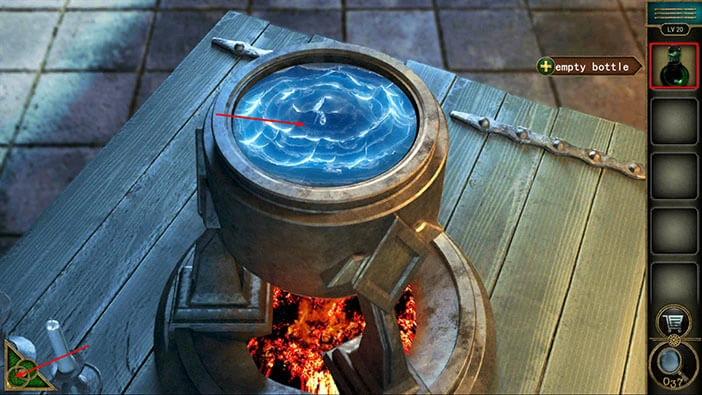
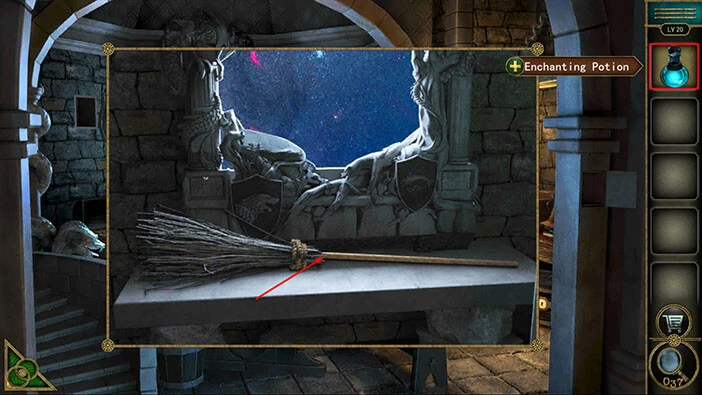
Next, just below the window, you will notice a broom. Let’s tap on it to take a closer look.
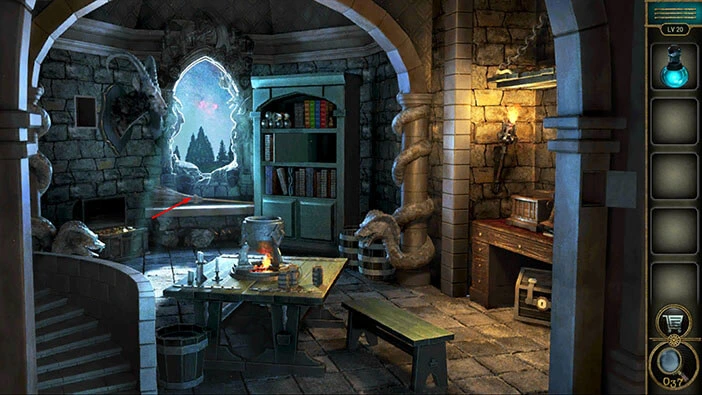
Select the “Enchanting potion” from the inventory and use it on the broom. You will create a flying broom, and our character will use it to fly out of the window, to the next level.
With that, we have reached the end of the fifth part of the walkthrough. If you want to see the sixth part, tap on the next part button. In the sixth part of the walkthrough, we will cover levels 21-24.
Thank you for reading.