Can you escape the 100 room 17 | Levels 13-16
Hello everyone and welcome to the fourth part of the walkthrough for “Can you escape the 100 room 17”. In the fourth part of the walkthrough, we will cover levels 13 to 16.
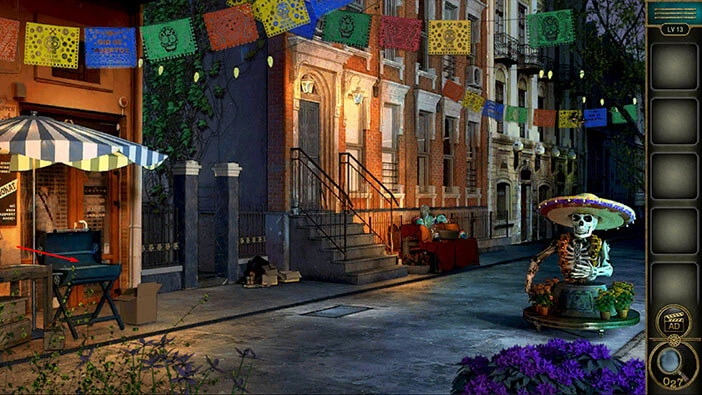
Level 13
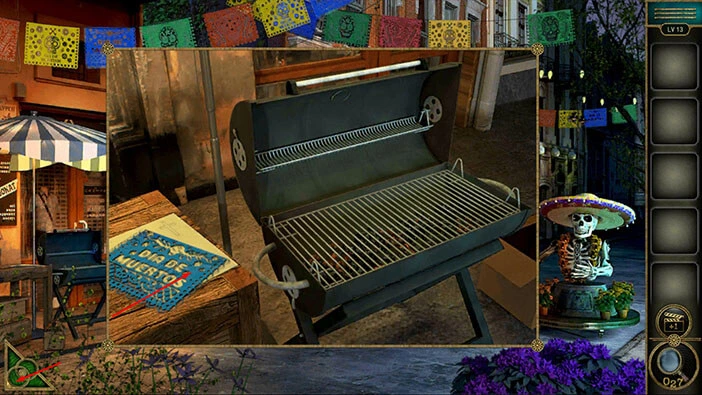
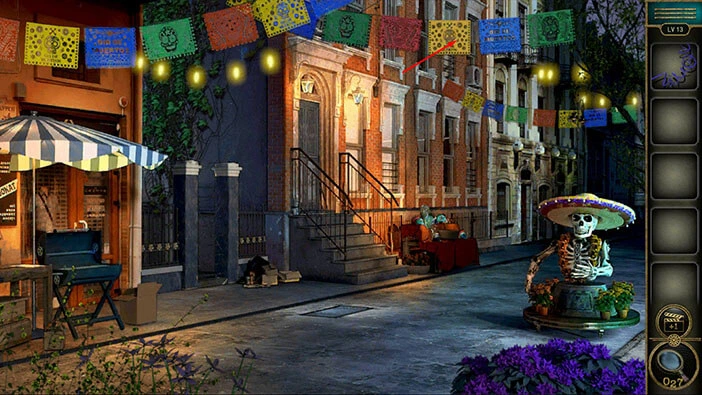
Let’s explore the thirteenth level. This time we are exploring the street after a party. Let’s explore it. Tap on the barbeque on the left side of the street to take a closer look at it.
On the left, you will notice a “Flag”. Tap on it to pick it up. After that, tap on the green button in the bottom left corner of the screen to go back.
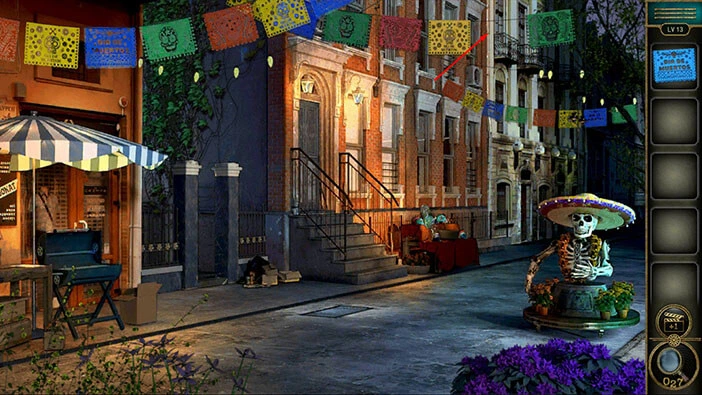
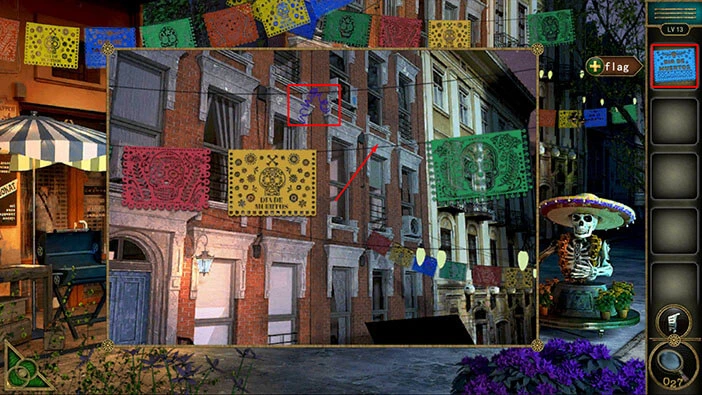
Next, tap on the flags that are hanging from the wire to take a closer look.
You will notice three flags and one empty spot. So, select the “Flag” from the inventory and attach it to the empty spot on the wire. When you do that, a purple item above the wire will fall off.
Our character will automatically look at the spot on the street where the “Ribbon” fell. Tap on the “Ribbon” to pick it up.
After that, tap on the green button in the bottom left corner of the screen to go back.
Let’s look again at the flags on the wire.
Let’s look at the color of the flags starting from left to right. Here we have, red, yellow, blue, and green. Memorize/write down this information because the order of the colors represents the hint for one of the following puzzles.
Once you’re done, tap on the green button in the bottom left corner of the screen to go back.

Next, tap on the table, located at the end of the street on the left, to take a closer look at it.

Here, you will notice a bread basket. Tap on it three times to eat the bread.
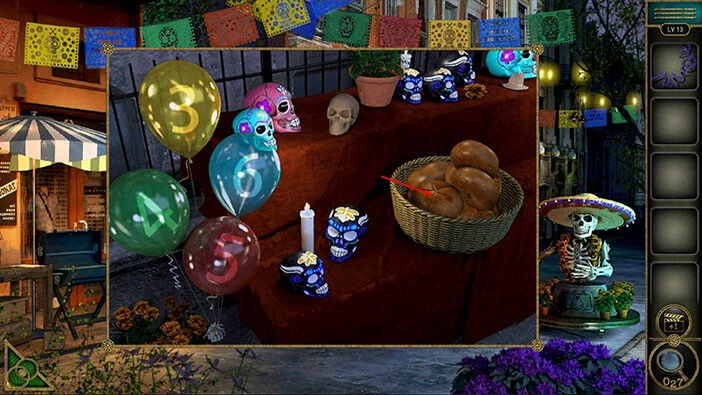
Below the bread you will find an “Achievement Star”. Tap on it to pick it up. There is also a skull on the table. Tap on it to pick it up and “Plasticine” will be added to your inventory.
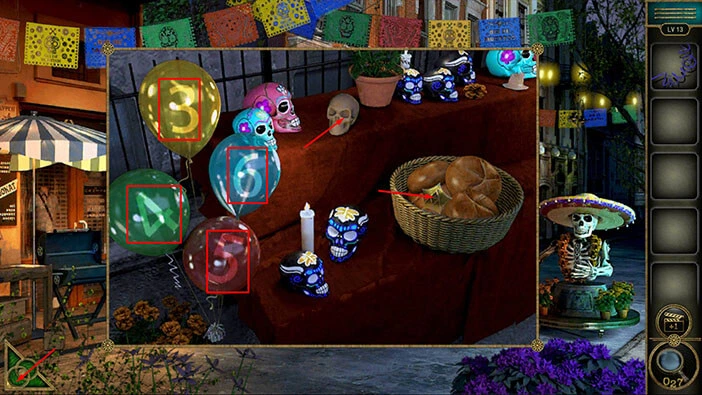
Also, you will notice four balloons on the left. The balloons are in the same colors as the flags that we saw previously. So, we already discovered the correct order of the colors, and now we can determine the number for each color by looking at the balloons. We have,
First = Red = 5
Second = Yellow = 3
Third = Blue = 6
Fourth = Green = 4.
Memorize/write down this information because it represents the solution for one of the puzzles that we will solve a bit later.
Once you’re done, tap on the green button in the bottom left corner of the screen to go back.
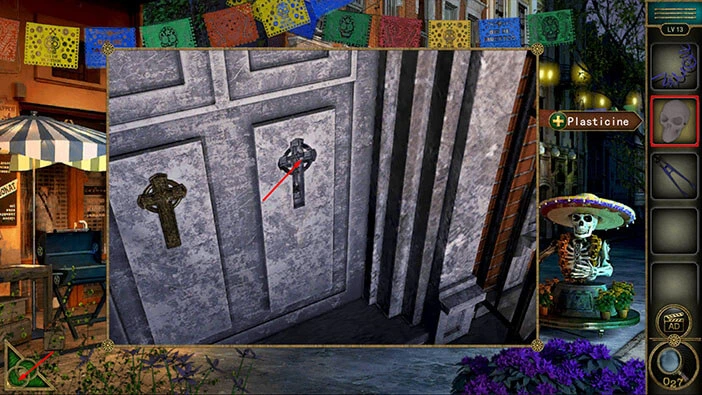
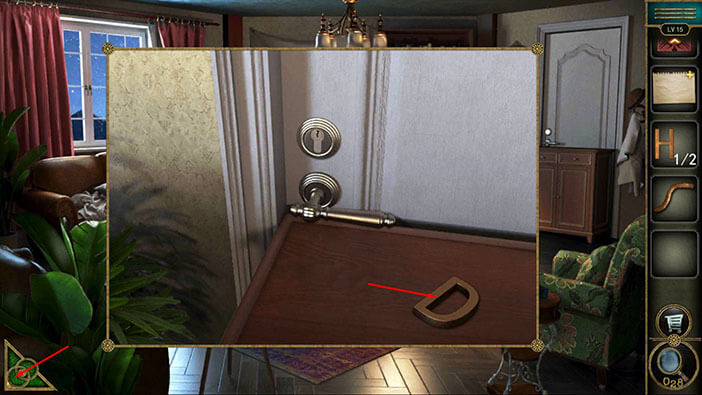
Next, tap on the door on the left to take a closer look at it.

Next to the door, you will notice “Pliers”. Tap on them to pick them up.
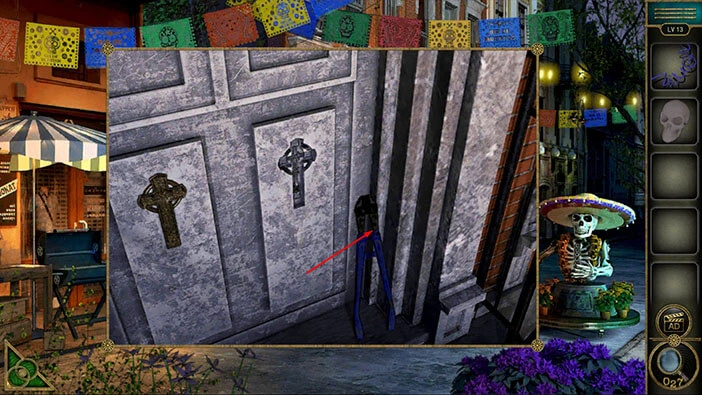
Before we proceed, select the “Plasticine” from the inventory and insert it into the right slot on the door that is shaped like a cross. The plasticine will be shaped like a cross, so let’s tap on it to pick it up. “Key mold” will be added to your inventory.
Once you’re done, tap on the green button in the bottom left corner of the screen to go back.
Next, tap on the gate on the left to take a closer look at it.

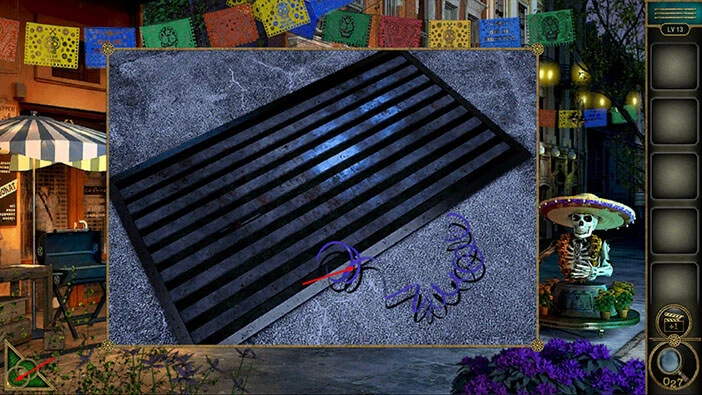
This passage is blocked by the barbed wire. So, let’s select the “Pliers” from the inventory and use them to cut the wire.
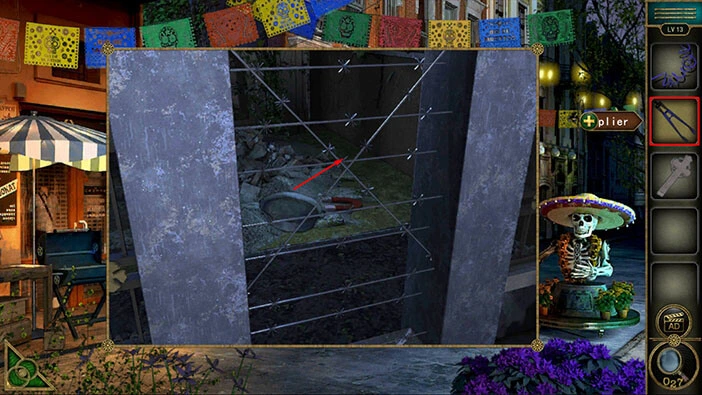
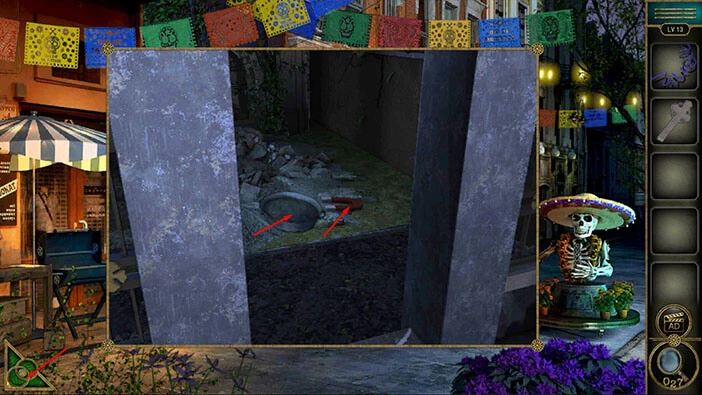
Once you cut the wire, you will gain access to the two items. Tap on them to pick them up. The “Sand” and the “Magnet” will be added to your inventory.
Next, select the “Magnet” from the inventory. After that, select the “Ribbon” from the inventory and attach it to the “Magnet”.
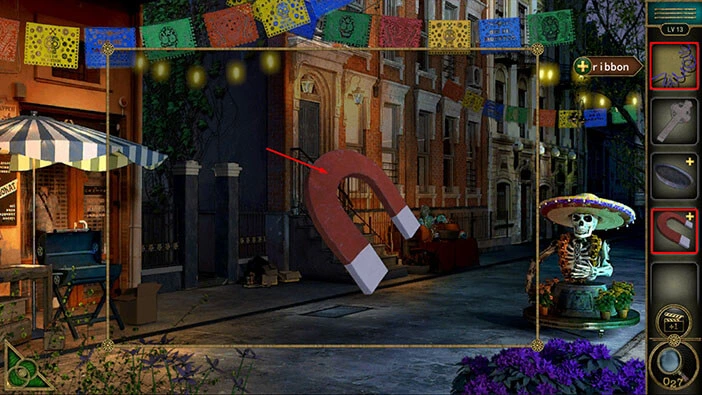
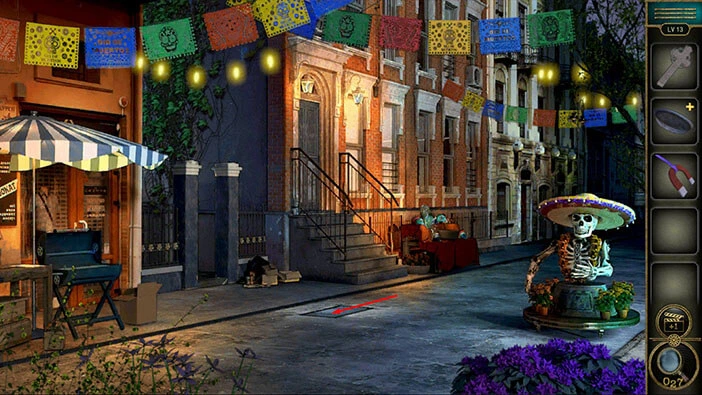
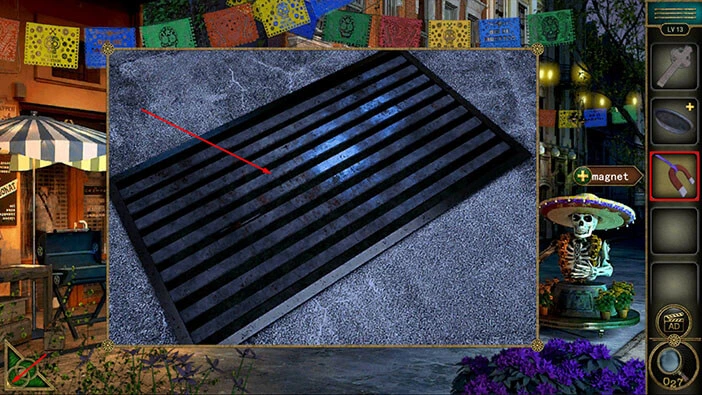
Next, tap on the metal bars on the street to take a closer look at them.
Select the “Magnet” from the inventory and use it to reach the item below the bars. A “Screwdriver” will be added to your inventory.
After that, tap on the green button in the bottom left corner of the screen to go back.
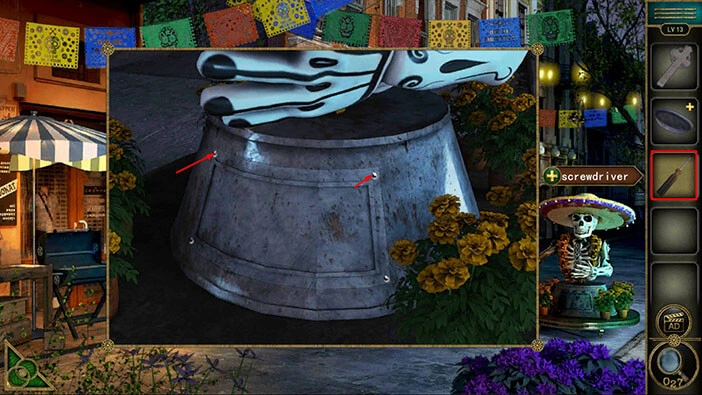
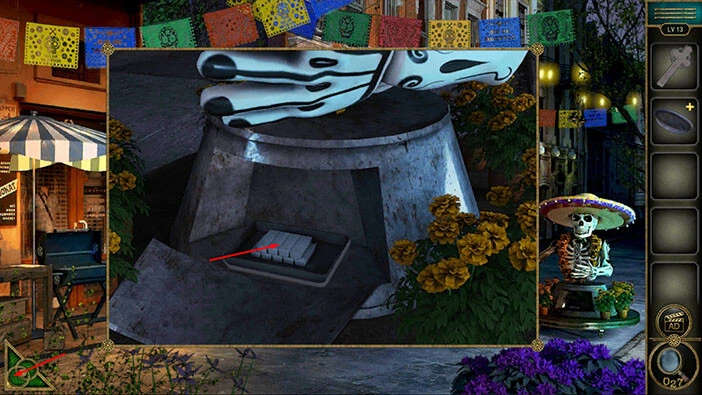
Next, tap on the base of the statue to take a closer look at it.

Select the “Screwdriver” from the inventory and use it to remove the lid on the statue. After that, tap on the slots in the statue to start the interaction.
Let’s enter the four numbers that we saw previously (by examining the color of the flags, and the colors and numbers of the balloons).
Enter the code “5364”.
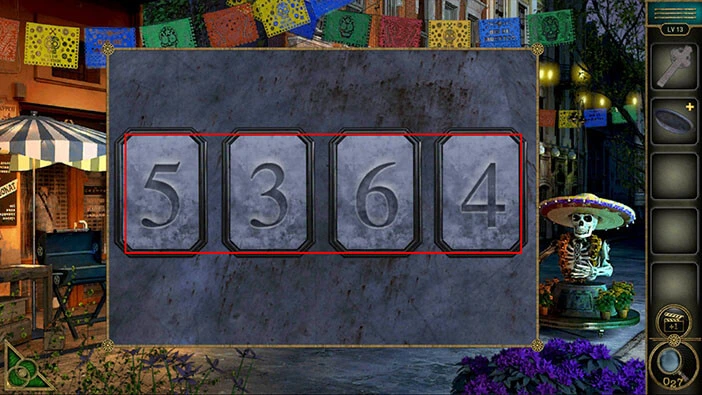
In the statue, you will find “Aluminum”. Tap on it to pick it up. After that, tap on the green button in the bottom left corner of the screen to go back.
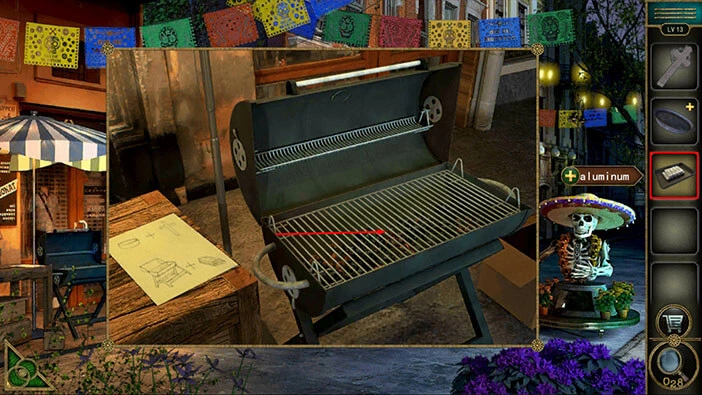
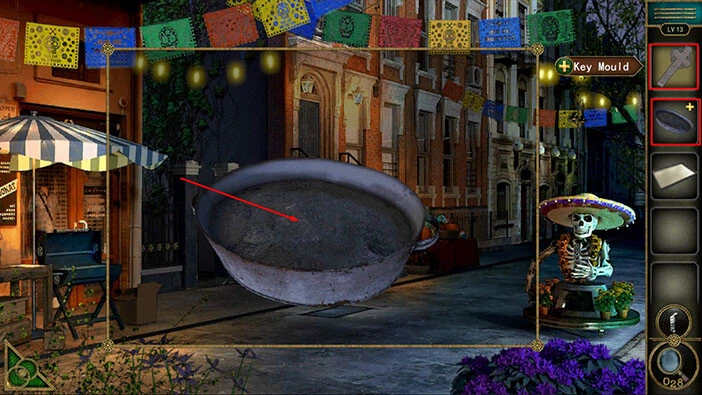
Next, tap on the barbecue on the left to take a closer look at it.

If you take a look at the table on the left, you will see the instructions. Here, we can see that we should combine the barbecue with the “Aluminum”, and we should combine the “Sand” with the “Key Mold”.
So, select the “Aluminum” from the inventory and place it into the barbecue.
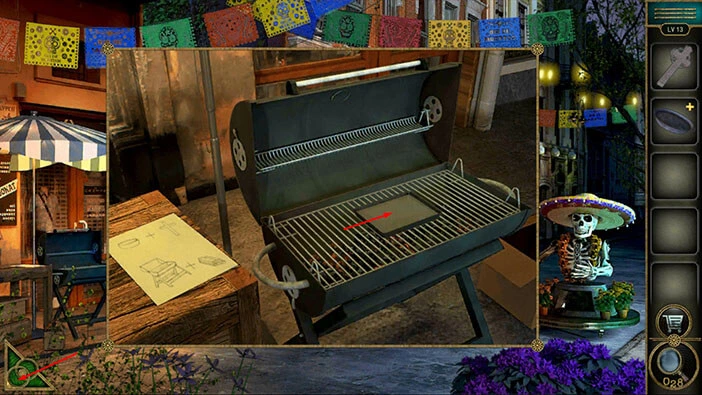
The red light will glow on the barbecue. Wait a few moments and the light will turn green and the barbecue will open.
We managed to heat up the aluminum, and it is now “Liquid Aluminum”. Tap on it to pick it up. After that, tap on the green button in the bottom left corner of the screen to go back.
Next, select the “Sand” from the inventory and it will appear in the middle of the screen. After that, select the “Key Mold” from the inventory and place it into the “Sand”.
Well, we will create a mold. So, select the “Liquid Aluminum” from the inventory and pour it into the mold.
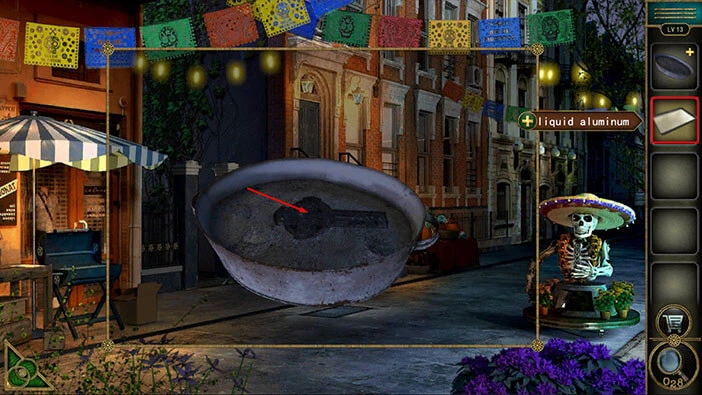
With that, you will create a “Key”. Tap on it to pick it up.
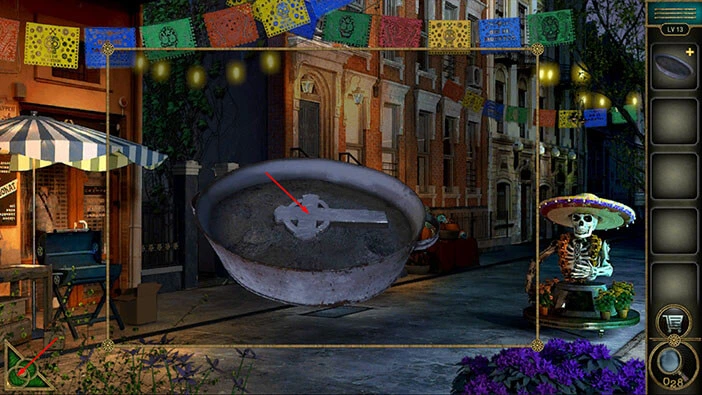
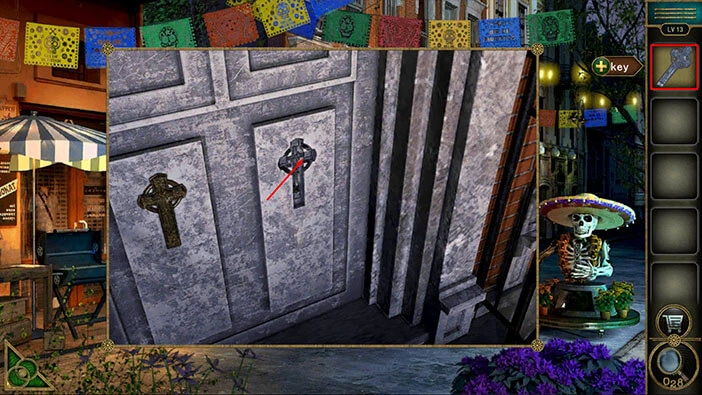
Next, tap on the door on the left to take a closer look at it.

Select the “Key” from the inventory and insert it into the slot on the right. With that, you will unlock the door. Tap on the door to proceed to the next level.
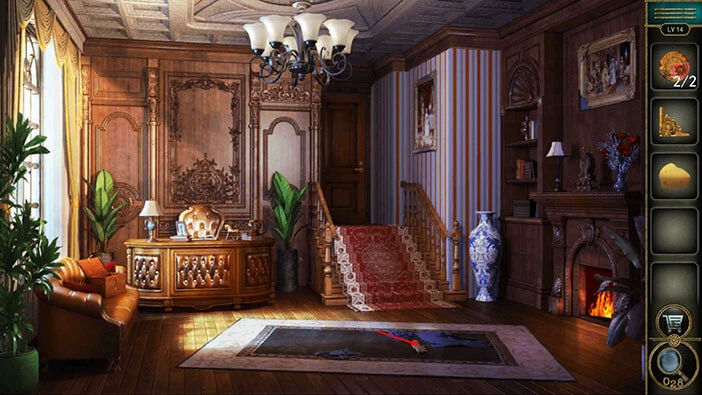
Level 14
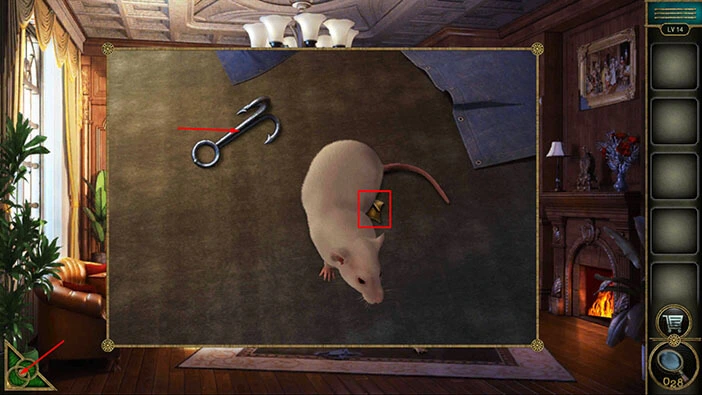
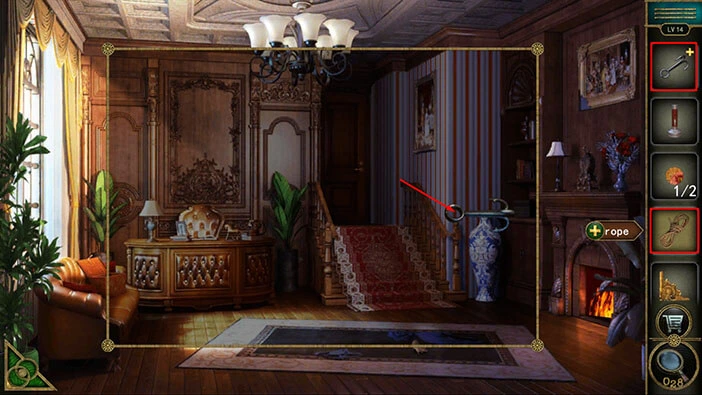
Let’s explore the fourteenth level. On the carpet in the middle of the room, you will notice a white mouse. Tap on it to take a closer look.

You will see a fishing hook just to the left of the mouse. Tap on the “Hook” to pick it up. You will also notice an “Achievement Star” hidden below the mouse. We will come back to it a bit later in the walkthrough.
Once you’re done, tap on the green button in the bottom left corner of the screen to go back.
Next, tap on the desk in the left corner of the room to take a closer look at it.
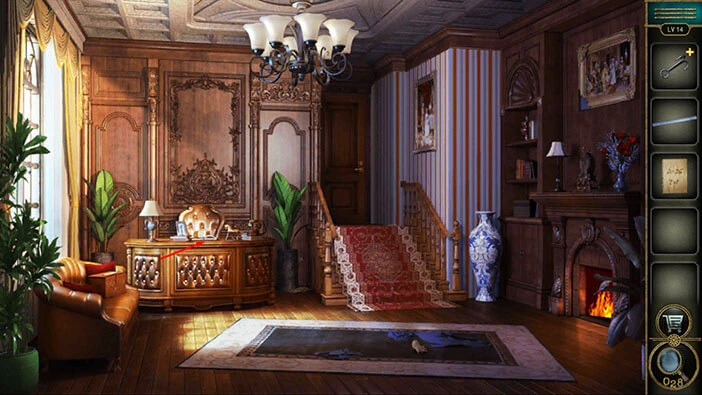
On the table, you will find an “Iron Ruler” and a “Paper with hints”. Tap on them to pick them up.
After that, tap on the green button in the bottom left corner of the screen to go back.
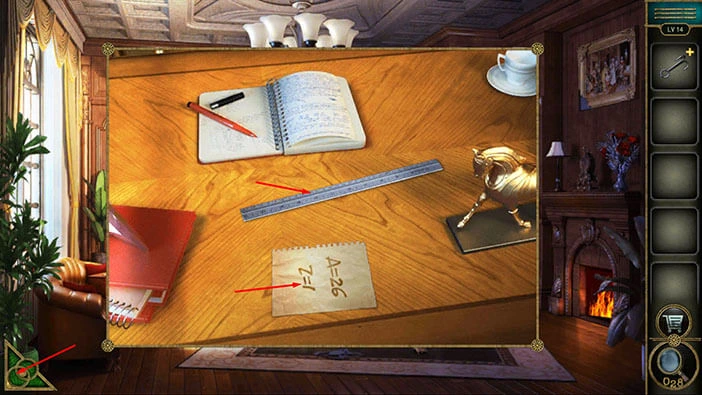
Next, let’s tap on the “Paper with hints” in our inventory to examine it.

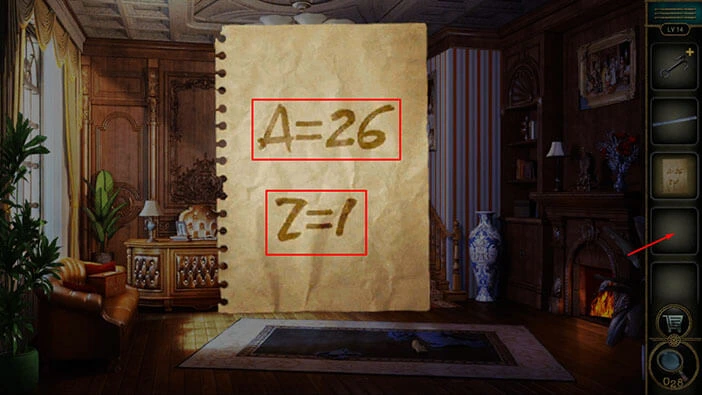
Here, we can see “A = 26”. “A” is the first letter of the alphabet, and it should have the value of 1. However, the paper with hints shows us that we should determine the value of the letter by looking at the alphabet in the reverse order. Let’s look at the next hint.
Below we can see “Z = 1”. “Z” is the last (26th) letter of the alphabet, but it has the value of 1. This confirms our theory. Memorize the information that we discovered by examining the hint (that we should count the letters in reverse order) because we will need it for the next puzzle.
Once you’re done, tap on the inventory slot to put down the “Paper with the hint”.
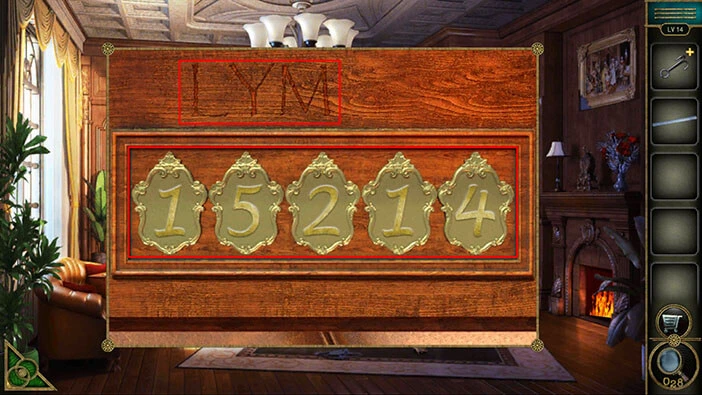
Next, tap on the chest, located on the couch on the left, to take a closer look at it, and tap again to start the interaction.

In order to unlock this chest, we will need a five-digit code. If you take a look at the part of the box above the digits, you will notice three letters “LYM”. We should use the logic that we discovered by examining the “Paper with hints” to determine the value of these letters. So, we should look at the alphabet in reverse order and determine the value of the letter.
Once you do that, you will discover the values
L = 15
Y = 2
M = 14
When we put it all together, we will get “15214”. Enter this code and you will unlock the chest.
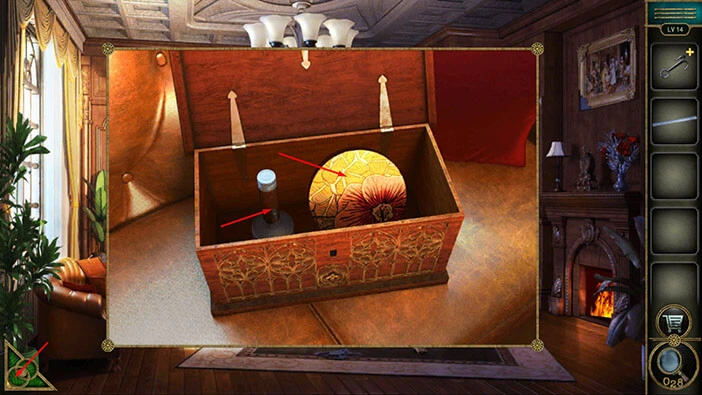
In the chest, you will find, a “Flashlight” and a “Game prop”. Tap on them to pick them up. After that, tap on the green button in the bottom left corner of the screen to go back.
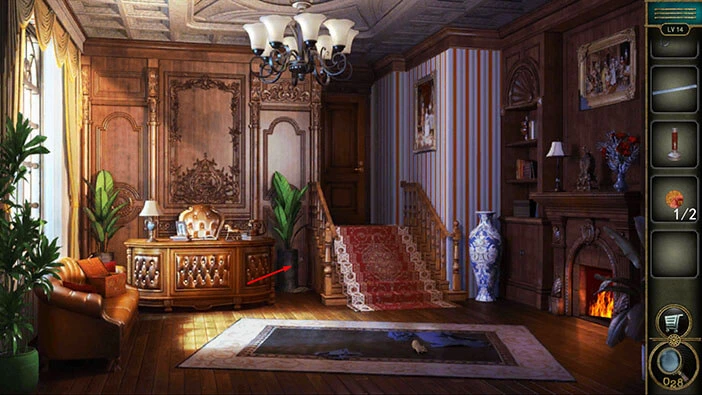
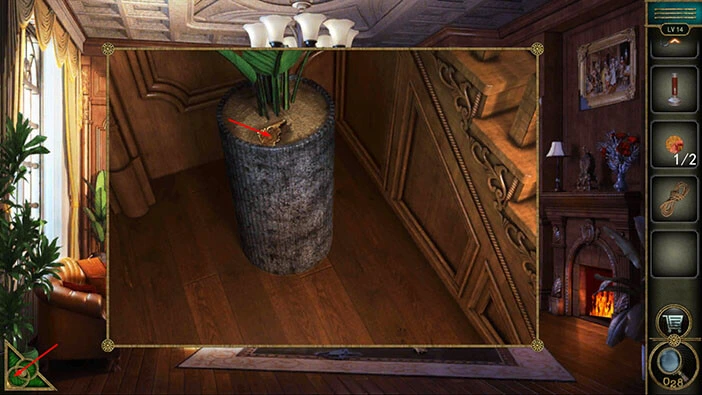
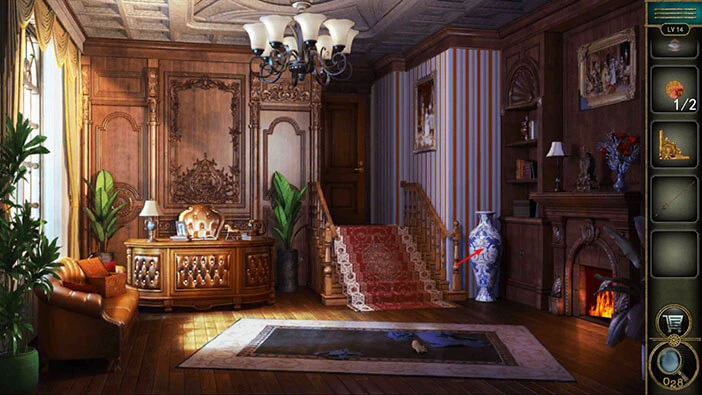
Next, tap on the vase located just to the right of the desk, to take a closer look at it.
You will notice a “Rope” so let’s tap on it to pick it up. After that, select the “Iron ruler” and use it to dig the dirt in the vase.

In the dirt, you will find a “Frame piece” so let’s tap on it to pick it up. After that, tap on the green button in the bottom left corner of the screen to go back.
Next, tap on the “Hook” in your inventory to select it and it will appear in the middle of the screen. After that, select the “Rope” from the inventory and attach it to the “Hook”. “Grappling Hook” will be added to your inventory.
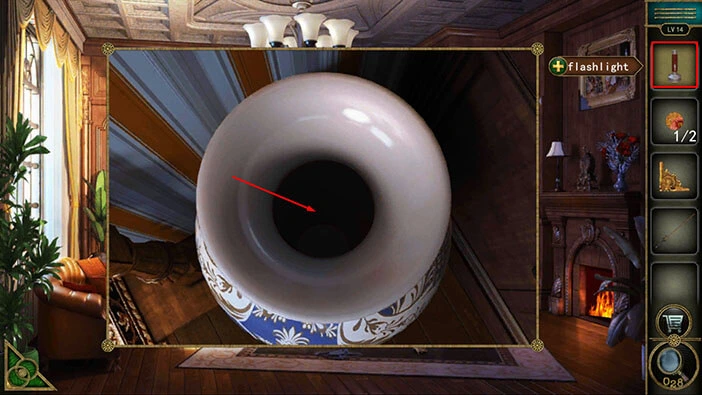
Next, tap on the vase on the right to take a closer look at it.
You will notice that the inside of the vase is dark. So, select the “Flashlight” from the inventory and use it to illuminate the inside of the vase.
You will notice something at the bottom of the vase, but our character can’t reach it with his bare hands. So, let’s select the “Grappling Hook” and use it to reach the item at the bottom of the vase. You will pick up another “Game Prop”.
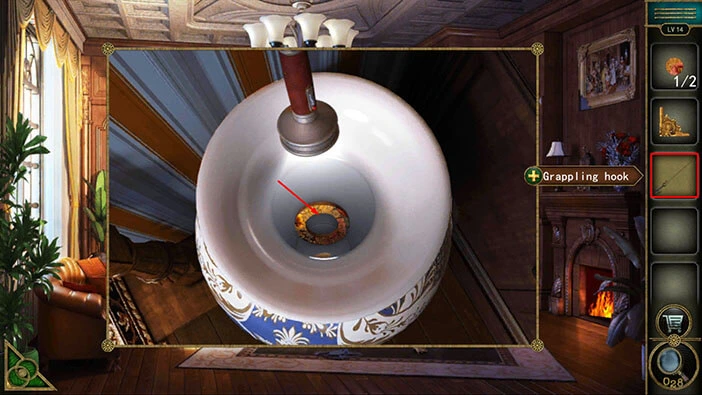
There is one more item at the bottom of the vase, so let’s use the “Grappling Hook” to reach it. You will pick up a “Cheese”.
Once you’re done, tap on the green button in the bottom left corner of the screen to go back.

Previously, we saw a white mouse in the middle of the room, and below it, we also saw an “Achievement Star”. Let’s go back to this mouse.
Select the “Cheese” from the inventory and give it to the mouse.
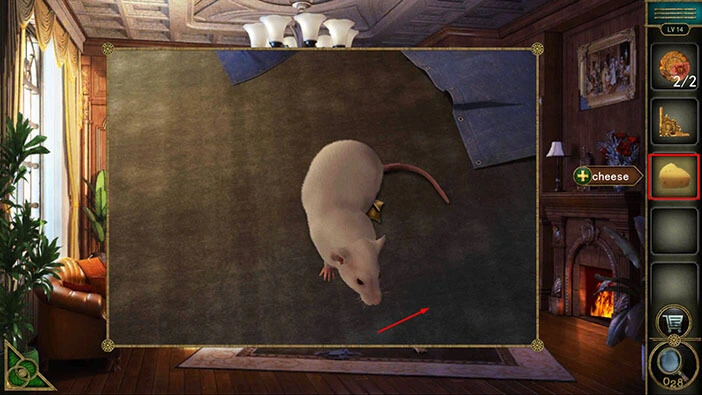
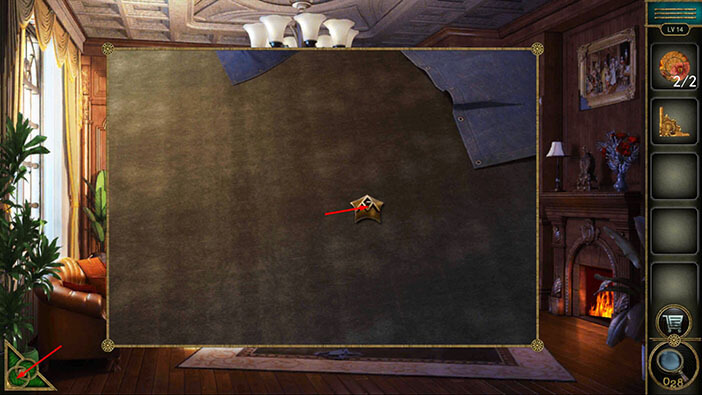
The mouse will run away with cheese. So, let’s tap on the “Achievement Star” to pick it up.
After that, tap on the green button in the bottom left corner of the screen to go back.
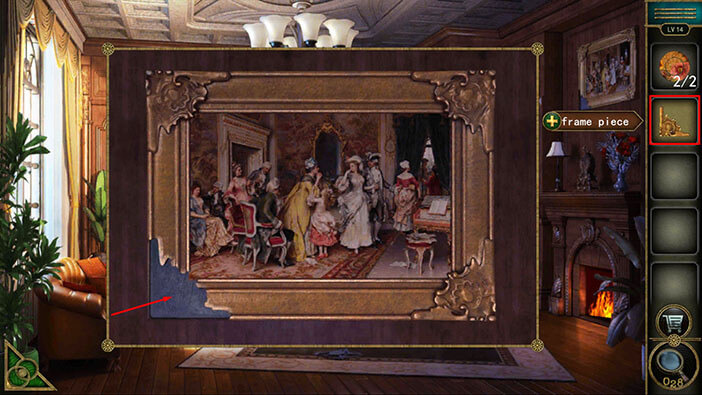
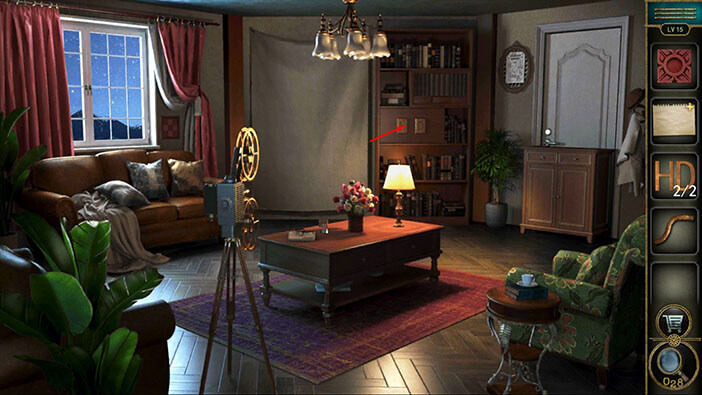
Next, if you pay attention to the wall above the fireplace, you will notice a picture. Tap on this picture to take a closer look at it.

You will notice that the bottom left corner of the picture is missing. So, let’s select the “Frame piece” from the inventory and insert it into the empty space.
The picture will move down as soon as you assemble it, and you will discover another puzzle behind the picture. Here, you will notice that two parts of the puzzle are missing. So, let’s select the “Game Props” from the inventory and insert them into the empty slots.
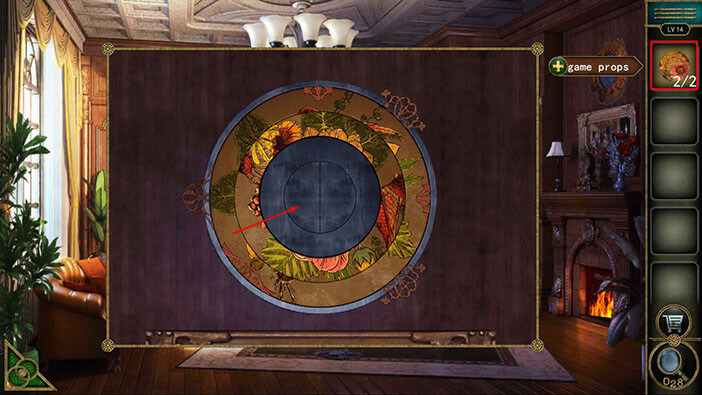
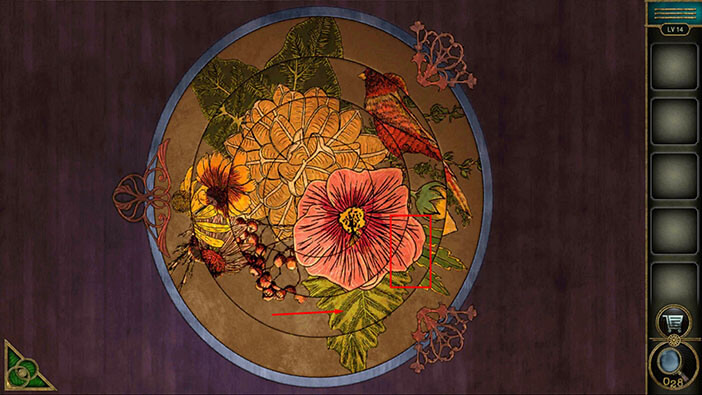
Once you assemble the puzzle, tap on it to start the interaction. Here, our task is to assemble the picture by rotating the four circles. But, there is a catch. The circles are connected, and you will rotate two circles at the same time.
We will do this puzzle in several steps. Let’s begin.
Step 1
Grab the first (outer) circle and rotate it to the left. You will also rotate the inner (fourth) circle with it. Take a look at the image below.
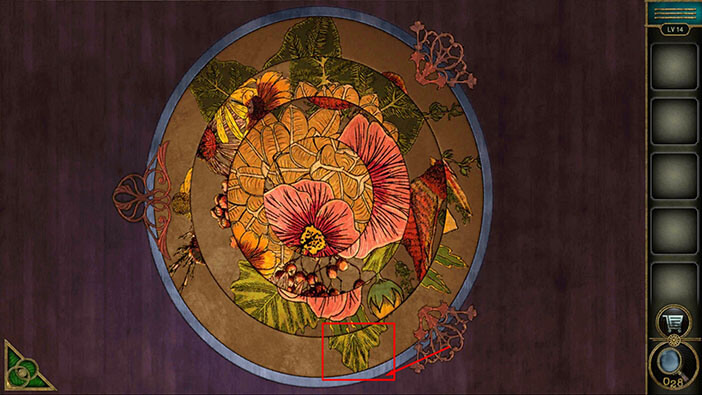
Step 2
Grab the fourth (inner) circle and rotate it to the right. With it, you will also rotate the third circle.
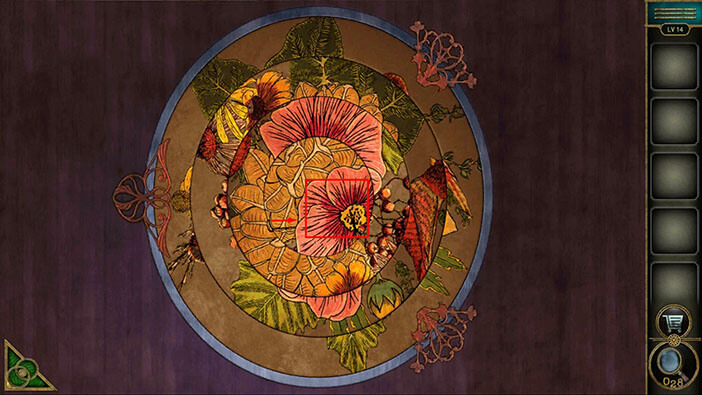
Step 3
Grab the third circle and rotate it to the left (assemble the flower). With it, you will also rotate the second circle.
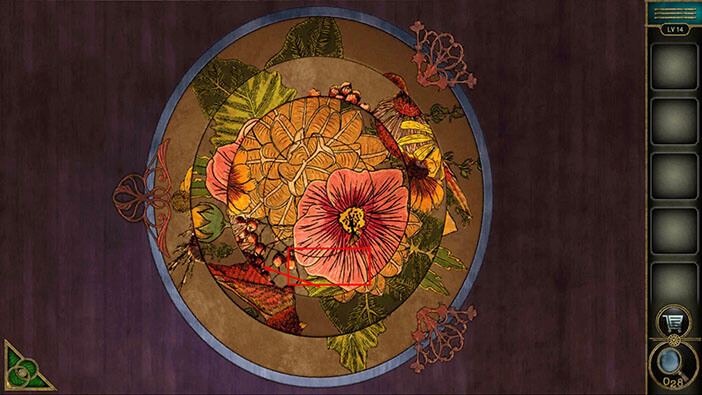
Step 4
Grab the second circle and rotate it to the right (assemble the flower). This circle isn’t connected to the other circles. When you complete this step, you will solve this puzzle.
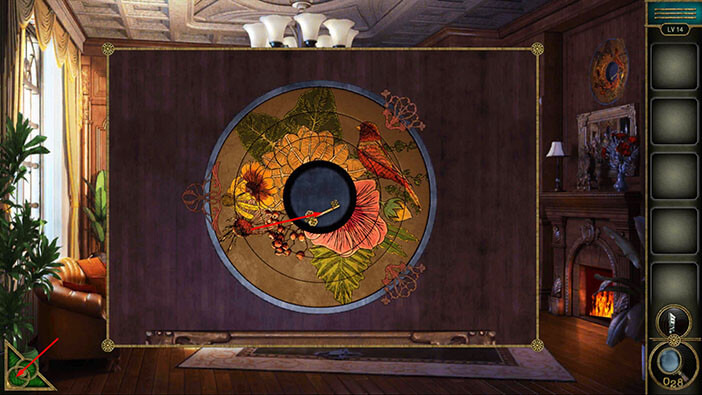
As soon as you solve the puzzle, the inner circle will open, and inside you will find a “Key”. Tap on it to pick it up.
After that, tap on the green button in the bottom left corner of the screen to go back.
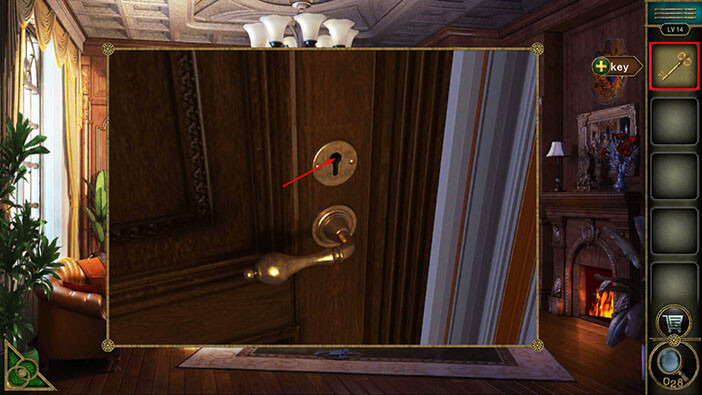
Tap on the door, located at the top of the stairs, to take a closer look at it. Select the “Key” from the inventory and use it to unlock the door. Tap on the door again to proceed to the next level.
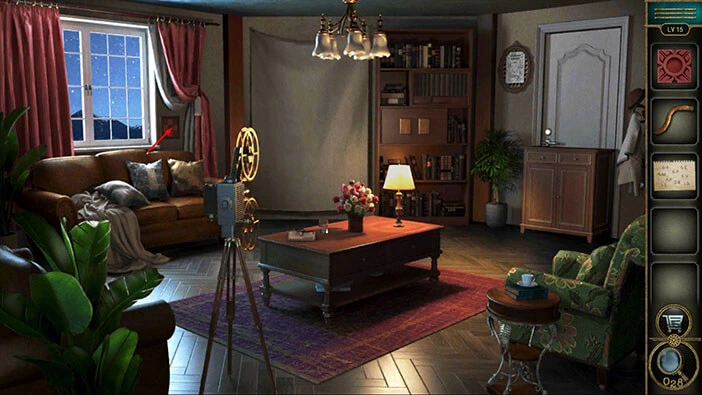
Level 15
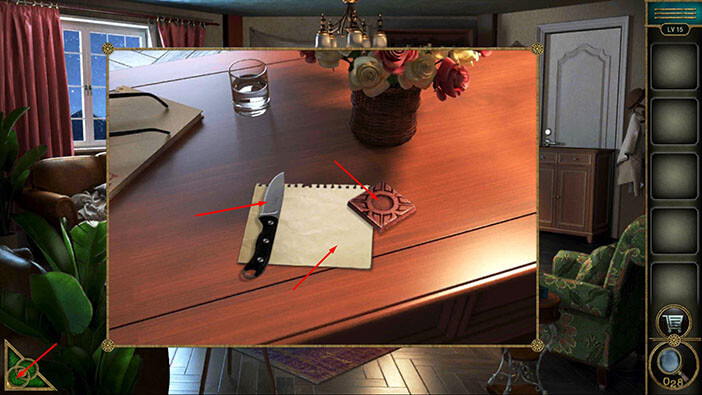
Let’s explore the fifteenth level. Tap on the table to take a closer look at it.
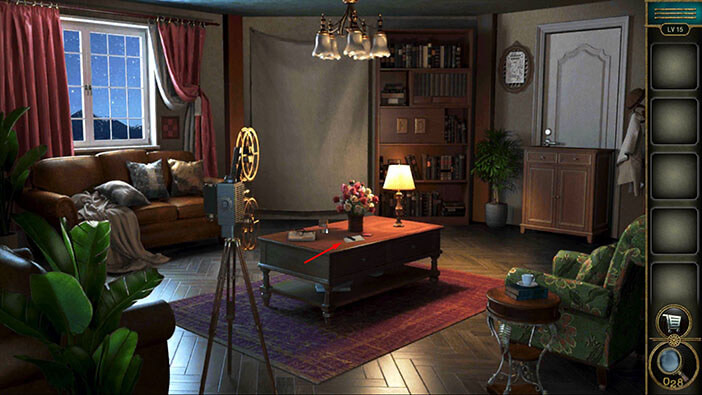
Here, you will find three items. Tap on them to pick them up. A “Knife”, “Game props”, and a “Paper” will be added to your inventory.
Once you’re done, tap on the green button in the bottom left corner of the screen to go back.
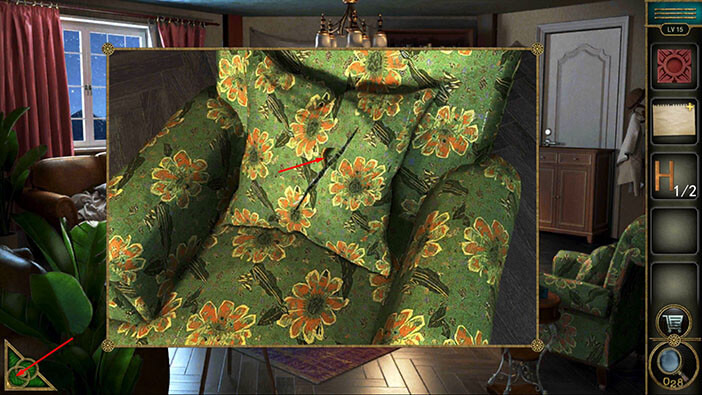
Tap on the armchair on the right to take a closer look at it.

Here, you will find a “Letter H”. Tap on it to pick it up. Also, you will notice a cut on the pillow. So, select the “Knife” from the inventory and use it to cut open the pillow.
In the pillow, you will find a “Fuse”. Tap on it to pick it up. After that, tap on the green button in the bottom left corner of the screen to go back.
Next, tap on the door on the right to take a closer look at it.
Here, you will find a “Letter D”. Tap on it to pick it up. After that, tap on the green button in the lower-left corner of the screen to go back.
Next, tap on the two large letters on the bookshelf to take a closer look at them.
You will notice that the “H” and “D” slots are empty. So, select the “Letters” from the inventory and insert them into the empty slot.
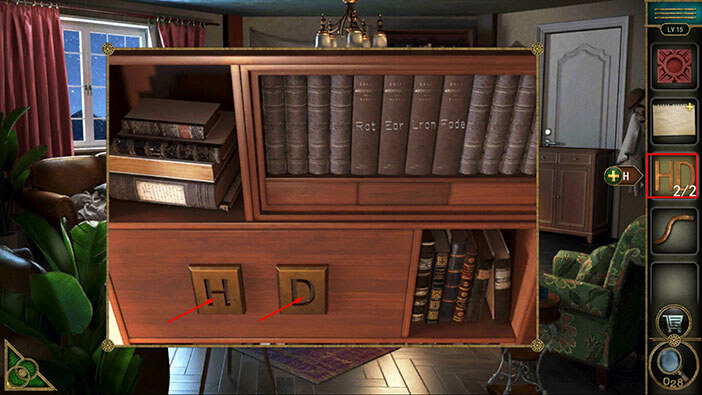
As soon as you insert the letters, you will open the drawer, and inside you will find a “Pencil”. Tap on it to pick it up.
After that, tap on the green button in the lower-left corner of the screen to go back.
Next, select the “Paper” from the inventory and it will appear in the middle of the screen. After that, select the “Pencil” from the inventory and use it on the paper.

Some numbers and letters will appear, and the “Paper with hints” will be added to your inventory. We will come back to this hint a bit later in the walkthrough.
For now, tap on the board, located on the wall next to the window on the left, to take a closer look at it.
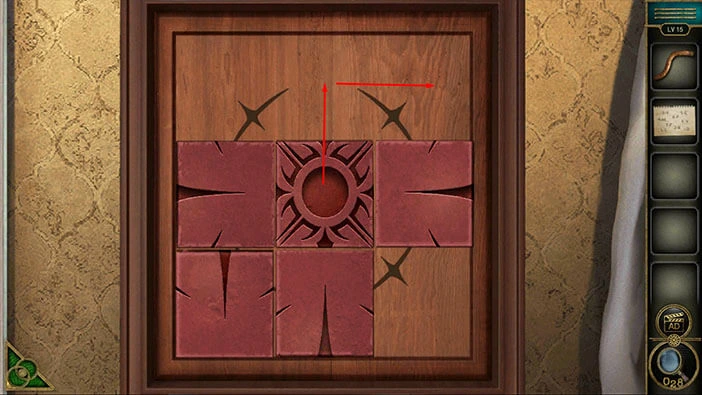
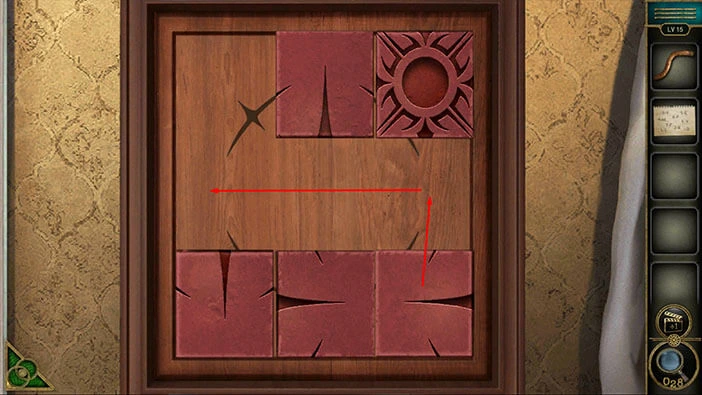
Here, we can see four pieces of the puzzle. Let’s select the “Game prop” from the inventory and insert it into the middle of the puzzle.
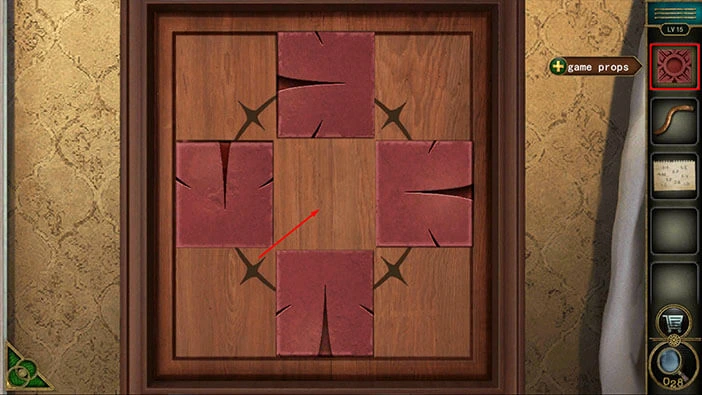
Here, we have another puzzle. Our task is very simple in this puzzle. You will notice that there is an arrow on each of the four game props. We should shuffle the game props, and place them in the correct position (prop with right arrow on the right, prop with left arrow on the left, etc.).
We will do this puzzle in several steps. Let’s begin.
Step 1
Select the game prop in the left slot and drag it into the bottom left slot.
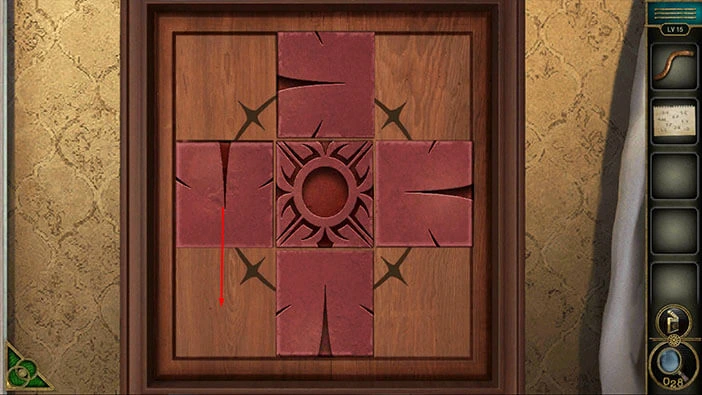
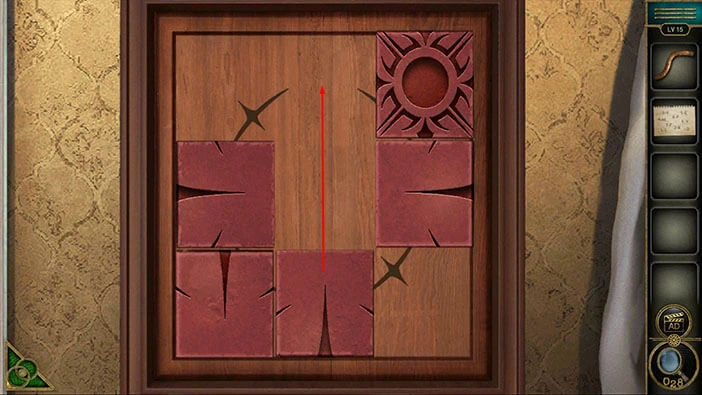
Step 2
Select the game prop in the top slot and drag it into the left slot.
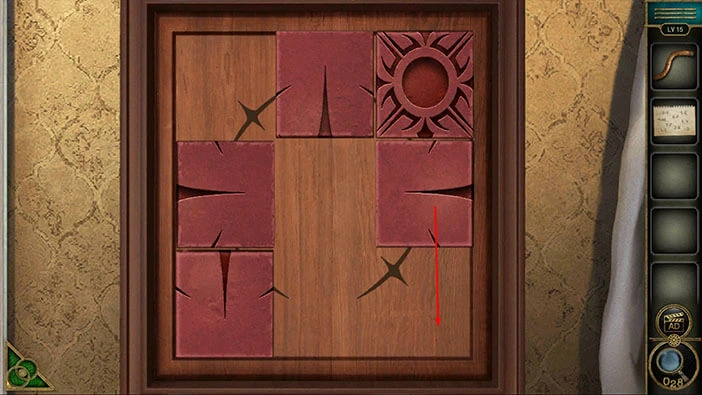
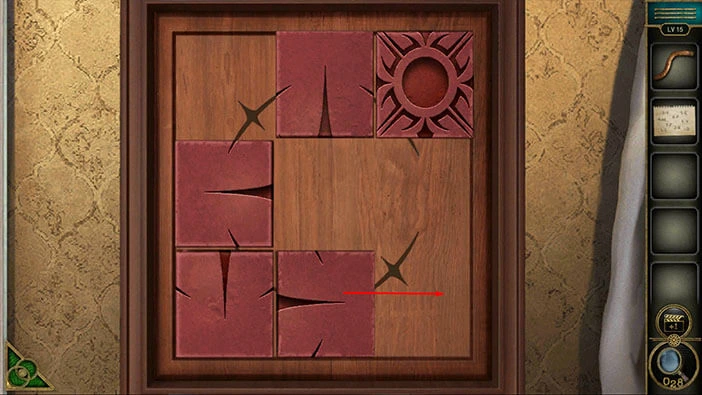
Step 3
Select the game prop in the center slot and drag it into the top right slot.
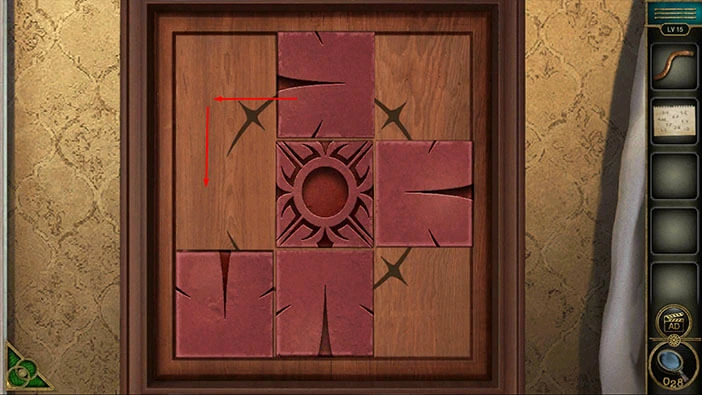
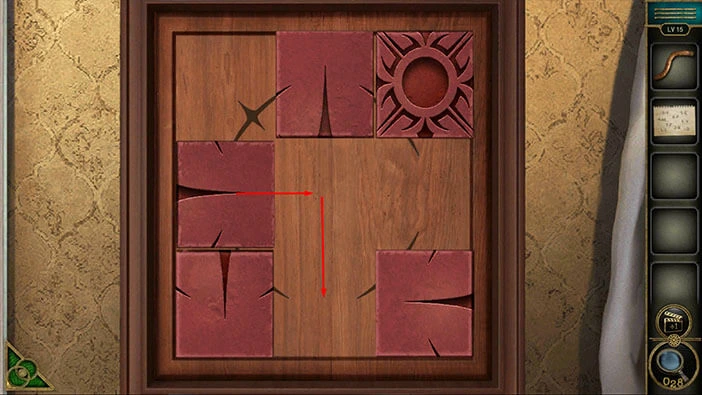
Step 4
Select the game prop in the bottom slot and drag it into the top slot.
Step 5
Select the game prop in the right slot and drag it into the bottom right slot.
Step 6
Select the game prop in the left slot and drag it into the bottom slot.
Step 7
Select the game prop in the bottom right slot and drag it into the left slot.
Step 8
Select the game prop in the bottom slot and drag it into the bottom right slot.
Step 9
Select the game prop in the top right slot and drag it into the center slot.
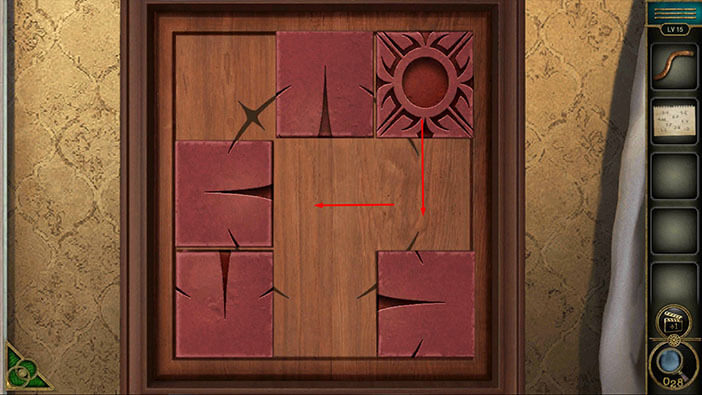
Step 10
Select the game prop in the bottom right slot and drag it into the right slot.
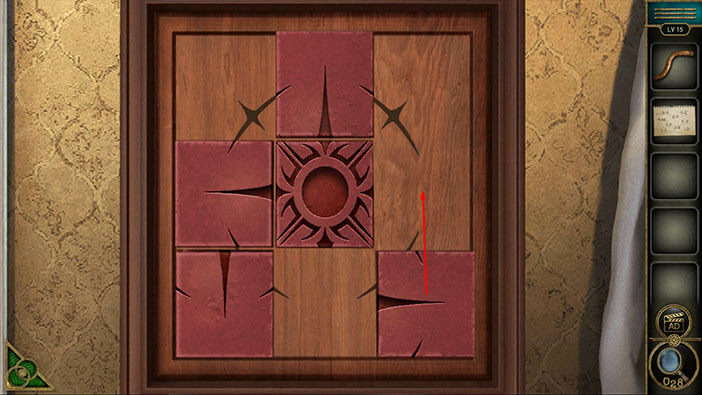
Step 11
Select the game prop in the bottom left slot and drag it into the bottom slot.
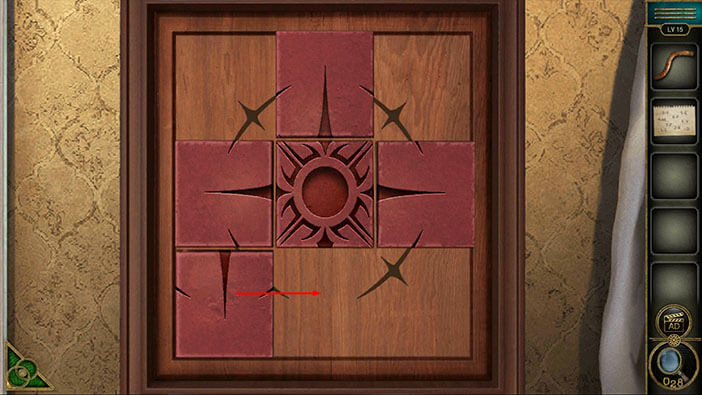
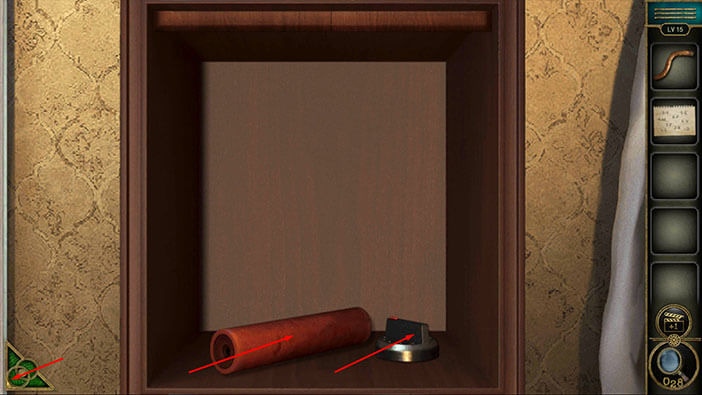
As soon as you arrange the game props, you will open the secret compartment, and inside you will find two items. Tap on them to pick them up. A “Detonator” and a “Control knob” will be added to your inventory.
Once you’re done, tap on the green button in the bottom left corner of the screen to go back.
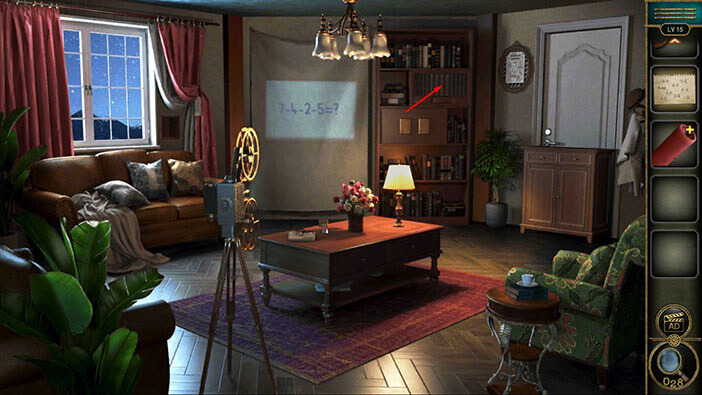
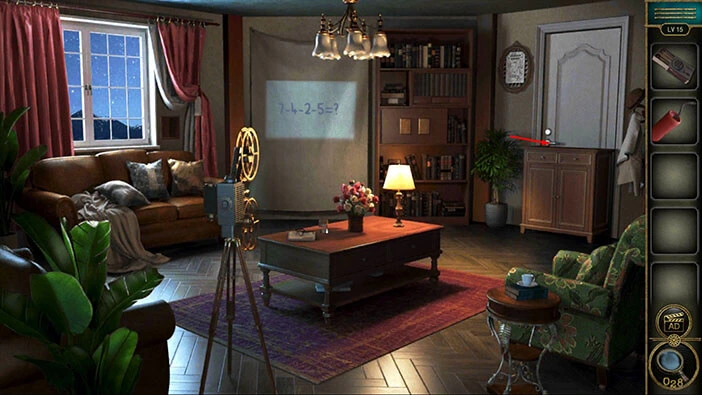
Next, tap on the camera to take a closer look at it.
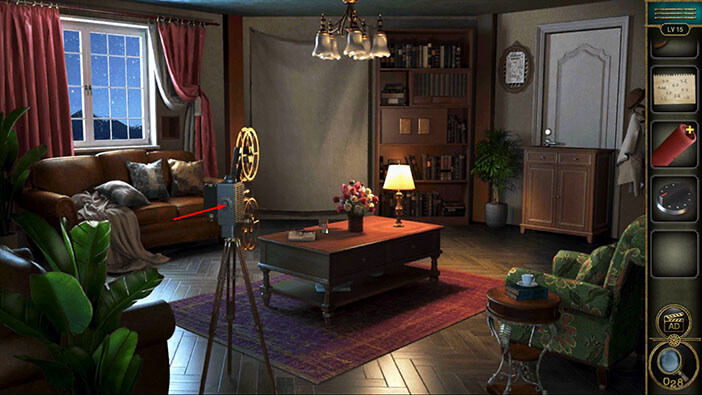
You will notice an empty slot in the camera. So, let’s select the “Control knob” from the inventory and insert it into the empty slot.
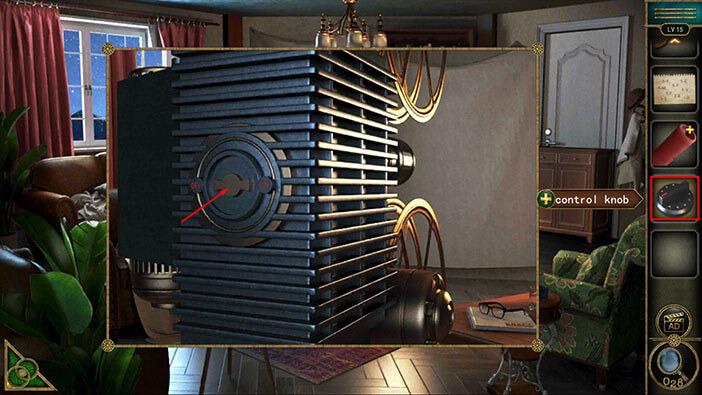
Tap on the “Control knob” to activate the camera, and you will see a projection on the wall. Let’s examine it.
Tap on the green button in the bottom right corner of the screen to go back.

Let’s tap on the projection on the wall to examine it.

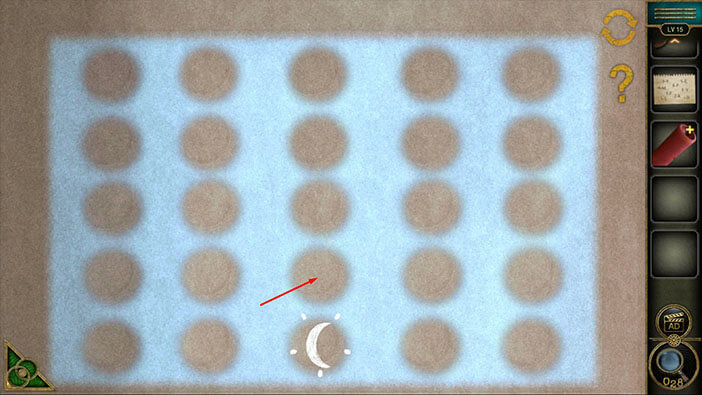
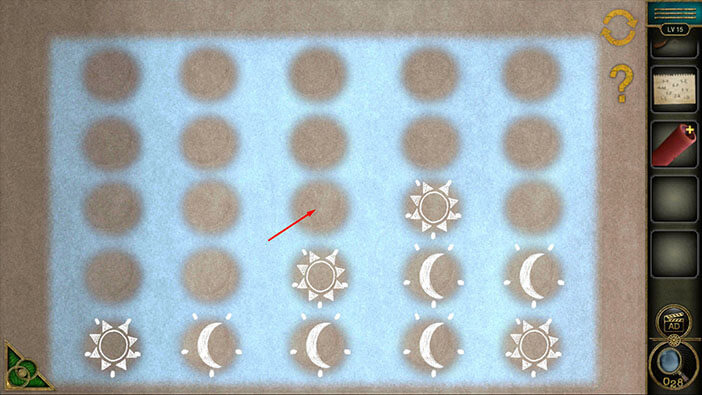
Here, we have another puzzle/mini-game. Our task is to place four suns in a row, vertically, or diagonally. At the same time, we shouldn’t allow the “opponent” to place four moons.
We will do this puzzle in several steps. Let’s begin.
Step 1
Tap on the third slot in the fourth row to place a “Sun symbol” above the moon.
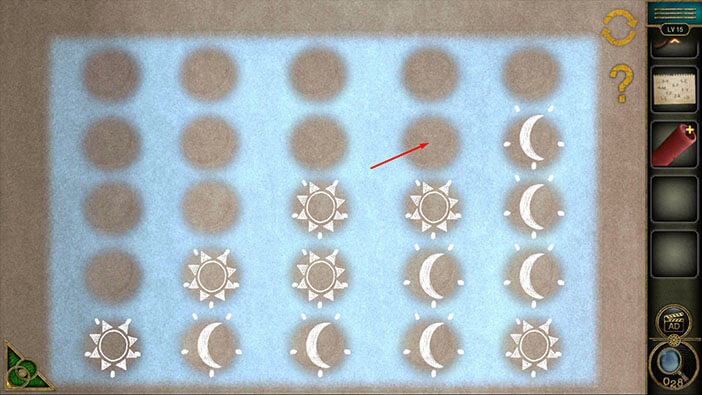
Step 2
Tap on the fifth slot in the fifth row to place a “Sun symbol”.
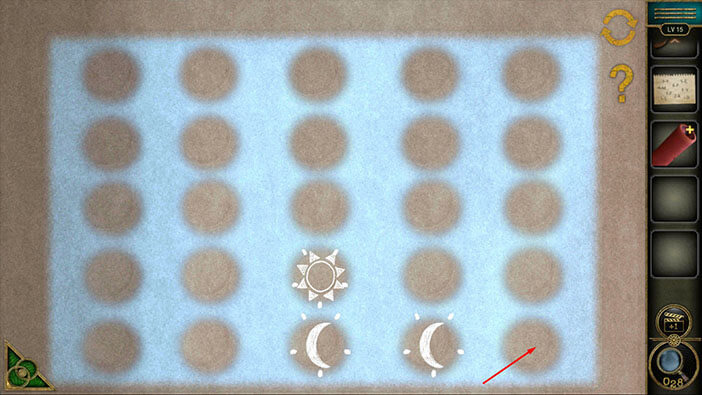
Step 3
Tap on the first slot in the fifth row to place a “Sun symbol”.
Step 4
Tap on the fourth slot in the third row to place a “Sun symbol”.
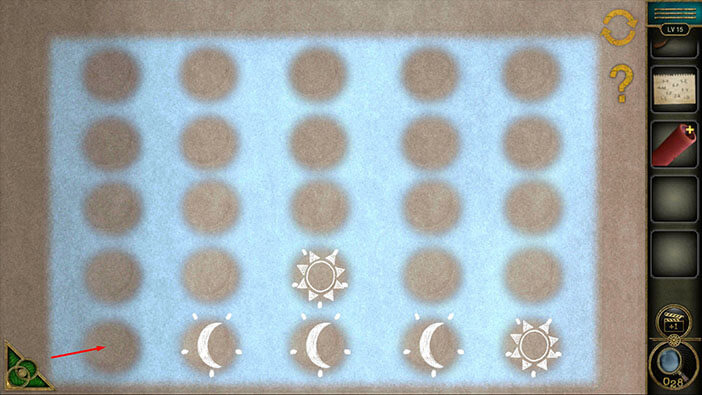
Step 5
Tap on the third slot in the third row to place a “Sun symbol”.
Step 6
Tap on the second slot in the fourth row to place a “Sun symbol”.

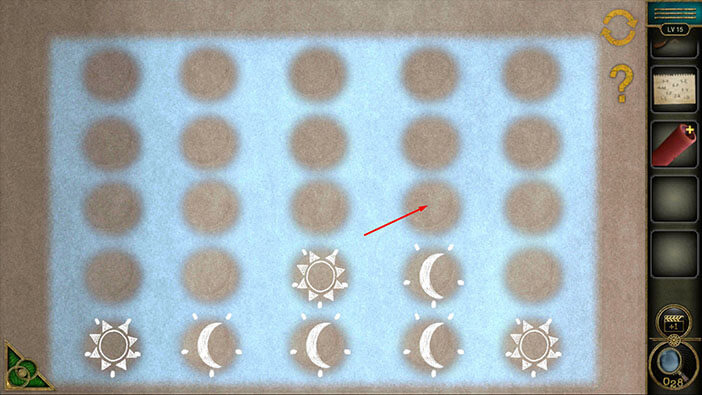
Step 7
Lastly, tap on the fourth slot in the second row to place a “Sun symbol” and you will solve this puzzle.
Once you solve the puzzle, you will discover another hint. You will now see “7-4-2-5=?”. Memorize/write down this hint, because we will need it for the next puzzle.
After that, tap on the green button in the bottom left corner of the screen to go back.
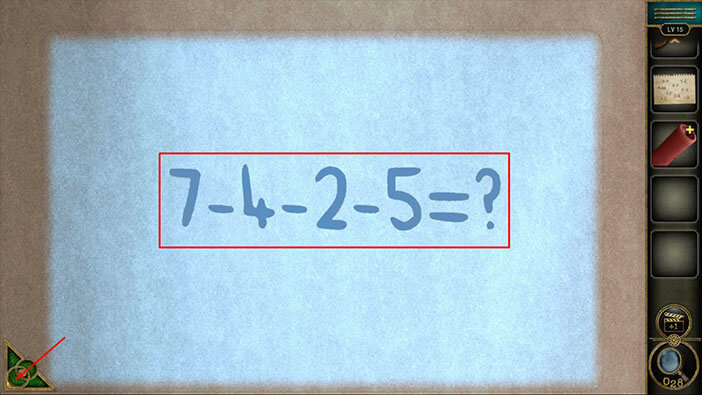
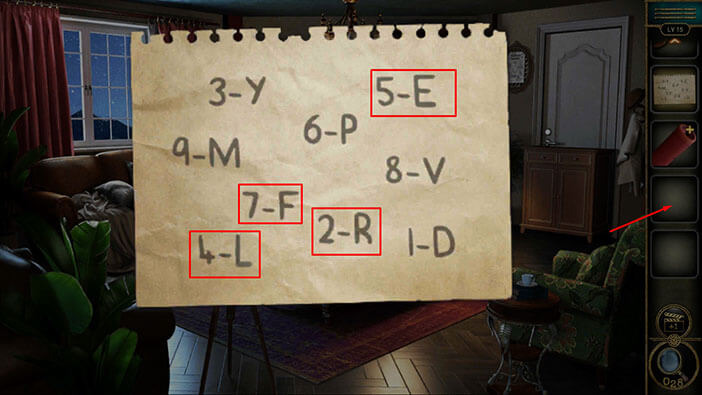
Let’s take a look at the “Paper with hints” in our inventory. Here, we can see numbers 1 to 9, and each number has one letter that is associated with it. So, if we exchange the numbers from the previous puzzle with the letters from this hint, we will get,
7 = F, 4 = L, 2 = R, 5 = E. When we put these letters together, we will get “FLRE”. Memorize/write down this information because it represents the solution for the next puzzle.
Once you’re done, tap on the inventory slot to go back.
Next, tap on the bookshelf on the right to take a closer look at it, and tap again to start the interaction.
Here, you will see four books, and you will notice that the titles of the books start with the letters that we discovered previously (“FLRE”). However, the first letters of the titles aren’t in the correct order. Which brings us to our next task. We should rearrange the books, so that the first letters of the titles match the order that we discovered, “FLRE”.
We will do this puzzle in several steps. Let’s begin.
Step 1
Select the “Fade” book and swap its position with the “Rat” book.

Step 2
Select the “Lron” book and swap its position with the “Ear” book.
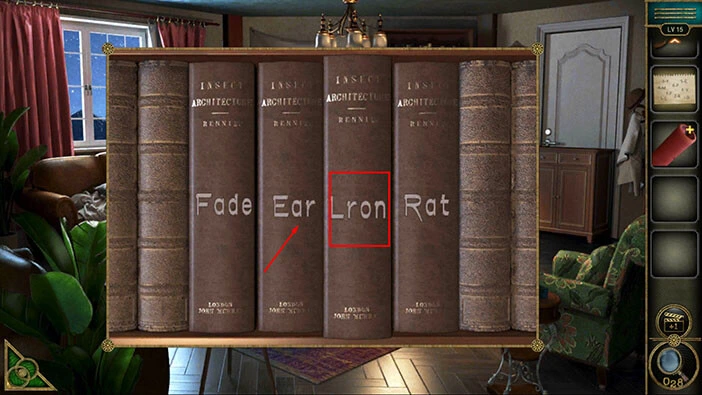
Step 3
Select the “Ear” book and swap its position with the “Rat” book. With this, we will arrange the books in the correct order (“FLRE”).

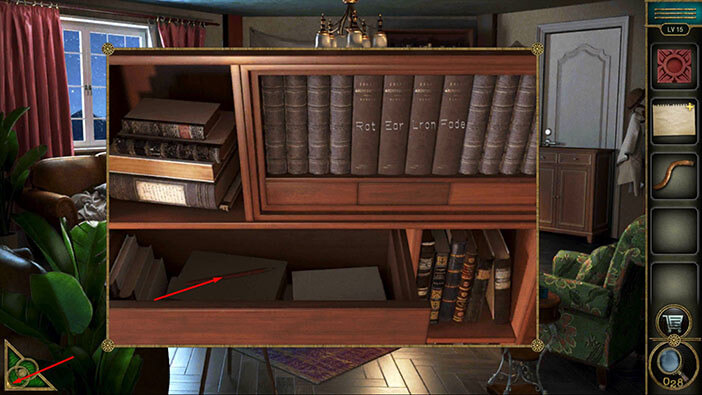
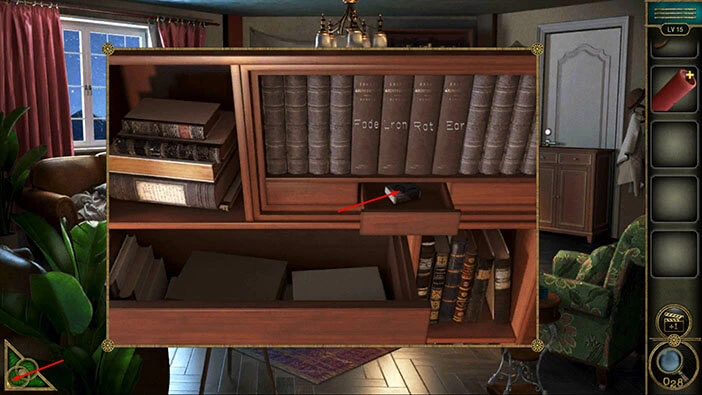
As soon as you solve the puzzle, you will open the drawer, and inside you will find the “Matches”. Tap on them to pick them up.
After that, tap on the green button in the bottom left corner of the screen to go back.
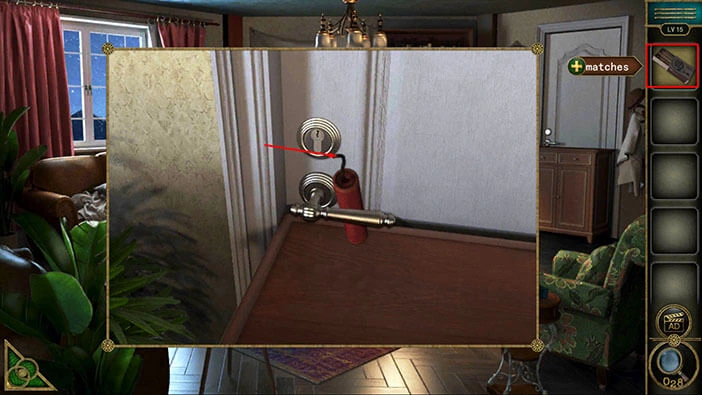
Next, select the “Detonator” from the inventory and it will appear in the middle of the screen. After that, select the “Fuse” from the inventory and insert it into the “Detonator”. A “Bomb” will be added to your inventory.
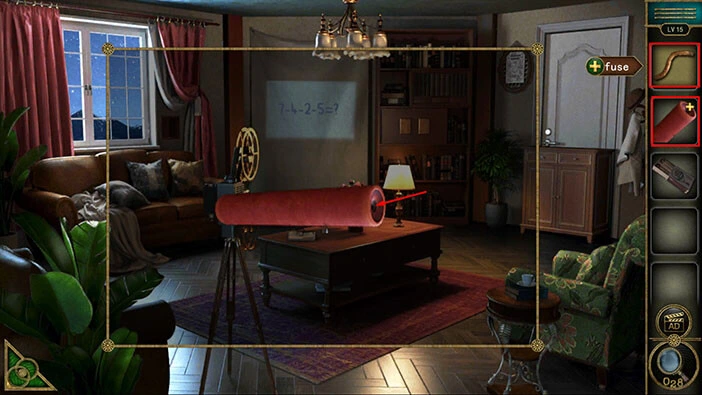
Let’s take another look at the door.
Well, we won’t use a key to unlock the door, like in previous levels. This time, we will use a bomb to blow up the door.
Select the “Bomb” from the inventory and place it between the door and the doorknob.

Lastly, select the “Matches” from the inventory and use them to light the fuse. You will blow a hole in the door, and our character will automatically proceed to the next level.
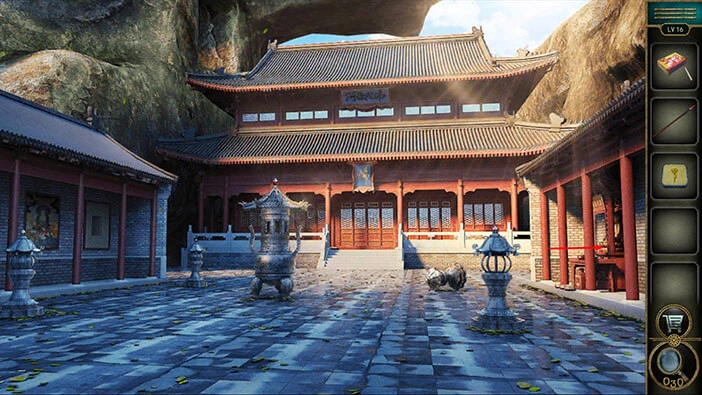
Level 16
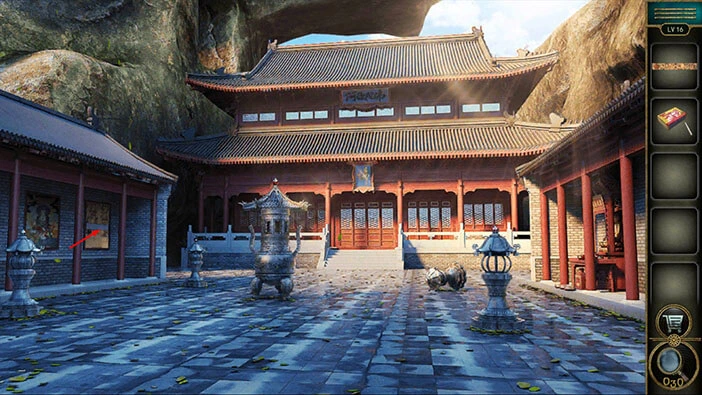
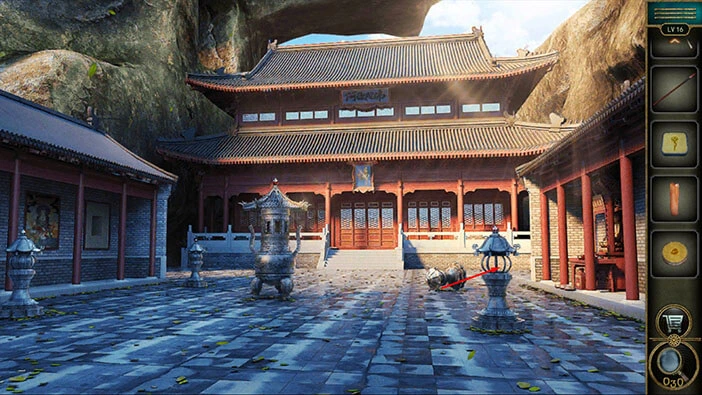
Let’s explore the sixteenth level. Tap on the pillar in front of you to take a closer look at it.

Here, you will find a “Mural” and “Matches”. Tap on them to pick them up.
After that, tap on the green button in the bottom left corner of the screen to go back.
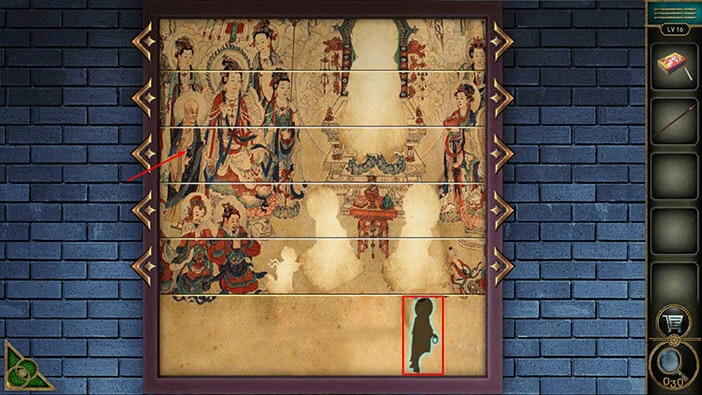
Next, tap on the second picture on the wall on the left to take a closer look at it.
You will notice that one part of the picture is missing. So, let’s select the “Mural” from the inventory and insert it into the empty slot.
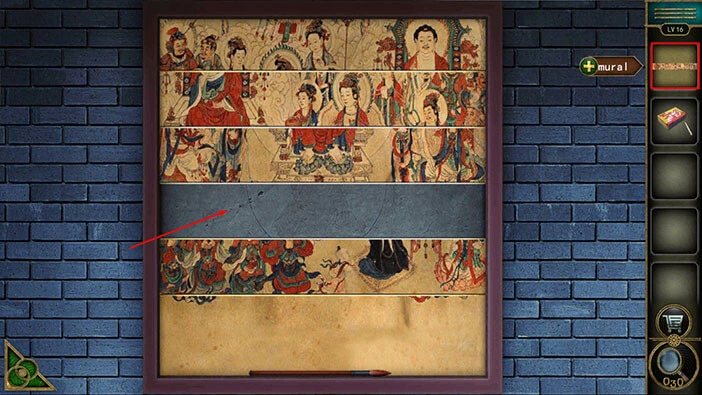
As soon as you insert the last piece of the picture, three shapes with a blue outline will appear below the picture. We will come back to them a bit later.
You will notice left/right arrows next to each of the five puzzle pieces. Our first task is to slide the puzzle pieces and correctly assemble the picture. We will do this puzzle in several steps. Let’s begin.
Step 1
Tap four times on the right arrow of the fourth (looking from top to bottom) puzzle piece to slide it to the right.
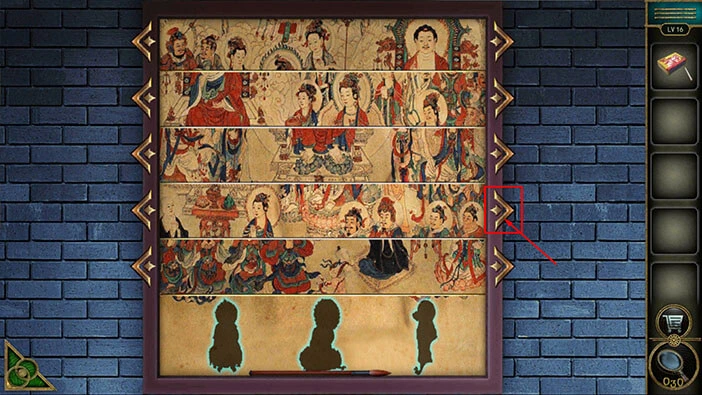
Step 2
We have now aligned the fourth and fifth puzzle pieces. Let’s continue. Tap two times on the right arrow of the third puzzle piece to slide it to the right.
Step 3
We have now aligned the third and fourth puzzle pieces. Let’s continue. Tap four times on the right arrow of the second puzzle piece to slide it to the right.
Step 4
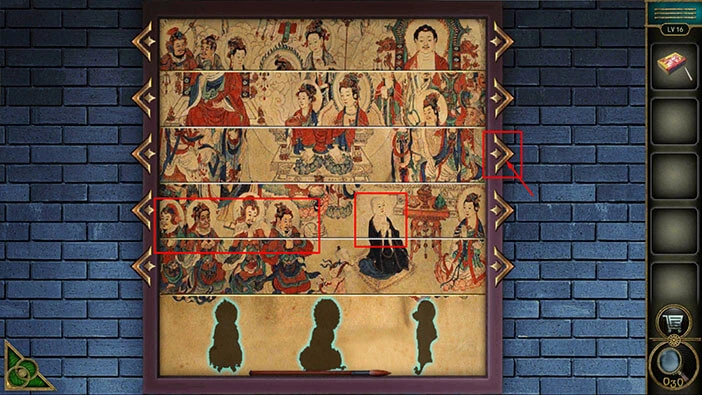
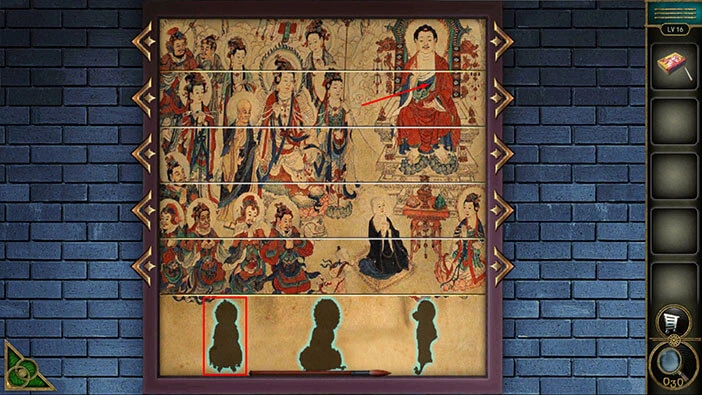
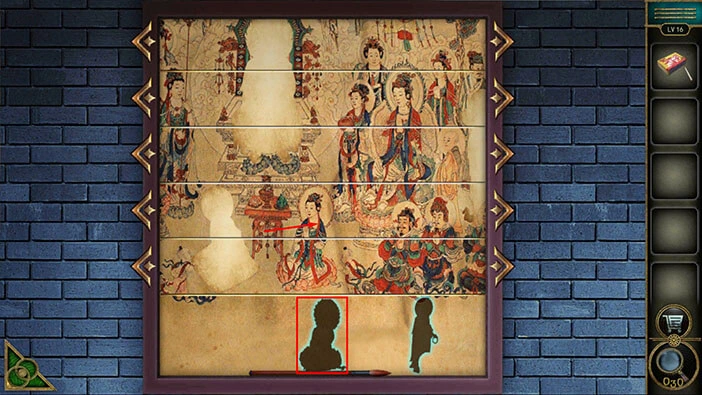
We have assembled the picture, and our next task is to look at the shapes below and find them in the picture.
If you tap on the character in the top right corner of the picture, you will discover that it matches the shape on the left.
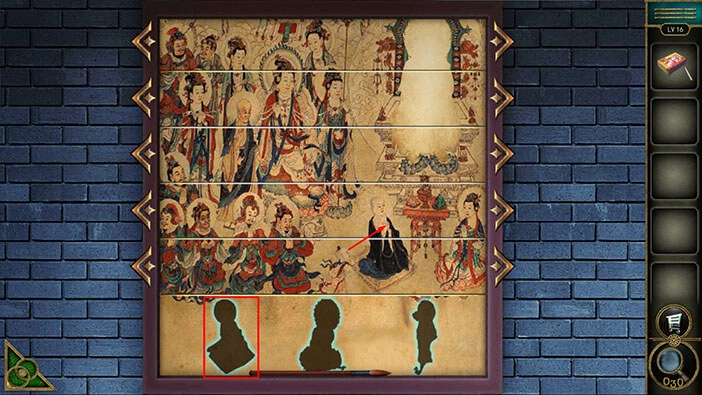
Step 5
Another shape will appear on the left instead of the previous one. If you tap on the kneeling character in black robes located in the bottom right corner of the picture, you will notice that it matches the new shape on the left.
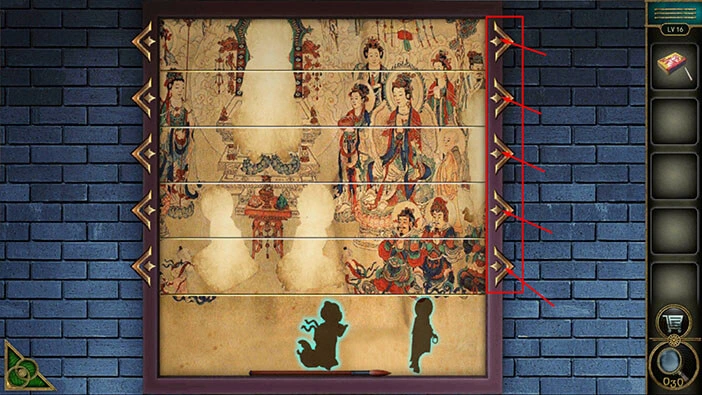
Step 6
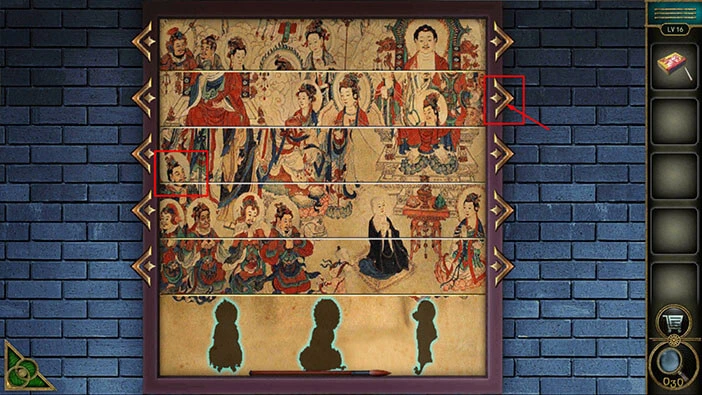
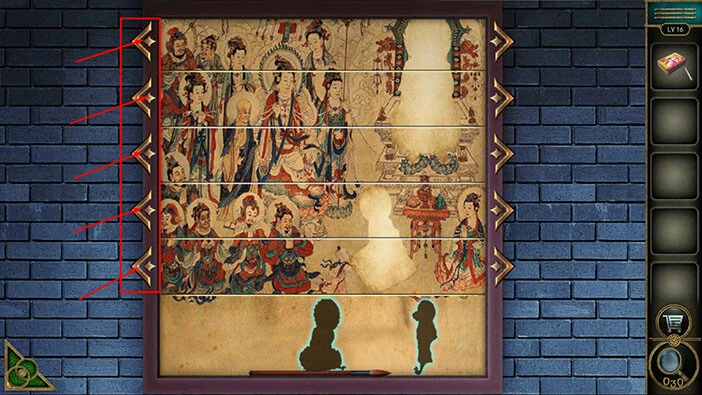
The shape on the left will disappear but, this time, it won’t be replaced with another one. We can’t find the other two shapes in the picture, so we will have to shuffle the pieces of the picture once more.
So, let’s tap three times on the left arrow of all puzzle pieces, and we will slide the entire picture to the left.
Step 7
If you look at the right side of the picture, you will notice a character, and we can only see his left half. Tap on it, and you will discover that it perfectly matches the shape on the right.
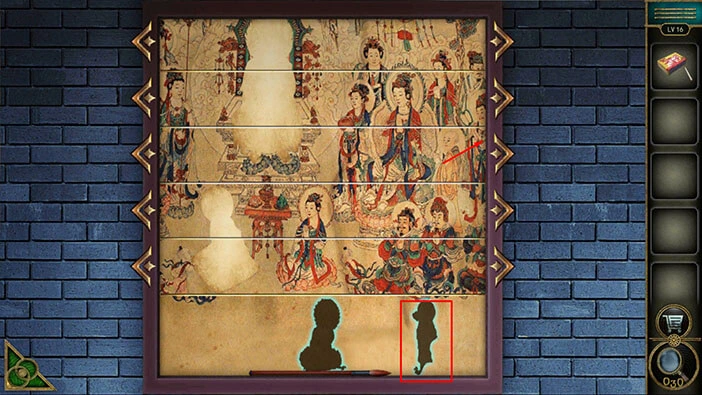
Step 8
Another shape will appear on the right instead of the previous one. Next, if you tap on the kneeling woman at the bottom of the picture, you will notice that it matches the shape in the middle.
Step 8
Another shape will appear in the middle instead of the previous one. However, in order to find the last two shapes, we have to scroll the picture once more. So, let’s tap twice on the arrow on the right of all puzzle pieces, and we will slide the entire picture to the right.
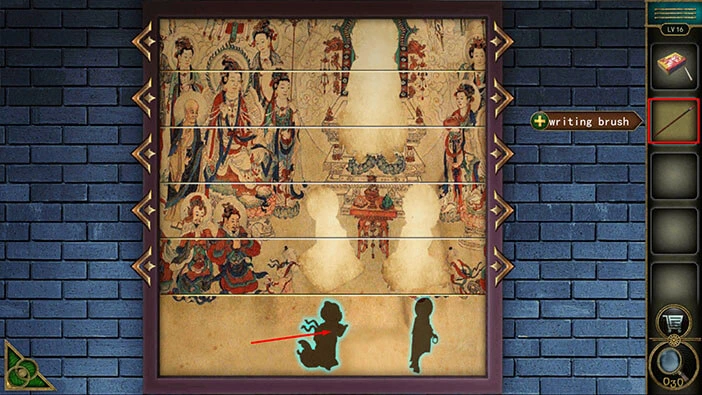
Step 9
If you tap on the shape in the middle, you will get a “Writing brush”.
Step 10
At the bottom of the picture, you will notice a small child. Tap on it, and you will discover that it perfectly matches the shape in the middle.
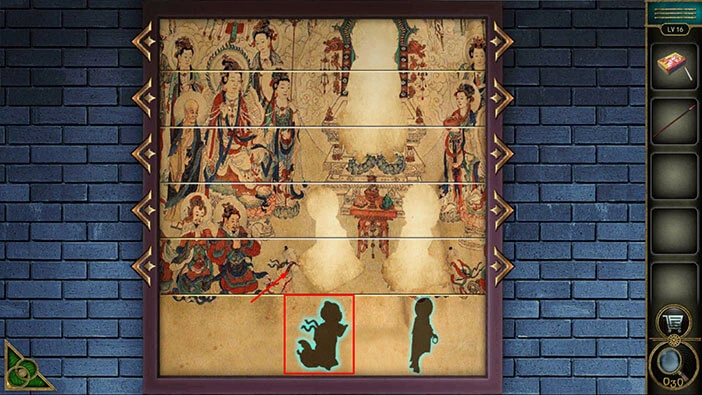
Step 11
The shape in the middle will disappear and it won’t be replaced with another shape. On the left side of the picture, you will notice a man. Tap on it and you will discover that it perfectly matches the shape on the right. With that, you will solve this puzzle.
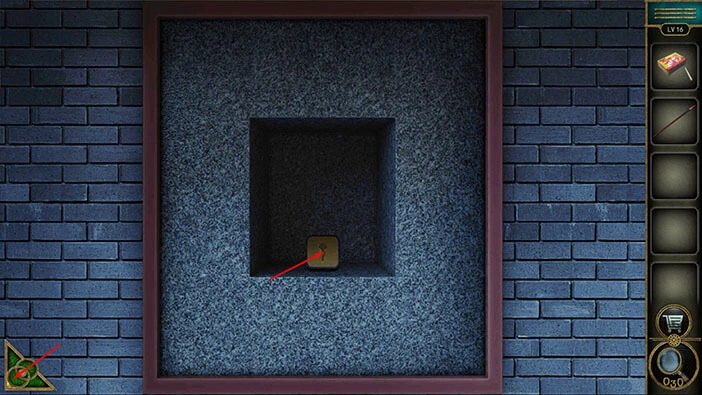
As soon as you find all the shapes, you will open the secret compartment under the picture. Inside you will find, a “Square”. Tap on it to pick it up.
After that, tap on the green button in the bottom left corner of the screen to go back.
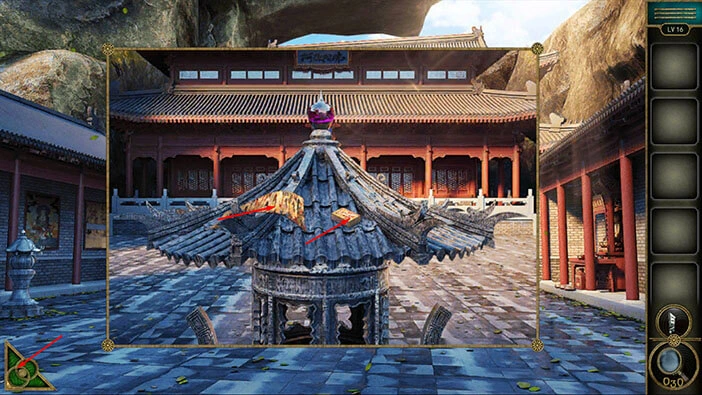
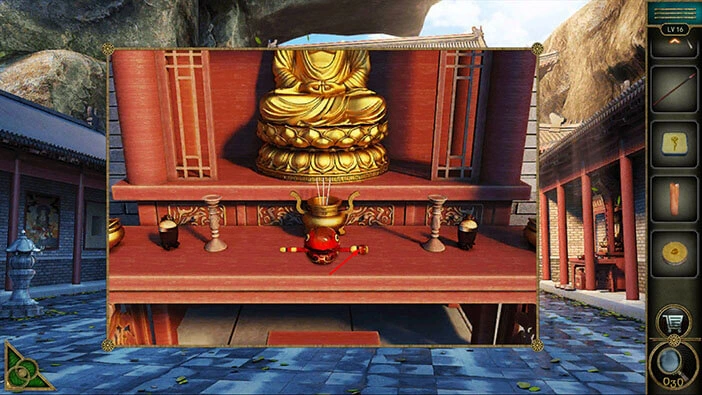
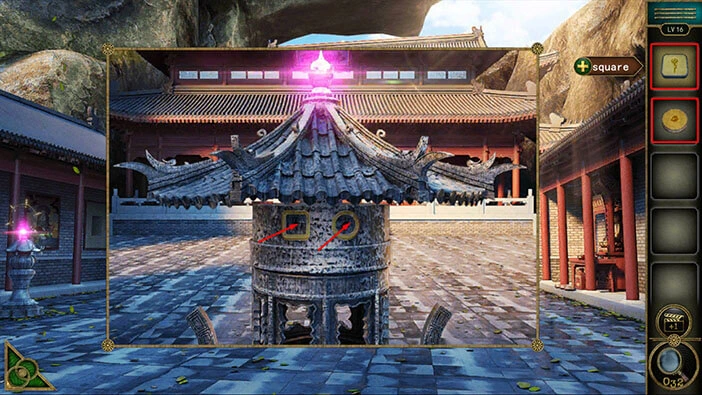
Next, let’s tap on the shrine on the right to take a closer look at it.
Here, you will find a “Candle” and a “Circle”. Tap on them to pick them up.

Next, you will notice a red frog and it is holding a stick in its mouth. Tap on the stick, and our character will use it to whack a frog on the head three times. Repeat this process, and tap on the stick two more times (three in total), and you will find another “Achievement Star”.
Once you’re done, tap on the green button in the bottom left corner to go back.
Next, tap on the lamp on the right to take a closer look at it.
Select the “Candle” from the inventory and insert it into the lamp.

Next, select the “Matches” from the inventory and use them to light the candle.
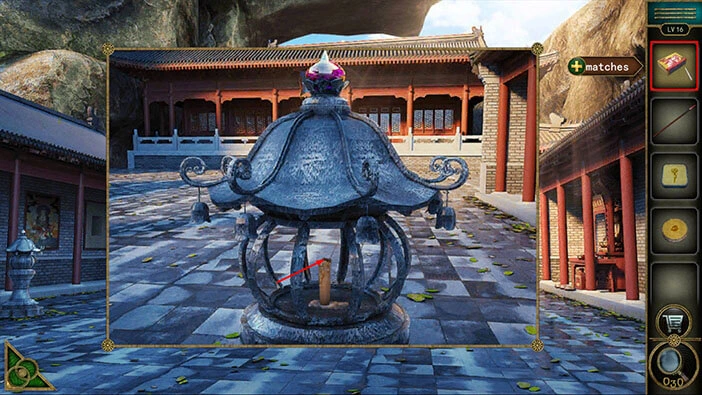
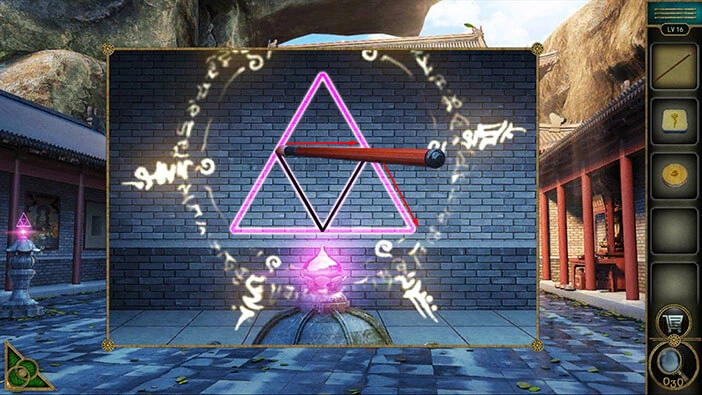
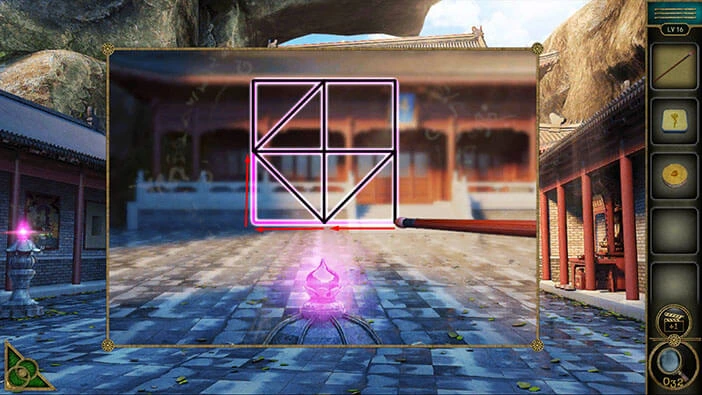
A pink ray will light up the lamp on the left, and a triangular symbol will appear above it. Let’s tap on this symbol to take a closer look at it.

Next, select the “Writing brush” from the inventory and tap on the symbol to start the interaction.
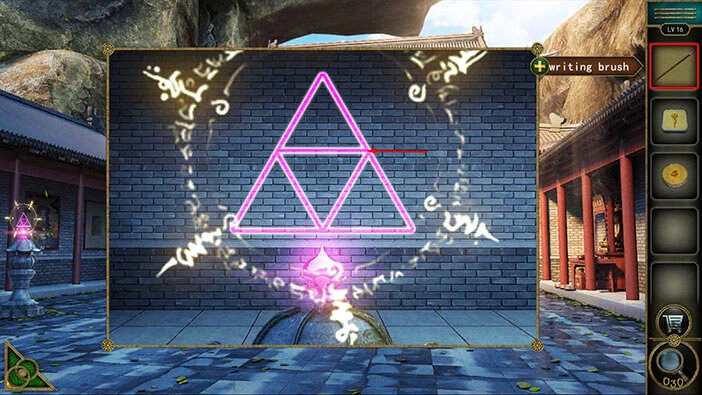
Our next task is to use the writing brush to draw the lines of symbols, but we will have to do that in one stroke (without raising the writing brush). We will do this in several steps. Let’s begin.
Step 1
Drag the brush down and to the left. After that, drag the brush up and to the left.
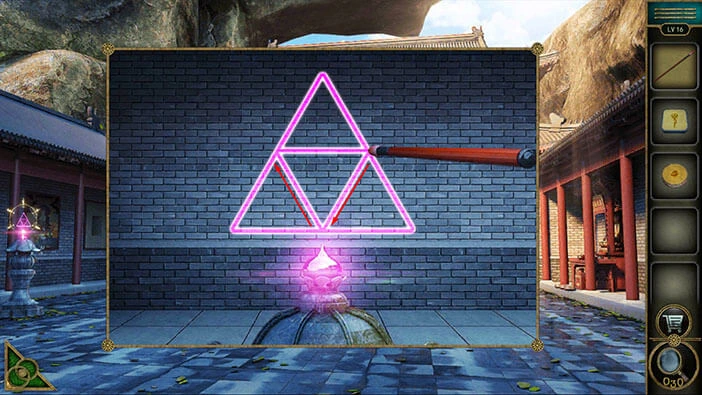
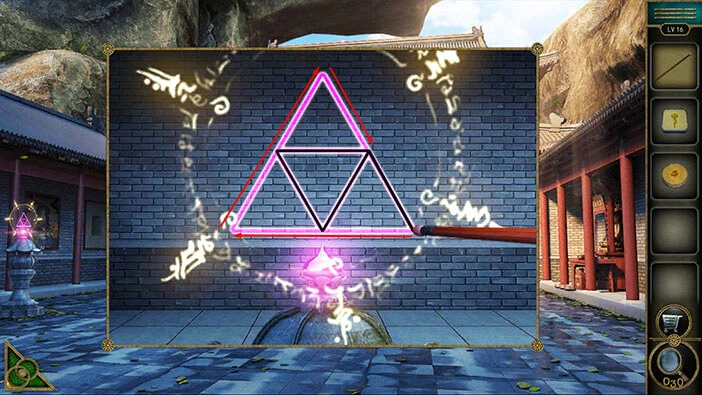
Step 2
Drag the brush to the right. After that, drag the brush down and to the right.
Step 3
Drag the brush all the way to the left, then up and to the right, and finally down and to the right.
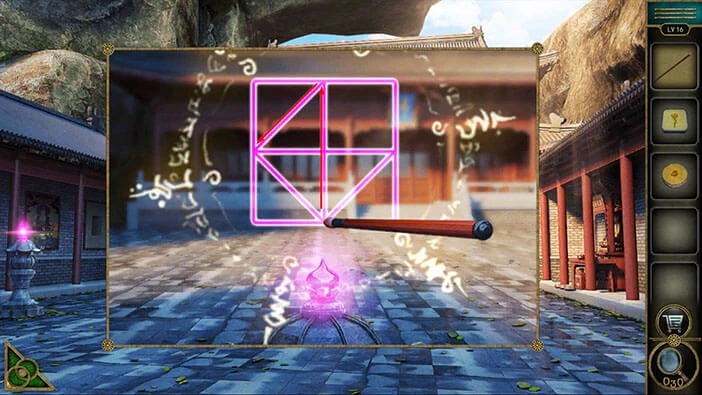
As soon as you solve the puzzle, a symbol that resembles the square will appear above the third lamp. Let’s tap on it to take a closer look.

Next, select the “Writing brush” from the inventory, and tap on the symbol to start the interaction.

Just like before, our next task is to use the writing brush to draw the lines of symbols, but we will have to do that in one stroke. We will do this in several steps. Let’s begin.
Step 1
Drag the brush all the way up, then drag the brush down and to the left.
Step 2
Drag the brush down and to the right, then drag the brush up and to the right.
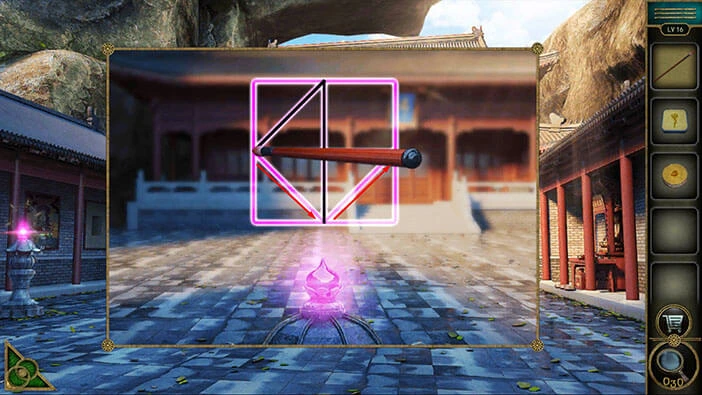
Step 3
Drag the brush all the way to the left, then drag the brush up.
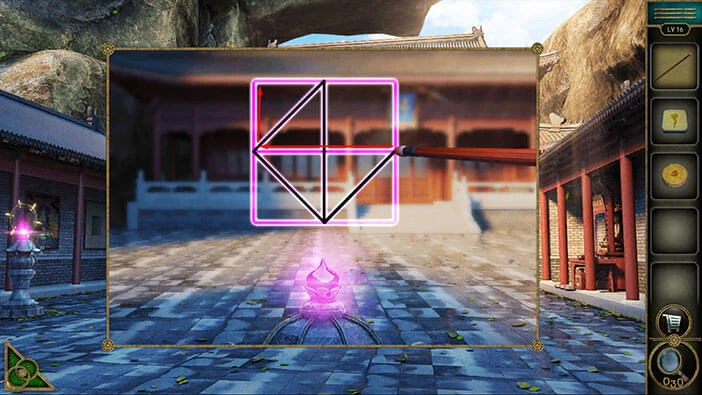
Step 4
Drag the brush all the way to the right, then drag the brush all the way down.
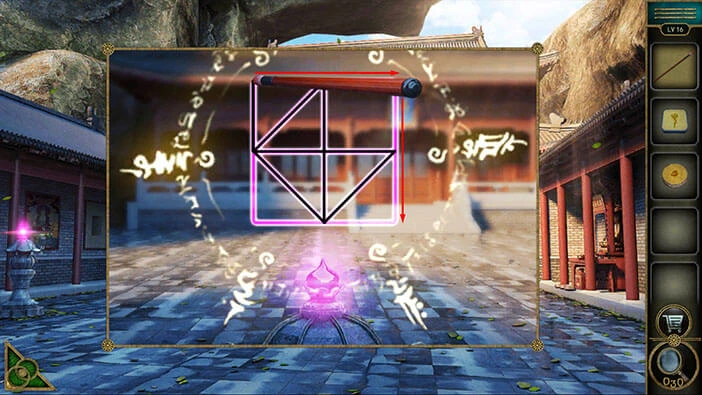
Step 5
Lastly, drag the brush all the way to the left, then drag the brush up.
As soon as you draw the lines, a ray will shoot out of the pillar, and the roof will rise. Let’s tap on the roof to take a closer look at it.
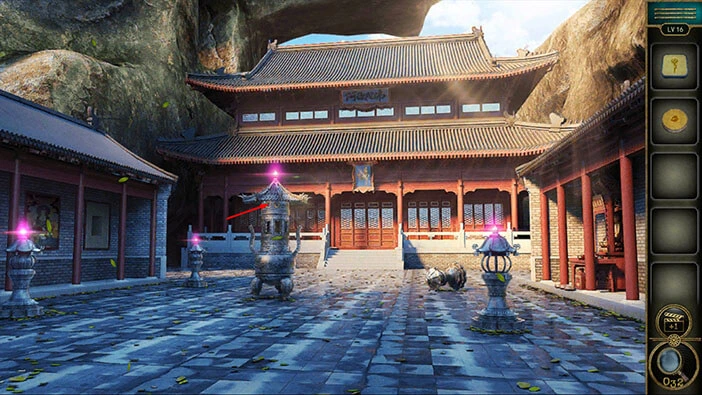
You will notice two empty slots, one is shaped like a circle, and the other one is shaped like a square. So, select the “Square” and the “Circle” from the inventory and insert them into the empty slots.
Another ray will shoot out of the roof, and this ray will open the door. Tap on the door to proceed to the next level.

With that, we have reached the end of the fourth part of the walkthrough. If you want to see the fifth part, tap on the next part button. In the fifth part of the walkthrough, we will cover levels 17-20.
Thank you for reading.