The White Door Day 1-3
Hello everyone and welcome to the first part of our walkthrough for the “White Door” a puzzle-solving game developed by Rusty Lake – one of the most famous game developers in puzzle solving genre. In this game, our character has amnesia and wakes up in a psychiatric institution. Our task is to slowly restore his memory by solving a series of puzzles and performing prescribed daily rituals. Let’s begin.
NOTE: The first part of the walkthrough covers the first 3 days.
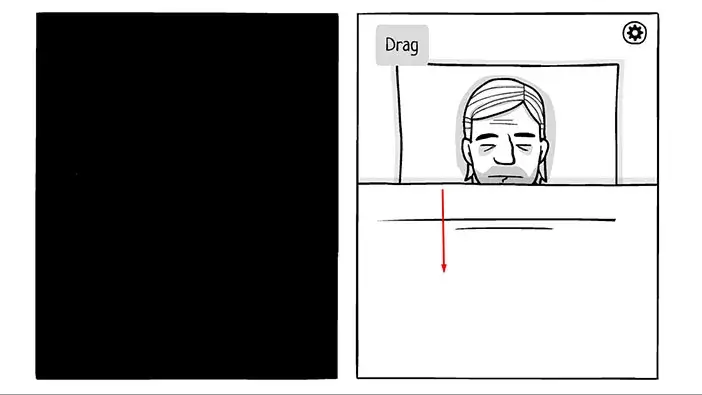
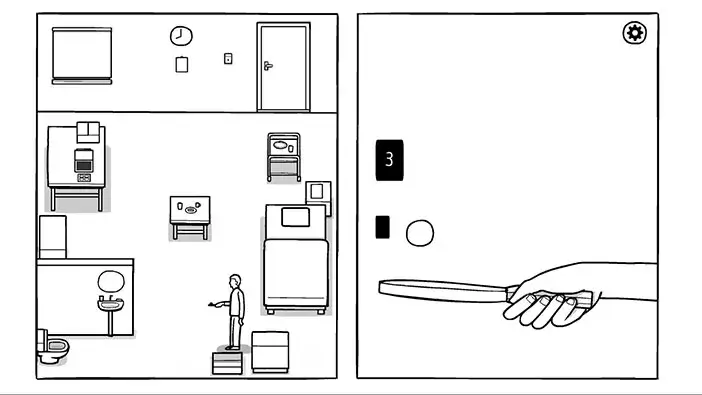
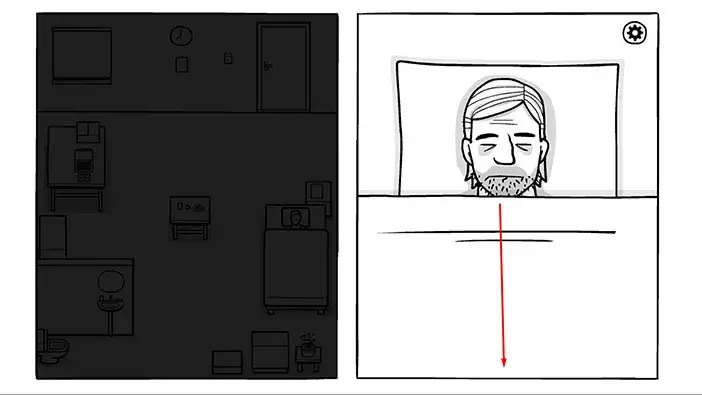
Drag the blanket to wake up, and get out of bed.
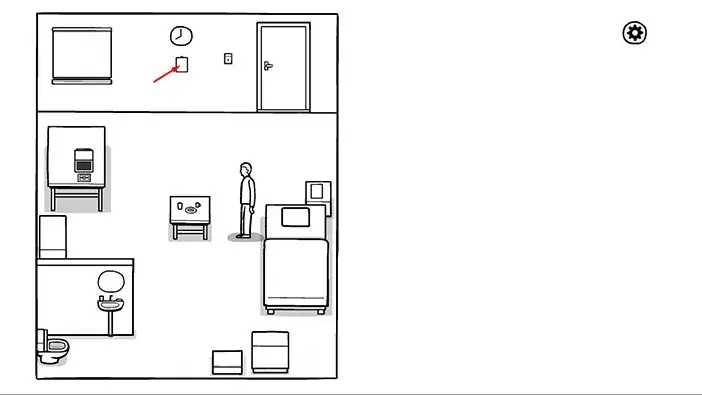
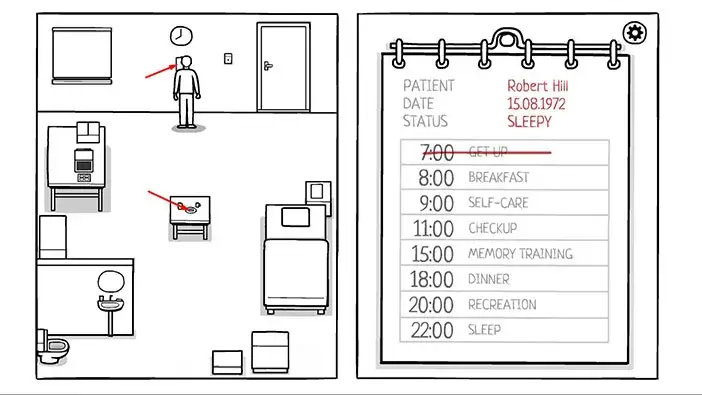
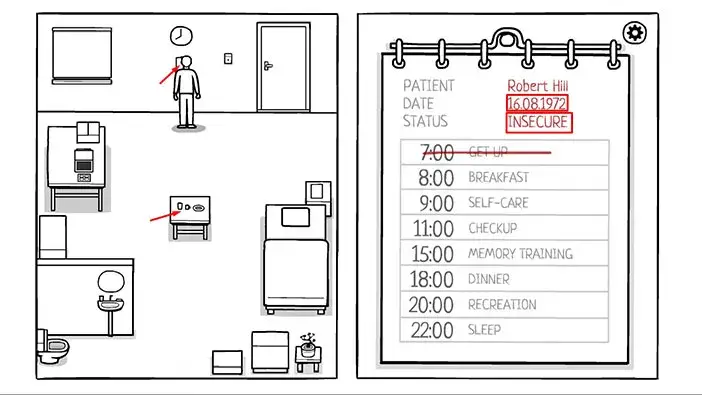
Let’s take a look at our daily tasks. Tap on the note below the clock.
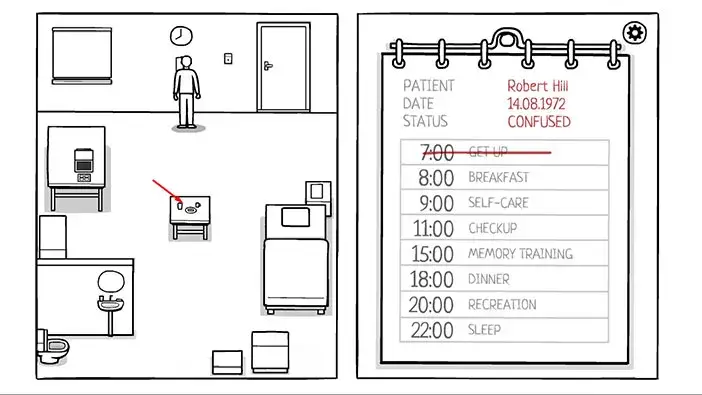
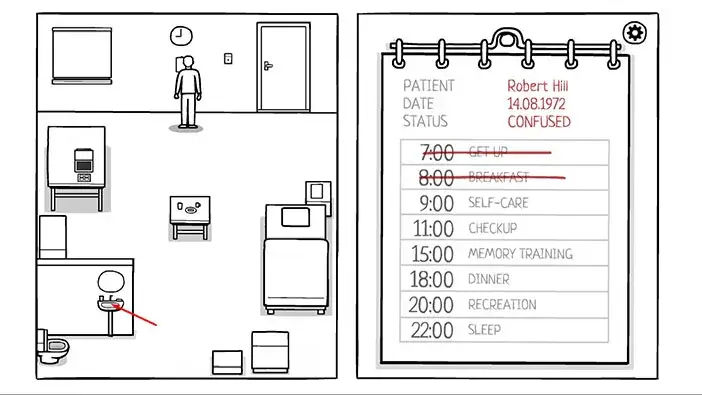
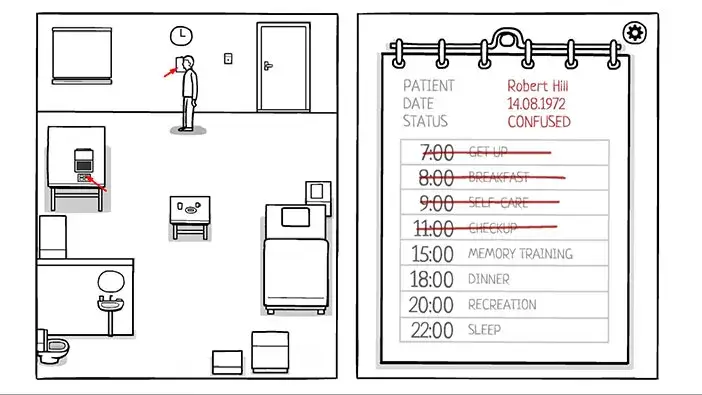
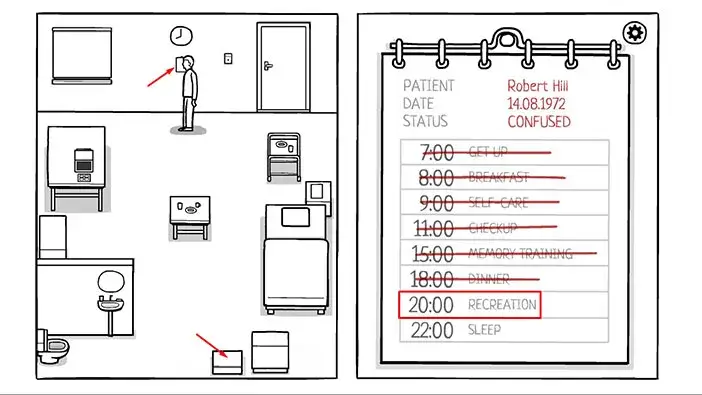
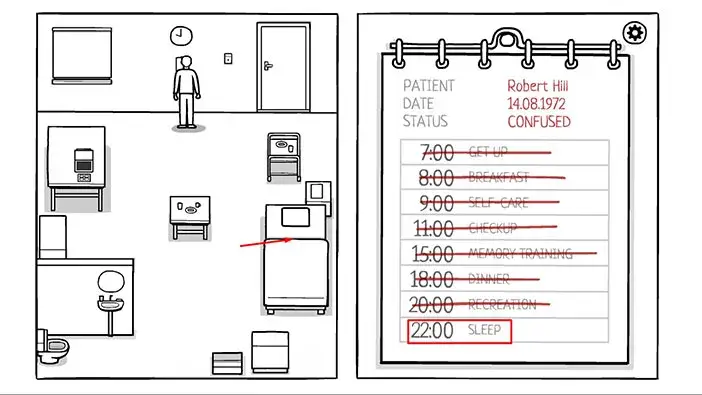
The name of our character is “Robert Hill” born on 14.08.1972. and his current status is “confused”.
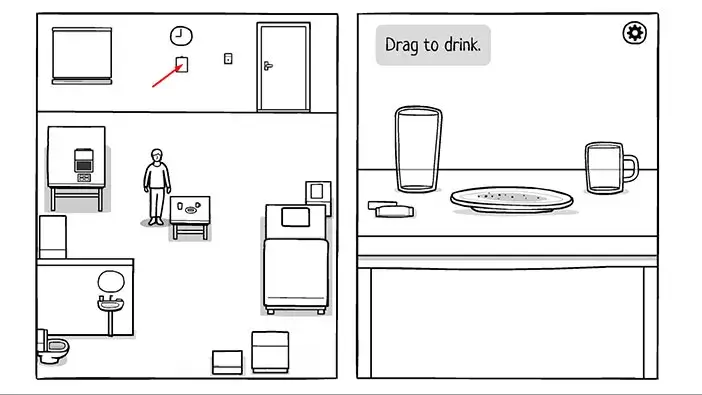
Below this information, we can see our daily schedule. We already got out of bed, so let’s proceed to the next task, breakfast. Tap on the small table in the middle of the room.
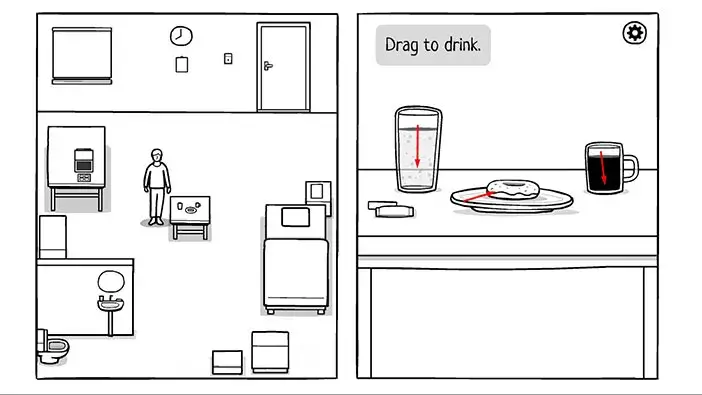
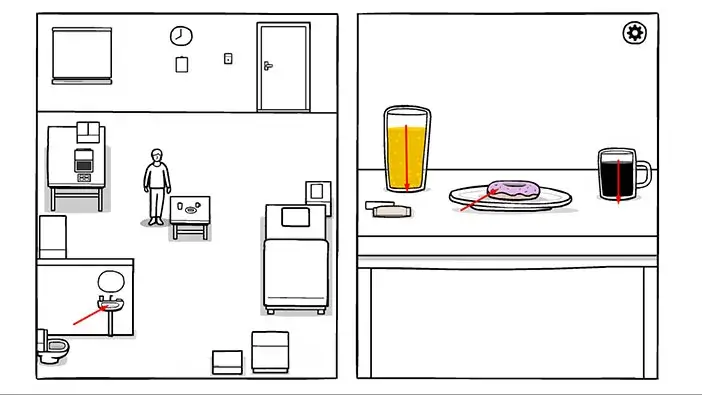
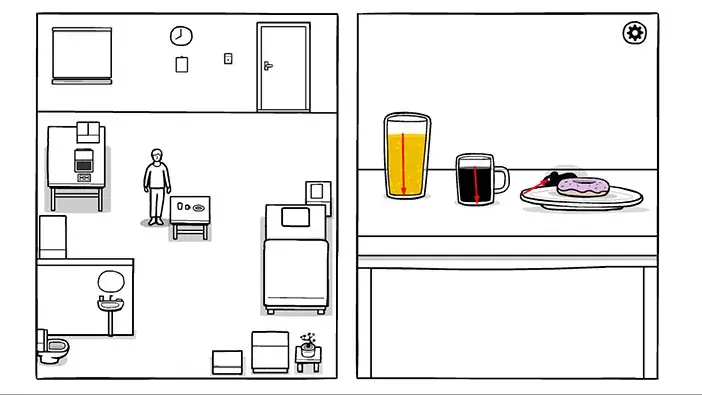
First, drag down the water glass to drink the water.
After that, drag down the cup of coffee to drink the coffee.
Lastly, tap on the donut three times to eat it.
Let’s check out our next daily task.
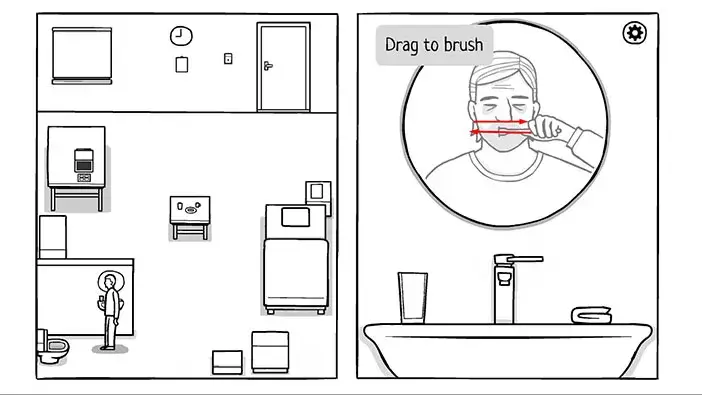
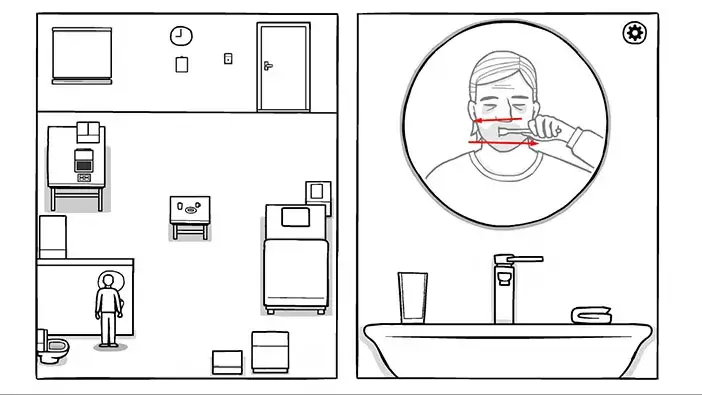
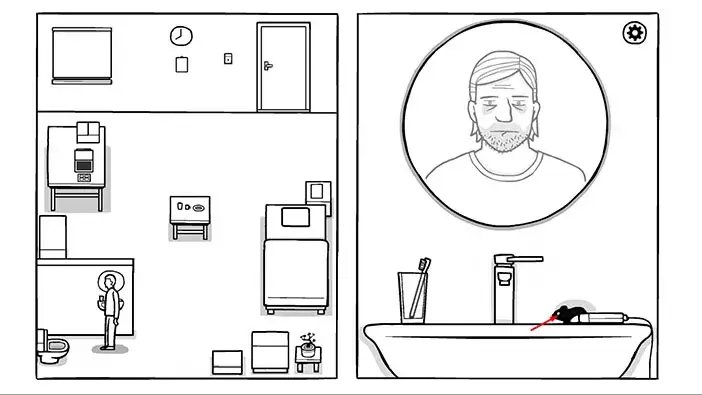
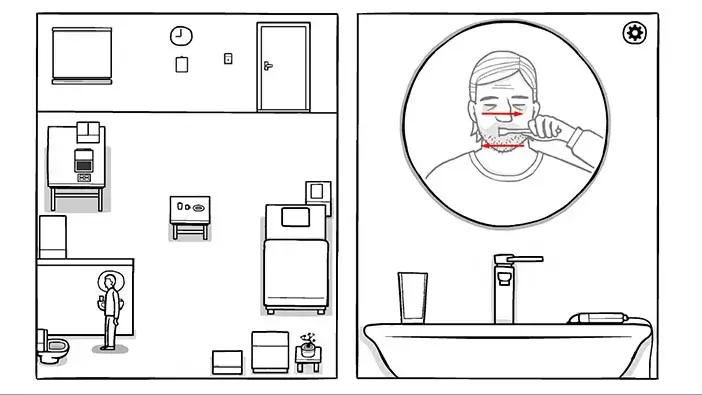
Ok, next, we have “Self-care”. Tap on the mirror and the sink located in the lower left corner of the room.
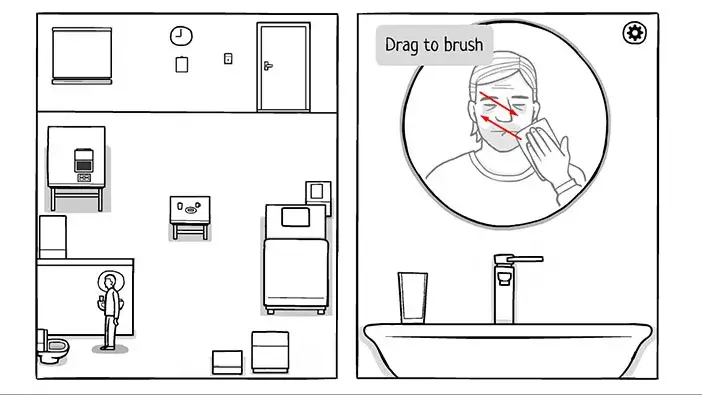
Tap on the toothbrush on the left to pick it up. After that, drag horizontally to brush your teeth.
Next, tap on the towel on the right to pick it up. After that, drag the towel to clean your face.
Ok, let’s take a look at our next task.
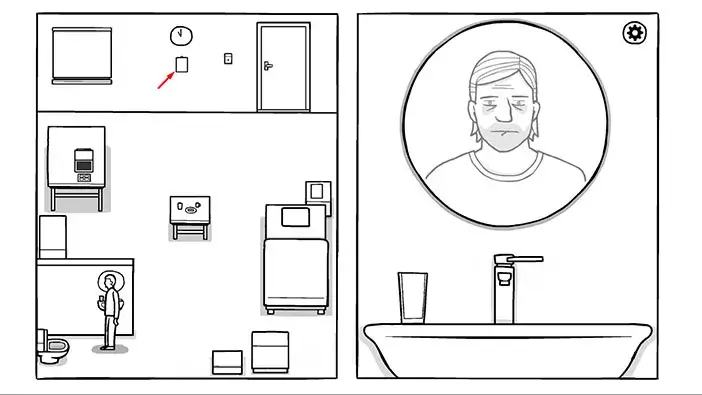
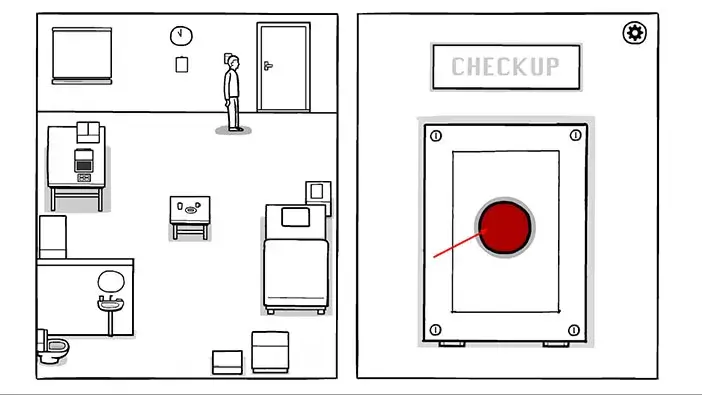
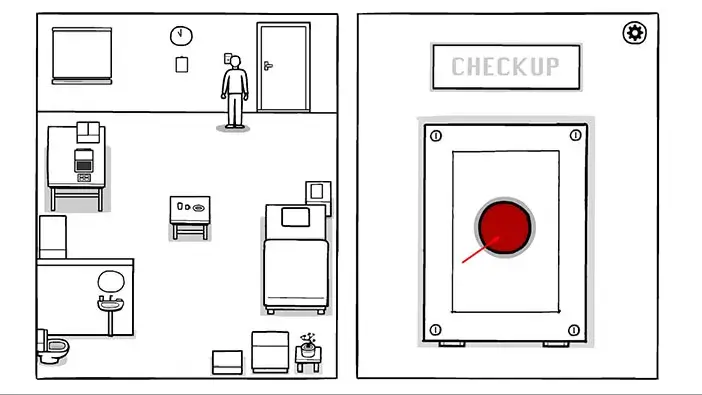
Our next task is a check-up. Tap on the button on the left side to approach it, then tap on the red button to press it.
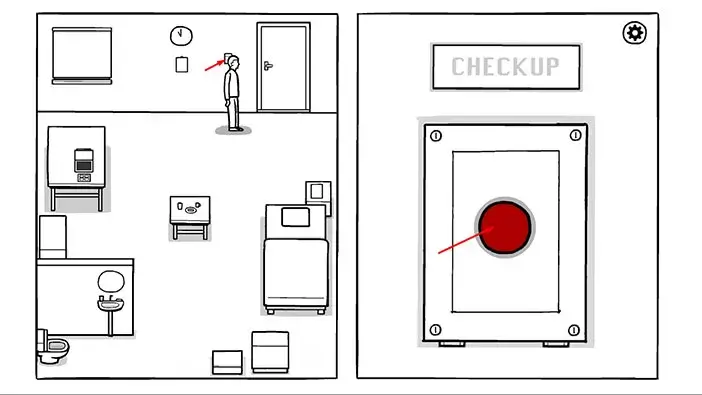
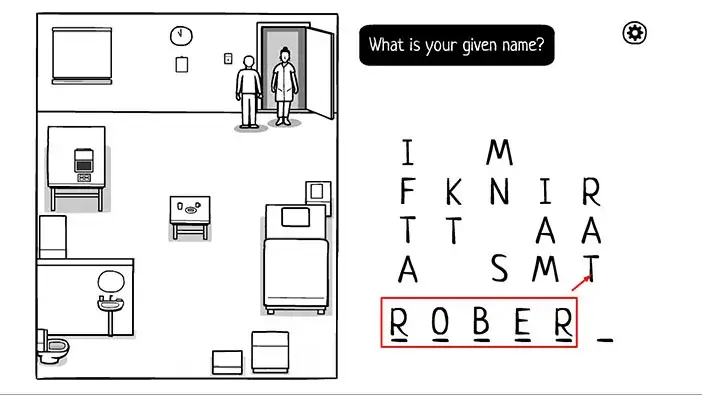
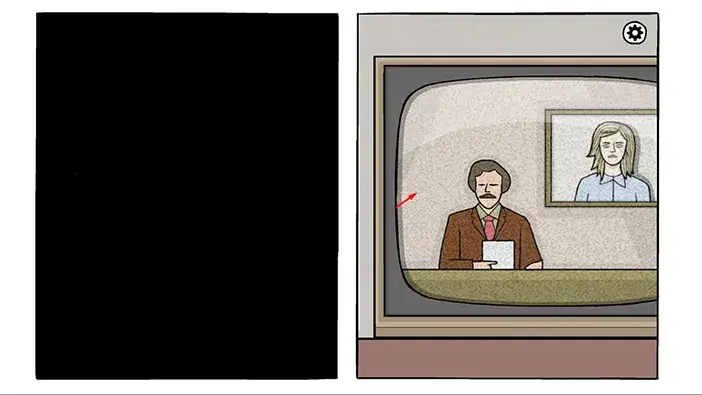
The door will open and the nurse will come into the room. Tap on the nurse to start the conversation. The nurse will greet your character, and she will also inform him that he suffered an accident and that he is in the hospital because he has amnesia. Next, she will ask if you remember your name.
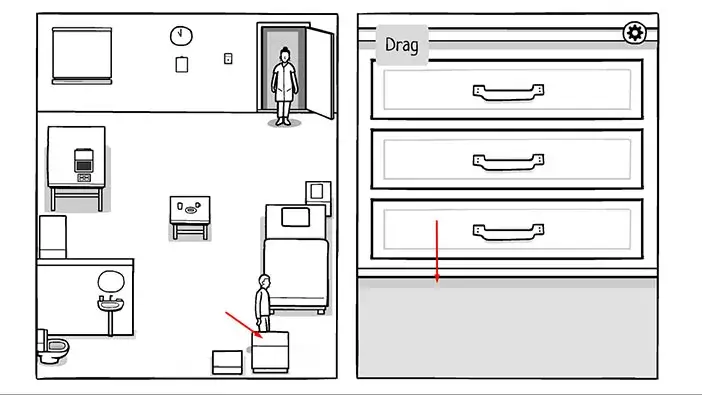
Let’s see if we can find our ID. Tap on the cabinet in the lower right corner of the room to approach it. After that, drag the bottom drawer to open it.
In the drawer, you will find your ID. Tap on it to take a closer look.
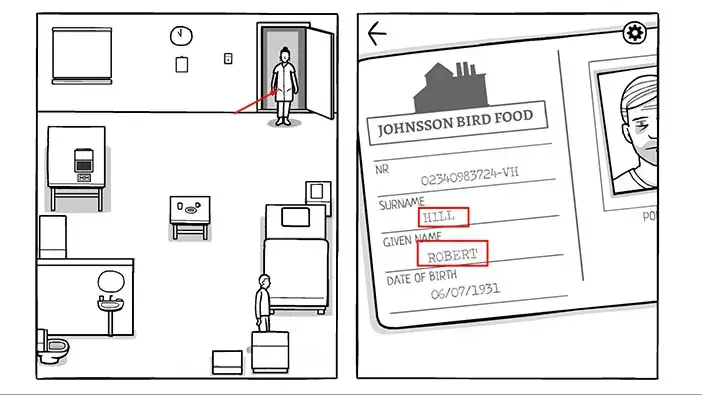
If you look at the ID, you will see the name of our character, “Robert Hill”. Tap on the nurse to go back to her.
Enter the name of your character, “Robert”.
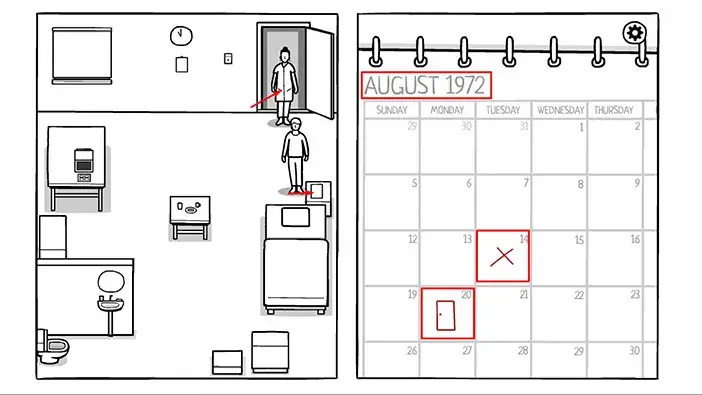
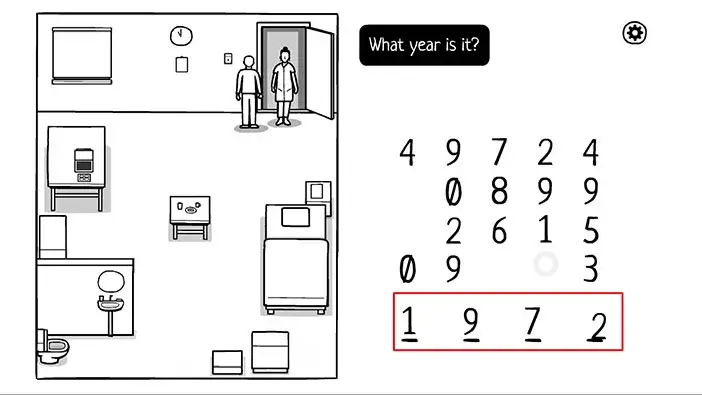
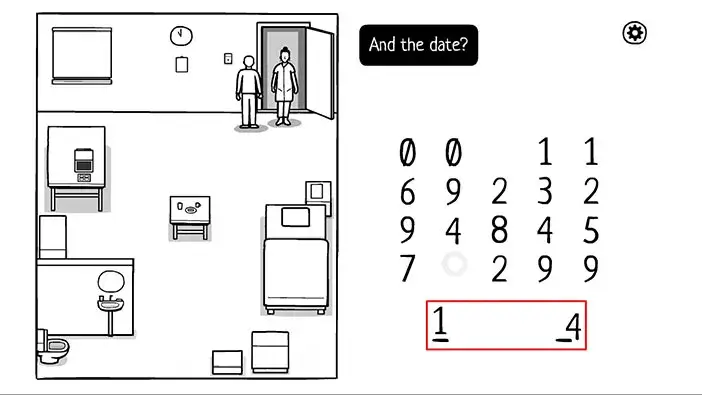
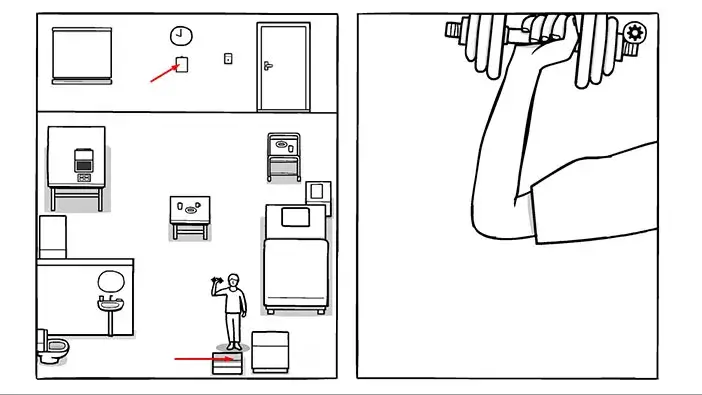
Next, the nurse will ask “What year is it?” Tap on the calendar, located just above the bed, to take a closer look.
We can see that the date is the 14th of August 1972 – memorize this information. If you pay attention to the calendar, you will notice that the door is drawn in the 20th of August square. So, our character discharge from the hospital is probably scheduled for this date, meaning that we should stay here for another week.
Let’s go back to the nurse and answer her question.
Enter the current year, “1972”.
Enter the date, “14”.
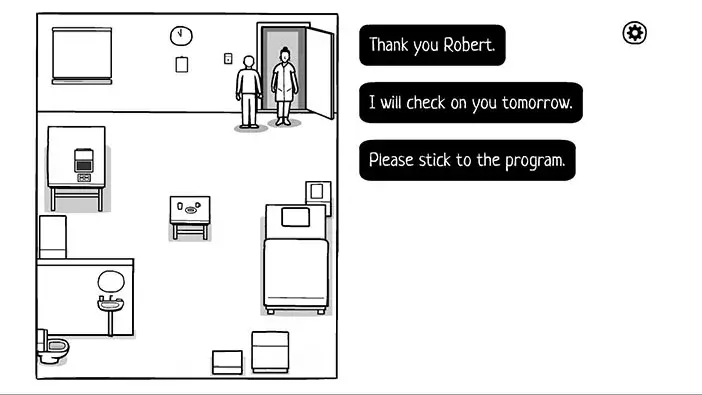
The nurse will take you for answering her question, and she will remind you to stick to the program. After that, she will leave the room.
Some time will pass, so let’s take a look at our next task.
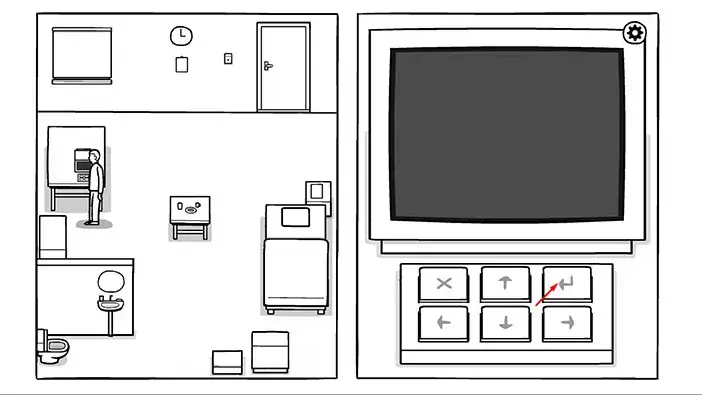
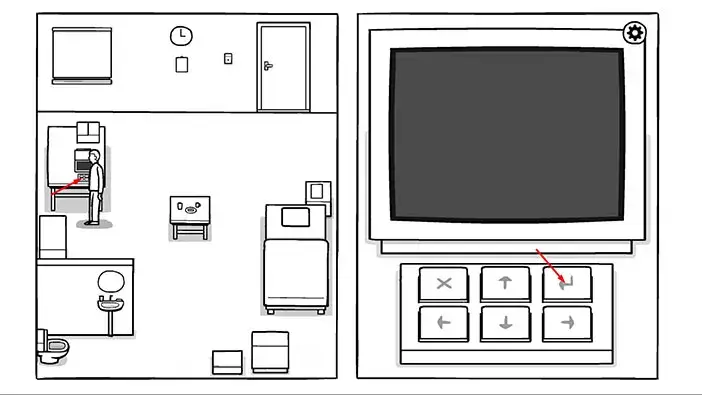
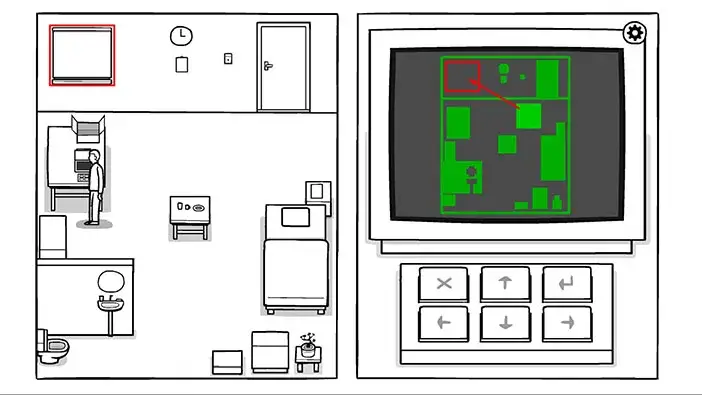
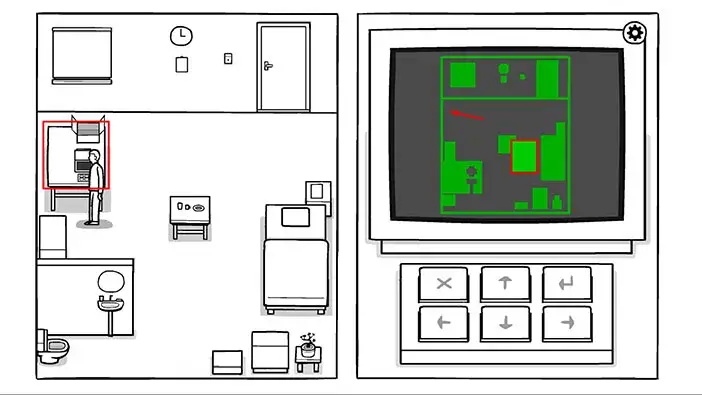
Next up is “Memory training”. Tap on the small computer on the left to start the interaction.
Tap on the “Enter” button to start the program.
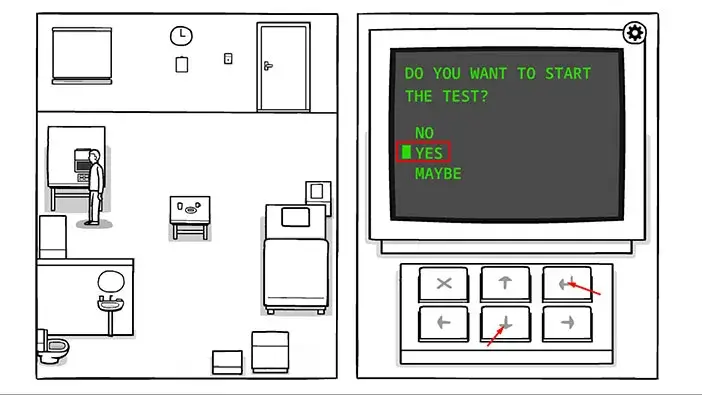
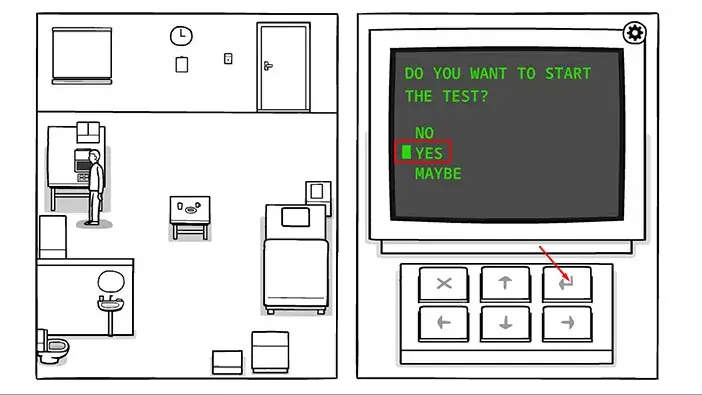
“Do you want to start the program?”
Tap on the down arrow to move the pointer, then tap on the “Enter” to proceed.
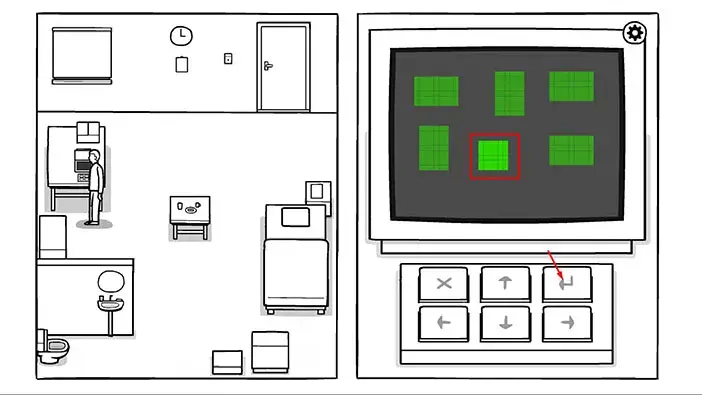
A donut will appear on the screen, so tap on enter to continue. On the next screen, move the pointer to the third answer, donut, and tap on enter to confirm.

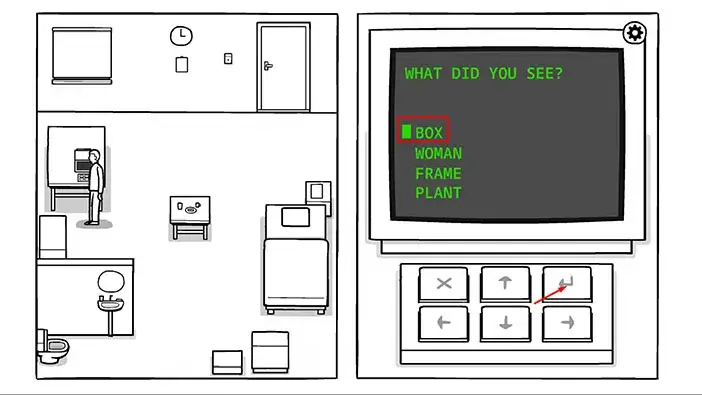
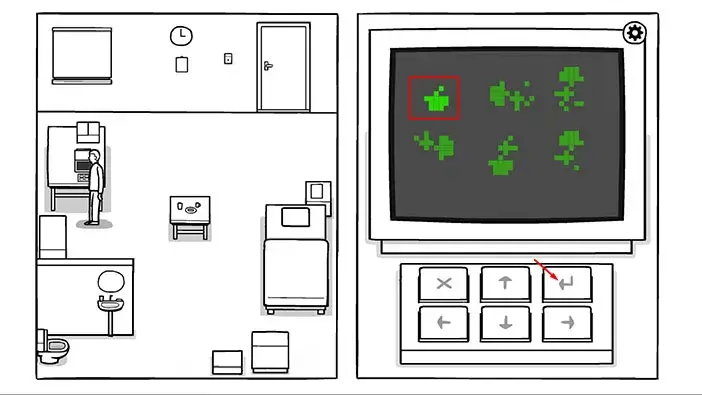
Next, you will see a box, so tap on enter to continue. On the next screen, move the pointer to the first answer, box, and tap on enter to confirm.
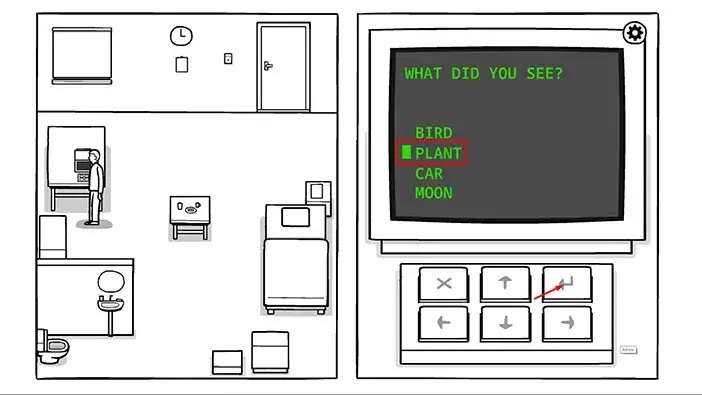
Next, you will see a plant, so tap on enter to continue. On the next screen, move the pointer to the second answer, plant, and tap on enter to confirm.
Next shape will appear, tap on enter to continue. On the next screen, move the pointer to the third answer, frame, and tap on enter to confirm.

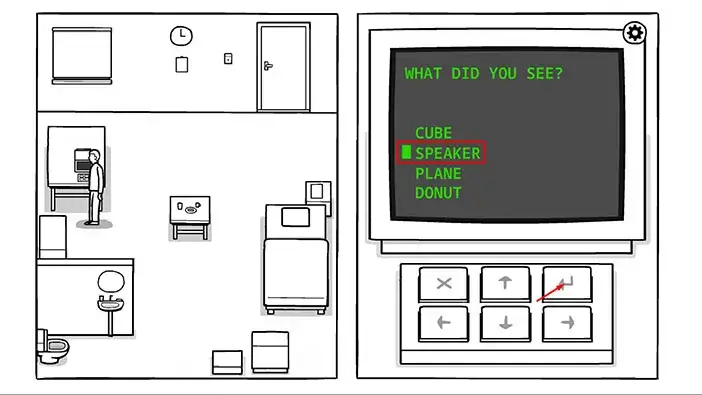
Next shape will appear, tap on enter to continue. On the next screen, move the pointer to the second answer, speaker, and tap on enter to confirm.
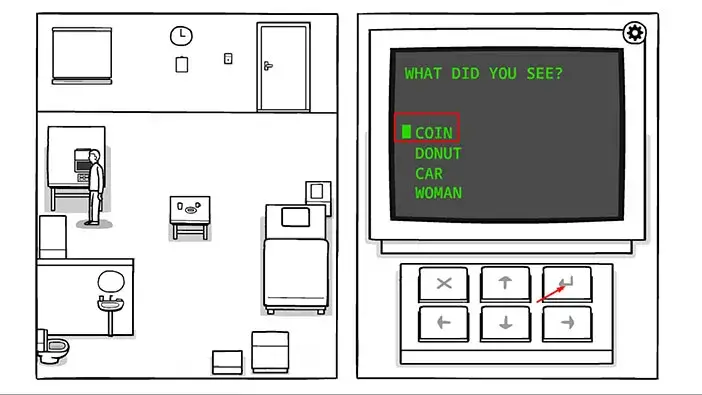
Next shape will appear, tap on enter to continue. On the next screen, move the pointer to the first answer, coin, and tap on enter to confirm.
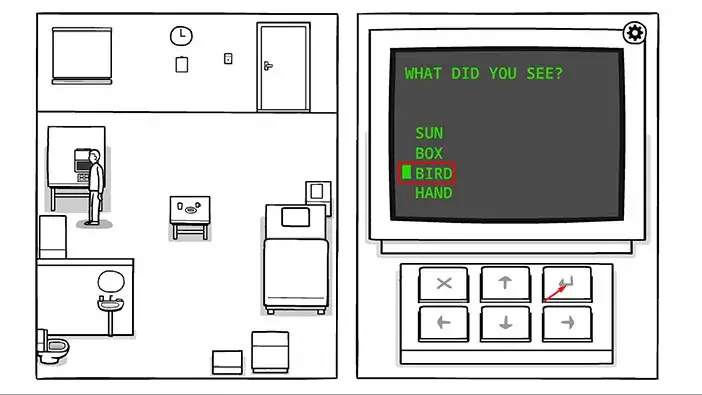
Next shape will appear, tap on enter to continue. On the next screen, move the pointer to the third answer, bird, and tap on enter to confirm.
With this last answer, you will complete the test, and dinner will be delivered to your room. Tap on the service cart to approach it.
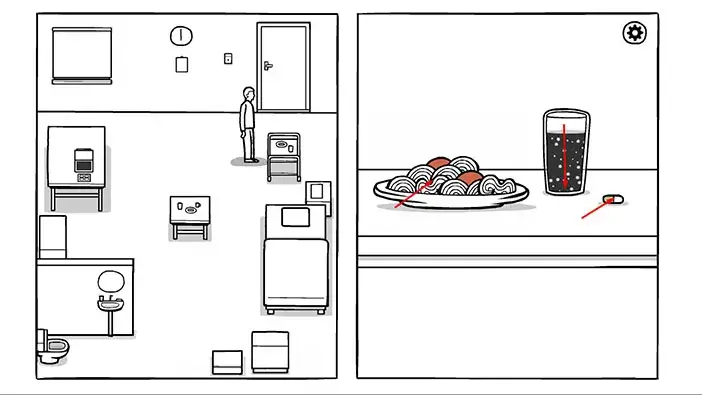
Tap on the food to it. After that, take a pill. Lastly, wash it all down with some water.
Let’s tap on the board to check out our next task.
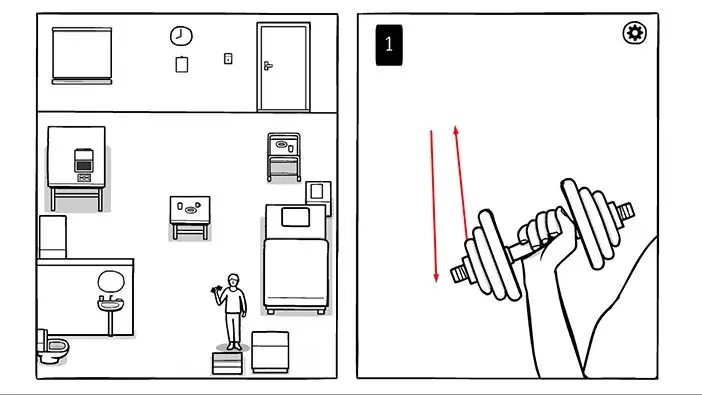
Our next task is recreation. Tap on the box at the bottom of the room (next to the cabinet) to take a closer look at it.
Tap on the box to open it and inside you will find a dumbbell. Tap on it to pick it up.
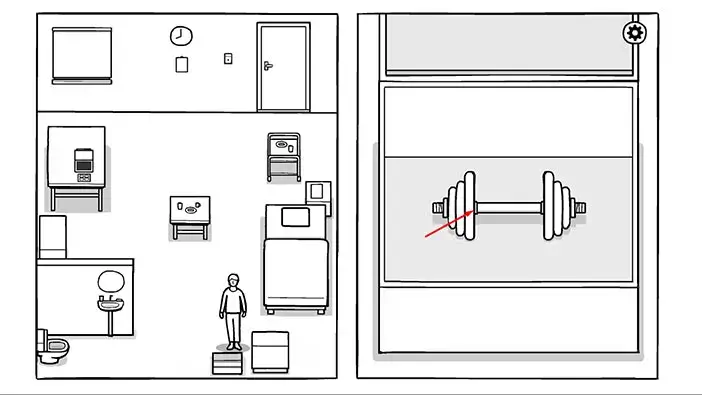
Let’s do 10 reps. Drag up to lift the dumbbell, then drag down to lower it.
Tap on the box to return the dumbbell. After that, go back to the notice board to take a look at the next task.
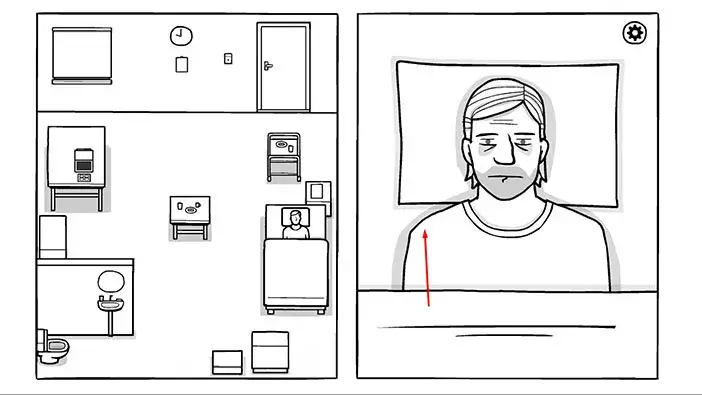
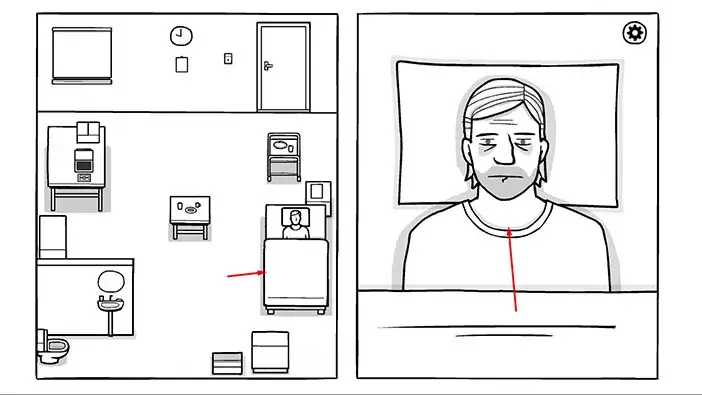
Well, we completed all the daily tasks, and now we can get some sleep. So, tap on the bed on the right side of the room.
Drag the blanket up, and our character will go to sleep.
In the next scene, our character will dream about an event from his past.
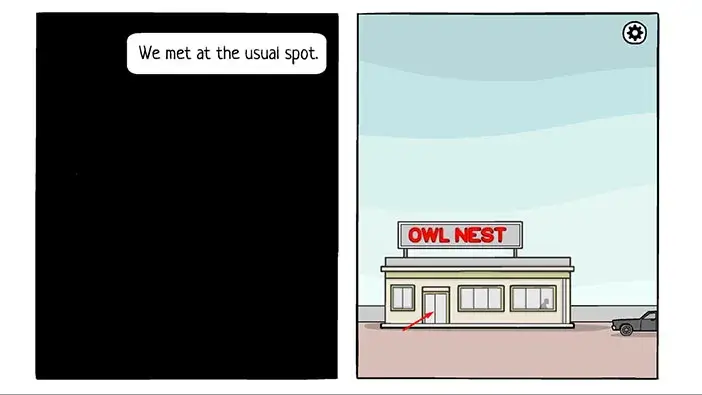
In his dream, our character was about to meet with his date at their usual spot, “Owl’s nest” diner. Tap on the door to proceed into the diner.
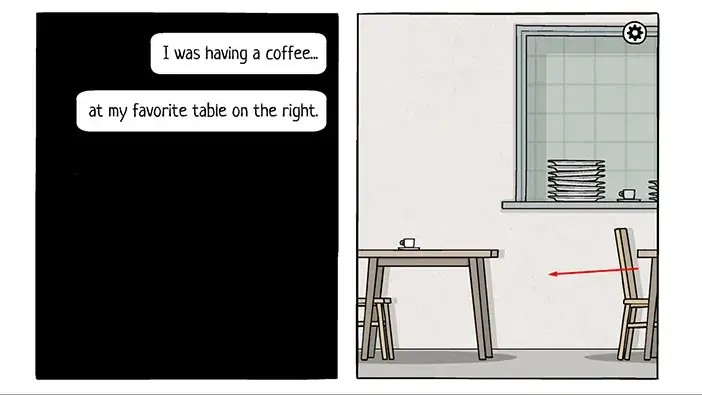
Our character remembered that he was having a coffee at his favorite table on the right. So, sweep to the right until you find our character.
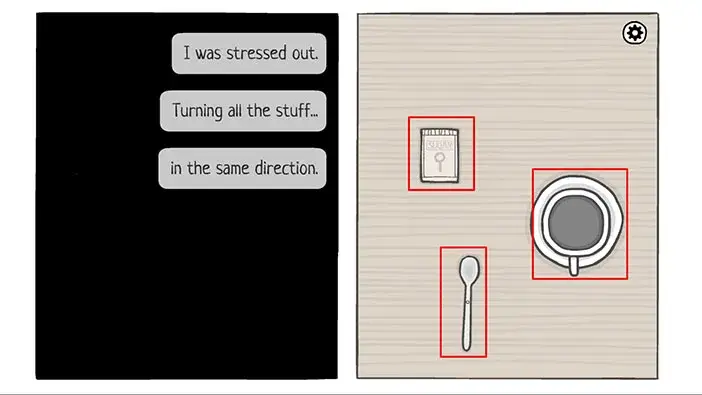
Tap on the table to start the interaction. Next, our character remembered that he was turning all the items in the same direction, while he was waiting for his date.
So, let’s rotate the spoon, the sugar, and the cup of coffee, and point them downward.
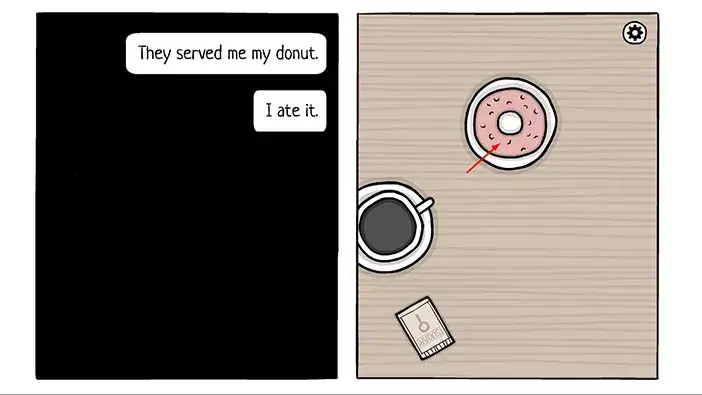
Next, drag the cup of coffee to take a sip. After that, the donut will arrive, so tap on it several times to eat it.
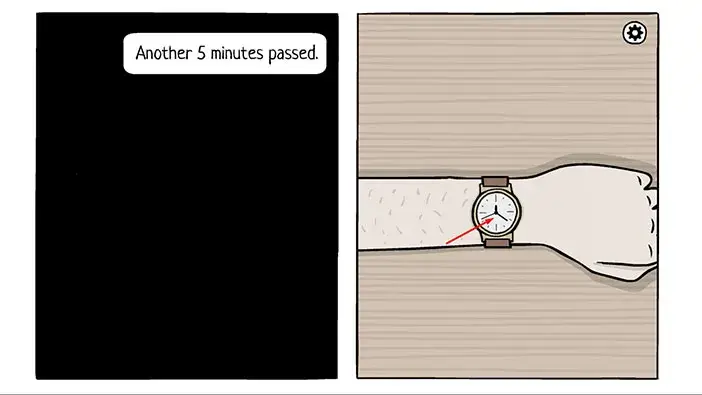
Another 5 minutes passed. Keep tapping on the watch, to pass the time.
Finally, his date has arrived. She was a bit late and looked tired. Normally, that wouldn’t be a problem, but when she looked away, our character sensed that something was wrong. At one moment our character remembered that she pulled her chair closer to the table. So, drag on the chair to pull it. When our character says that she looked away, drag her eyes to the right to continue the story.
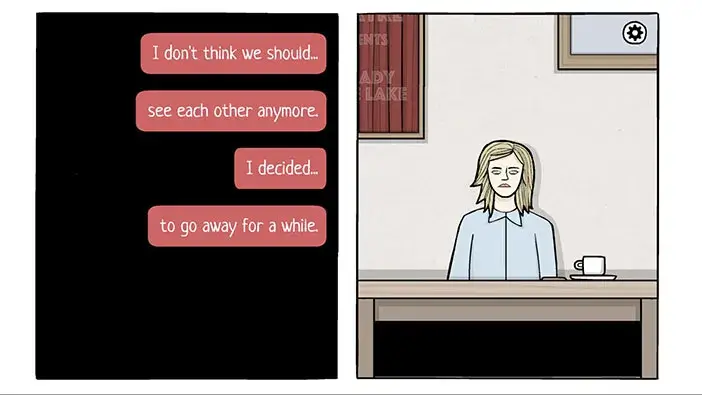
His instinct was correct. His date told him that she intends to move away and that she doesn’t want to see him anymore.
Our character was shocked. He decided to take another sip (drag the coffee cup to take a sip).
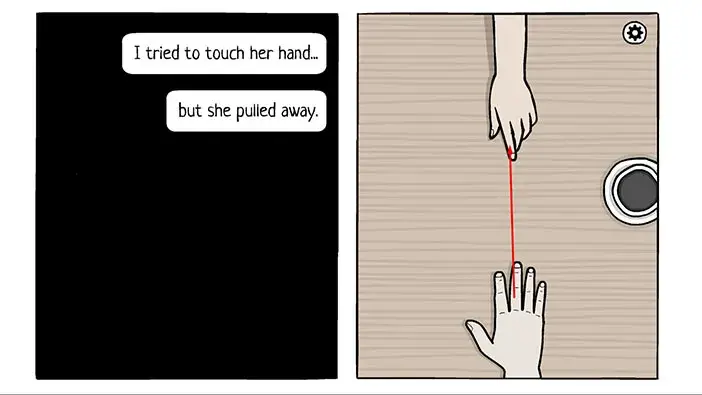
Next, he tried to touch her hand. So, drag his hand towards hers.
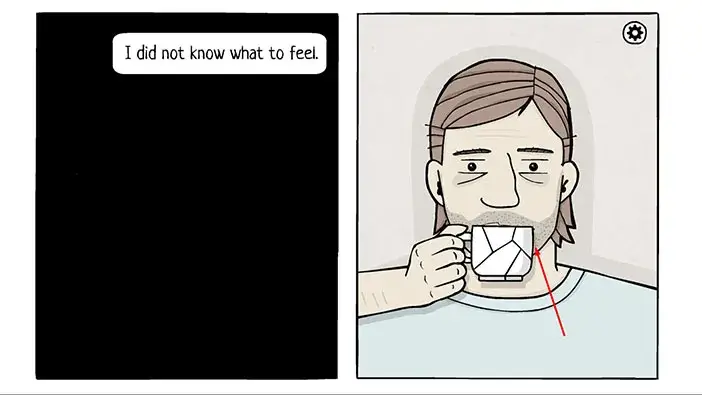
The next thing our character remembers is that she was gone, and he was alone, sitting at the table with a cup of coffee in his hand. Drag the cup of coffee towards his mouth to take another sip. Several cracks will appear on the coffee cup. Tap on it again and it will break into several pieces, and the dream will end.
That’s the end of day 1.
DAY 2
Let’s start the day 2. Drag down the blanket to get out of bed. After that, tap on the notice board to check your daily tasks.
Next, on the list is breakfast, so tap on the table in the middle of the room to approach it.
Ok, let’s eat breakfast. Drag down on the glass of juice to drink it. After that, tap on the donut several times to eat it. Lastly, drag down the cup of coffee to drink it.
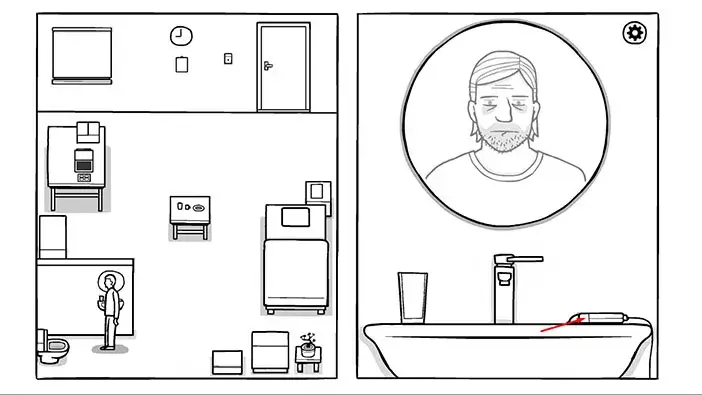
Once you’re done, tap on the sink and the mirror in the lower left corner of the room to proceed to the next task, “Self-care”.
Tap on the toothbrush, located in the glass on the left, to pick it up. After that, drag the toothbrush horizontally to brush your teeth.
Next, tap on the towel on the right to pick it up, and use it to wipe your face (drag).
Our next task is “Checkup” so go to the button on the left side of the door.

Tap on the red button. You will hear the buzzing sound, the door will open, and the nurse will come into the room. Tap on the nurse to start the interaction.
The nurse will greet you, and then she will proceed with your daily checkup.
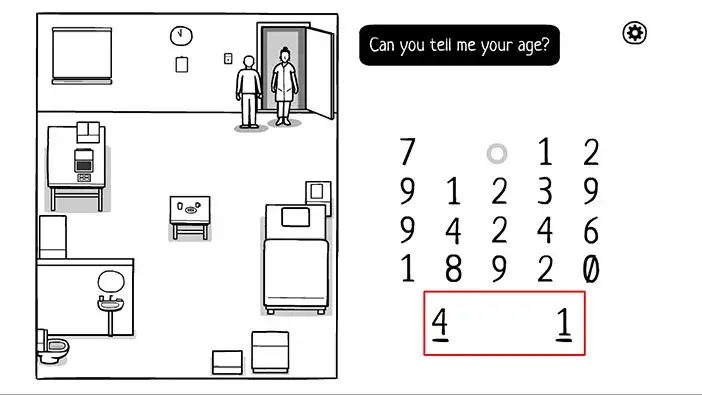
First question. “What is your age?”
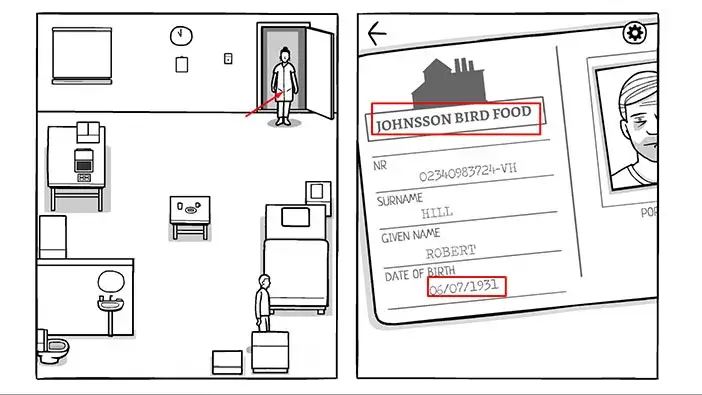
Ok, to find out our character’s age we should take a look at his ID. It is located in the cabinet in the bottom right corner of the room, inside the bottom drawer (we already looked at his ID during day 1 tasks). Once you open the drawer, tap on the ID to take a closer look at it.
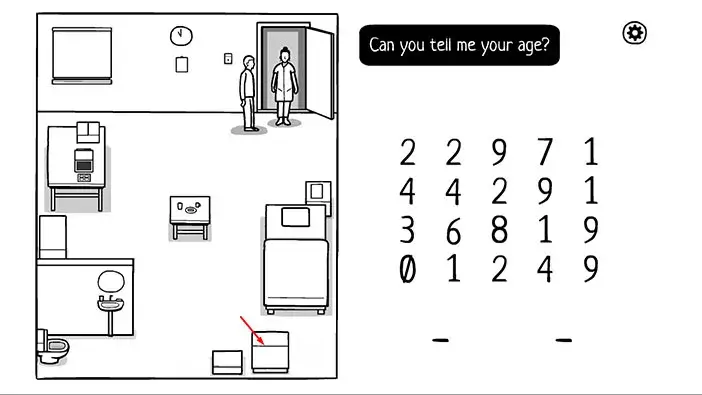
We can see that Robert was born on the 6th of July, 1931. The current date is the 15th of August, 1972. (during day 1 tasks it was the 14th. You can check the calendar by tapping on the small cabinet above the bed). So, that means that our character is 41.
While we’re here, let’s also memorize where our character worked before he was admitted to the hospital. “Johnsson Bird Food”.
Let’s go back to the nurse and answer her question.
Enter the number 41.
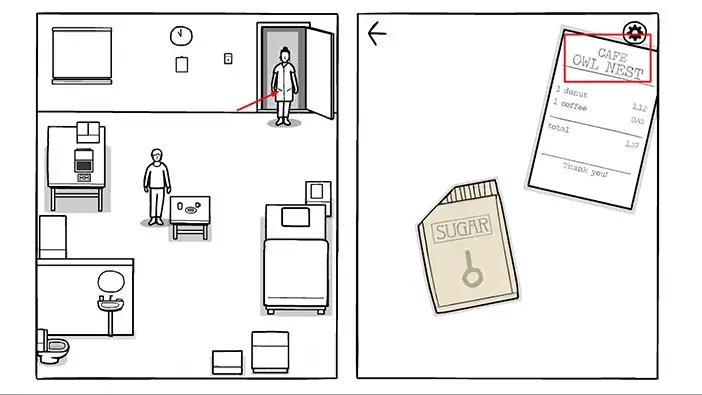
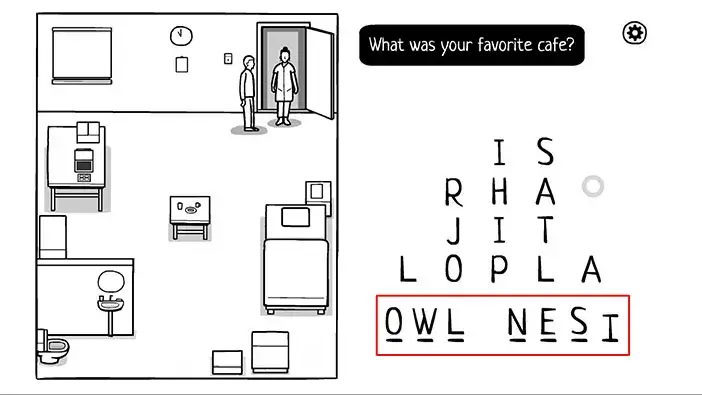
Next, we should enter the name of our favorite cafe. In the dream, the name of the café was “Owl Nest”. Let’s check out some more clues about that. Tap on the table in the middle of the room to take a closer look.
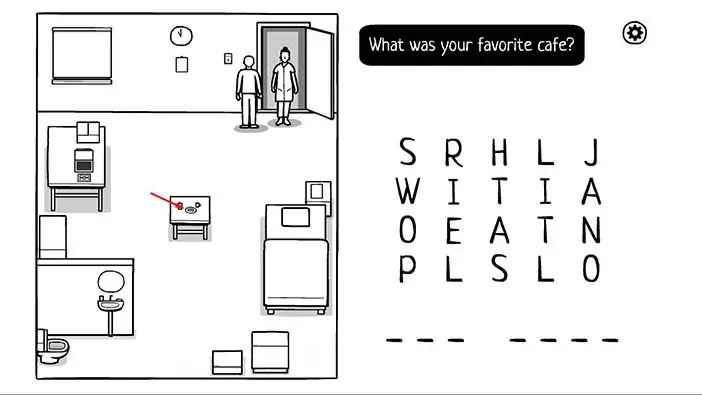
Tap on the two small bags on the left side of the table to take a closer look at them. You will see a receipt from a café “Owl Nest”. So that confirms the name of our favorite café. Let’s go back to the nurse and answer her question.
Enter the name of your favorite café, “Owl Nest”.
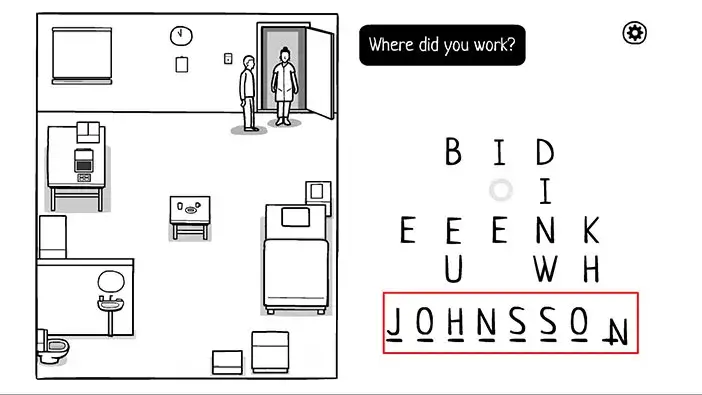
Next question. “Where did you work?”
We already discovered that Robert worked at the “Johnsson Bird Food” when we looked at his ID. So, enter the name of Robert’s workplace, “Johnsson”.
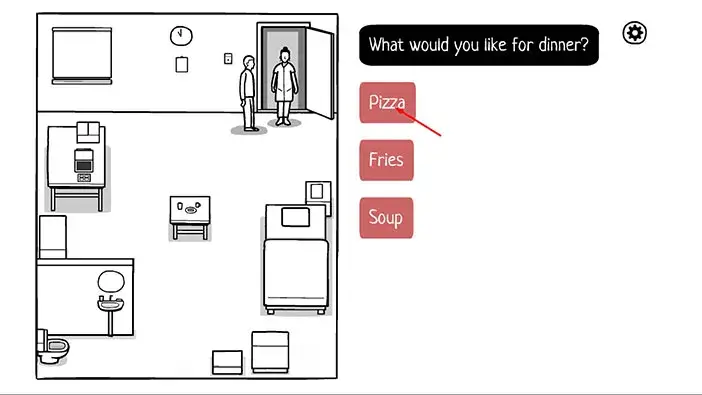
Next question. “What would you like for dinner”?
Let’s go with the first answer, “Pizza”.
The nurse will thank us for answering her questions, and she will also mention that we are making progress. Probably because Robert’s memory is slowly returning.
Some time will pass, so let’s proceed with our next task, “Memory Training”. Tap on the computer on the left to approach it. After that, tap on the “Enter” to start the application.
Move the pointer next to the “Yes” option, then tap on “Enter” to proceed to the test.
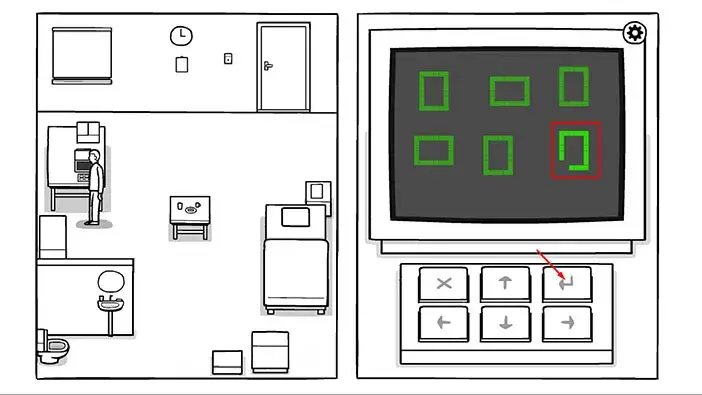
Ok, this puzzle is different from the one that we saw on Day 1. Here, we can see six shapes. Five of them are the same shape with different rotations. So, our task is to find a shape that is different from the others.
In the first puzzle, select the third shape in the first row ( use the arrows on the keyboard) then tap on “Enter” to confirm.

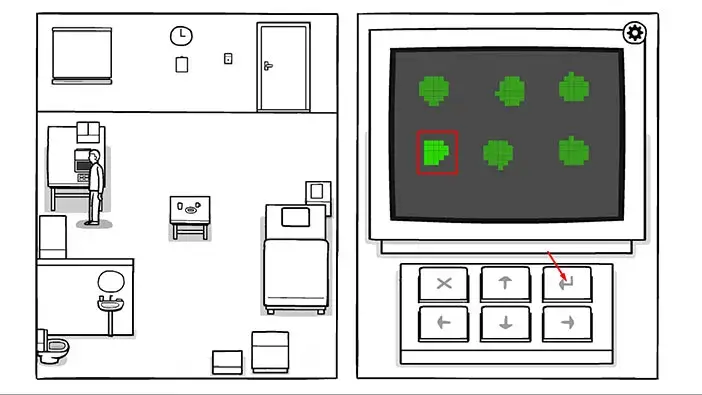
Second puzzle. Select the second shape in the second row then tap on “Enter” to confirm.
Third puzzle. Select the first shape in the first row then tap on “Enter” to confirm.
Fourth puzzle. Select the third shape in the second row then tap on “Enter” to confirm.
Fifth puzzle. Select the third shape in the first row then tap on “Enter” to confirm.

Sixth puzzle. Select the first shape in the second row then tap on “Enter” to confirm.
Seventh puzzle. Select the second shape in the first row then tap on “Enter” to confirm, and you will complete the “Memory Training” test.

As soon as you complete the “Memory Training” test, the service cart with our dinner will arrive. So, tap on the cart to approach it.
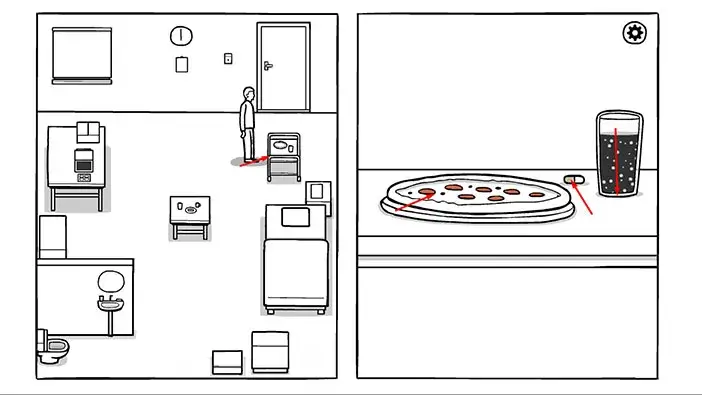
We said that we want pizza for dinner, so that’s what we got. Tap on all slices of pizza to eat them. After that, tap on the pill. Lastly, wash it all down with some water (drag down the glass).
Our character will say that he loves pizza.
Our next task is recreation, so let’s head down to the small cabinet on the other side of the room. Once you get there, tap on the “recreation box” to open it and inside you’ll see a table tennis racket and a ball. Tap on them to pick them up.
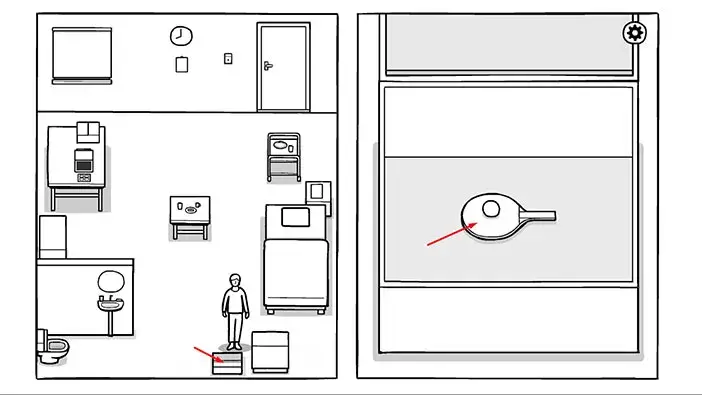
Move the racket left and right to bounce off the ball. You will need 10 reps to complete this task.
Ok, we completed all daily tasks. Tap on the bed to approach it. After that, drag the blanket to cover Robert, and he will fall asleep.
In his dream, our character will remember another event from his past.
He was driving to work, and he decided to turn off the radio because the music reminded him of his ex-girlfriend. Turn off the radio by dragging/turning the button to the right.
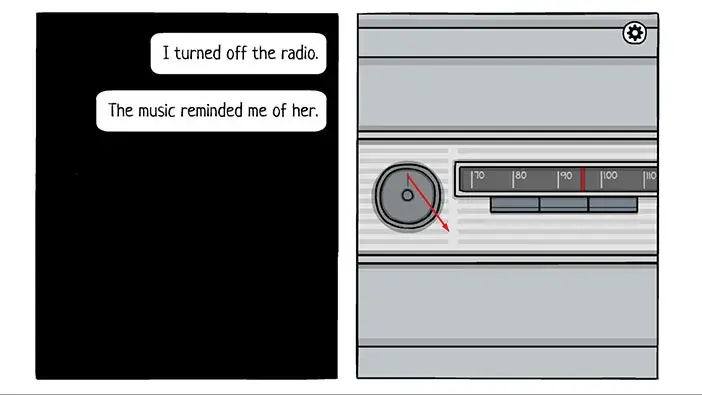
With the radio off, our character can now focus on the road.
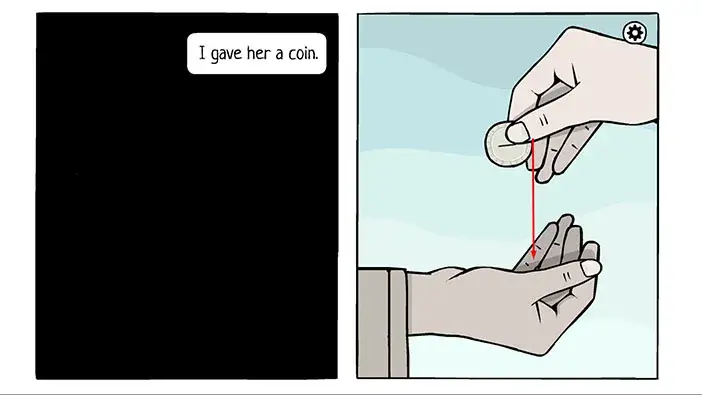
After driving for some time, we will get to the red light, and our character will stop his car. The beggar will approach, so drag down to roll down the window.
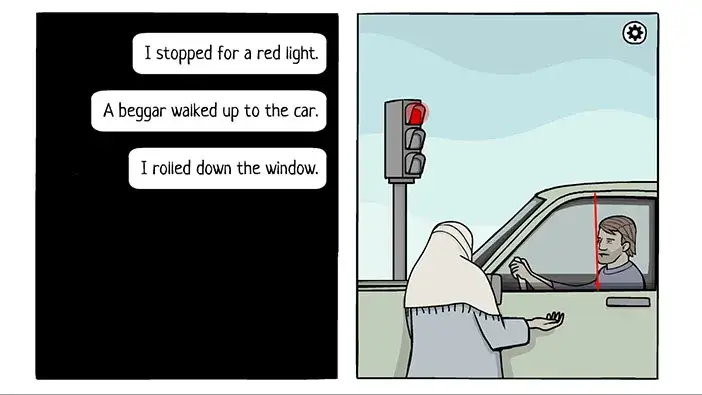
Drag your hand down to give her a coin.
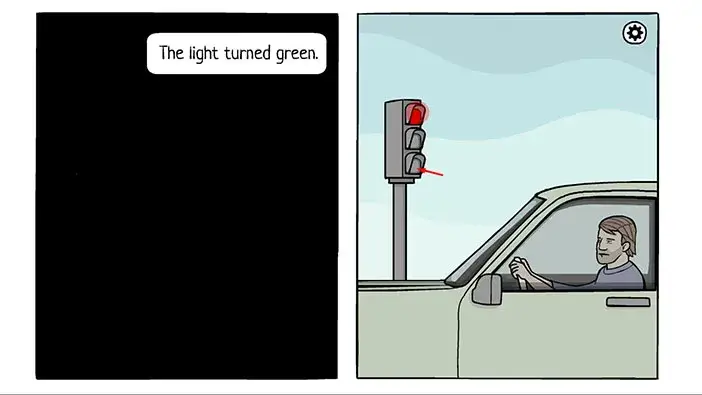
Next, the light turned green. So, let’s tap on the light at the bottom.
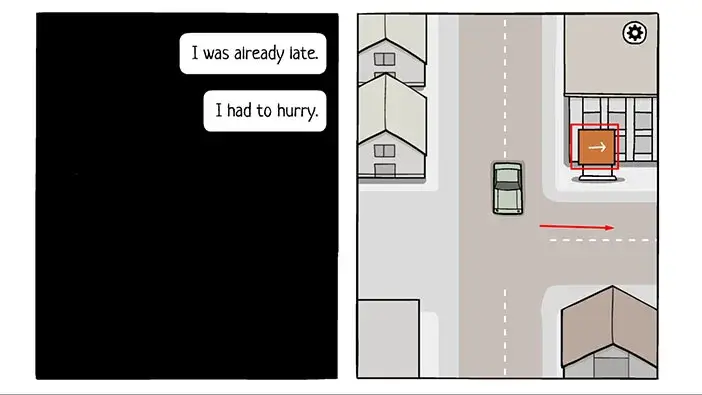
Pay attention to the white arrows on the orange signs by the road. We should steer our car in the direction of these arrows and you will eventually reach Robert’s workplace.
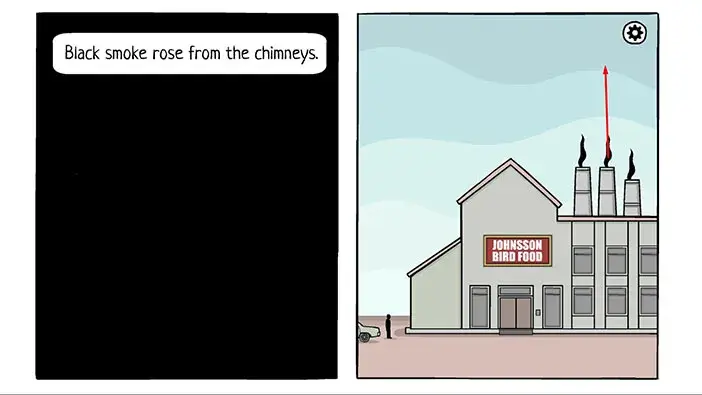
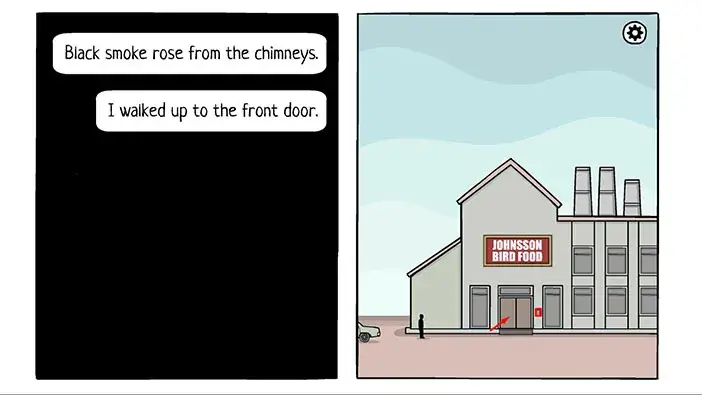
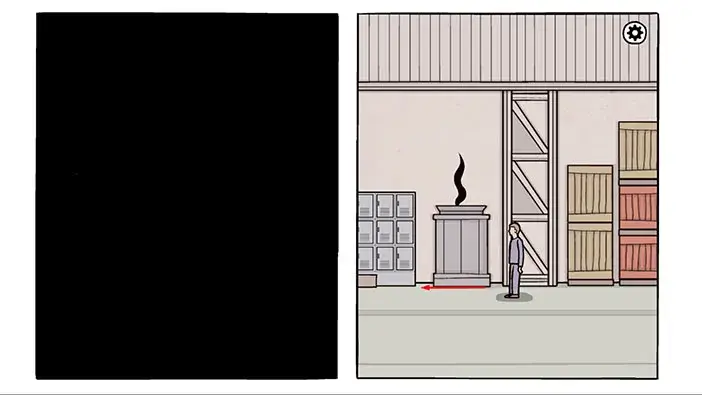
Black smoke rose from the chimneys. Drag the smoke up.
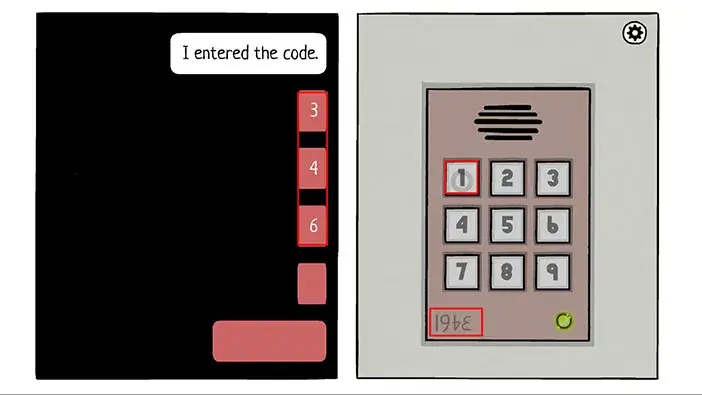
Next, our character walked up to the front door but it was locked. Hold on the front door to approach then tap on the keypad on the right side of the door to start the interaction.
We can see the code in the lower left corner, but it is upside down. So, enter the code “3461”.
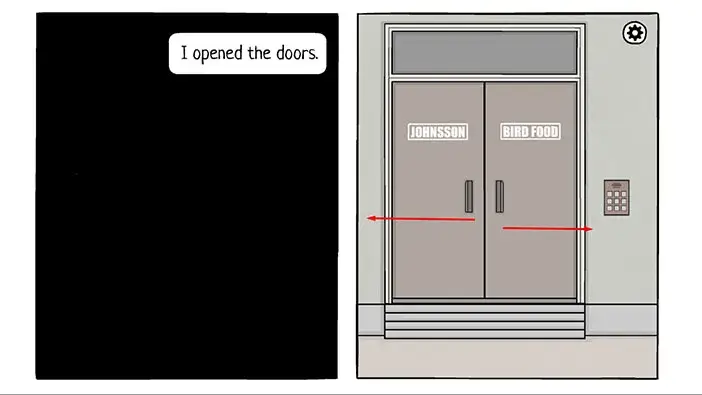
You will unlock the door, and your supervisor will say, in an angry tone, that you are late for work. Drag the doors to open them, and Robert will go inside the factory.
Go to the right until you see Robert’s boss. Our character remembered that his boss tightened the tie, so drag the tie.

The boss is angry because we are late, and he ordered us to go to our working station. So, proceed to the right until you see machine number 1. Robert will automatically stop when he reaches the machine.
Here, we have a very simple puzzle. There are three holes next to the conveyor belt. Several items, of different shapes, will go down the belt, and our task is to put them into the correct hole.
If you pay attention to the top of the screen, you will notice three shapes next to the white button. These shapes are circular, square, and oval. So, our task is to put/drag the items of circular shape (biscuits) into the first hole, square-shaped items (plastic bags) into the second hole, and oval-shaped (ear of corn) items into the third hole. The last item that will appear is a severed hand, and you should put it into the first hole (because the severed hand looks like a circle).
Tap on the white button to turn on the machine.
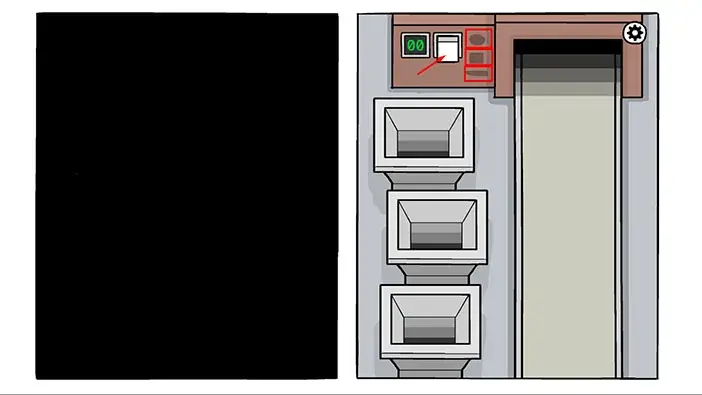
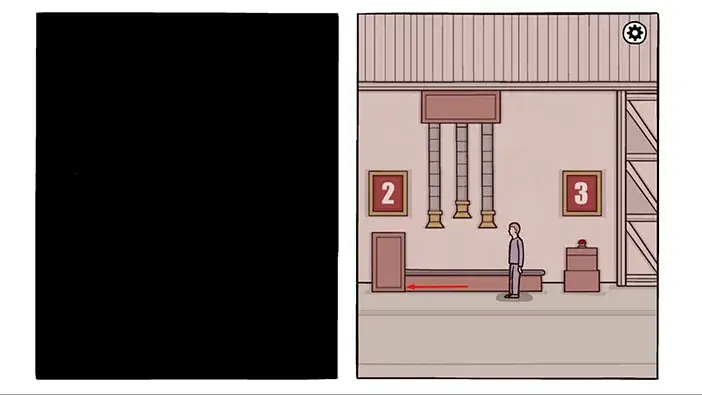
Once you put the severed hand into the first hole, you will complete this puzzle. Let’s move to the right to the next machine.
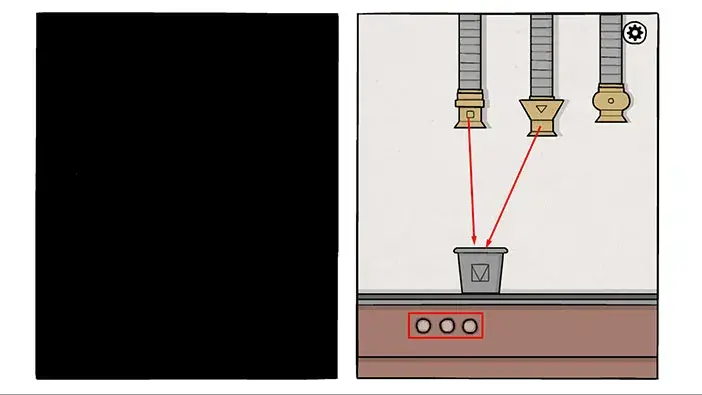
Once you reach machine number 2, you will face another puzzle to solve. Here, we have three pipes, and each pipe is marked with a shape. Starting from left to right, these shapes are square, triangle, and circle.
The buckets will appear on the conveyor belt, and each bucket will be marked with some shape. Our task is to put an item from the pipe with a matching shape into the bucket. However, the shapes on the bucket might represent a combination of two shapes. For example, in the image below we can see a bucket with a square and a triangle. So, you should put items from the first and second pipes into this bucket.
Each time you put the correct shape into the bucket, one of the three green lights in the lower left corner will start to glow. So, in order to solve this puzzle we need to properly fill three buckets.
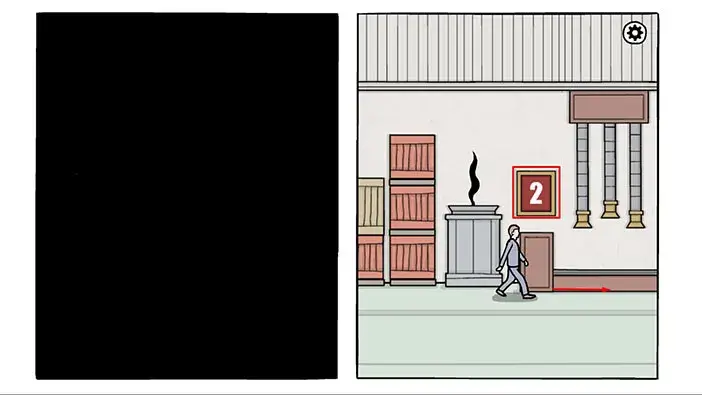
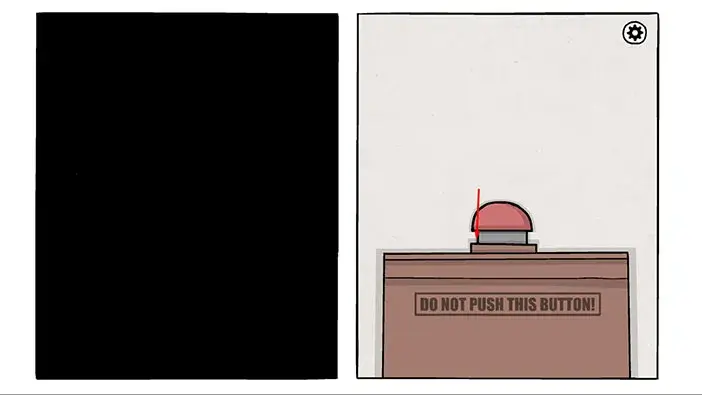
Once you finish this puzzle, go to the right and you will reach station number 3. Here, we can see a big, red, emergency button. For some reason, our character wants to sound the alarm, so let’s do that. Drag down the red button to push it.
Well, we turned on the alarm. Let’s go back to the left and see what our boss thinks about it.
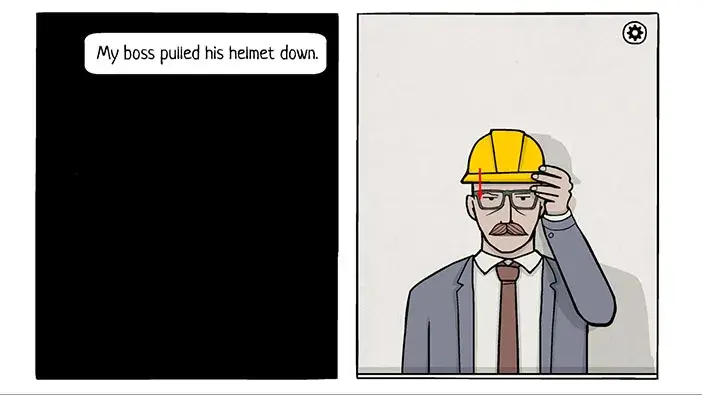
Well, unsurprisingly, Robert’s boss has a very angry look in his eyes. Let’s pull down his helmet.
Well, Robert just got fired, and his boss told him to pick up his stuff and leave. Let’s do that. Go to the left until you reach your locker.
Drag the middle locker to open it and pick up a helmet and the other three items. After that, tap on the photos to take a closer look at them.
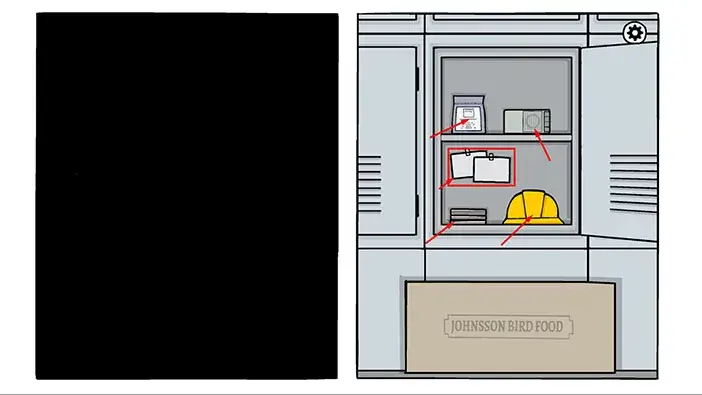
Drag down the photos to pick them up. In the first photo, we can see Robert in front of the “Johnsson Bird Food” factory. In the second photo, we can see Robert and his ex-girlfriend in front of their favorite café, “Owl Nest”.

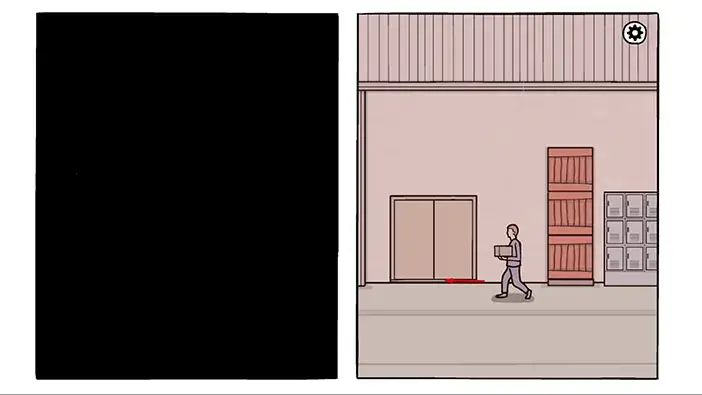
Well, we’re fired, so let’s get out of the factory. Go to the left until you reach the front door.
DAY 3
Well, we have reached day 3. If you take a closer look at Robert, you will notice that he has grown a short beard. Let’s wake up Robert by pulling down his blanket.
Let’s take a look at our daily schedule. Tap on the notice board to approach it.
Here, we can see that the date has been changed to 16.08.1972. Also, Robert’s status was changed from “Confused” to “Insecure”. So, I guess we’re making progress.
Ok, let’s eat our breakfast. Tap on the table in the middle of the room.
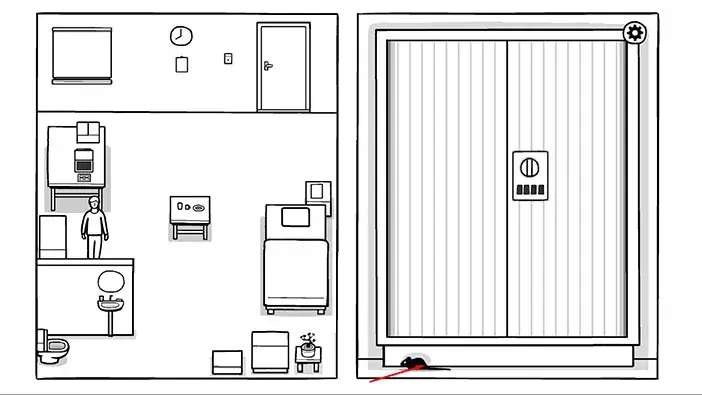
Drag down on the glass of coffee and a glass of juice to drink it. You will notice a mouse hiding behind a donut. Let’s tap on the mouse.
The mouse will run away toward the sink and the mirror. Let’s follow it.
Let’s tap on the mouse again. It will run away again and this time it will hide next to the computer. So, let’s follow it.
Let’s tap on the mouse again. It will run away again and this time it will hide next to the cabinet just below the computer. Let’s follow it.
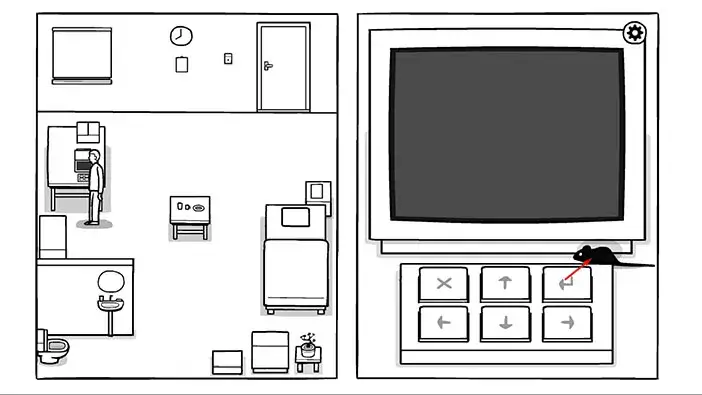
Let’s tap on the mouse again, this time it will run back to the table in the middle, so let’s follow it.
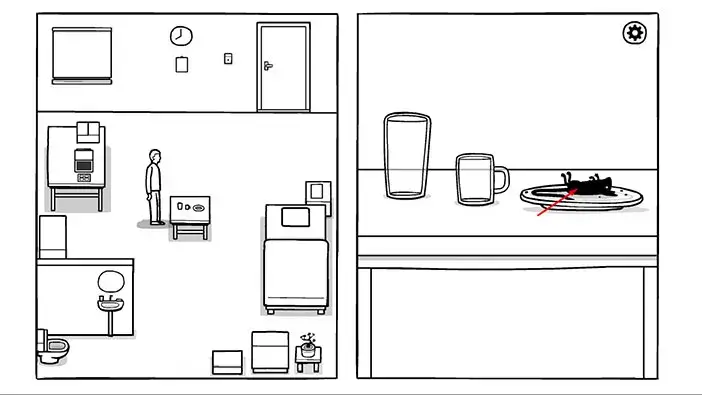
Here we can see that the mouse ate the donut and died. Tap on the mouse, and our character will say that it is gross. With this, we have finished the first task, breakfast.
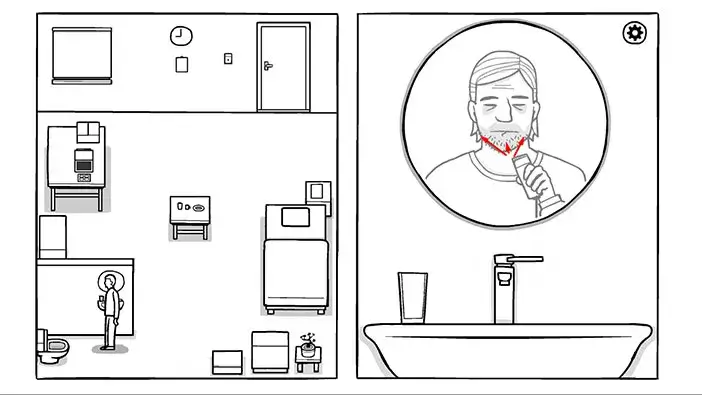
Let’s proceed to our next task, self-care. Tap on the sink and the mirror in the lower left corner of the room to approach them.
After that, tap on the toothbrush to pick it up.
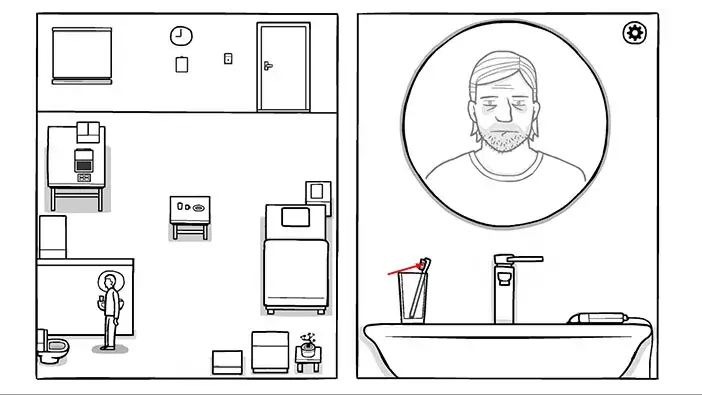
Drag the toothbrush left and right to brush your teeth.
Robert’s bear has grown during the last couple of days, so let’s take care of it. Tap on the electric shaver to pick it up.
Drag the electric shaver to cut Robert’s beard.
Well, with that we finished self-care. Let’s proceed to our next task, the check-up. Just like before, approach the button next to the front door, and push it down to open the door.
Tap on the nurse to start the interaction.
After the formal greeting, the nurse will ask you several questions.
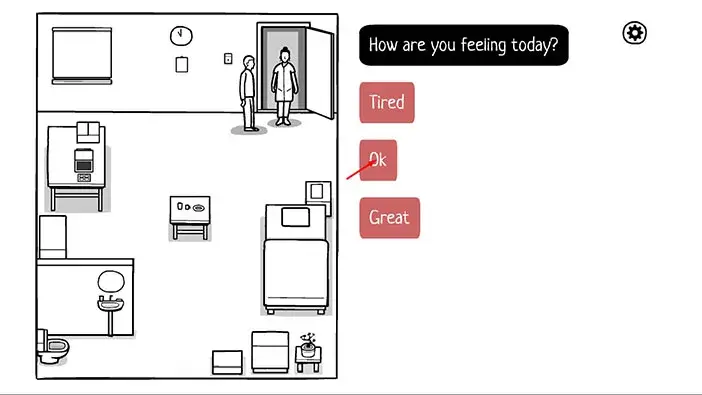
First question. “How are you feeling today?”
Let’s go with the second option “Ok”.
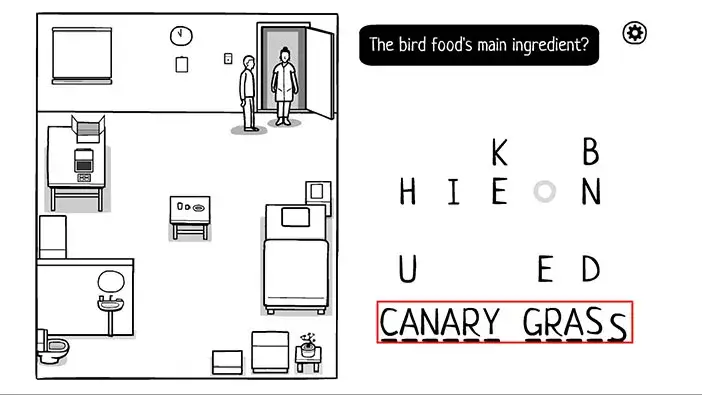
Second question, “The bird food’s main ingredient?”
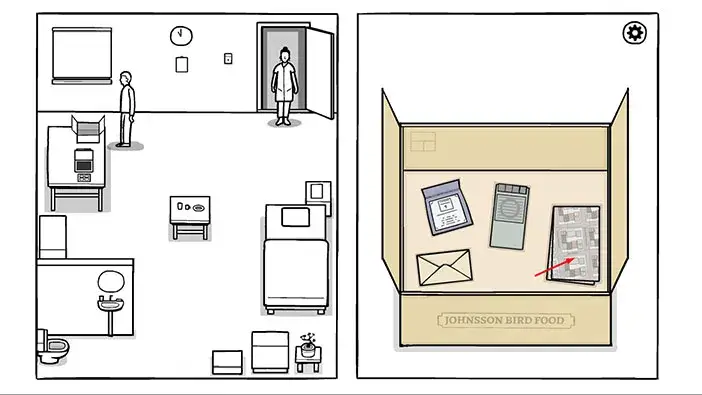
Let’s look for clues before we answer this question. Tap on the box above the computer to take a closer look at it.
When you approach the box, drag up the duct tape to remove it. After that, drag the box sides to open the box.
Ok, this is the box with Robert’s personal items. The box that he took from the factory when he was fired.
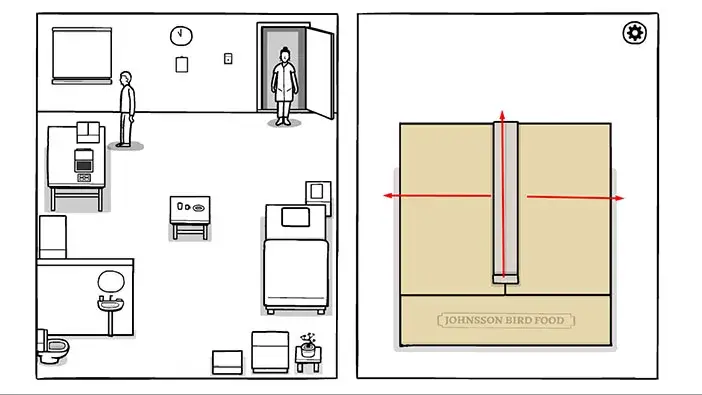
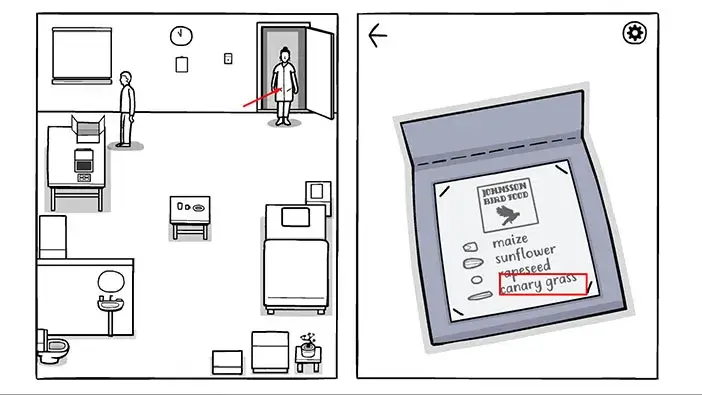
Let’s tap on the grey plastic bag in the upper left corner of the box to take a closer look at it.

The fourth item on this list, canary grass, is the main ingredient for bird food. So, let’s memorize “canary grass” and then tap on the nurse to go back to her.
Let’s answer the question. Enter “Canary grass”.
Third question. “Where is your work located?”
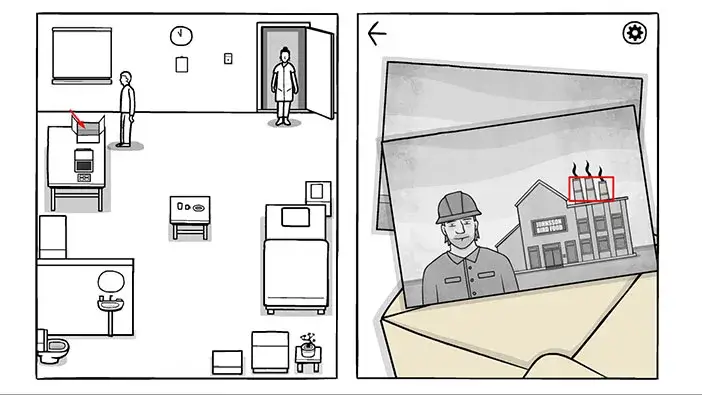
Well, to discover this, we will have to go back to the box with Robert’s personal items.
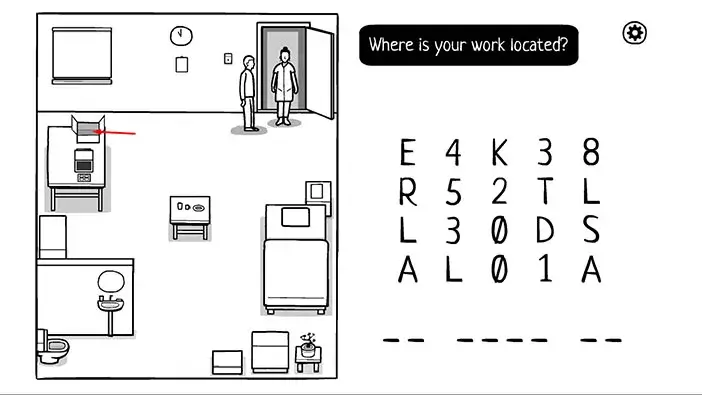
Tap on the letter to look inside, and you will find the two photos that we already saw in Robert’s dream.

If you take a closer look at the photo, you will notice that there are no other buildings right next to the “Johnsson Bird Food”. You will also notice that the factory has three chimneys. We will use this information to locate the factory on the map.
Tap on the box again.
Tap on the map, located on the right side of the box, to take a closer look at it.
If you take a look at the southeast side of the map (down and to the right) you will notice a lone building with three chimneys. So, we found a factory. The location of the factory is “30 Lake Street”. Memorize/write down this information, then go back to the nurse.

Let’s answer her question. Enter “30 Lake ST”.

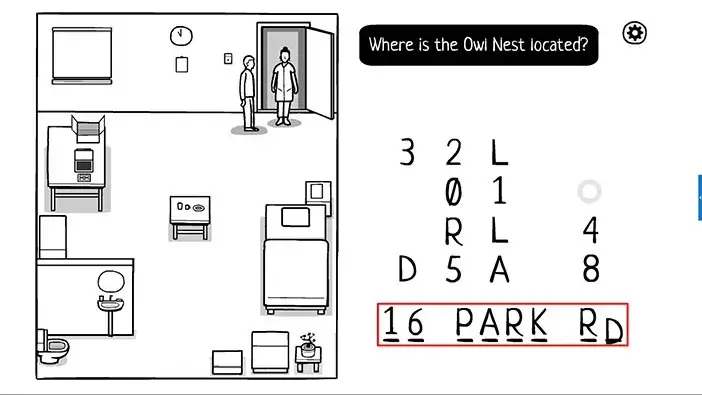
Next question. “Where is Owl Nest located?”
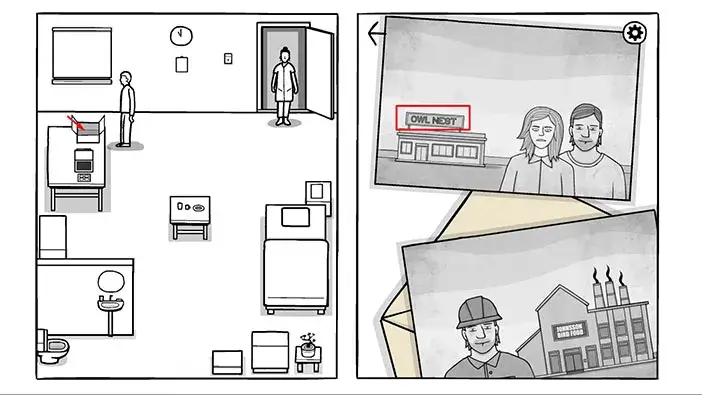
Well, we will have to go back to the box with Robert’s personal items, find a photo of “Owl Nest”, and then find its location on the map. So, let’s do that.
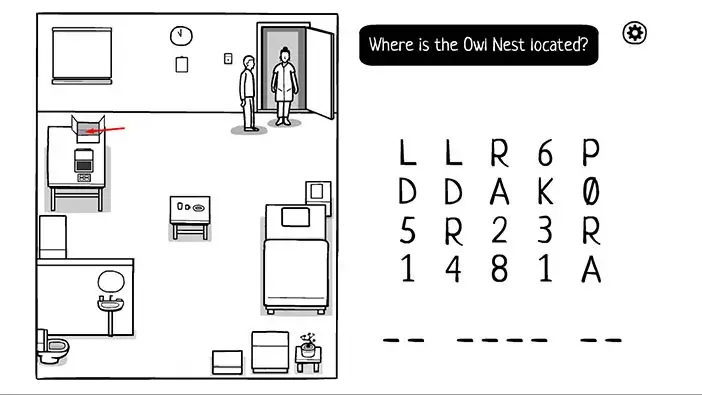
Tap on the letter to take a look at the photos, and drag the other photo in front of the other one.
Just like with the factory, there are no buildings close to the “Owl Nest”. Also, there is a large rectangular sign with the name “Owl Nest” at the top of the building. We will use this information to find the café on the map.
Tap on the box again to take a look inside.
Tap on the map to take a look at it. Let’s look in the northwest direction (up and to the left). You will notice a lone building with the “ON” letters next to it, so we found the café. Let’s memorize/write down the location of the café. It’s “16 Park RD”.
Ok, let’s go back to the nurse.
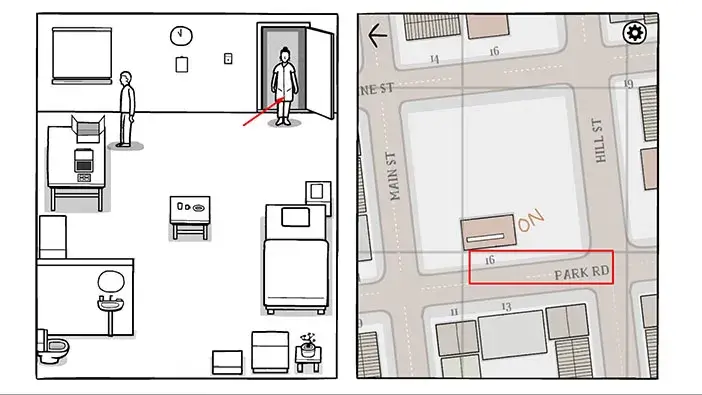
Let’s answer her question. Enter “16 Park RD”.
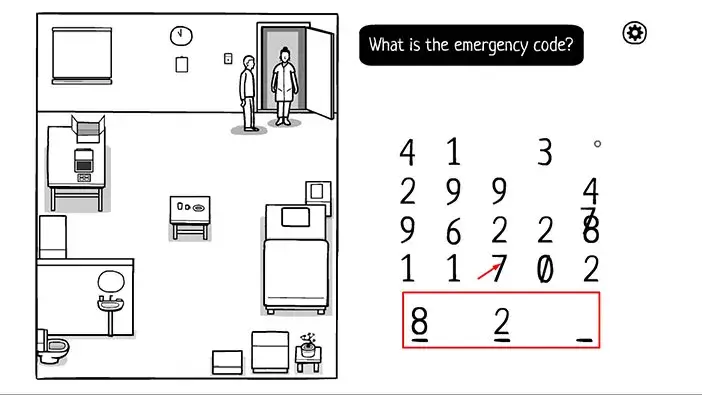
Next question. “What is the emergency code?”
Again, we will have to go through Robert’s personal items in order to discover the answer to this question. Let’s go back to the box.
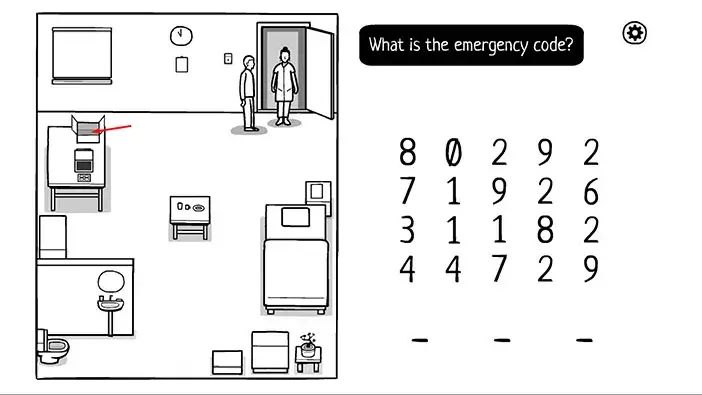
You will also see a pager in the box. Tap on it to take a closer look. After that, open the pager by dragging the cover panel to the left.
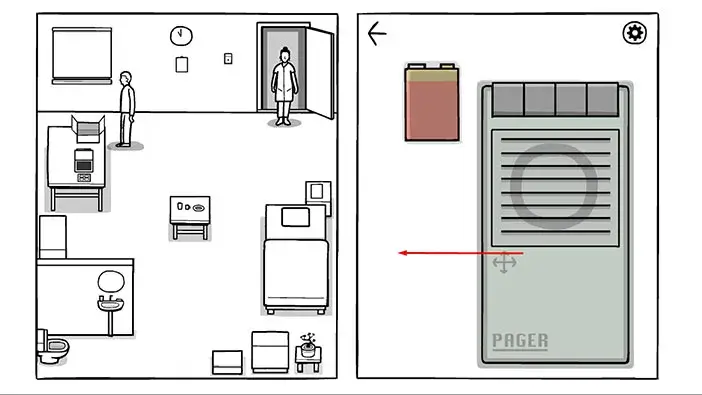
We can see that the battery is missing. So, drag the battery and put it into the slot in the lower left corner.
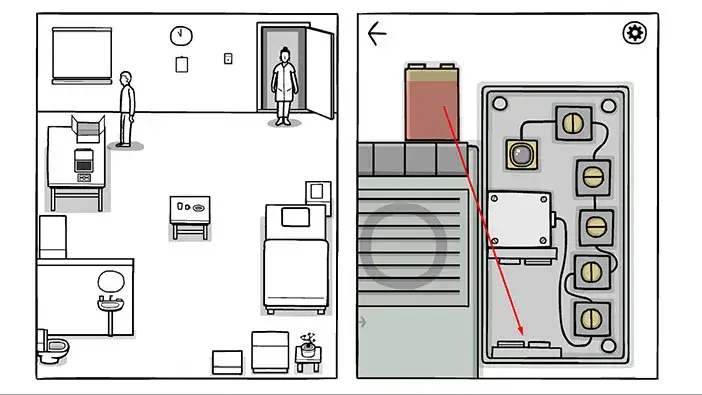
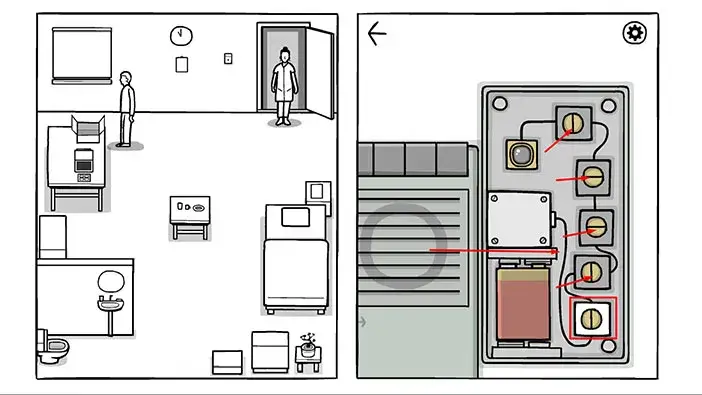
The screw at the bottom is connected, because we can see the white background around it. Let’s tighten the other screws by tapping on them, starting from the bottom screw and working our way up.
Once you tighten all screws, drag the cover and reassemble the pager.
Tap on the third button (looking from left to right) to hear the recorded message.
When Robert turned on the alarm, he caused an emergency shutdown. The code is “827”. Memorize it, and let’s go back to the nurse.
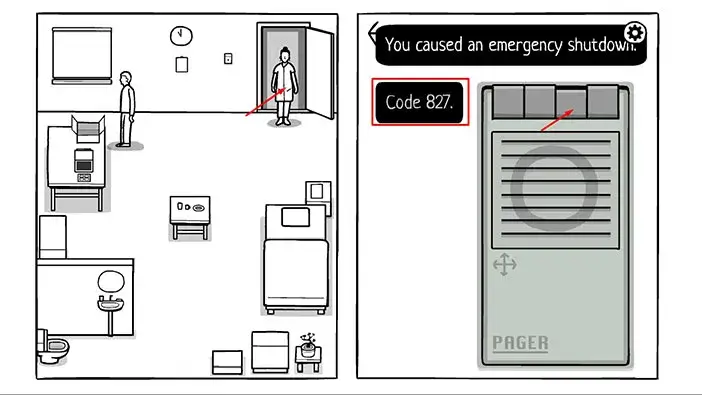
Enter the code “827”.
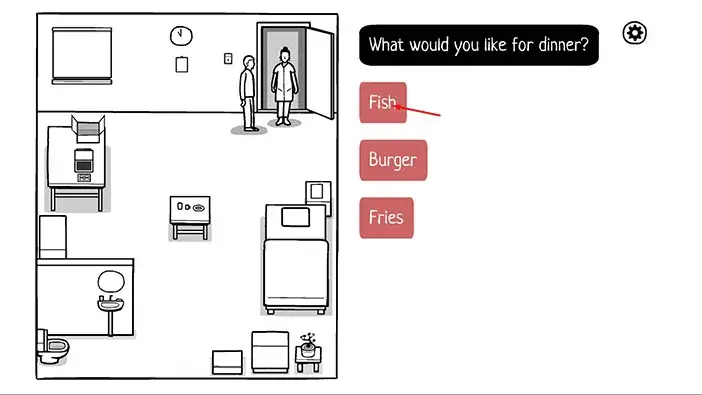
Last question. “What would you like for dinner?”
Let’s go with “Fish” this time.
Let’s start the next task, “Memory training”. Tap on the computer to approach it, then tap on “Enter” to start the application.
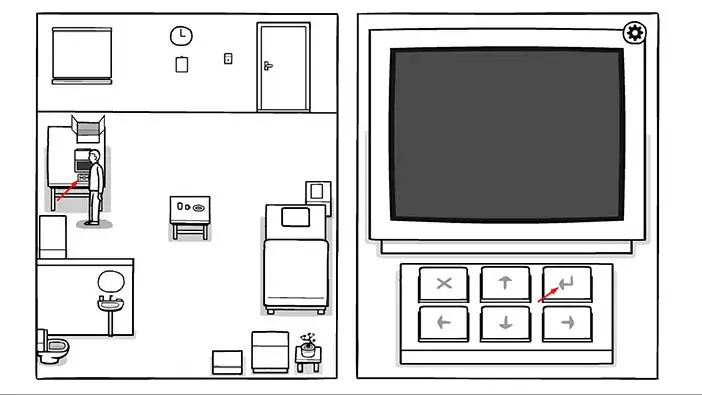
Move the pointer to the “Yes” option and tap on “Enter” to confirm.
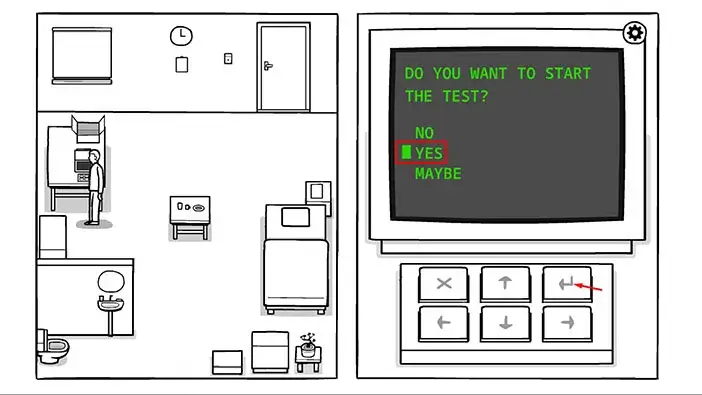
It seems that the types of puzzles for memory training change each day. This time around, we can see Robert’s room on the screen. However, in the room on the screen, one item will always be in the wrong position. So, our task is to move this item into the correct position. Let’s begin.
If you compare the room on the screen with the room on the left, you will notice that there is no board in the top left corner of the room. So, use the arrow key to move the board to the top left corner.
Next puzzle. If you compare the room on the screen with the room on the left, you will notice that there is no table in the middle of the room. So, use the arrow key to move the table to the middle of the room.

Next puzzle. If you compare the room on the screen with the room on the left, you will notice that there is no vase in the bottom right corner of the room. So, use the arrow key to move the vase to the bottom right corner of the room.

Next puzzle. If you compare the room on the screen with the room on the left, you will notice that there is no computer desk on the left side of the room. So, use the arrow key to move the computer desk to the correct position.
Next puzzle. If you compare the room on the screen with the room on the left, you will notice that there is no front door in the room on the screen. So, use the arrow key to move the front door to the top right corner of the room.
With that, you complete the memory training task.
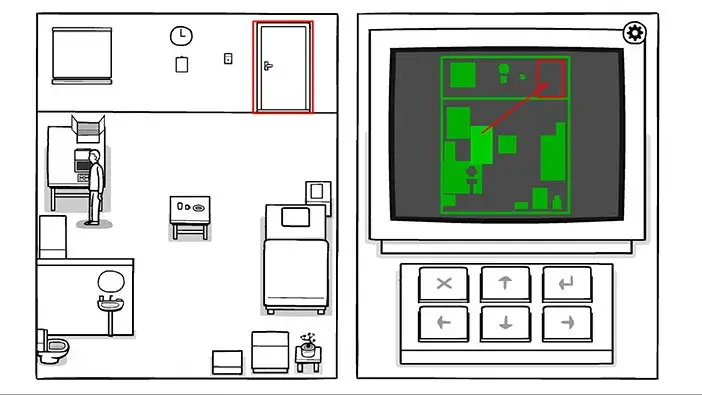
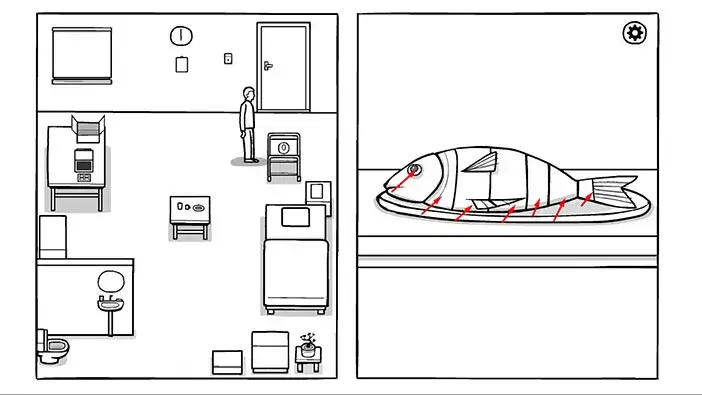
We completed the memory training task, and food has been delivered to our room. So, let’s proceed to our next daily task, “Dinner”. Tap on the service cart to approach it, then tap on it to take the therapy.
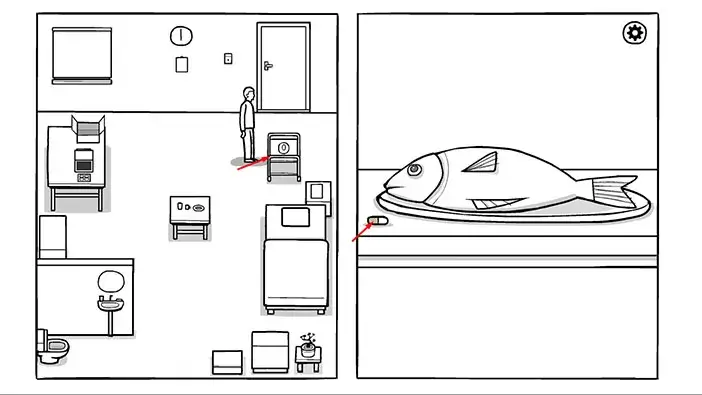
We ordered a fish for dinner and that’s what we got. Tap on the fish to cut it into small pieces. After that, tap on each piece to eat it.
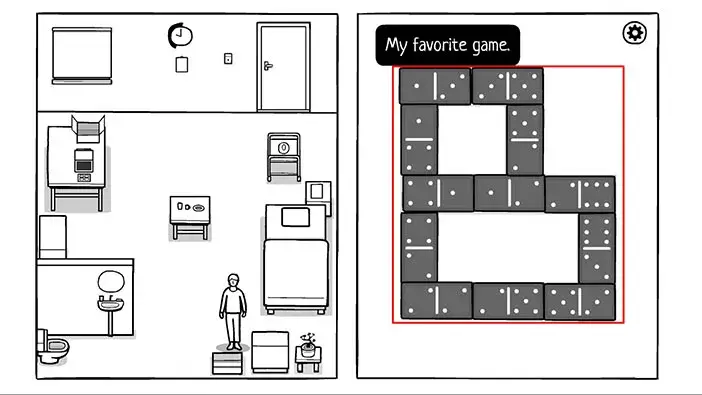
Our next task is recreation. So, let’s what’s in the recreation box today. Tap on the recreation box to open it and inside you will find another box. Tap on this box to open it, then tap again to start the game.
Well, today we can play a game of dominoes for recreation. You can see the solution for this game in the image below.
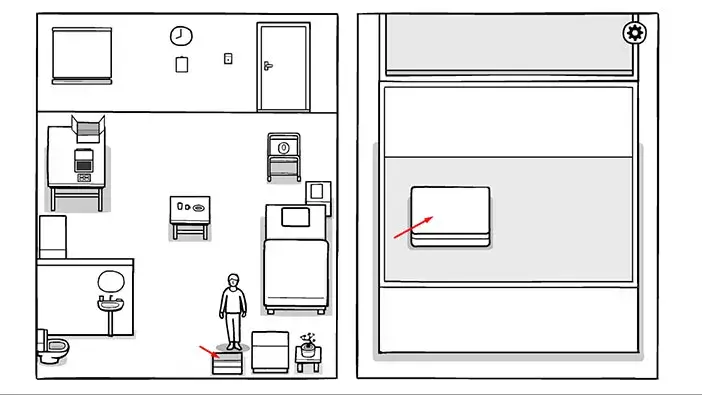
Ok, we’re done with the daily tasks, so it’s time to go to sleep. Tap on the bed to approach it, then drag the blanket to cover Robert.
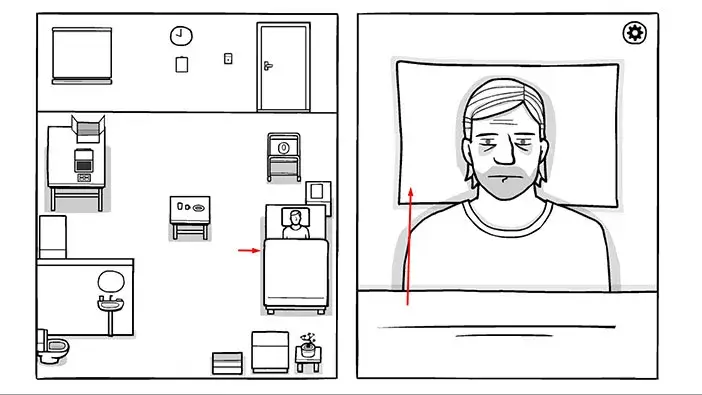
Robert will dream again, and in his dream, he will remember some things from the past. This dream is titled “Laura”.
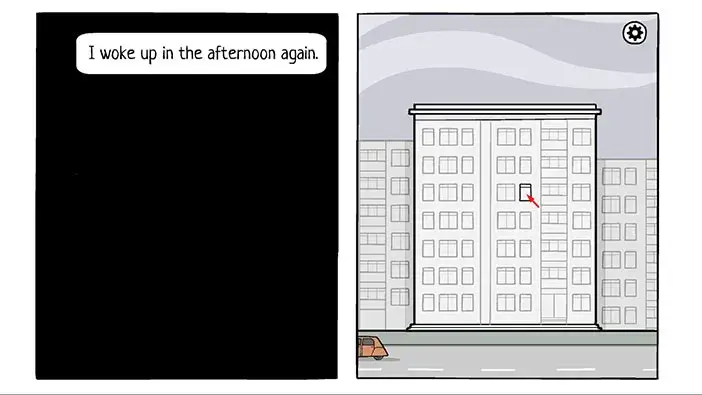
Robert woke up in the afternoon. Tap on the blinking window, because that’s one of the windows in Robert’s room.
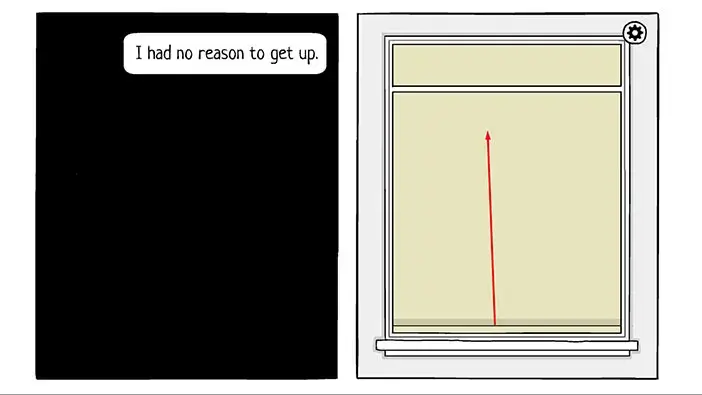
He had no reason to get up. To continue this dream, roll up the blinds by dragging.
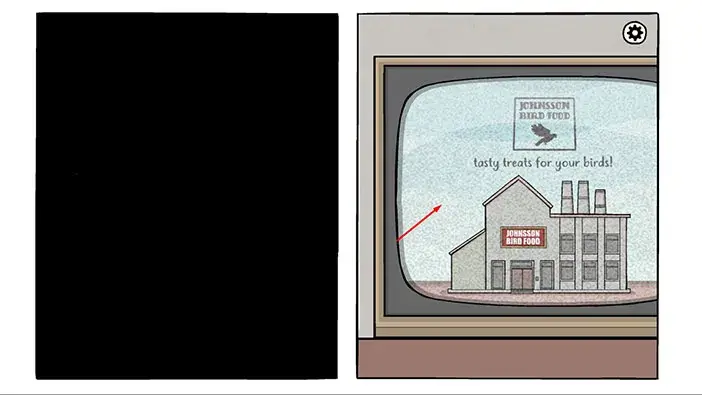
Robert was watching TV so drag to the right until you see a TV. After that, tap on the TV screen to turn on the TV. “Johnsson bird food” will be on the first channel. So, the TV probably represents Robert’s subconsciousness, since he worked at this factory until recently, and it looks like he is depressed after being fired and losing his girlfriend.
Tap on the screen to change the channel.
Next, we can see the news, and the headline is “Woman found dead – no sign of the killer”. Oh, boy, I hope they are not talking about his ex-girlfriend, but they probably are, since the TV is just a manifestation of his subconsciousness.
Let’s change the channel.

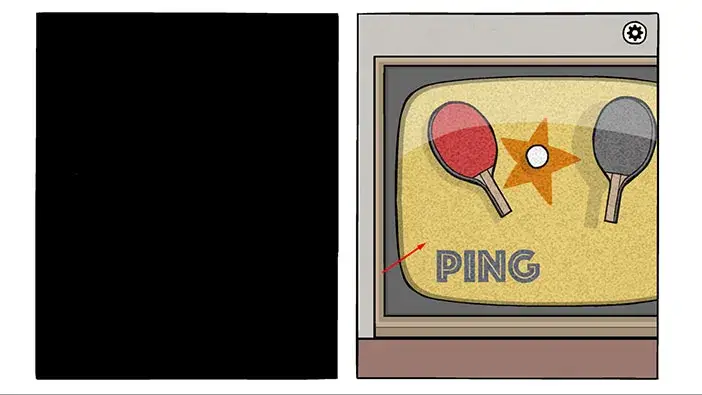
On the next channel, you will see a ping-pong advertisement. Ping-pong was Robert’s recreation on the second day in the mental hospital. Let’s go to the next channel.
Well, here we can see a photo of Robert’s ex-girlfriend, so it looks like she was the victim that was mentioned earlier. I just hope our character isn’t one of the suspects. Let’s change the channel again.
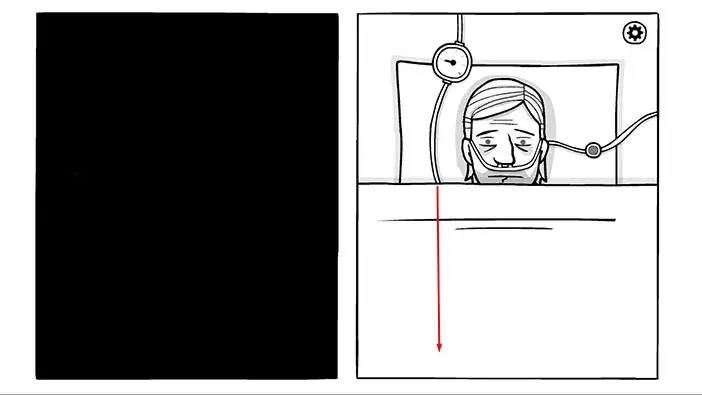
On the next two channels, you will see two messages, urging Robert to wake up. After that, we can see Robert lying in bed, with some medical tubes attached to him. Let’s wake him up by pulling down the blanket.
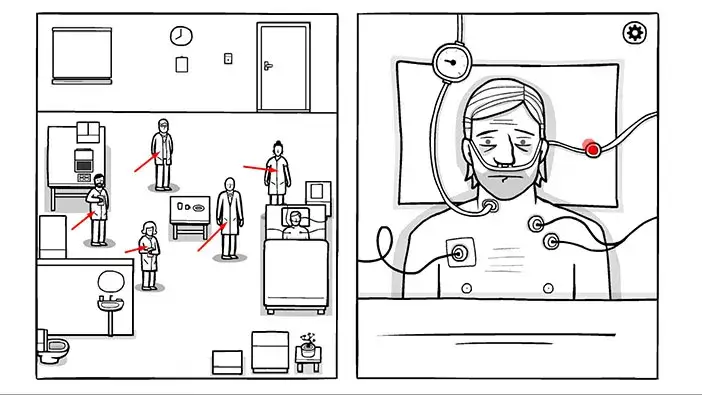
As soon as you pull down the blanket, Robert will wake up, and the left side of the screen will now show his room. He is lying in bed, and some kind of monitoring equipment is tracking his condition. We can also see several doctors in his room. Tap on doctors to proceed.
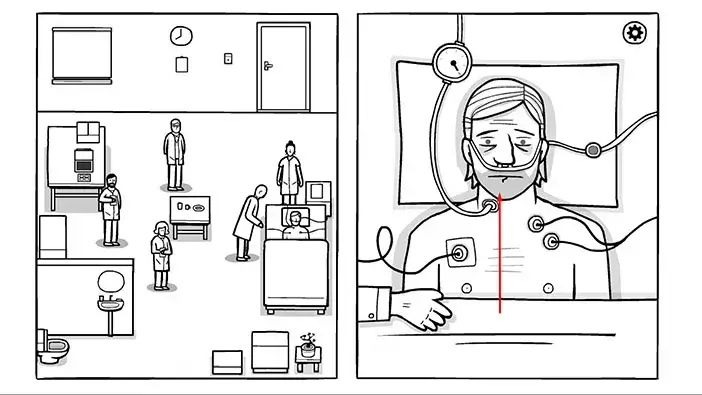
One of the doctors will approach Robert’s bed. Pull up the blanket, and Robert will go back to sleep. So, it looks like the staff in this hospital is using some kind of medical equipment to monitor Robert’s dreams. Interesting.
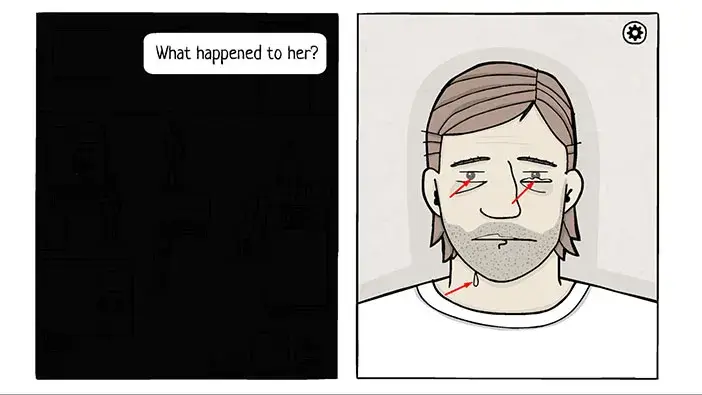
Let’s change the channel a couple of times. You will see an image of Robert’s ex-girlfriend lying in a pool of blood. So, she was murdered, just as we suspected.
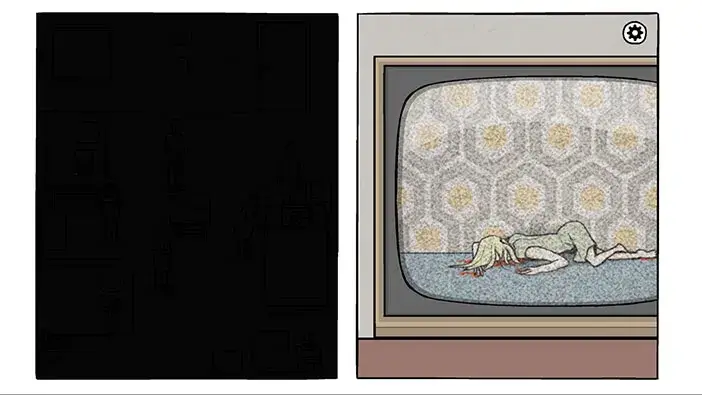
Robert realized that his ex-girlfriend was dead, and he cried, realizing that he still had feelings for her. Tap on Robert’s tears to wipe them off.
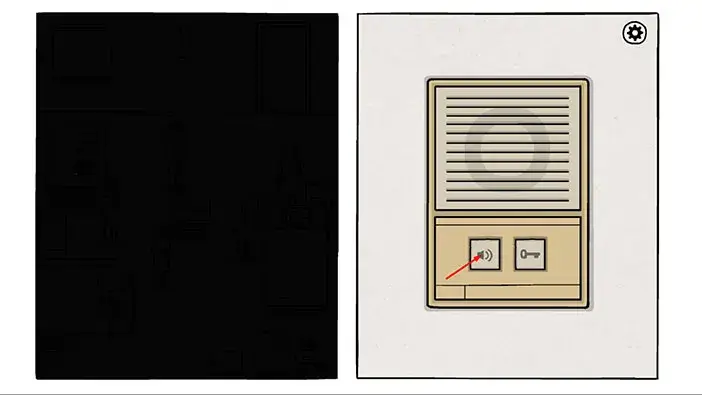
Tap on the intercom to take a closer look at it. After that, tap on the button on the left.
Tap on the button on the right to unlock the door.
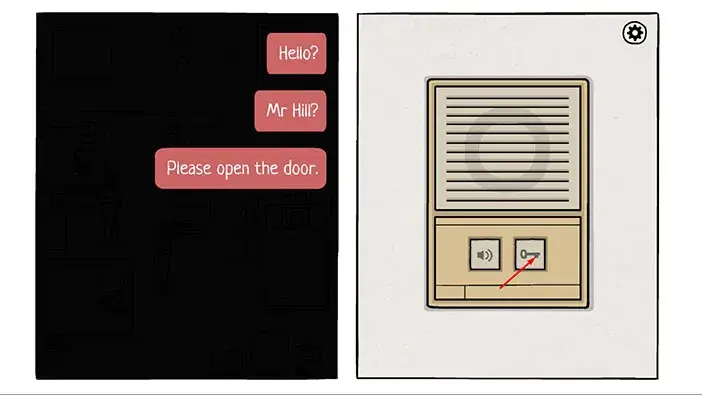
Next, you will hear someone knocking on the door. So, tap on the door to approach it. After that, drag to the right to open the door.

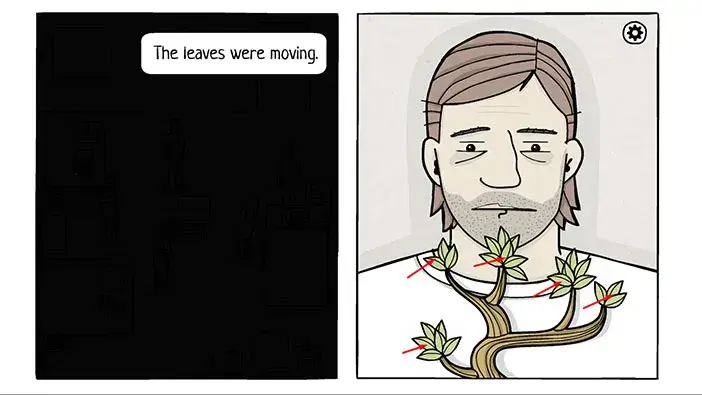
An unknown woman will appear and she will offer her condolence. She has also brought Robert a gift, it is a small tree. Tap on the small tree to take it.
Robert remembered that the leaves on the small tree were moving. So, tap on the leaves.
Next, the lady will ask Robert to fill out a questionnaire. Tap on it.
Let’s go with the middle (third answer) for all questions.

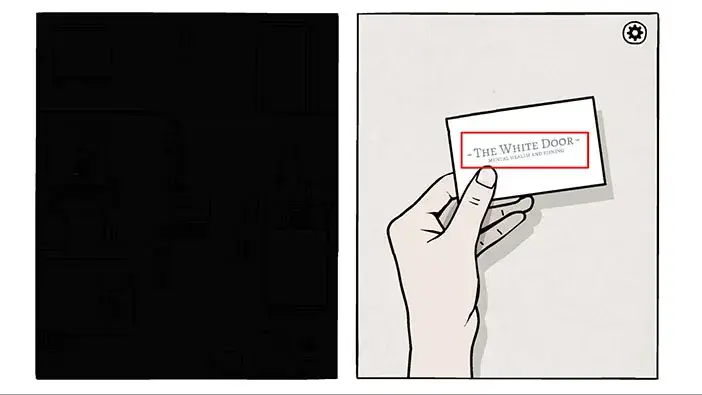
The lady will offer her card, so tap on it to take it. Interestingly enough, the card says “The white door” just like the name of this game. Below it, we can see “Mental health and fishing”. Why fishing? How are these two related? Maybe the institution is researching the effects of fishing on mental health. I don’t know, it seems weird.
Well, looks like Robert decided to call her, and he was admitted to the “White door”, mental health institution. At least now we know how he ended up there. He was probably overwhelmed with grief and decided to look for professional help. However, we still do not know if he was one of the suspects in the murder of his ex-girlfriend.
We will end the first part of the walkthrough here. You can check out the second part of the walkthrough by tapping on the “Next Part” button.
Thank you for reading.