Scary Horror 2 – Chapter 3, Part 4
Hello everyone and welcome to Part IV of our walkthrough for Chapter 3 of the “Scary Horror 2: Escape Games”. At the end of Part III, we found the sixth coin, and we went into the room with the slot machine which requires 6 gold coins.
NOTE: This is the last part of the walkthrough, and here you can find both endings.
Ok, before moving on to the slot machine that requires six gold coins, let’s quickly look at the blue slot machine on the left.
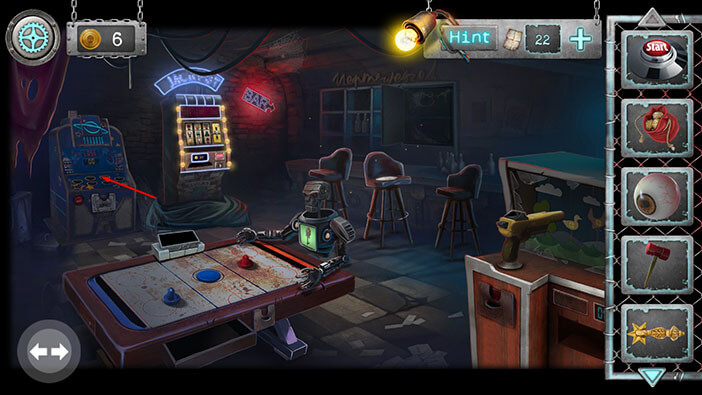
To activate the slot machine, we should select the “Hammer” from the inventory and place it on the right side of the slot machine.
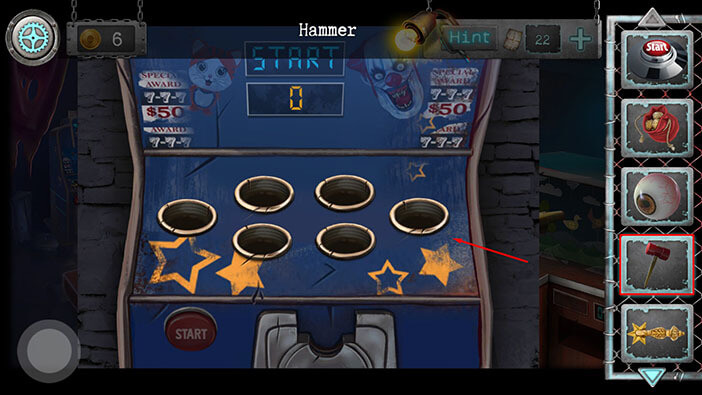
After that, select the pouch with coins from the inventory and insert one of the coins into the slot.
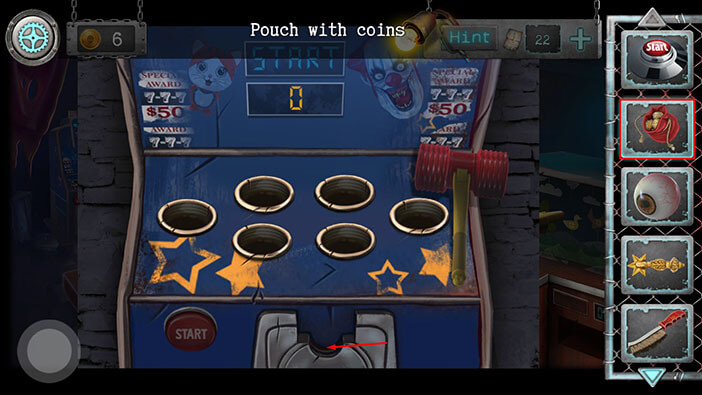
Lastly, tap on the start button to start the game.
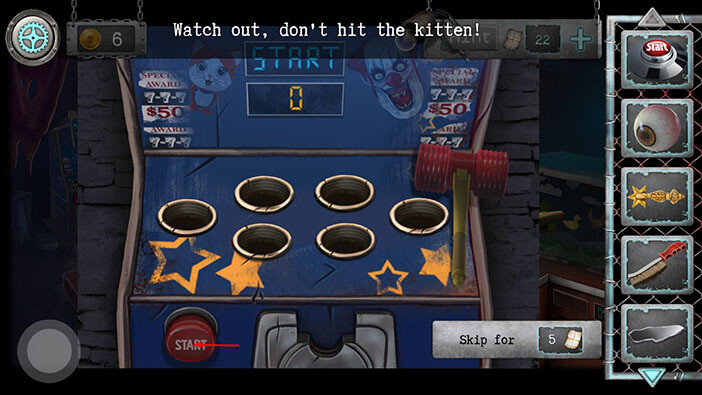
This minigame is fairly simple. You should use the hammer to smack the clowns, but you shouldn’t smack the cats. Your score is displayed in the upper part of the slot machine, and once you hit 20 clowns, you will complete the minigame.
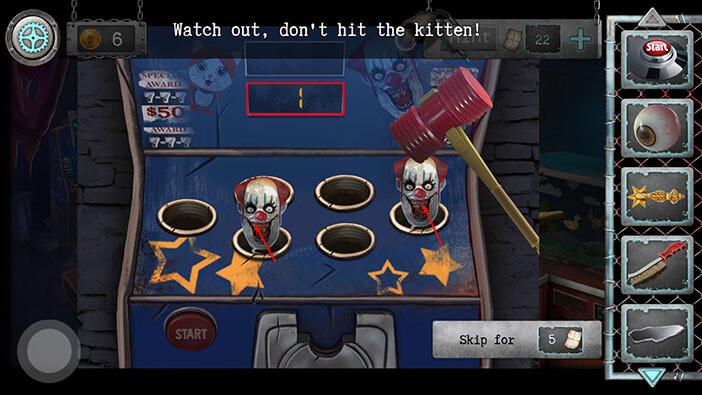
Once you score 20 points, your character will go berserk and smash down the slot machine with the hammer. Drag left and right to remove the debris.
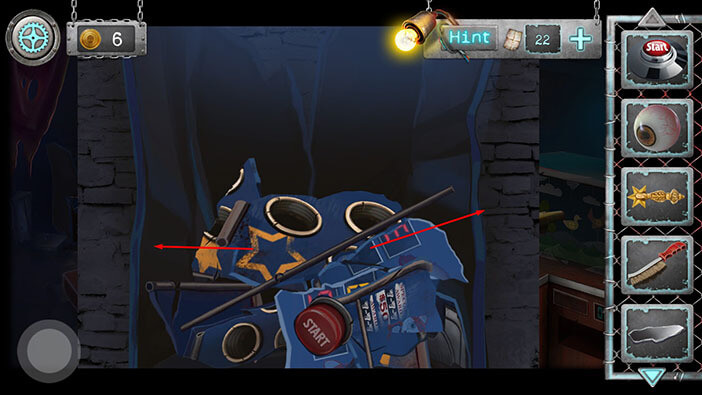
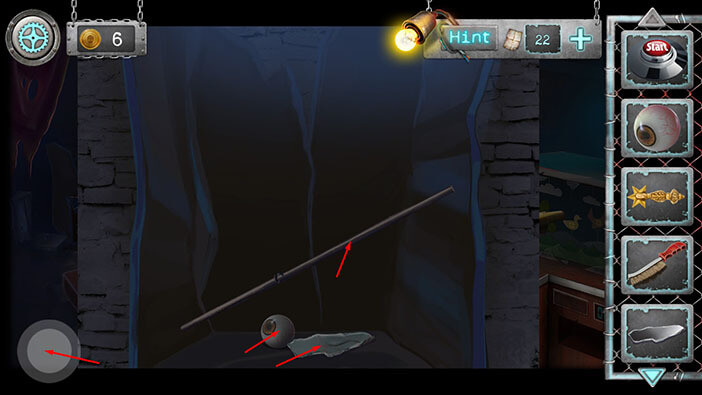
Also, tap on the pole to remove it. Below the debris, you will discover two items. Tap on them to pick them up. “Mirror shard 4”, and another “Creepy eye” will be added to your inventory.
Once you’re done, tap on the button in the lower left corner to go back.
Ok, now let’s take a look at the slot machine on the right which requires 6 gold coins because that’s the main reason why we came back to this room.
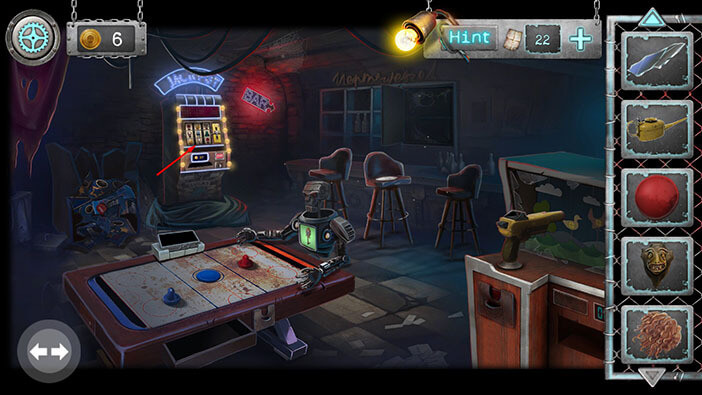
To the left of the start button, you will see a display with the 0/6 coins text. We gathered the six coins, so let’s tap on the start button to start the interaction.
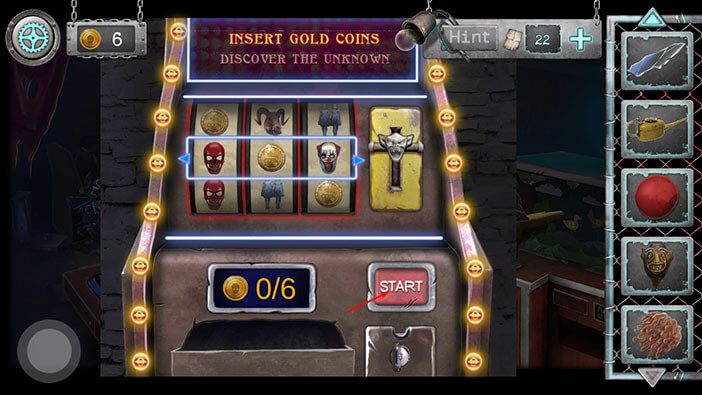
Our character will use one of the gold coins, and in return, you will get one hint. Repeat this process six more times, and spend all of your coins.
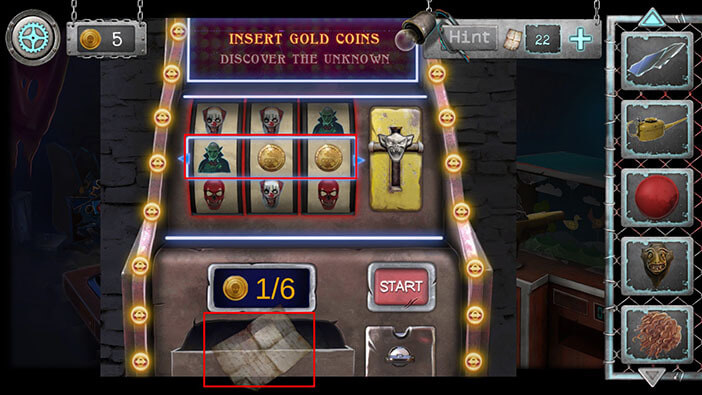
The first five times you try, you will get a +1 hint. However, on the sixth attempt, you will score a jackpot (three red masks).
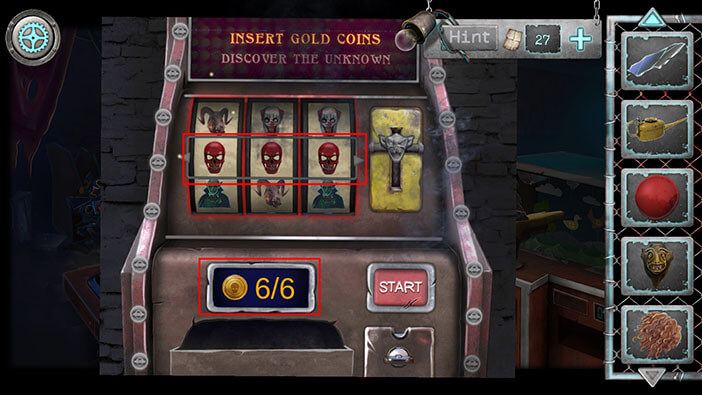
The slot machine will start to shake, and afterward, it will slide to the right, revealing a hidden passage in the wall behind it. Tap on the hole in the wall to proceed into the secret room.
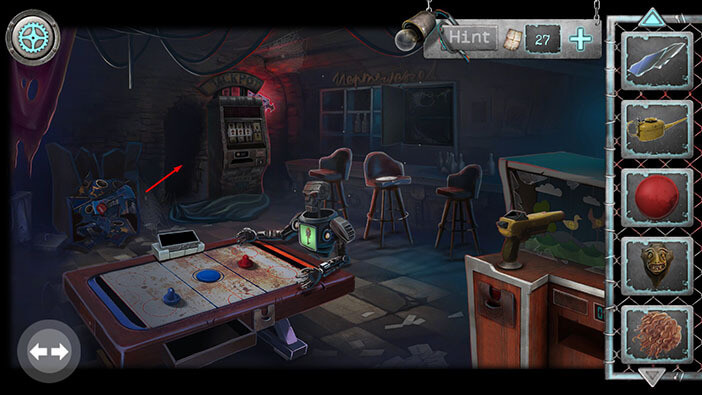
We are now inside the secret room. As you probably already realized, the only way to access this secret room is to find all 6 gold coins, which are scattered throughout the levels. Ok, let’s explore. Tap on the table on the right to take a closer look at it.
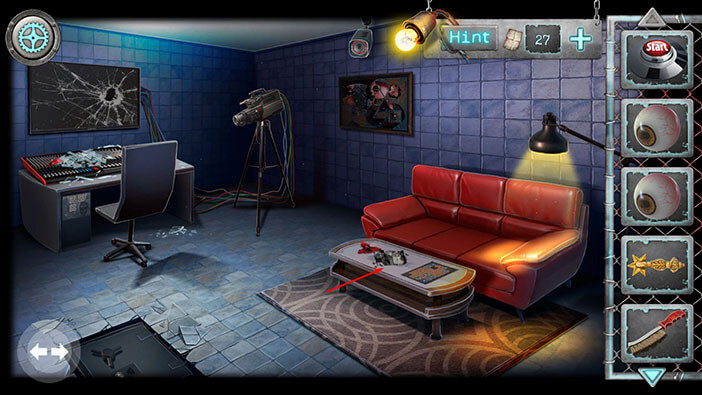
Tap on the red item to pick it up and “Part of the mask” will be added to your inventory.
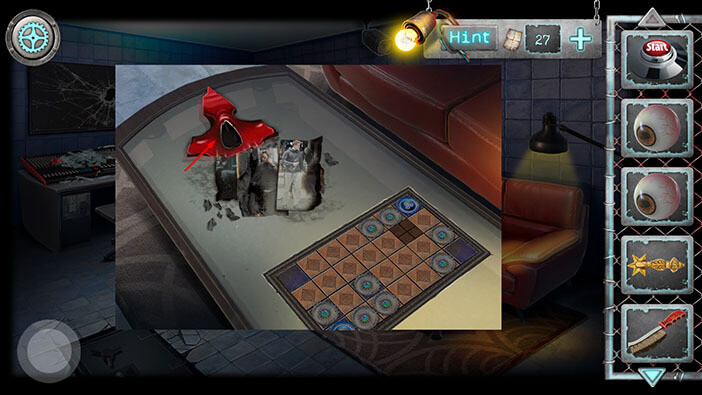
Next, you’ll notice some kind of board game. Tap on it to start the interaction.
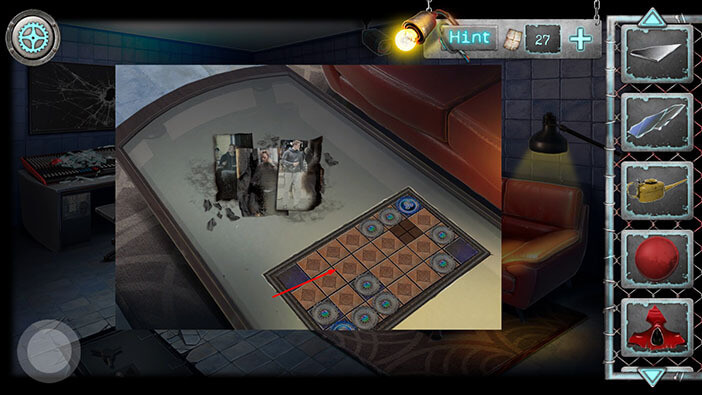
Here we have another puzzle. Our task is to shuffle the gears and use them to connect the blue gear in the bottom left corner with the other blue gear in the top right corner. We will do this puzzle in multiple steps. Let’s begin.
Step 1
Tap on the sixth slot (left to right) in the third row (top to bottom) to move the card up. After that, tap on the seventh slot in the third row to move the gear to the left.
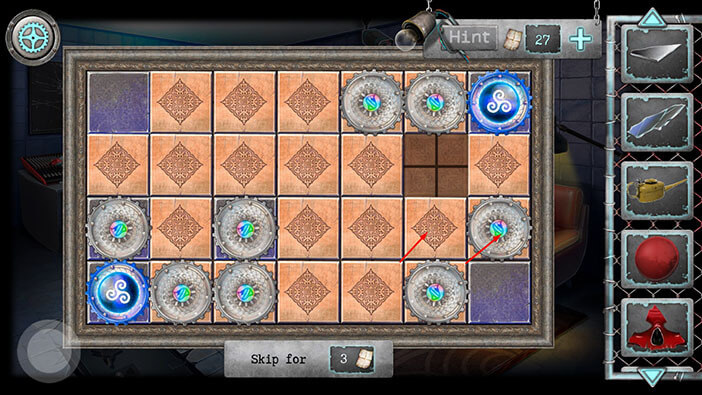
Step 2
Tap on the seventh slot in the second row to move the card down. After that, tap on the sixth slot in the second row to move the other card to the right.
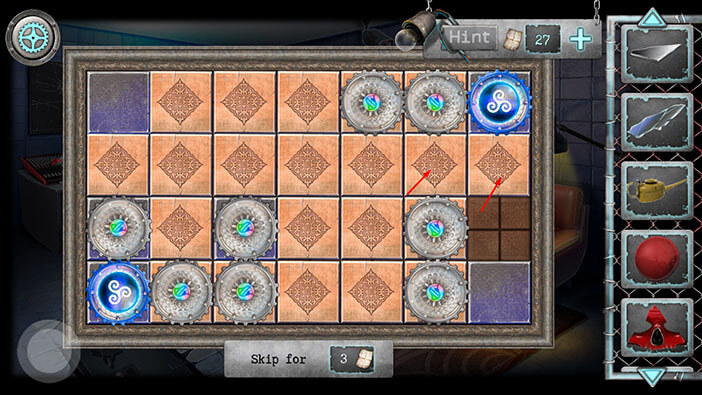
Step 3
Tap on the sixth slot in the third row to move the gear up. After that, tap on the fifth slot in the third row to move the card to the right.
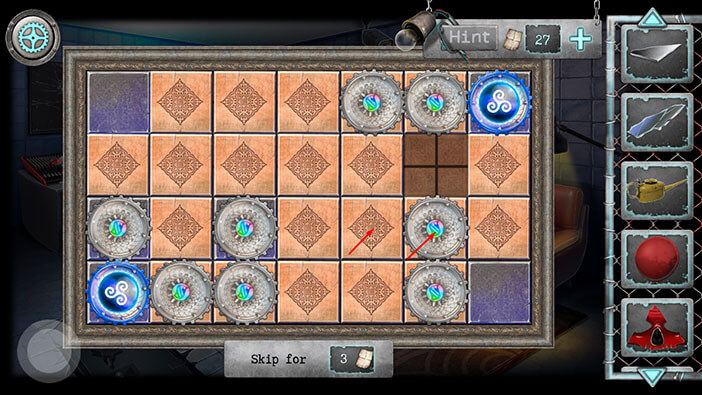
Step 4
Tap on the fifth slot in the fourth row to move the card up. After that, tap on the sixth slot in the fourth row to move the gear to the left.
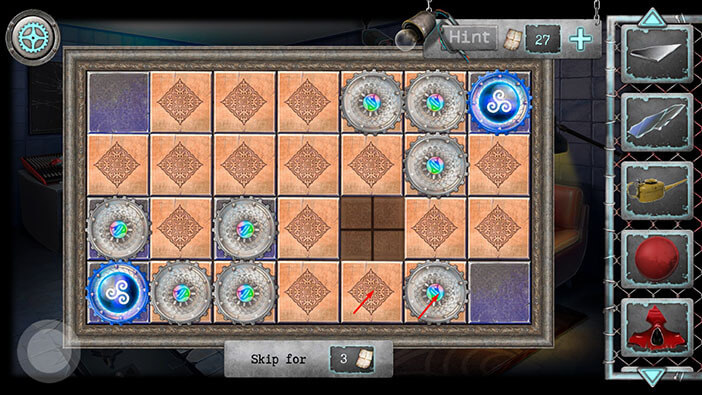
Step 5
Tap on the sixth slot in the third row to move the card down. After that, tap on the fifth slot in the third row to move the other card to the right.
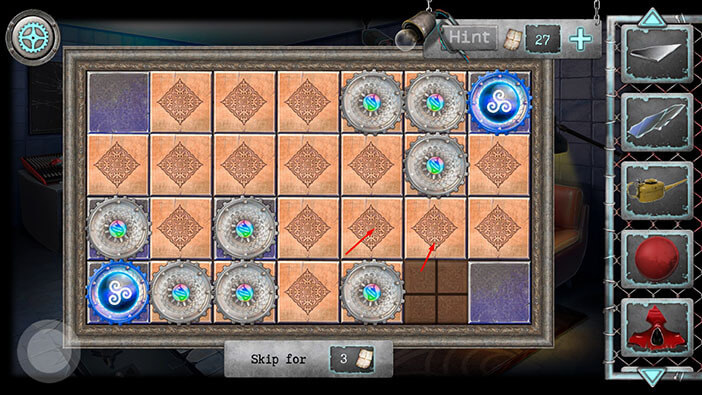
Step 6
Tap on the fifth slot in the fourth row to move the gear up. After that, tap on the sixth slot in the fourth row to move the card to the left.
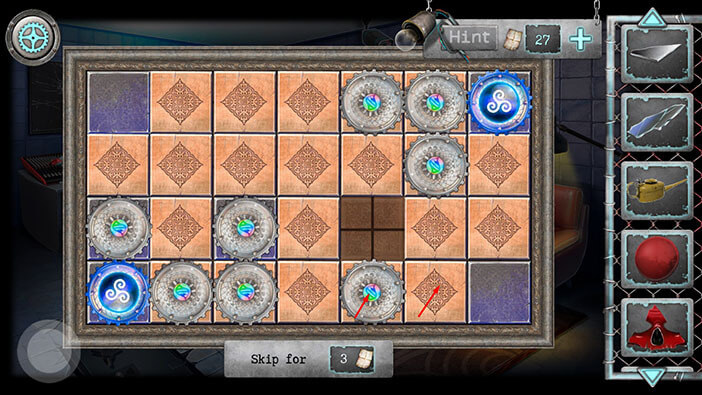
Step 7
Tap on the sixth slot in the third row to move the card down. After that, tap on the fifth slot in the third row to move the gear to the right.
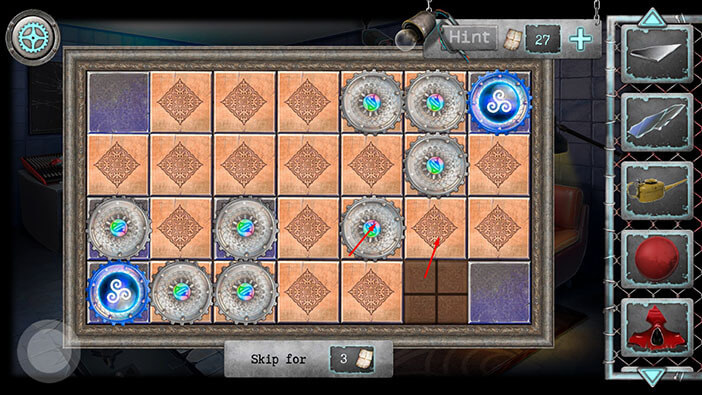
Step 8
Tap on the fifth slot in the second row to move the card down. After that, tap on the fifth slot in the first row to move the gear down.
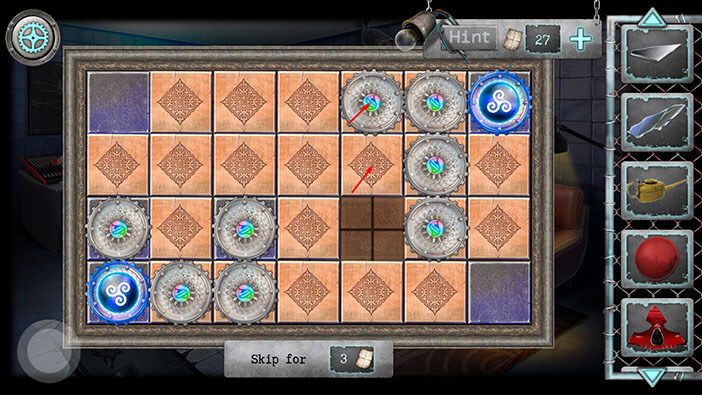
Step 9
Tap on the fourth slot in the first row to move the card to the right. After that, tap on the fourth slot in the second row to move the other card up.
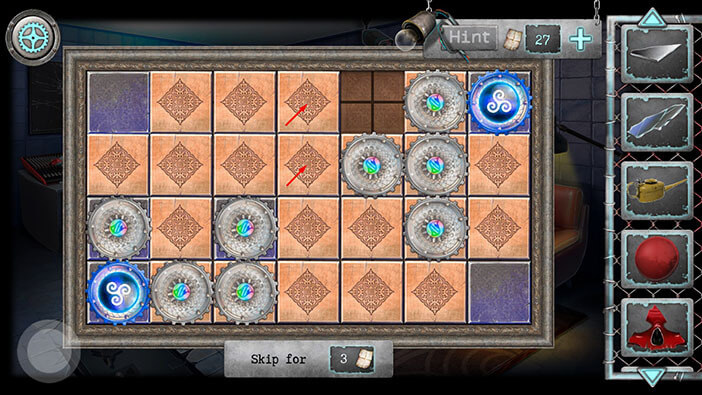
Step 10
Tap on the third slot in the second row to move the card to the right. After that, tap on the second slot in the second row to move the other card to the right.
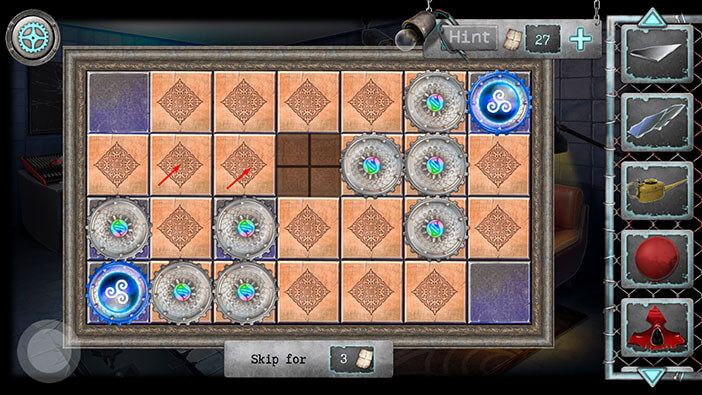
Step 11
Tap on the second slot in the third row to move the card up. After that, tap on the second slot in the fourth row to move the gear up.
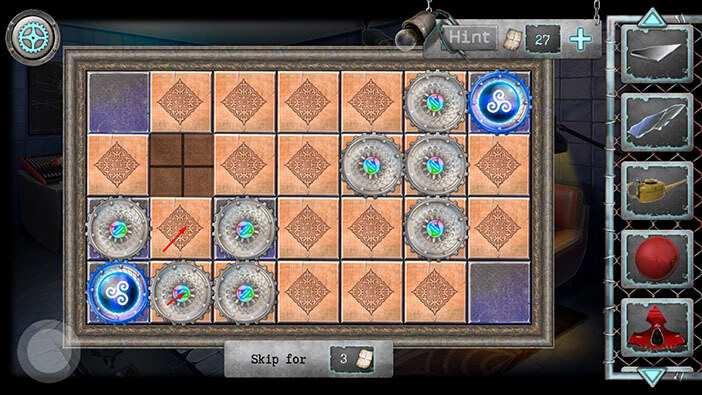
Step 12
Tap on the third slot in the fourth row to move the gear to the left. After that, tap on the fourth slot in the fourth row to move the card to the left.
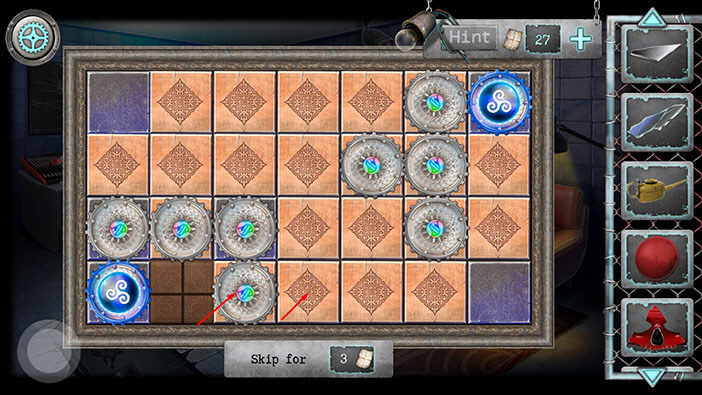
Step 13
Tap on the fourth slot in the third row to move the card down. After that, tap on the fourth slot in the second row to move the other card down.
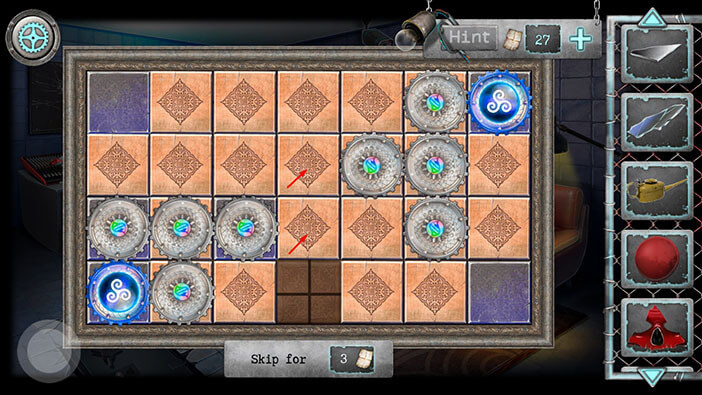
Step 14
Tap on the third slot in the second row to move the card to the right. After that, tap on the second slot in the second row to move the other card to the right.
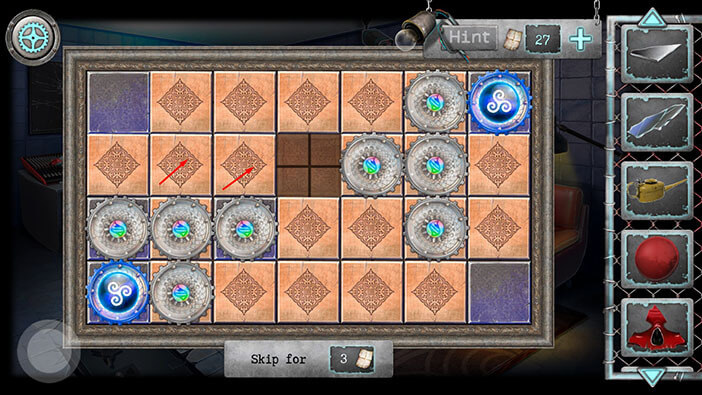
Step 15
Tap on the second slot in the third row to move the gear up. After that, tap on the second slot in the fourth row to move the other gear up.
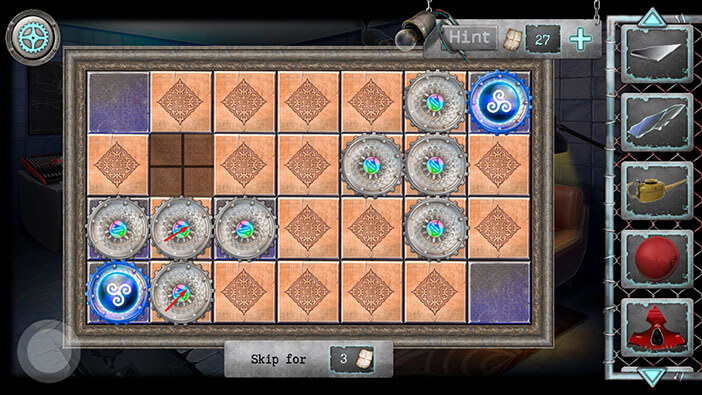
Step 16
Tap on the third slot in the fourth row to move the card to the left. After that, tap on the fourth slot in the fourth row to move the other card to the left.
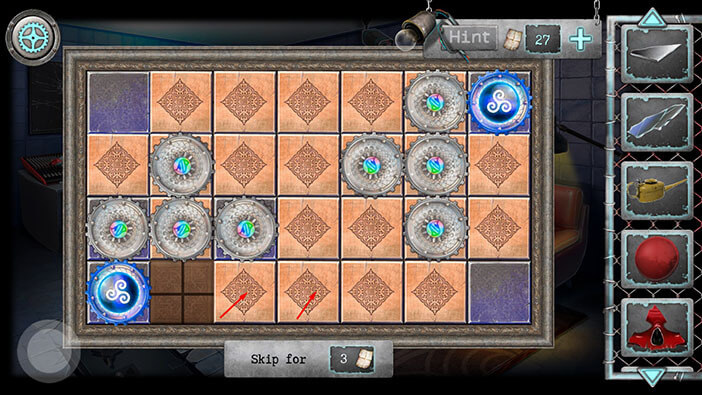
Step 17
Tap on the fourth slot in the third row to move the card down. After that, tap on the fourth slot in the second row to move the other card down.
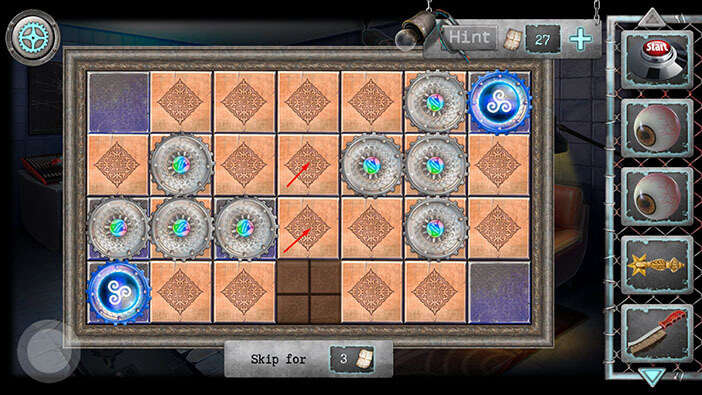
Step 18
Tap on the third slot in the second row to move the card to the right. After that, tap on the second slot in the second row to move the gear to the right.
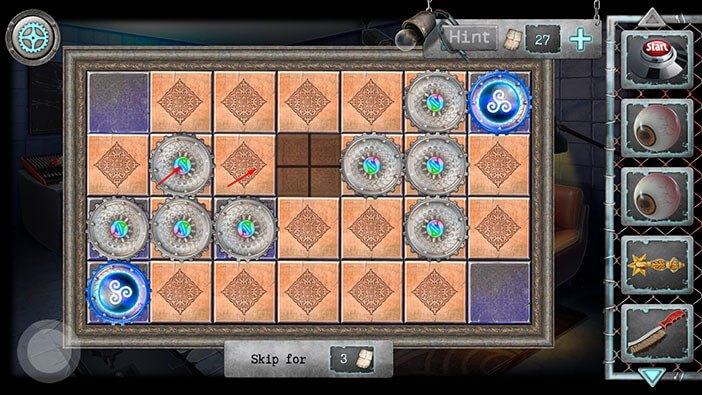
Step 19
Tap on the second slot in the first row to move the card down. After that, tap on the third slot in the first row to move the other card to the left.
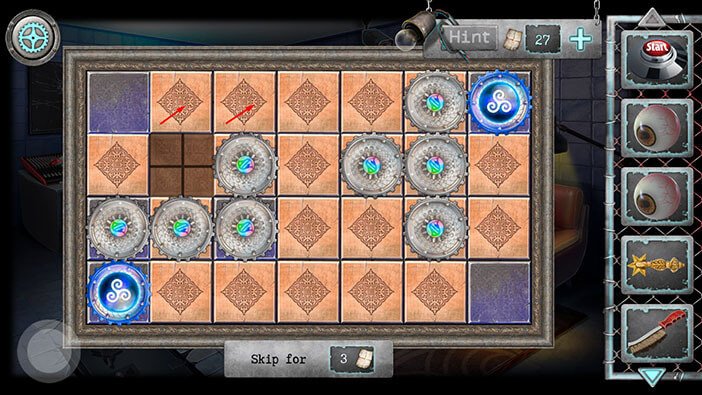
Step 20
Tap on the fourth slot in the first row to move the card to the left. After that, tap on the fourth slot in the second row to move the other card up.
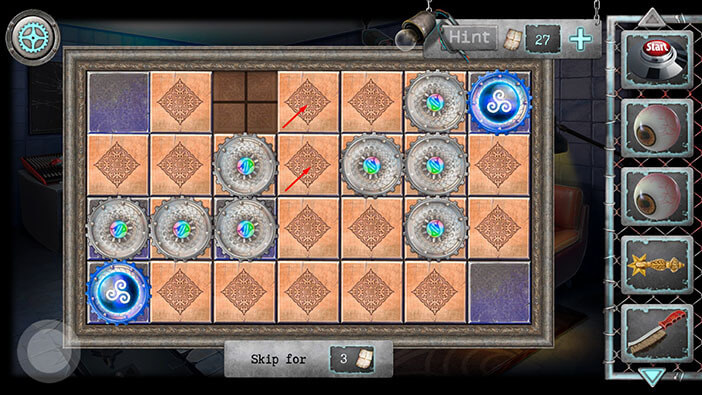
Step 21
Tap on the third slot in the second row to move the gear to the right. After that, tap on the third slot in the first row to move the card down.
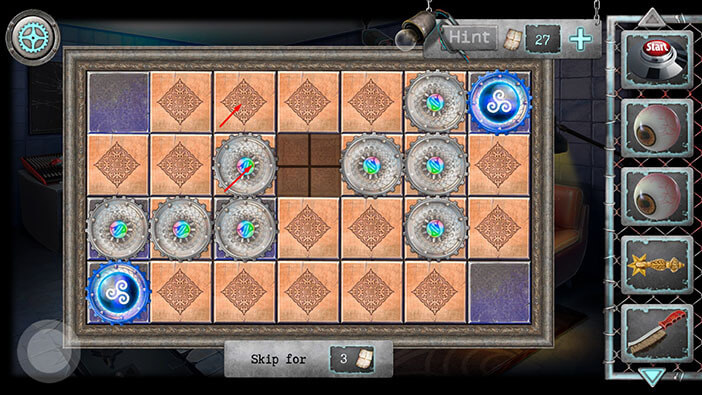
Step 22
Tap on the fourth slot in the first row to move the card to the left. After that, tap on the fifth slot in the first row to move the other card to the left.
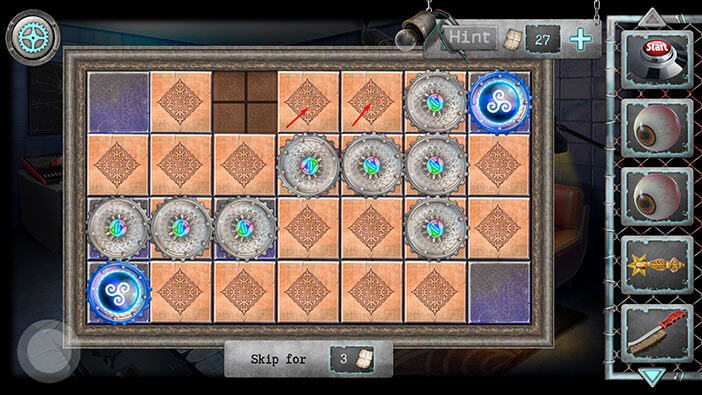
Step 23
Tap on the fifth slot in the second row to move the gear up. After that, tap on the fourth slot in the second row to move the other gear to the right.
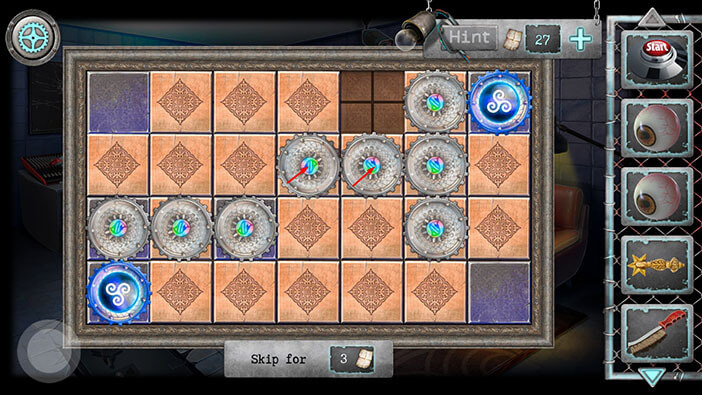
Step 24
Tap on the fourth slot in the third row to move the card up. After that, tap on the fifth slot in the third row to move the other card to the left.
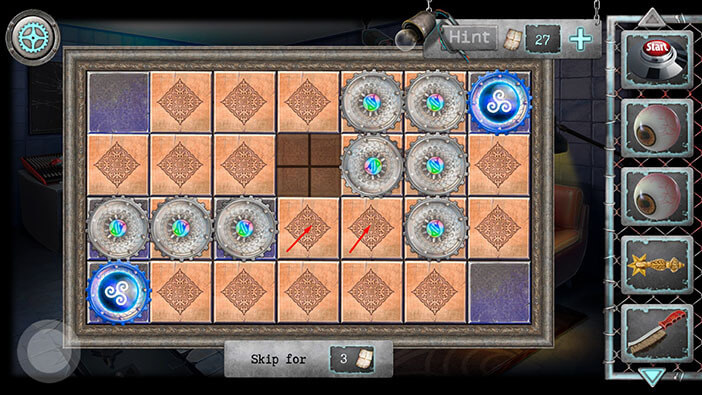
Step 25
Tap on the fifth slot in the second row to move the gear down. After that, tap on the fifth slot in the first row to move the other gear down.
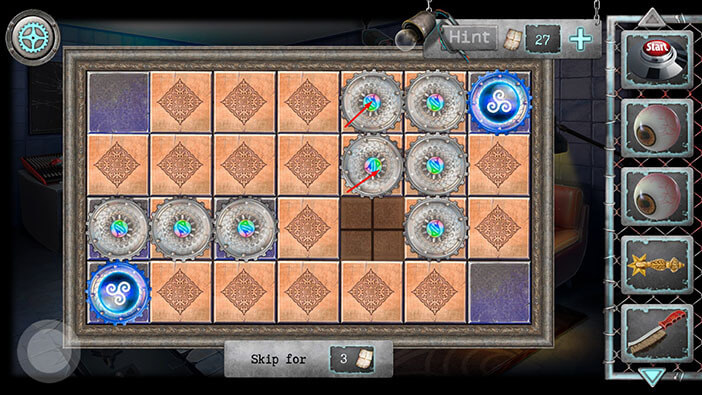
Step 26
Tap on the fourth slot in the first row to move the card to the right. After that, tap on the fourth slot in the second row to move the other card up.
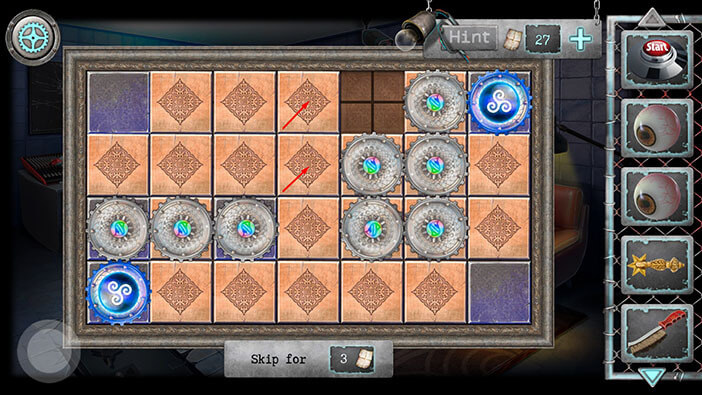
Step 27
Tap on the fourth slot in the third row to move the card up. After that, tap on the fifth slot in the third row to move the gear to the left.
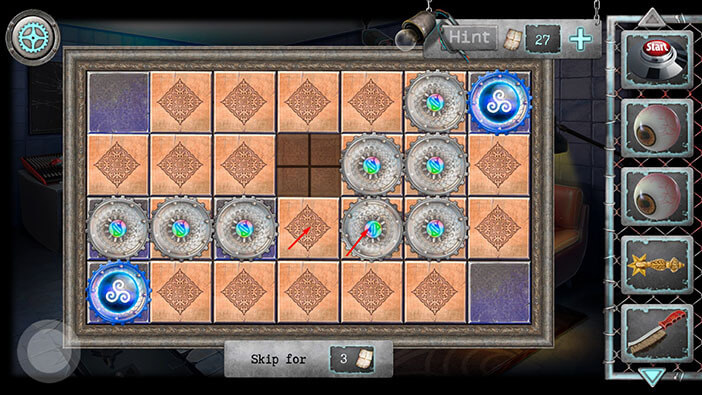
Step 28
Finally, tap on the fifth slot in the second row to move the gear down, and you will connect the two blue gears, and complete this puzzle.
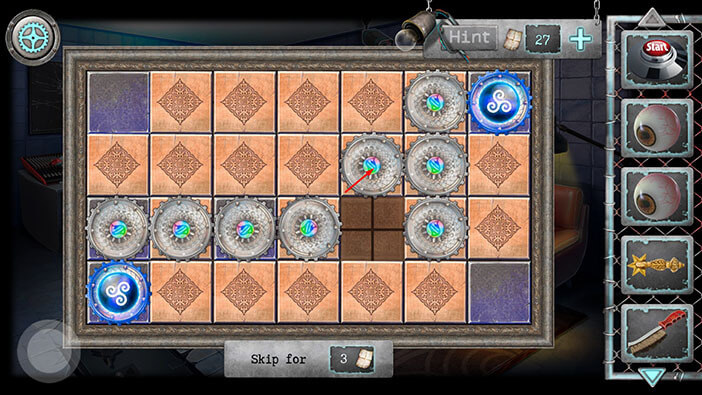
As soon as you complete the puzzle, the secret compartment will open, and inside you will find another red item. Tap on it to pick it up and another “Part of the mask” will be added to your inventory.
After that, tap on the button in the lower left corner to go back.
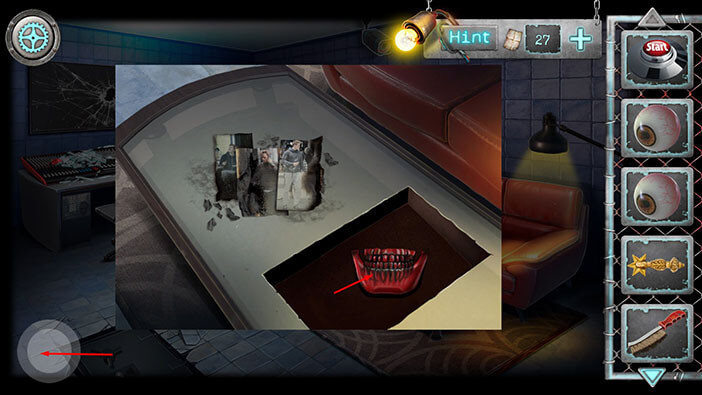
Next, tap on the control panel on the left to take a closer look at it.
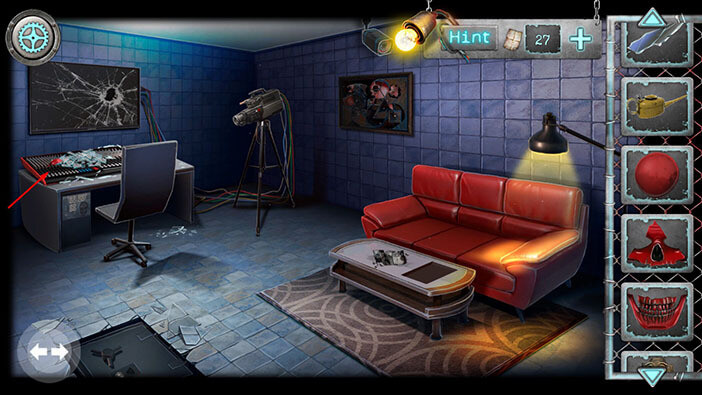
Here you will discover another red item. Tap on it to pick it up and another “Part of the mask” will be added to your inventory.
After that, drag left and right to remove the pieces of broken glass.
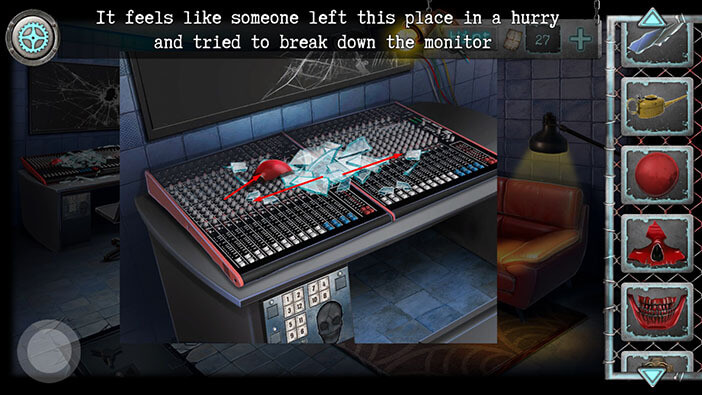
Below the broken glass, you will find a key. Tap on it to pick it up, and the “Copper key” will be added to your inventory (I already picked it up, but you can see this item in the inventory).
After that, tap on the button in the lower left corner to go back.
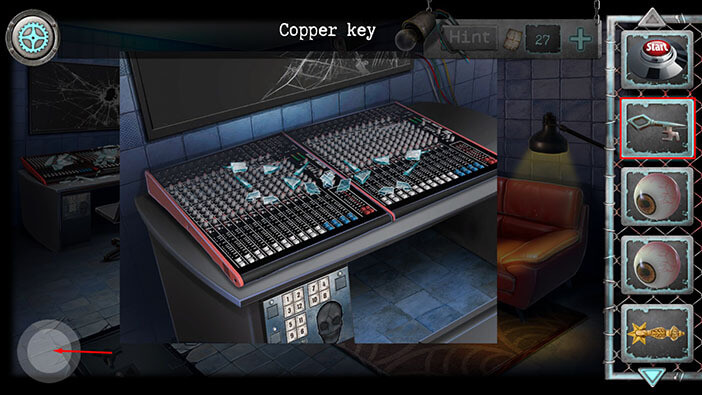
Ok, let’s take a closer look at the picture on the right.
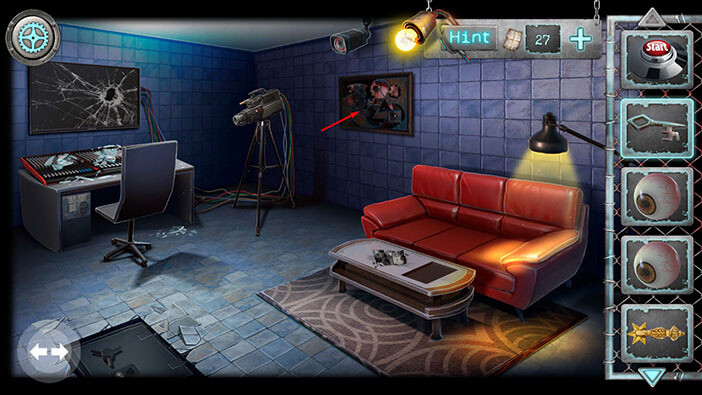
Select the “Copper key” from the inventory and use it to unlock the last piece of the puzzle.
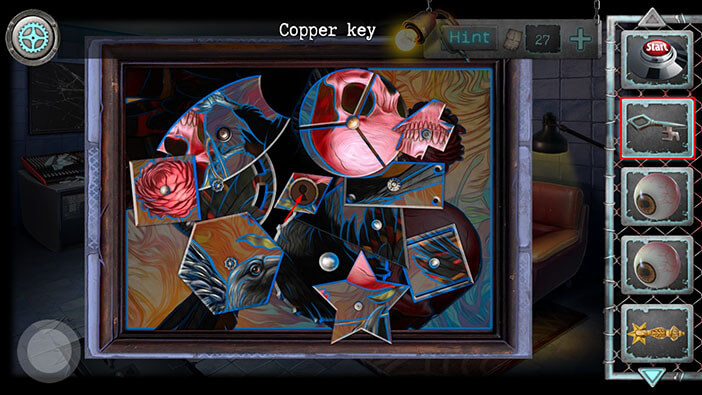
Ok, our next task is to assemble the picture. We rotate the parts of the picture by tapping on the small gears. We can also swap the pieces of the picture between the gears. We will do this puzzle in several steps. Let’s begin.
NOTE: It seems that the rotation of the pieces is randomized each time you initiate the interaction, so pay attention to the rotation of the pieces in the images below to solve this puzzle (don’t rely too much on the text if your pieces have different starting rotations).
Step 1
Tap and hold on to the large skull piece in the top right, and drag it to the small wing piece in the bottom right to swap their positions.
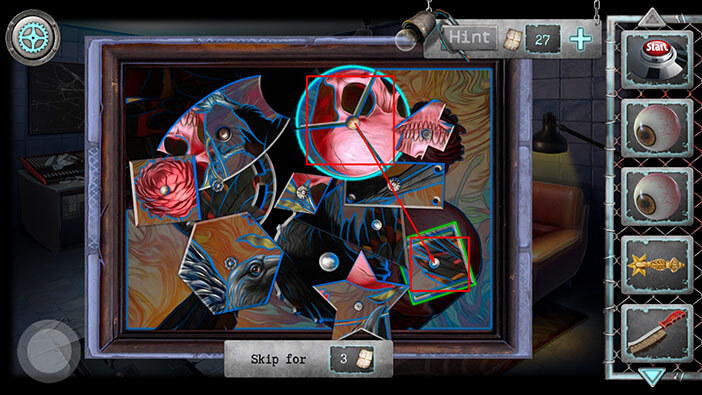
Step 2
Tap twice on the skull piece in the bottom right to rotate it.
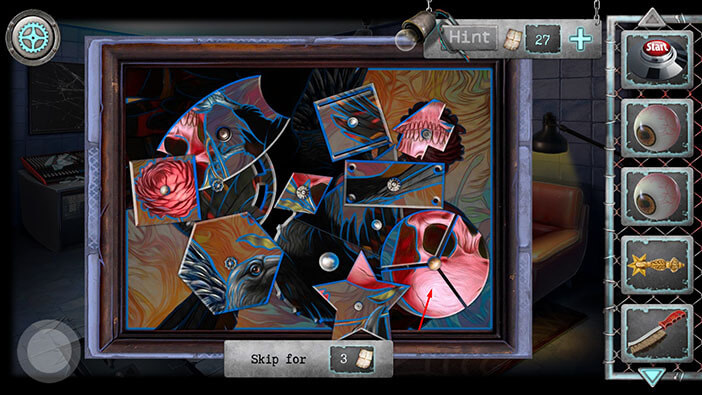
Step 3
Tap and hold on the teeth piece in the top right, and drag it to the star piece in the bottom right to swap their positions.
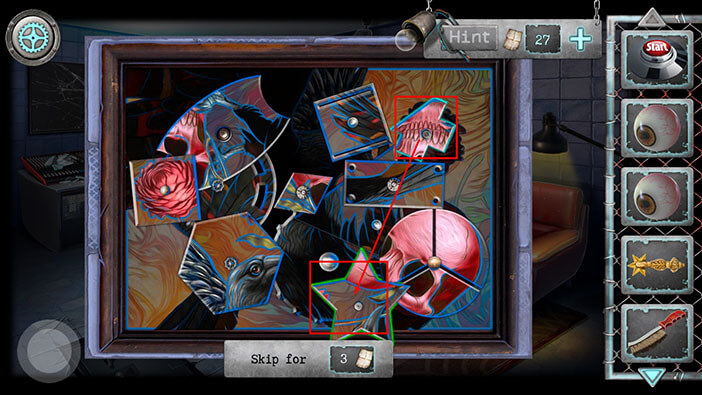
Step 4
Tap once on the teeth piece to rotate it.
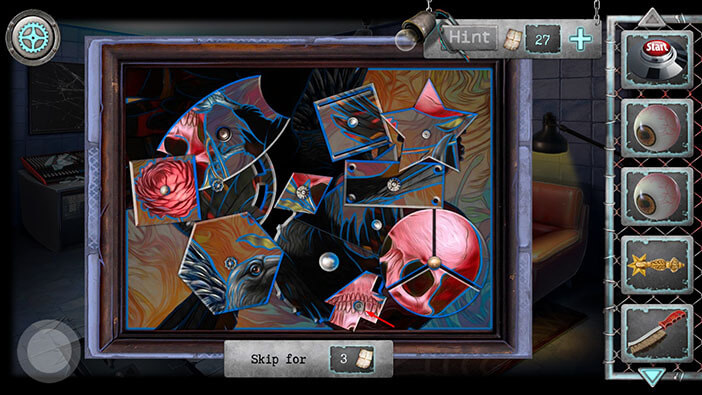
Step 5
Tap and hold on the large piece in the top left, and drag it to the large, round piece in the middle-bottom to swap their positions.
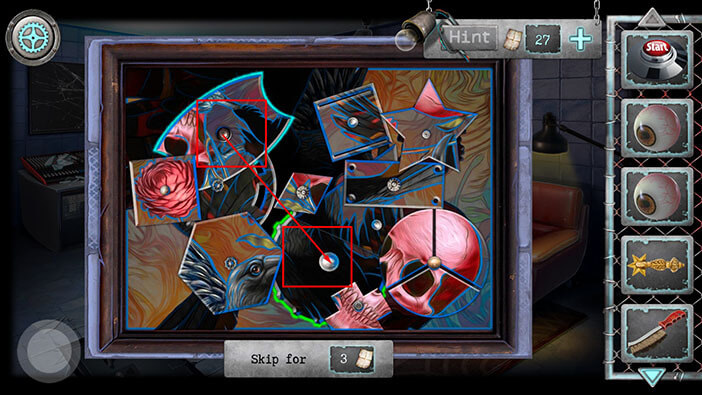
Step 6
Tap four times on the “crow’s legs” piece in the middle-bottom three times to rotate it.
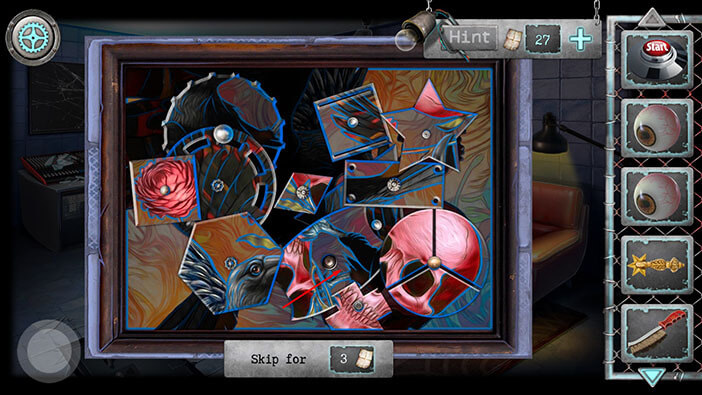
Step 7
Tap and hold on the star piece in the top right, and drag it to the rectangular piece below it to swap their positions.
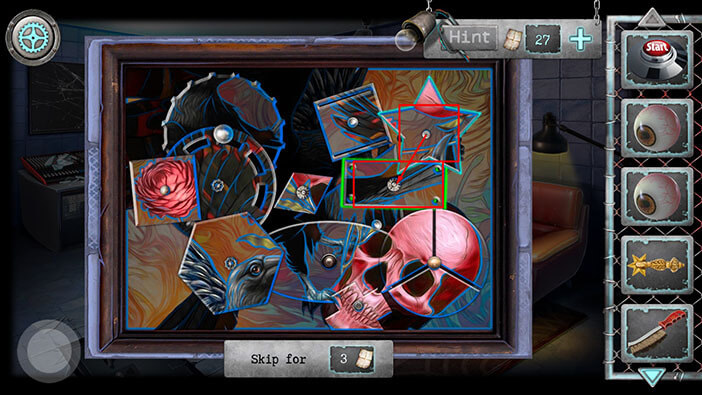
Step 8
Tap once on the star piece to rotate it.
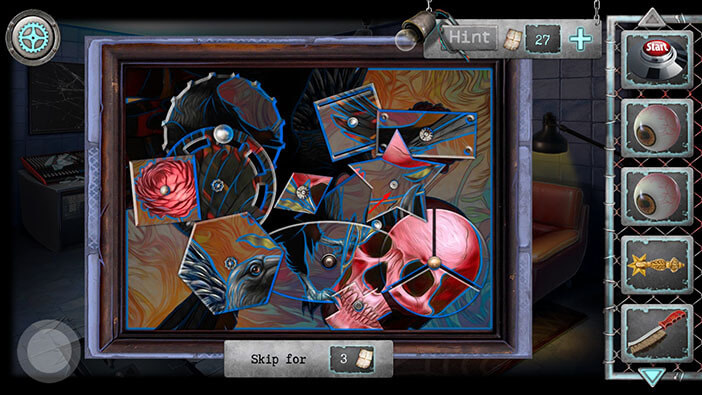
Step 9
Tap and hold on the square piece on the far left, and drag it to the rectangular piece on the top right to swap their positions.
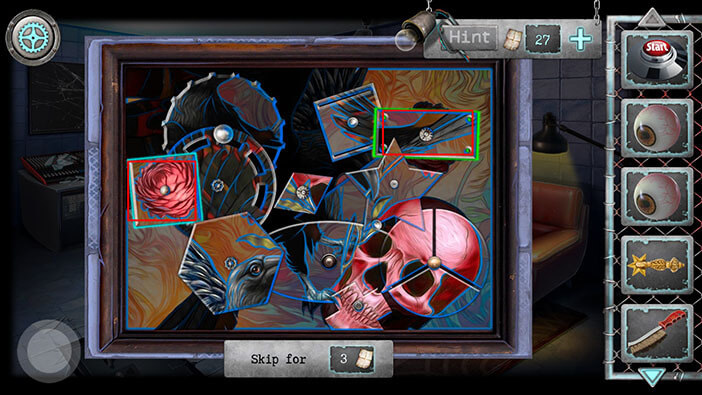
Step 10
Tap once on the square piece in the top right to rotate it.
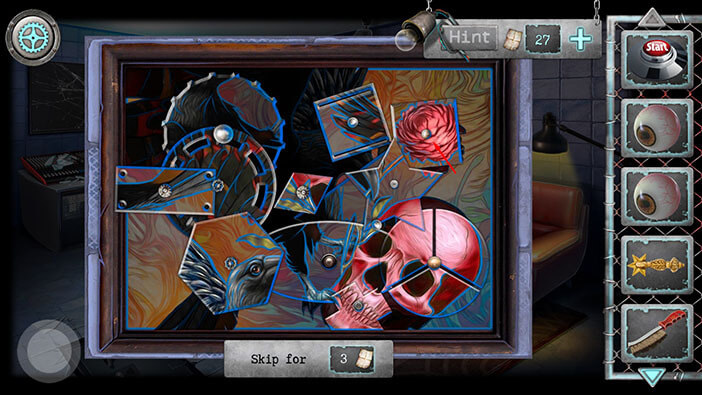
Step 11
Tap and hold on the small piece in the middle, and drag it to the larger piece on the right to swap their positions. (The big part of the piece on the right is covered by the star piece, so it’s easy to misclick this part).
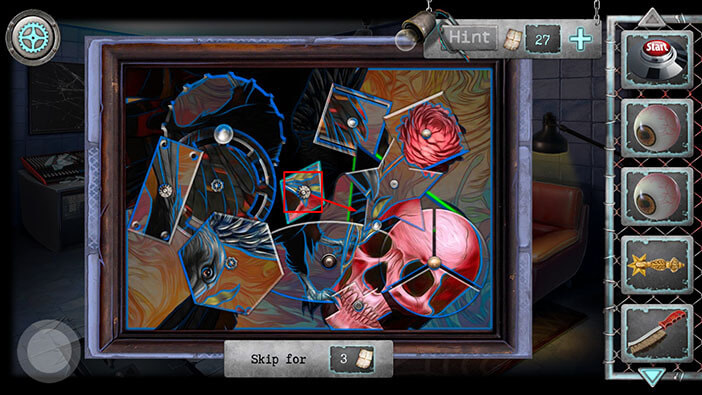
Step 12
Tap once on the small piece on the right to rotate it, and you will assemble the skull.
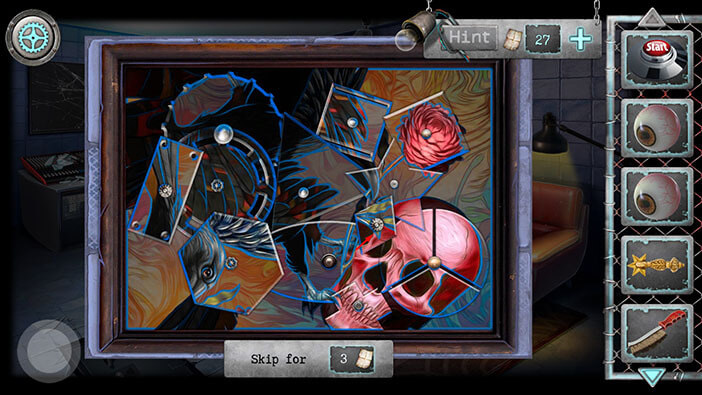
Step 13
Tap and hold on the “crow’s head” piece in the bottom left, and drag it to the crow’s wing piece in the top right to swap their positions.
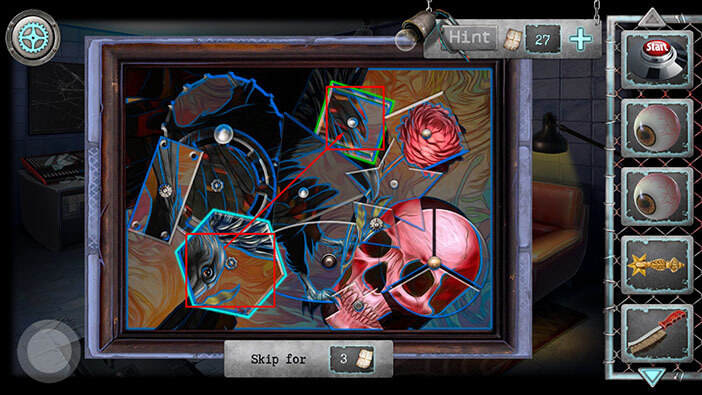
Step 14
Tap once on the “Crow’s head” piece in the top right to rotate it, and you will assemble the beak.
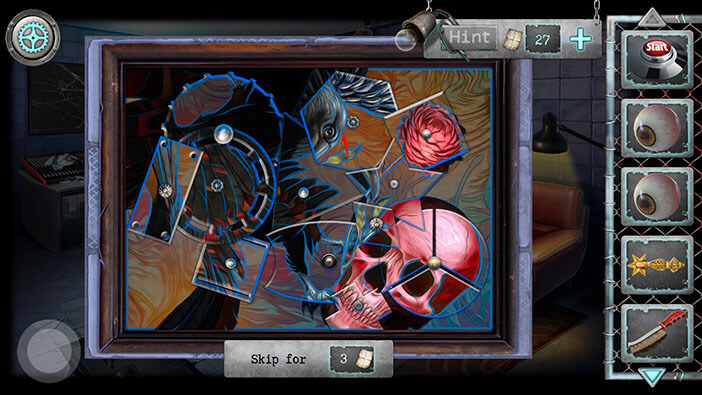
Step 15
Tap and hold on the large circular piece in the top left, and drag it to the crow’s wing piece in the middle to swap their positions.
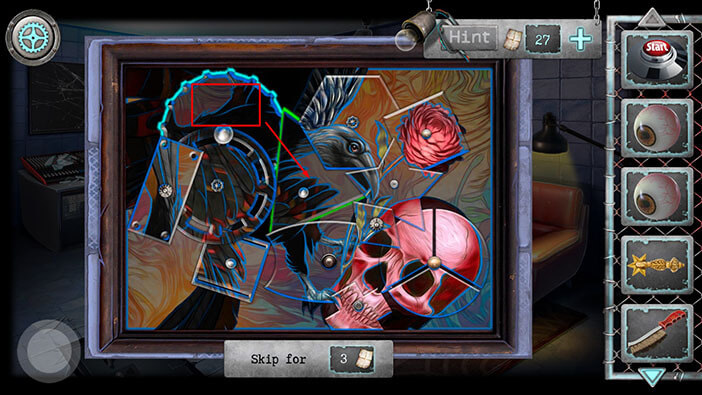
Step 16
Tap three times on the large circular piece in the middle, and you will align it with the crow’s head and the crow’s legs.
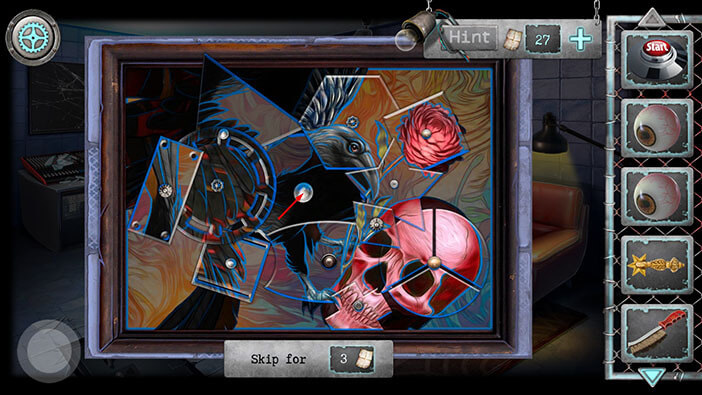
Step 17
Tap and hold on the rectangular piece on the left, and drag it to the square piece in the bottom left to swap their positions.
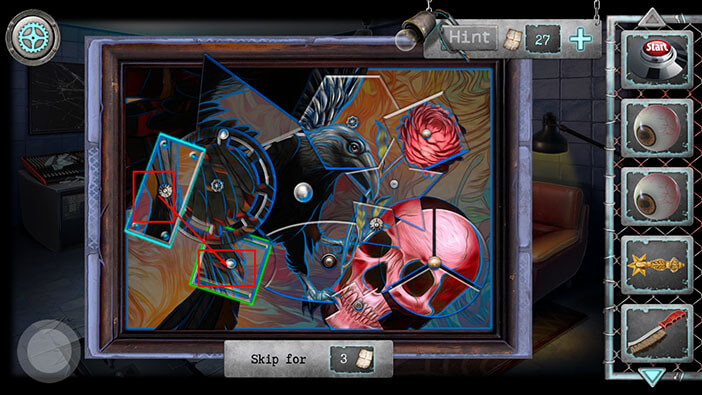
Step 18
Tap twice on the rectangular piece to rotate it, and you will assemble the crow’s tail.
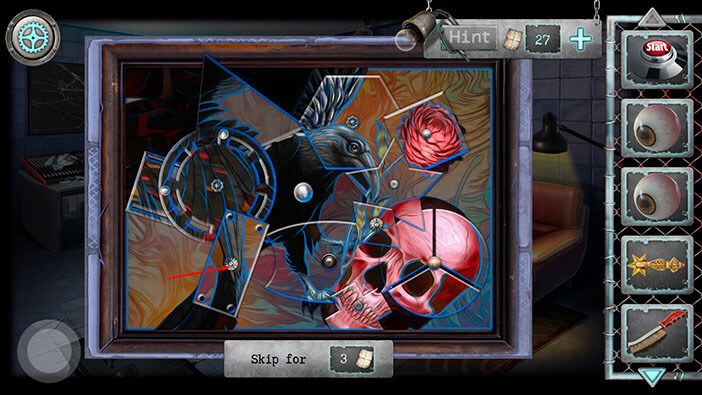
Step 19
Tap and hold on the large circular piece on the left, and drag it to the triangular piece above it to swap their positions.
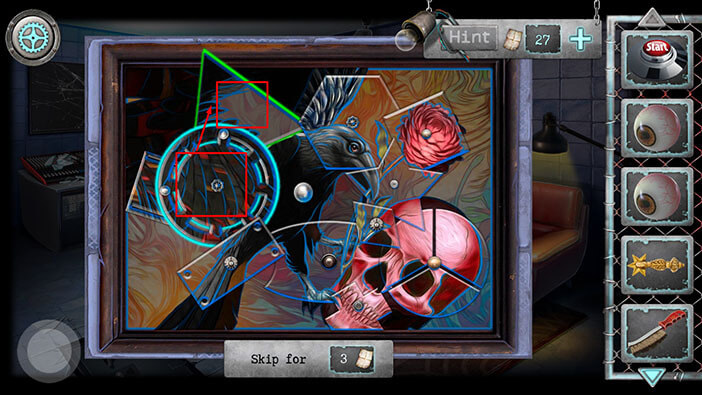
Step 20
Tap three times on the triangular piece on the left to rotate it, and you will assemble the crow’s wing.
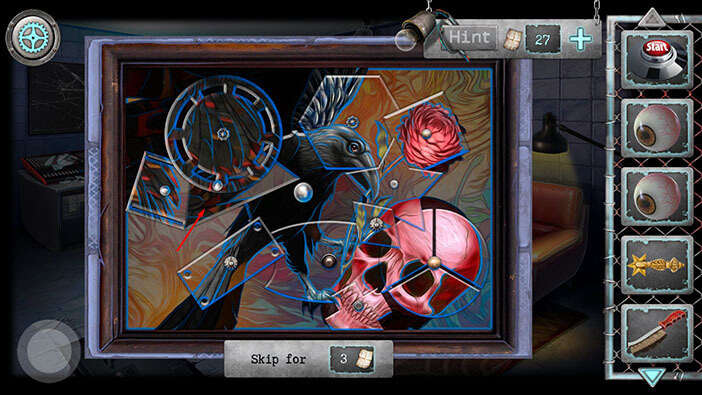
Step 21
Tap on the rectangular piece on the left four times, and you will align it with the other part of the wing.
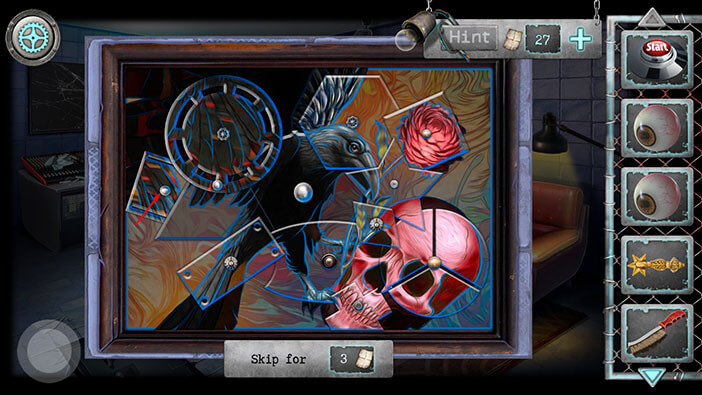
Step 22
Finally, tap four times on the large circular piece in the top left to rotate it, and you will align the last piece of the wing (feathers). With this last step, we have assembled the picture. Do note that the feathers (large circular piece on the top left) can be a bit tricky to align.
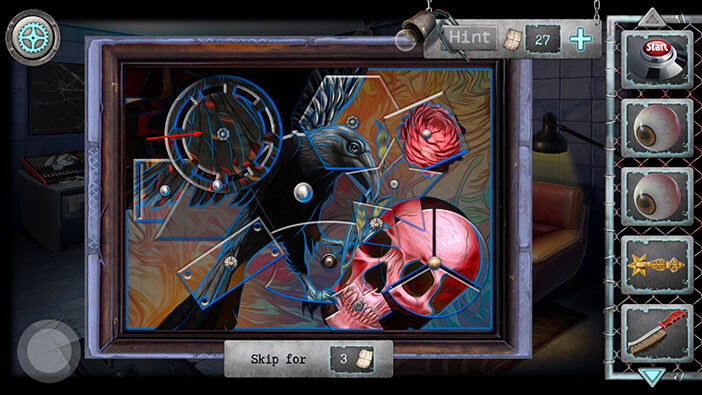
Tap on the picture to complete this puzzle.
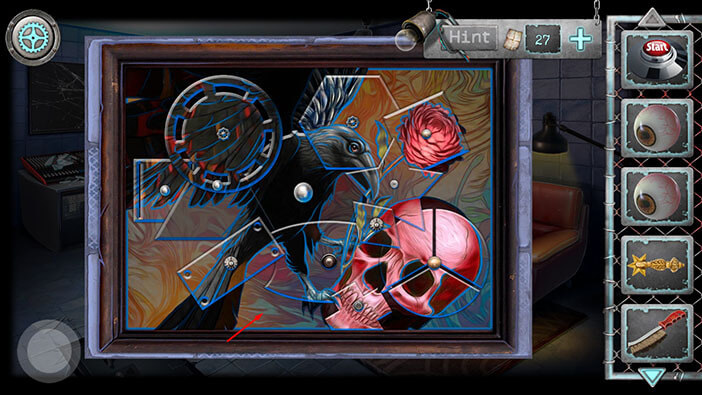
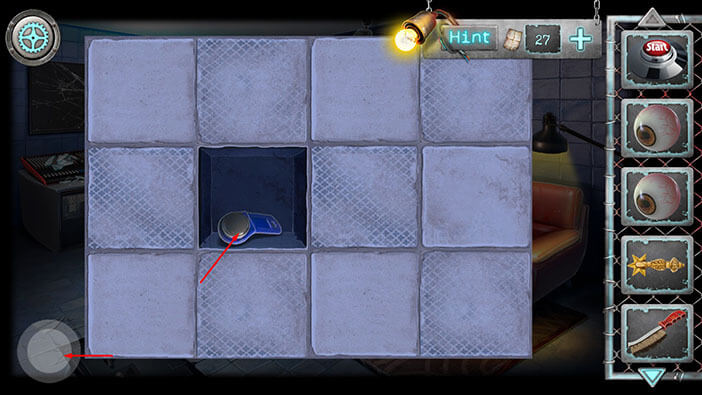
As soon as you tap on the solved puzzle, the picture will fall down, revealing a secret compartment that was hidden behind it. Tap on the item inside to pick it up, and “Chip” will be added to your inventory.
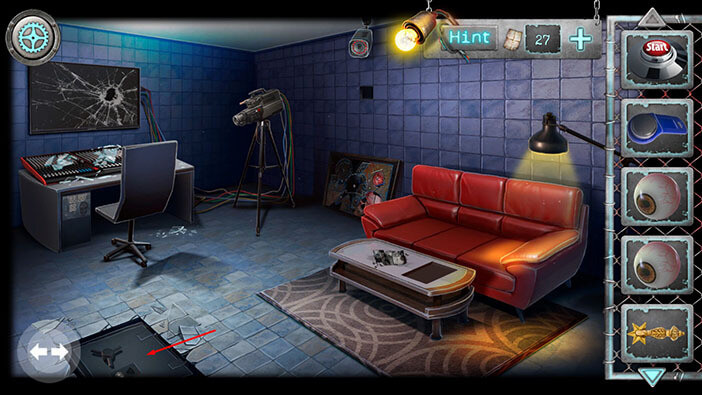
Next, tap on the floor safe in the bottom left corner to take a closer look at it.
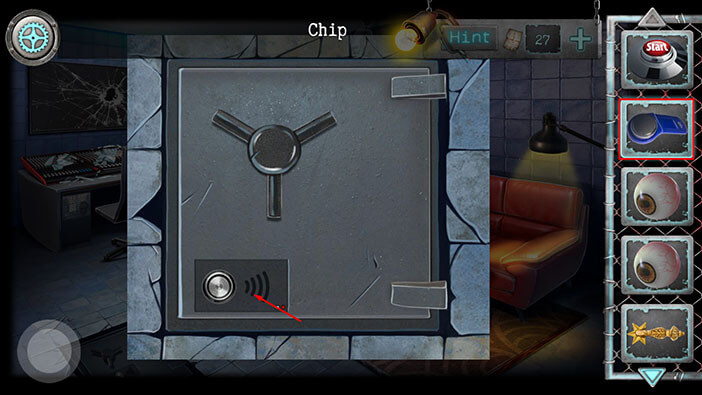
Select the “Chip” from the inventory and use it to unlock the safe.
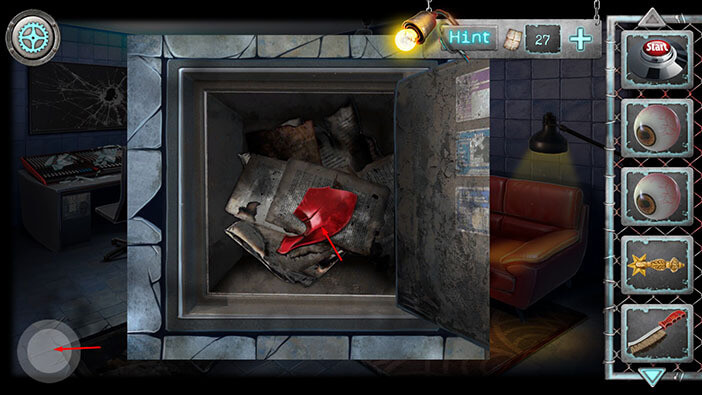
Our character will hear an explosion inside the safe, and a few moments later the door will open. Tap on the red item inside the safe, and another “Part of the mask” will be added to your inventory.
Ok, let’s take another look at the control panel.
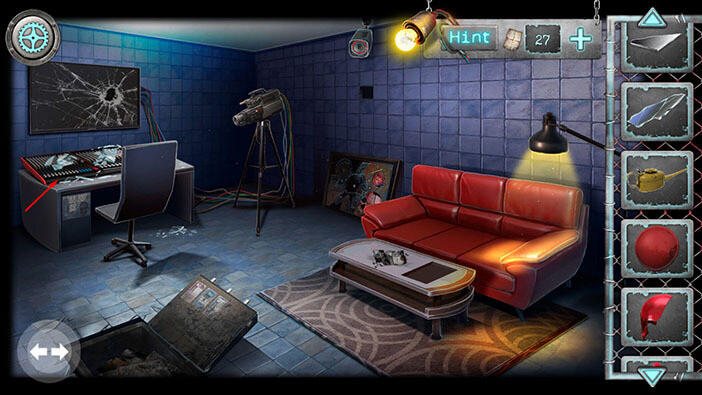
Tap on the panel in the bottom left corner to start the interaction.
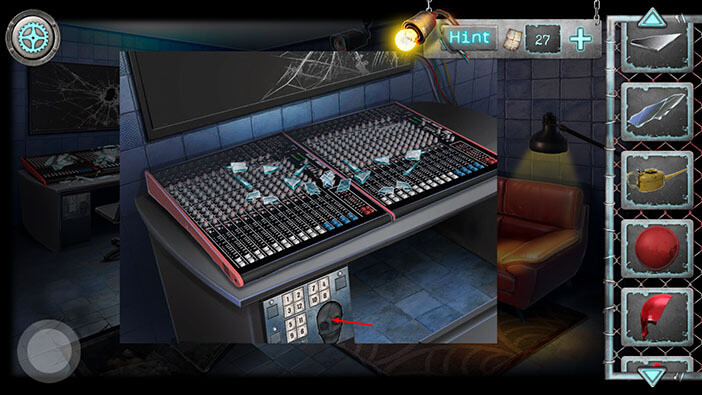
Select all four pieces of the mask from the inventory and drag them into the mask slots on the panel.
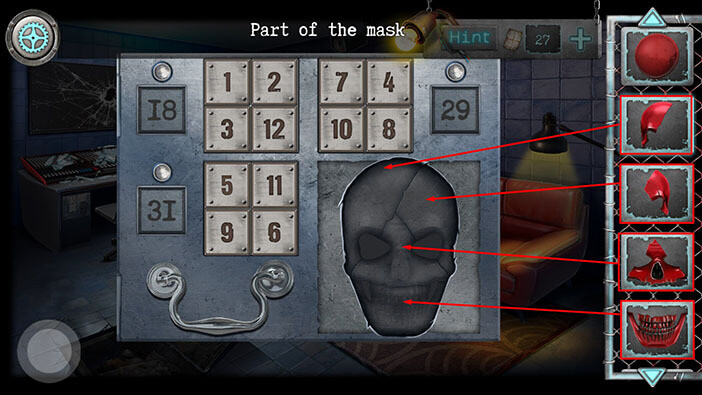
Here we have another puzzle. If you take a look at the three squares on the left, you will notice that each of them has four fields with four numbers. Besides each of them, you will also see a smaller square with only a single number. The number in the smaller square represents the sum of the four numbers in the larger square. If you add these three sums and divide them by three (the number of squares) you will get the number 26 (arithmetic mean).
18 + 31 + 29 = 78
78 / 3 = 26.
So, the goal of this puzzle is to set the sum of numbers in all squares to 26. We will do this puzzle in several steps. Let’s begin.
Step 1
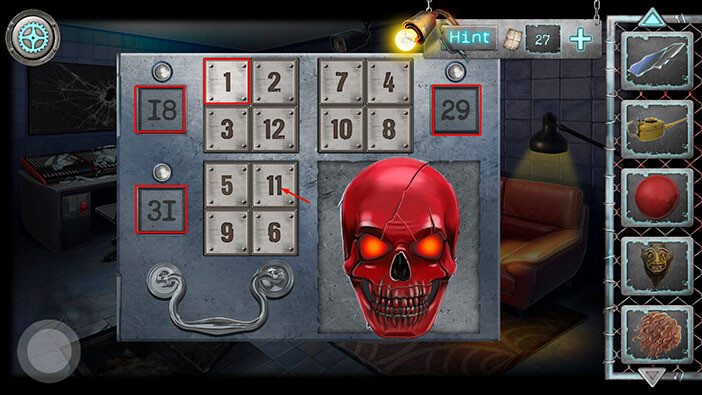
Tap on the number one in the top left square, and swap it with the number 11 in the bottom left square.
Step 2
Select the number 3 in the top left square and swap it with the number 1 in the bottom left square. When you complete this action the sum of numbers in the top left square will be 26.
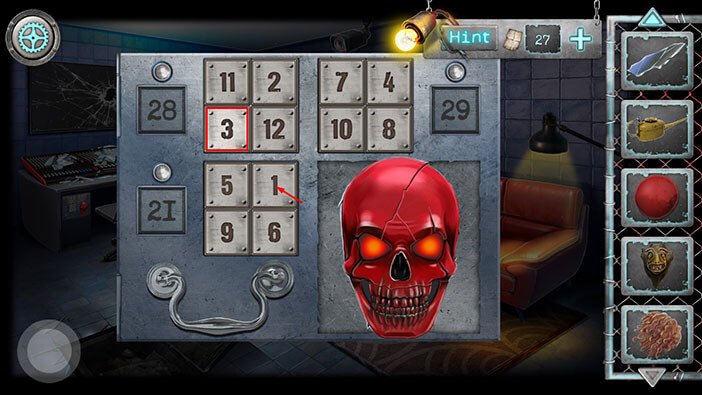
Step 3
Select the number 5 in the bottom left square, and swap it with the number 8 in the top right square. After you complete this step, the sum in all three squares will be 26, and you will solve the puzzle in just three steps.
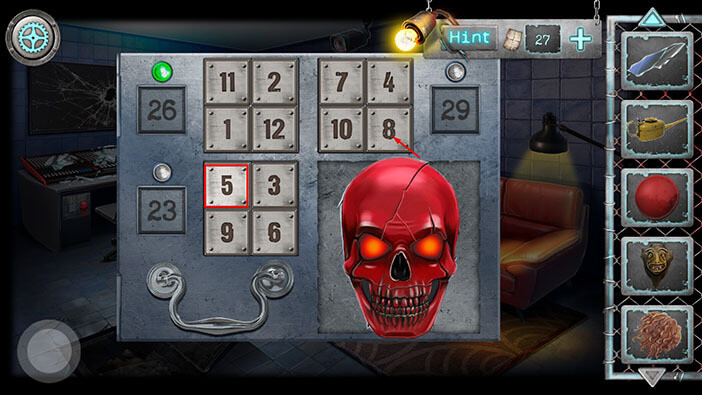
As soon as you set the sum in all squares to 26, the “Mask” will be added to your inventory, and the cabinet door below the panel will open. Tap on the item inside the cabinet to pick it up, and “Cartridge” will be added to your inventory.
After that, tap on the button in the lower left corner to go back.
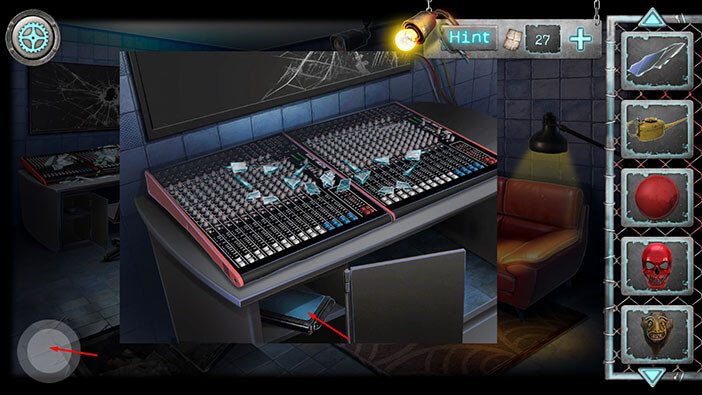
Ok, we’re done here. Tap two times on the button in the lower left corner to go back, outside.
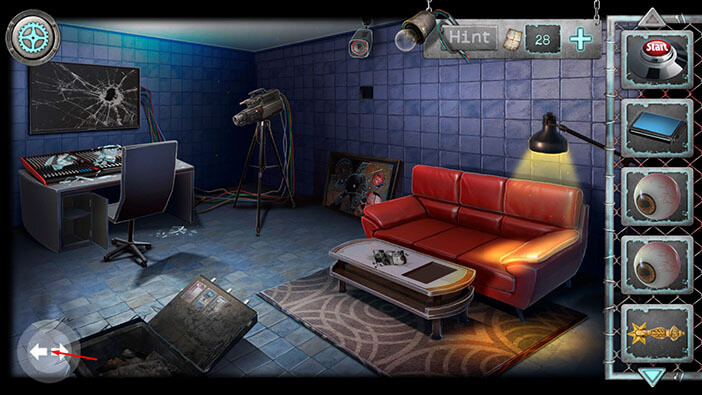
Tap on the gate at end of the path to go to the carousel area.
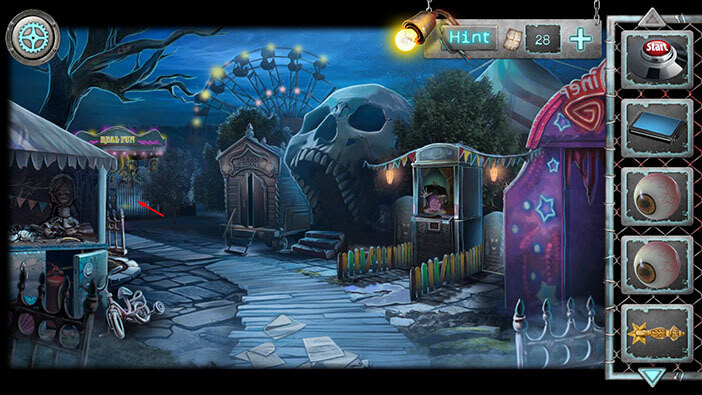
Tap on the clown to take a closer look at it.
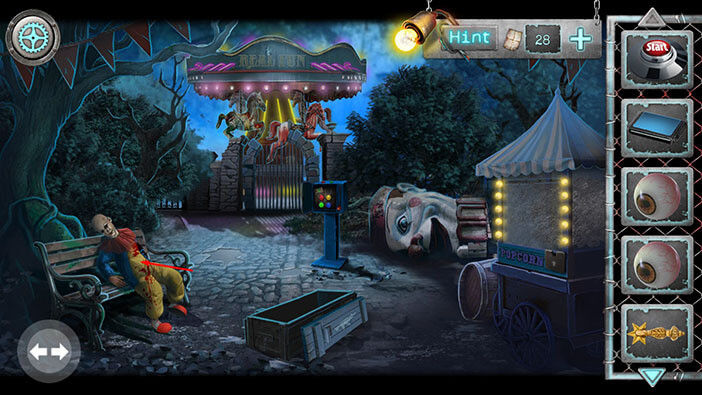
The clown mannequin is missing some parts, so let’s assemble it. Select the two “Creepy eyes” from the inventory and insert them into the eye sockets.
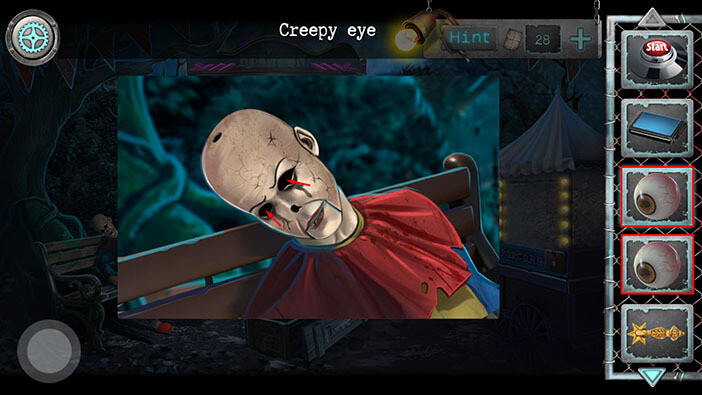
Next, select the “Ginger wig” from the inventory and place it on the clown’s head.
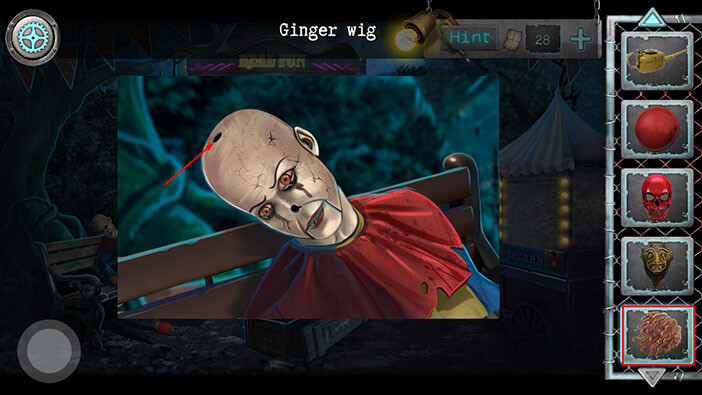
Lastly, select the “Clown nose” from the inventory and place it into the empty slot.
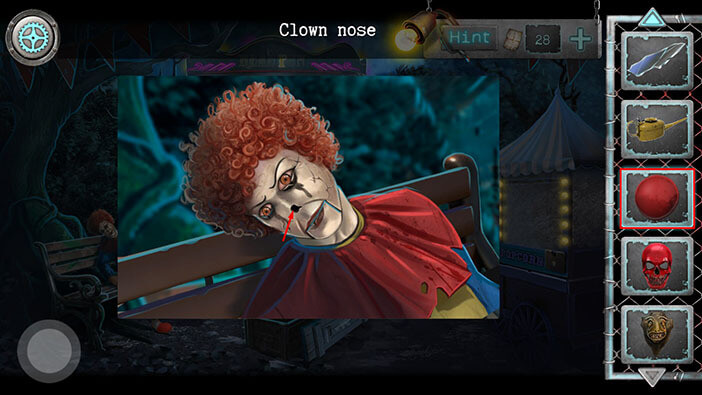
As soon as you assemble the clown, his eyes will roll up, he will roar and then open his mouth. Tap on the item inside the clown’s mouth to pick it up and the “Scary key” will be added to your inventory.
After that, tap on the button in the lower left corner to go back.
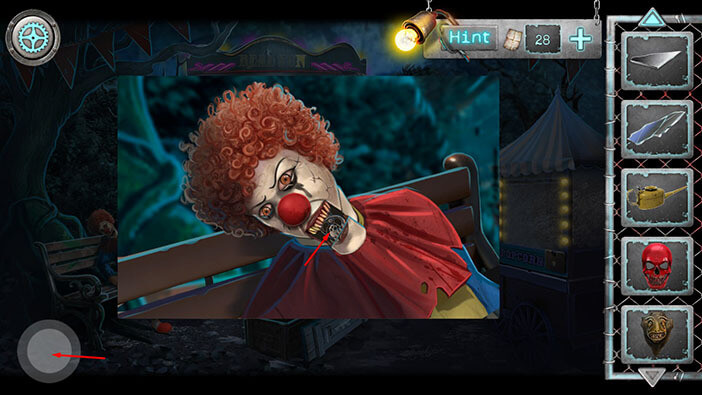
Tap on the arrows in the lower left corner to go back.
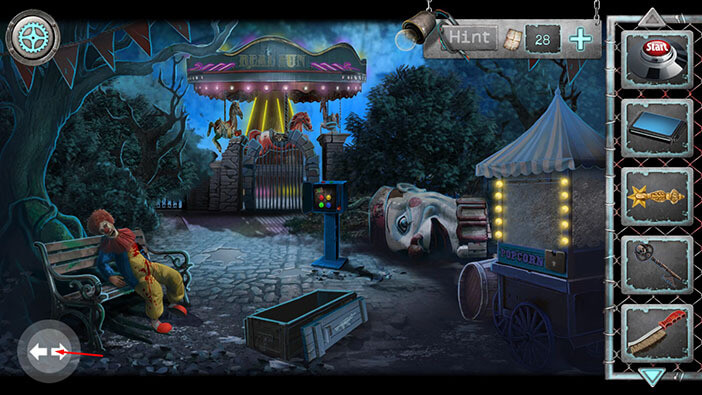
Tap on the trailer door to go into the mirror room.
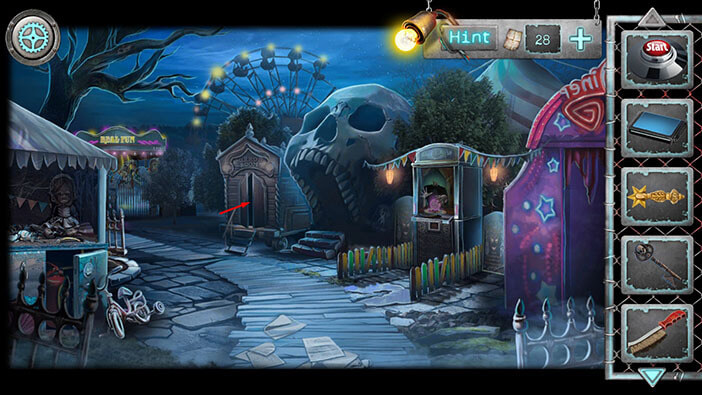
Tap on the mirror to take a closer look at it.
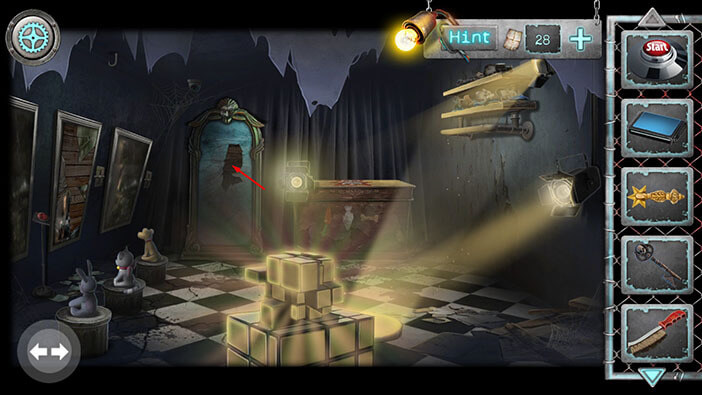
Ok, we now have all four mirror shards, so select them from the inventory and use them to reassemble the mirror.
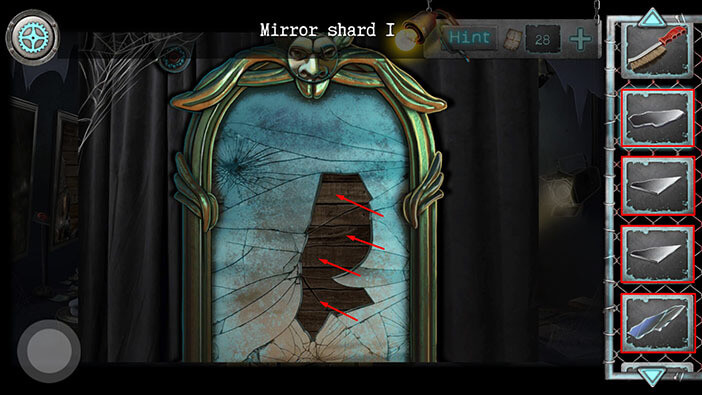
As soon as you reassemble the mirror, our character will see his own screaming reflection, but he stayed calm because he was sure that this was some kind of an illusion or a special effect. More importantly, the “Creepy face” will be added to your inventory.
Tap twice on the button in the lower left corner to go back, outside.
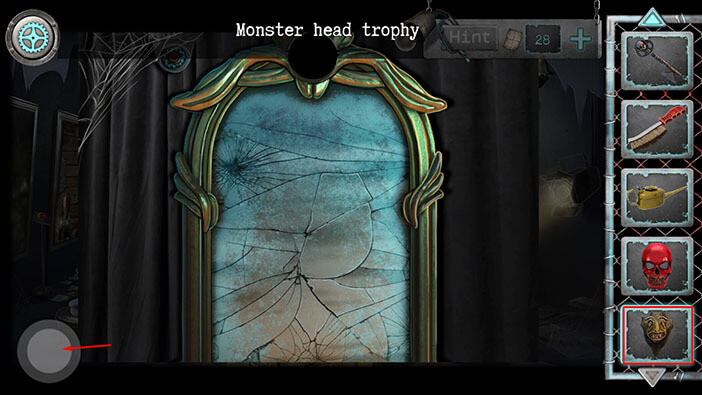
Ok, let’s tap on the entrance into the skull to take a closer look.
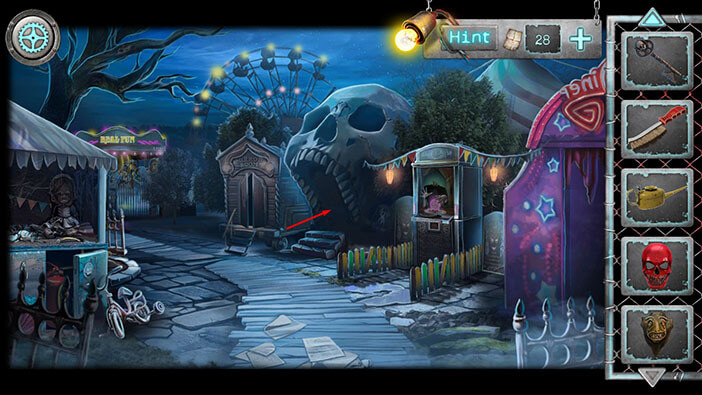
Well, as expected, the entrance to the skull is locked and we will have to solve another puzzle in order to unlock this door. Select the “Creepy face” from the inventory and place it into the empty slot.
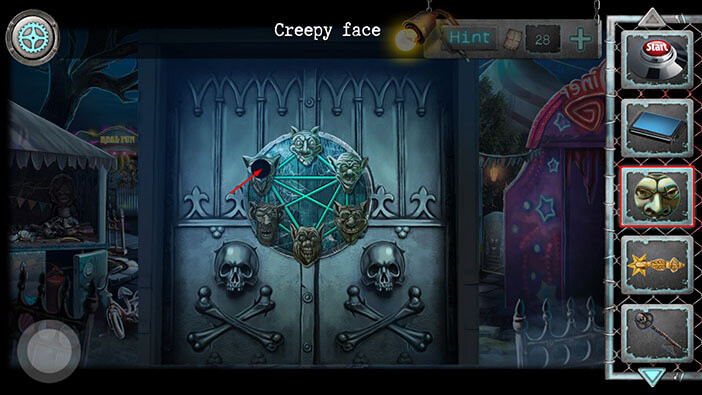
All heads are in place, so let’s tap on the puzzle to start the interaction.
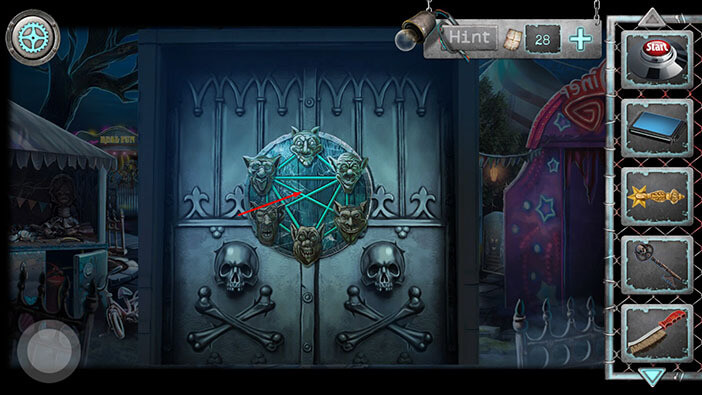
The goal of this puzzle is to shuffle around the faces and pair them up with matching heads. We will do this puzzle in several steps. Let’s begin.
Step 1
Tap on the face in the bottom left slot to select it, and exchange it with the face in the top left slot.
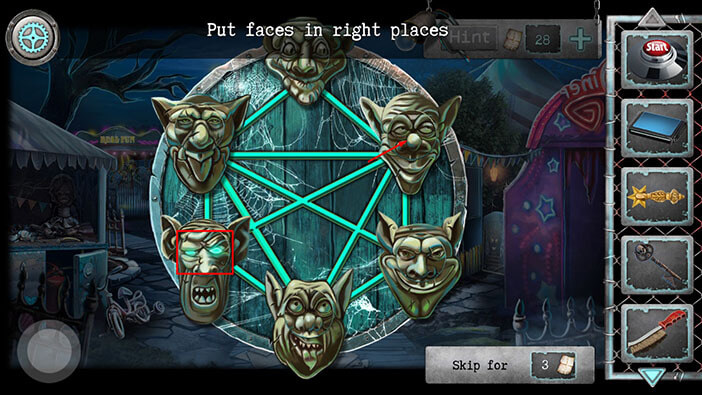
Step 2
Tap on the face in the bottom slot to select it, and exchange it with the face in the bottom left slot.
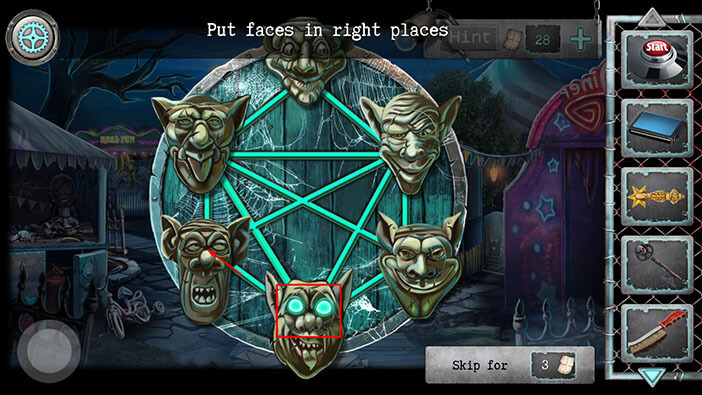
Step 3
Tap on the face in the bottom slot to select it, and exchange it with the face in the bottom right slot.
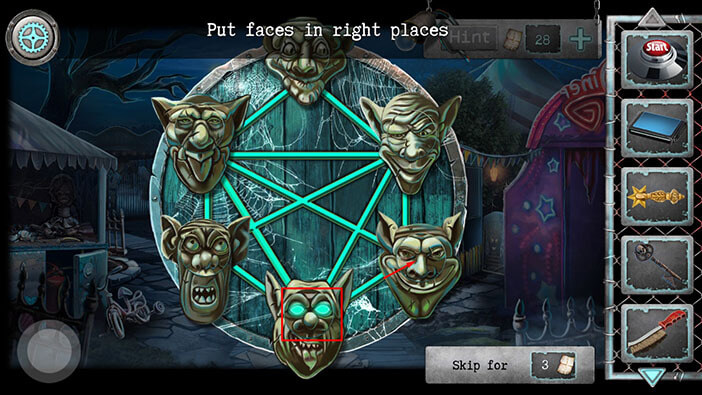
Step 4
Tap on the face in the bottom left slot to select it, and exchange it with the face in the top left slot.
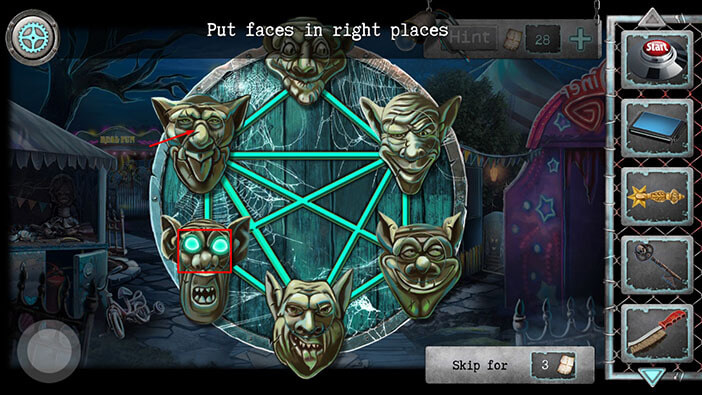
Step 5
Tap on the face in the top left slot to select it, and exchange it with the face in the top slot.
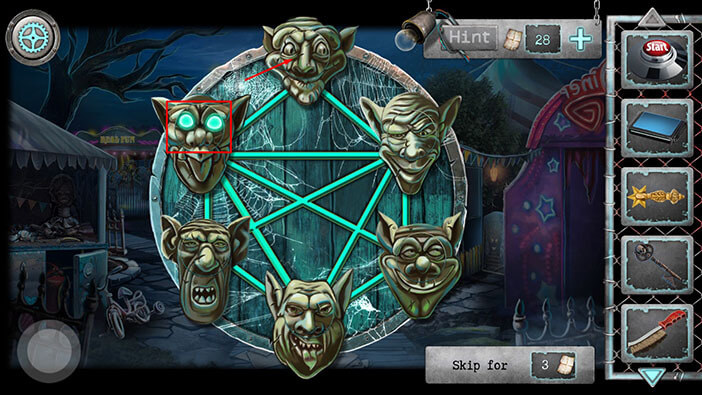
Step 6
Tap on the face in the bottom slot to select it, and exchange it with the face in the bottom left slot.
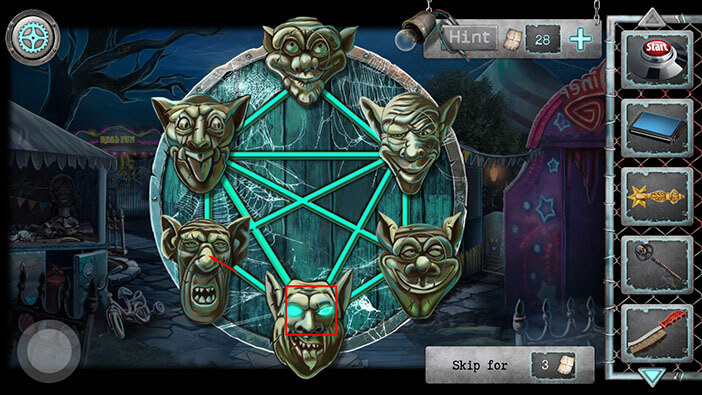
Step 7
Tap on the face in the bottom left slot to select it, and exchange it with the face in the top left slot.
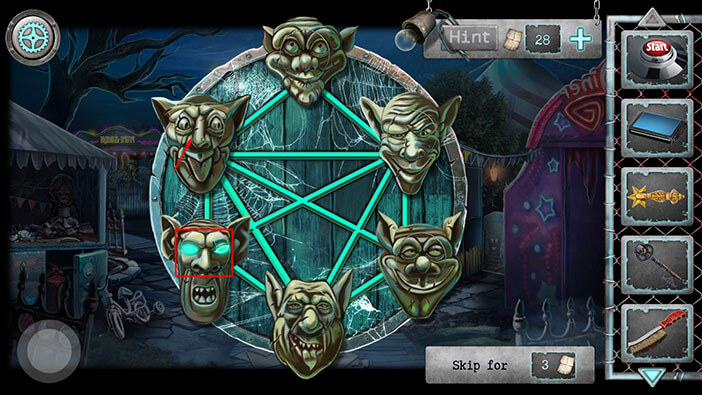
Step 8
Finally, tap on the face in the bottom left slot to select it, and exchange it with the face in the bottom slot. When you complete this last step, you will solve the puzzle.
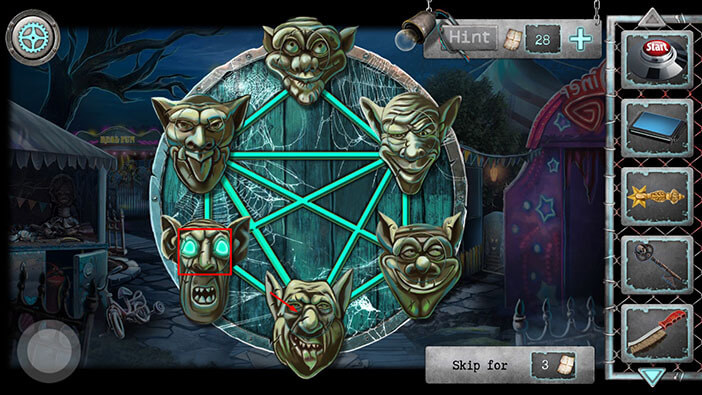
As soon as you solve the puzzle, the disk with the head will fall down, revealing a keyhole that was hidden beneath it. Select the “Scary key” from the inventory and use it to unlock the door.
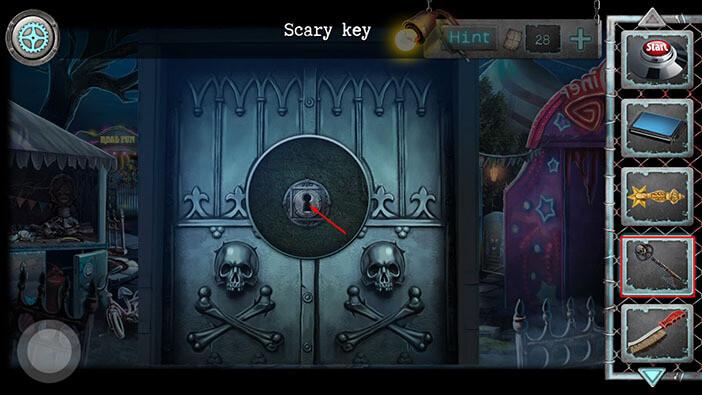
The swarm of bats will fly out of the room as soon as you open the door. Let’s tap on the door to proceed inside.
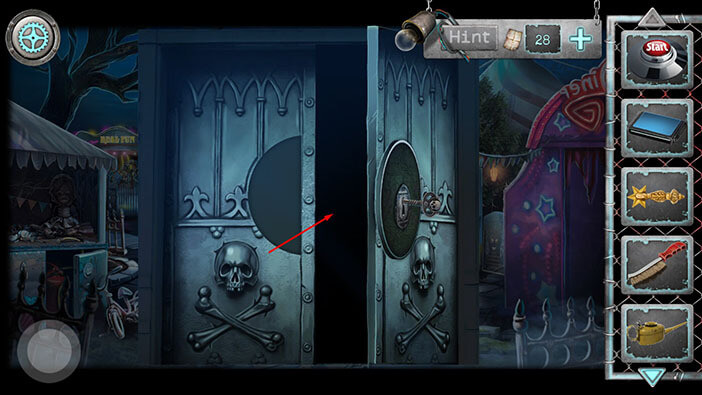
We have discovered another area, but it seems that the way forward is blocked by a barrier of wooden planks. Let’s explore this room. Tap on the small train to take a closer look at it.
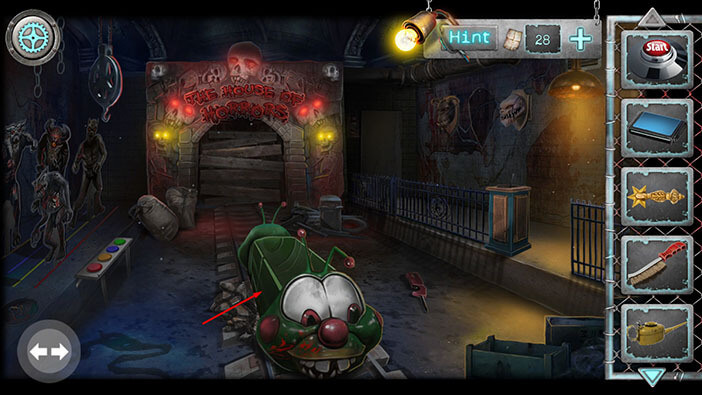
If you take a closer look at the wheels, you will notice that they are very rusty, and there’s no way that the train will be able to run while its wheels are in such poor condition. So, select the “Metal brush” from the inventory and use it to remove the rust from the wheels. Our end goal is to make the train operational and use it to bust through the barricade.
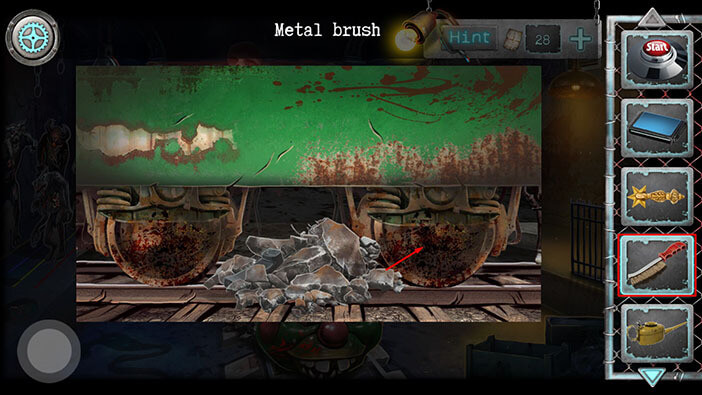
Next, it looks like there’s a telephone on the left side of the debris, but we can’t pick it up, at the moment. So, drag left and right to remove some of the debris.
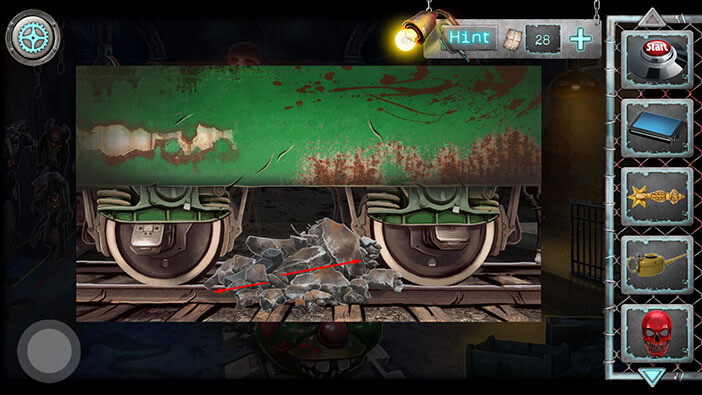
Tap on the telephone to pick it up, and a “Radiotelephone handset” will be added to your inventory. After that, keep clearing the debris until you remove all of it.
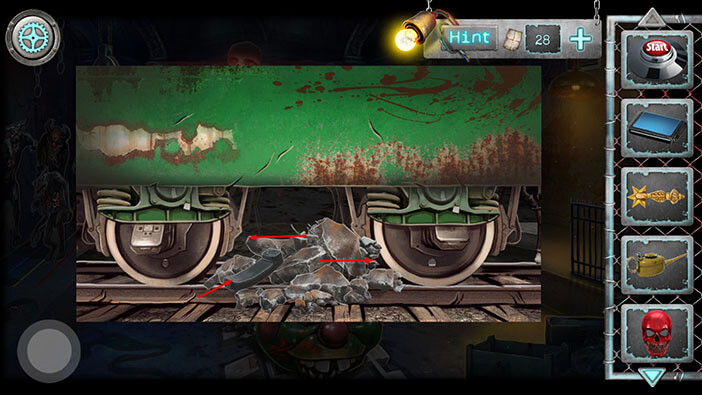
Next, select the “Oiler” from the inventory and use it to grease the wheels.
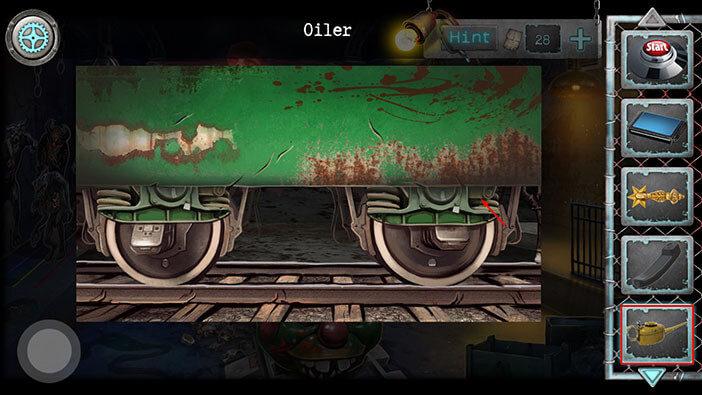
Ok, that’s it for now. Let’s tap on the button in the lower left corner to go back.
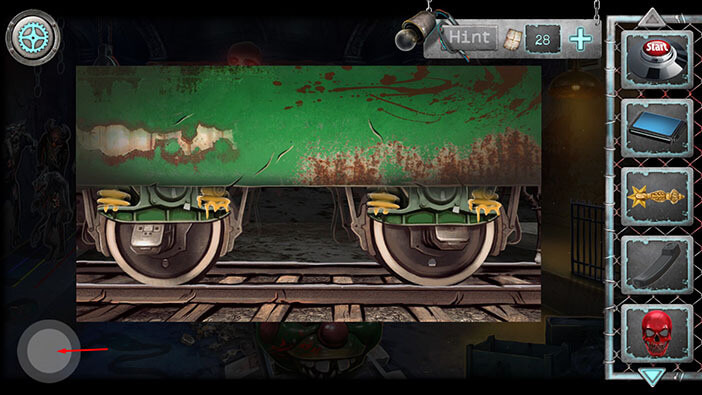
Next, tap on the multicolored buttons on the left to take a closer look.
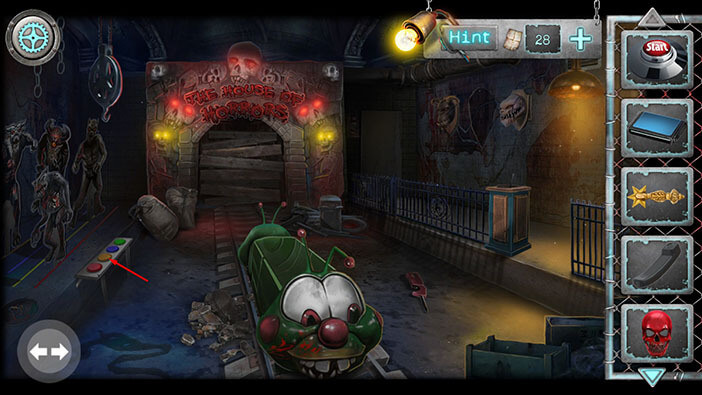
You will probably notice that the button on the left is missing. So, select the “Start button” from the inventory and insert it into the empty slot on the left.
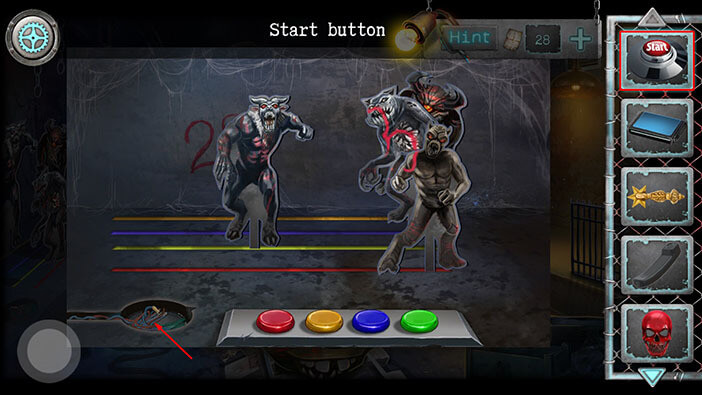
The colored buttons will light up, so let’s tap on the start button to activate the mechanism.
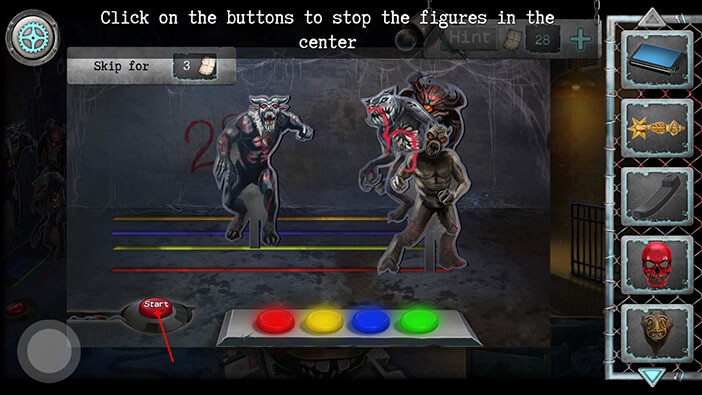
Here we have another minigame. If you pay attention to the wall behind the monsters, you will notice some numbers. Every monster is sliding left and right on a lane of a specific color. We can stop the monster by tapping on the button that matches the color of the lane. However, once you tap on the button on some other button, the first monster will start moving again. So, you can only stop one lane/monster at a time.
The goal of this puzzle is to arrange all the monsters in a single file (one behind the other). To do that, tap on the button to stop the monster in the specific lane, and then tap on the button again once the monster is in line with the other monsters.
You can see the monsters in a single file in the image below.
NOTE: Keep in mind that the monster in the green line is moving in the opposite direction.
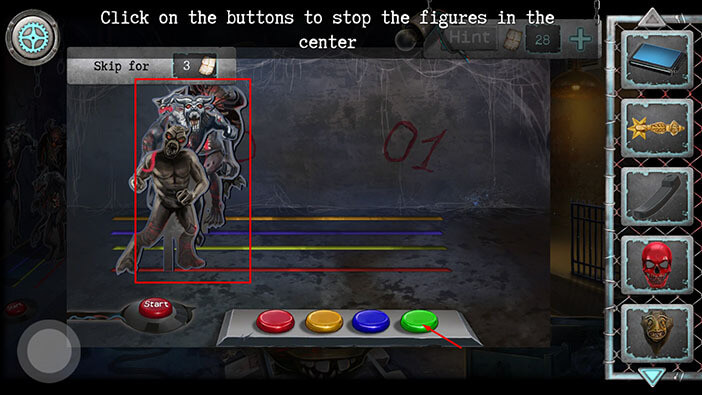
Once you have all the monsters in line, wait for them to reach the middle of the lane, and then tap on the “Start button” to stop them.
All monsters except the monster on the green lane will stop. The monster on the green lane will fall out of its lane.
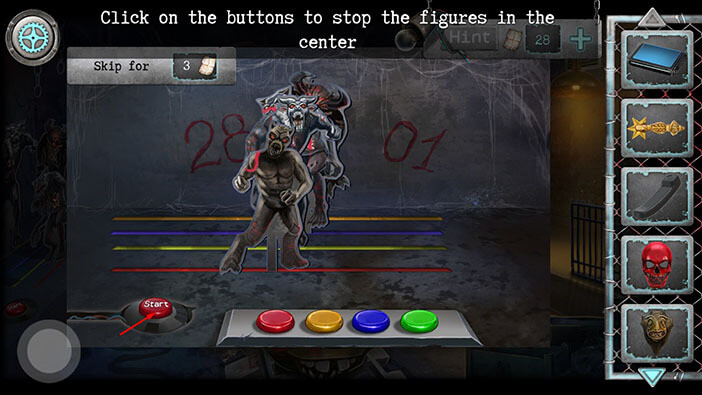
Ok, if you pay attention to the three remaining monsters you will notice that they form the number 3. So, when we combine it with the numbers written on the wall, we will get the code “28301”. Memorize/write down this code because we will need it for the next puzzle.
Once you’re done, tap on the button in the lower left corner to go back.
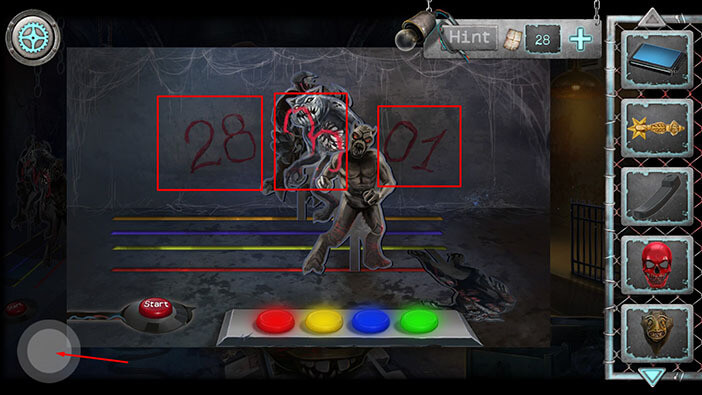
If you look at the ground on the right side of the train, you will notice an object. Tap on it to pick it up and “Gas lighter” will be added to your inventory.
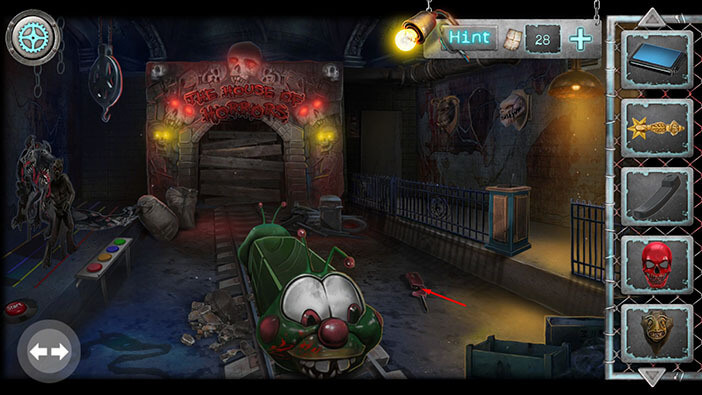
Ok, now, let’s take a closer look at the door on the right.
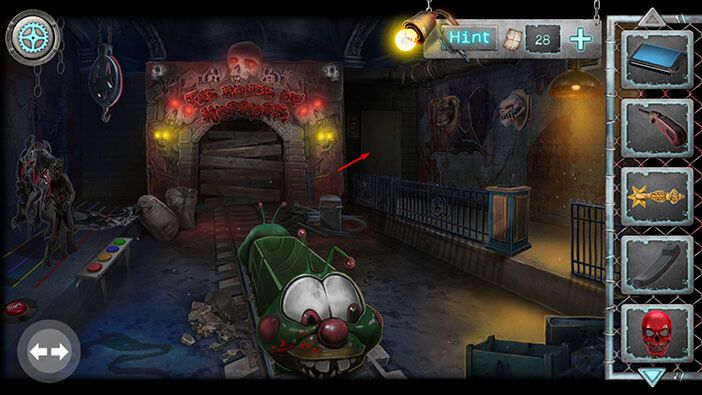
Well, it is very dark in this part of the room, so let’s select the “Gas lighter” from the inventory and light up the lantern on the left.
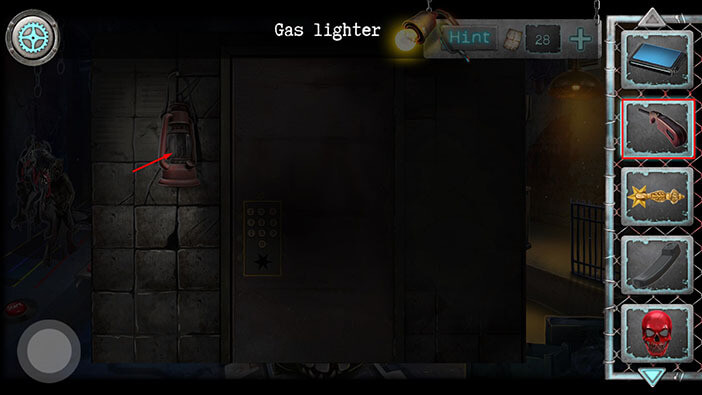
Well, we now have enough light, and we can see a star-shaped slot on this door. So, select the “Door handle” from the inventory and insert it into the slot.
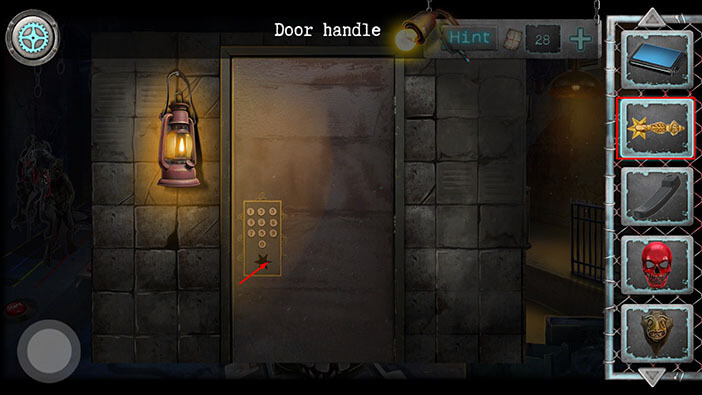
After that, tap on the number pad, above the door handle, to take a closer look at it.
NOTE: I had to tap several times, and wait a bit before I could interact with the number pad. I don’t know if it’s a common occurrence, but if something similar happens during your playthrough, just wait 5-6 seconds before tapping again on the number pad.
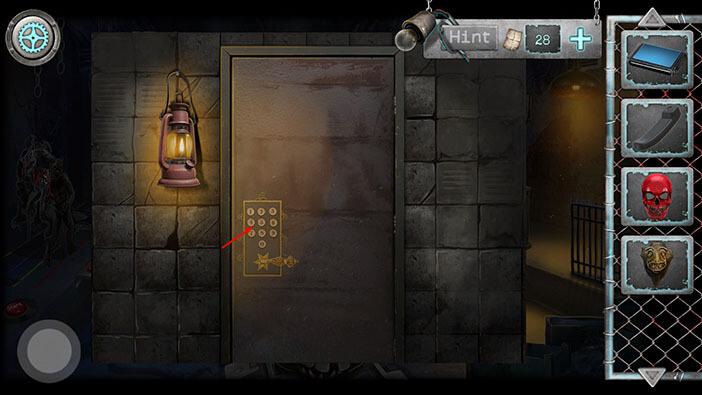
On the left side, in the dark, we can see the puzzle with the monsters which we solved earlier. So, let’s enter the code “28301” which we discovered by solving that puzzle.
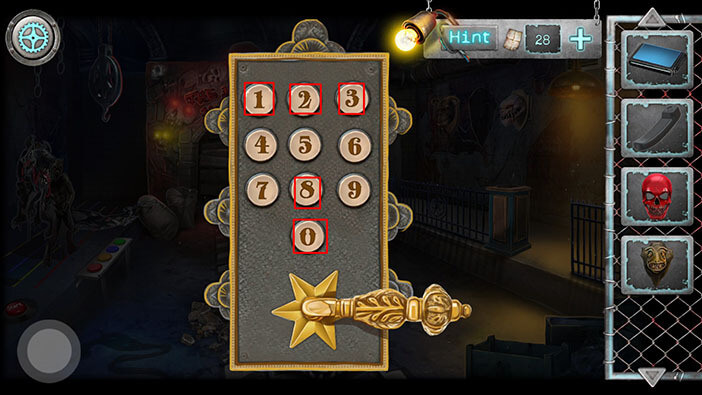
As soon as you enter the correct code, the door will open. However, this room is on fire, and our character will back away a bit from the heat and the flames.
Tap on the door to look inside the room.
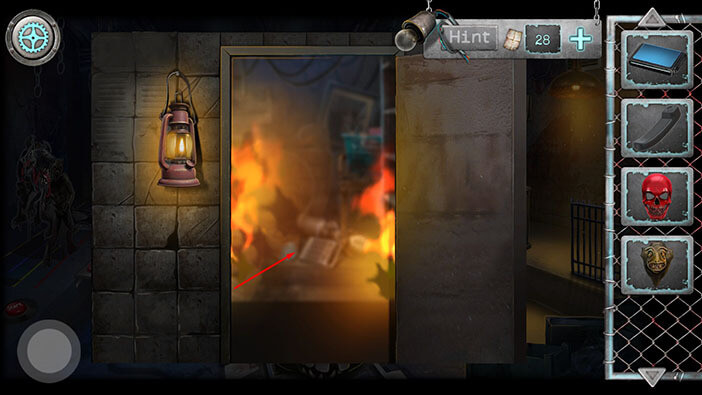
Tap on the green item on the shelf on the left to pick it up. “Screwdriver” will be added to your inventory.
After that, tap two times on the button in the lower left corner to go back.
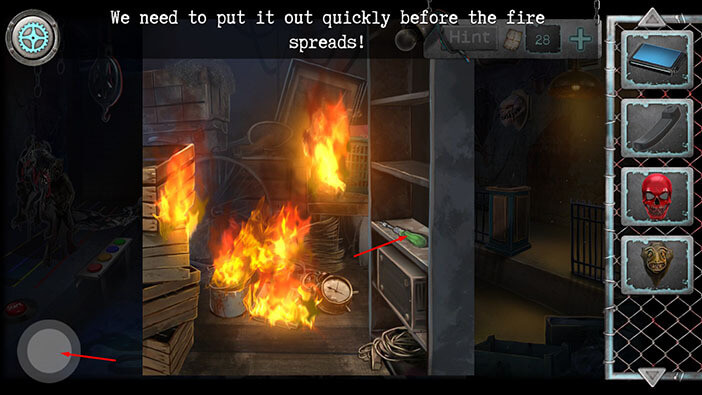
Next, tap on the small pillar on the right to take a closer look at it.
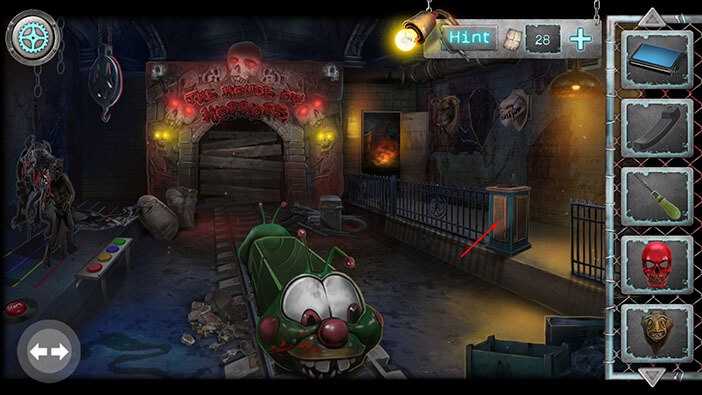
This lever is broken, so select the “Screwdriver” from the inventory and use it to remove the screws and detach the lever. Our character thinks that there might be a spare lever in the backroom, but we will first have to put out the fire.
Once you’re done, tap on the button in the lower left corner to go back.
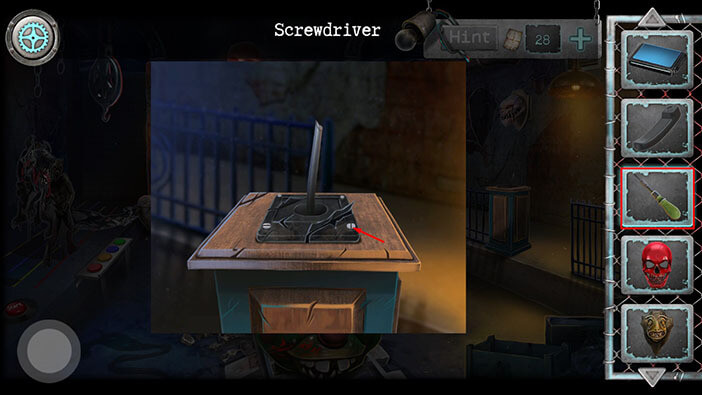
Tap on the head trophies on the wall on the right to take a closer look at them.
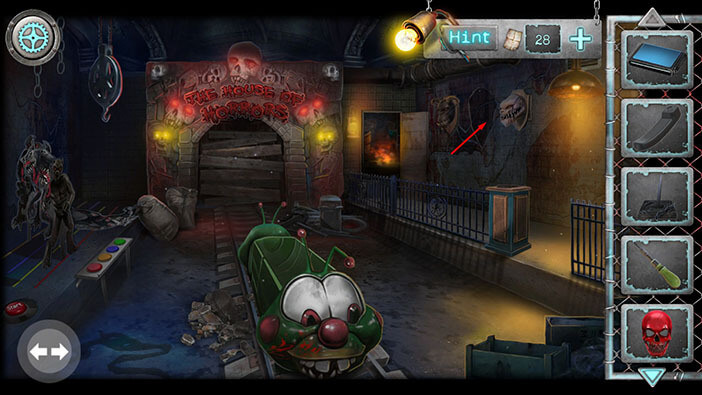
We can see that the trophy in the middle is missing, so select the “Monster head trophy” from the inventory and place it on the empty spot.
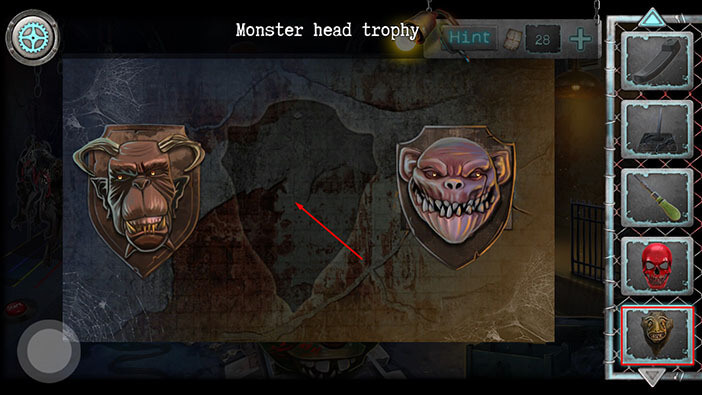
As soon as you place the trophy on the empty spot, some strange, glowing, symbols will appear on the head trophies. Write down/draw these symbols, because we will need them for the next puzzle.
Once you’re done, tap on the mouth of the middle trophy to start the interaction.
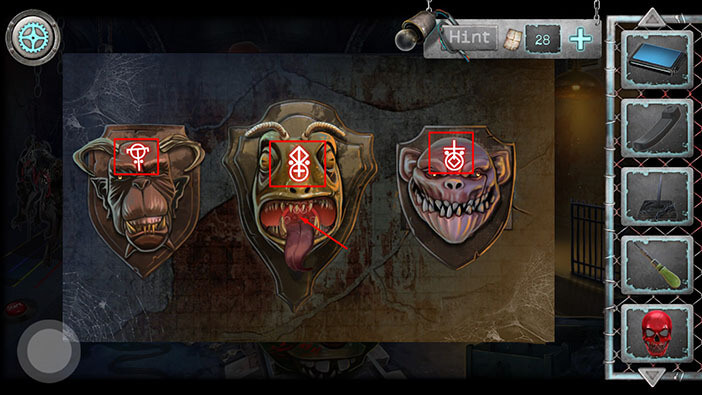
Ok, we can assemble the symbols that we saw on the head trophies by combining the four simple shapes into the complete shape (the slot in the middle of the circle). You can tap on any of the four slots to rotate to the next shape. We will do this puzzle in several steps. Let’s begin.
Step 1
Tap two times on the upper right slot to rotate to the third shape.
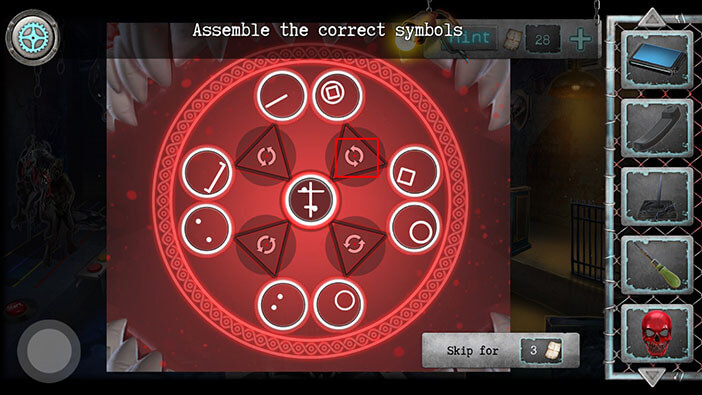
Step 2
Tap two times on the lower right slot to rotate to the third shape.
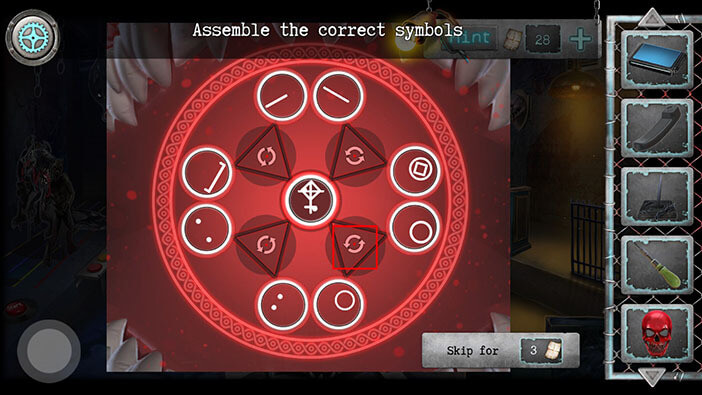
Step 3
Tap two times on the lower left slot to rotate to the third shape. With this step, you will assemble the first symbol.
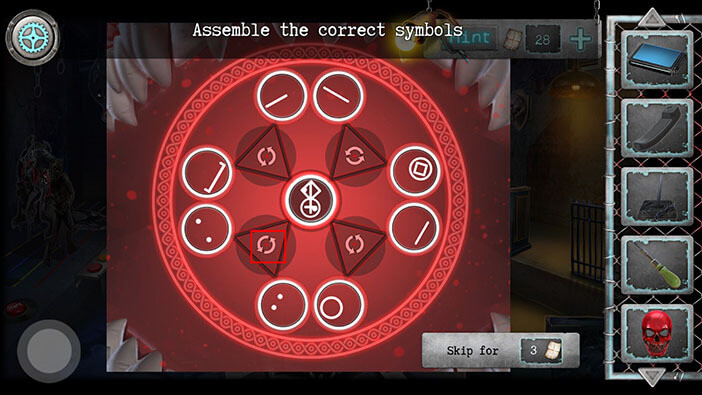
Step 4
Tap once on the upper left slot to rotate to the next shape.
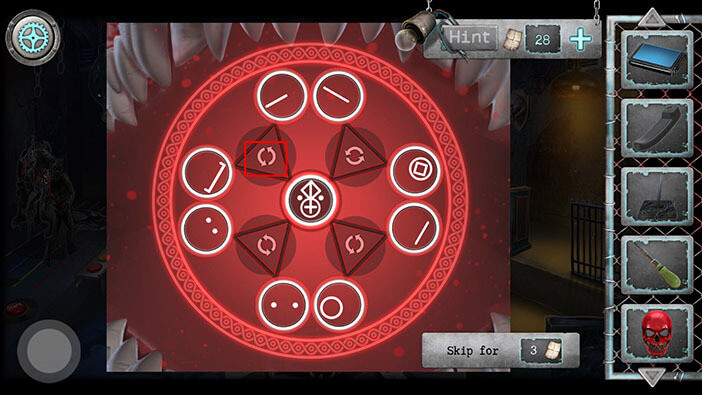
Step 5
Tap twice on the lower right slot to rotate to the third shape.
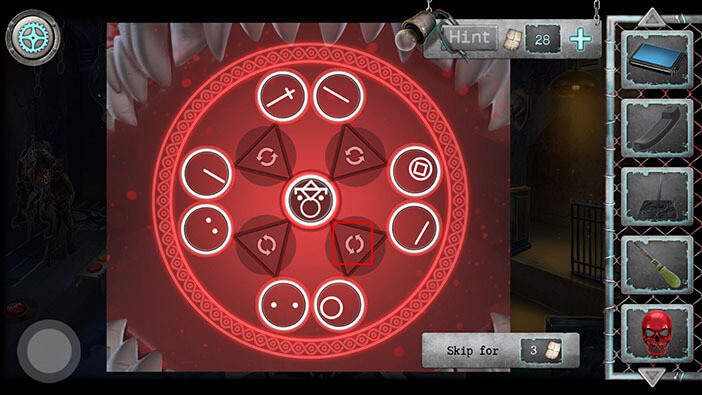
Step 6
Tap twice on the lower left slot to rotate to the third shape.
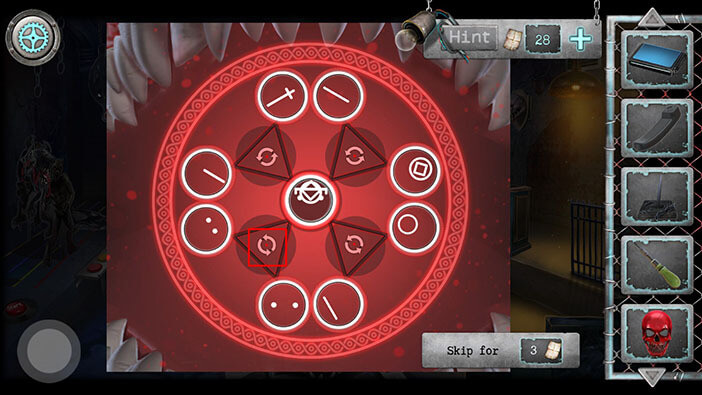
Step 7
Tap twice on the upper left slot to rotate to the third shape.
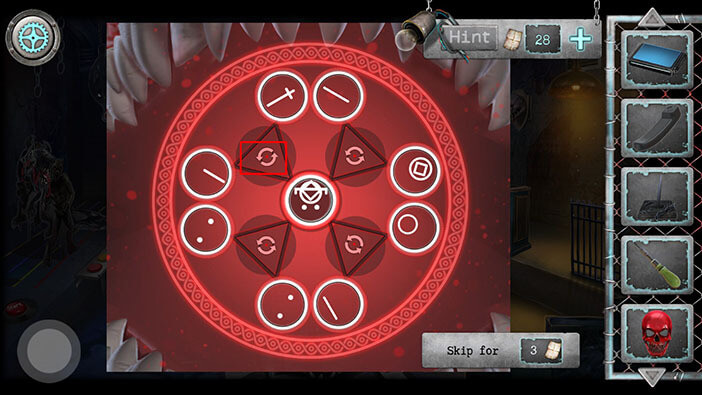
Step 8
Tap once on the upper right slot to rotate to the next shape. With this step, you will assemble the second symbol.
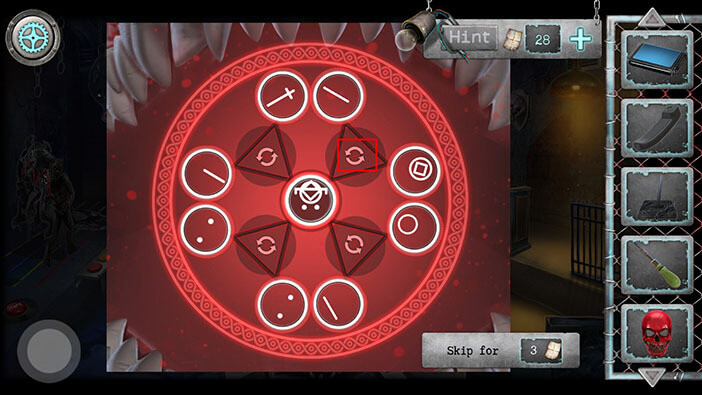
Step 9
Tap once on the lower left slot to rotate to the next shape.
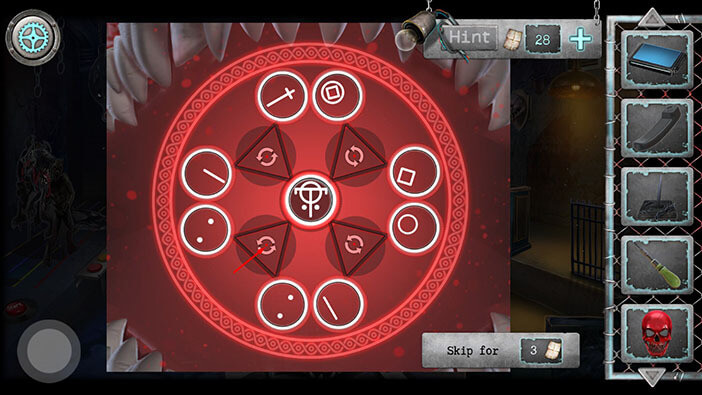
Step 10
Tap once on the upper right slot to rotate to the next shape.
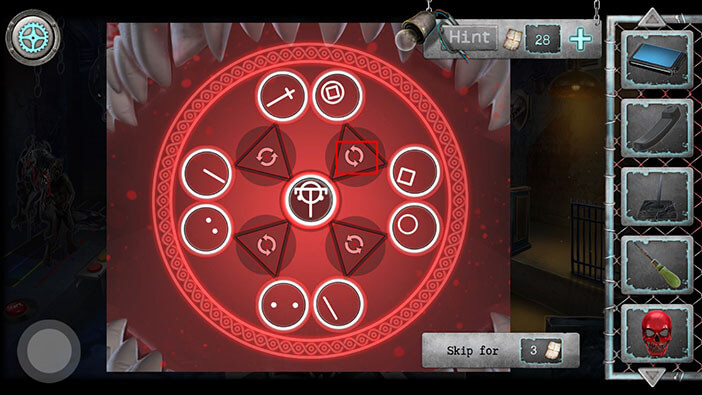
Step 11
Tap once on the upper left slot to rotate to the next shape.
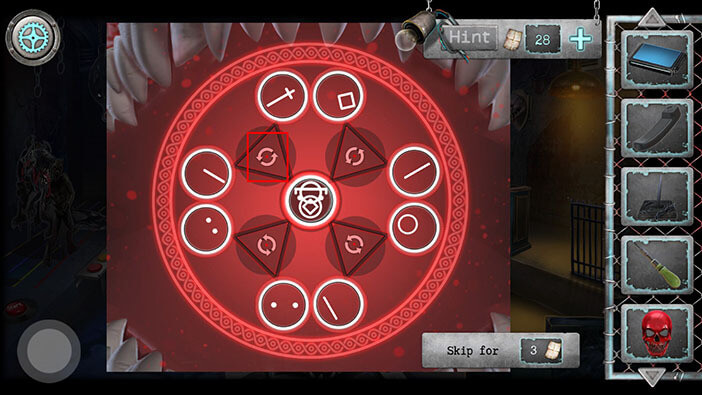
Step 12
Finally, tap two times on the lower right slot to rotate to the third shape. With this step, you will assemble the third symbol, and you will solve the puzzle.
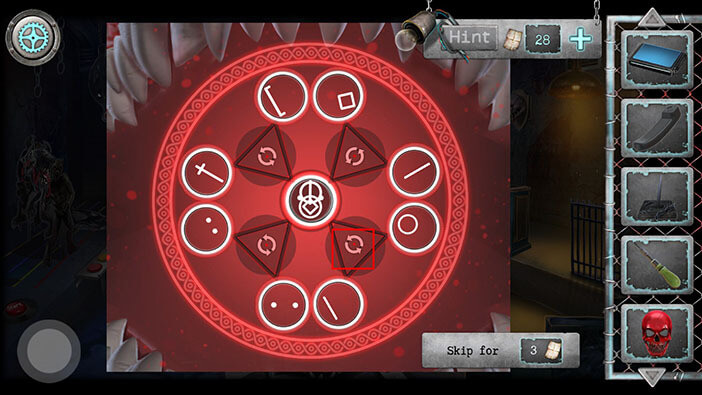
As soon as you solve the puzzle, the “Locker room” key will fall out of the mouth of the trophy in the middle, and our character will pick up the key. Also, the trophy on the right will fall down, revealing some kind of a hidden compartment.
Select the “Piece of metal” from the inventory and use it to break the glass on the hidden compartment.
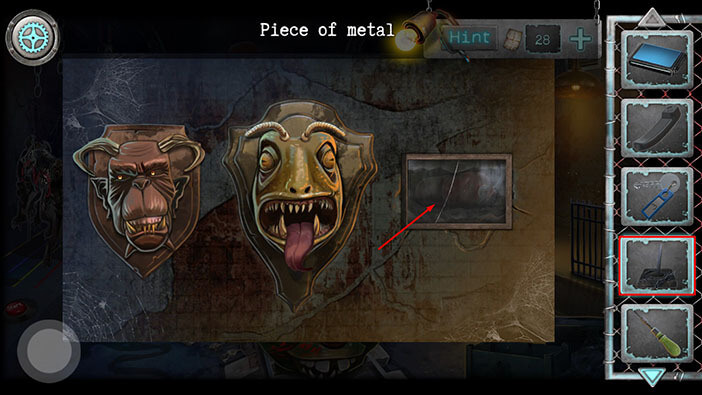
Tap on the item inside the hidden compartment to pick it up and “Fire extinguisher” will be added to your inventory. After that, tap on the button in the lower left corner to go back.
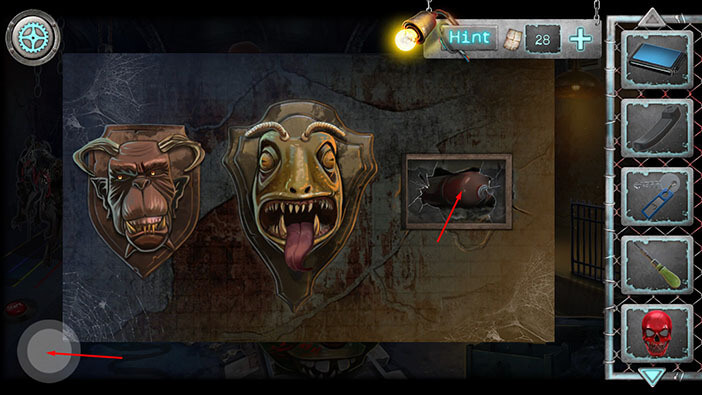
Let’s go into the room on the right and put out the fire.
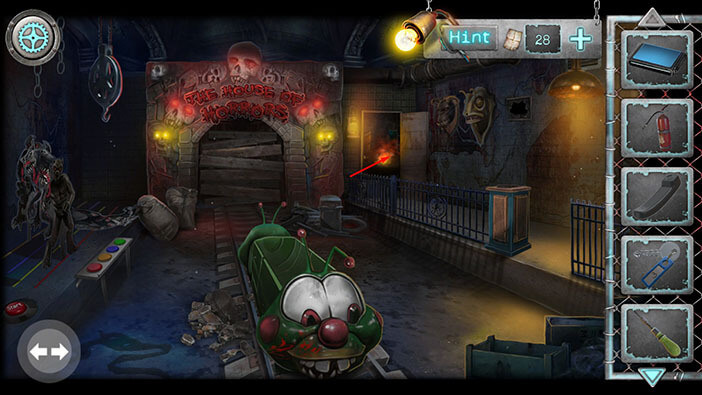
Select the “Fire extinguisher” from the inventory and use it to put out the fire.
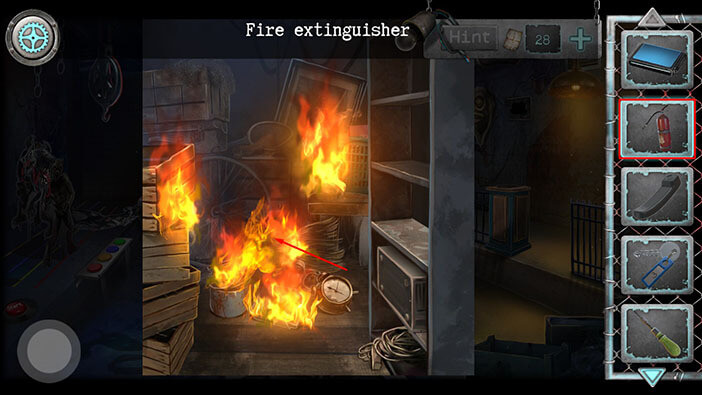
Tap on the items on the floor to move them aside.
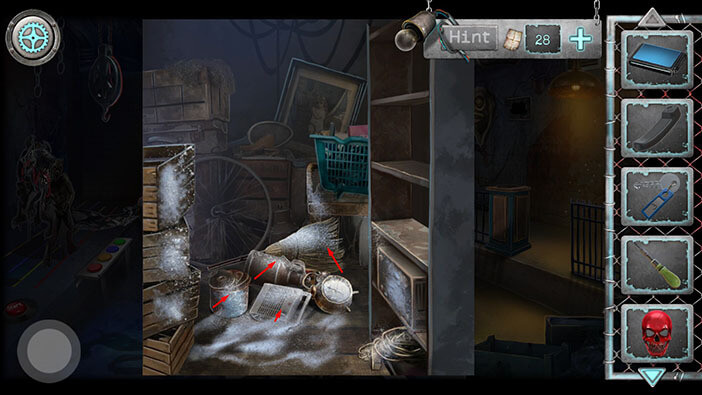
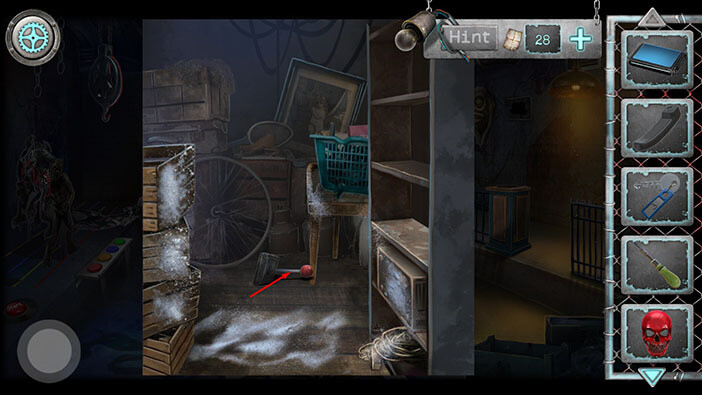
Tap on the item on the ground (that was hidden at the bottom of the pile) to pick it up. “Lever” will be added to your inventory.
After that, tap two times on the button in the lower left corner to go back.
Let’s revisit the small pillar on the right since we just found the spare lever.
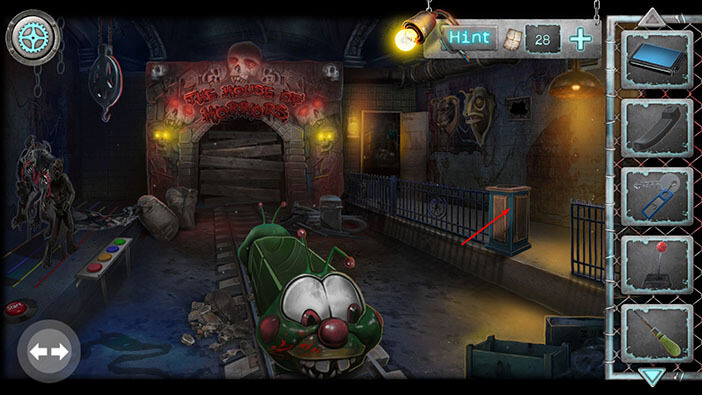
Select the “Lever” from the inventory and insert it into the empty slot. Your character will automatically tighten the screws and firmly attach the lever.
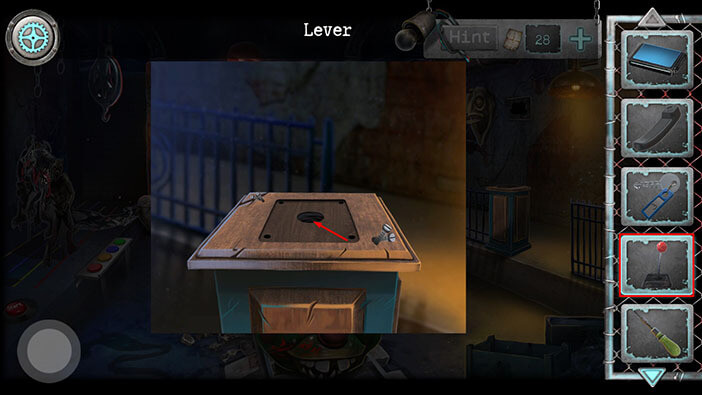
Tap on the lever to activate the train, and it will smash through the barricade.
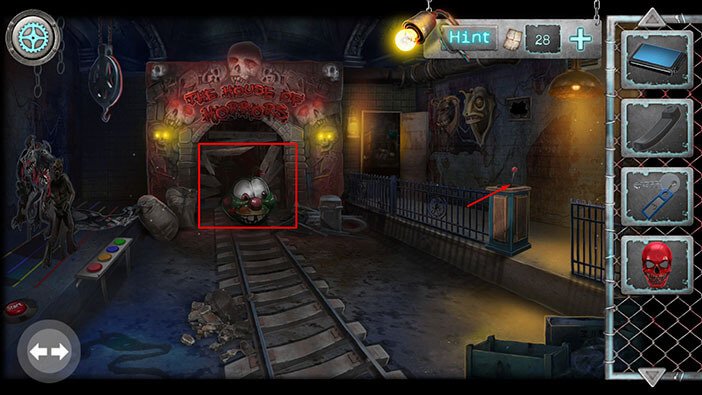
Next, tap on the “Lantern”, located next to the door on the right, to pick it up.
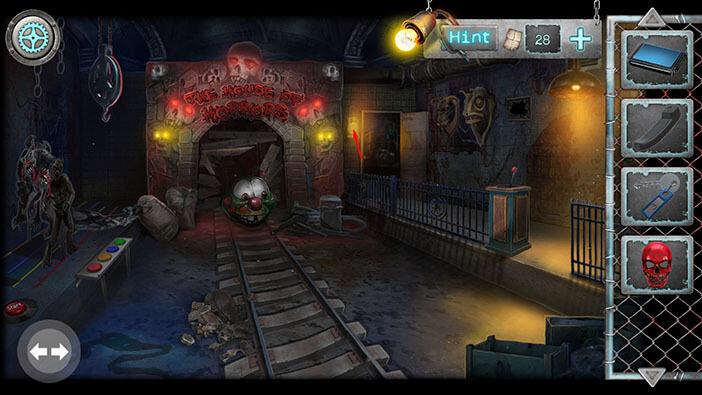
Ok, we cleared the way, so let’s proceed into the tunnel.
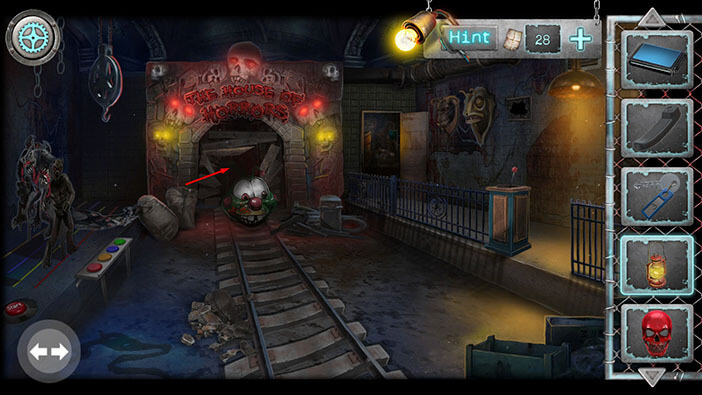
Swipe left and right to illuminate the monsters while you’re driving on the train.
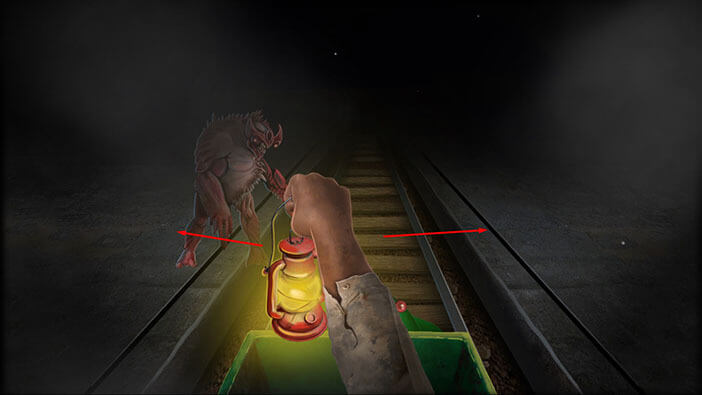
As soon as you get out of the tunnel, you will see one of the kidnappers waiting for you in front of the door that leads out of the building.
Ok, let’s explore this room. First, tap on the note on the ground to pick it up. “Crumpled scheme” will be added to your inventory.
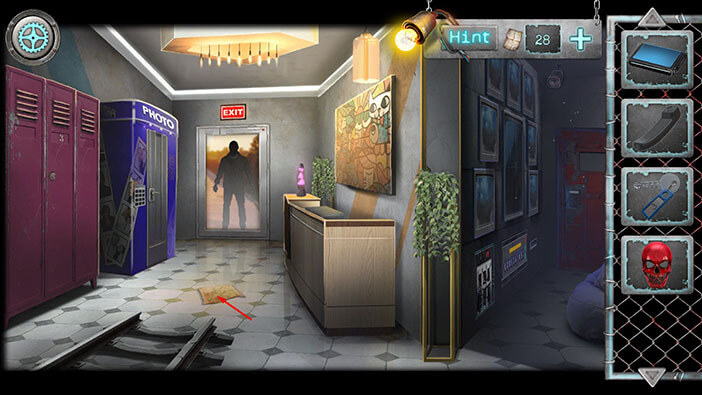
Next, tap on the purple lockers on the left to take a closer look at them.
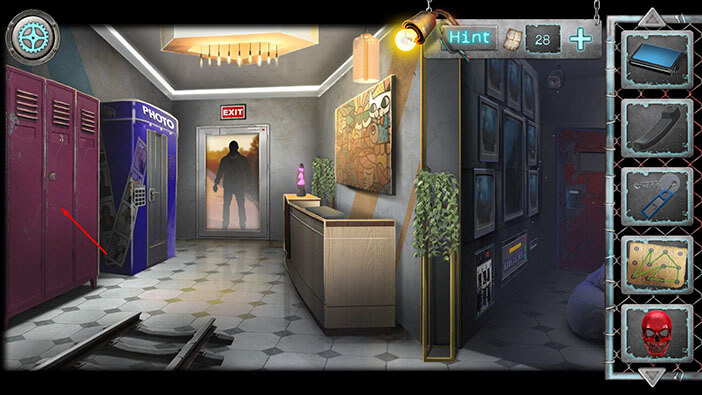
If you look at your inventory, you will see a key with the label “3”, and you will also see the same number on one of the lockers. So, select the “Locker room key” from the inventory and use it to unlock locker number 3.
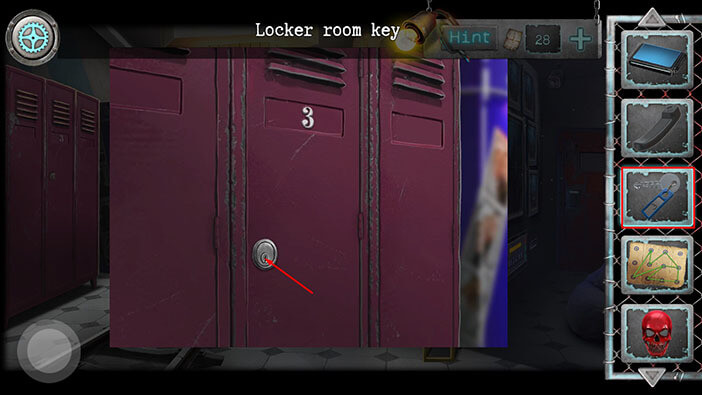
Tap on the note on the locker door to pick it up and “Sheet with a code” will be added to your inventory.
After that, tap on the button in the lower left corner to go back.
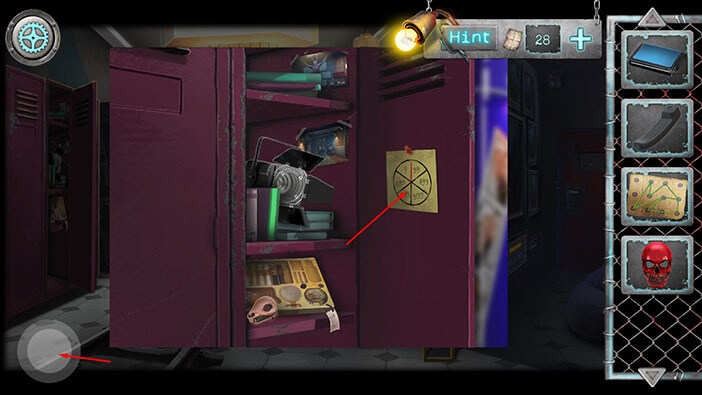
Next, tap on the reception desk on the right to take a closer look at it.
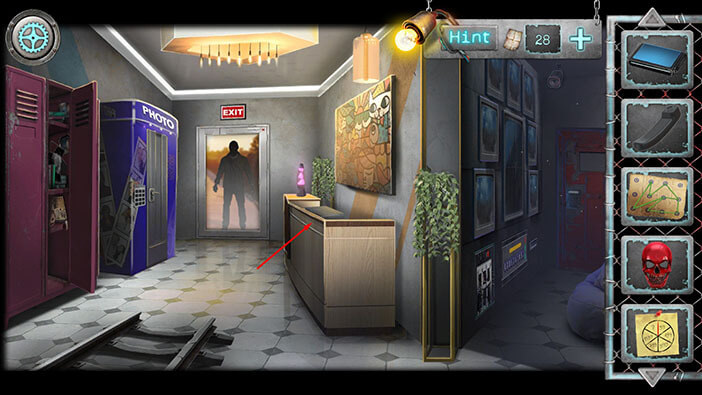
Tap on the locked case on the right to take start the interaction.
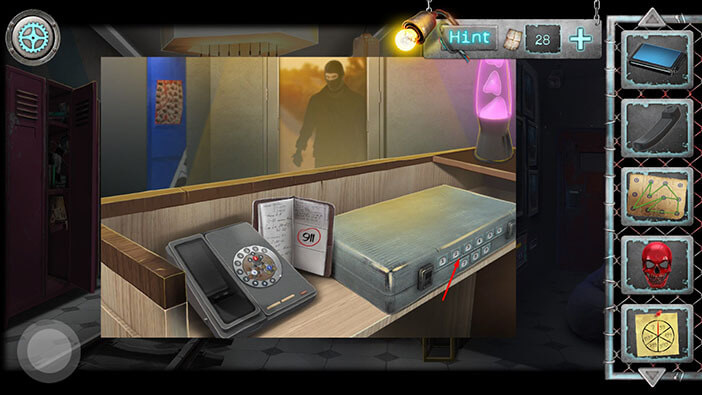
Our character will automatically attach the sheet with the code in the top left corner of the suitcase. Ok, in order to crack the code for the suitcase lock, we have to find a pattern on the note on the left. So, let’s take a look at the numbers on the note.
Here we have 99, 199, 399, 799, 1599, and a blank space.
The first number is 99 and the second number is 199. 199 – 99 = 100. So, the second number increased by 100.
The third number is 399. 399 – 199 (second number) = 200. So, the third number increased by 200. Or in other words, twice as much compared to the previous number (100 x 2).
The fourth number is 799 and here we have a +400 increase (200 x 2).
The fifth number is 1599 and here we have a +800 increase (400 x2).
The sixth number should be 1599 + 1600 (800 x 2) = 3199.
The number that we’re looking for is 3199, so enter the code “3199”.
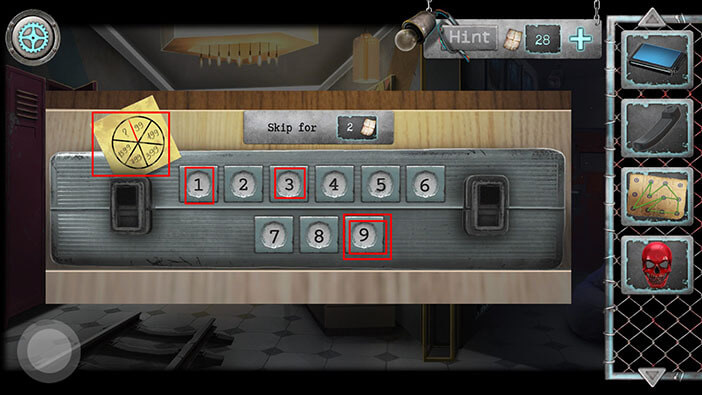
As soon as you enter the correct code, the suitcase will open. Tap on the item in the suitcase to pick it up and “Remote control” will be added to your inventory.
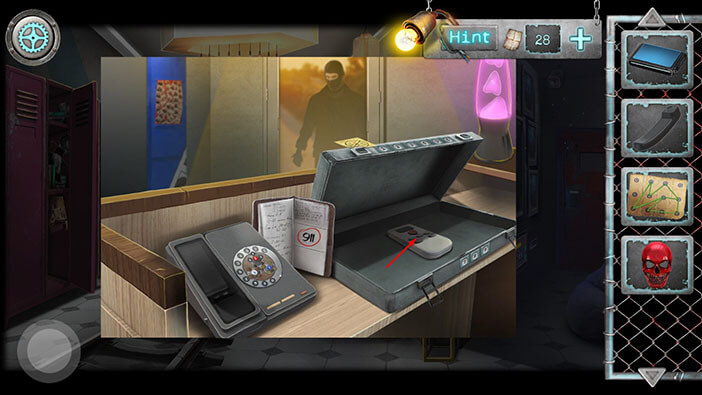
Next, select the “Radiotelephone handset” from the inventory and put it in the empty slot on the left.
After that, tap on the telephone to start the interaction.
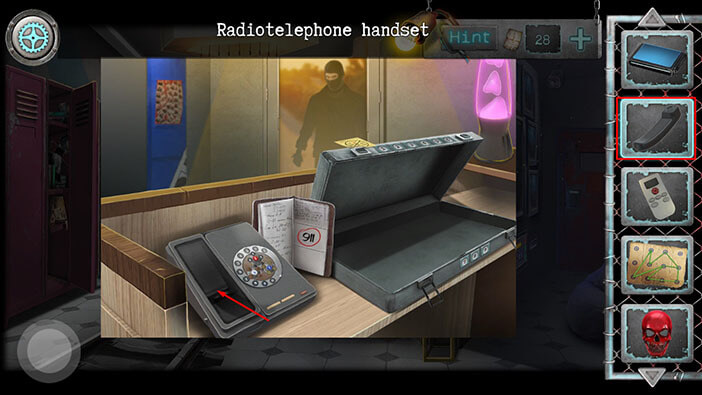
Well, it seems that we will have to solve the puzzle in order to use the phone. The goal is to rearrange the number and place them around the matching main number. So, all smaller number 9s should be around the large number 9, etc. We can do this by rotating the smaller number around the three main numbers. We will do this puzzle in several steps. Let’s begin.
Step 1
Tap once on the blue number 1 to rotate the smaller numbers.
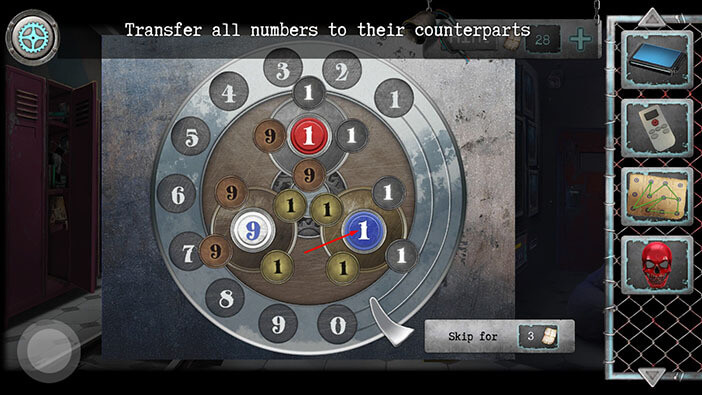
Step 2
Tap once on the large number 9 to rotate the smaller numbers.
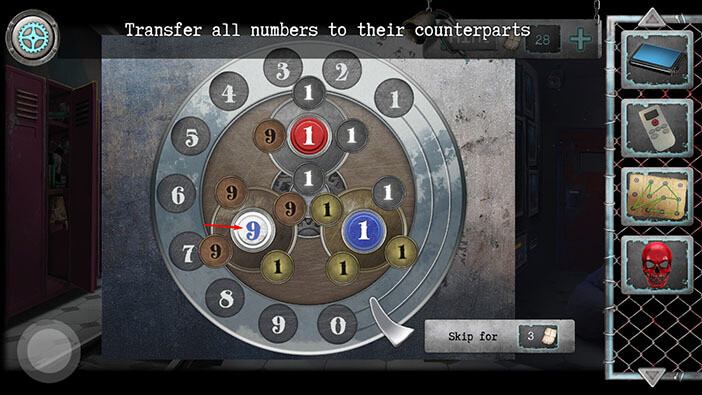
Step 3
Tap once on the blue number 1 to rotate the smaller numbers.
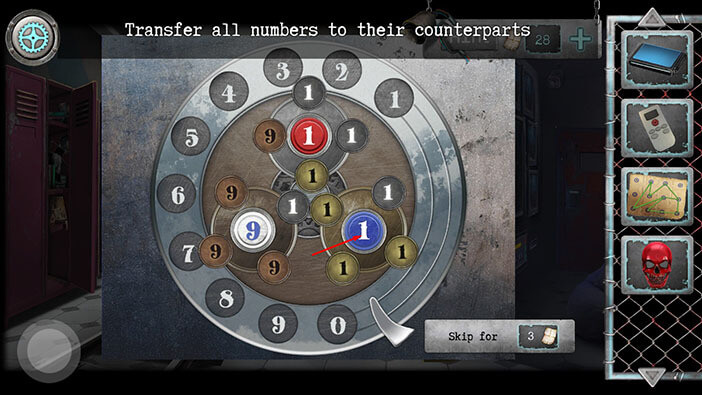
Step 4
Tap once on the red number 1 to rotate the smaller numbers. With this last step, you will solve the puzzle.
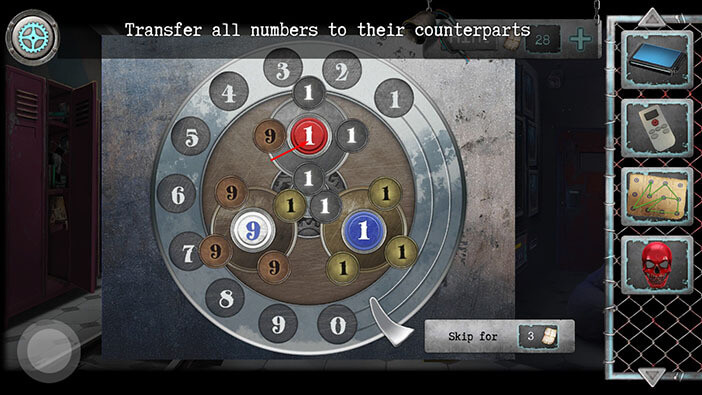
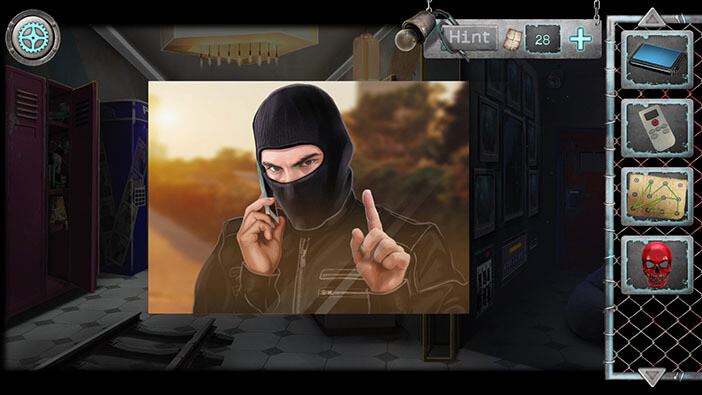
Tap on the phone again and our character will call 911. However, the kidnapper rerouted the call to his cellphone and showed him a no-no gesture, by wiggling his index finger. Frustrated because this attempt failed, our character smashed the telephone with his fist.
Tap on the “Wires” on the broken telephone to pick them up. After that, tap on the button in the lower left corner to go back.
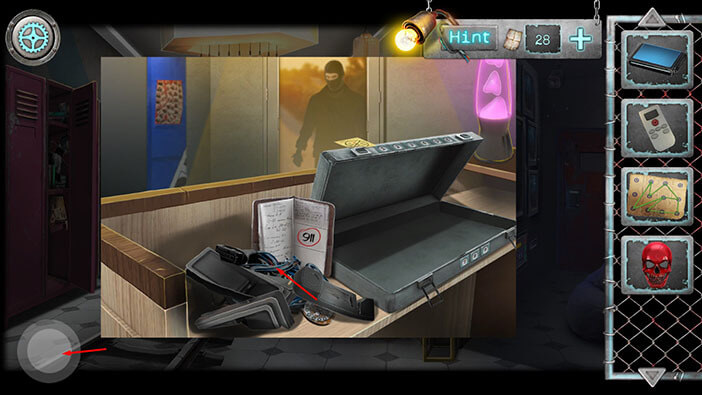
Ok, let’s tap on the monitors on the right to take a closer look at them.
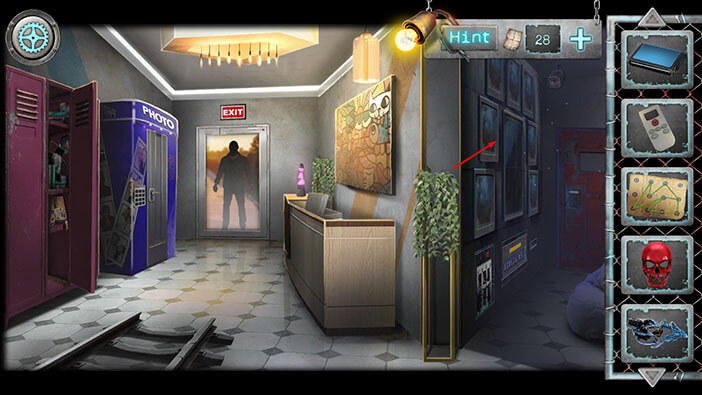
If you pay attention to the lower left corner, you will see smoke and some exposed wires. It seems that there was a shortcut here, so let’s try to fix that.
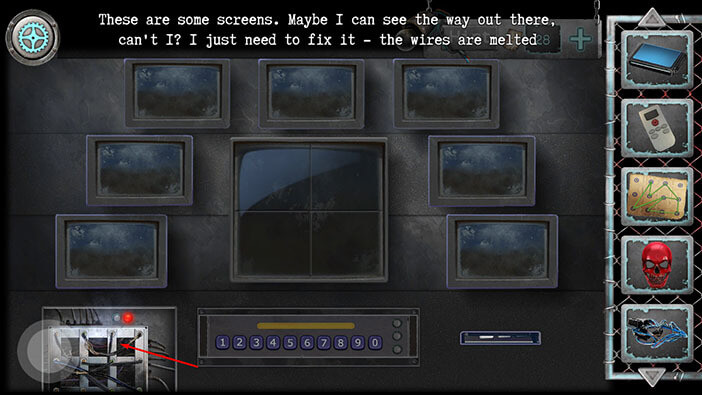
Ok, our character will automatically attach the scheme in the top right corner. The goal of this puzzle is to replace the damaged wires with new ones, and the connection between the wires should match the scheme in the top right corner.
But, we are getting ahead of ourselves. First, tap on the damaged wires to remove them.
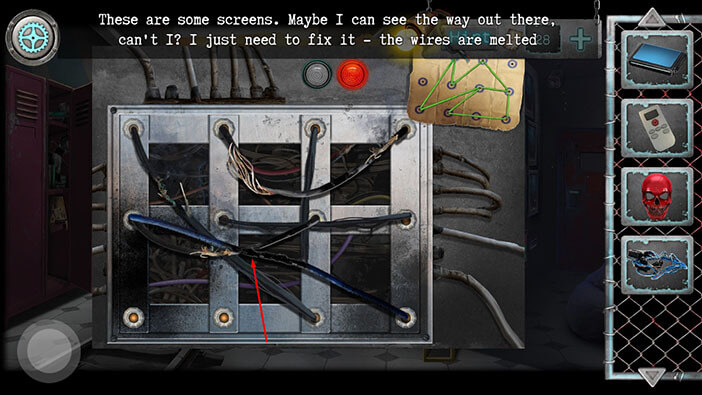
Next, select the “Wires” from the inventory and use them to replace the damaged wires.
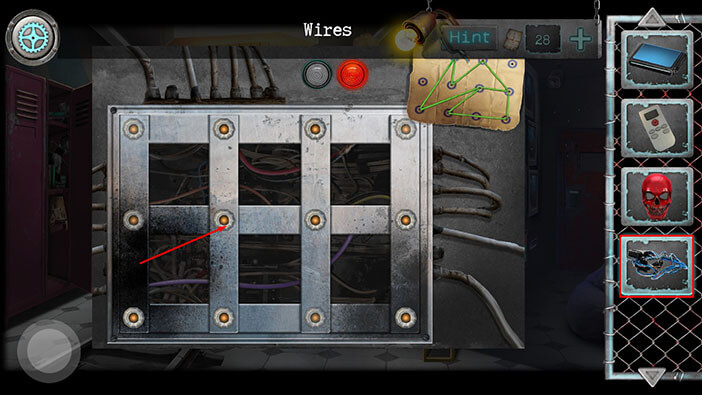
Ok, now we have to reattach the wires to match the scheme in the top right. We will do this puzzle in several steps. Let’s begin.
Step 1
Select the wires in the fourth slot (left to right), second row (top to bottom), and drag them to the fourth slot in the first row.
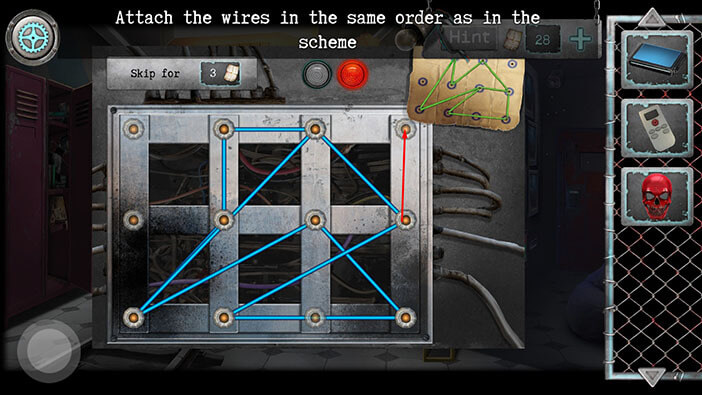
Step 2
Select the wires in the third slot, first row, and drag them to the fourth slot in the second row. You will see the green light on the fourth slot in the second row, indicating that these wires are in the correct position.
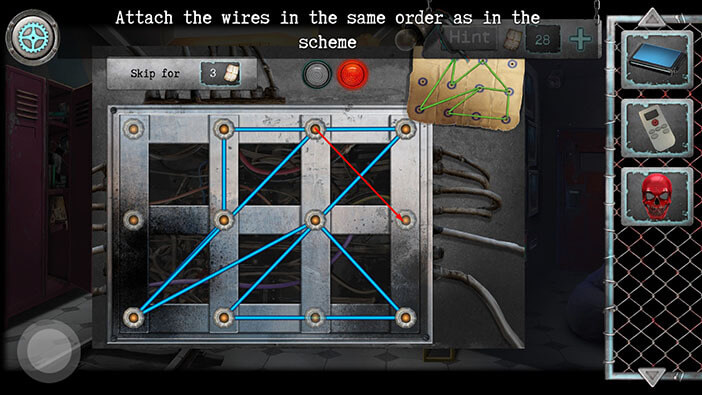
Step 3
Select the wires in the third slot, second row, and drag them to the third slot in the first row.
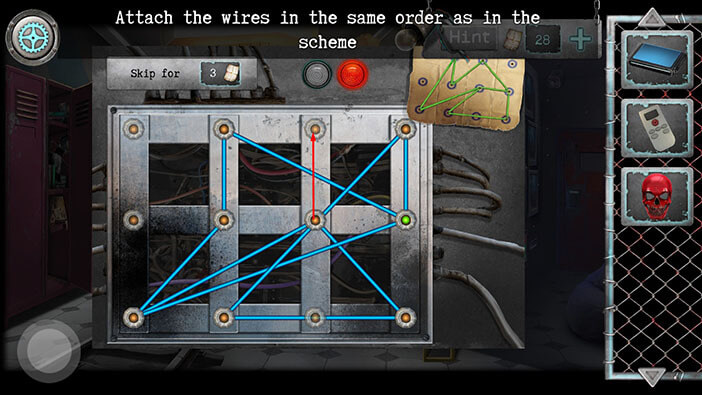
Step 4
Select the wires in the second slot, second row, and drag them to the first slot in the first row.
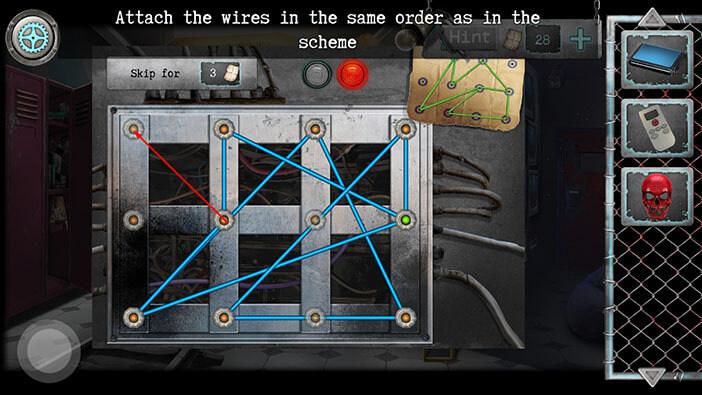
Step 5
Select the wires in the first slot, third row, and drag them to the third slot in the second row.
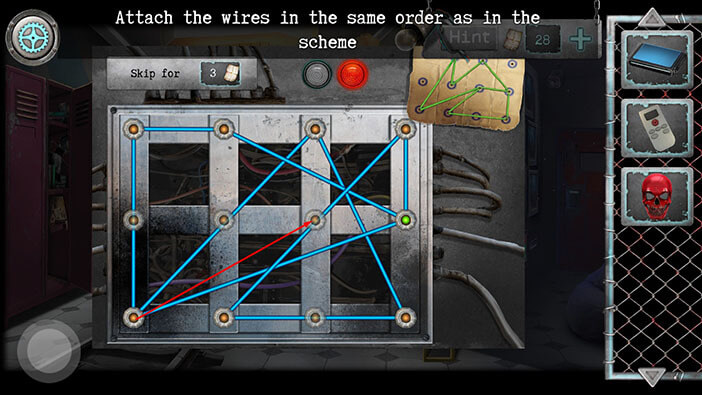
Step 6
Select the wires in the third slot, third row, and drag them to the first slot in the third row.
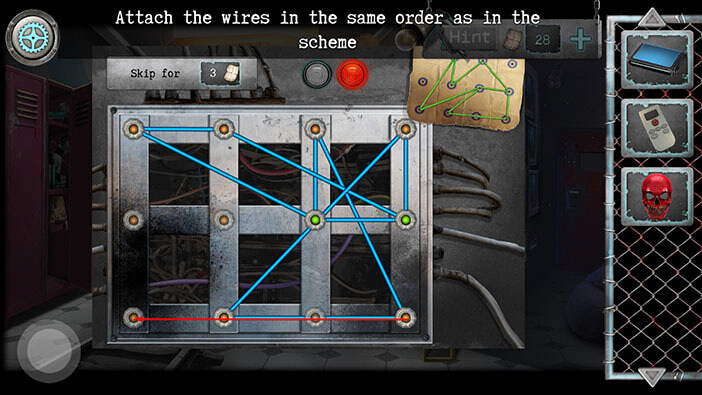
Step 7
Select the wires in the third slot, first row, and drag them to the third slot in the third row.
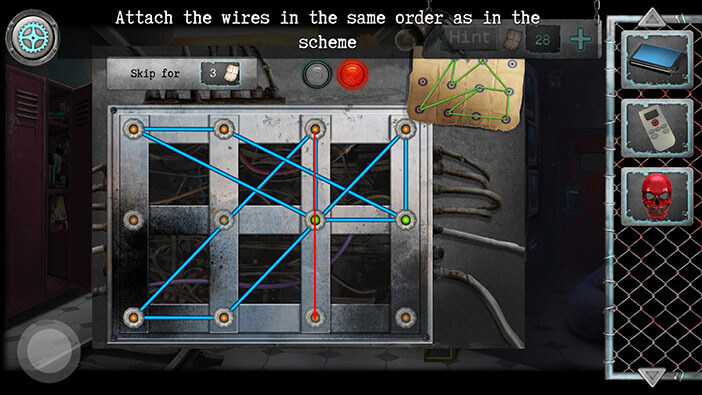
Step 8
Select the wires in the fourth slot, first row, and drag them to the fourth slot in the third row.
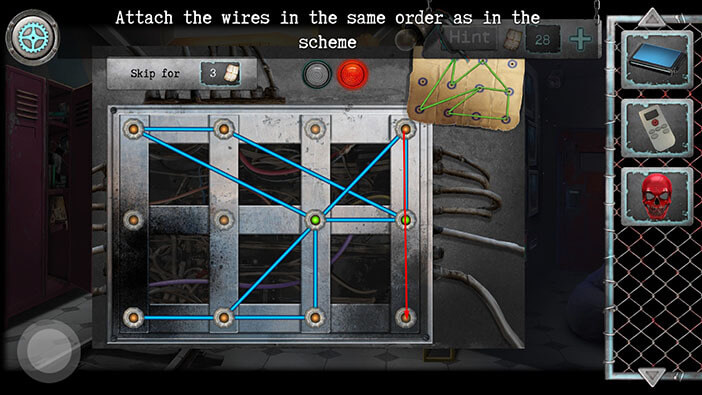
Step 9
Select the wires in the third slot, third row, and drag them to the second slot in the second row.
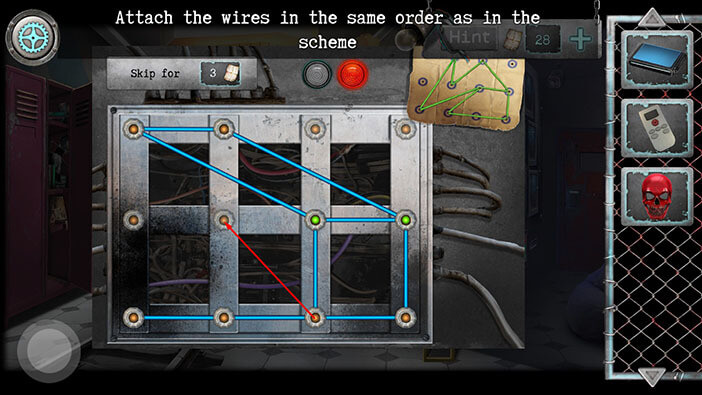
Step 10
Select the wires in the second slot, first row, and drag them to the fourth slot in the first row.
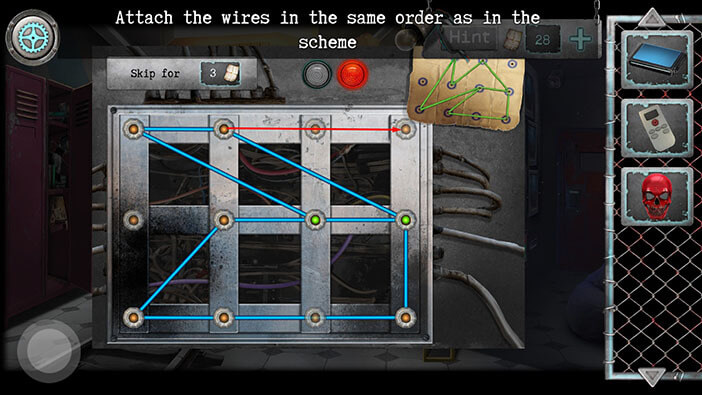
Step 11
Select the wires in the first slot, first row, and drag them to the third slot in the first row.
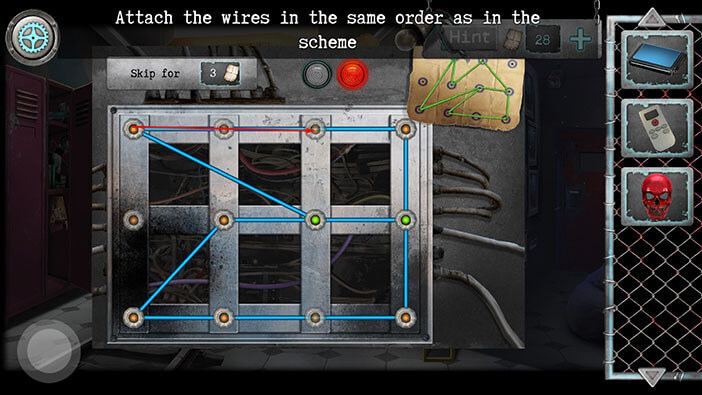
Step 12
Select the wires in the fourth slot, third row, and drag them to the second slot in the first row.
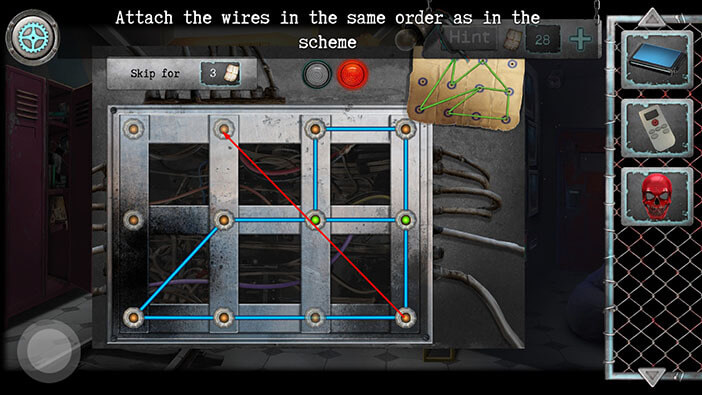
Step 13
Select the wires in the fourth slot, first row, and drag them to the fourth slot in the third row.
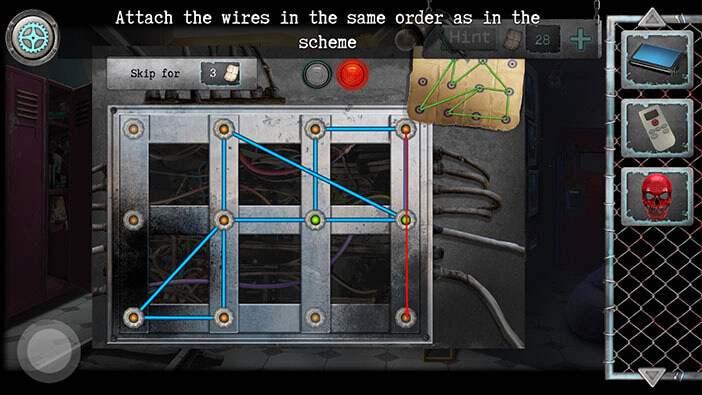
Step 14
Select the wires in the third slot, first row, and drag them to the third slot in the third row.
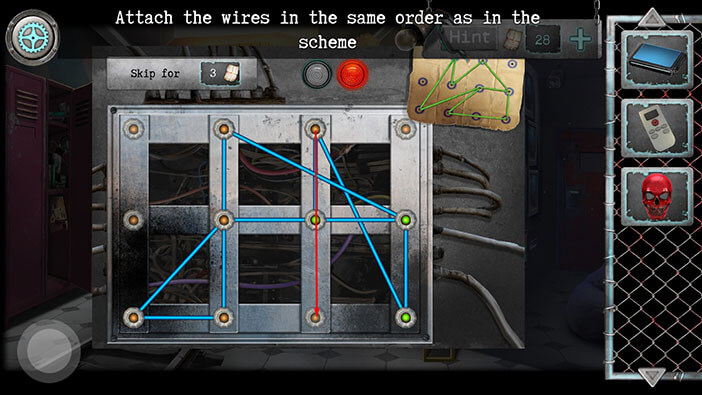
Step 15
Select the wires in the second slot, third row, and drag them to the first slot in the first row.
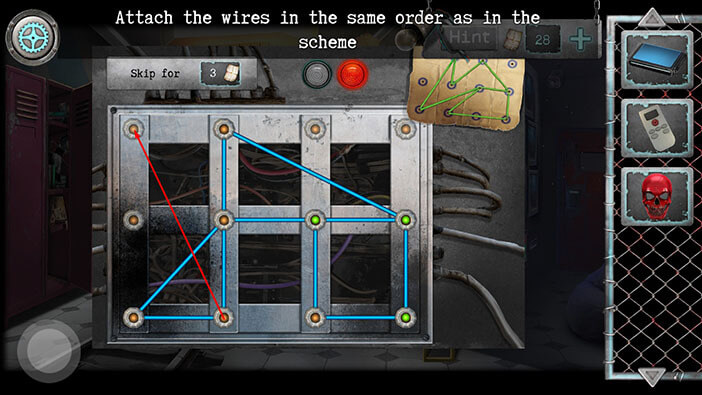
Step 16
Select the wires in the second slot, first row, and drag them to the third slot in the first row.
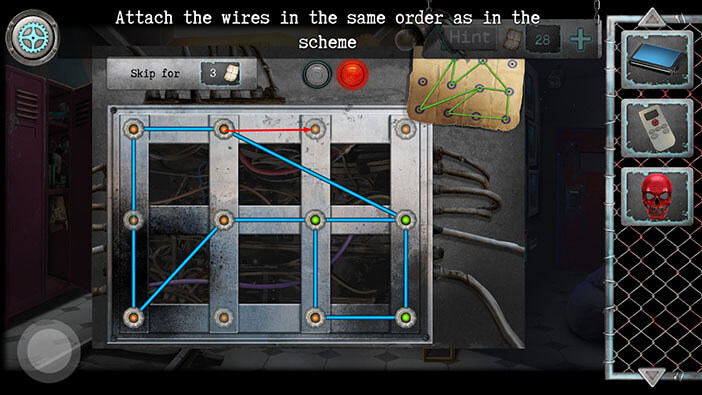
Step 17
Select the wires in the first slot, first row, and drag them to the second slot in the first row.
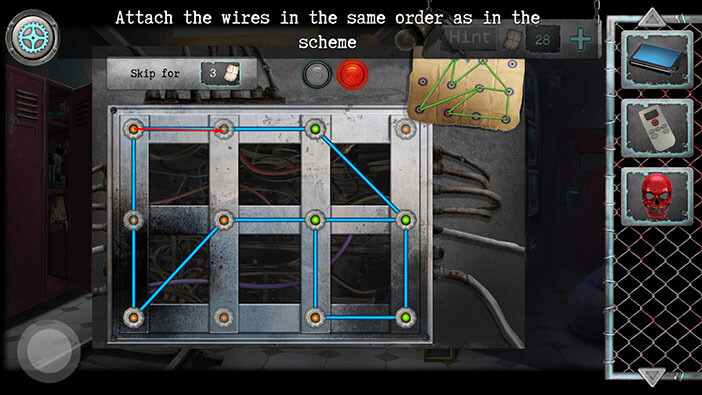
Step 18
Select the wires in the third slot, third row, and drag them to the second slot in the third row.
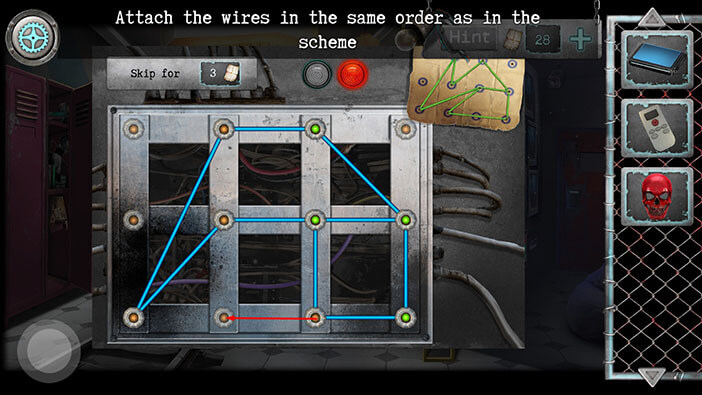
Step 19
Select the wires in the first slot, third row, and drag them to the first slot in the second row.
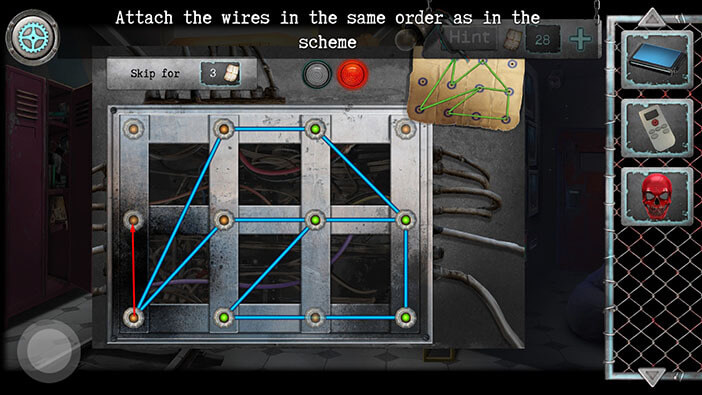
Step 20
Select the wires in the second slot, second row, and drag them to the first slot in the third row.
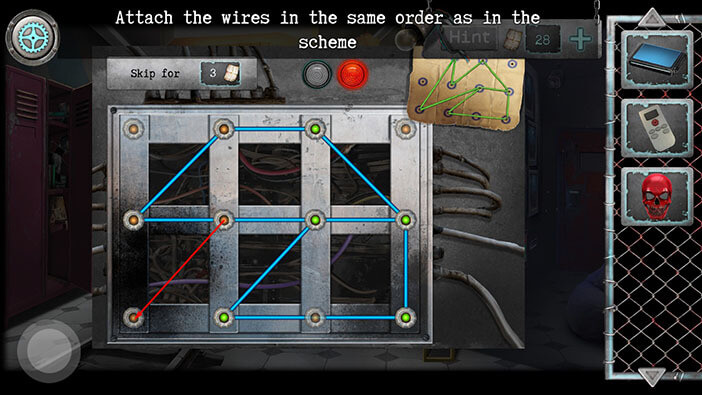
Step 21
Select the wires in the second slot, first row, and drag them to the second slot in the second row.
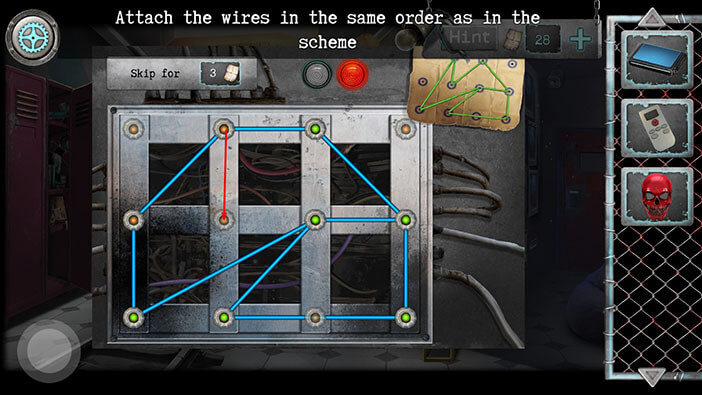
Step 22
Finally, select the wires in the first slot, second row, and drag them to the second slot in the first row. With this last step, you will solve the puzzle. Tap anywhere on the screen to confirm.
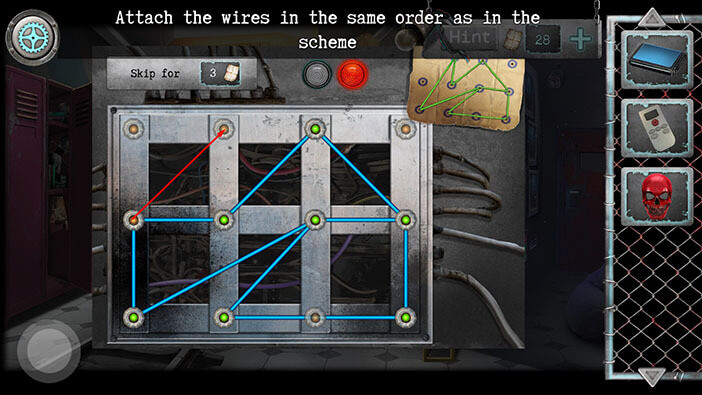
Next, select the “Remote control” from the inventory and use it to turn on the monitors.
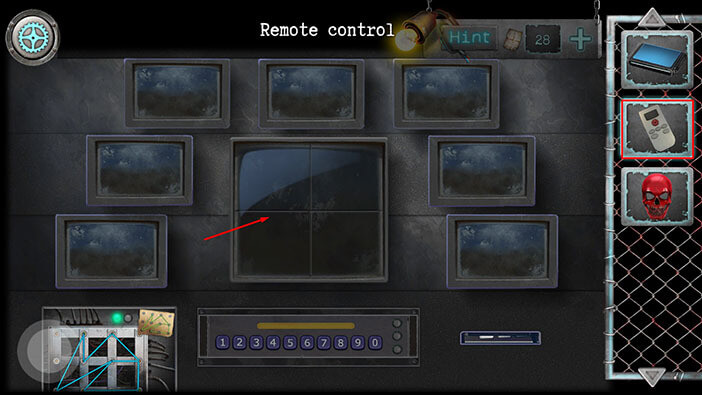
After a short countdown, the numbers will randomly appear on the screens, and our task is to memorize/write down these numbers.
NOTE: It seems that the numbers are randomized (will be different during each playthrough) so the numbers in your game probably won’t match the numbers in this guide. However, you can easily solve this puzzle if you just write down the numbers in your game, as they appear on the TV screens.
The first batch of numbers in my game was “84527”. So, the next step would be to enter these numbers.
The second batch of numbers in my game was “27635”.
The third batch of numbers in my game was “32154”.
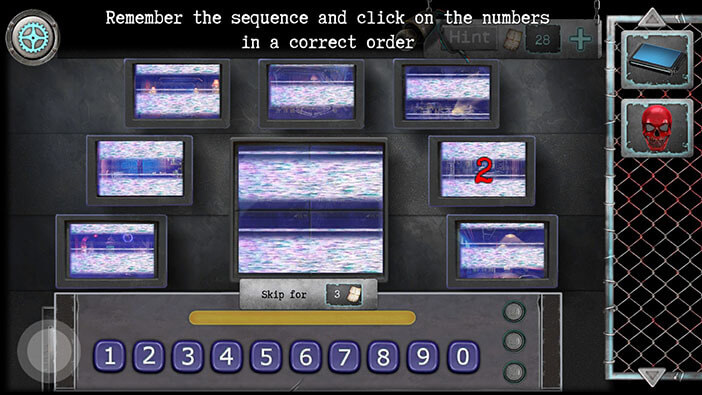
As soon as you enter the correct numbers, you will gain access to the surveillance cameras, and an item will come out of the slot on the right.
NOTE: The second ending of the story will be presented later in the guide, and the second ending will start at this point. In other words, the branching of the story begins at this point.
Tap on the item on the right to pick it up and “Keyboard” will be added to your inventory.
After that, tap on the button in the lower left corner to go back.
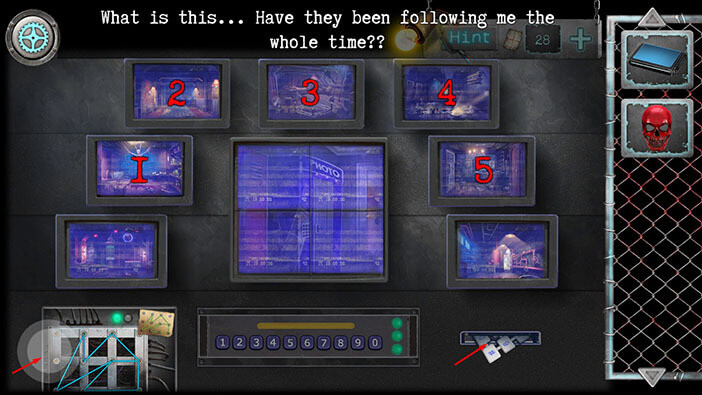
Tap on the purple machine on the left to take a closer look at it.
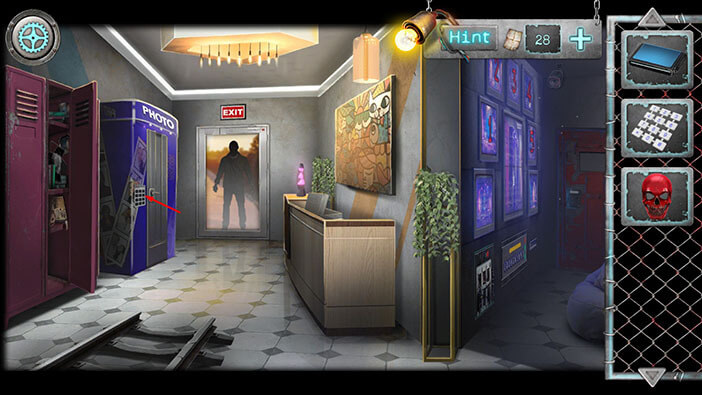
Select the “Keyboard” from the inventory and insert it into the empty slot.
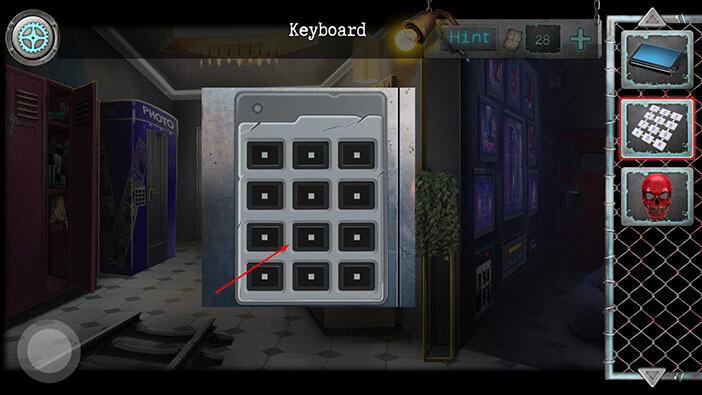
Enter the code “12345” to unlock the door. After that, tap on the button in the lower left corner to go back.
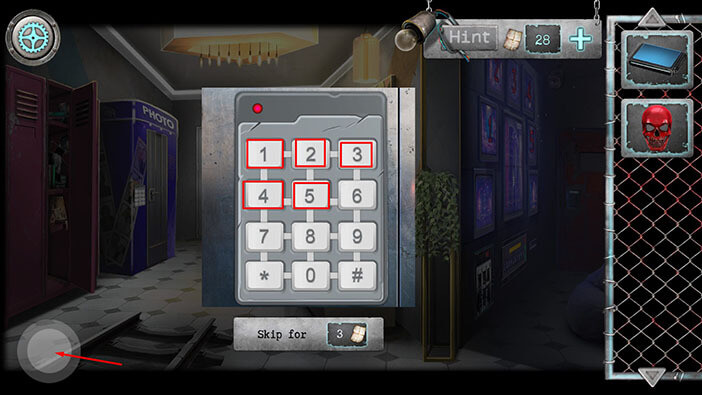
Tap on the door to look inside.
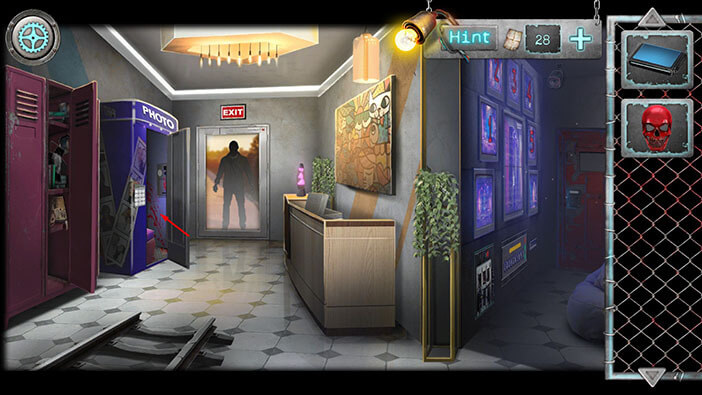
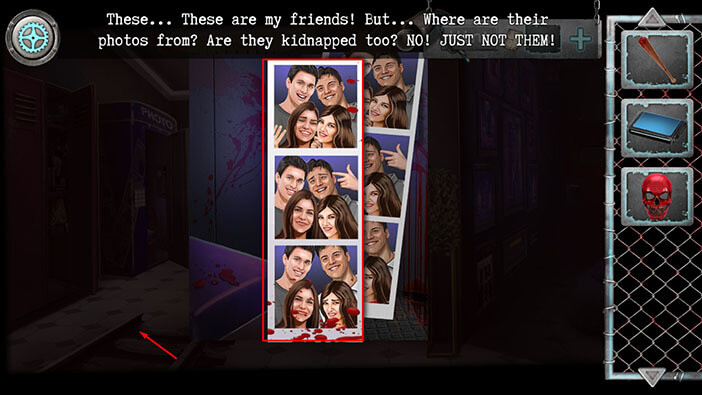
Tap on the “Baseball bat” to pick it up. Our character will automatically pick up the photos on the floor to examine them, and he will realize that these are the photos of his friends. He’s terrified because he thinks that his friends might be kidnapped.
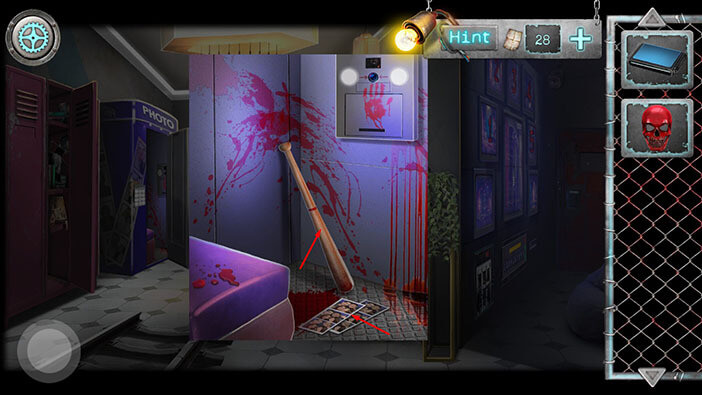
Tap anywhere to put down the photos, then tap on the button in the lower left corner to go back.
Select the “Baseball bat” from the inventory and throw it at the door. The baseball bat will break the glass, and it will also injure the kidnapper that is waiting on the other side of the door.
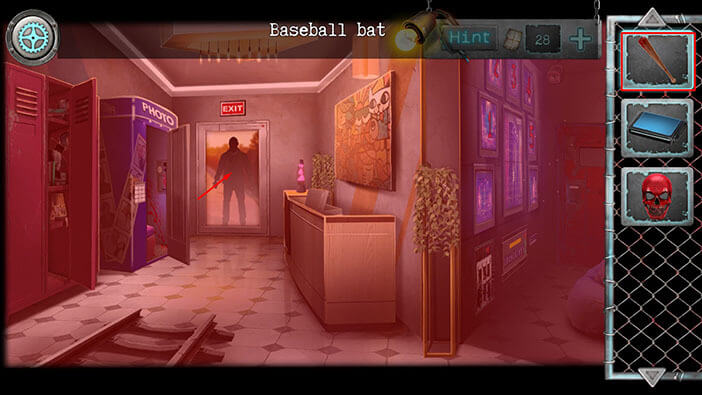
Our character will immediately charge forward through the door, and he will punch and knock down the kidnapper.
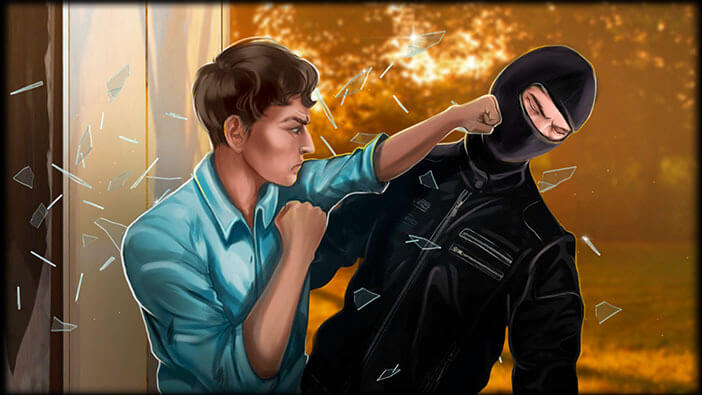
Our character was preparing to give his kidnapper a proper beating, but then he heard the voice of his friends, wishing him a happy birthday. Confused, he looked up and saw his friends smiling. They were waiting for him with the cake and a happy birthday sign. So, the kidnapping and everything was just one very elaborate joke.

Our character was still confused about the entire situation, because he felt that his life was in danger while he was going through this “escape room” quest. However, his friends explained that the entire event was organized by a team of professionals in this field. With that said, the people that organized this adventure introduced themselves to our character and offered their business cards. So, this entire adventure was just one very well-thought-out prank.
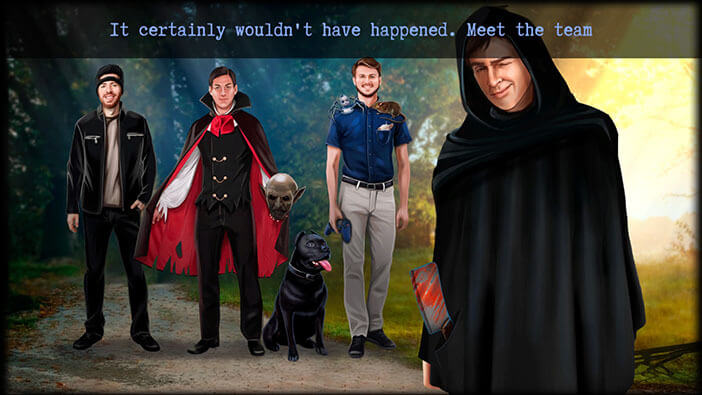
Well, after the dust settled and our character calmed down a bit, he, his friends, and the people that organized this prank took a group photo. In the end, our character was very grateful to his friends, because escaping from the “Scary horror” was the most exciting experience he ever had.

Well, we completed the game, but this is just the first ending. In order to complete the second ending, we will have to gather all six gold coins and discover the secret room. We already covered in this walkthrough both the location of the gold coins and how to obtain them, and the puzzles in the secret room. Below, we also covered the second ending of the story, and the branching of the story begins when you activate the security cameras (as we already mentioned). Unfortunately, you will have to play the entire game from the beginning in order to see the other ending…
TIP: You can use your accumulated HINTS to skip through some of the puzzles during your second playthrough.
SECOND (SECRET) ENDING
Ok, as mentioned previously, the second ending starts when you activate the cameras, and pick up the keyboard.
Select the “Cartridge” from the inventory and insert it into the slot in the lower right corner.
NOTE: We found both the “Cartridge” and the “Mask” in the secret room, and to access the secret room you must find all 6 gold coins. So, these items are required in order to unlock the second ending.
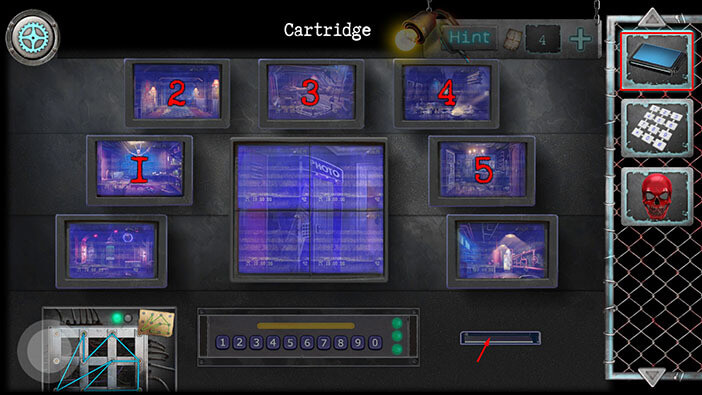
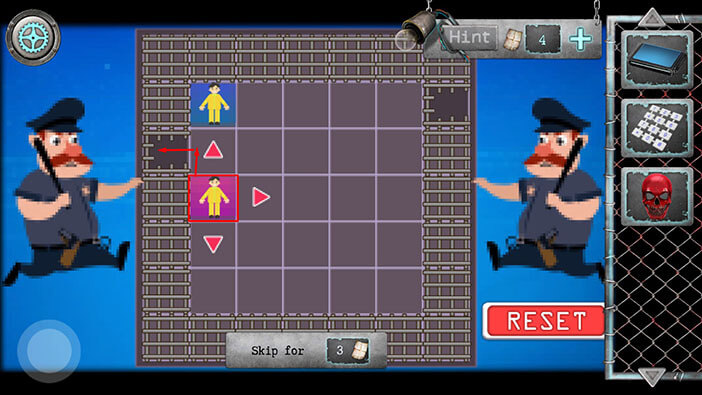
Here, we have another puzzle to solve. Our task is to lead the people into the halls in the mesh. We will solve this puzzle in several steps. Let’s begin.
Step 1
Tap on the first man (left to right) to select him, and then on the “Up” arrow.
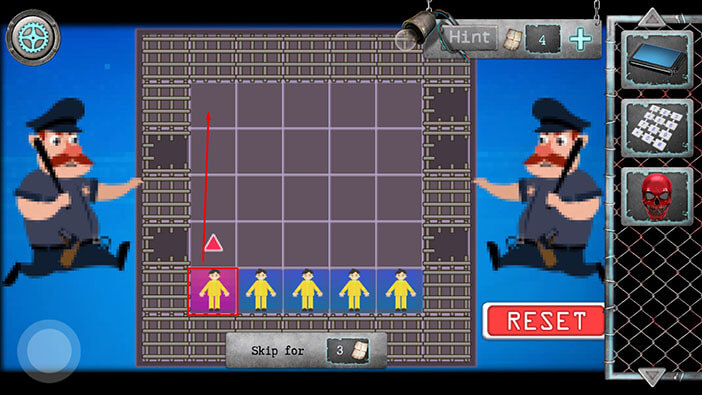
Step 2
Tap on the second man to select him, then tap on the “Left” arrow. After that, tap on the “Up” arrow to lead him below the previous man.
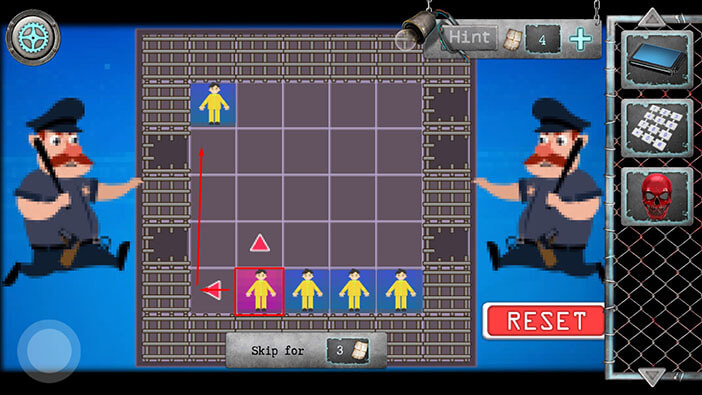
Step 3
Tap on the third man to select him, then tap on the “Left” arrow. After that, tap on the “Up” arrow to lead him below the previous man.
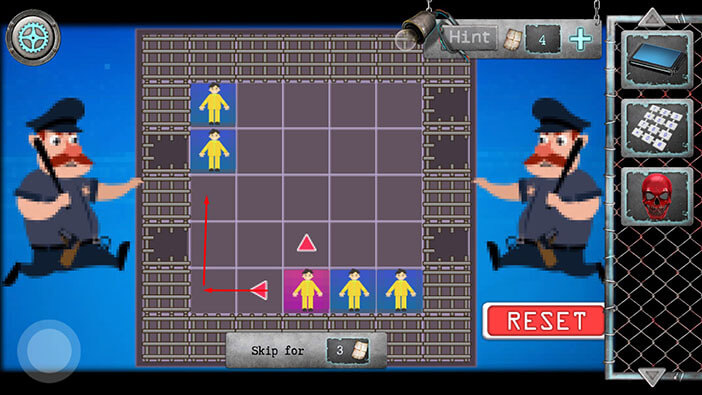
Step 4
Tap on the fourth man to select him, then tap on the “Left” arrow. After that, tap on the “Up” arrow to lead him below the previous man.
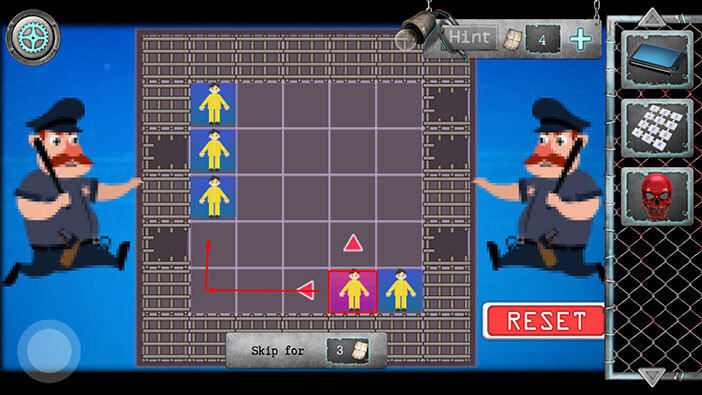
Step 5
Tap on the man in the fourth row (top to bottom) to select him, then tap on the “Right” arrow to lead him into the hole on the right.
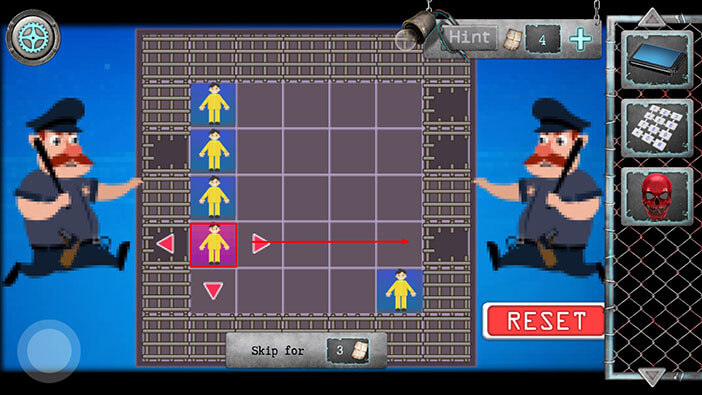
Step 6
Tap on the last man in the fifth row to select him, then tap on the “Left” arrow. After that, tap on the “Up” arrow.
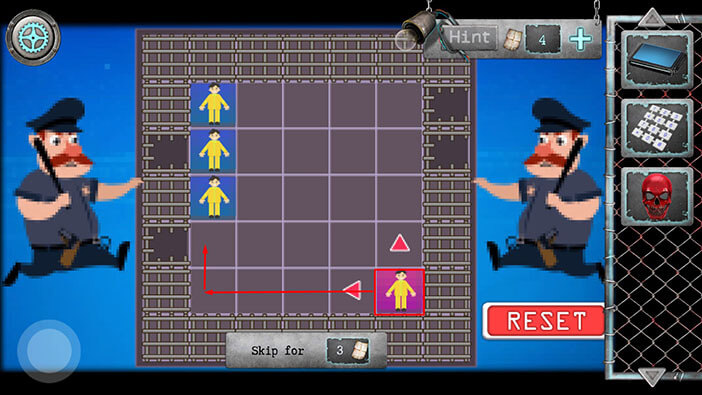
Step 7
Tap on the man in the fourth row to select him, then tap on the “Left” arrow to lead him into the hole on the left.
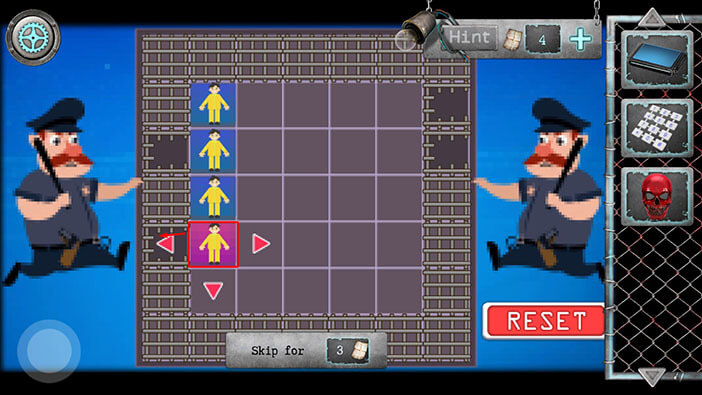
Step 8
Tap on the man in the second row to select him, then tap on the “Right” arrow to lead him into the hole on the right.
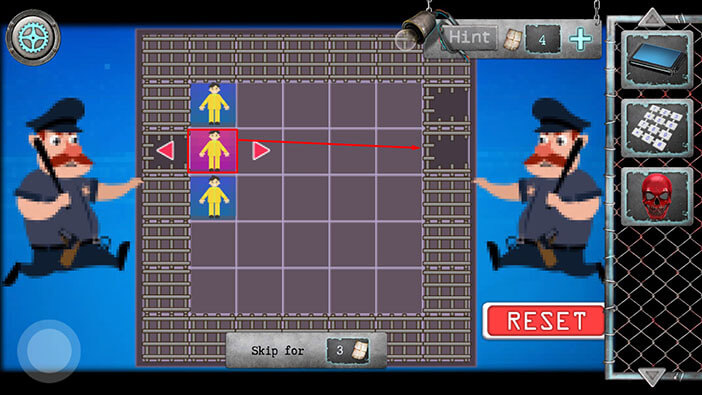
Step 9
Tap on the man in the third row to select him, then tap on the “Up” arrow. After that, tap on the “Left” arrow to lead him into the hole on the left.
Step 10
Tap on the last man to select him, then tap on the “Right” arrow to lead him into the hole on the right.
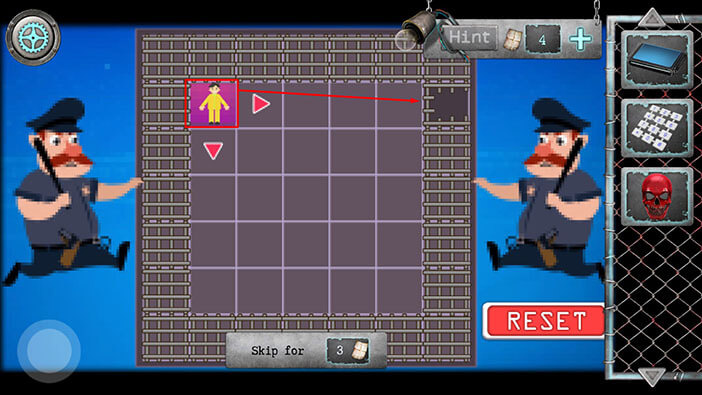
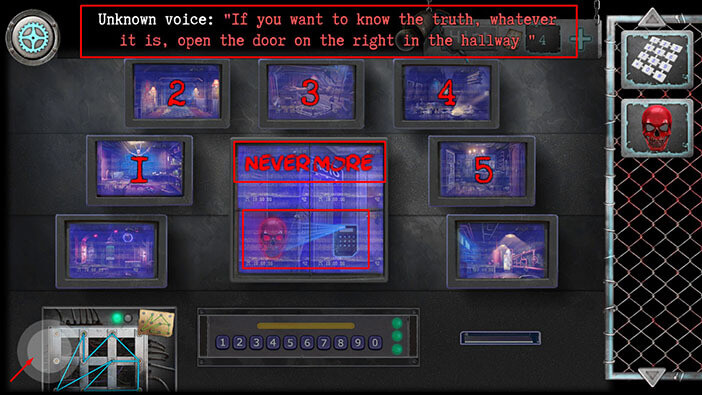
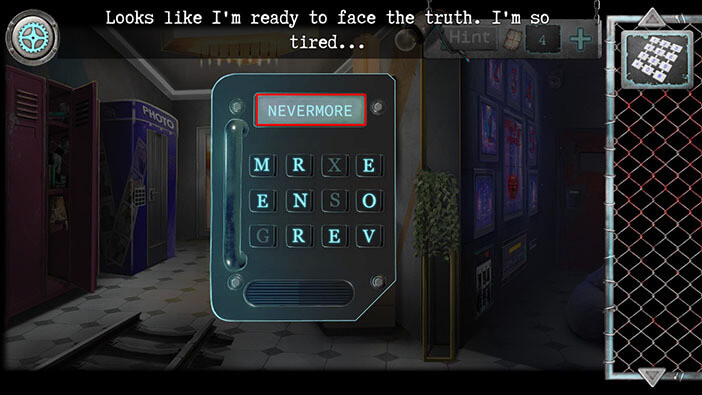
As soon as you solve the puzzle, an unknown voice will instruct you to open the door on the right because that’s the only way to find out the truth. Also, on the main monitor the word “Nevermore” will appear. Memorize/write down this word because it represents the password for the next puzzle. Lastly, we can also see that we will also need the mask in order to unlock the door on the right.
Once you’re ready, tap on the button in the lower left corner to go back.
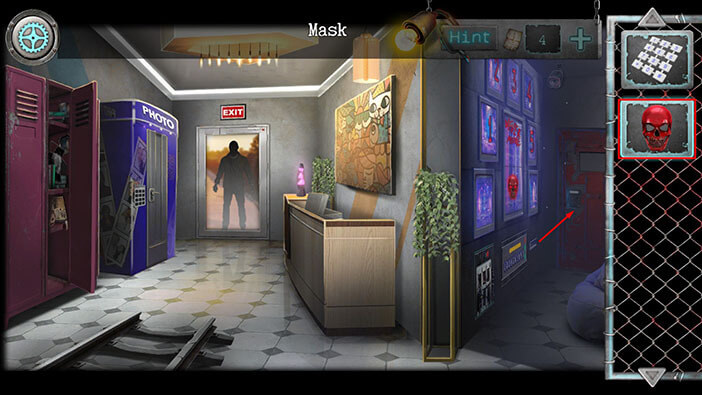
Select the “Mask” from the inventory and tap on the door on the right to start the interaction.
Some strange device will scan the mask, and, after that, some kind of keyboard will appear. Enter the password “Nevermore”.
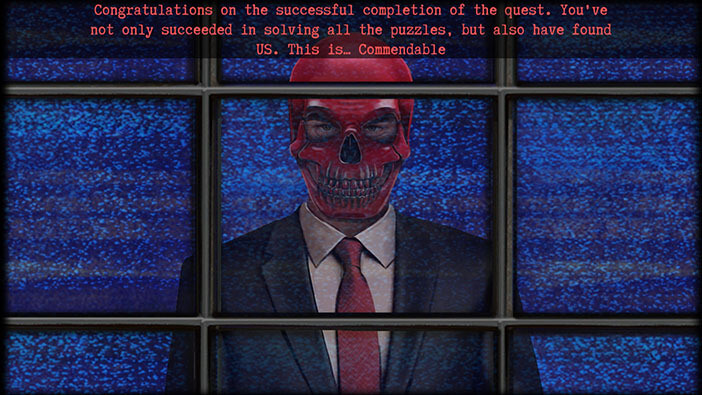
In the next scene, our character will find himself in a room filled with monitors. The stranger in the red mask will appear on the monitors and congratulate him on completing all the puzzles, and discovering them (looks like they are some kind of a secret society that likes to wear masks and prank people).
After that, the stranger will say that our character deserves a prize.

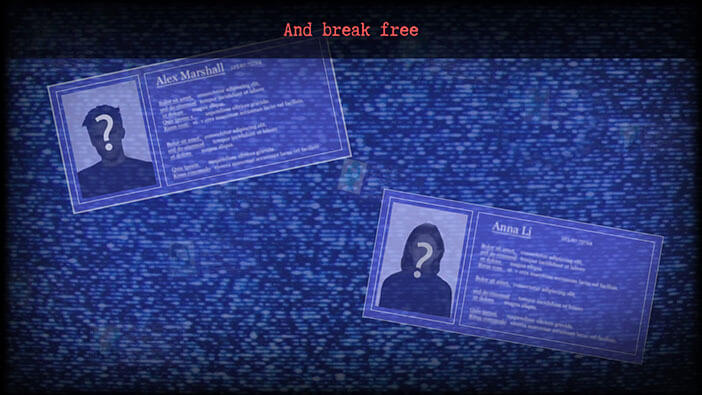
Lastly, the stranger will tell our character to choose Alex Marshall and Anna Li, and he will break free (I’m a bit confused by this ending, but OK).
Well, with the second ending completed, we came to the end of this walkthrough. If you’re interested in Escape Room games, check out our guides for the other games of this genre.
Thank you for reading.