Mystery Detective Adventure | Case 3. Mine Accident
Introduction
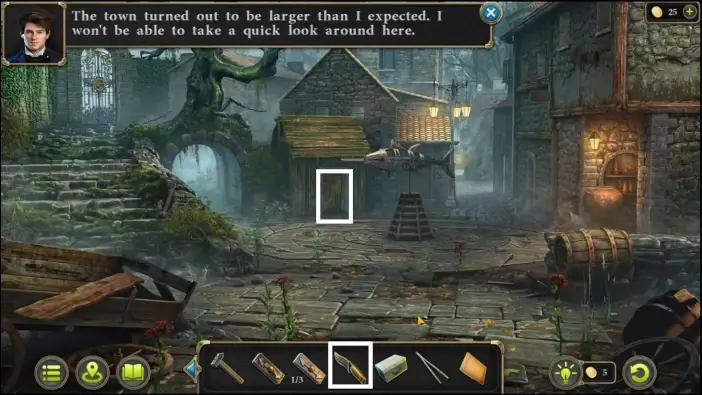
Welcome to the walkthrough for “Mystery Detective Adventure” from FIVE-BN GAMES. This walkthrough will show you how to solve your third case.
File 1. Death of Henry
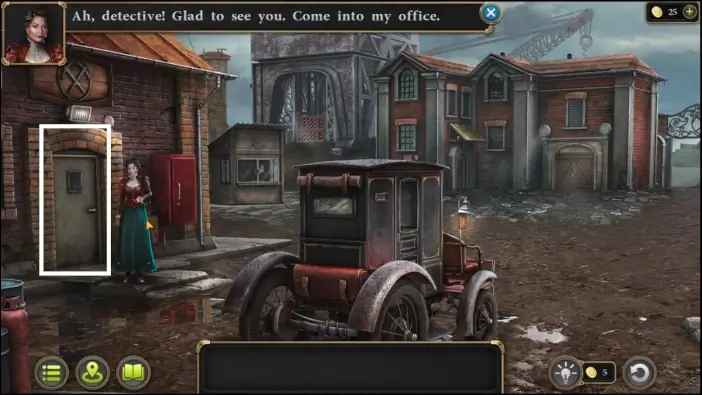
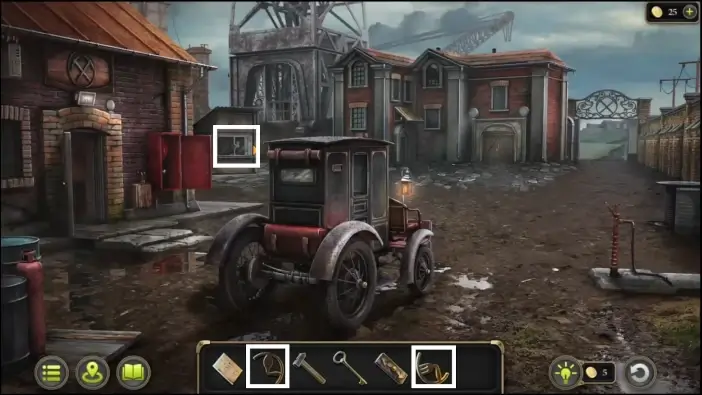
When you arrive at the mining camp, go to Margaret’s office and speak with her. She will give you the pass for the elevator.
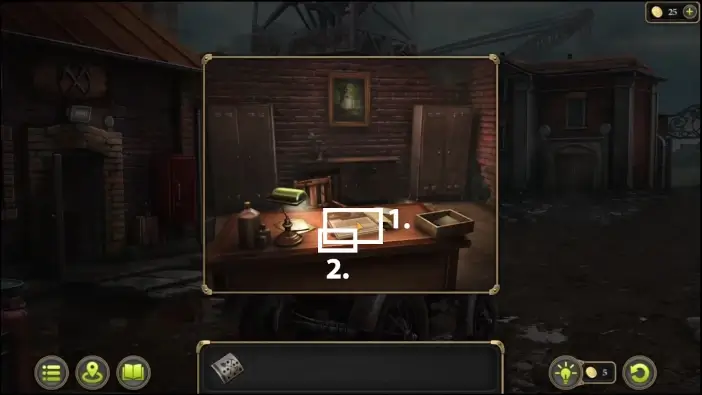
After she leaves the office, pick up the newspaper and clip from her desk. The newspaper will help you obtain the key to the house 37 later.
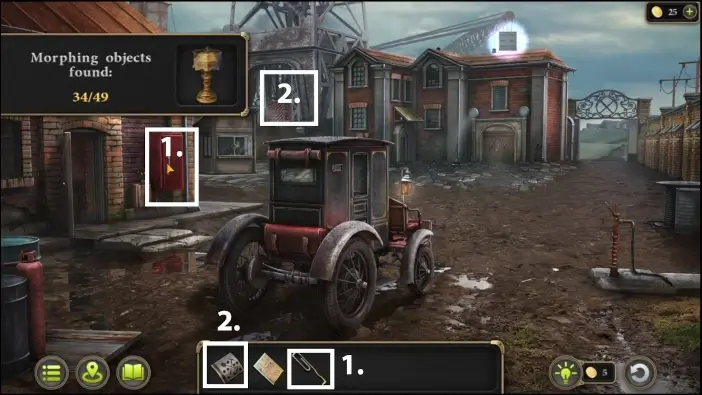
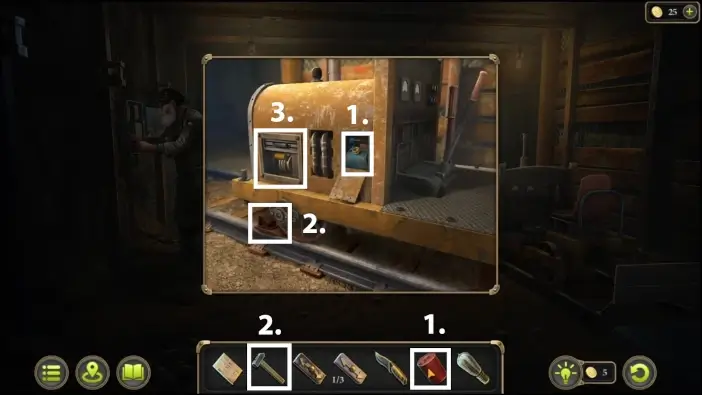
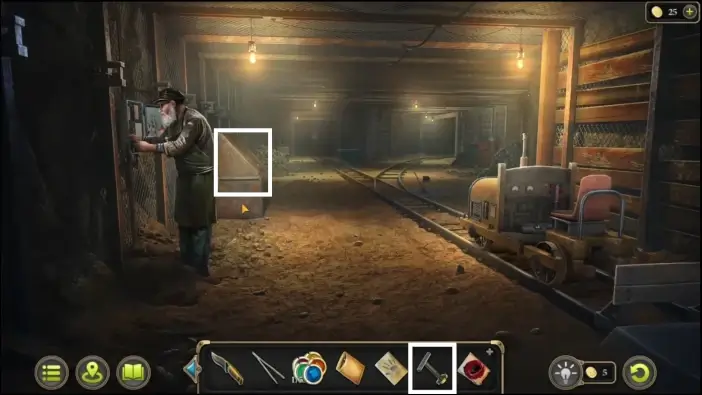
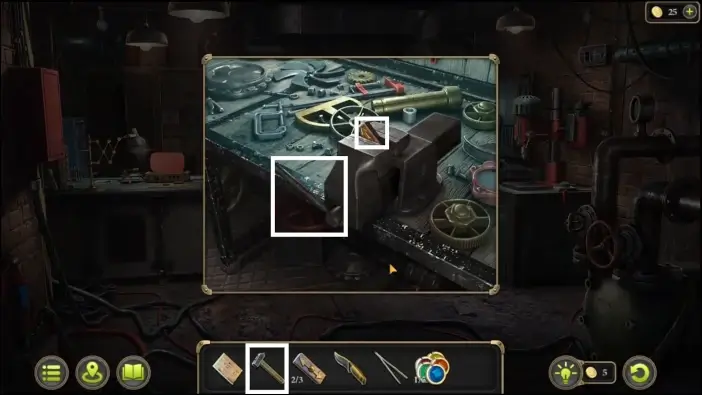
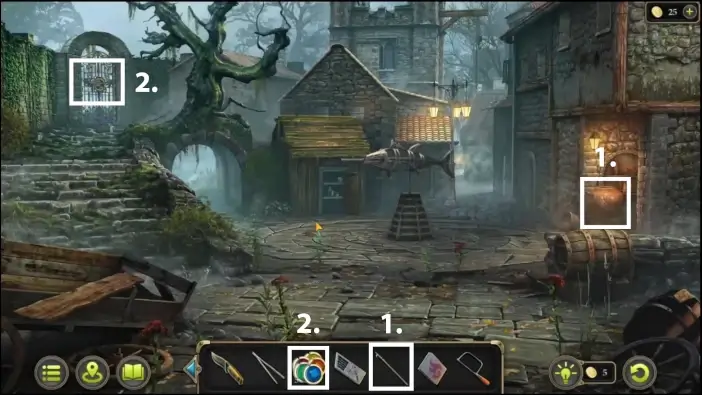
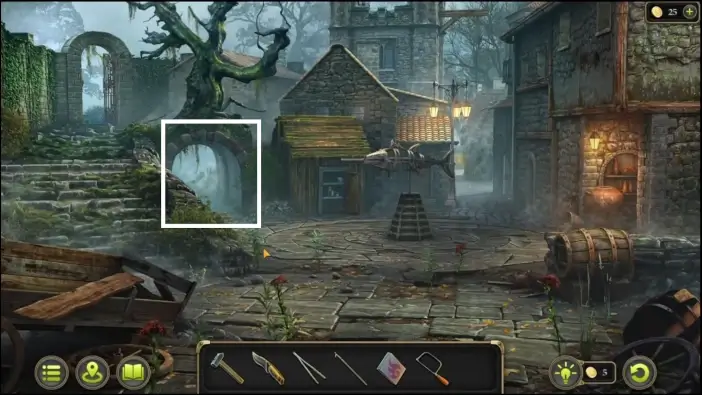
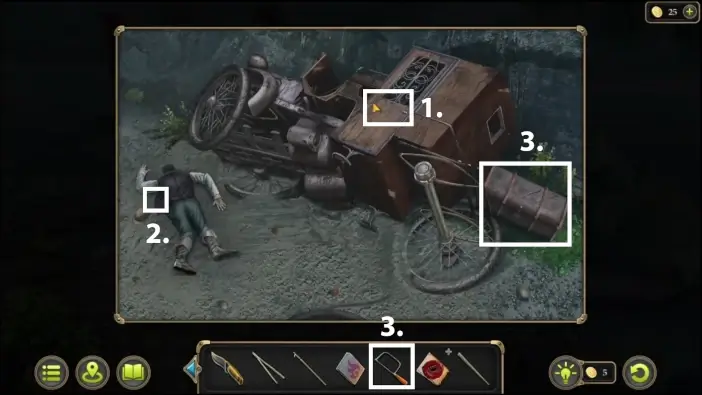
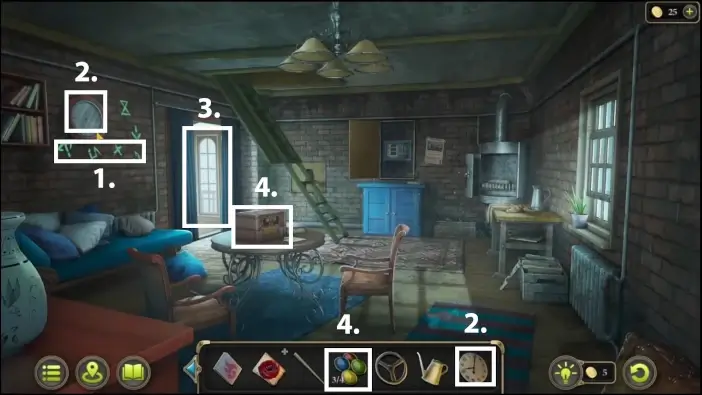
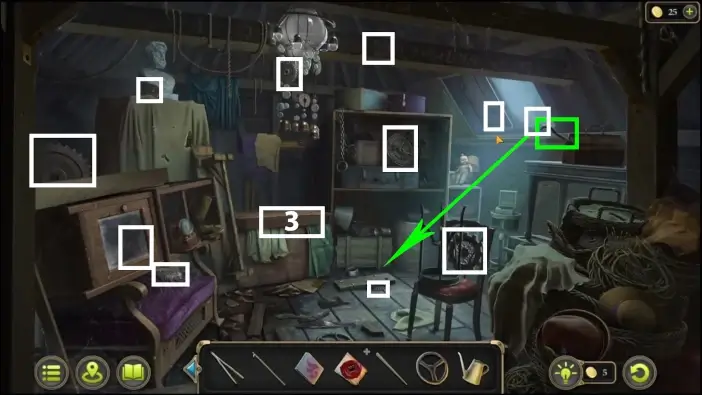
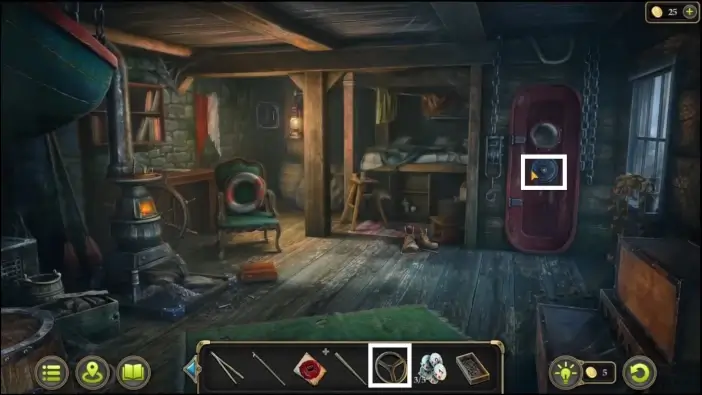
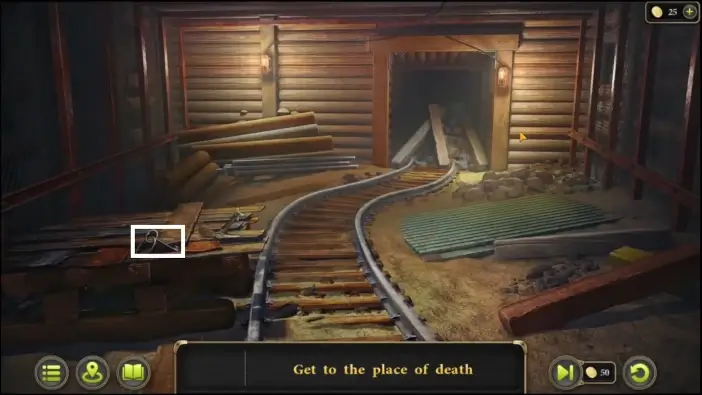
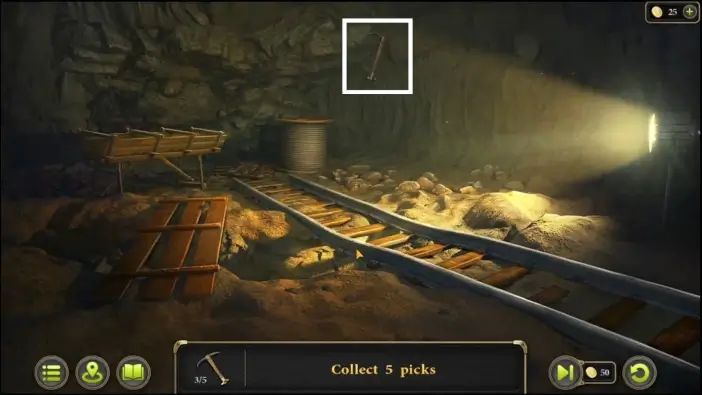
1. Use the clip you just picked to open a fire extinguisher box near the office entrance. Pick up the hammer and the “detail with a spoon” from the box. You will use “detail with a spoon” and “detail with a fork” to open a guardhouse. As for the hammer, you will need it on multiple occasions.
2. Approach the elevator and use the pass the manager gave you. Use the elevator to descend into the mines. Once you are in the mines, speak with the engineer. He will give you the key to the boiler room.
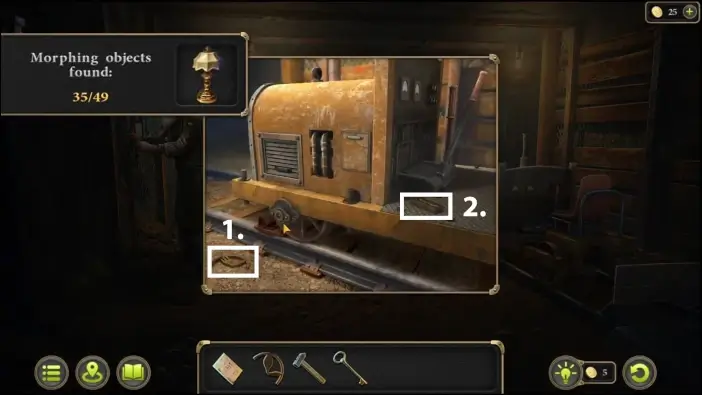
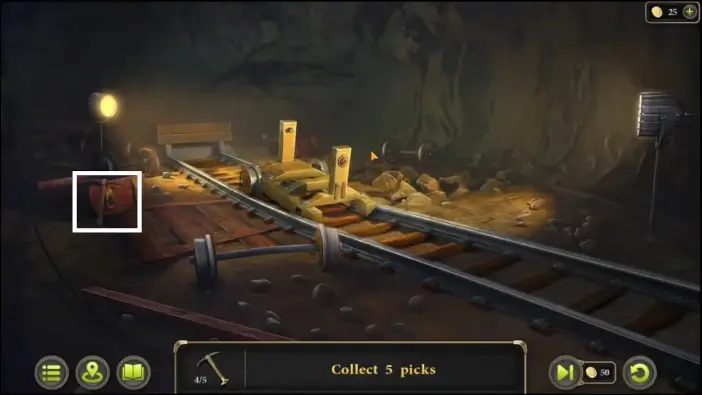
Approach the handcar on the right. Pick the detail with a fork and the dirty part. You will later clean it with the pump.
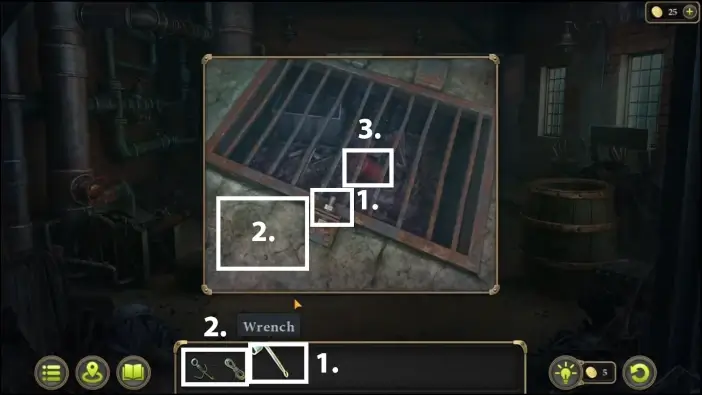
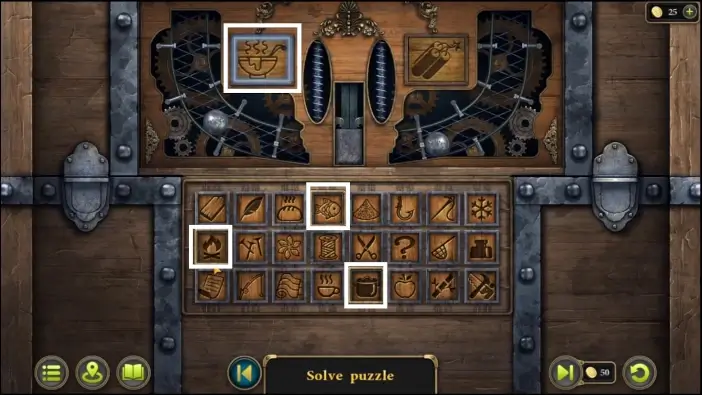
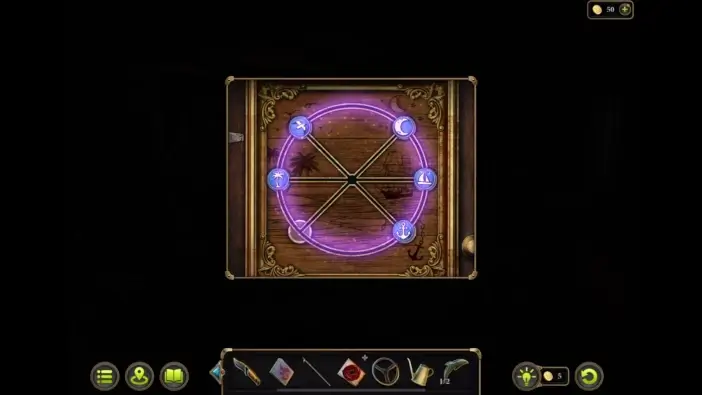
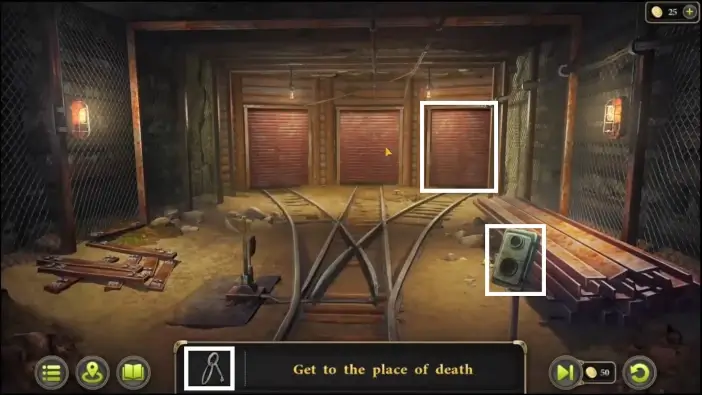
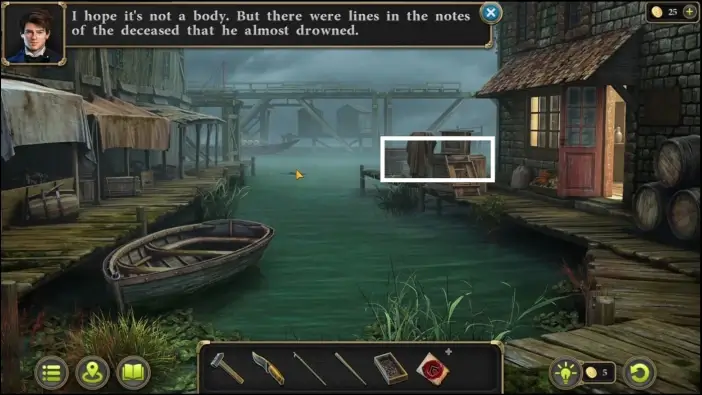
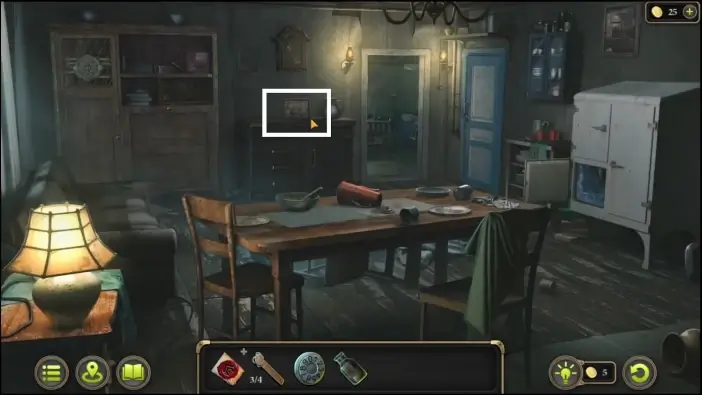
Go back to the surface. Go to the guardhouse. To open it, place “detail with a spoon” and “detail with a fork”. In the guardhouse, pick the detail. You will need 3 details to start one puzzle challenge in the workshop.
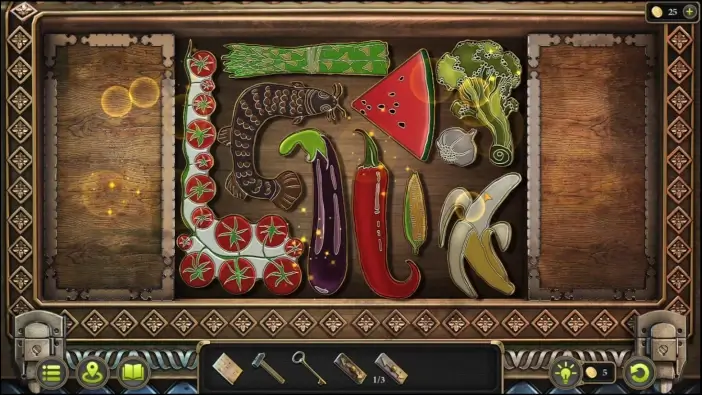
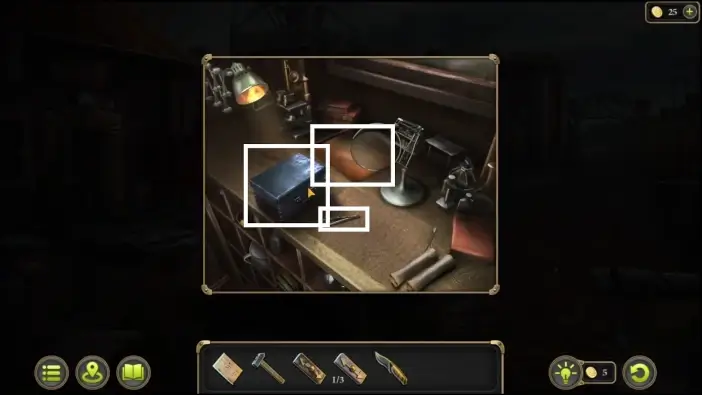
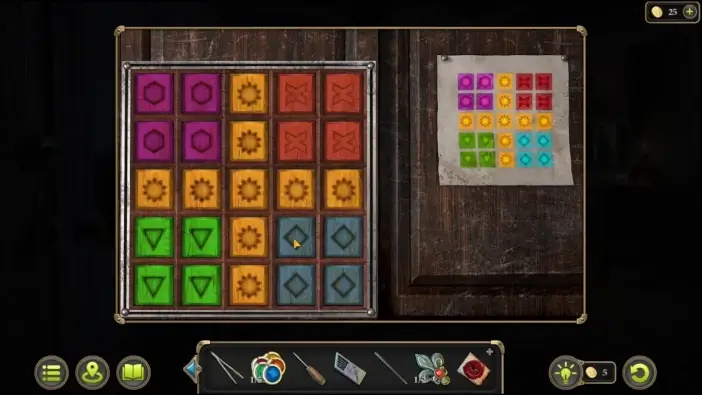
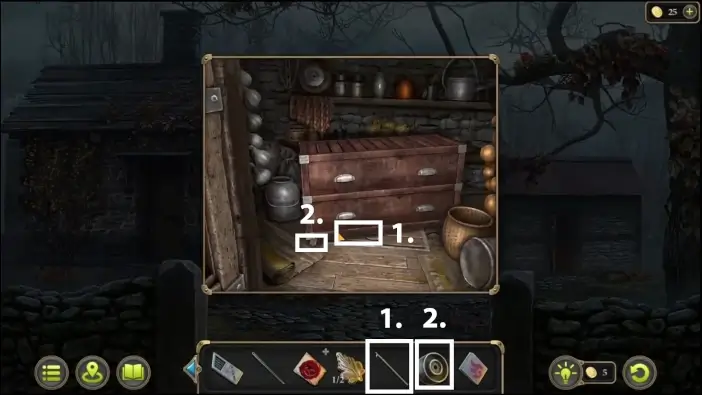
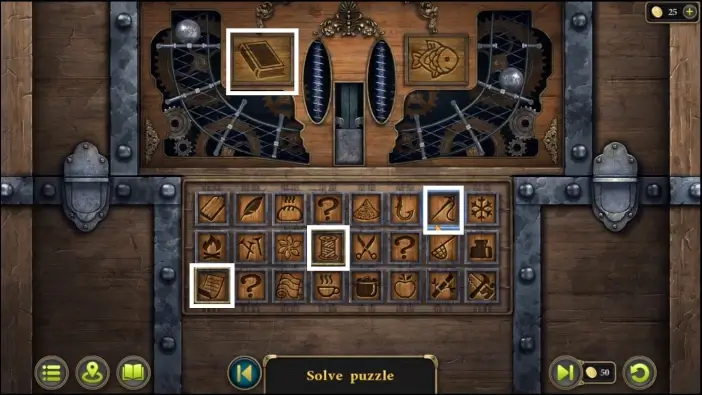
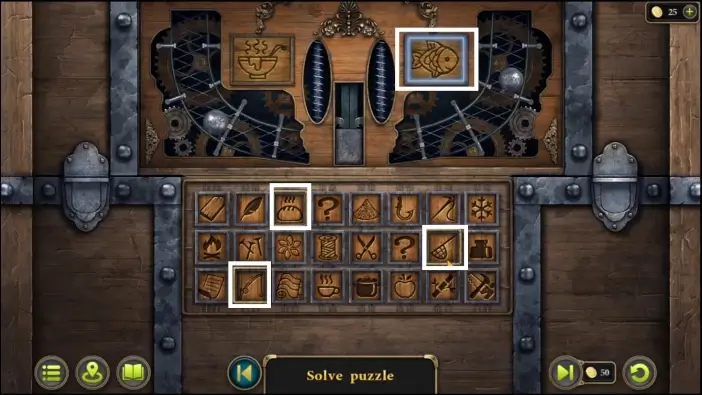
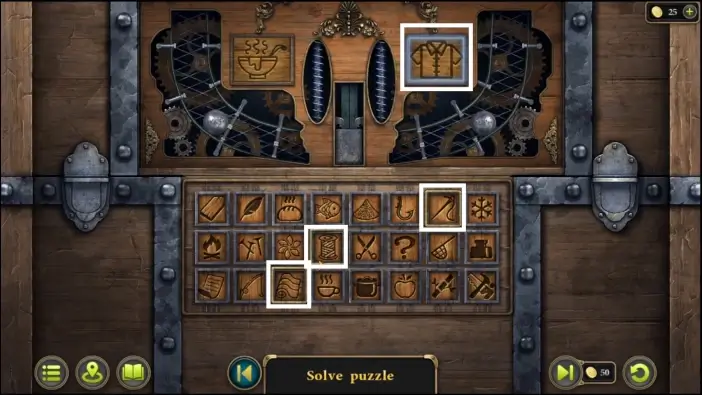
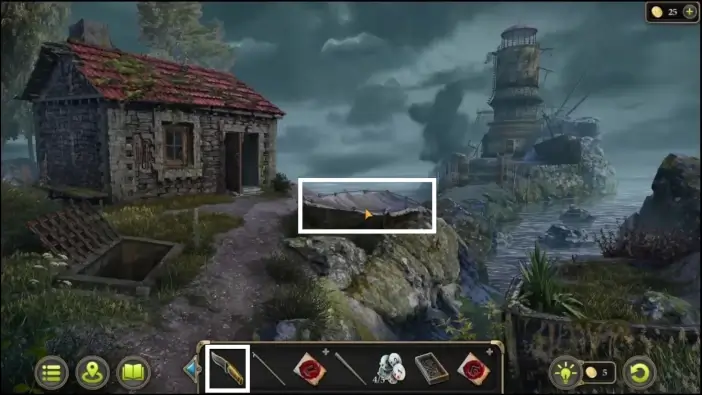
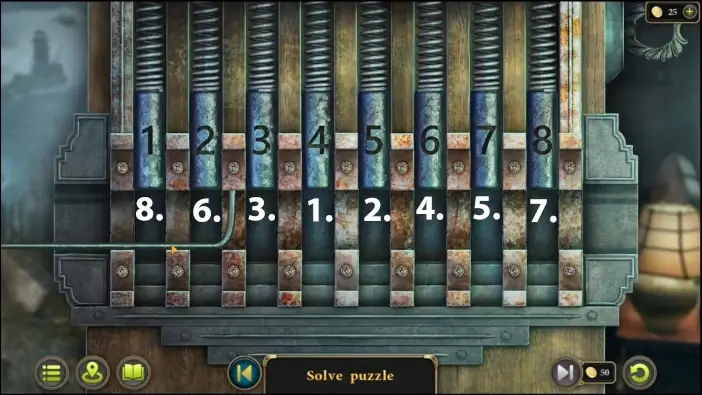
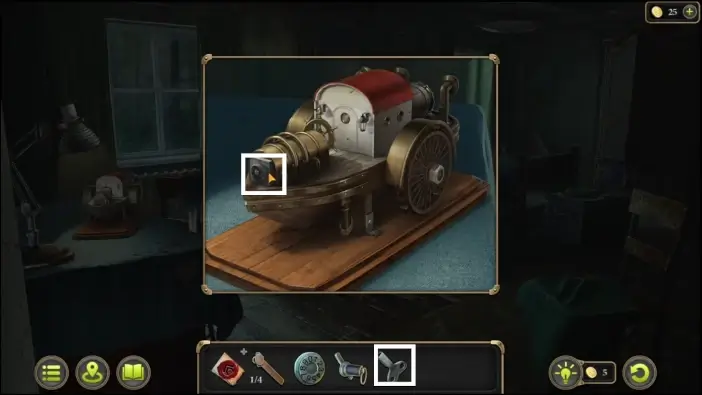
Approach the chest. This will start a new puzzle challenge. Place all the decorations on the field, as in the picture above. Once you solve the puzzle, the chest will open. Pick the knife from the chest.
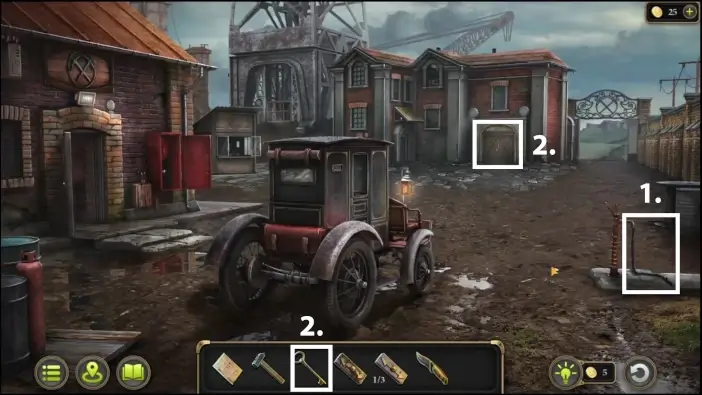
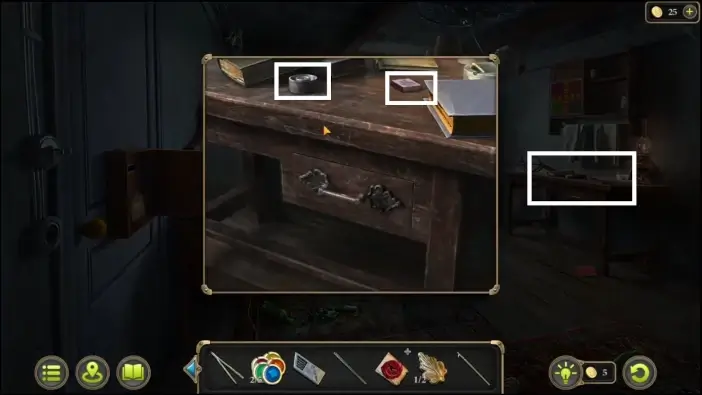
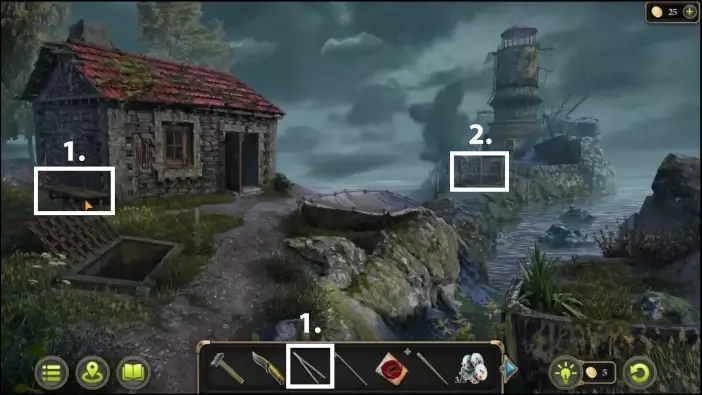
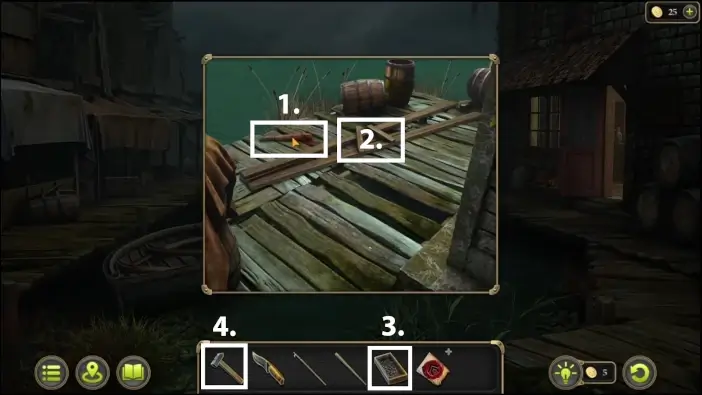
1. Return to the starting area and pick up a hose. Later, you will need the hose to fill the jerry can.
2. Go to the building with the boiler room and use the key the engineer gave you.
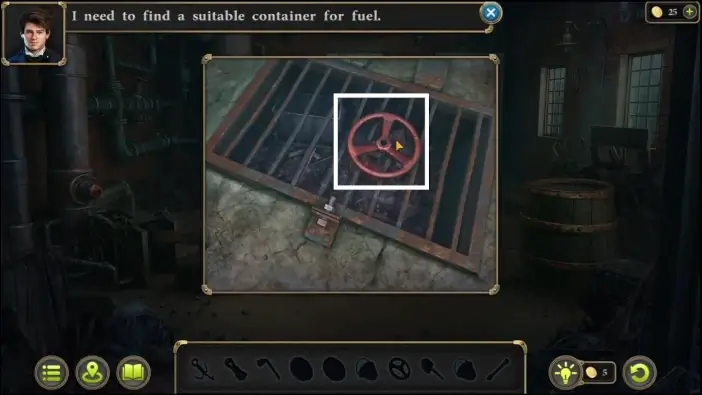
Pick Valve.
Pick the shovel.
Pick the bucket and the rope.
Fill the bucket with water from the barrel. After that, take the token from the bottom of the barrel.
1. Use the shovel to place more coal inside the furnace.
2. Use the bucket full of water to put more water in the water reservoir of the furnace.
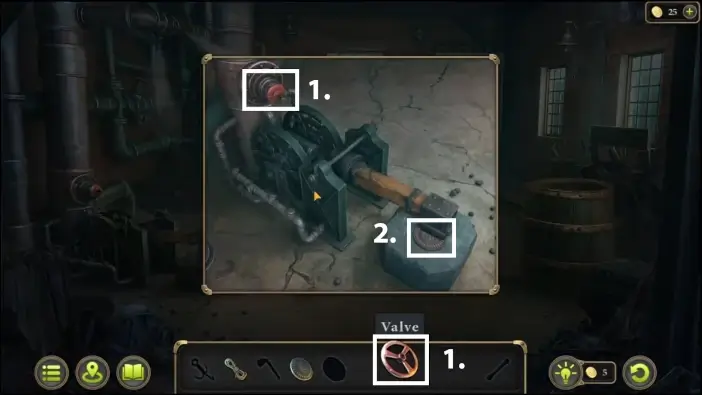
Place the valve and turn it, then get the second token.
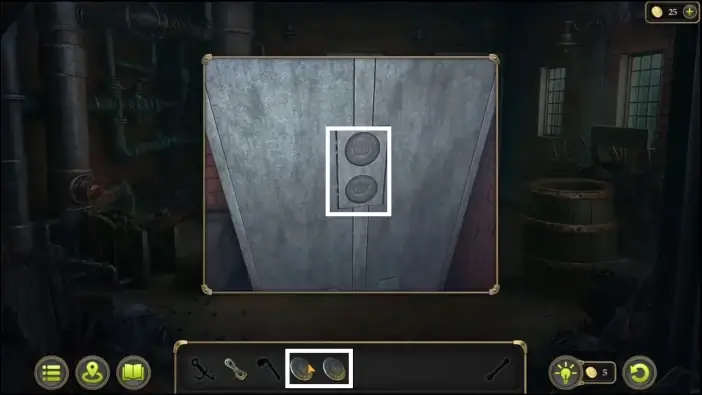
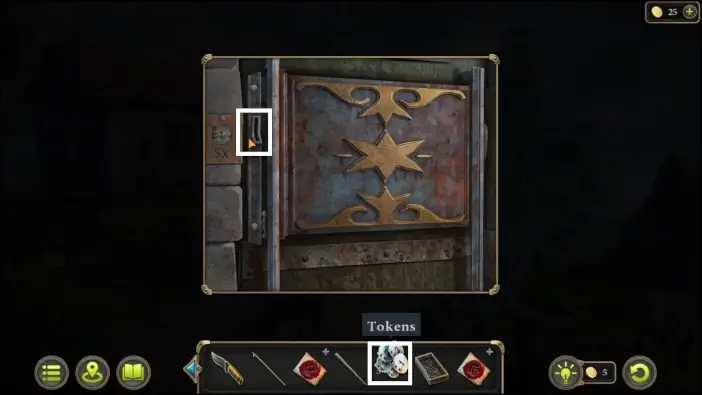
Go to the cabinet and place the two tokens you got to unlock it.
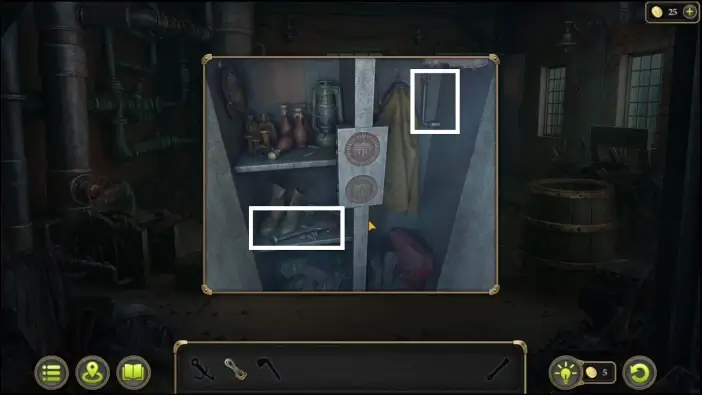
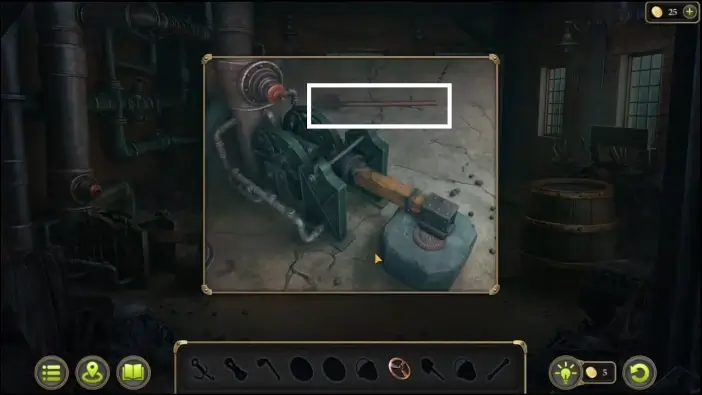
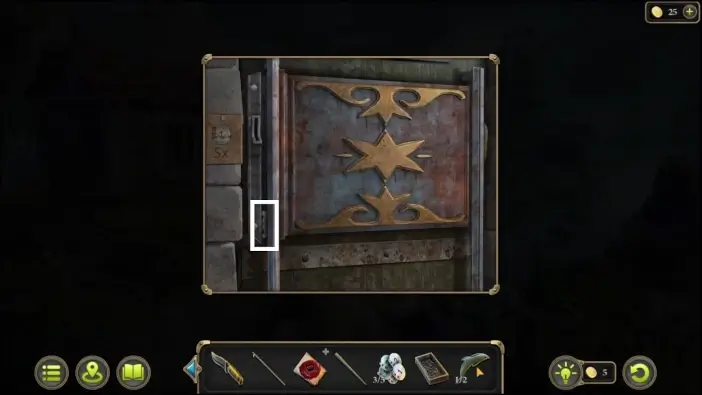
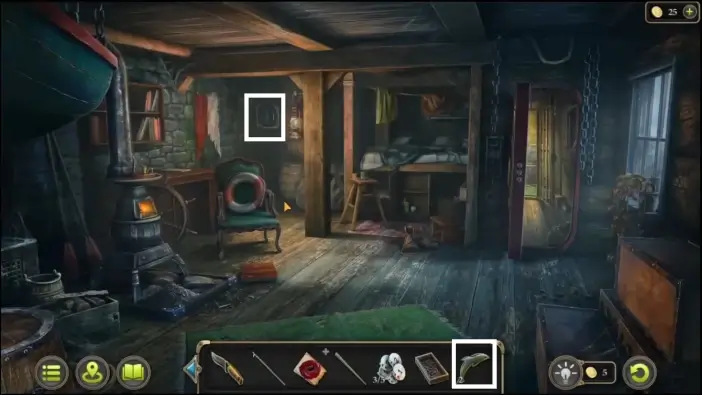
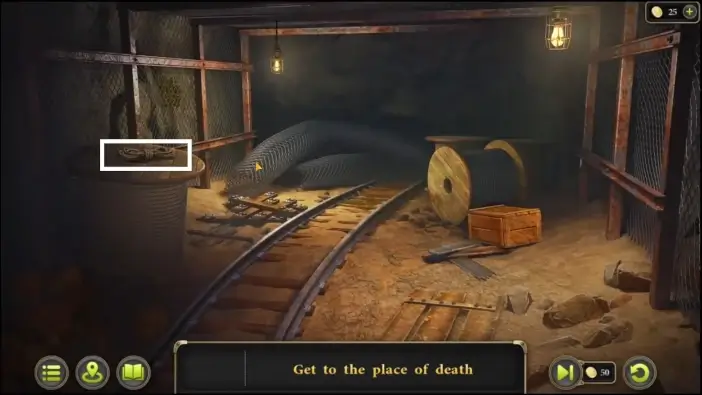
Pick the chisel and the wrench.
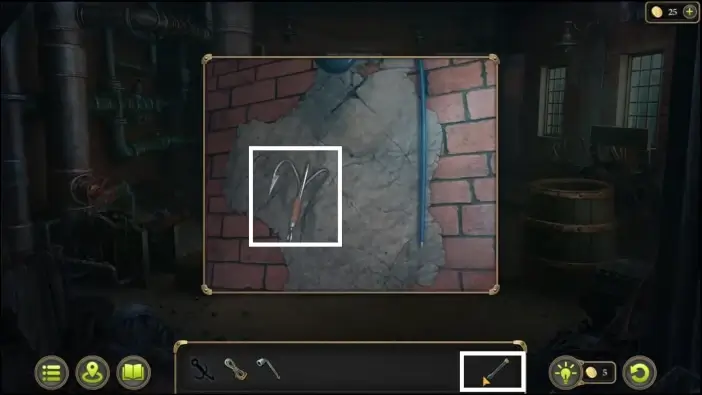
Use the chisel on the wall to get a hook.
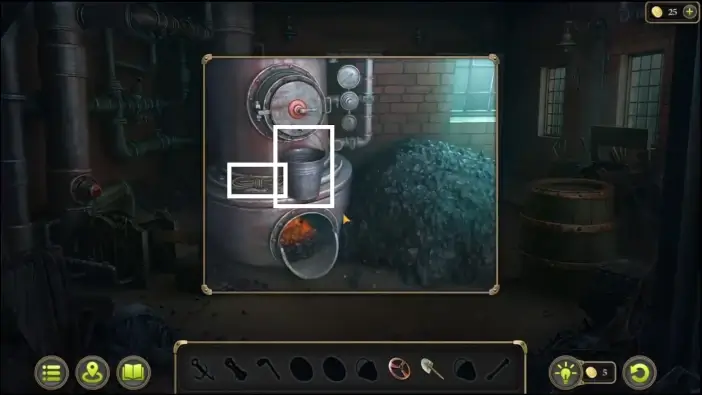
1. Use the wrench to open the manhole.
2. Place the hook, then place the rope on the ground. Attach the rope to the hook.
3. Use the hook to get the jerry can. You’ll need a jerry can full of oil for the handcar in the mine.
Once you get the jerry can, exit the boiler room, and go to the workshop.
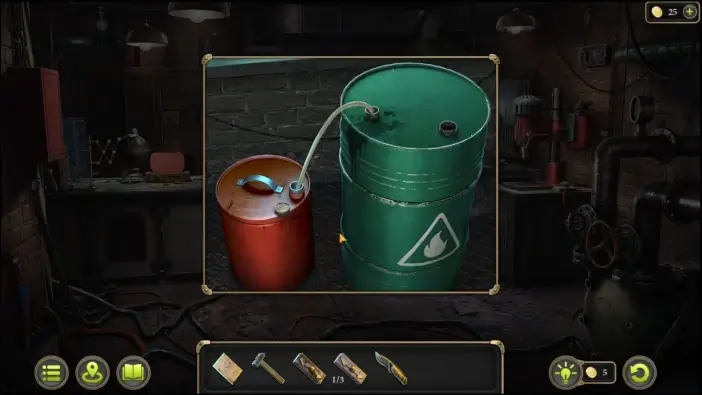
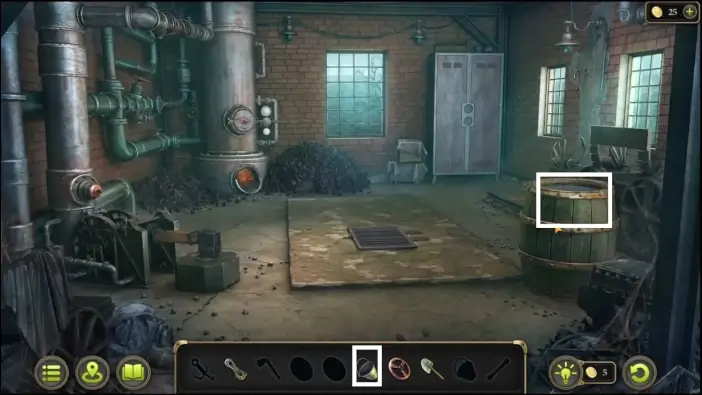
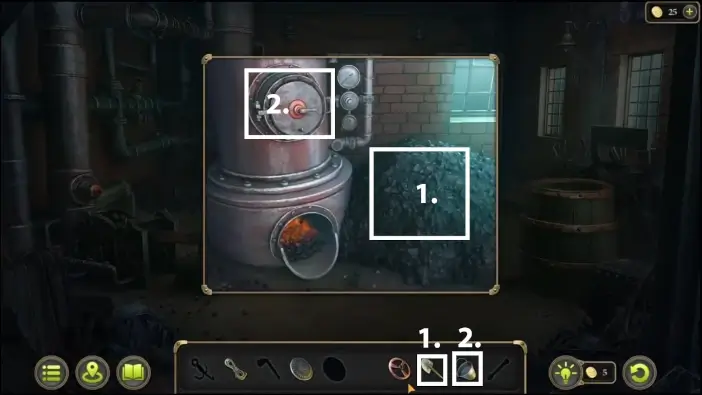
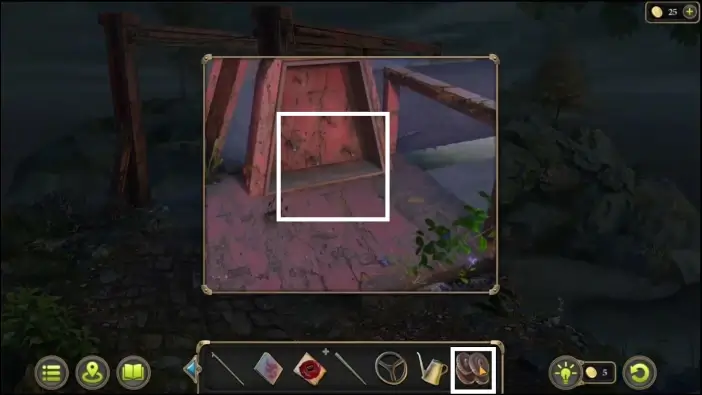
Approach the oil tank and place the jerry can beside it. Use the hose you acquired earlier to fill the jerry can. Then, pick up the now-full jerry can.
Go to the workbench on the right and pick up the pulp. You will need it to illuminate the place where the victim died.
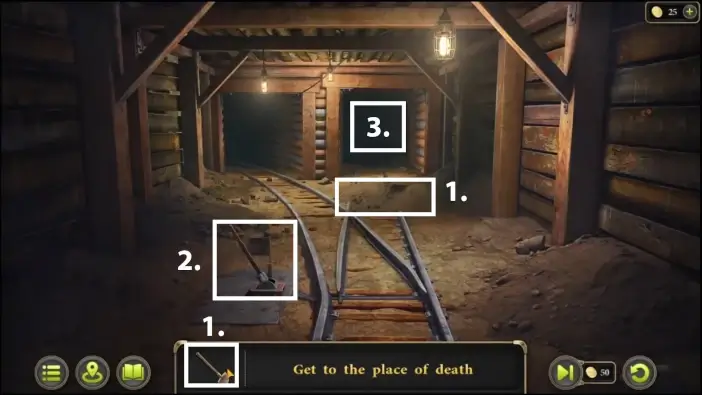
Go back to the mines (using the elevator) and approach the handcar.
1. Refill the handcar’s fuel with your jerry can.
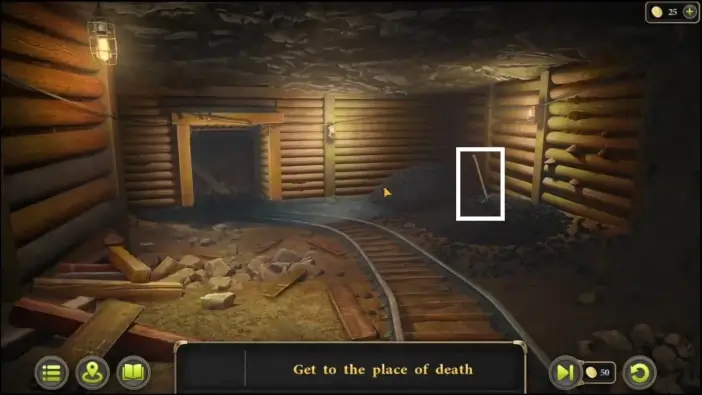
2. Use the hammer you got from the fire extinguisher box to remove the obstacle on the rails.
3. Activate the handcar. Choose the path on the right.
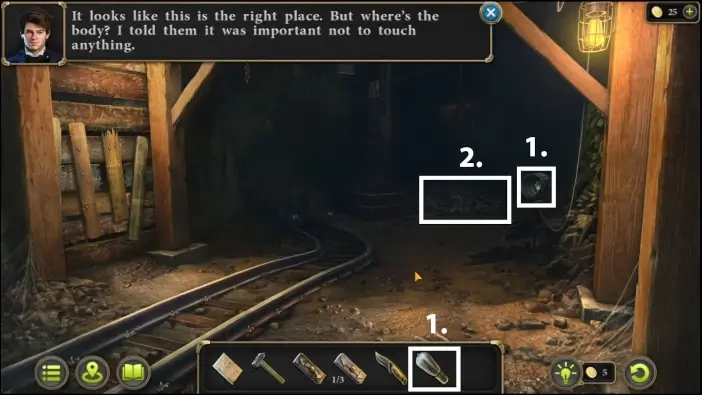
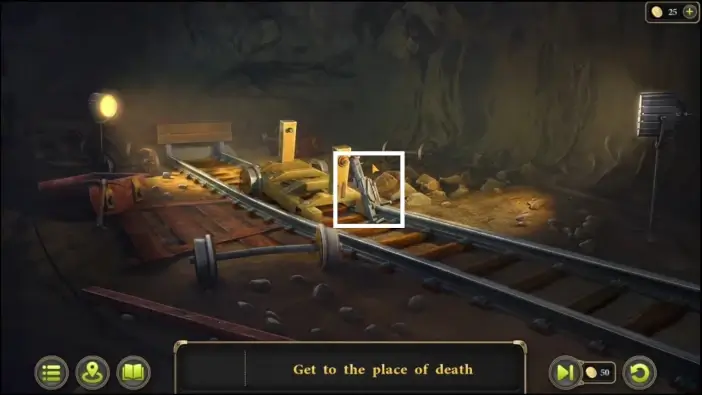
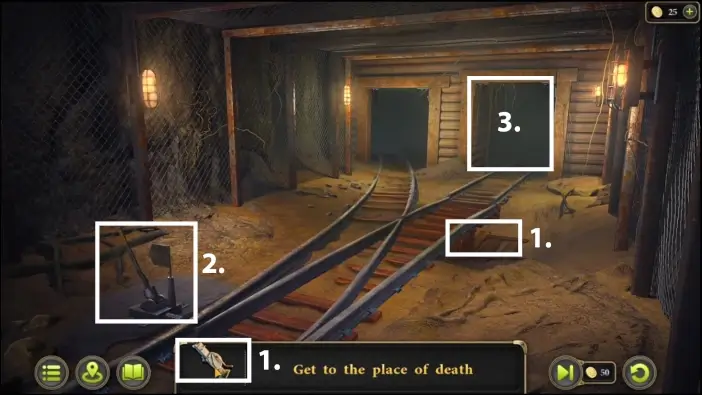
1. You will arrive at the place where the victim died. Replace the broken bulb with the bulb you just got from the workshop.
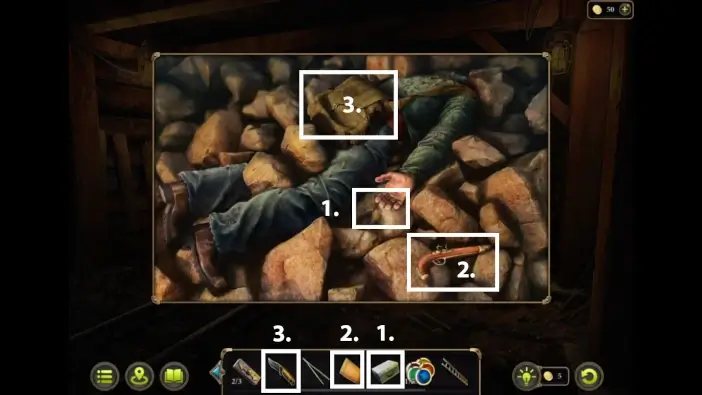
2. Approach Henry’s body.
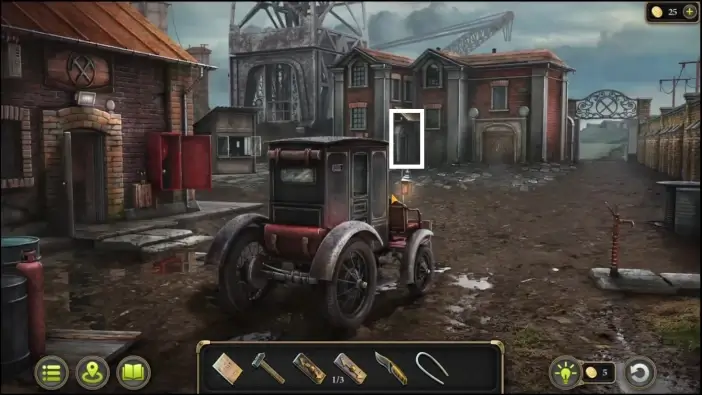
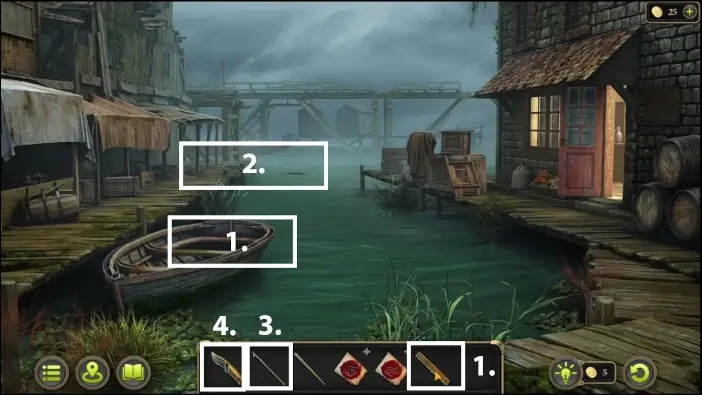
Go back to your car at the starting area. Get the fingerprint kit, the tweezers, and the evidence envelope. You will use an evidence envelope to pick up the gun that is near the victim’s body, and a fingerprint kit to get fingerprints of the victim.
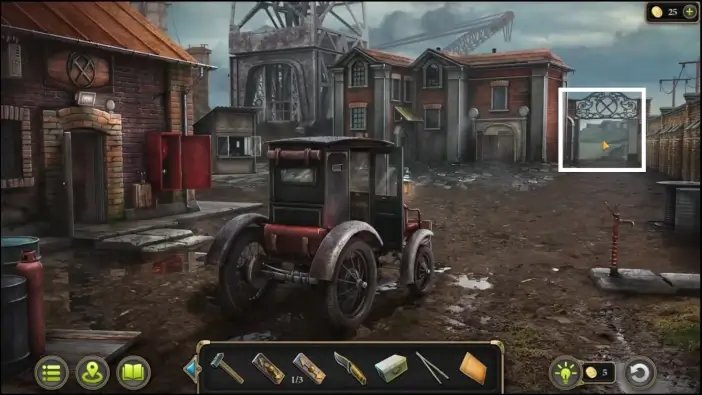
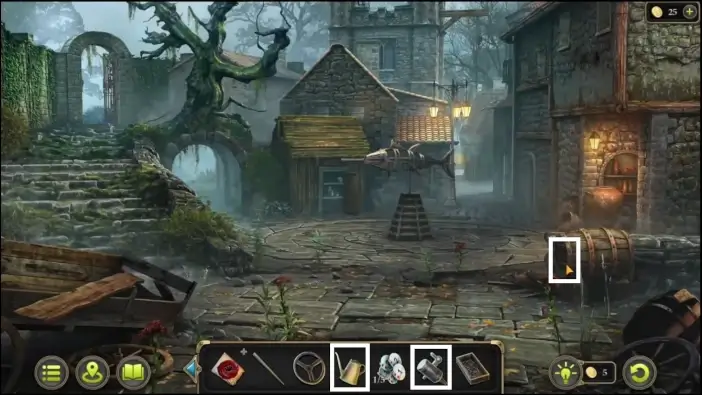
Go to the town center.
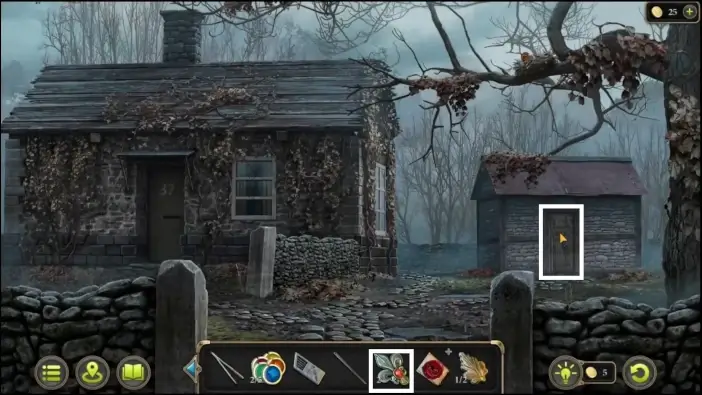
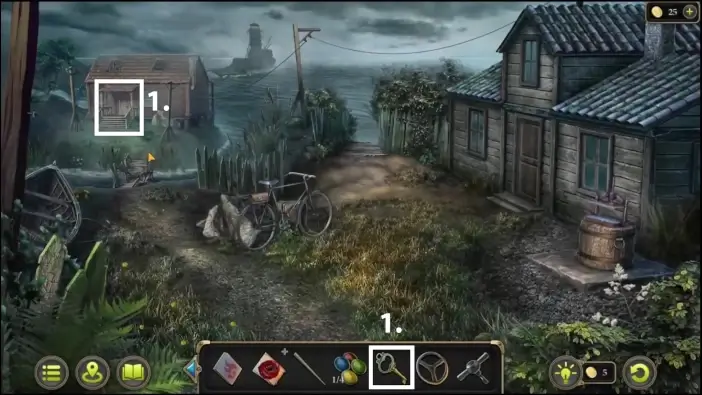
Use the knife you got from the guardhouse to open the shed. Pick the chips and the ladder. You will need 5 chips to unlock the gate in the town center that leads to the lighthouse. As for the ladder, you will need it near Hanry’s body in the mine, to investigate the crane above him.
1. Go back to the crime scene in the mines. Use the fingerprint kit to get the fingerprints of the victim.
2. Use the evidence envelope to pick up the gun near the victim’s body.
3. Use the knife to get the bag of the victim. From the victim’s bag, pick the key for the equipment container.
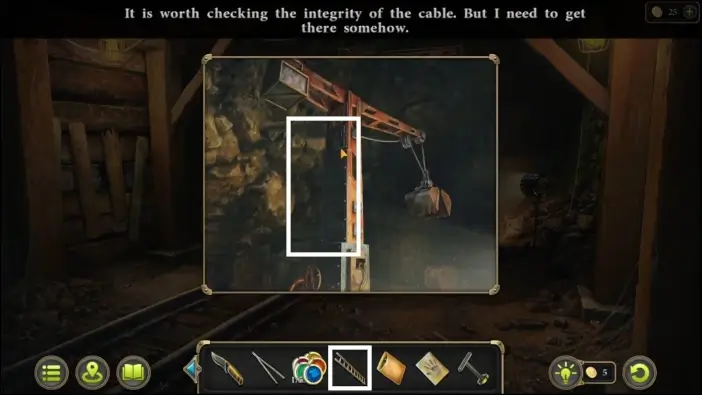
Use the ladder to climb the crane.

Open a cable box and check the handprint. This is the first evidence for the “Death of Henry” file.
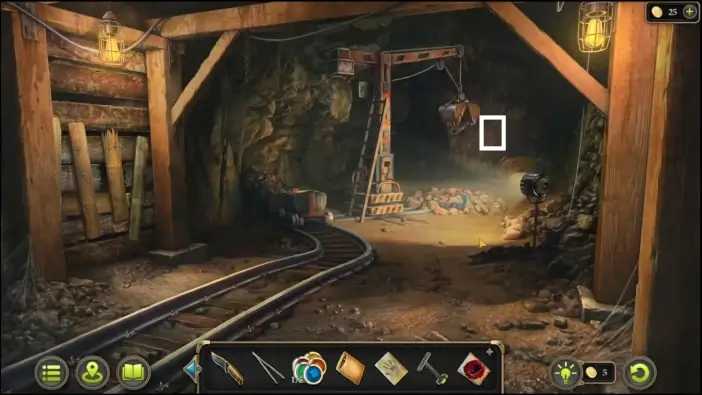
Check the cut cable. This is the second piece of evidence.
Check the farthest wall. The stuck bullet in a wall is the 3rd evidence.
Go to the mine area where the engineer is. With a key from the victim’s bag, unlock the equipment container next to him. Inside the container, take the pickaxe.
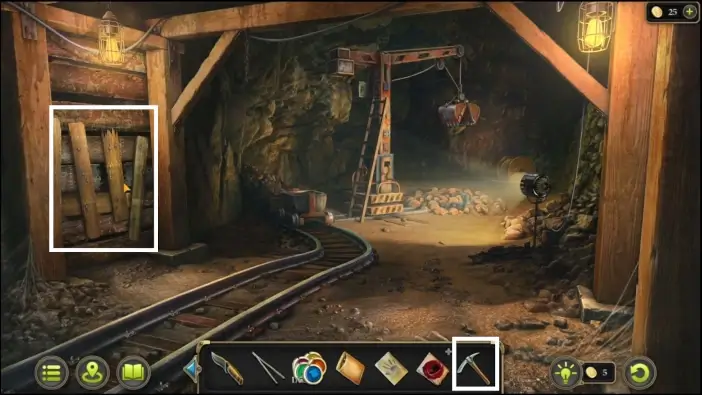
Go to the crime scene. Use the pickaxe on the barricaded wall on the left. Pick the lever. You will need a lever to fix the pump in the starting area.
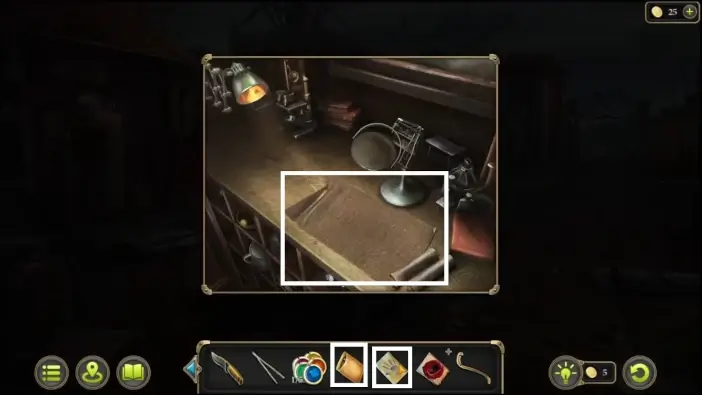
Go to your car at the starting area and place the victim’s fingerprints and gun on your table. This will start a new puzzle challenge.

Connect all fingerprints with fingerprint traces on the gun to solve this puzzle. Once you solve it, you will get the last evidence for the “Death of Henry” file.
File 2. Death of Jacob
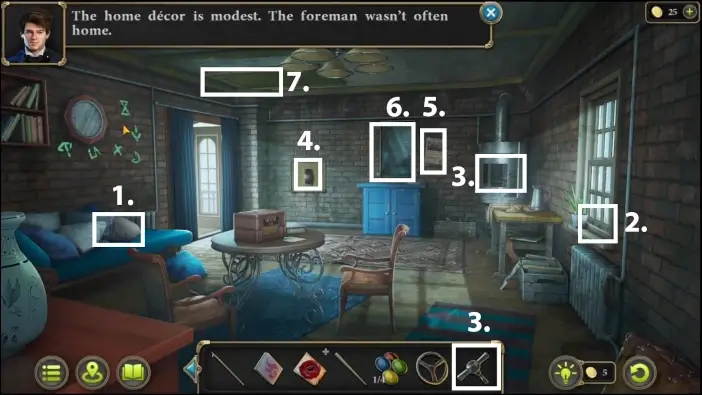
Talk with Robert and Steve in the starting area, near the office.
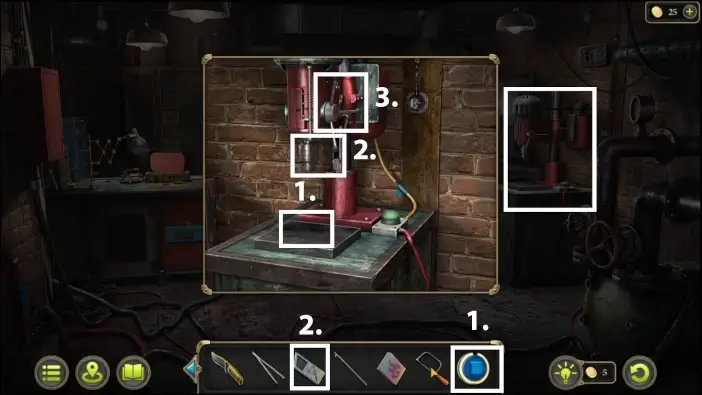
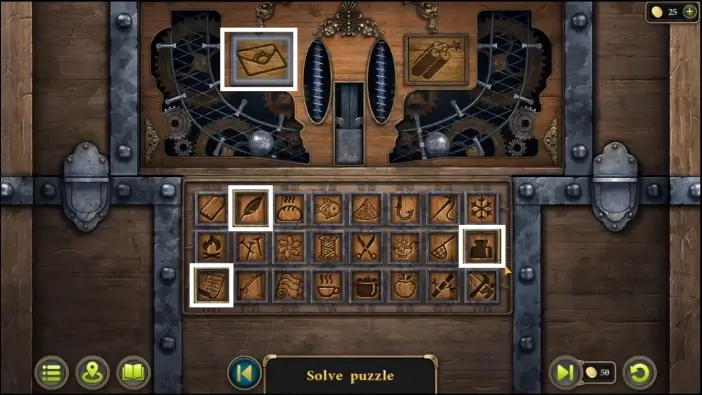
After the conversation, use the lever to fix the pump. Use the pump to wash the dirty detail. The cleaned detail will now be saved as the second detail in your inventory.
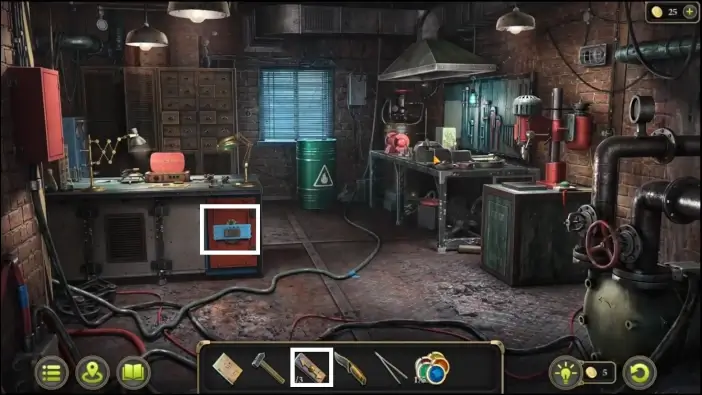
Go to the workshop and approach the workbench. Use the hammer to unstuck the machine and pick the 3rd and final detail.
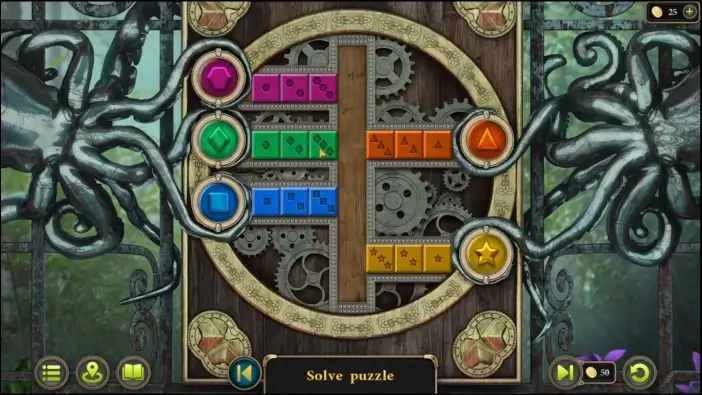
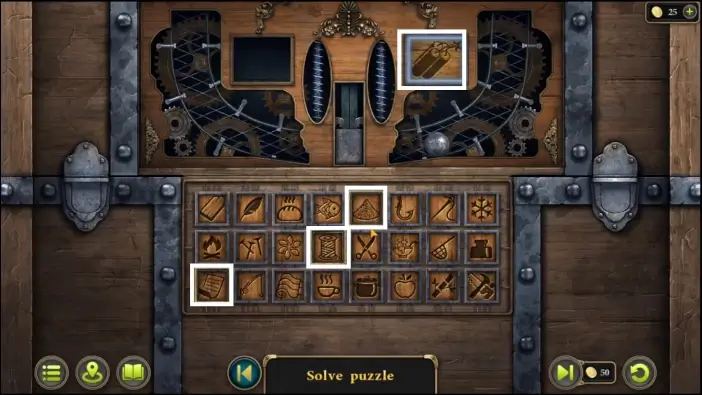
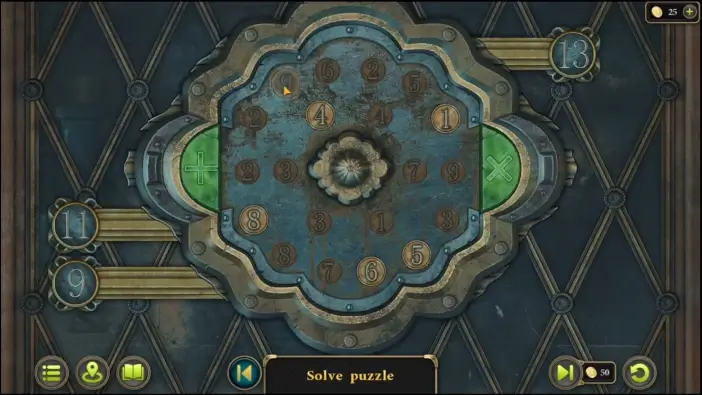
Place the 3 details you have so far to start a new puzzle challenge.
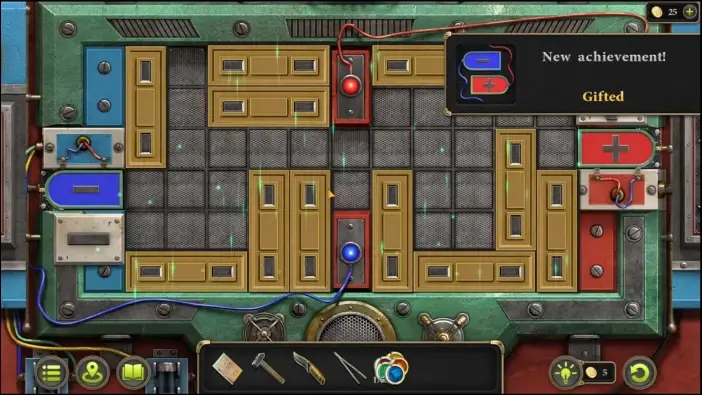
To solve this puzzle, you need to switch the plus and minus signs. You can move the yellow bars to make room for your plus and minus fields (red and blue fields). If you play the Steam version of the game and you complete this puzzle in less than 80 seconds, you will earn the “Gifted” Steam achievement.
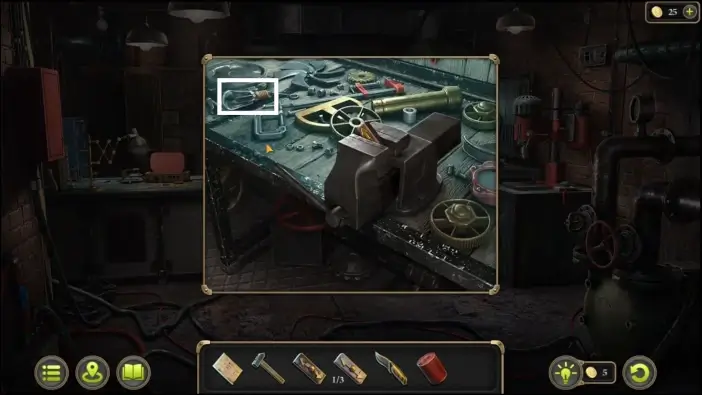
Once you solve the puzzle, the safe will be opened. Pick the screwdriver. You will need it in many situations later. From the safe, pick the set of drills as well.
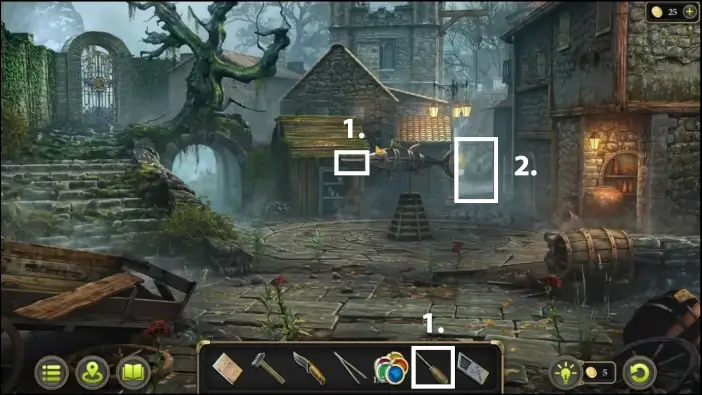
Go to the town center and approach the fish monument at the town square. Use the screwdriver to get the hacksaw blade that is attached to the monument. You will need to place the hacksaw blade into the hacksaw frame later.
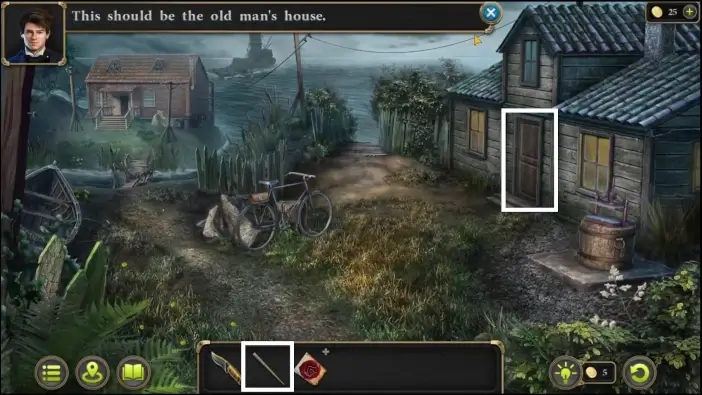
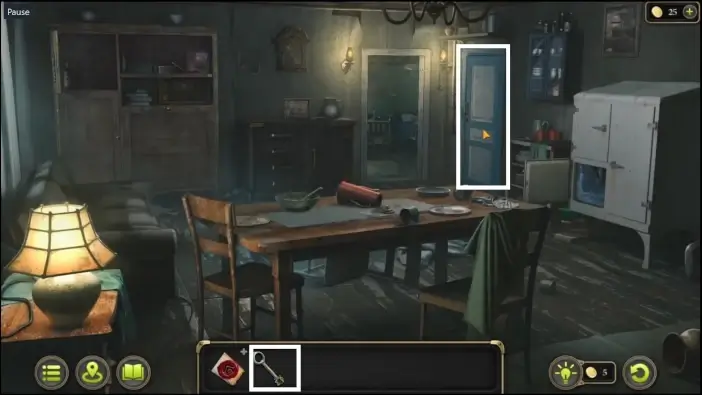
Go to the right to reach house 37 where Jacob lives.
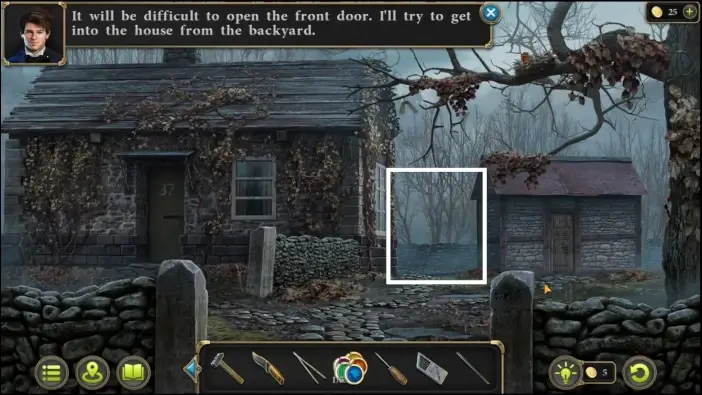
Since the front door is locked, go to the backyard.
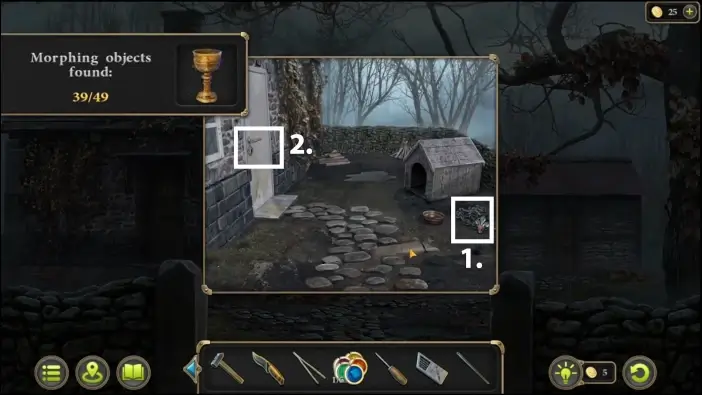
1. In the backyard, near the doghouse, pick the 1st fleur-de-lis. You will need 2 fleur-de-lis to open a shed next to the house.
2. Approach the door.
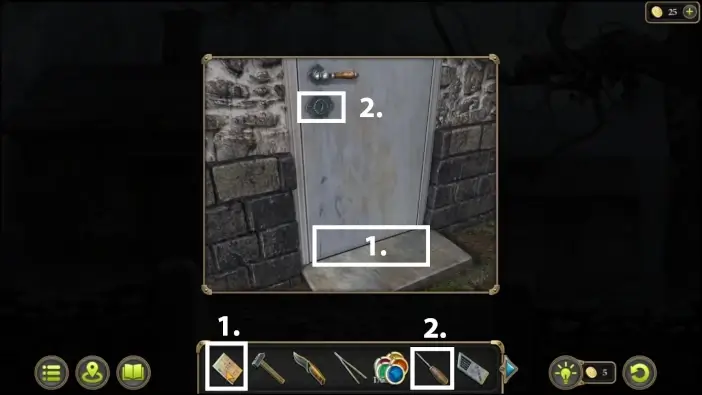
Place the newspaper below the door. Use the screwdriver to push the key out of the lock. Pull the newspaper to get the key. Use the key to open the door. Enter the house.
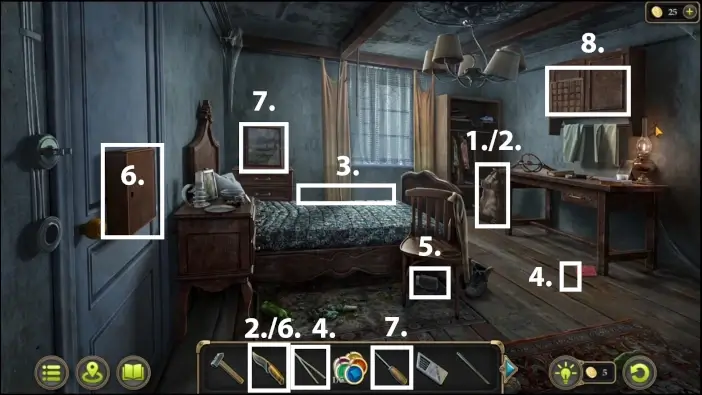
1. Check the fingerprints on the sack. This is the first piece of evidence for the “Death of Jacob” file.
2. Use the knife to cut the ropes.
3. Go to Jacob’s body and check the cable. This is the 2nd evidence.
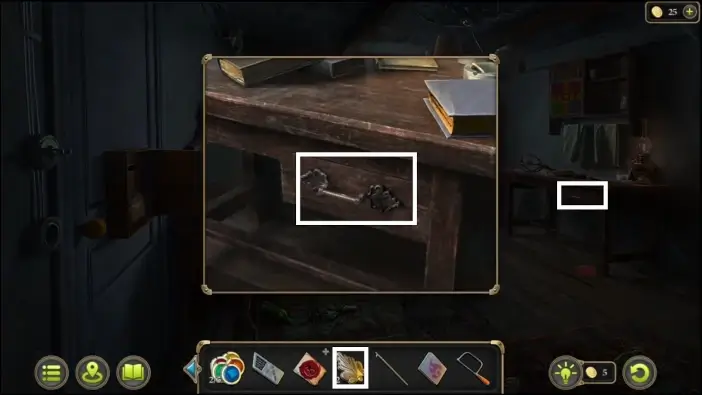
4. Below the desk on the right, there is a stuck paper on the floor. Use the tweezers to grab it. You will get the drawing.
5. In the room, below the chair, there is a jar of sleeping pills. This is a 3rd piece of evidence.
6. On the door on the left side, there is a mailbox. Use a knife to open it. From the mailbox, pick the 2nd chip. Open the envelope to read the letter. This is the 4th piece of evidence.
7. Go to the painting and use the screwdriver. Pick the 1st leaf behind the painting. You will need 2 leaves to unlock the drawer of the table.
8. To open the cabinet above the table, you’ll need to solve the puzzle. Use the drawing you just found as a guideline.
To solve the puzzle, you need to place the fields like in the drawing. You change the field position by clicking on one of the fields, and all the fields around that field will move clockwise.
Once you solve the puzzle, the cabinet will open. Pick the 2nd fleur-de-lis inside the cabinet.
On the table, pick the wheel and the matches. You will need a wheel for the dresser in the shed. As for matches, you will need them to light one lantern in the stone house, in the lighthouse area.
Exit the house 37. Go to the shed near the house. To unlock it, use the 2 fleur-de-lis you got so far. This will start a new puzzle challenge.
You need to place all the frames to the correct sigils to solve this puzzle challenge.
Once you solve the puzzle, the shed will open. From the shed, pick the hook.
Lift the dresser with your hook. Place the wheel. Now that the dresser has all the wheels, your character will automatically move it to the side. You can now access the trapdoor. Below the trapdoor, there are the 2nd leaf and a hacksaw frame.
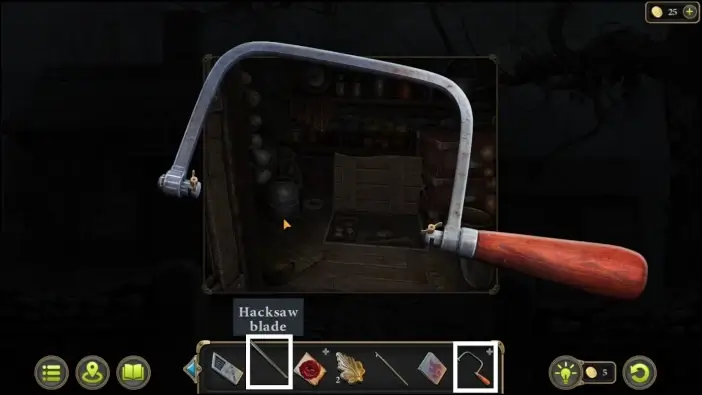
Place the hacksaw blade you got from the town center into the hacksaw frame. A functional hacksaw will be added to your inventory. It will be useful for opening Michael’s chest later.
Return to Jacob’s room. Use the two leaves to unlock the drawer of the table. From the drawer, pick the third chip and check the newspaper. The newspaper is the fifth and final piece of evidence for the “Death of Jacob” file.
File 3. Death of Michael
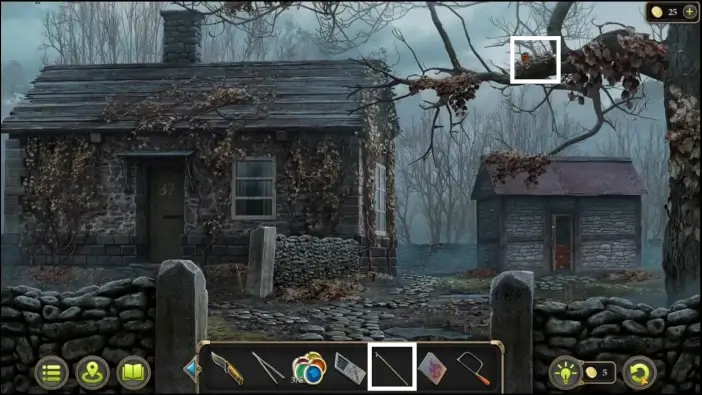
Exit the house 37. Use the hook to reach the 4th Chip on the branch.
Go to the Town Center. Approach the pot on the right and use the hook to reach the 5th and final chip inside the pot.
Go to the gate to the left side of the square. Place all 5 chips you have so far. One of the chips won’t work, so pick it up (it will be added to your inventory as a “wrong chip”).
Bring the wrong chip back to the workshop at the mining facility. Approach the drilling machine.
Place the wrong chip on the table and set of drills to the drilling machine. You got the set of drills earlier in the workshop, from the safe. Activate the drilling machine. As a result, you will get the correct chip.
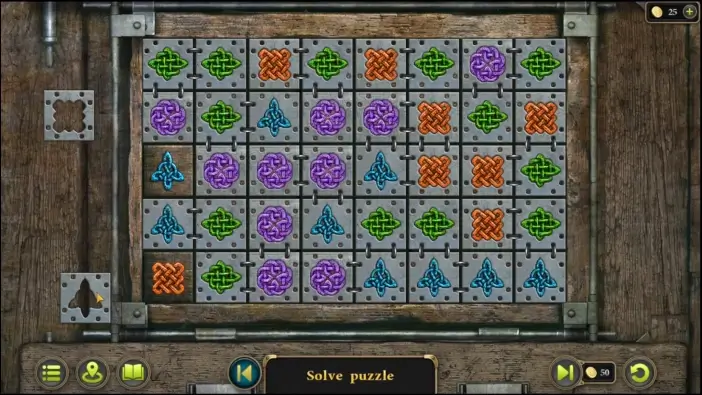
Go back to the town center, and to the gate leading towards the lighthouse. Place the missing chip on the gate. This will start a new puzzle challenge.
To solve this puzzle, you must move all tokens of the same symbol next to the symbol in the circle.
Once you solve the puzzle, the gate will open. Proceed through the gate.
1. On the left, cut the prickly shrub with your knife from the guardhouse and pick up the bag full of coins. You will need a bag to buy a rum in the tavern.
2. Check the bridge’s mechanism. You will find a handprint, which is the first evidence for the “Death of Michael” file.
3. Remove the broken gears. You will place new gears later.
Go back to the town center. Go belove the arch. Go downstairs to the fishing village.
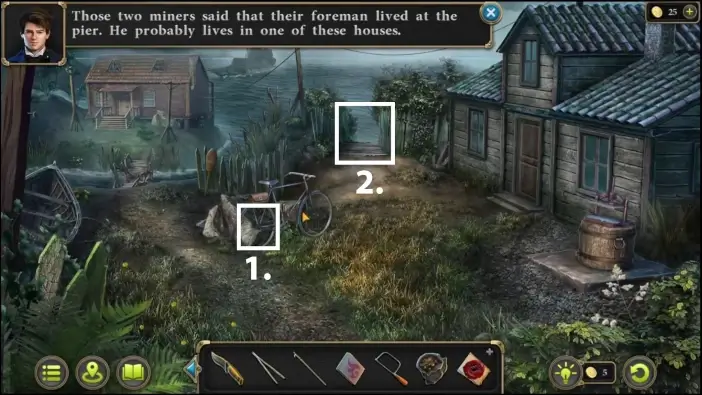
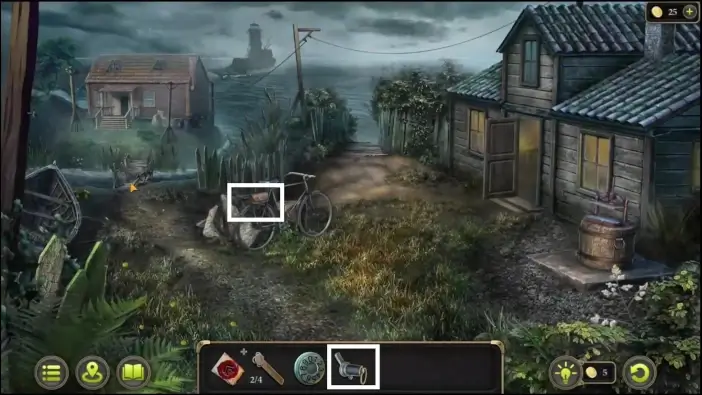
1. Approach the bicycle and take one bicycle spoke. You will need it later to lockpick the front door of the engineer’s house.
2. Go to the pier.
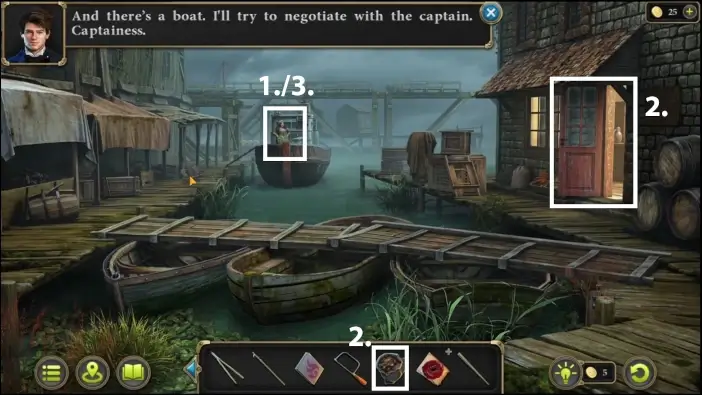
1. Approach the captain of the ship and speak with her. You will ask her to give you a rope ladder, but she will demand rum from you.
2. Go to the tavern on the right. Speak with the tavern keeper. During the conversation, your character will buy a bottle of rum for the captain with the bag of coins.
3. Bring the rum to the captain. Take the rope ladder. You will need it to climb down to the gorge to reach Michael’s body.
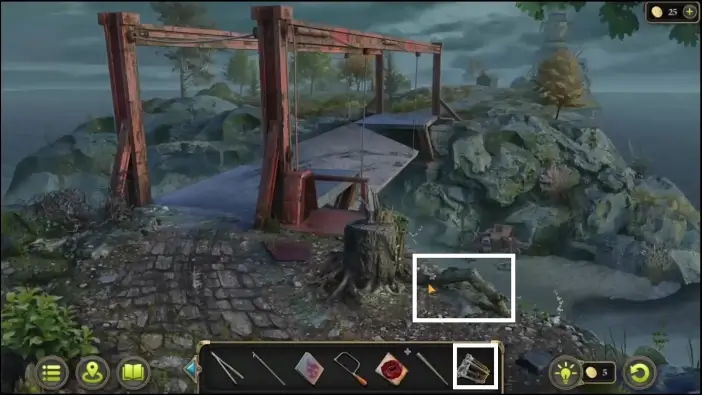
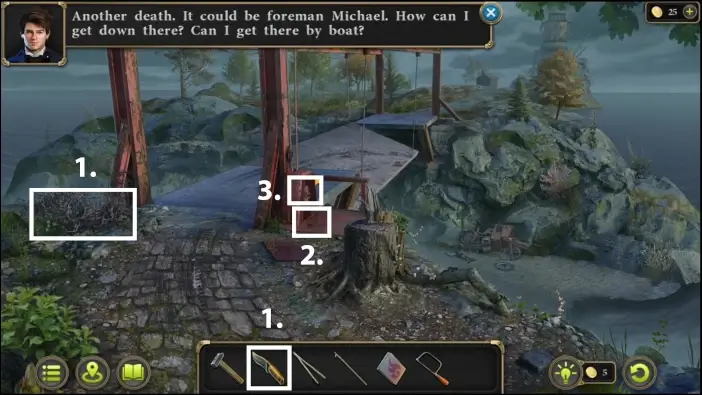
Go back to the bridge that leads to the lighthouse. Place the ladder rope on the slope to climb down into the gorge. Approach the car.
1. Open the car, and pick the 1st stone from the seat. You will need 4 stones to unlock a box in Michael’s house.
2. Approach the Michael’s body. Pick his key from the pocket.
3. Approach the chest and use a hacksaw to unlock it. Open the chest. Pick the valve and the handle from the chest. You will need a handle to open a furnace inside Michael’s house. As for the valve, you will need it to unlock one door in the stone house, at the lighthouse area.
Go to the fishing village and approach Michael’s house. Open the front door with the key you just got and enter the house.
1. Approach the bed and move one of the pillows. You will see a 2nd stone. Pick it.
2. Use a knife on a stuck window to open it. This will reveal a 3rd stone. Pick it.
3. Go to the furnace and open it with the handle you got from Michael’s chest. Pick the lever from the furnace.
4. Place the lever where it belongs and activate the mechanism. This will drop a ladder to the attic.
5. Optionally, you can check the newspaper page on the wall.
6. Beside the page, there is a mirror. Move the mirror to reveal the safe.
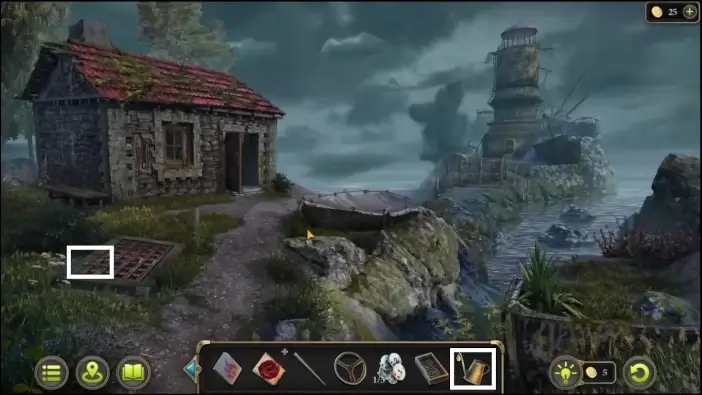
Go to the attic. Pick the oiler and the clock face. You will use the oiler later to fill it with oil from the barrel, in the town center.
1. Go back to the house and check the symbols on the wall, near the clock. This is the 2nd evidence.
2. Put the clock face inside the clock. This will reveal a hidden compartment that has the 4th and last stone. Don’t forget to pick the part of the code as well. You will need 2 parts of the code to open the safe in Michael’s house.
3. Optionally, you can check the view on the lighthouse, from the balcony.
4. Use the 4 stones you got to unlock the box on the table. This will start a new puzzle challenge.

In this puzzle, you have two symbols at the top. At the bottom, you have three rows, each row has a frame for a selected field. You need to put frames on the 3 things that are used to create one of the objects on the top.

Once you solve the puzzle, the box will be open. Pick the second part of the code.
Go to the safe and place both parts of the code. This will start a new puzzle challenge.
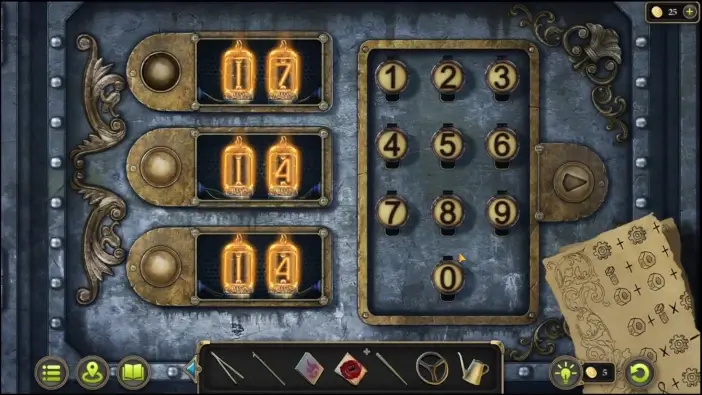
In the code, figure out which part represents which number. The solution: Gear is 2, screw is 4, and screw nut is 9. Then you need to figure out the next 3 sums. Enter the sums via buttons on the safe.
Once you solve the puzzle, the safe will be open. Read the letter from Michael. This is the 3rd evidence.
Go to the attic. Open the window to illuminate the rest of the attic.
You need to find 15 gears. Use the crowbar to pull out the nails and remove the plank.
Once you finish, the gears will be added to your inventory.
Go to the bridge that leads to the lighthouse. Use the gears to fix the bridge. Cross the bridge.
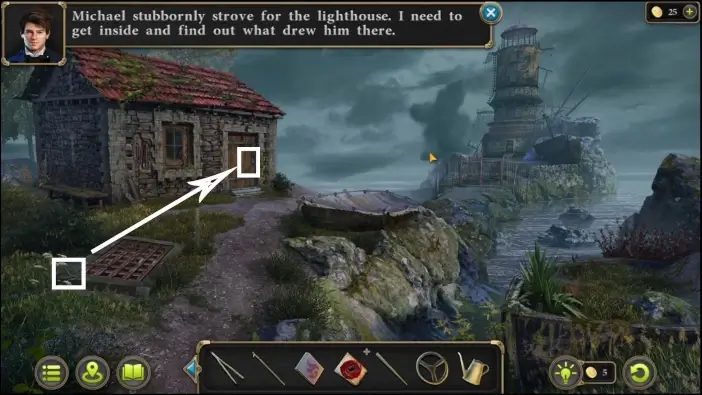
Pick the key and unlock the door of the stone house with it. Enter the stone house.
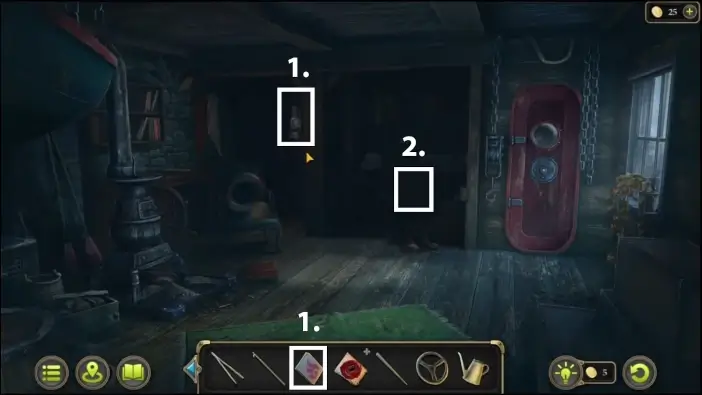
1. Use the matches from Jacob’s room to light the lantern. This will illuminate the room.
2. Go to the cabinet and start the puzzle challenge.
Place the tokens in such a way that the objects from the token are in the same place as the objects from the background picture.
From the cabinet, pick the 1st white token. You will need 5 tokens to unlock the lighthouse.
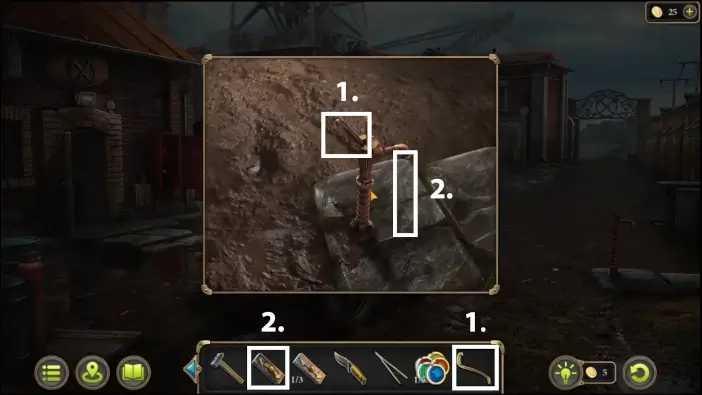
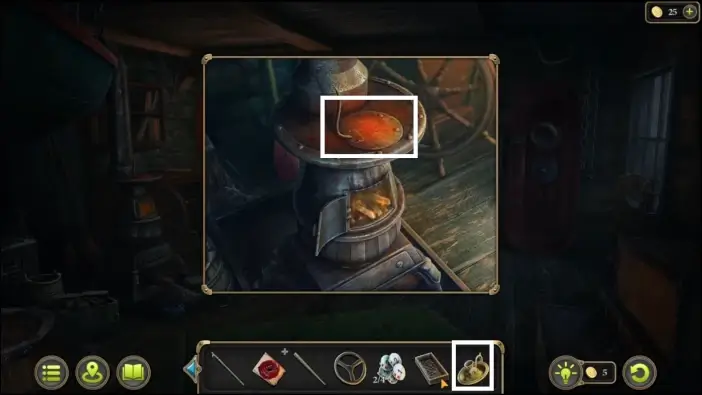
Pick the tap and the nails. You will need the tap for the barrel in the town center and nails to create a wooden bridge later.
Go to the town center and place the tap on the barrel. Hit the tap with a hammer.
Place the oiler from Michael’s attic below the tip and fill it with oil from the barrel. The oiler with oil will be added to your inventory.
Go to the lighthouse area, and in front of the stone house, there is a water drain. Use the full oiler to pour oil on it. Open the water drain.
Use the hook to pull out the box from the water drain.
Open the box and pick a candlestick with wax and the 2nd token.
Enter the stone house and approach the furnace. Open the slit and light the firewood with your matches.
Place the candlestick with wax on the stove plate. Wait for the wax to melt then pick the 3rd token.
At the door near the window, place the valve and open the door. You got the valve from the chest near Michael’s body. Proceed to the next room.

Once you are inside, you need to find all the objects. Some of the objects will help you to reach the other ones.
At the end of the puzzle, you will unlock the large chest with 2 coins.
From the chest, pick the key to the lighthouse’s gate. Exit the stone house.
1. Approach the bench on the side of the stone house. Use the tweezers to pick the first dolphin.
2. Approach the lighthouse’s gates and use the key you just got from the stone house.
At the front door of the lighthouse, there is a 2nd dolphin stuck.
Go back to the stone house. Approach the picture of the lighthouse and place the 2 dolphins to unlock the hidden compartment. In the compartment, look at the photograph. This will be the first evidence for the “Engineer and his Grandchildren” file.
Don’t forget to pick the 4th token from the hidden compartment.
Exit the house and approach the rowboat. Cut the linen with your knife. Pick the 5th and the last token.
Go to the lighthouse and place the 5 tokens. This will unlock a new puzzle challenge.
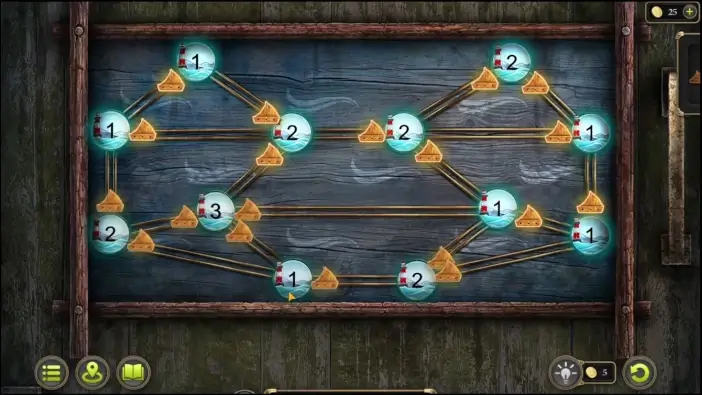
You need to move the boats and place the exact number of boats mentioned in the circles. For example, near the circle that has the number 1, you need to place only 1 boat, circle with the number 2, you need 2 boats, etc… If you play the game on Steam and you complete this puzzle in less than 35 moves, you will get the “Skillful” Steam achievement.
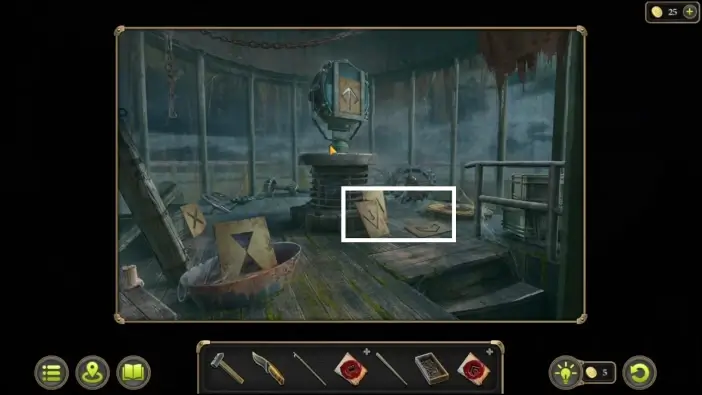
Climb to the top of the lighthouse. Check the stencils with symbols. This is the 4th and final evidence for the “Death of Michael” file.
File 4. Engineer and his Grandchildren
Go to Margaret’s office at the mining camp, and speak with her. You will get the key to the mine area where’s Henry’s grave.

Go back to the mine via elevator. Use the key to unlock the grave area. Set the switch for the rails then proceed to the tunnel.
You will have many paths to choose from. Change the paths by using the switch, to change the rails.
To find a shovel, go: left, left, and then straight.
Go back twice and then use the shovel to clear the dirt from the rails. Point the lever towards the right and go right.
There, you will find a Jack.
Go back to the area with three tunnels. go right and then right again. Place the jack to fix the rails. Go to the right.
Pick the key.
Go back once and take the left path. Place the key to open the next sections of the tunnel.
Go left and pick the rope.

Go back once and then take the right tunnel. Use the rope to descend into the hole. This is the grave area. To open the chest you will need 5 pickaxes. The first pickaxe is in the same hole.
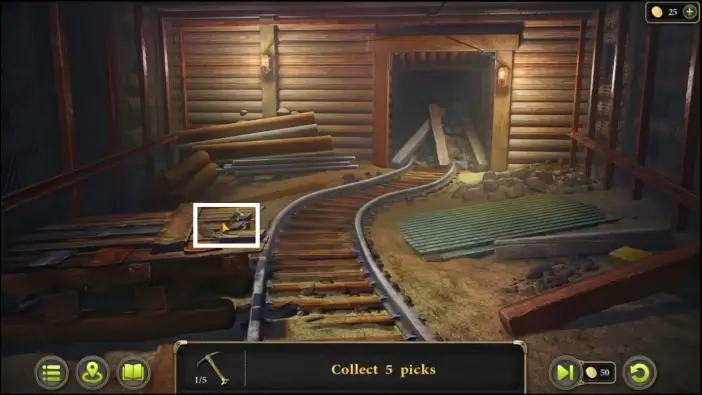
Go back to the start of the tunnels then go right, right, and right again. Take the 2nd pickaxe.

Go back to the three tunnels and go right and left. Take the 3rd pickaxe.
Go back to the three tunnels and take the middle path. Take the 4th pickaxe.
Go back to the three tunnels and go left and then right. Take the 5th and the final pickaxe.
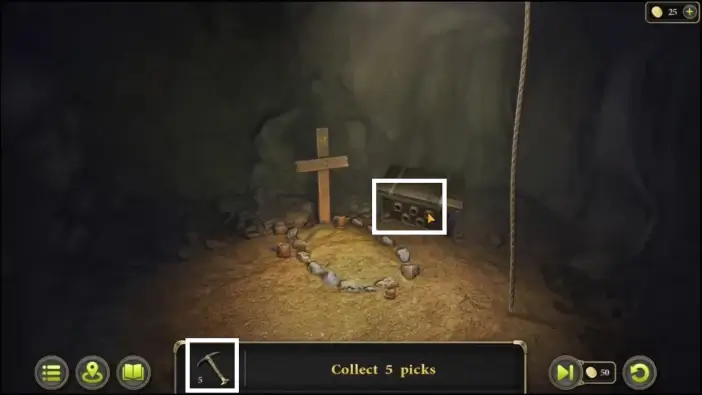
Once you find all the pickaxes, return to the grave and unlock the chest.
Read the letter. This is the second evidence for the “Engineer and his Grandchildren” file.
Go to the workshop. Speak with the old engineer. Once the conversation is over, go to the tavern, at the pier. Speak with the tavern keeper.
You can optionally peek through the window.
File 5. Death of Robert
Go around the tavern.
1. Near the tavern, check the club. This is the first evidence for the “Death of Robert” file.
2. Place the boards.
3. Place your box of nails you got from the stone house. Place the nails on the planks.
4. Use the hammer to drive the nails.
Once you finish, the newly built bridge will be added to your inventory.
Place the bridge to the rowboat. Now you can access the Robert’s body. Use the hook to pull out the body from the water. Use a knife to cut the net.
Check the Robert’s body. This is the final evidence for the “Death of Robert” file.
File 4. Engineer and his Grandchildren Part 2.
Go to the engineer’s house in the fishing village.
The door will be locked. Use the bicycle spoke to lockpick the door. This will unlock a new puzzle challenge.
You need to push the locks in a specific order. The order is 4, 5, 3, 6, 7, 2, 8, 1.
Once you solve the puzzle, the door will open. Enter the house.
1. Open the fridge. Use the knife to cut through the ice. Pick the 1st detail. You will need it to start one puzzle challenge in the engineer’s house later.
2. Go to the couch. Use the knife to cut it and take the rotating dial. You will need it for the chest in the bedroom of the engineer’s house.
3. Go to the bedroom.
1. There is a large sack on the bed. Use the knife to open it. Pick the key from it.
2. Pick the newspaper from the dresser. Pick the bookmark from it. The newspaper will be the 3rd evidence.
3. To open the lower part of the dresser you need to solve a puzzle. Use the bookmark you just picked to help you.

Match the numbers with the symbols as instructed by the drawings on the bookmark.
Once you solve the puzzle, the dresser will open. Pick the winding key.
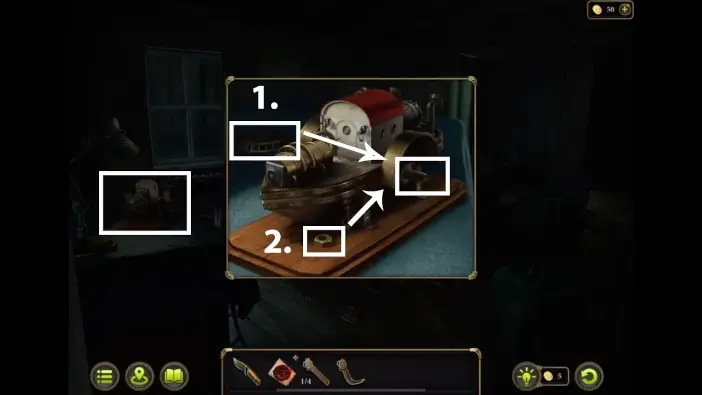
4. Approach the steamship model on the table. Place the wheel. Place the screw nut on the wheel.
On the front side of the model, place the winding key and activate the model ship. You will get a 2nd detail.
Exit the house, and approach the bicycle. Use the key to open a bag. Pick the 3rd detail and the book.
1. Go back to the engineer’s house. Check the handprint near the door. This is the 4th evidence.
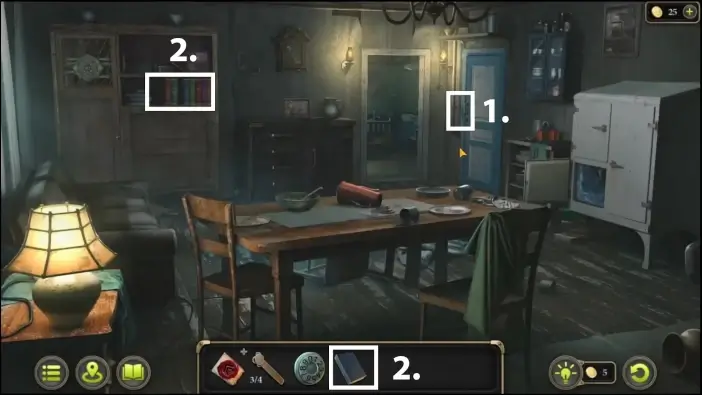
2. Place the book on the shelf. This will unlock a new puzzle.
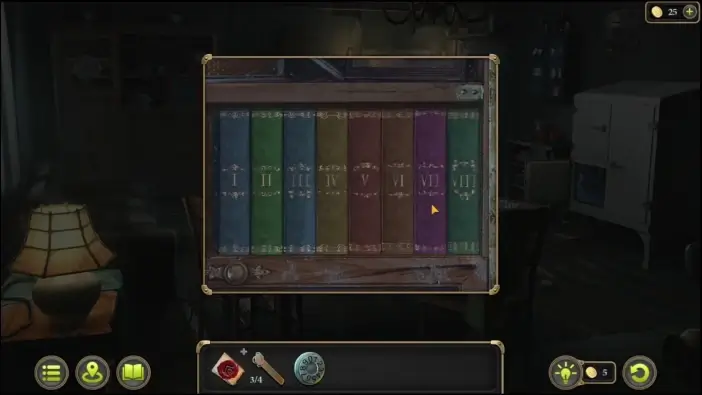
You just need to reshuffle the books in a numerical ascending order.
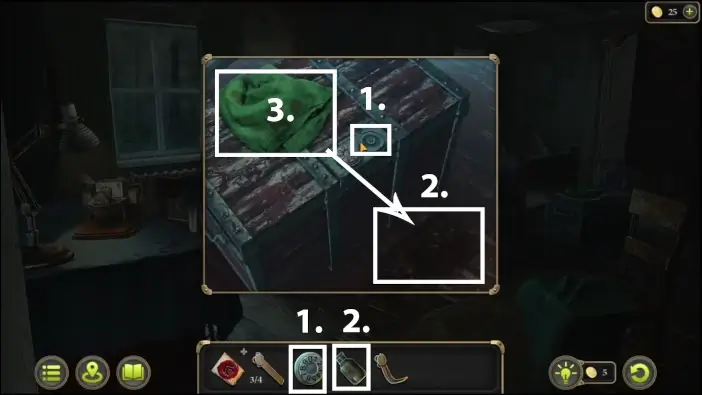
Once you solve the puzzle, a hidden compartment will open. Pick the alcohol.
Check the picture on the dresser. This is the 5th evidence. Pick the bent part beside the picture.
1. Go to the bedroom and approach the large chest. Place the rotating dial in its place.
2. Spill the alcohol on the ground right in front of the chest.
3. Use the cloth on the chest to wipe the clean the floor. You will see 3 numbers for the chest.
Rotate the numbers on the chest following the clue on the ground. Once you open the chest, move the rags and pick a valve.
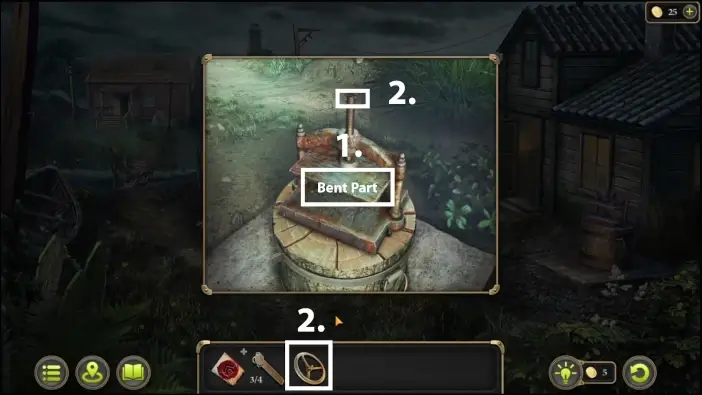
Exit the house and approach the small barrel. Place the bent part and the valve. Turn the valve. You will get the 4th detail.
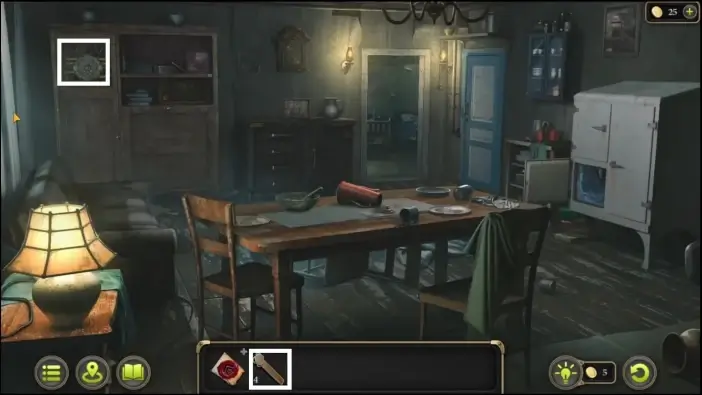
Return to the engineer’s house, and place all the details on the cabinet. This will start a new puzzle challenge.
You need to combine 2 numbers by either summing them or multiplying them. You need to get all the results shown on the sides. You can’t use the same numbers multiple times.
Once you solve the puzzle, the cabinet will be opened. Pick the key.
Use the key to unlock the door where the handprint is. Proceed to the basement.
To escape the basement you need to find all the necessary items. Many items will help you to find the next ones. Beware that you’ll have a limited time to escape because of the poisonous gas. You must solve this puzzle in under 2 minutes. The fact that you are trapped by the engineer’s son will be the sixth and final evidence for the “Engineer and his Grandchildren” file.
In the end, you will cut the slit with a saw and break the window to escape.