Can you escape the 100 room 17 | Levels 45-48
Hello everyone and welcome to the twelfth part of the walkthrough for “Can you escape the 100 room 17”. In the twelfth part of the walkthrough, we will cover levels 45 to 48.
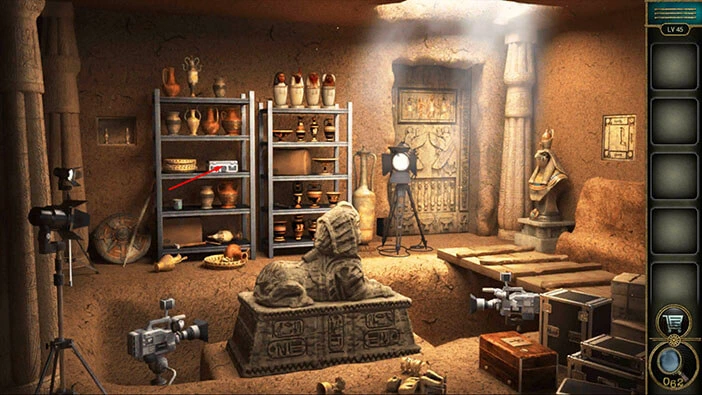
Level 45
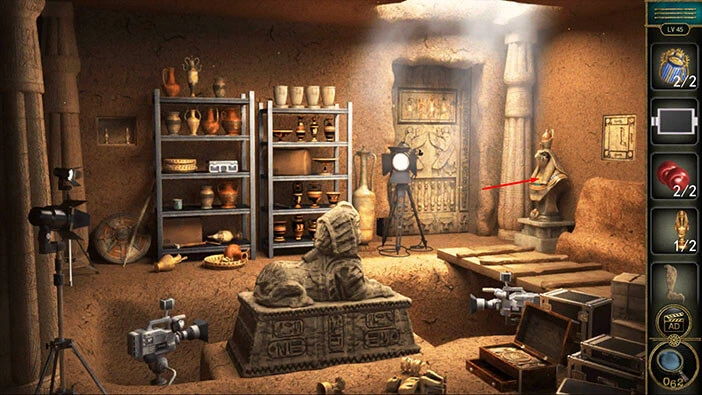
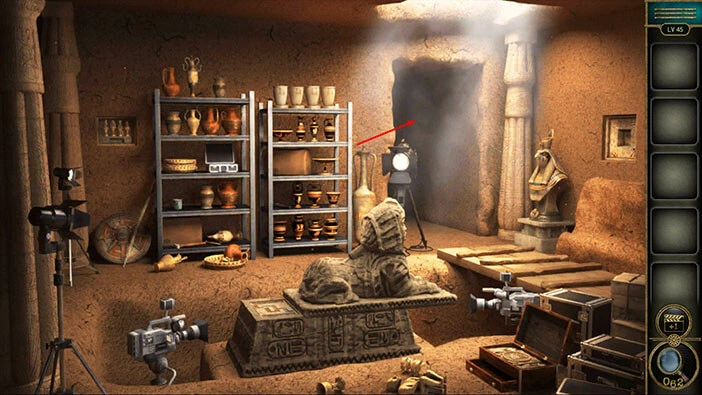
Let’s explore the forty-fifth level. Tap on the shelf on the left to take a closer look at it.
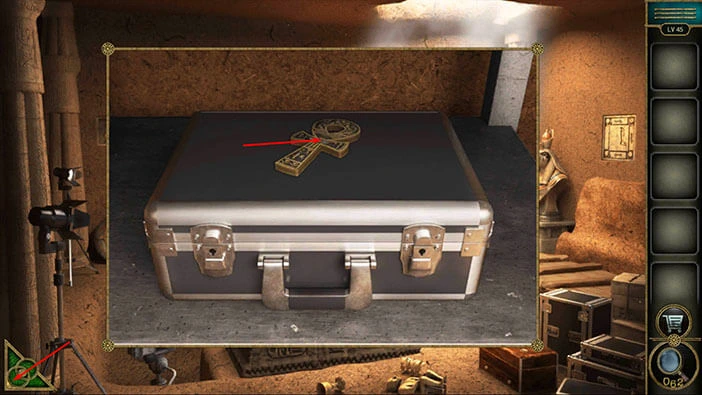
In the suitcase, you will find “Ankh”. Tap on it to pick it up. After that, tap on the green button in the bottom left corner of the screen to go back.
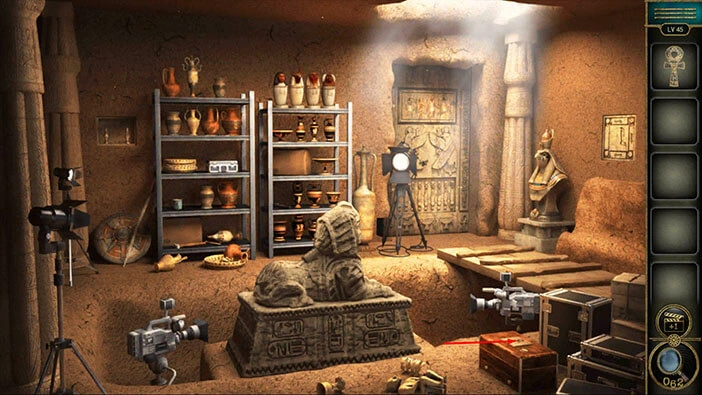
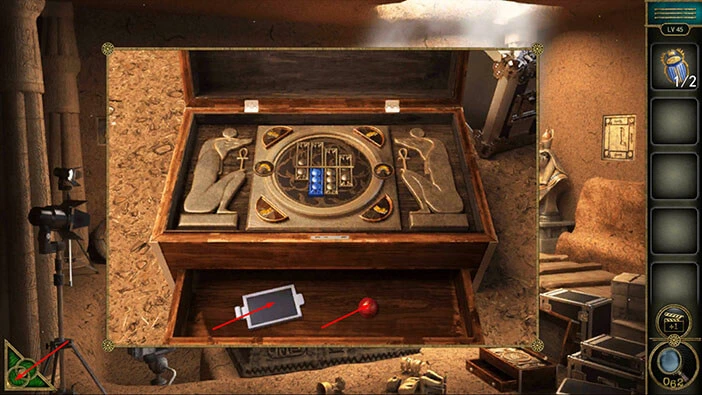
Next, let’s tap on the wooden chest in the bottom right corner of the screen to take a closer look at it.
On the right side of the chest, you will find a “Beetle”. Tap on it to pick it up.
After that, select the “Ankh” from the inventory and insert it into the empty slot on the chest.
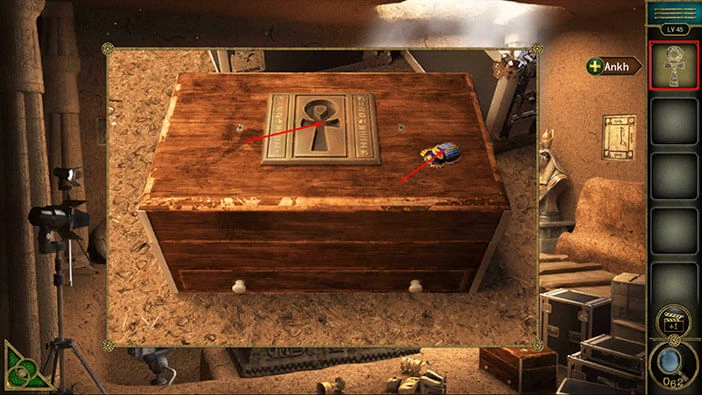
With that, you will open the chest, and inside you will discover another puzzle. Let’s tap on it to start the interaction.
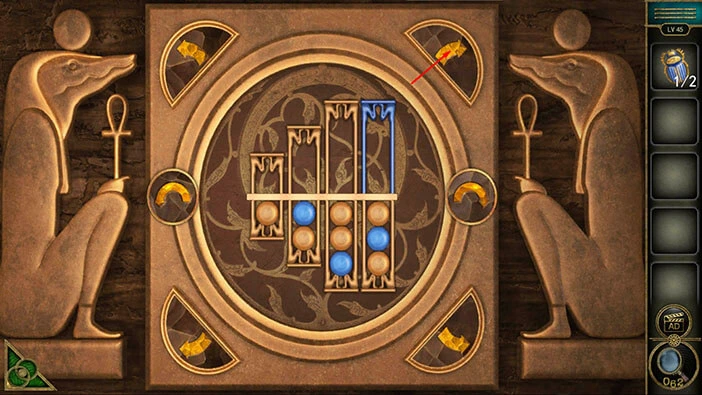
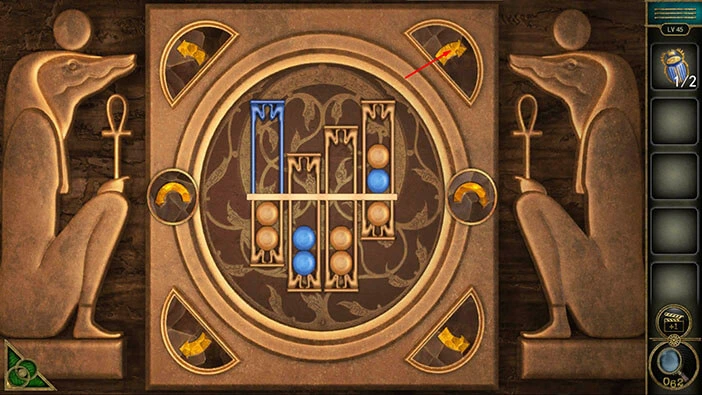
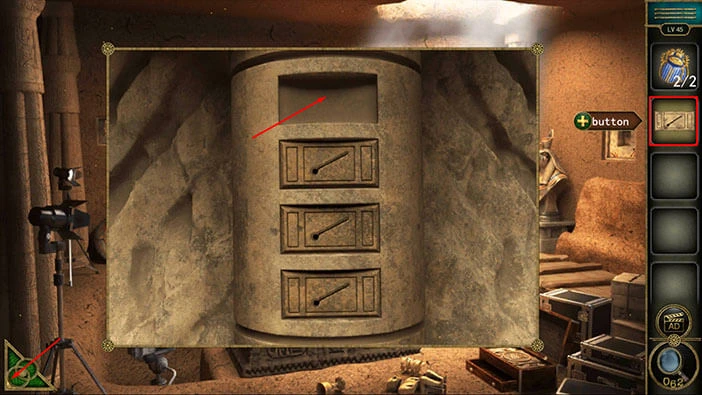
Here, we have another puzzle. Our task in this puzzle is to place all the blue balls into the blue container. We will do this puzzle in several steps. Let’s begin.
Step 1
Tap on the arrow in the top right slot to move all the containers at the top by one slot to the right.
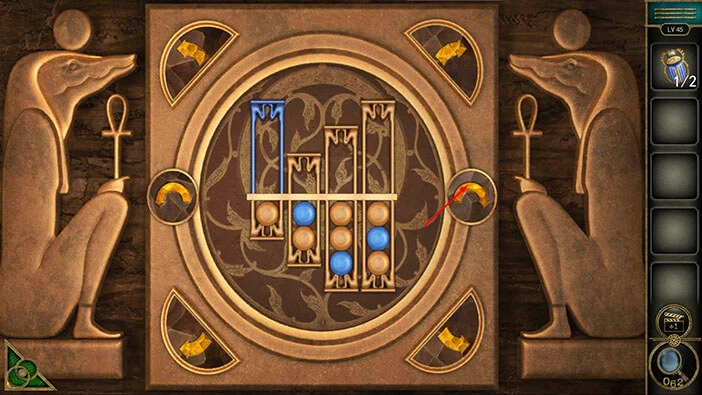
Step 2
Tap on the arrow on the right to rotate the containers.
Step 3
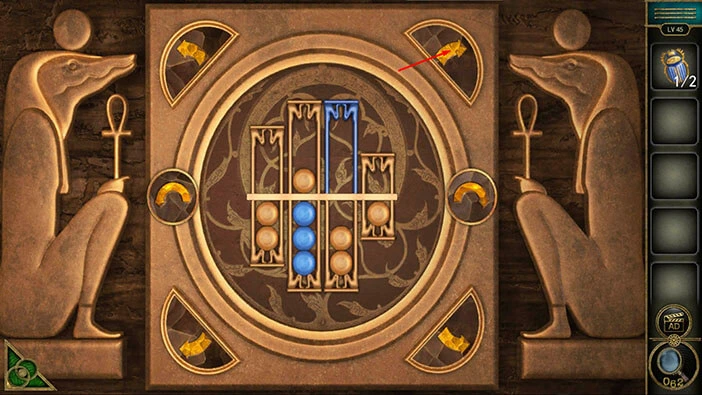
Tap on the arrow in the top right slot to move all the containers at the top by one slot to the right.
Step 4
Tap on the arrow on the right to rotate the containers.
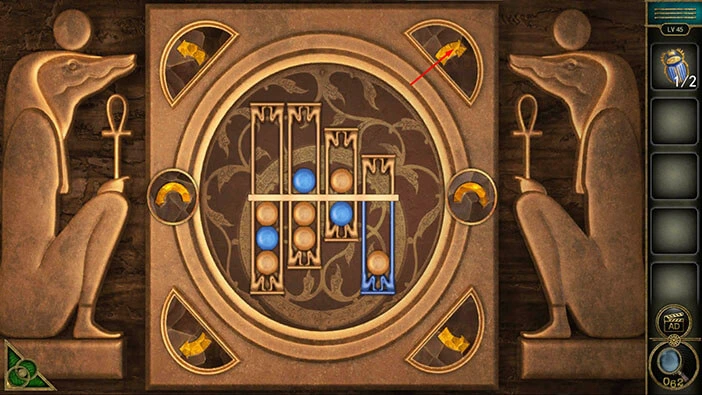
Step 5
Tap twice on the arrow in the top right slot to move all the containers at the top by two slots to the right.
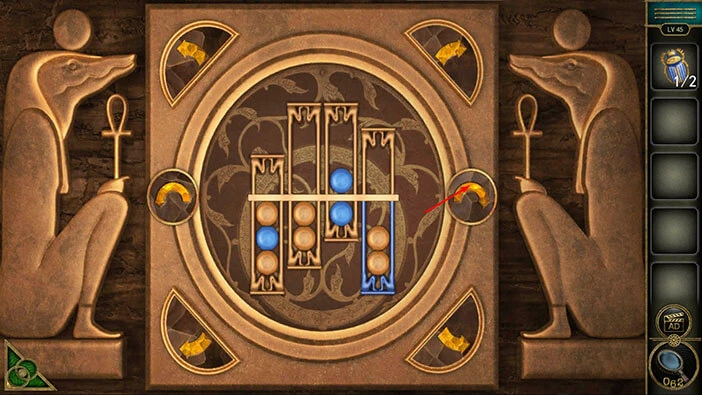
Step 6
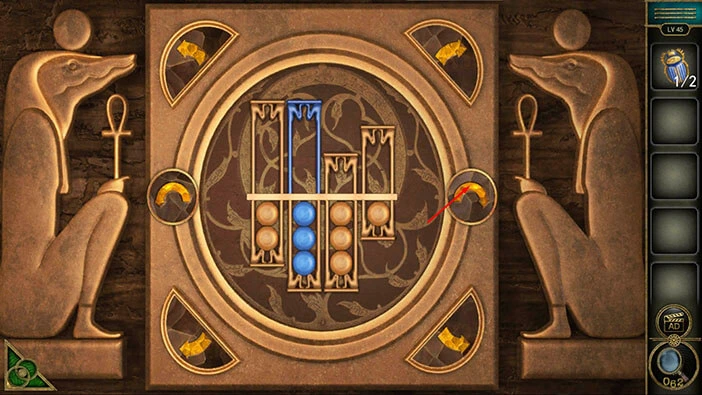
Tap three times on the arrow in the top right slot to move all the containers at the top by three slots to the right, and you will align the blue balls with the blue container.
Step 7
Tap on the arrow on the right to rotate the containers, and you will place all blue balls into the blue container.
The drawer below the puzzle will open, as soon as you place all the blue balls into the blue container. Inside you will find, a “Eyeball” and a “Screen”. Tap on these two items to pick them up.
After that, tap on the green button in the bottom left corner of the screen to go back.
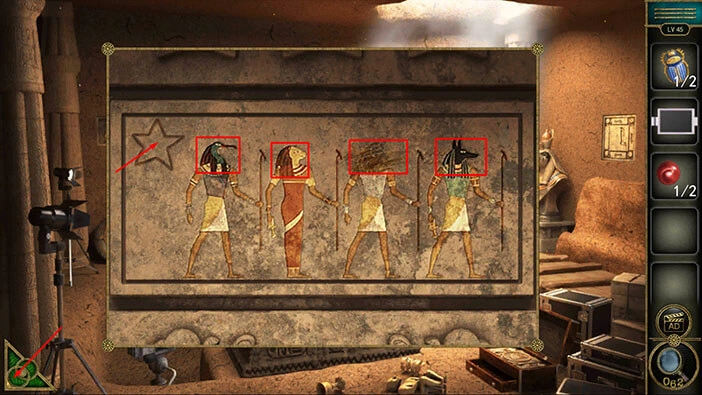
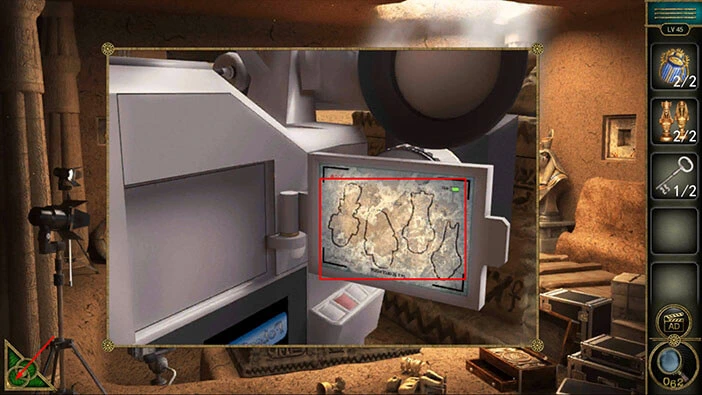
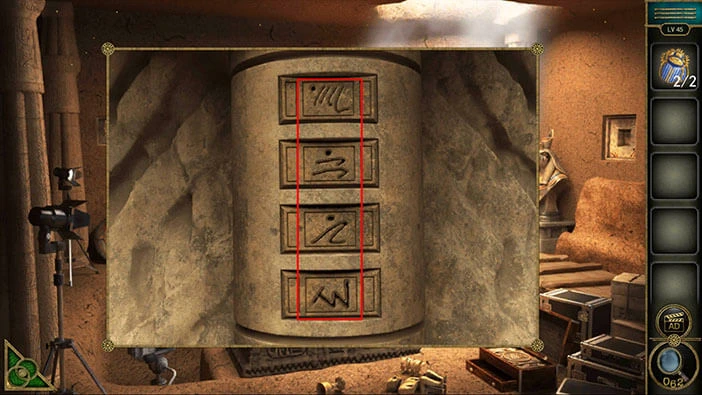
If you take a look at the top half of the door, you will notice a picture. Let’s tap on it to take a closer look.

In the picture, we can see that each of the four mythological creatures has a different head. Let’s memorize/write down the order of the heads because that information represents the hint for the next puzzle. So, starting from left to right, we have,
First head = Snake
Second head = Lion
Third head = Unknown
Fourth head = Wolf
Also, in the top right corner of the picture, we can see a star. Tap on it and you will get an “Achievement star”.
Once you’re done, tap on the green button in the bottom left corner of the screen to go back.
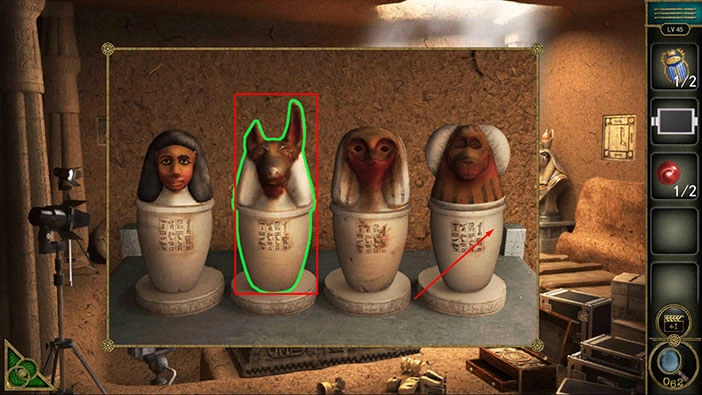
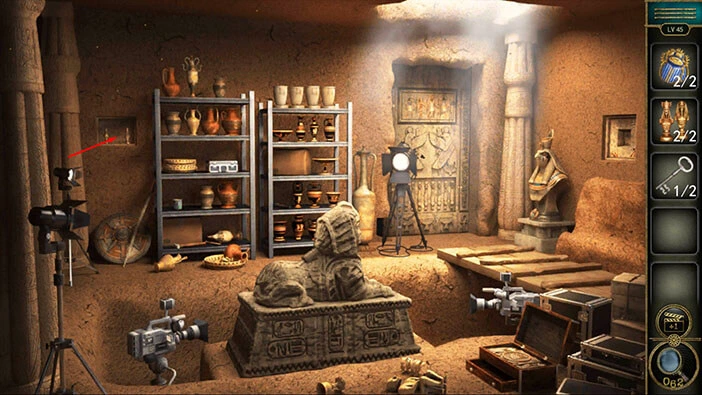
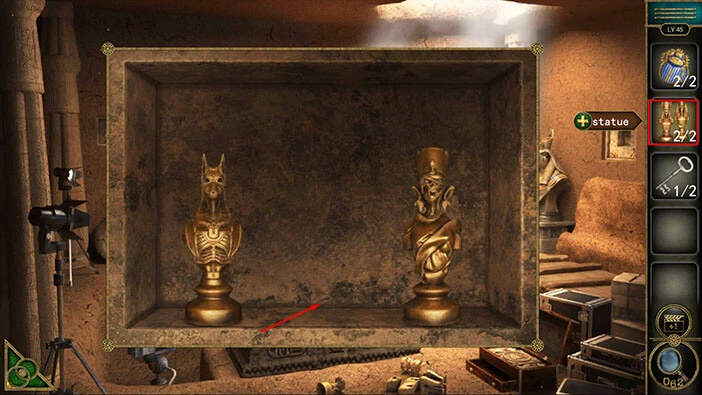
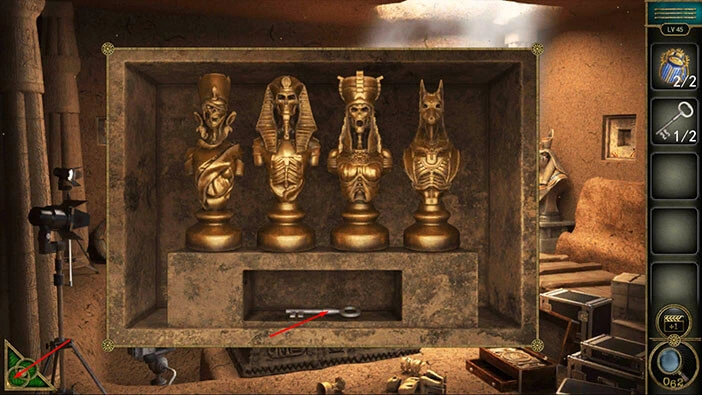
Next, let’s tap on the four statues, located at the top of the shelf on the right, to take a closer look at them.

Here, we can see the same four heads that we saw in the picture, a Snake head, a Lion head, and a Wolf head. Also, we discovered that the unknown head is the Monkey head. So, the Monkey head should be in the third slot.
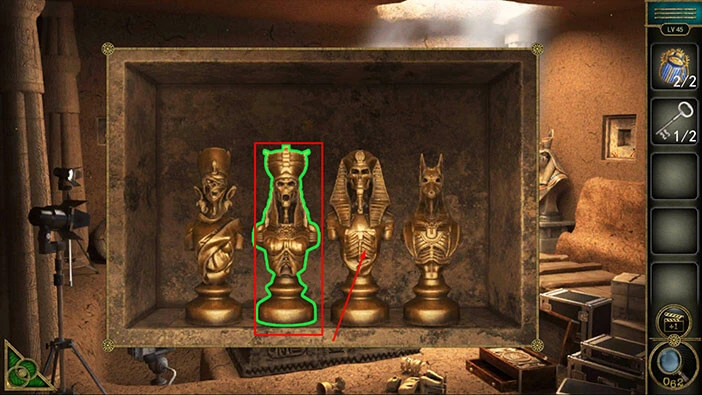
Let’s rearrange the heads and place them in an order that matches the order that we saw in the picture. We will do this puzzle in several steps. Let’s begin.
Step 1
Select the second head (Wolf’s head) then tap on the fourth head (Monkey’s head) to swap their position. With that, you will place the Wolf’s head into the correct slot.
Step 2
Select the first head (Lion’s head) then tap on the second head (Monkey’s head) to swap their position. With that, you will place the Lion’s head into the correct position.

Step 3
Select the first head (Monkey’s head) then tap on the third head (Snake’s head) to swap their position. With that, you will place all the heads into the correct positions, and you will solve this puzzle.
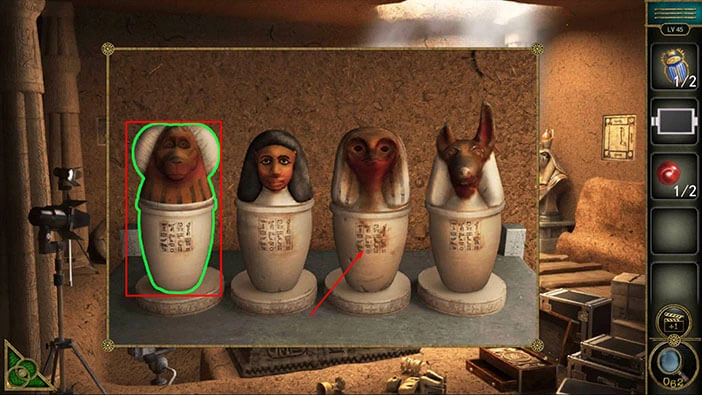
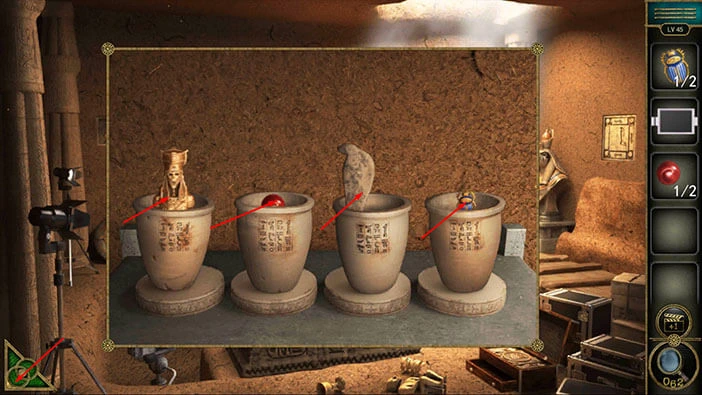
Here, you will find four items. A “Statue”, another “Eyeball”, a “Snake”, and another “Beetle”.
Once you’re done, tap on the green button in the bottom left corner of the screen to go back.
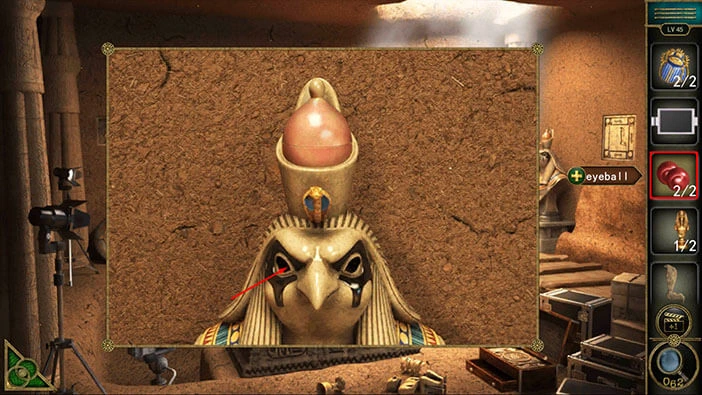
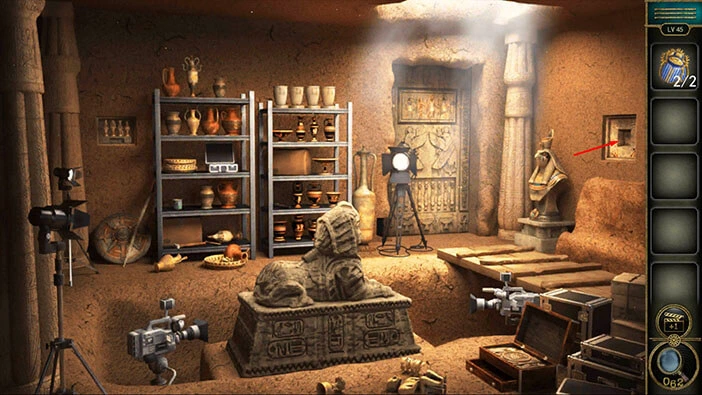
Next, let’s tap on the eagle statue on the right to take a closer look at it.
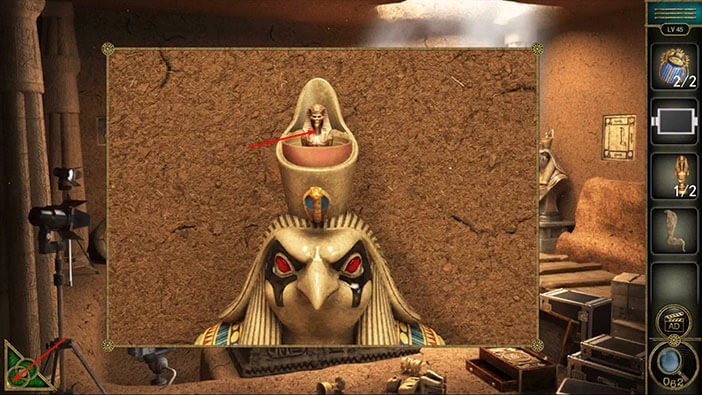
You will notice that the statue doesn’t have eyes. So, let’s select the “Eyeballs” from the inventory and insert them into the empty sockets.
The top of the statue will open as soon as you insert the “Eyeballs”, and inside you will find another “Statue”. So, let’s tap on it to pick it up.
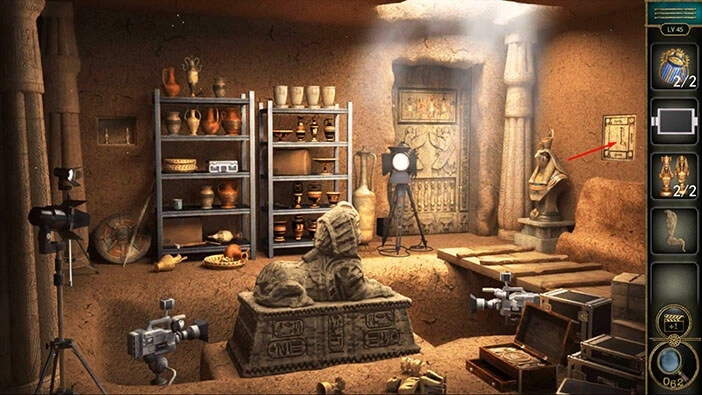
After that, tap on the green button in the bottom left corner of the screen to go back.
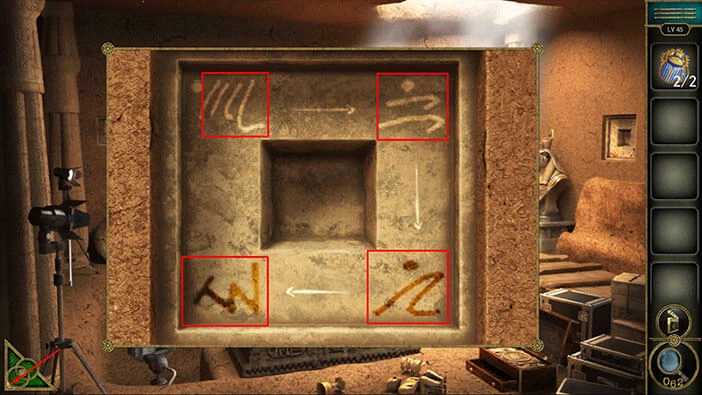
Next, let’s tap on the board on the wall on the right to take a closer look at it.
You will notice that one snake is missing, so let’s select the “Snake” from the inventory and insert it into the empty slot.
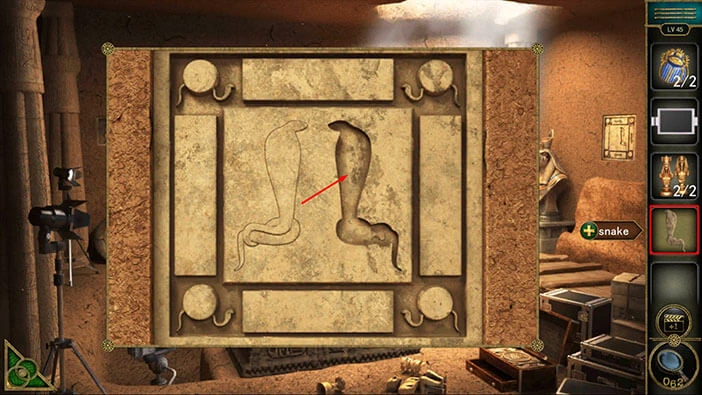
The secret compartment will open as soon as you insert the snake, and inside you will find a “Key”. Tap on it to pick it up.
Also, here we can see four symbols, and these symbols represent the hint for a puzzle that we will encounter later in the walkthrough. We will come back to this hint when we get to this puzzle, for now, just take note of it.
Once you’re done, tap on the green button in the bottom left corner of the screen to go back.
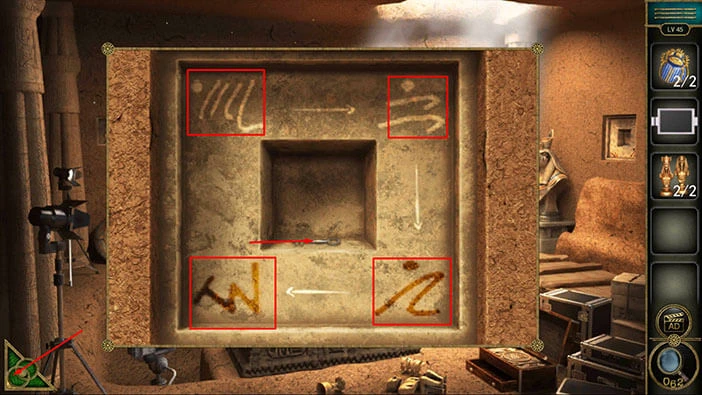
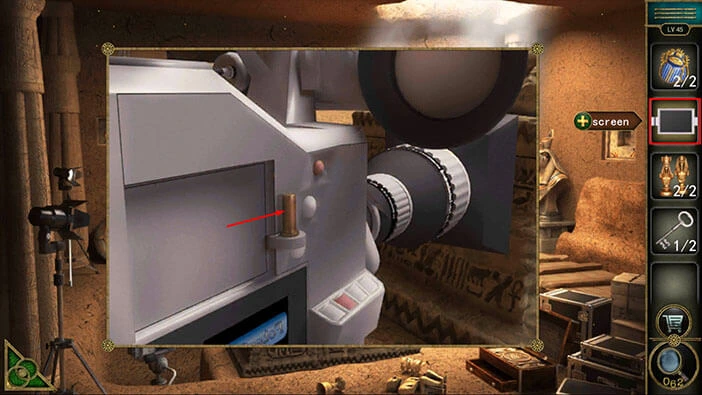
Next, let’s tap on the camera, located in the bottom left corner of the screen, to take a closer look at it.
Select the “Screen” from the inventory and attach it to the camera.
Here, we can see four shapes. Try to memorize/write down the order of the shapes, because this information represents the hint for the next puzzle.
Once you’re done, tap on the green button in the bottom left corner of the screen to go back.
Next, on the wall, in the top left corner of the room, you will notice a hole with two statues. Let’s tap on it to take a closer look.
Two statues are missing, so let’s select the “Statues” from the inventory and insert them into the empty slots.
Our next task is to rearrange the statues. The order of the statues should match the order of the shapes that we saw on the camera screen.
We will do this puzzle in several steps. Let’s begin.
Step 1
Select the first statue, then tap on the fourth statue to swap their positions.

Step 2
Select the second statue, then tap on the third statue to swap their positions. With that, you will solve this puzzle.
As soon as you solve the puzzle, you will discover a secret compartment, and inside you will find a “Key”. Let’s tap on it to pick it up.
After that, tap on the green button in the bottom left corner of the screen to go back.
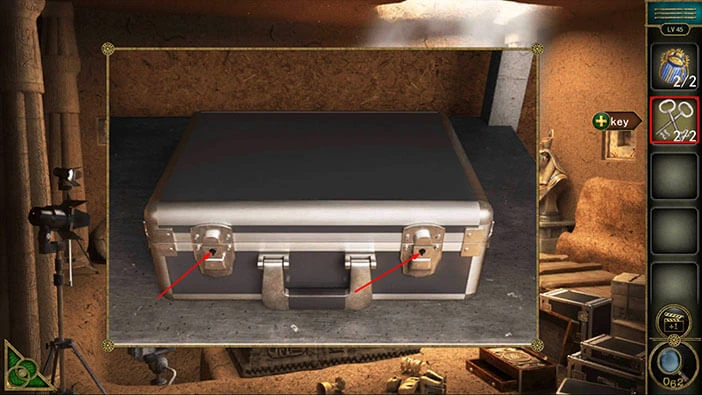
Next, let’s tap on the suitcase on the shelf on the left to take a closer look at it.

Select the “Keys” from the inventory and use them to unlock the suitcase.
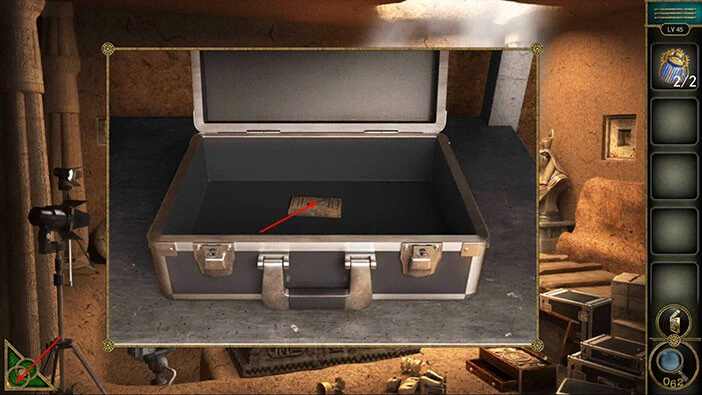
In the suitcase, you will find a “Button”. Tap on it to pick it up.
After that, tap on the green button in the bottom left corner of the screen to go back.
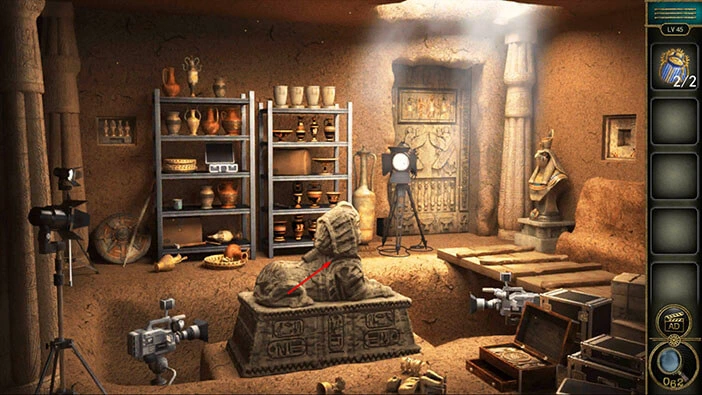
Next, let’s tap on the large sphinx statue to take a closer look at it.
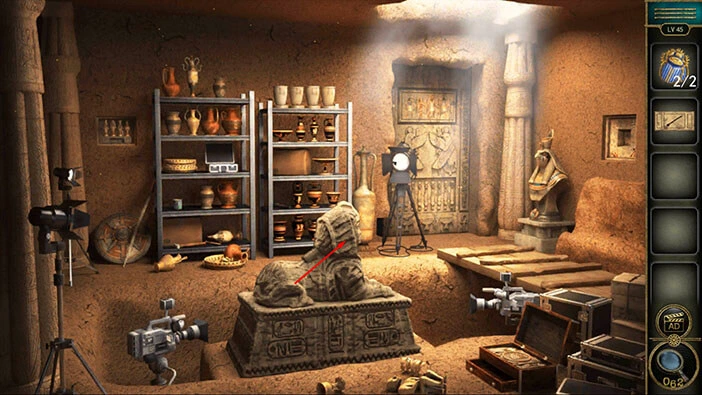
You will notice that one slot is empty, so let’s select the “Button” from the inventory and insert it into the empty slot.
You will notice that there is a strange symbol on each button. So, we need to discover the correct combination of symbols in order to solve this puzzle. Let’s do that.
Tap on the green button in the bottom left corner of the screen to go back.
Tap on the hole in the wall on the right to take another look at the symbols that we saw previously.
Here, we can see the symbols that represent the solution for the next puzzle. The symbol in the top right corner is the first one, and we can follow the arrows to determine the order of the other three symbols. Let’s memorize/write down the symbols and their order.
Once you’re done, tap on the green button in the bottom left corner of the screen to go back.
Let’s tap on the sphinx statue again to start the interaction.
Enter the four symbols that we discovered previously. You can see the solution in the image below.
Once you enter the correct symbols, the sphinx statue will slide to the right, and you will discover another puzzle. Let’s tap on it to take a closer look.
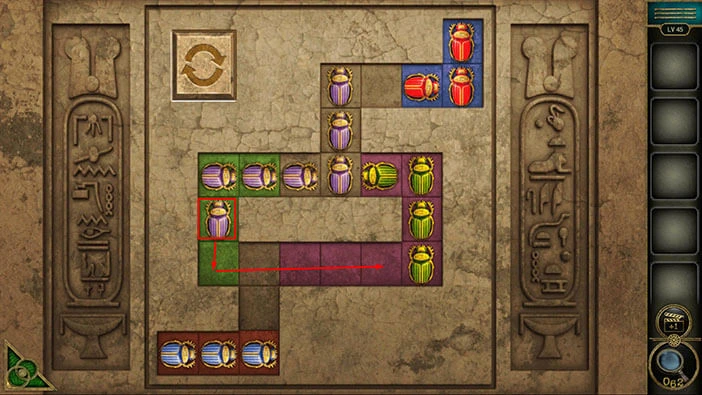
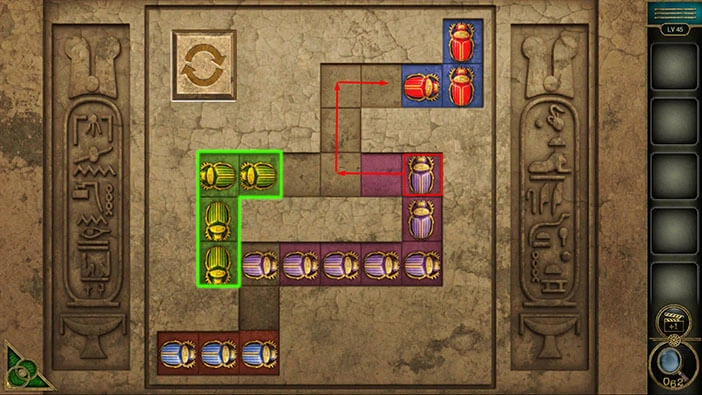
Here, we can see red, purple, and green beetles. However, there is only one blue beetle so, select the “Beetles” from the inventory and insert them into the empty slots at the bottom.
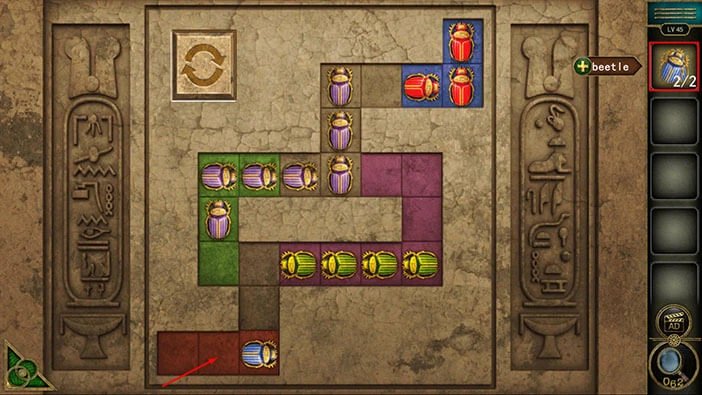
Our next task is to place all the beetles into the slots of the matching color (all blue beetles into the blue slots, etc.). We will do this puzzle in several steps. Let’s begin.
Step 1
Select the green beetles, and drag them to the fifth slot in the top-middle row.
Step 2
Select the purple beetles, and drag them to the fifth slot in the bottom-middle row.
Step 3
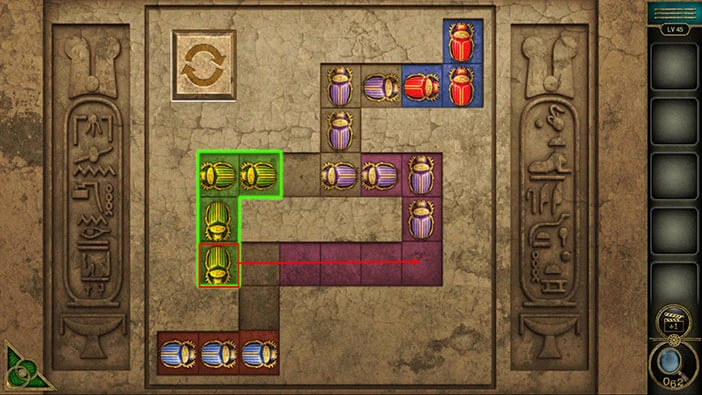
Select the green beetles, and drag them to the second slot in the top-middle row.
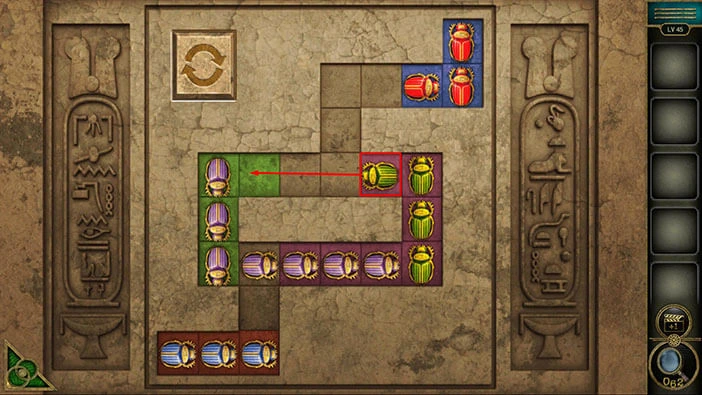
Step 4
Select the purple beetles, and drag them to the sixth slot in the top-middle row.
Step 5
Select the green beetles, and drag them to the first slot in the bottom-middle row.
Step 6
Select the purple beetles, and drag them next to the red beetles in the blue slots.
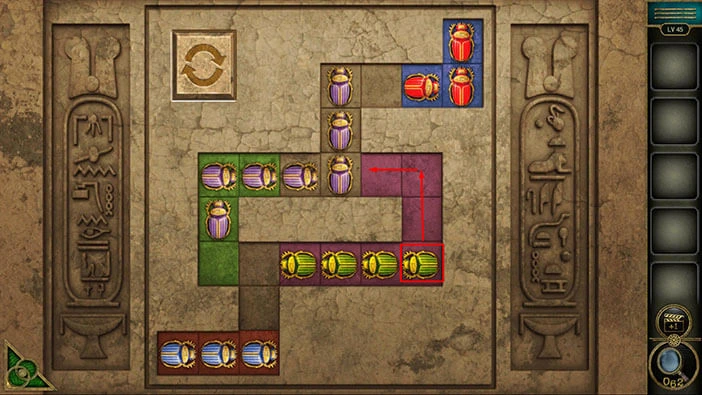
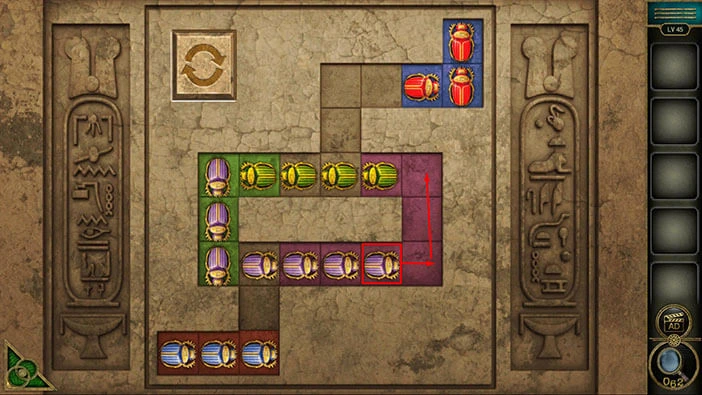
Step 7
Select the green beetles, and drag them to the sixth slot in the bottom-middle row.
Step 8
Select the blue beetles, and drag them to the third slot in the top-middle row.
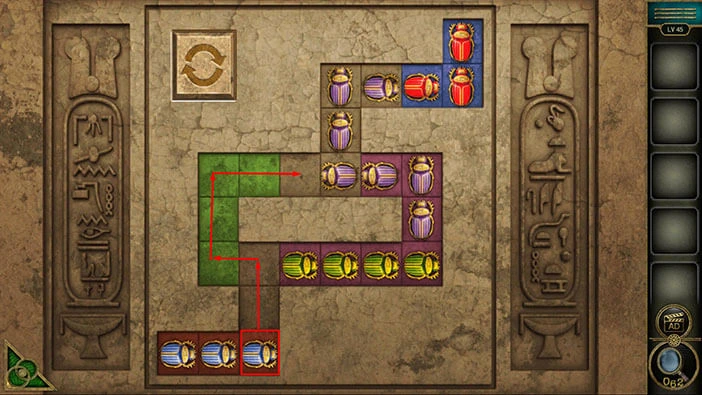
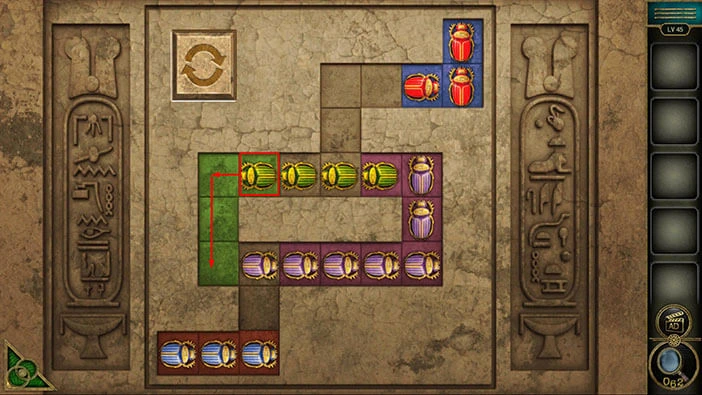
Step 9
Select the green beetles and drag them to the bottom of the puzzle.
Step 10
Select the purple beetles, and drag them next to the blue beetles on the left side.
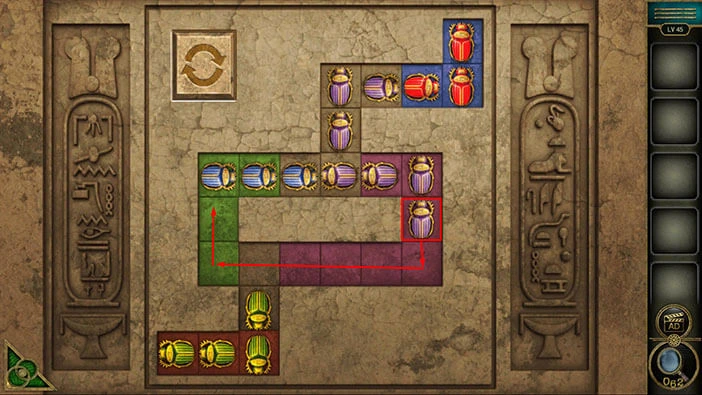
Step 11
Select the red beetles, and drag them to the purple beetles on the right.
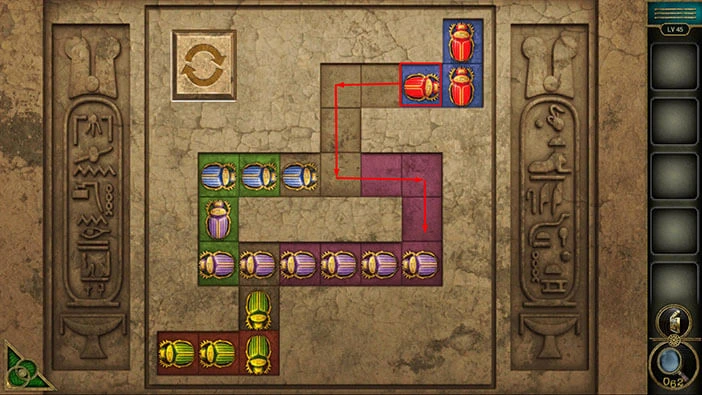
Step 12
Select the blue beetles, and drag them into the blue slots in the top right.
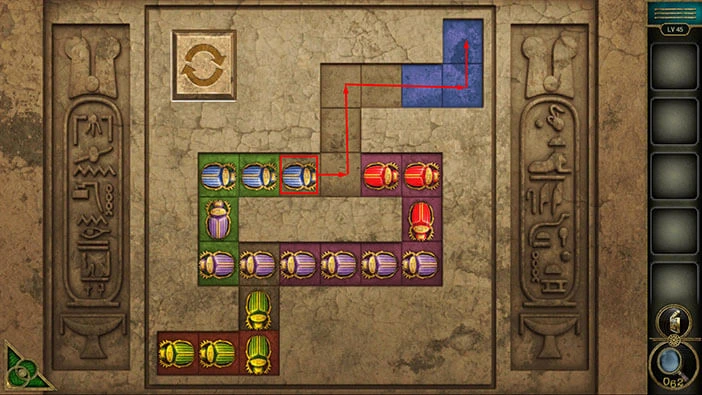
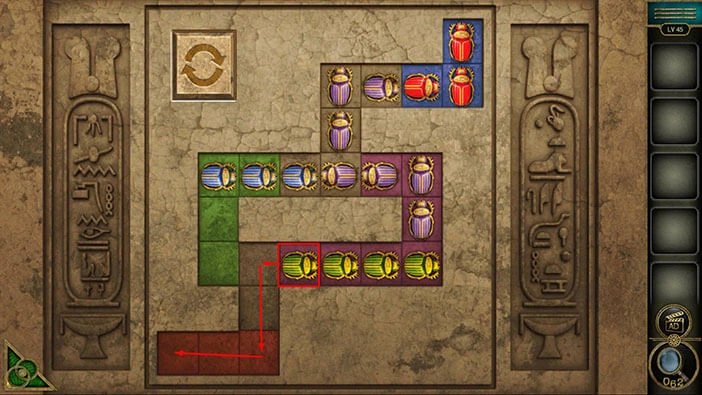
Step 13
Select the red beetles, and drag them to the first slot in the top-middle row.
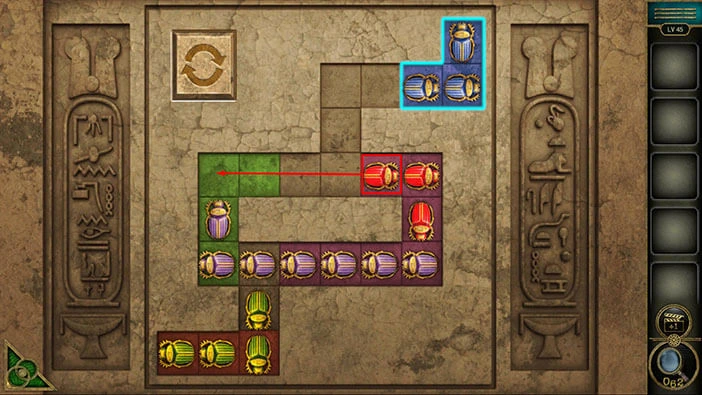
Step 14
Select the purple beetles, and drag them next to the blue beetles in the top right.
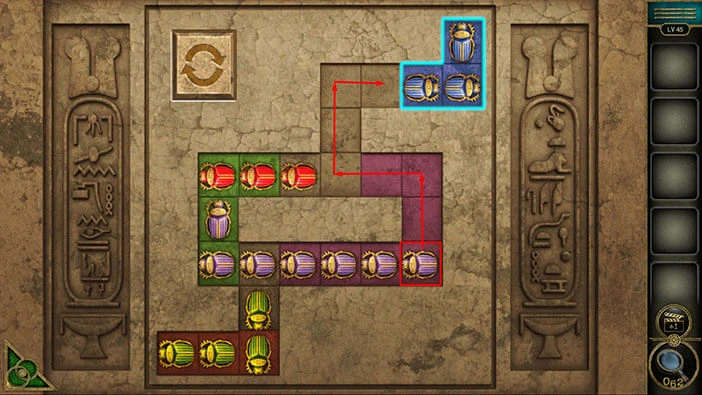
Step 15
Select the green beetles, and drag them to the sixth slot in the bottom-middle row.
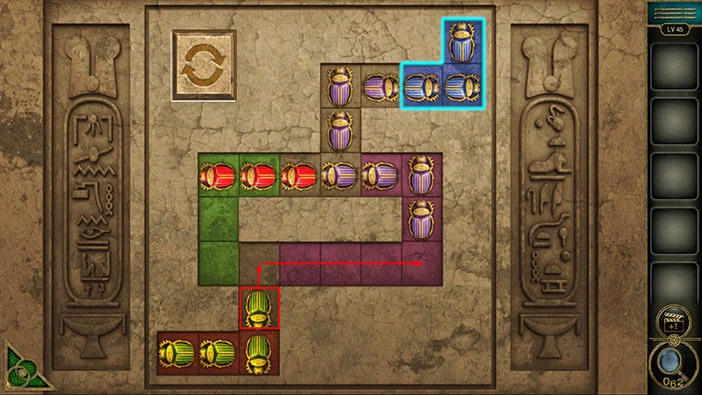
Step 16
Select the red beetles, and drag them into the red slots in the bottom left corner.
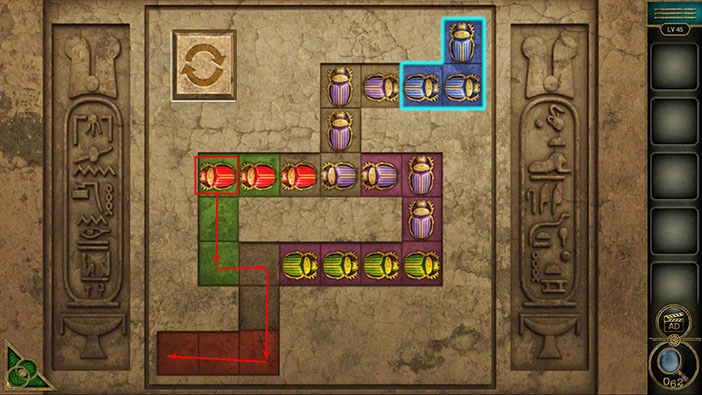
Step 17
Select the green beetles, and drag them into the green slots.
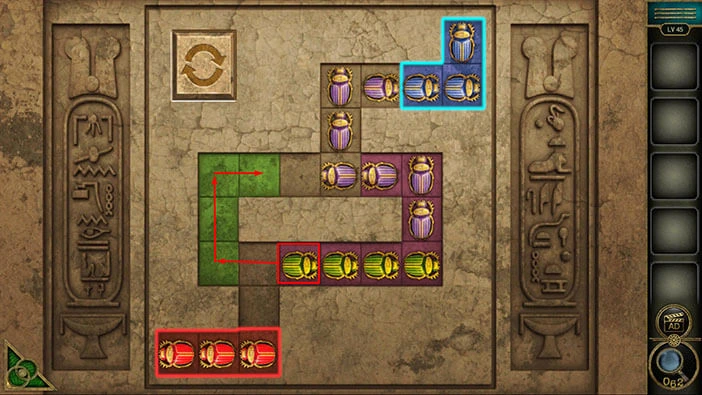
Step 18
Select the purple beetles, and drag them into the purple slots.
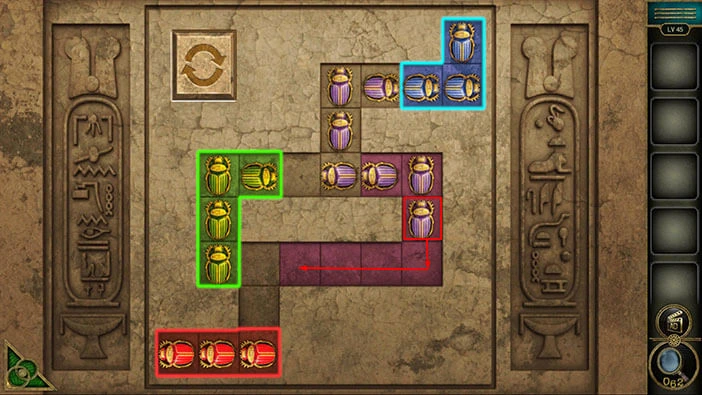
With that you will open the door, so let’s tap on it to proceed to the next level.
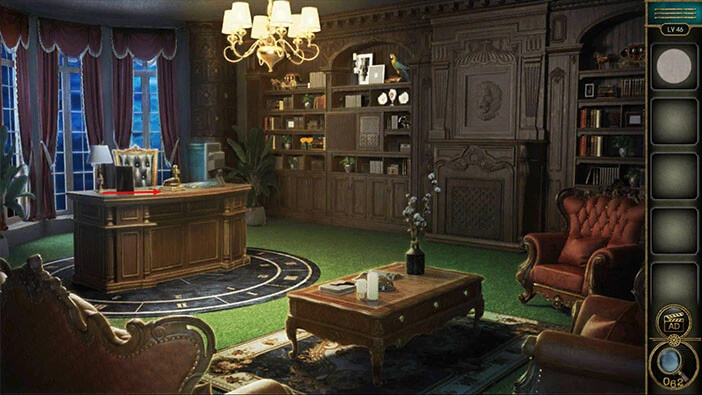
Level 46
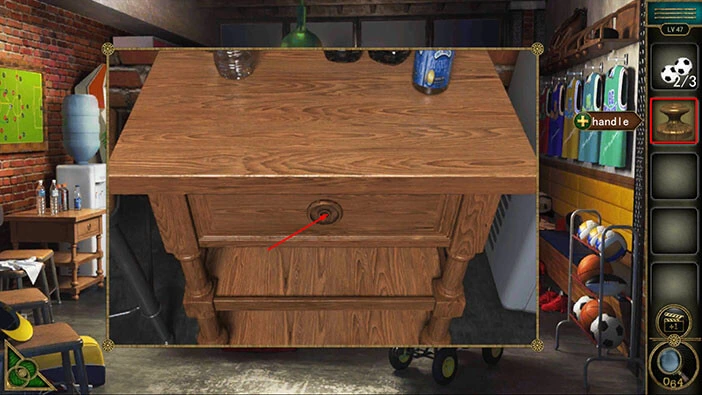
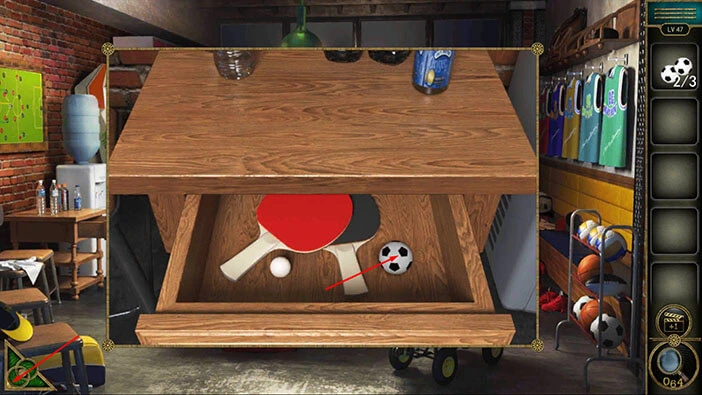
Let’s explore the forty-sixth level. Tap on the small table in front of you to take a closer look at it.
Here, you will find a “Button”. Tap on it to pick it up. After that, tap on the green button in the bottom left corner of the screen to go back.
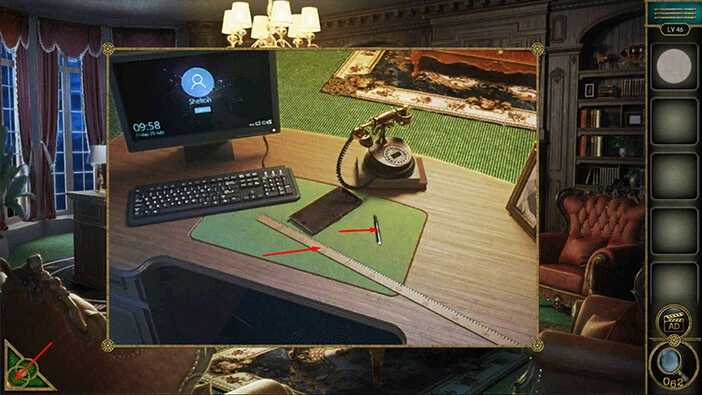
Next, let’s tap on the large desk to take a closer look at it.
Here, you will find two items, a “Pen” and a “Ruler”. Let’s tap on these two items to pick them up.
After that, tap on the green button in the bottom left corner of the screen to go back.
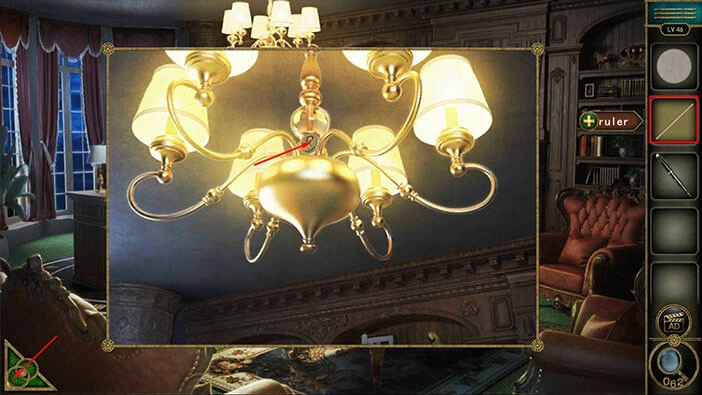
Next, let’s tap on the chandelier to take a closer look at it.

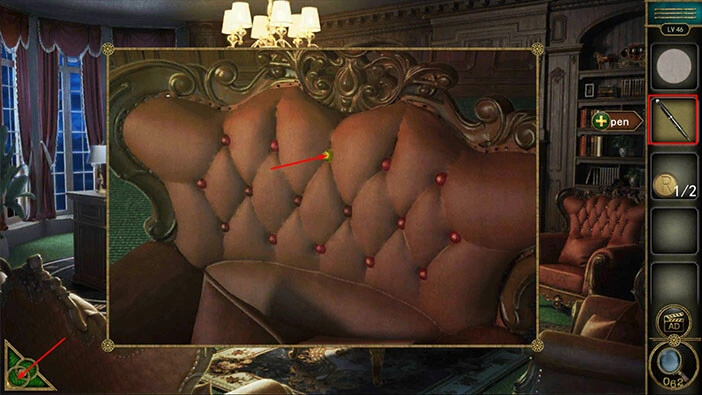
You will notice a game prop on the chandelier, but our character can’t reach it. So, let’s select the “Ruler” from the inventory and use it to reach the “Game prop”.
After that, tap on the green button in the bottom left corner of the screen to go back.
Next, let’s tap on the armchair on the right to take a closer look at it.
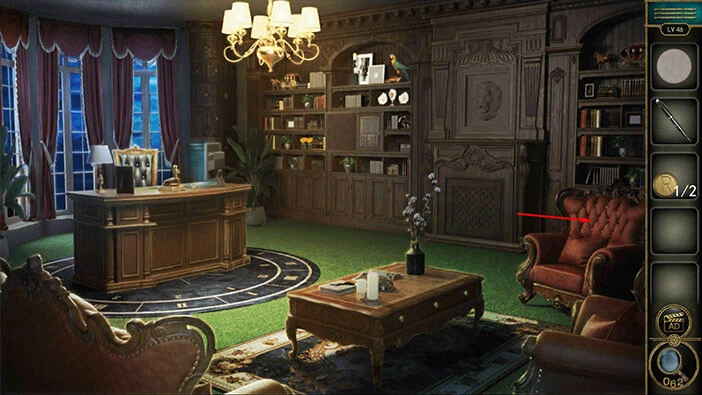
Here, you will find a “Ball” but it is attached to the armchair. So, let’s select the “Pen” from the inventory and use it to detach the “Ball” from the armchair.
Once you’re done, tap on the green button in the bottom left corner of the screen to go back.
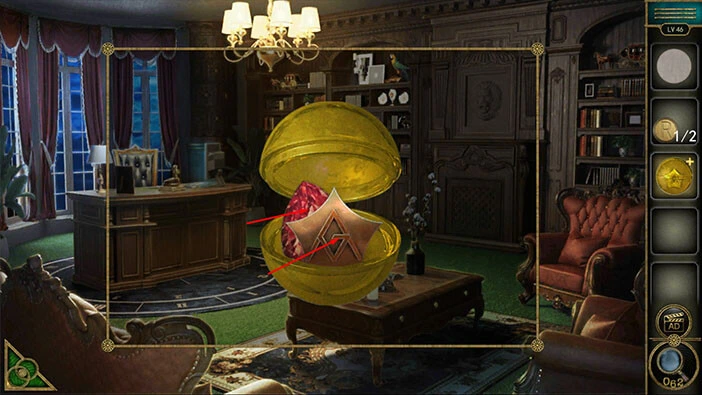
Tap on the “Ball” in your inventory to examine it, and it will appear in the middle of the screen. After that, tap on the “Ball” in the middle of the screen to open it.
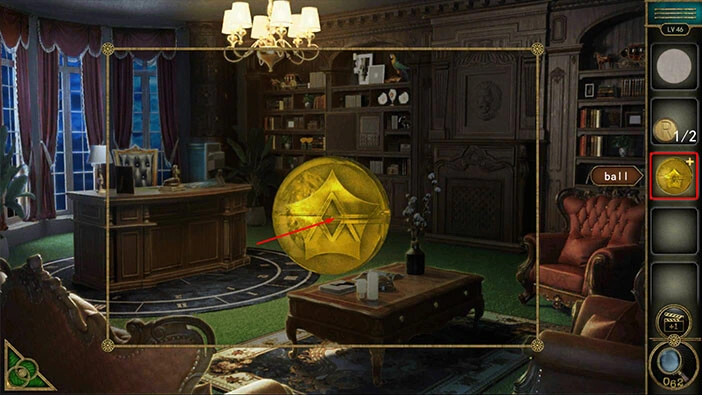
In the ball, you will find an “Achievement star” and an “Eye”. Tap on these two items to pick them up.
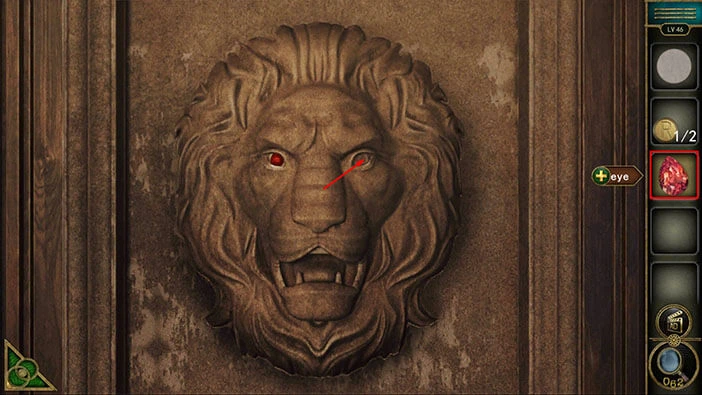
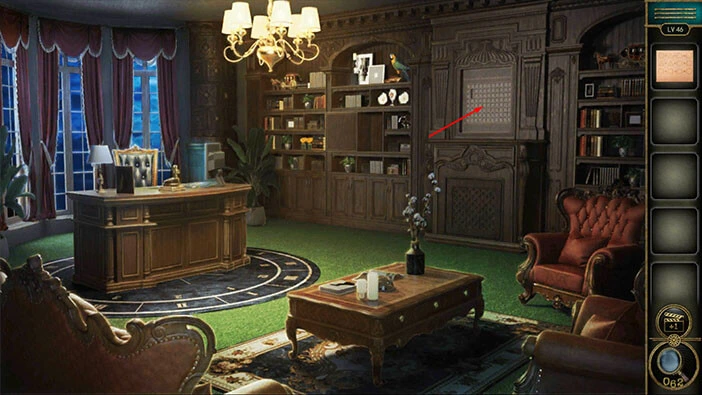
Next, if you take a look at the fireplace on the right, you will notice a lion’s head statue on the wall. Let’s tap on it to take a closer look.

You will notice that the lion is missing an eye, so let’s select the “Eye” from the inventory and insert it into the empty socket.
With that, you will discover the puzzle that was hidden behind the lion’s head. If you take a look at the puzzle, you will notice that one button is missing. So, let’s select the “Button” from the inventory and insert it into the empty slot.

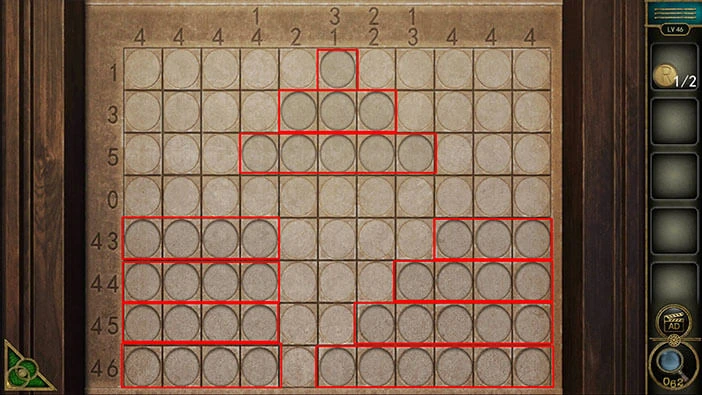
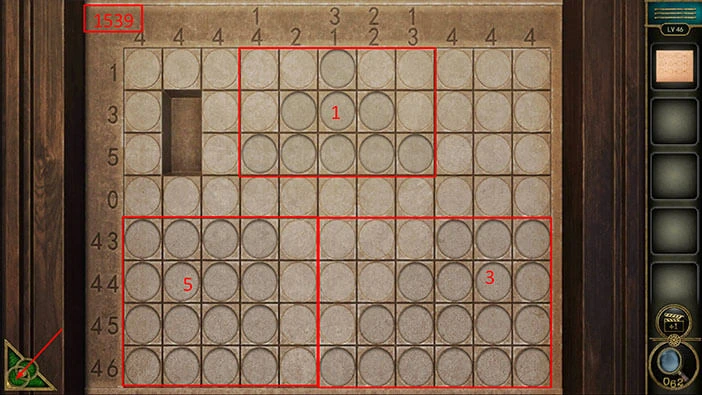
In this puzzle, our task is to activate certain buttons on the grid. The numbers next to the rows represent how many dots in each row should be activated, and the same is true for the numbers above the columns. The last four rows have two numbers, the first number represents the number of active dots looking from left to right, and the second number represents the number of dots looking from right to left.
You can see the solution to this puzzle in the image below.
The secret compartment on the left will open, as soon as you activate the correct dots on the grid, and inside you will find another “Game token”. Tap on it to pick it up.
After that, tap on the green button in the bottom left corner of the screen to go back.

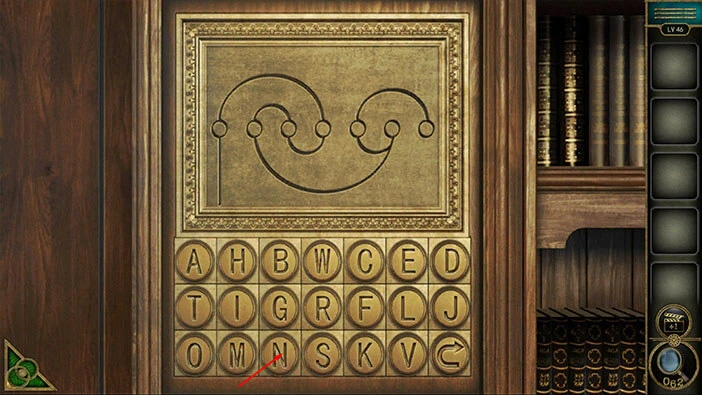
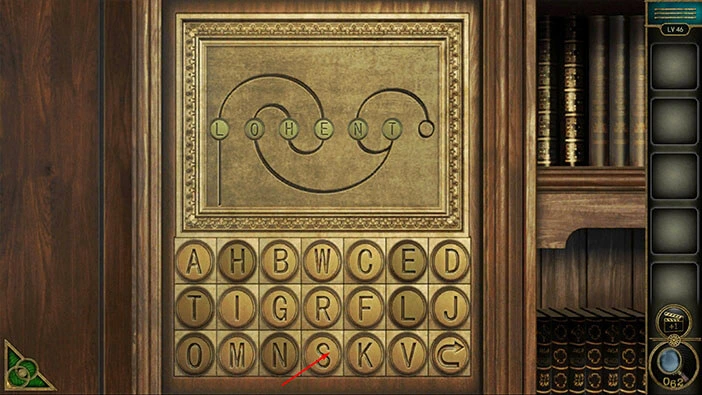
Next, let’s tap on the board on the right to take a closer look at it.
Here, you will notice that two letters are missing, so let’s select the letter “R, W” and insert them into the empty slots.
In this puzzle, our task is to assemble a certain word, however, we still need to discover this word. So, let’s tap on the green button in the bottom left corner of the screen to go back.

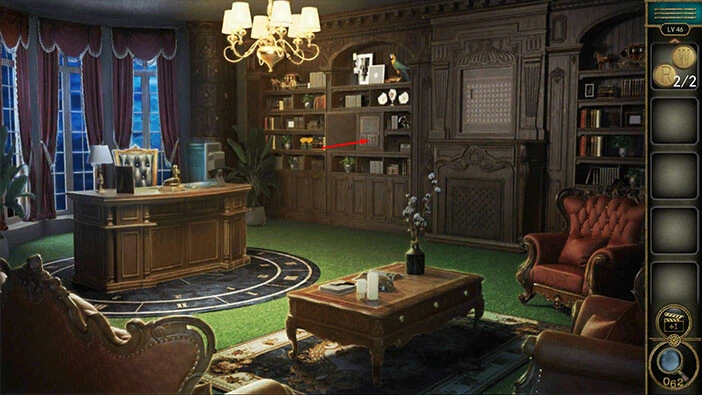
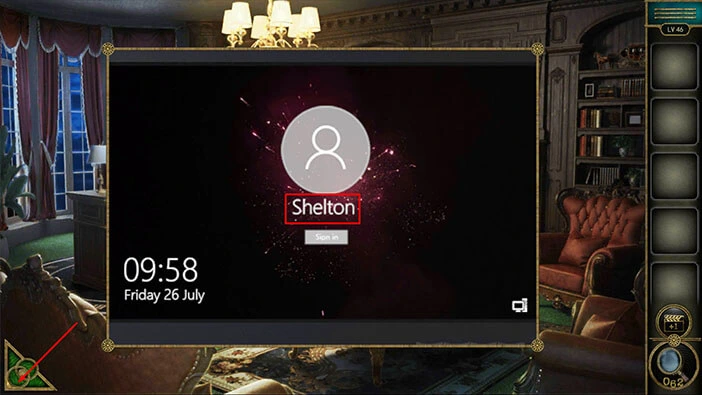
Next, let’s tap on the PC screen on the desk on the left to take a closer look at it, and tap again to start the interaction.
Here, you will see the profile name “Shelton”. Let’s memorize/write down this name, because this is the word that we need to assemble in the next puzzle.
Once you’re done, tap on the green button in the bottom left corner of the screen to go back.
Let’s go back to the puzzle on the board on the right.
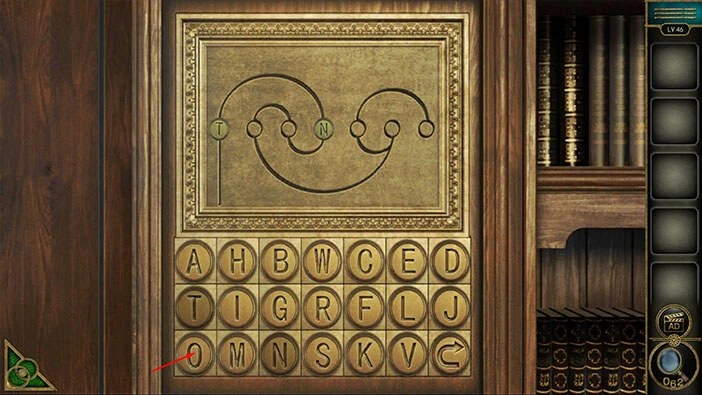
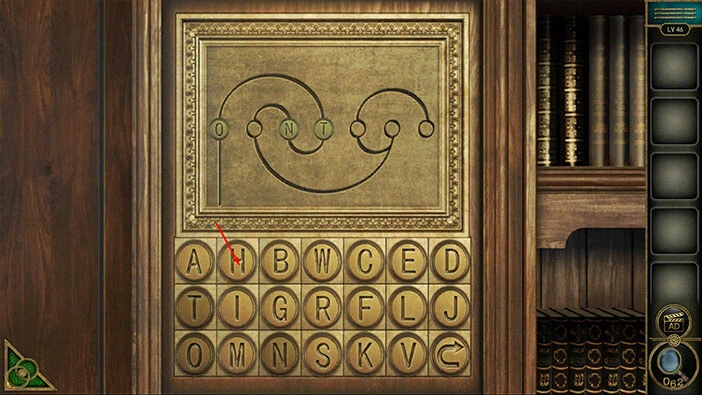
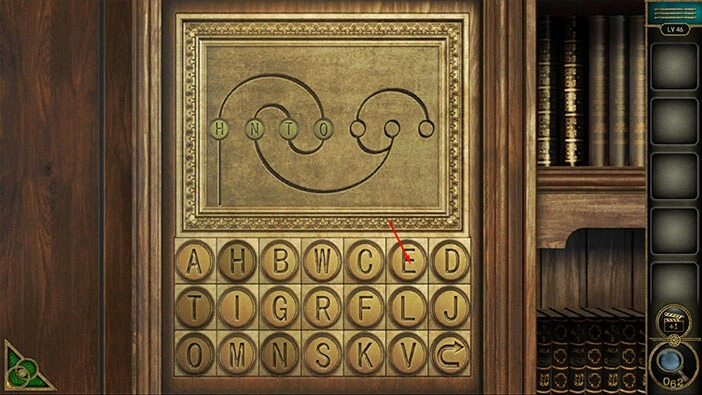
Here, our task is to assemble the word “Shelton”. We will do this in several steps, and we will have to press the letters of this word in a certain order. Let’s begin.
Step 1
First, let’s tap on the letter “N”.
Step 2
Second, let’s tap on the letter “T”.

Step 3
Third, let’s tap on the letter “O”.
Step 4
Fourth, let’s tap on the letter “H”.
Step 5
Fifth, let’s tap on the letter “E”.
Step 6
Sixth, let’s tap on the letter “L”.

Step 7
Lastly, let’s tap on the letter “S”.
With that, you will assemble the word “Shelton” and the secret compartment will open. Inside you will find a “Paper with hints” so tap on it to pick it up.
After that, tap on the green button in the bottom left corner of the screen to go back.
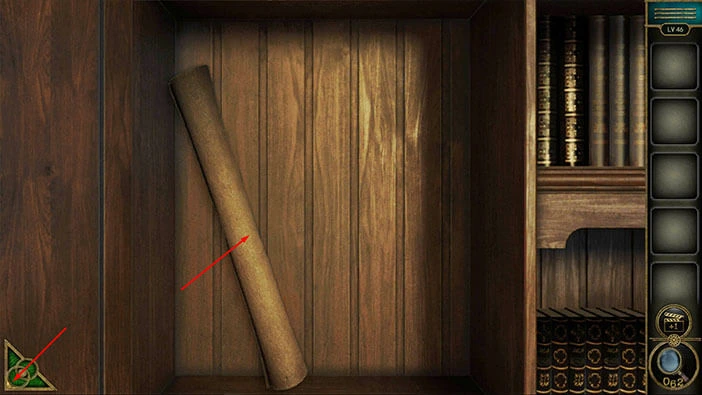
Tap on the “Paper with hints” in your inventory to select it and it will appear in the middle of the screen. After that, tap on the “Paper with hints” in the middle of the screen to unroll it.
Tap again on the “Paper with hints” in your inventory to examine it.
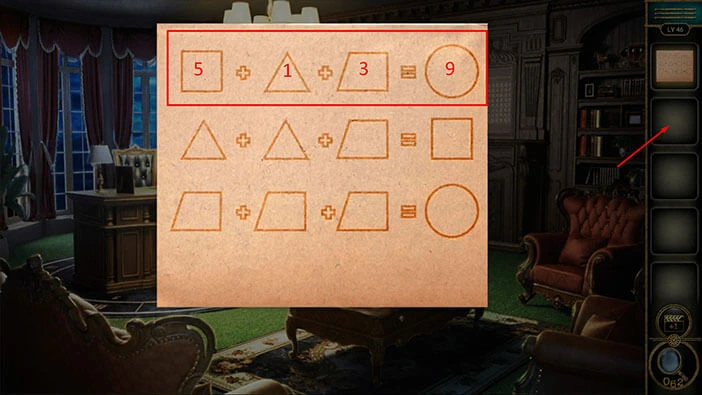
Here, we have a very tricky equation, but we will solve it, step by step. First, we will try to discover the value of the triangle.
Let’s take a look at the third row.
Trapezoid + Trapezoid + Trapezoid = Circle. So, Circle = 1/3 trapezoid
Let’s look at the second row.
Triangle + Triangle + Trapezoid = Square.
We discovered that Trapezoid = 1/3 Circle. So, let’s exchange the value of the trapezoid in the second row.
So, second row would be,
Triangle + Triangle + 1/3 Circle = Square
Lastly, let’s take a look at the first row.
Here, we have,
Square + Triangle + Trapezoid = Circle. Let’s exchange the values for the square and the circle and represent them with triangles and circles. We will get,
Square = 2 Traingles + Trapezoid. Trapezoid = 1/3 Circle.
So, Square = 2 Triangle + 1/3 Circle
Well, if we exchange the values in the first row, we will get
2 Triangles + 1/3 Circle (Square) + Triangle + 1/3 Circle (Trapezoid) = Circle.
We will get,
3 Triangles = 1/3 Circle. We now have a starting point. Let’s presume that the Triangle = 1, because this shape has the lowest value. So, let’s determine the value for the other shapes.
3 Triangles = 1/3 Circle. So, Circle = 9 Triangles. If Triangle = 1, Circle = 9.
Next, let’s determine the value of the Trapezoid. We will take a look at the third row.
Trapezoid + Trapezoid + Trapezoid = 9 (Circle = 9). So, Trapezoid = 3.
Lastly, let’s calculate the value of the Square, by looking at the second row.
Triangle + Triangle + Trapezoid = Square
1 + 1 + 3 = 5. So, the Square = 5.
Finally, let’s exchange the shapes in the first row with their values. In the first row we have,
Square + Triangle + Trapezoid = Circle.
5 + 1 + 3 = 9. Let’s memorize/write down this information.
Once you’re done, tap on the empty inventory slot to put down the note.
Next, let’s tap on the board on the right to take a closer look at it.
If we take a look at the active dots (slots) we will notice three shapes that we saw in the “Paper with hints”, a triangle, a square, and a trapezoid. The only shape that is missing is a circle.
Let’s take a look at the order of the shapes, starting from top to bottom. Here, we have,
First = Triangle = 1
Second = Square = 5
Third = Trapezoid = 3
We don’t, have a circle on the grid, so that is the last shape. Circle = 9.
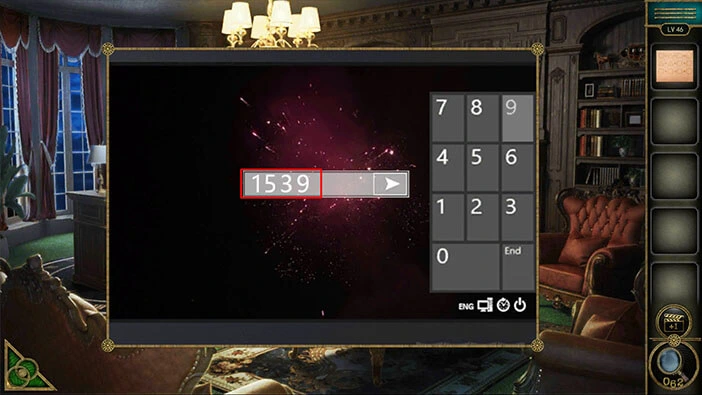
When we put it all together, we will get the number “1539”. Let’s memorize/write down this number, because it represents the solution for the next puzzle.
Once you’re done, tap on the green button in the bottom left corner of the screen to go back.
Next, tap on the PC screen to take a closer look at it, and tap again to start the interaction.

Enter the number “1539” and you will gain access to the computer.
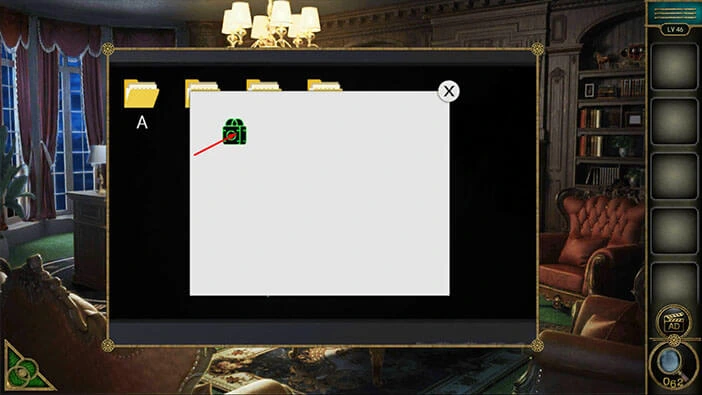
Let’s tap on the “C” folder to open it. After that, tap on the C-2.
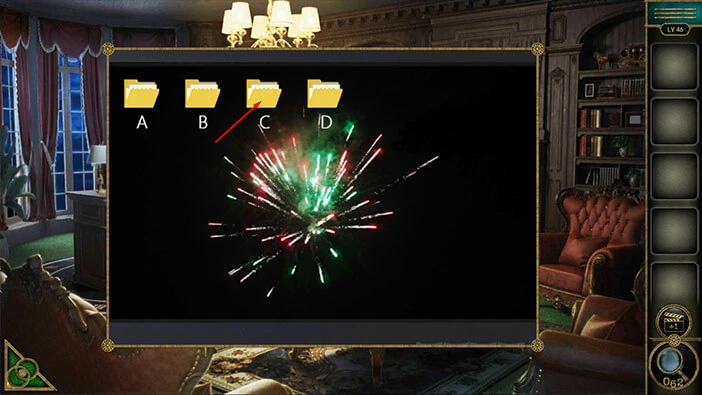
Tap on the “Padlock” icon, and you will open the secret passage that was disguised as a fireplace.
Let’s tap on the secret passage to proceed to the next level.
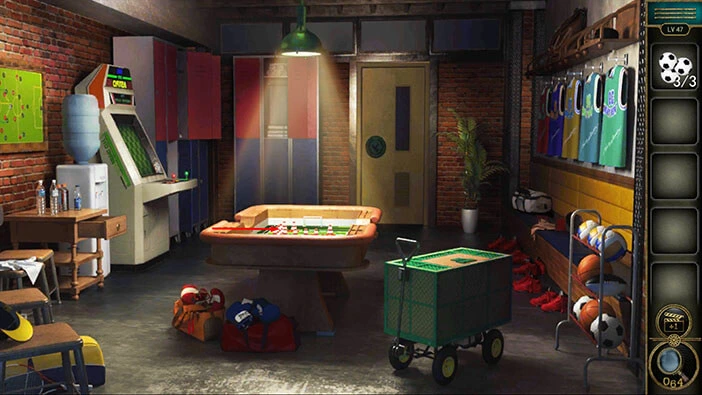
Level 47
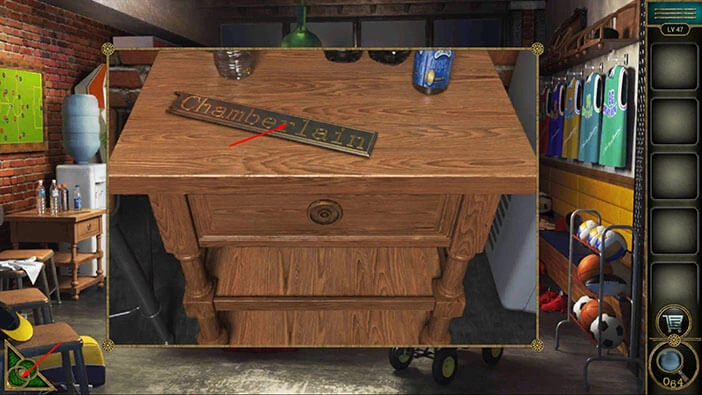
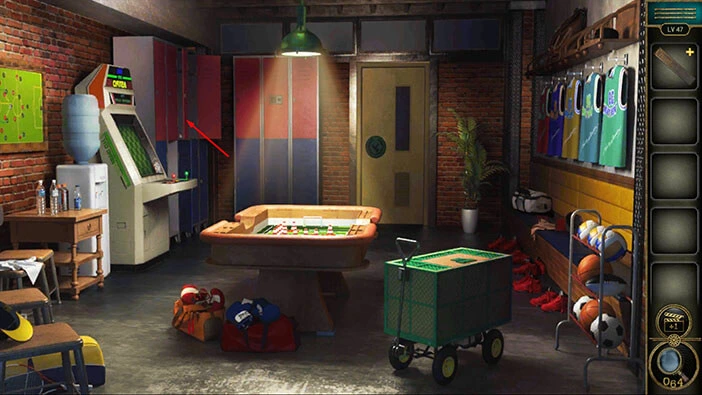
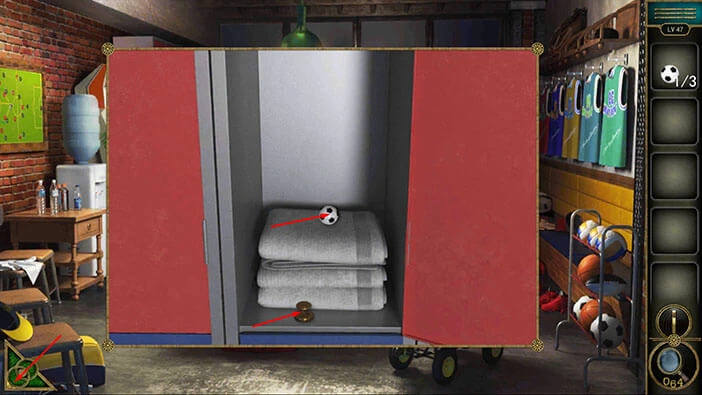
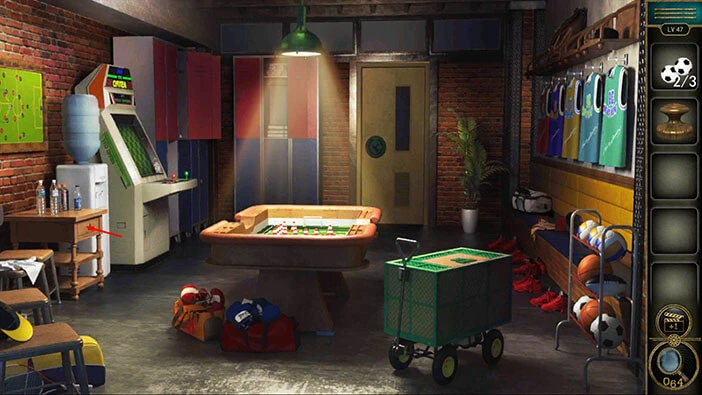
Let’s explore the forty-seventh level. Tap on the cabinet on the left to take a closer look at it.

Here, you will find a “Piece”. Tap on it to pick it up.
After that, tap on the green button in the bottom left corner of the screen to go back.
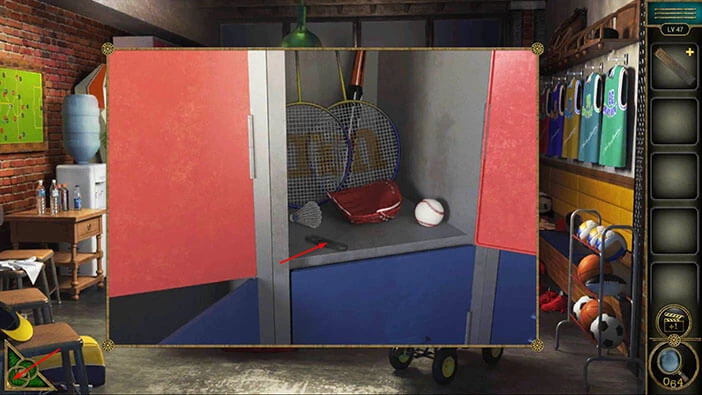
Next, let’s tap on the lockers on the left to take a closer look at them. Tap again to open the locker.
Here, you will find a “Clip”. Tap on it to pick it up. After that, tap on the green button in the bottom left corner of the screen to go back.
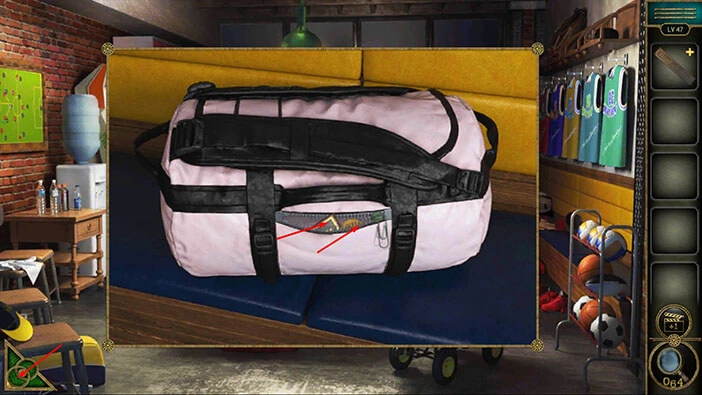
Next, let’s tap on the white bag in the top right corner of the room to take a closer look at it, and tap again to start the interaction.

Select the “Paper clip” from the inventory, and use it to open the bag.
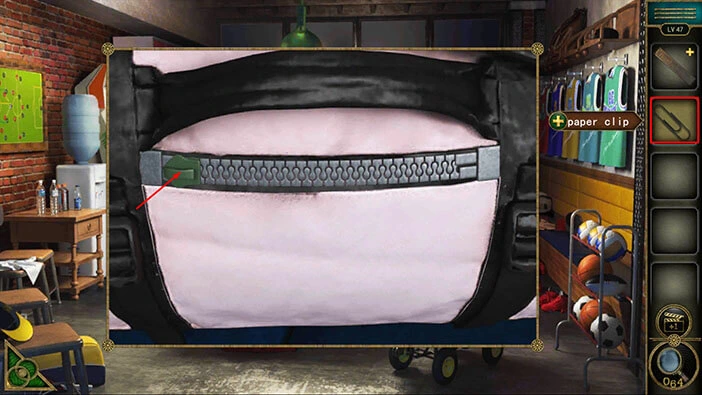
In the bag, you will find another “Piece” and a “Coin”. Tap on these two items to pick them up.
After that, tap on the green button in the bottom left corner of the screen to go back.
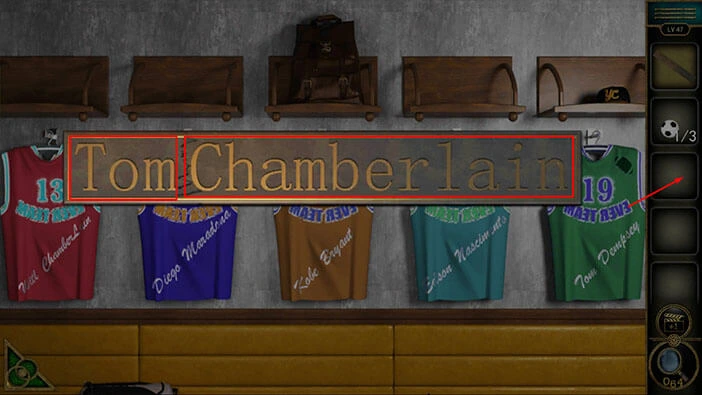
Select the first “Piece” in your inventory, and it will appear in the middle of the screen. After that, select the other “Piece” (Tom) from the inventory and attach it to the “Piece” (Chamberlain) in the middle of the screen. Once you connect the two pieces, a “Brand” will be added to your inventory.

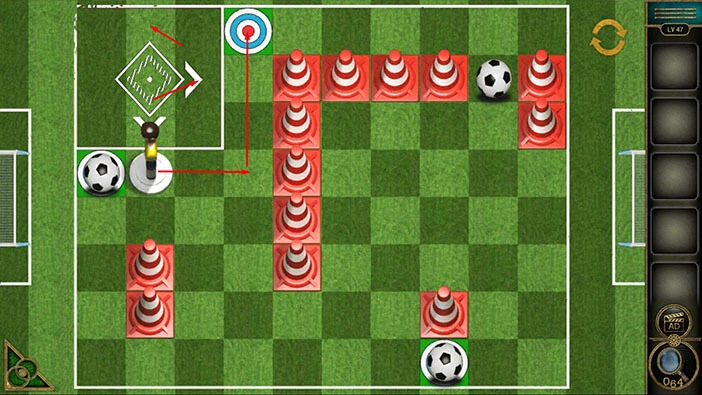
Next, let’s tap on the arcade machine on the left to take a closer look at it.
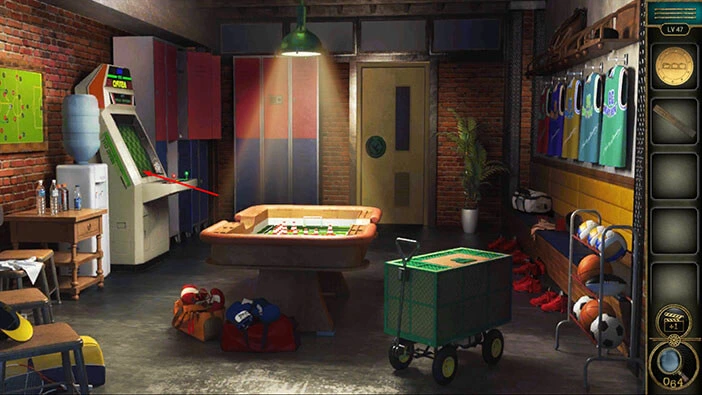
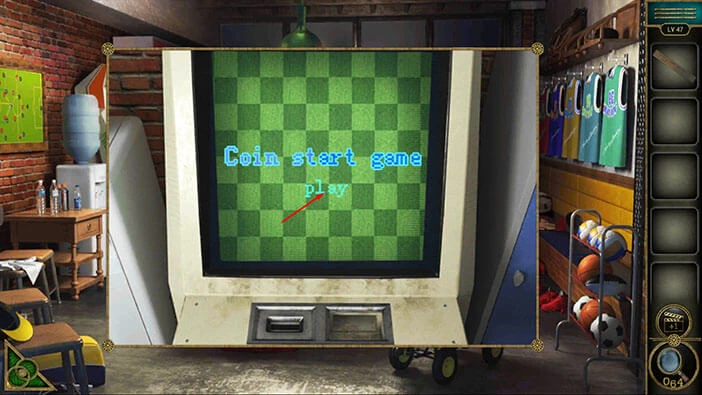
Next, select the “Coin” from the inventory and insert it into the coin slot.
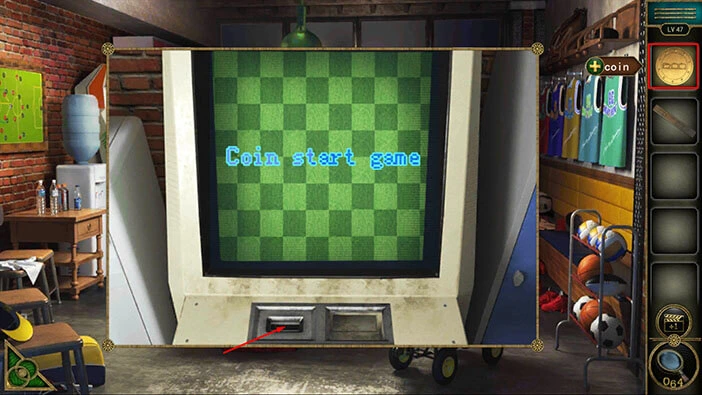
As soon as you enter the “Coin”, “Play” button will appear on the screen. Tap on it to start the game.
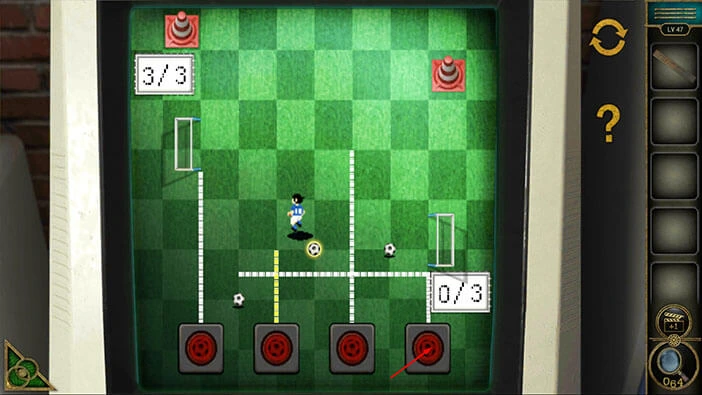
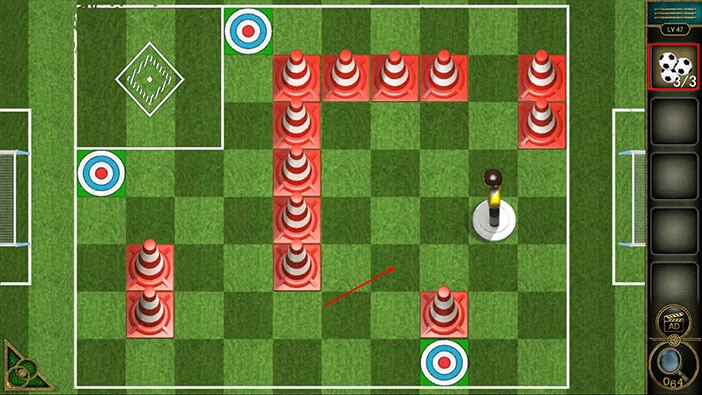
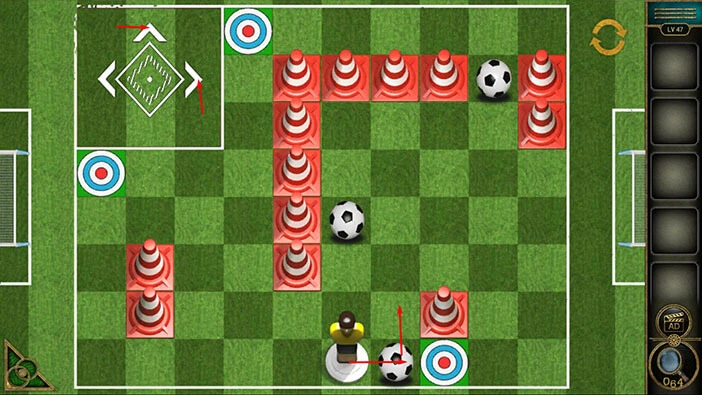
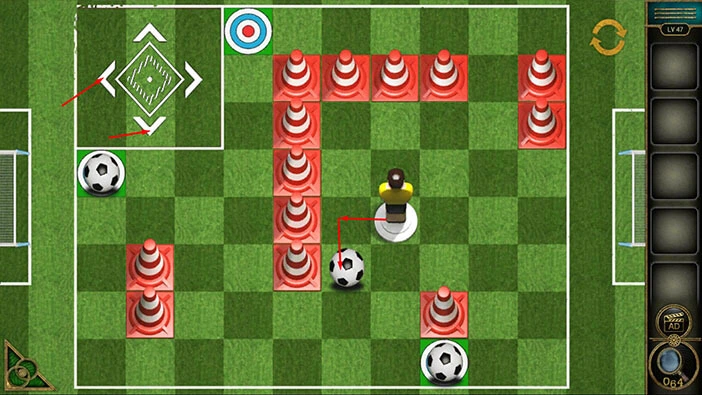
Here, we have a small minigame. In this minigame, we will control the football player, located in the top right corner of the screen. Also, here we can see two goals, one on the left and one on the right.
Our task is to score six goals, three on each side. We will do this puzzle in several steps. Let’s begin.
Step 1
Tap twice on the second button (looking from left to right) and the player will move up and to the right, and then it will move down.

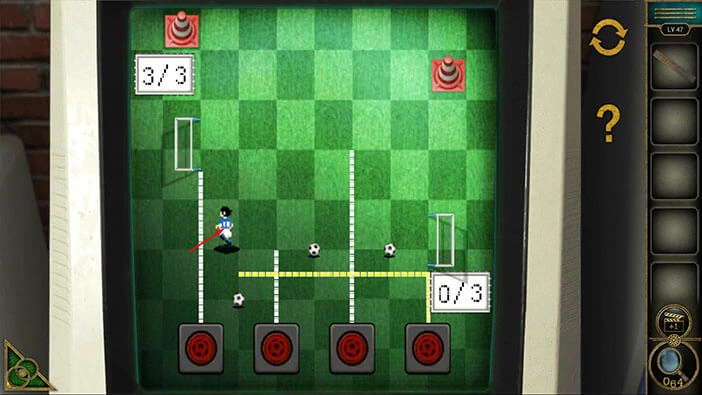
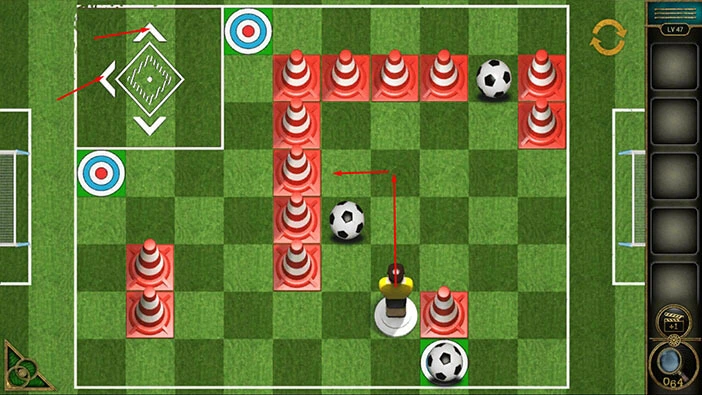
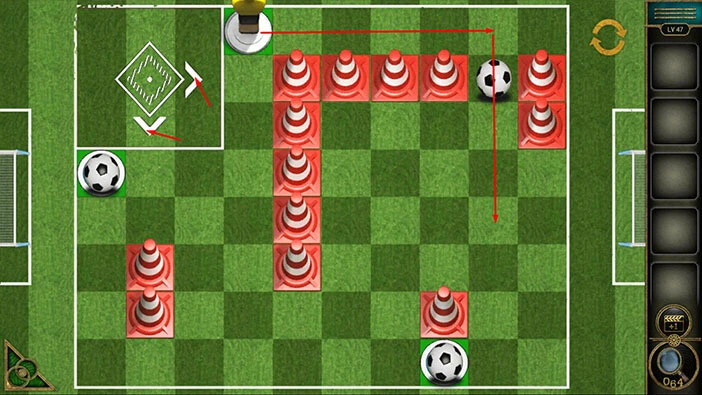
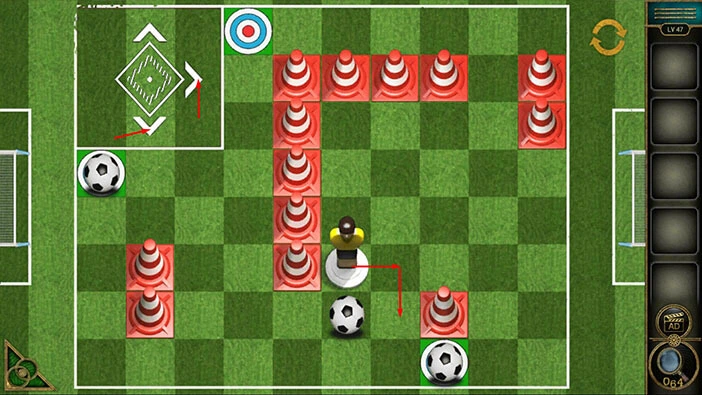
Step 2
Tap twice on the third button.
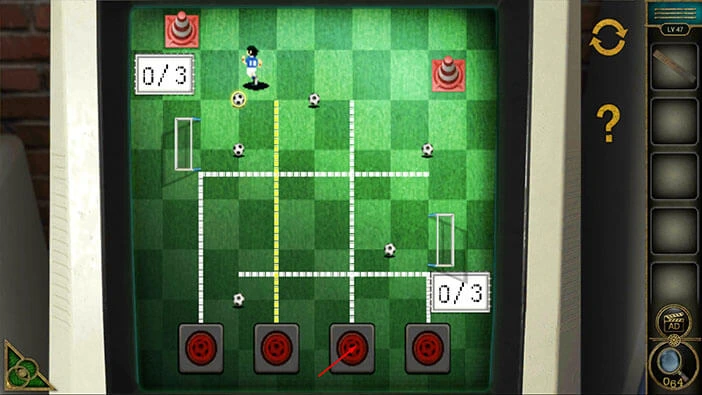
Step 3
Tap seven times on the first button and you will score three goals on the left side.
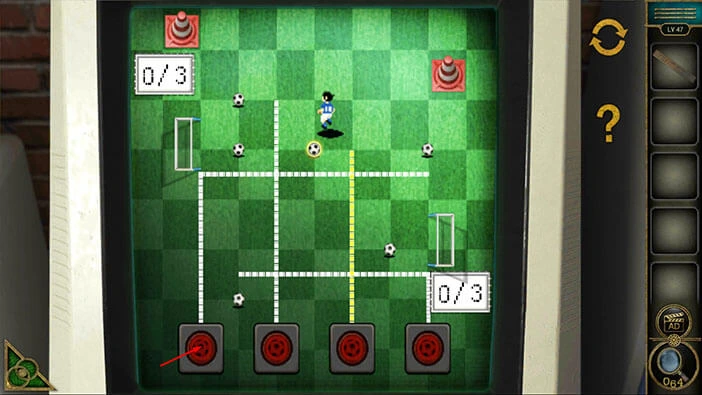
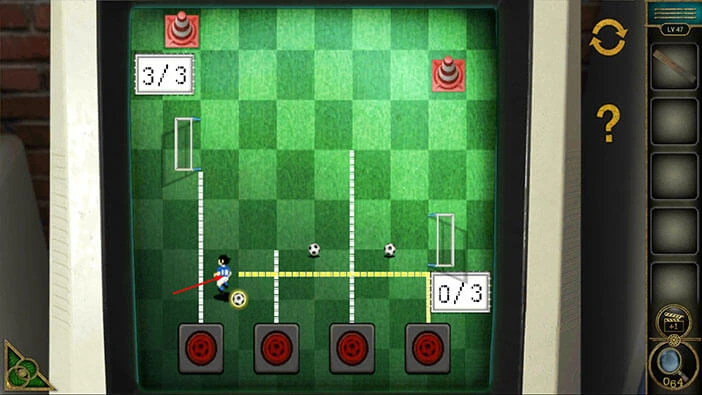
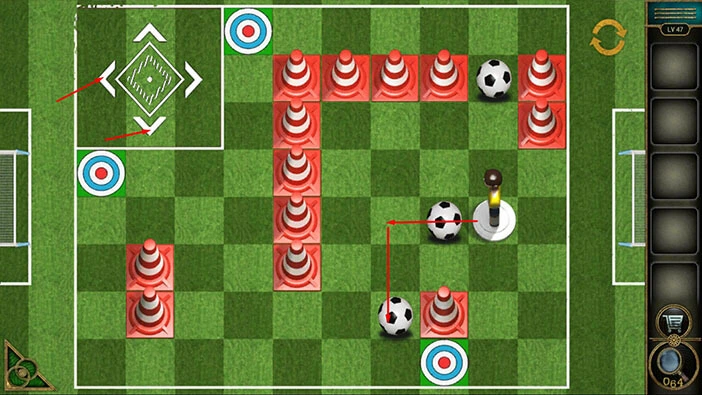
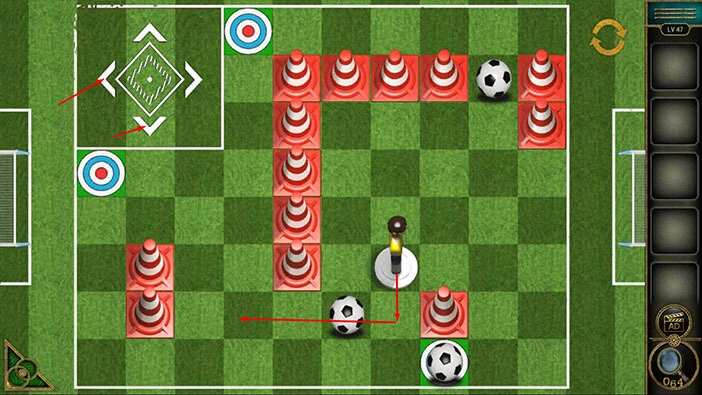
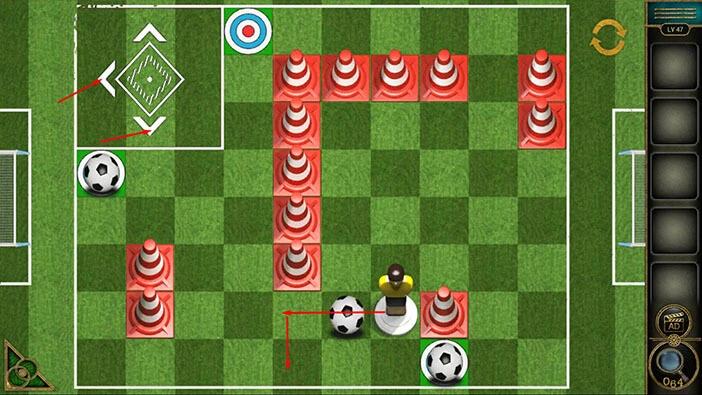
Step 4
Tap once on the second button.

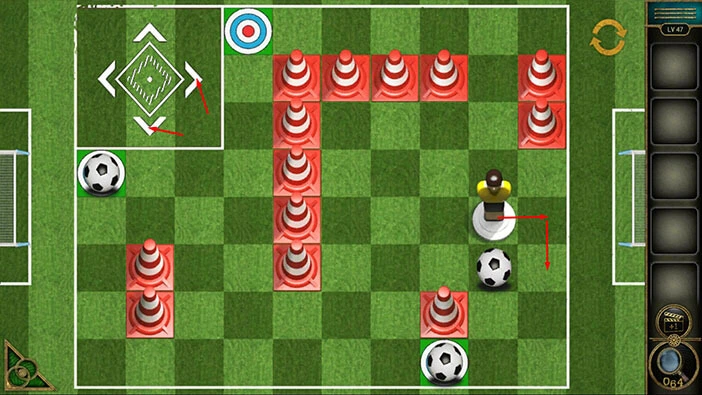
Step 5
Tap once on the football player and it will move to the second (vertical) line.

Step 6
Tap three times on the second button.
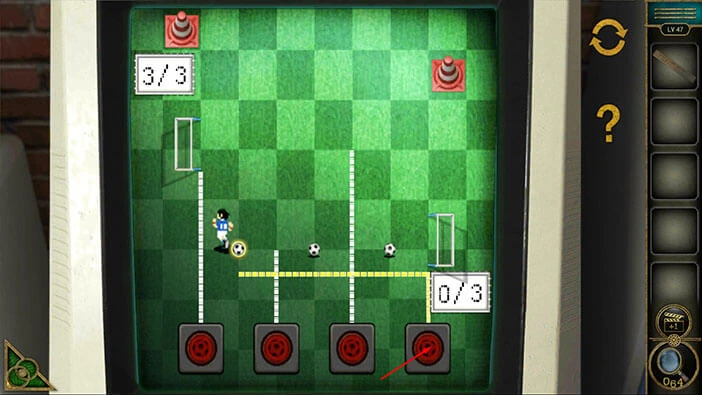
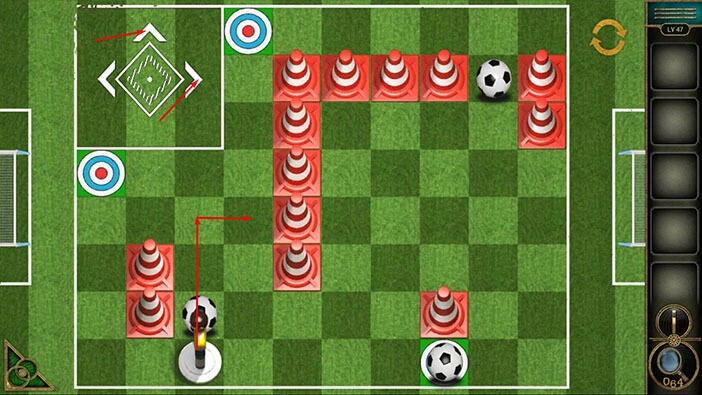
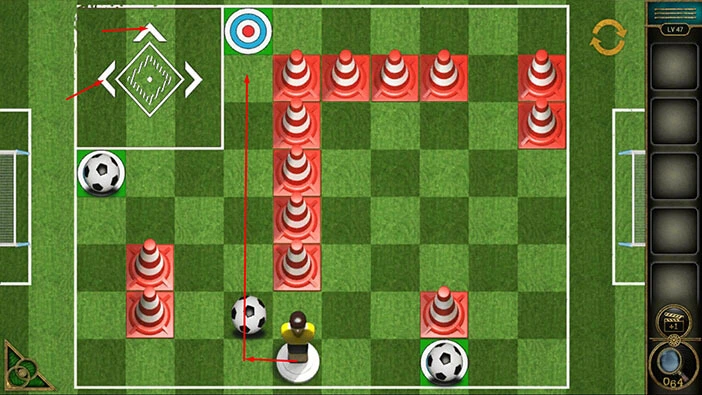
Step 7
Tap once on the fourth button.
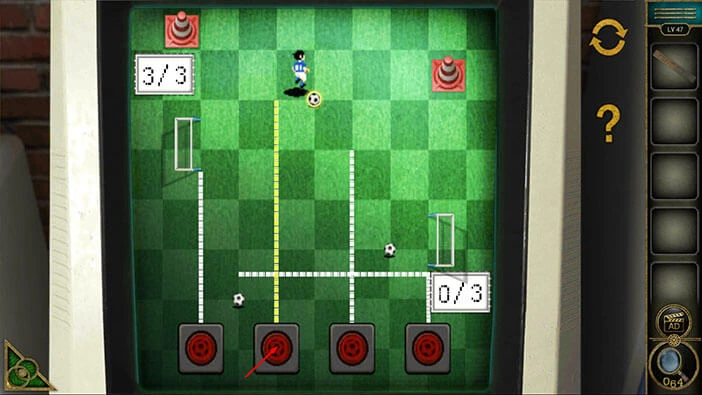
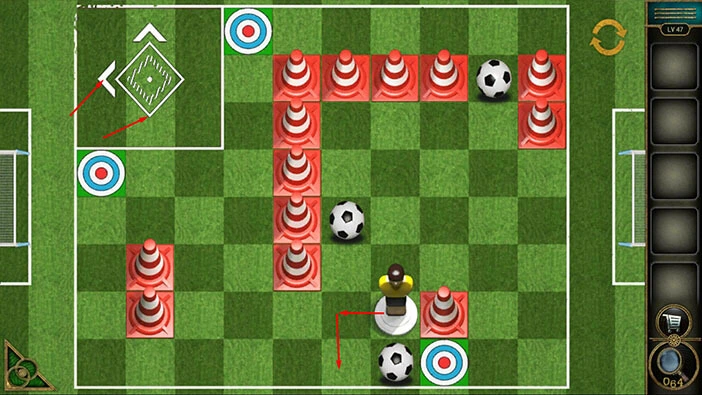
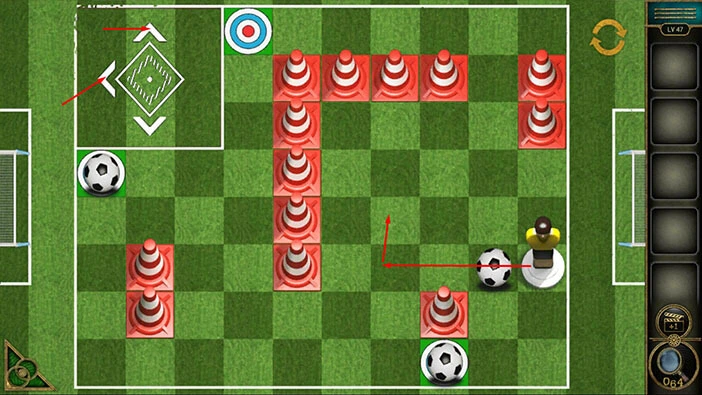
Step 8
Tap once on the football player, and it will pick up the ball at the bottom.
Step 9
Tap on the football player again and it will stand on the horizontal line.
Step 10
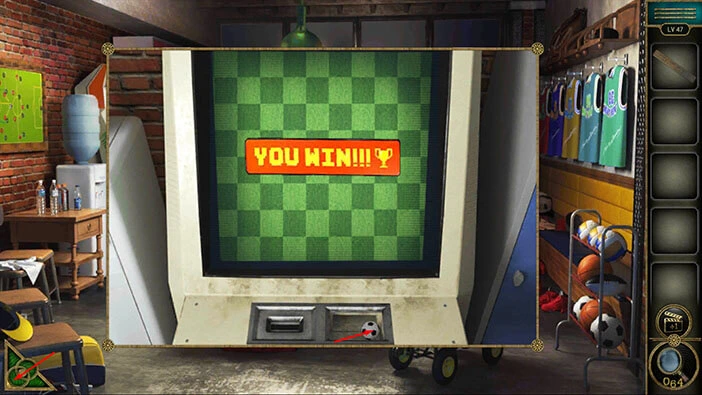
Lastly, tap five times on the fourth button and you will score three goals on the right. With that, you will solve this puzzle.
You will see a win screen, as soon as you beat the minigame. In the slot below the screen, you will notice a “Football”. Tap on it to pick it up.
After that, tap on the green button in the bottom left corner of the screen to go back.
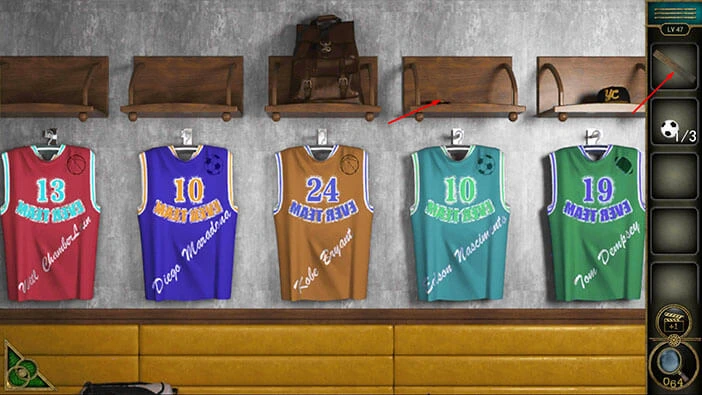
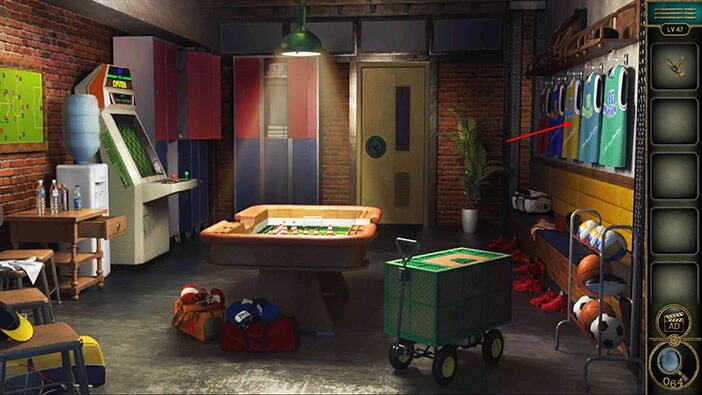
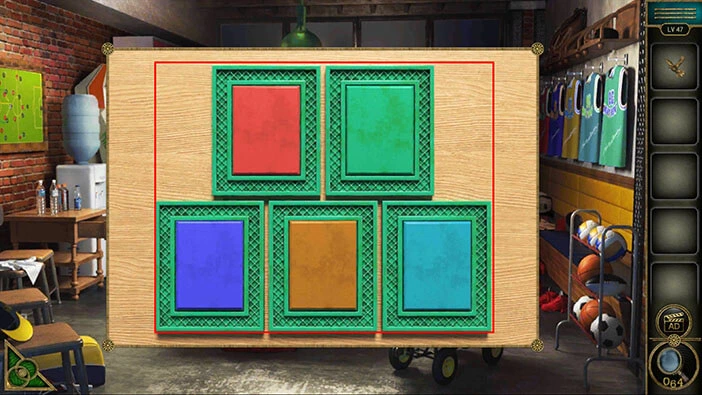
Next, let’s tap on Jerseys on the right to take a closer look at them.

On the fourth shelf, you will notice an “Achievement star”. Tap on it to pick it up.
After that, let’s tap on “Brand” in our inventory to examine it.
Here, we can see the name “Tom Chamberlain”. Let’s memorize/write down this name. We will look for this name on the jerseys.
Once you’re done, tap on the empty inventory slot to put down the “Brand”.
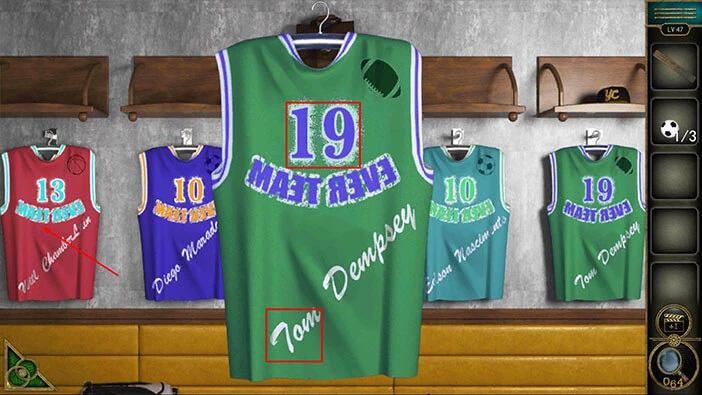
Let’s tap on the green jersey on the right to take a closer look at it.
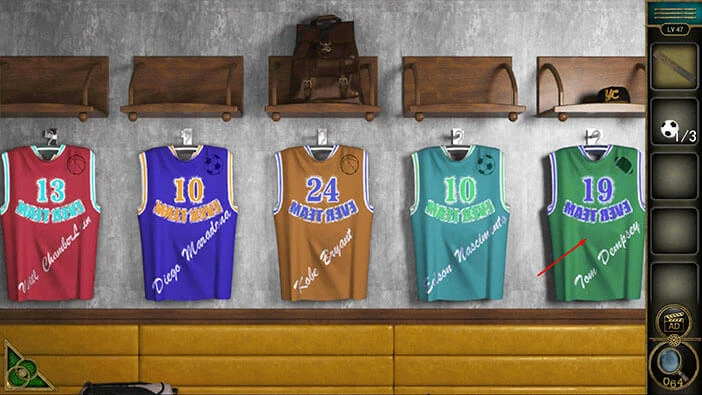
Here, we can see the name “Tom” and above it, we can see the number “19”. Let’s memorize/write down this number, because we will need it for the next puzzle.
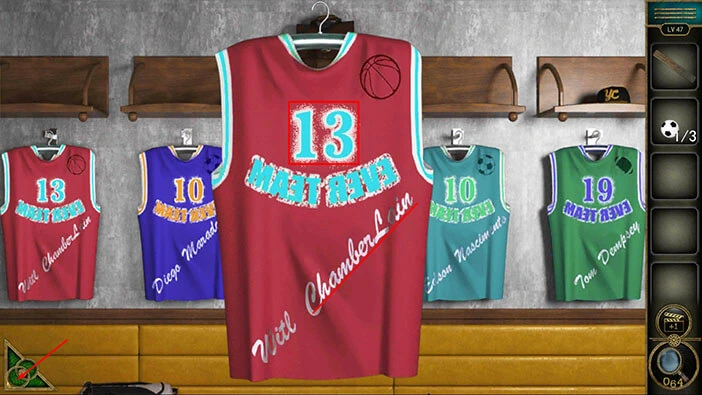
After that, tap on the first jersey to take a closer look at it.
Here, we can see the name “Chamberlain” and above it, we can see the number “13”. When we put these two numbers together, we will get the number “1913”. Let’s memorize/write down this number, because we will need it for the next puzzle.
Once you’re done, tap on the green button in the bottom left corner of the screen to go back.
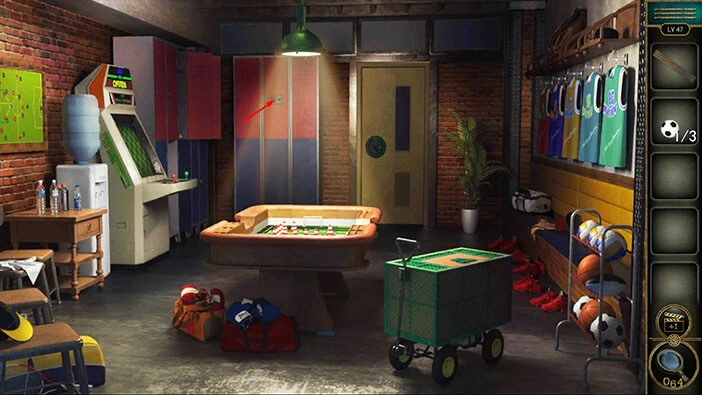
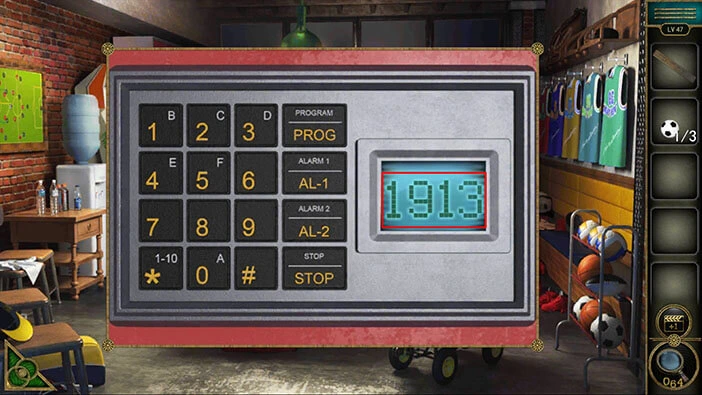
If you take a look at the lockers in front of you, you will notice a keypad on the middle locker. Let’s tap on it to take a closer look, and tap again to start the interaction.
Enter the number “1913” and you will unlock the locker.
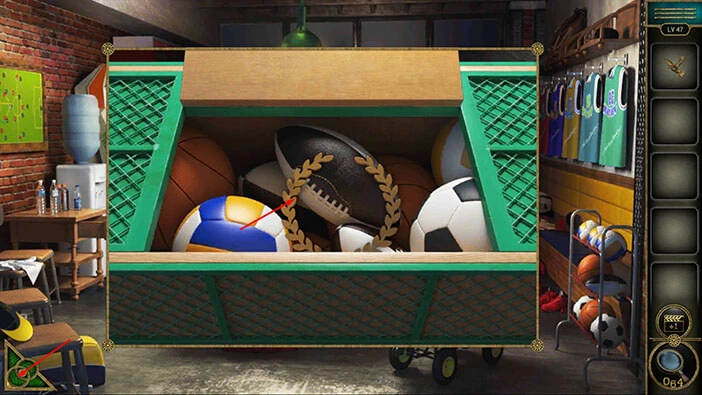
In the locker, you will find another “Football” and a “Handle”. Tap on these two items to pick them up.
After that, tap on the green button in the bottom left corner of the screen to go back.
Next, let’s tap on the cabinet on the left to take a closer look at it.
You will notice that there is no handle on the drawer. So, let’s select the “Handle” from the inventory and insert it into the empty slot.
In the drawer, you will find the third “Football”. Tap on it to pick it up.
After that, tap on the green button in the bottom left corner of the screen to go back.
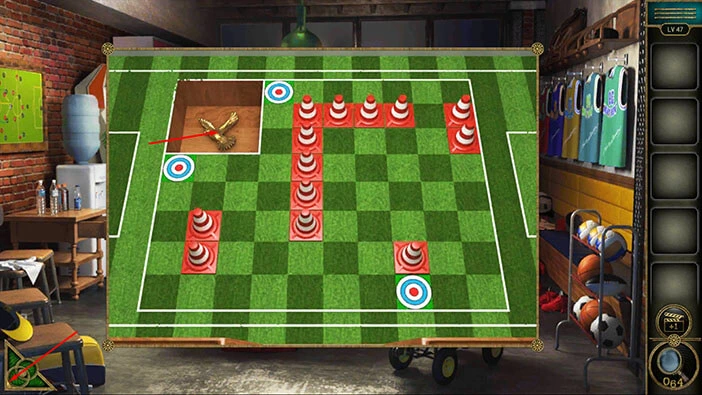
Tap on the green table in front of you to take a closer look at it and tap again to start the interaction.
Select the three “Footballs” from the inventory and place them on the table.
Our next task is to bring the three footballs onto the three slots with targets. We can do that by pushing them with our player, and we can move it by tapping on the four arrows in the top left corner of the screen.
We will do this puzzle in several steps. Let’s begin.
Step 1
Tap twice on the “Left” arrow to push the ball two slots to the left. After that, tap twice on the “Down” arrow to move the player two slots down.
Step 2
Tap once on the “Left” arrow to move the player one slot to the left. After that, tap once on the “Down” arrow to move the player one slot down.
Step 3
Tap once on the “Right” arrow to push the ball one slot to the right and you will place it onto the target slot. After that, tap once on the “Up” arrow to move the player one slot up.
Step 4
Tap three times on the “Up” arrow to move the player three slots up. After that, tap on once on the “Left” arrow to move the player one slot to the left.
Step 5
Tap twice on the “Down” arrow to push the ball two slots to down. After that, tap once on the “Right” arrow to move the player one slot to the right.

Step 6
Tap once on the “Down” arrow to move the player one slot down. After that, tap on three times on the “Left” arrow to move the player three slots to the left.
Step 7
Tap once on the “Down” arrow to move the player one slot down. After that, tap once on the “Left” arrow to move the player one slot to the left.

Step 8
Tap three times on the “Up” arrow to move the player three slots up. After that, tap once on the “Right” arrow to move the player one slot to the right.
Step 9
Tap once on the “Up” arrow to move the player one slot up. After that, tap twice on the “Left” arrow to move the player two slots to the left. With that, you will place the second ball onto the target slot.

Step 10
Tap twice on the “Right” arrow to move the player two slots to the right. After that, tap three times on the “Up” arrow to move the player three slots up.
Step 11
Tap five times on the “Right” arrow to move the player five slots to the right. After that, tap four times on the “Down” arrow to move the player four slots down.
Step 12
Tap once on the “Right” arrow to move the player one slot to the right. After that, tap once on the “Down” arrow to move the player one slot down.
Step 13
Tap three times on the “Left” arrow to move the player three slots to the left. After that, tap once on the “Up” arrow to move the player one slot up.
Step 14
Tap once on the “Left” arrow to move the player one slot to the left. After that, tap once on the “Down” arrow to move the player one slot down.
Step 15
Tap once on the “Right” arrow to move the player one slot to the right. After that, tap once on the “Down” arrow to move the player one slot down.
Step 16
Tap twice on the “Left” arrow to move the player two slots to the left. After that, tap once on the “Down” arrow to move the player one slot down.
Step 17
Tap once on the “Left” arrow to move the player one slot to the left. After that, tap six times on the “Up” arrow to move the player six slots up. With that, you will finish this minigame.
With that, you will open the secret compartment in the top left corner of the screen. Inside you will find a “Pigeon”. Tap on it to pick it up.
After that, tap on the green button in the bottom left corner of the screen.
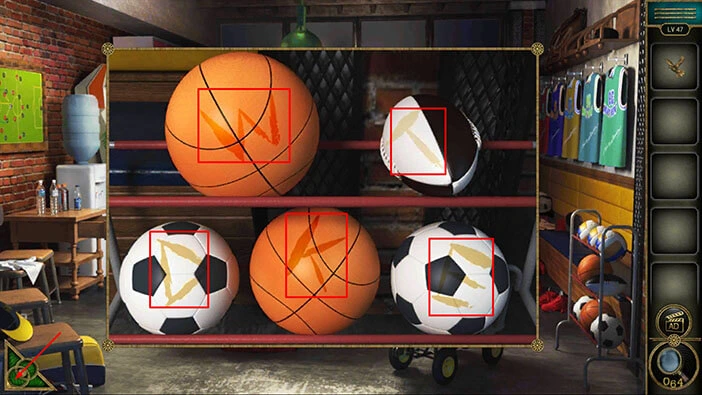
Next, let’s tap on the balls on the right to take a closer look at them.

Here, we can see two balls at the top, and three balls at the bottom. There is a letter on each ball. Let’s memorize/write down these letters, and their position, because this information represents the hint for the next puzzle. So, here we have
The ball in the top left = W
The ball in the top right = T
The ball in the bottom left = D
The ball in the bottom = K
The ball in the bottom right = E
Once you’re done, tap on the green button in the bottom left corner of the screen to go back.
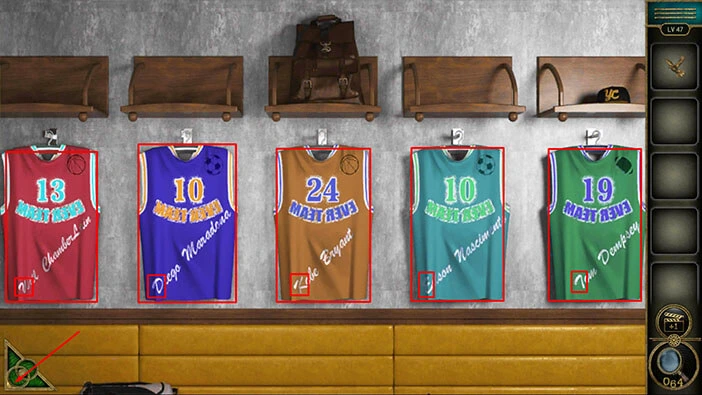
Let’s tap on the jerseys on the right to take another look at them.
Let’s take a look at the names on the jerseys. Here, we will look at the first letter on each jersey, and compare it with the letters that we wrote down. After that, we will write down the color of the jersey at that position, because this information represents the solution for the next puzzle.
The ball in the top left = W. The first jersey starts with the letter “W” (Wilt). This jersey is red.
The ball in the top left = Red
The ball in the top right = T. The fifth jersey starts with the letter “T” (Tom). This jersey is green.
The ball in the top right = Green
The ball in the bottom left = D. The second jersey starts with the letter “D” (Diego). This jersey is blue.
The ball in the bottom left = Blue
The ball in the bottom = K. The third jersey starts with the letter “K” (Kobe). This jersey is brown.
The ball in the bottom = Brown
The ball in the bottom right = E. The fourth jersey starts with the letter “E” (Edsan). This jersey is turquoise.
The ball in the bottom right = Turquoise
Once you’re done, tap on the green button in the bottom left corner of the screen to go back.
Next, let’s tap on the green box on the right to take a closer look at it, and tap again to start the interaction.

Here, we have two slots at the top, and three slots at the bottom. So, let’s set the color of these slots, because we already discovered this information.
The ball in the top left = Red
The ball in the top right = Green
The ball in the bottom left = Blue
The ball in the bottom = Brown
The ball in the bottom right = Turquoise
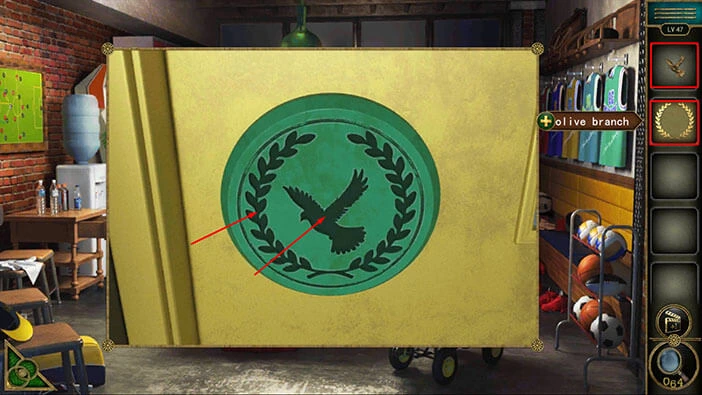
You will open the box, as soon as you set the correct colors. Inside, you will find an “Olive branch”. Tap on it to pick it up.
After that, tap on the green button in the bottom left corner of the screen to go back.
Let’s tap on the door to take a closer look at it.
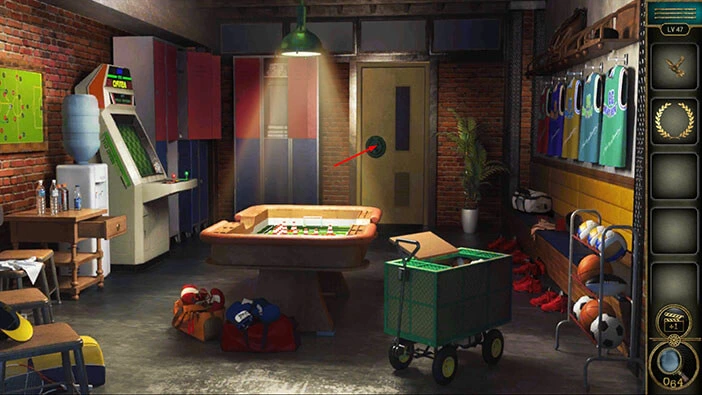
Select the “Olive branch” and the “Pigeon” from the inventory and insert them into the empty slots.
With that, you will open the door. Let’s tap on the door to proceed to the next level.
Level 48
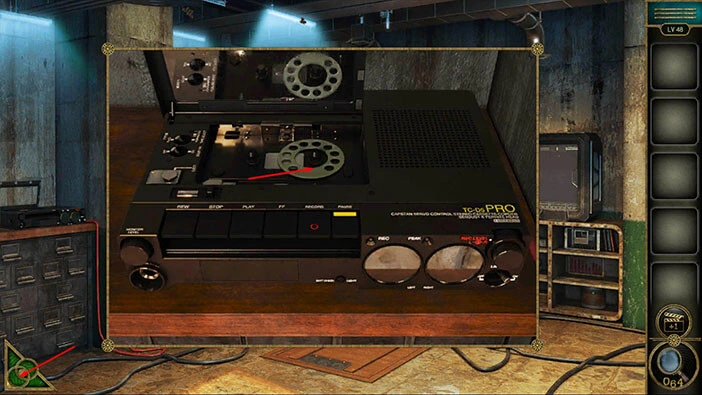
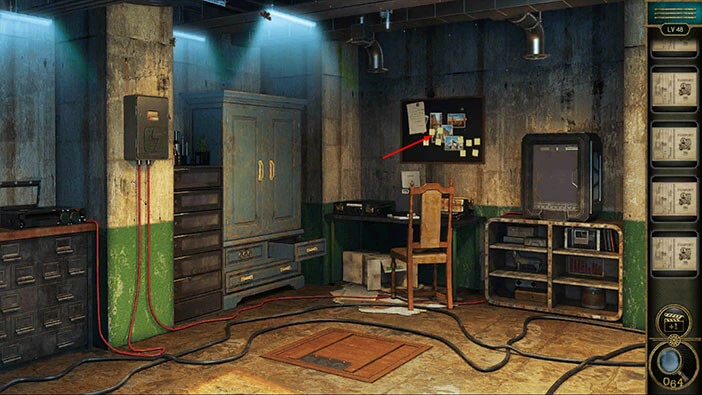
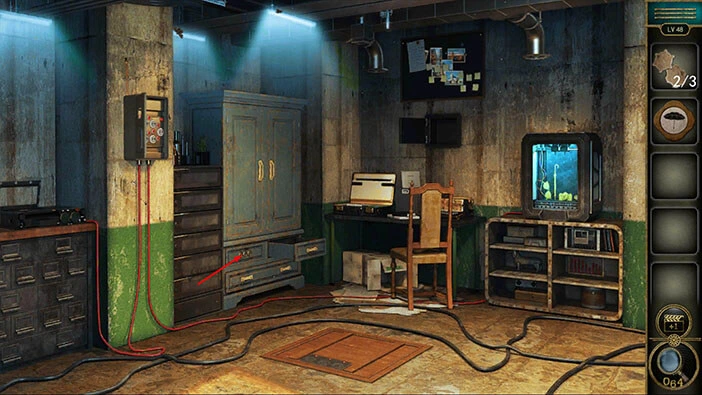
Let’s explore the forty-eighth level. Tap on the machine on the left to take a closer look at it, and tap again to open it.
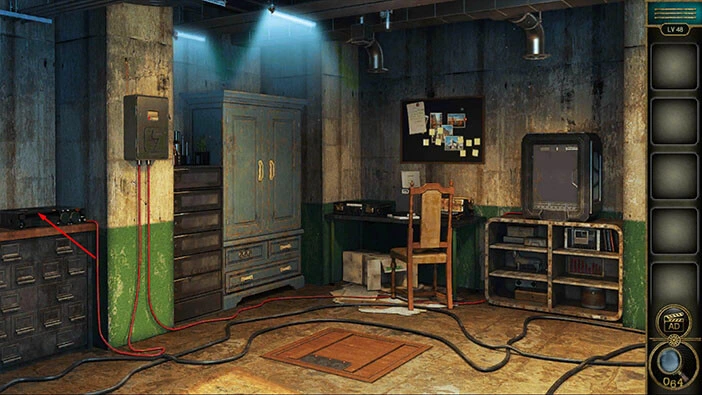
Inside you will find a “Dialpad”. Tap on it to pick it up.
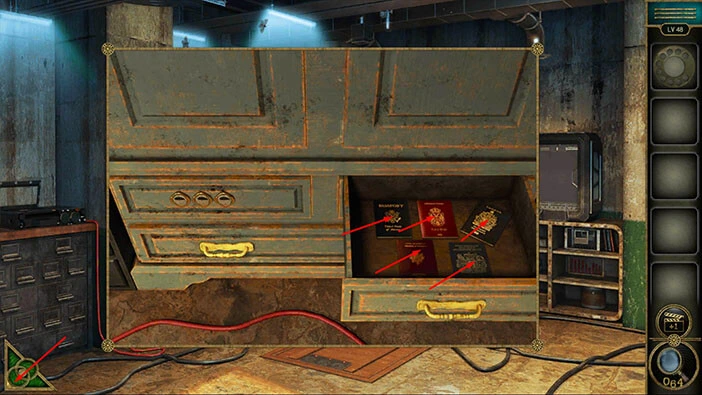
Next, let’s tap on the cabinet on the left to take a closer look at it, then tap on the top left drawer to open it.
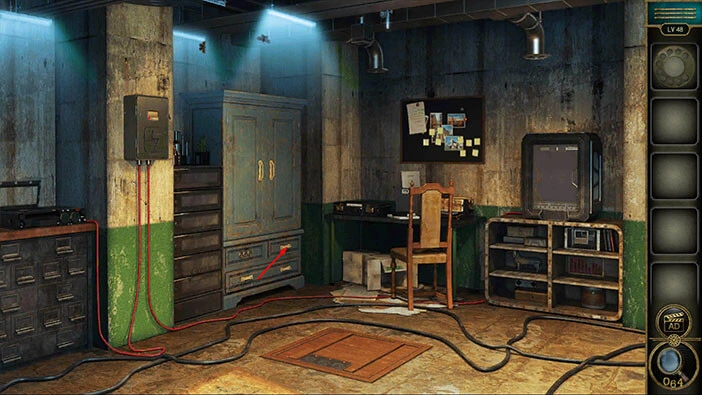
Inside, you will find five passports. Tap on them to pick them up.
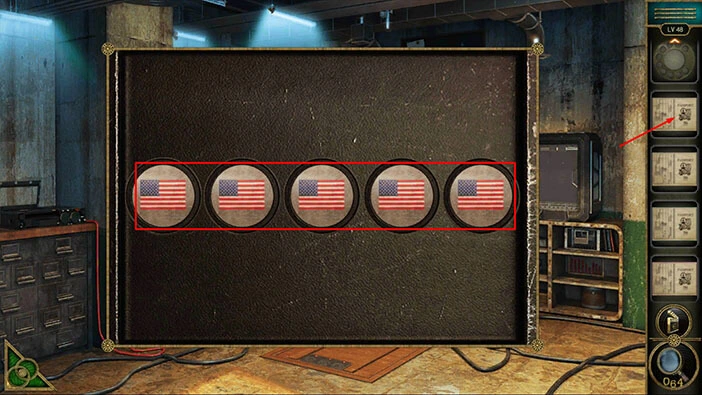
Next, let’s tap on the board, located on the wall above the table, to take a closer look at it. After that, tap on the board to open it.
Here, we can see five flags. So, in order to solve this puzzle we have to discover the correct combination of flags. Let’s do that.
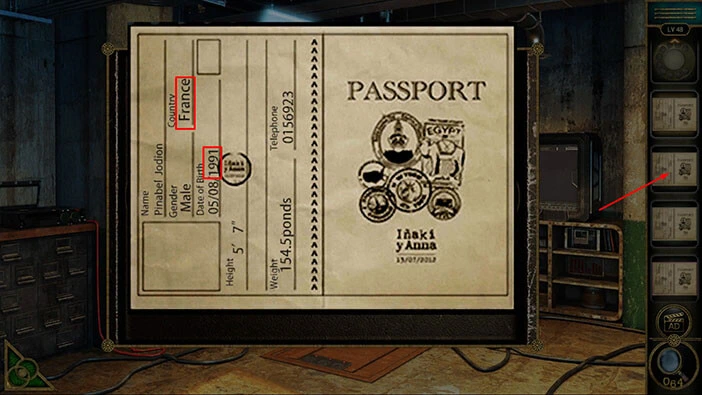
Tap on the first password to examine it.
Here, we are interested in two pieces of information, the age, and the country of the person that owns the passport. So, we can see,
Year of birth = 1991
Country = France
Memorize/write down this information. After that, tap on the second passport to examine it.
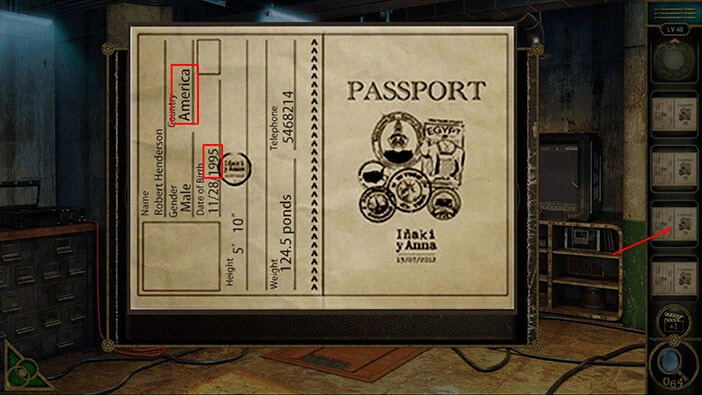
Let’s memorize/write down the information in the second passport.
Year of birth = 1995
Country = America
After that, tap on the third passport to examine it.
Let’s memorize/write down the information in the third passport.
Year of birth = 1993
Country = England
After that, tap on the fourth passport to examine it.
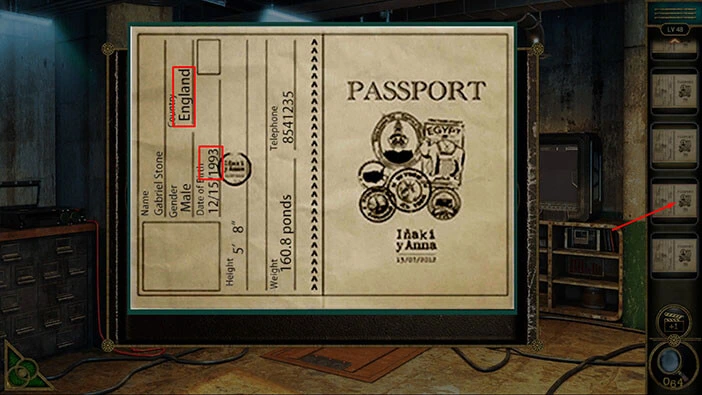
Let’s memorize/write down the information in the fourth passport.
Year of birth = 1994
Country = Germany
After that, tap on the fifth passport to examine it.

Let’s memorize/write down the information in the fifth passport.
Year of birth = 1992
Country = Canada
After that, tap on the fifth passport to examine it.
So, our next task is to arrange the passports by the age of their owners, starting with oldest.
When we do that, we will get,
First = 1991 = France
Second = 1992 = Canada
Third = 1993 = England
Fourth = 1994 = Germany
Fifth = 1995 = America
Memorize/write down this information, because our next task is to set the flags on the puzzle in this order.
Once you’re done, tap on the green button in the bottom left corner of the screen to go back.

Let’s set the flags. The order of the flags should be,
France, Canada, England, Germany, America.
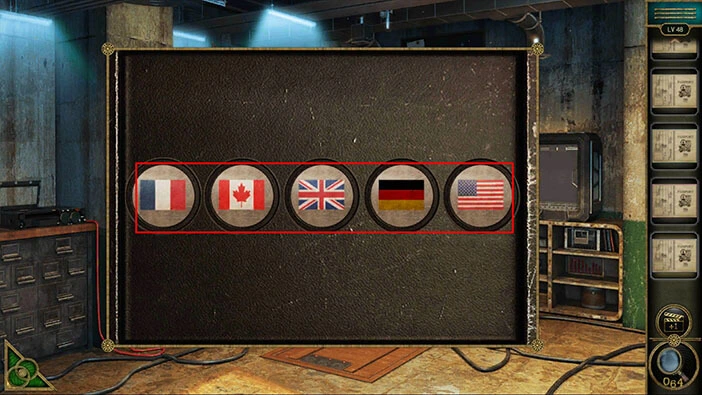
The safe will open, as soon as you set the correct flags. Inside, you will find a “Lightning”. Tap on it to pick it up.
After that, tap on the green button in the bottom left corner of the screen to go back.
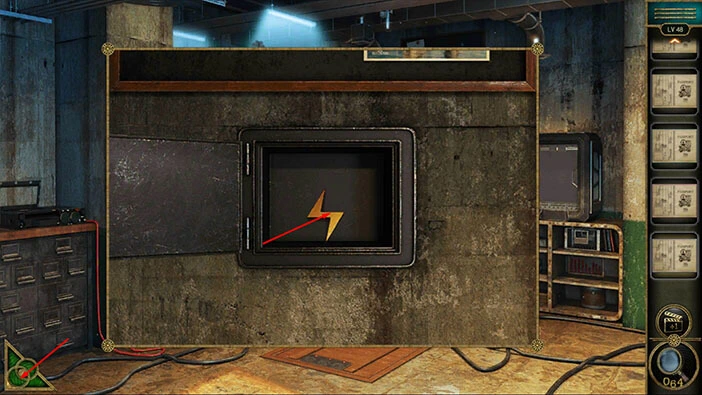
Next, let’s tap on the power box on the pillar on the left to take a closer look at it.

Select the “Lightning” from the inventory and insert it into the empty slot.
With that, you will unlock and open the box. Inside you will find an “Achievement star” and a “Game prop”. Tap on these two items. Here, you will also see another puzzle. We will come back to it later in the walkthrough, because one of the plugs is missing, and we still haven’t found it.
Once you’re done, tap on the green button in the bottom left corner of the screen to go back.
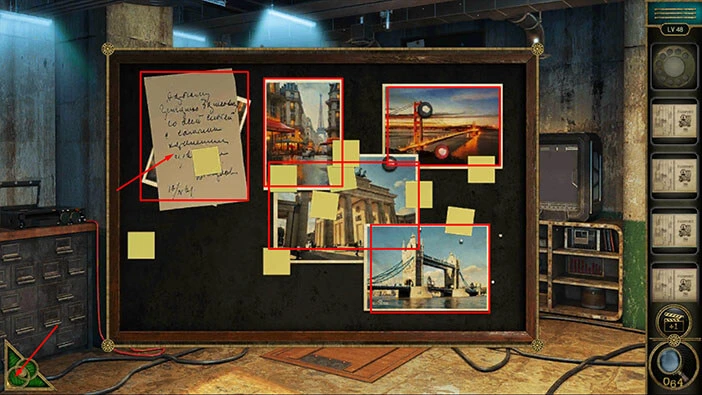
Next, let’s take another look at the board above the table.
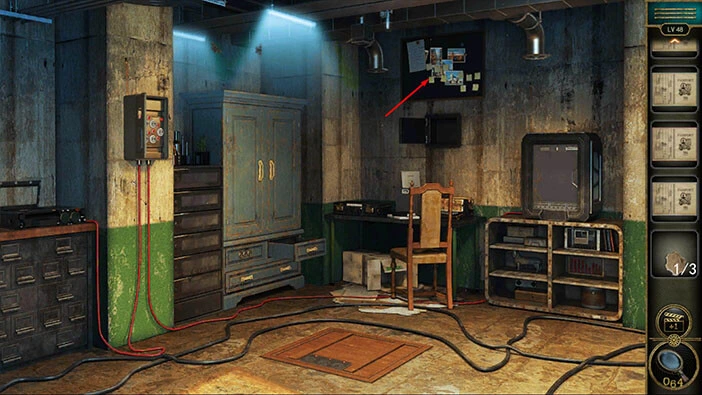
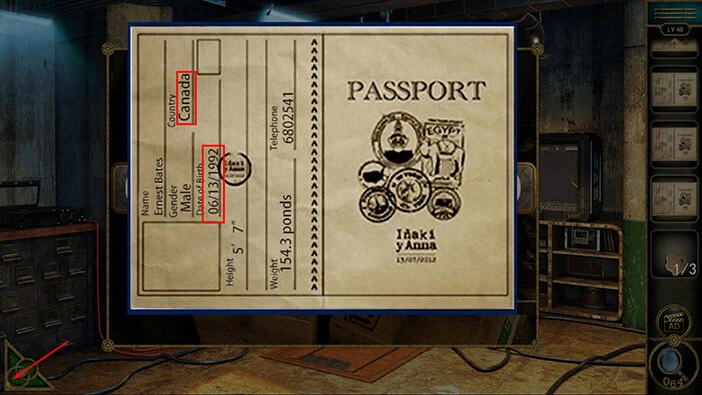
If you take a look at the photos on the wall, you will notice famous sites from four out of five countries that we saw in the passports, America, France, Germany, and England. However, the photo of Canada is covered in the top left corner of the board. So, the Canadian passport contains a hint for the next puzzle. Let’s memorize/write down this information.
After that, tap on the green button in the bottom left corner of the screen to go back.
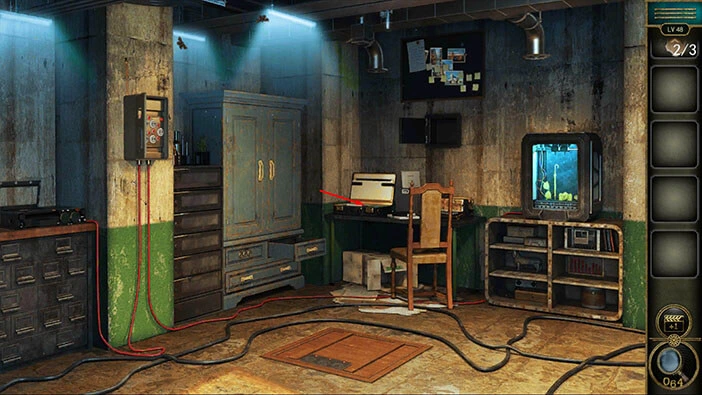
Next, let’s tap on the suitcase on the table to take a closer look at it, and tap again to start the interaction.
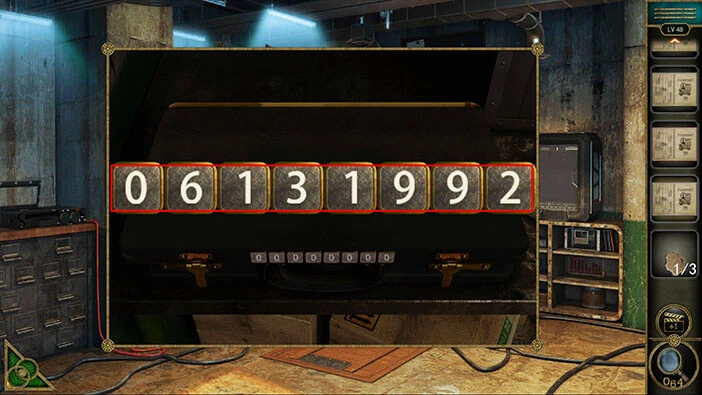
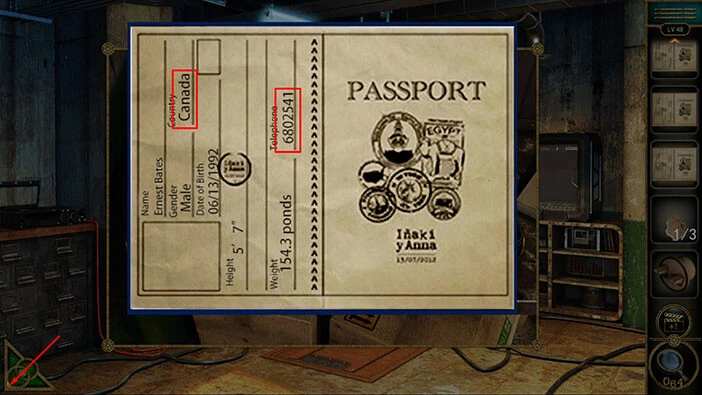
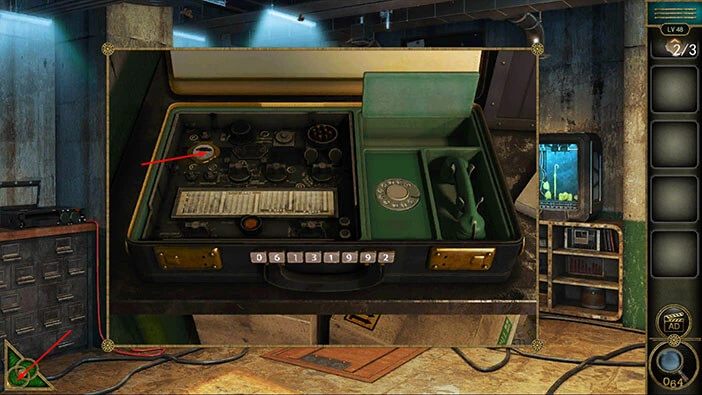
We will need an 8-digit code in order to unlock the suitcase. So, let’s take a look at the Canadian passport (Passport 4).
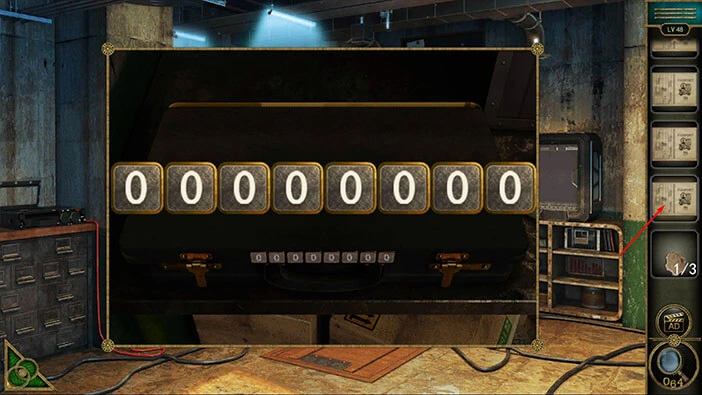
If we take a look at the date of birth, we will see 8 digits, 06131992. Let’s memorize/write down this number because it represent the code that we will use to unlock the suitcase.
Once you’re done, tap on the green button in the bottom left corner of the screen to go back.
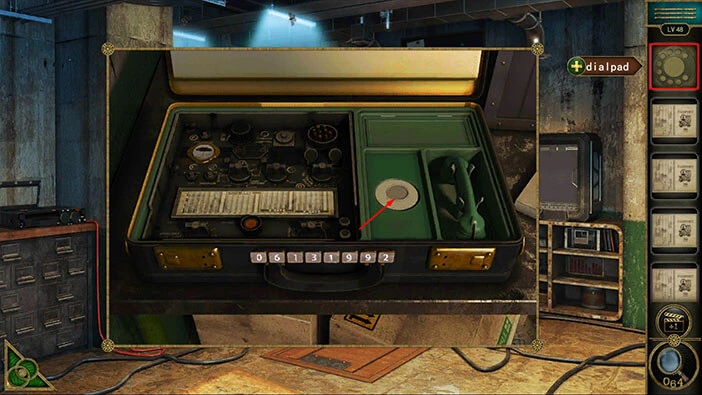
Enter the code “06131992” and you will unlock the suitcase.
In the suitcase, you will find a “Plug”. Tap on it to pick it up.
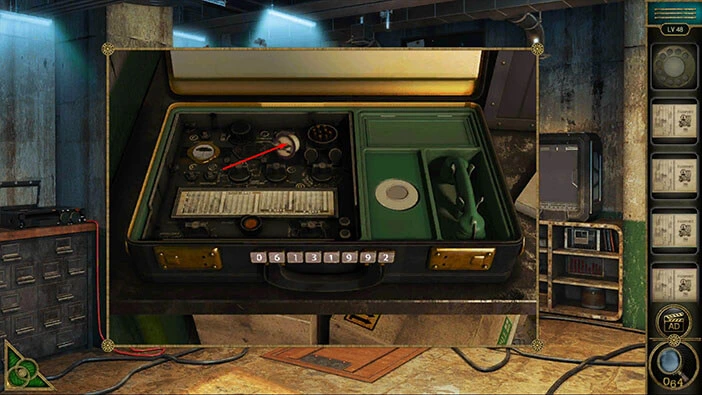
Before we continue, let’s select the “Dialpad” from the inventory and insert it into the empty slot.
Our next task is to use the phone in the suitcase to dial a certain telephone number. So, since this suitcase belongs to the person with the Canadian passport, let’s tap on the passport again to examine it.
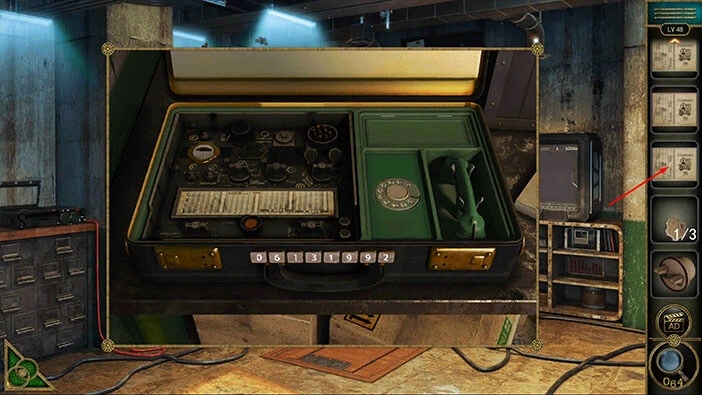
Here, we can discover a telephone number “6802541”. Let’s memorize/write down this number.
Once you’re done, tap on the green button in the bottom left corner of the screen to go back.
Next, tap on the telephone to start the interaction, and dial the number “6802541”.
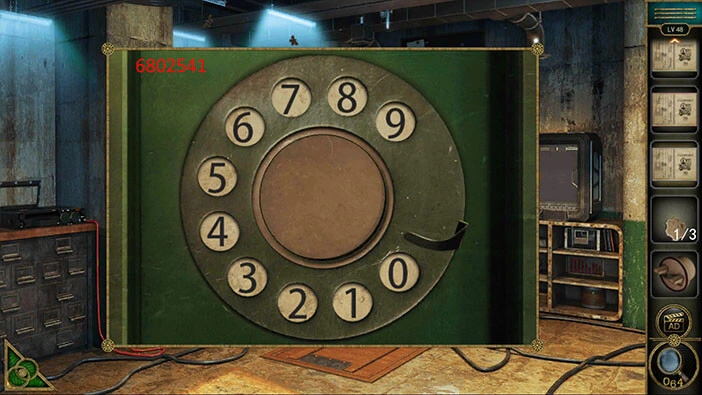
You will open the secret compartment in the suitcase, as soon as you dial the correct number. Inside you will find another “Game prop”. Tap on it to pick it up.
Once you’re done, tap on the green button in the bottom left corner of the screen to go back.

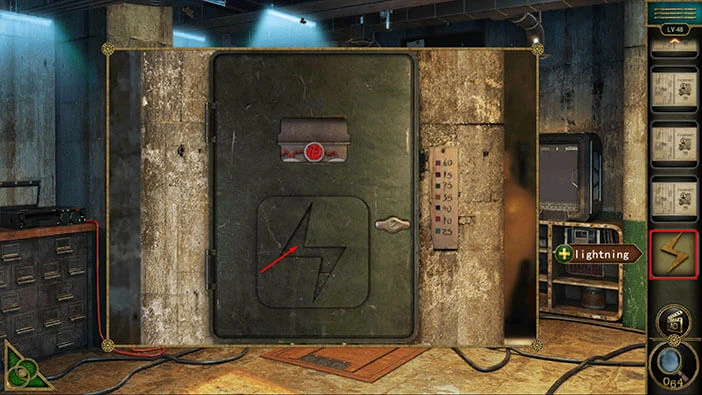
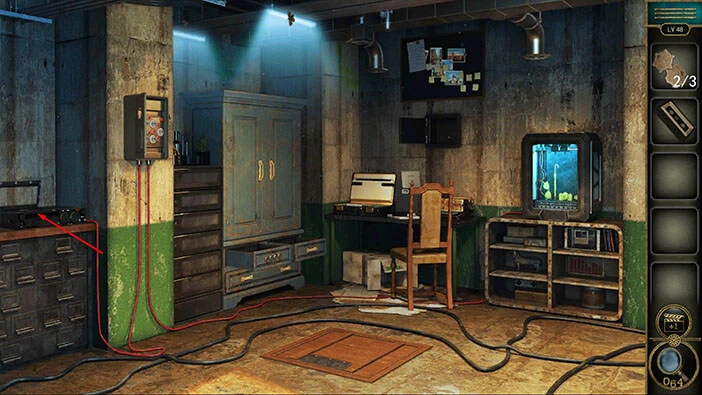
Next, let’s tap on the power box on the pillar on the left, to take another look at it, and tap again to start the interaction.
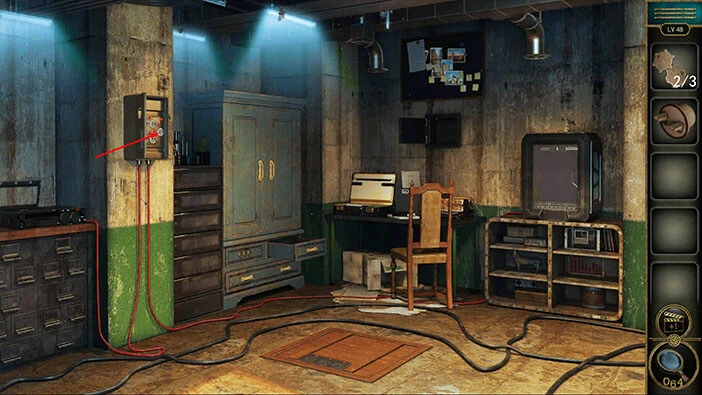
We have found the missing “Plug” so let’s insert it into the empty slot.
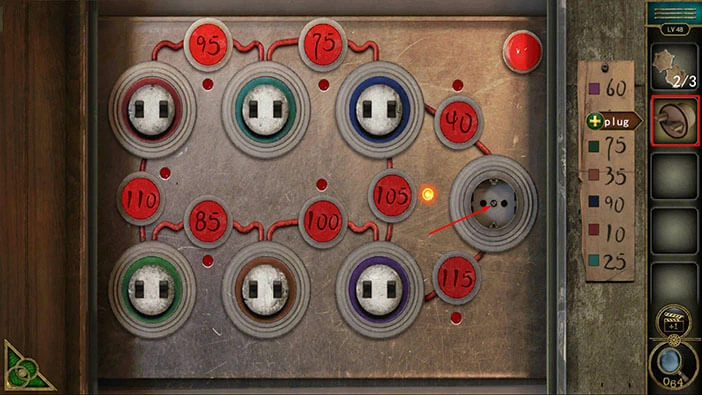
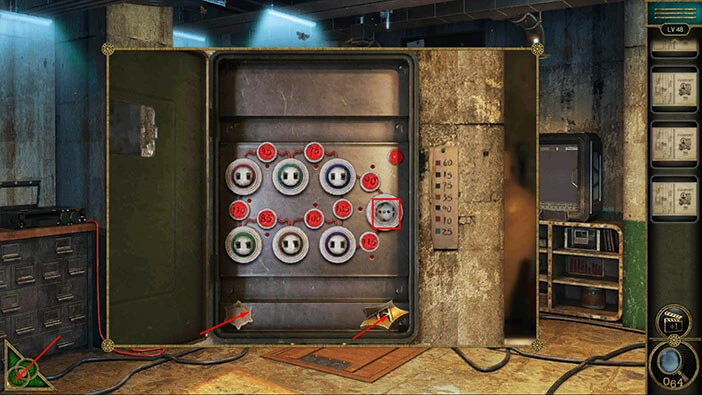
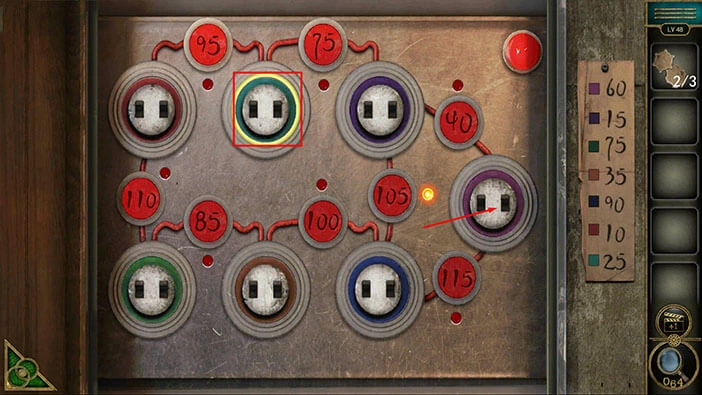
Here, we have another puzzle. On the right, we can see the note with the values for plugs of different colors. If we take a look at the main part of the puzzle, we will see seven plugs, and they are connected in pairs with the red wires, and we can also see what should be the value of each pair. For example, if we take a look at the first slot and second slot in the top row, we can see that their value should be 95.
So, our task is to reorder the plugs, and get the value shown on the screen. We will do this puzzle in several steps. Let’s begin.
Step 1
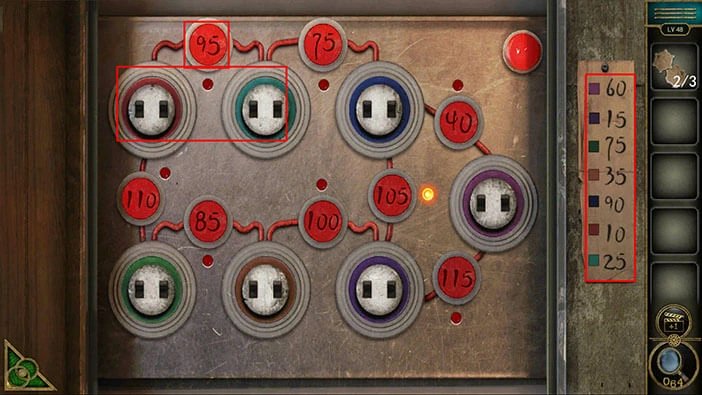
Select the blue plug from the third slot in the top row, then tap on the purple plug located in the third slot in the bottom row to swap their positions.
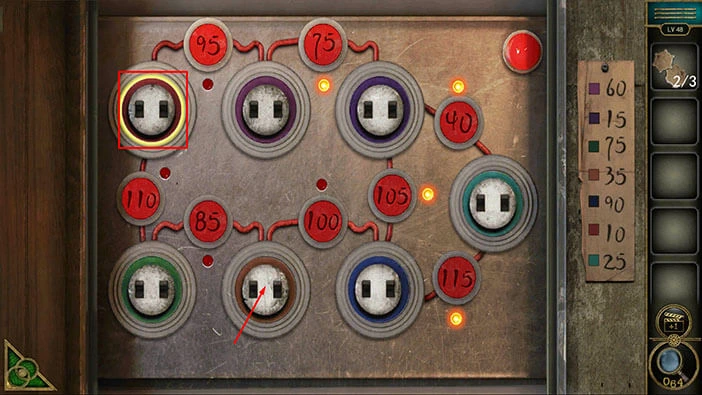
Step 2
Select the green plug from the second slot in the top row, then tap on the purple plug located in the right slot to swap their positions.
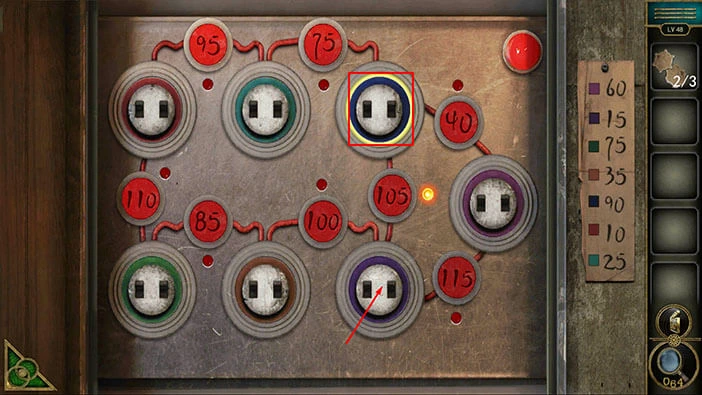
Step 3
Select the red plug from the first slot in the top row, then tap on the brown plug located in the second slot in the bottom row to swap their positions. With that, you will solve this puzzle.
As soon as you solve this puzzle, you will restore the power to the machine on the right. Let’s tap on this machine to take a closer look at it.

In the machine, we can see four items. Let’s memorize/write down the order of the items, because that is a hint for the next puzzle.
Starting from left to right, we have, Sunglasses, an Umbrella, a Camera, and a Smoking pipe.
Once you’re done, tap on the green button in the bottom left corner of the screen to go back.

I forgot to pick up one item from the suitcase, so let’s go back to it.
In the top left corner of the suitcase, you will notice a “Button”. Tap on it to pick it up.
After that, tap on the green button in the bottom left corner of the screen to go back.
Next, let’s tap on the cabinet on the left to take a closer look at it. After that, tap on the top left drawer to start the interaction.
We can see that the fourth button is missing, so let’s select the “Button” from the inventory and insert it into the empty slot.
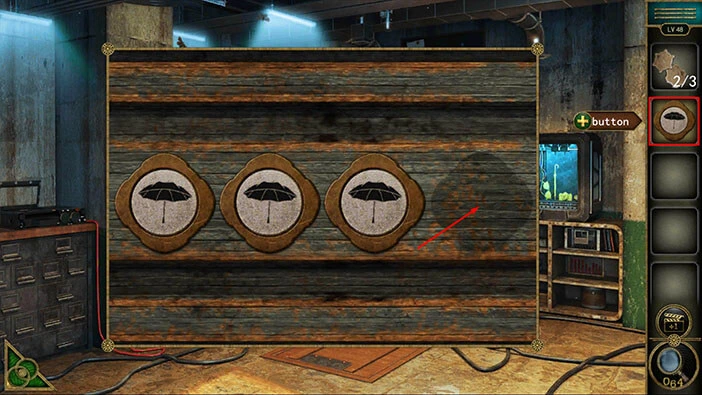
Here, we can see four umbrellas on the buttons. We already know the solution to this puzzle. When we examined the machine we saw the four items that we will need to solve this puzzle. So, let’s enter these items. We had,
Sunglasses, an Umbrella, a Camera, and a Smoking pipe.

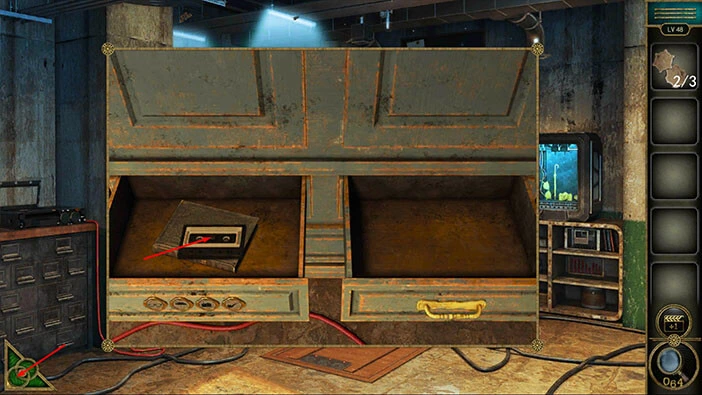
You will open the drawer, as soon as you enter the correct symbols. Inside you will find a “Video tape”. Let’s tap on it to pick it up.
After that, tap on the green button in the bottom left corner of the screen to go back.
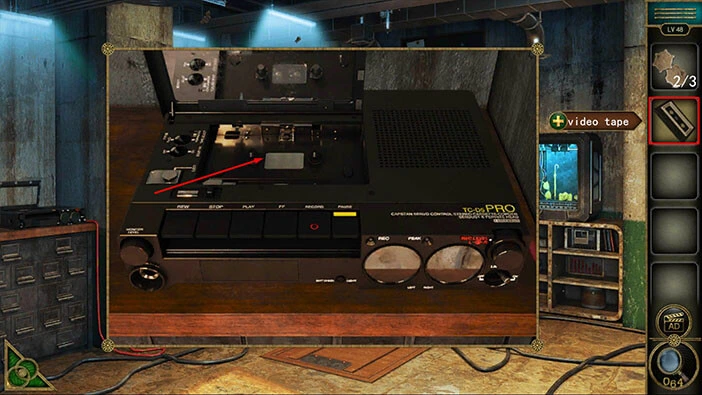
Next, let’s tap on the machine on the left to take a closer look at it.
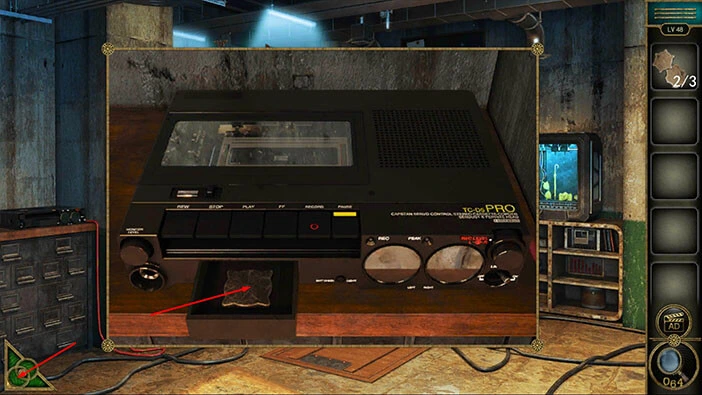
Select the “Videotape” from the inventory and insert it into the empty slot.
The secret compartment at the bottom will open, and inside you will find the third “Game button”. Tap on it to pick it up.
After that, tap on the green button in the bottom left corner of the screen to go back.
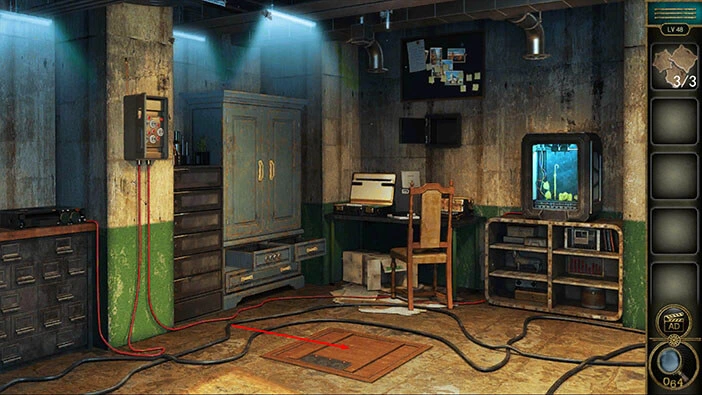
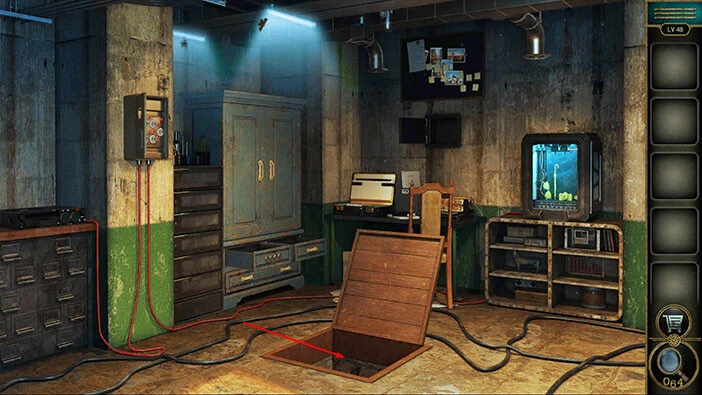
Next, let’s tap on the wooden trapdoor to take a closer look at it.
Select the “Game buttons” from the inventory and insert them into the empty slots. After that, tap on the buttons to start the interaction.
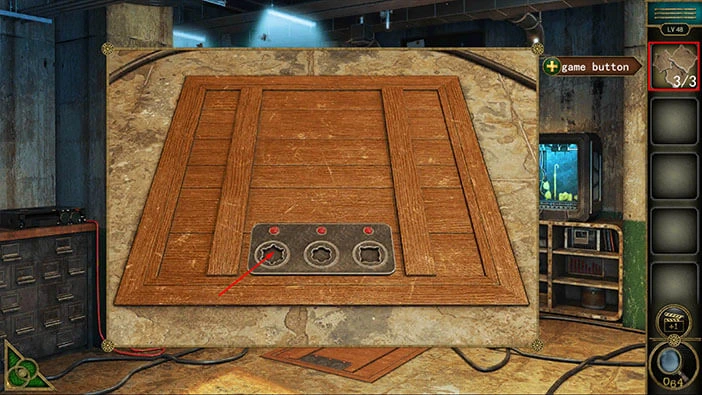
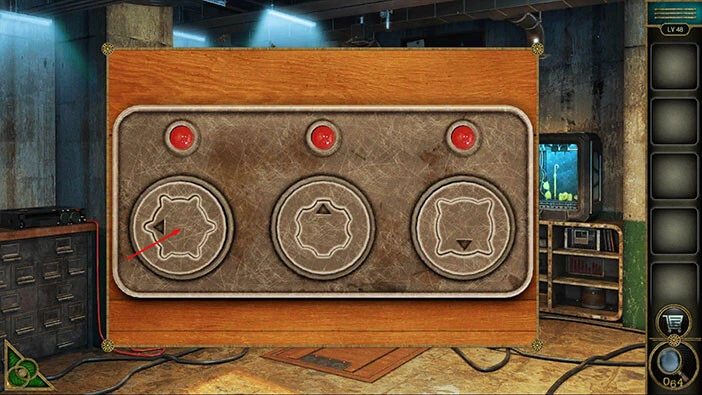
Here, we have another puzzle. Our task is to rotate the three buttons until the arrows on the buttons are pointing up.
We will do this puzzle in several steps. Let’s begin.
Step 1
Tap six times on the third button.
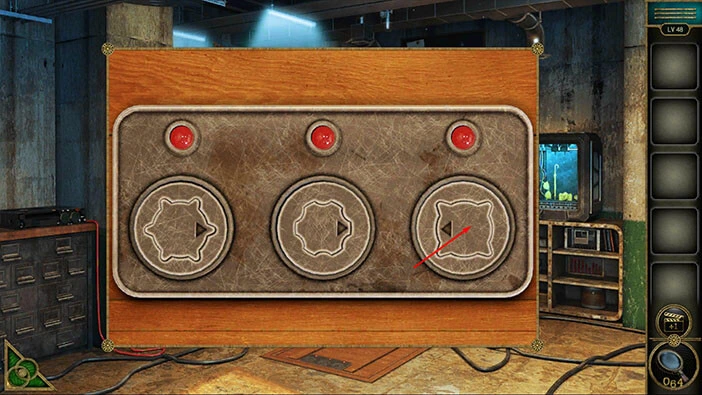
Step 2
Tap six times on the second button.
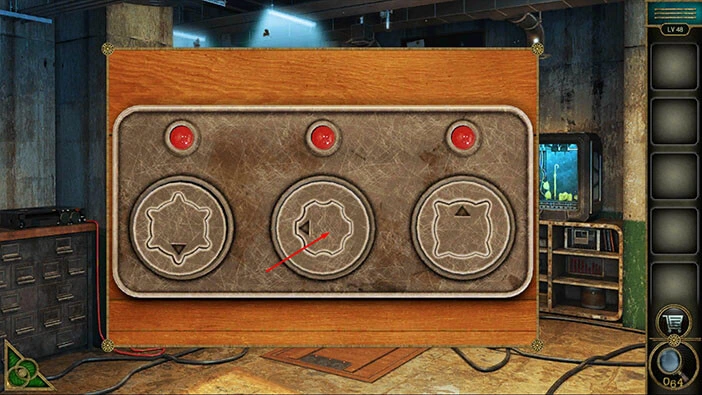
Step 3
Tap six times on the first button and you will solve this puzzle.
With that, you will open the trapdoor. Tap on it to proceed to the next level.
With that, we have reached the end of the twelfth part of the walkthrough. If you want to see the thirteenth part, tap on the next part button. In the thirteenth part of the walkthrough, we will cover levels 49-51.
Thank you for reading.