Can you escape the 100 room 17 | Levels 37-40
Hello everyone and welcome to the tenth part of the walkthrough for “Can you escape the 100 room 17”. In the tenth part of the walkthrough, we will cover levels 37 to 40.
Level 37
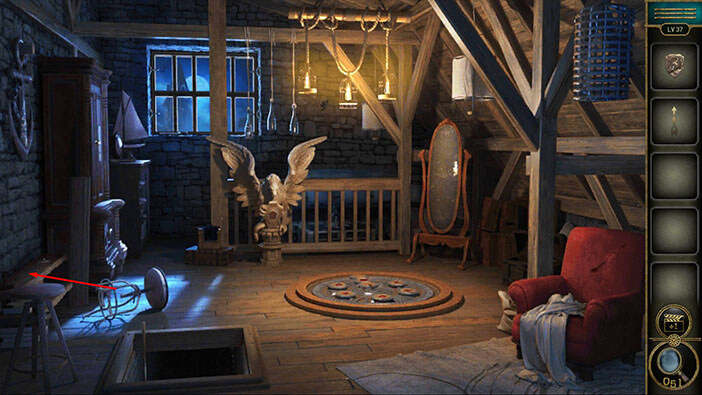
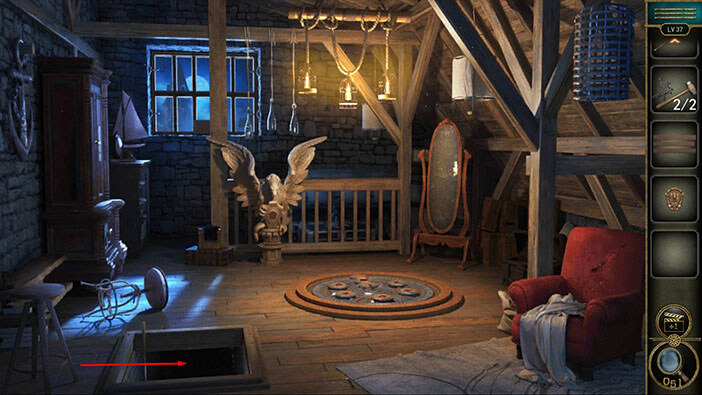
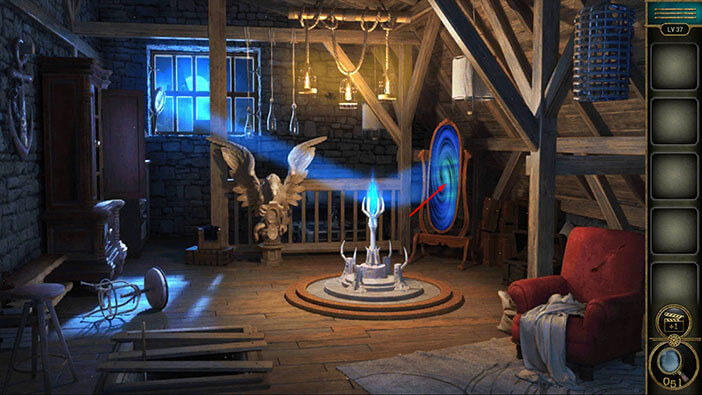
Let’s explore the thirty-seventh level. This level is a bit different from the previous levels. On the left side of the floor, you will notice a large hole that leads to the basement. Our first task in this level is to block this hole because if we don’t move fast enough, the monster (probably a werewolf) will come out of the basement and it will attack our character.
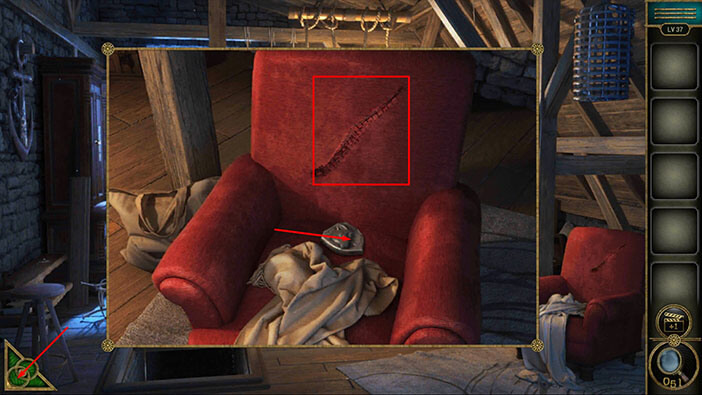
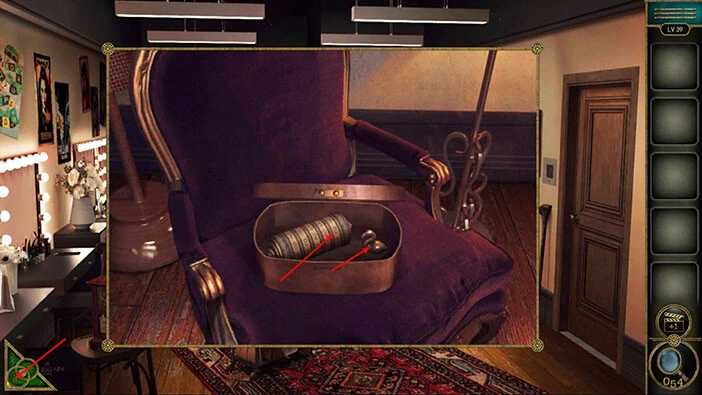
So, let’s move quickly. Tap on the armchair on the right to take a closer look at it.

Here, you will find a “Werewolf emblem”. Let’s tap on it to pick it up. Also, you will notice that there was a large cut on the armchair. We will come back to it a bit later.
Once you’re done, tap on the green button in the bottom left corner of the screen to go back.
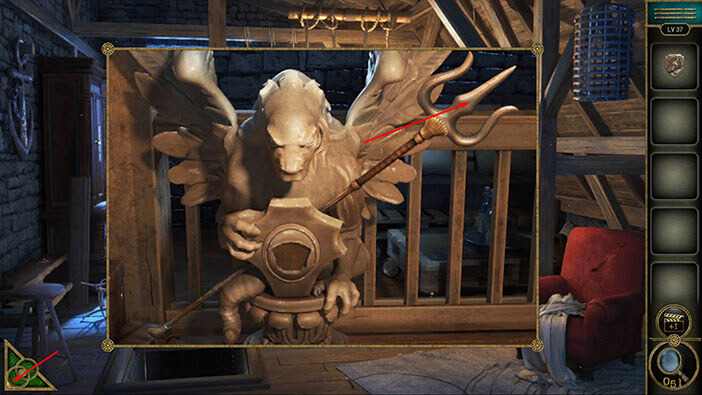
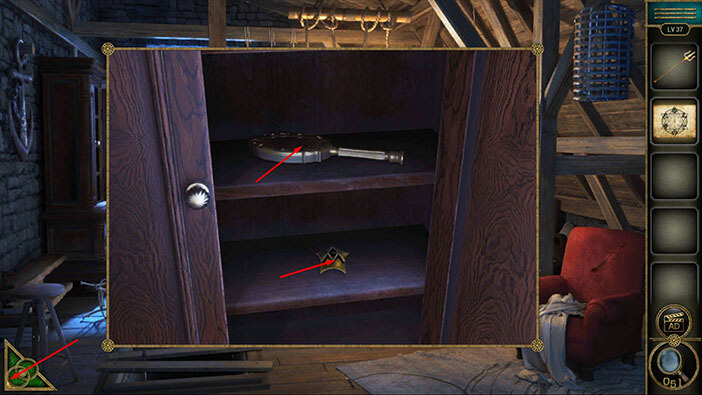
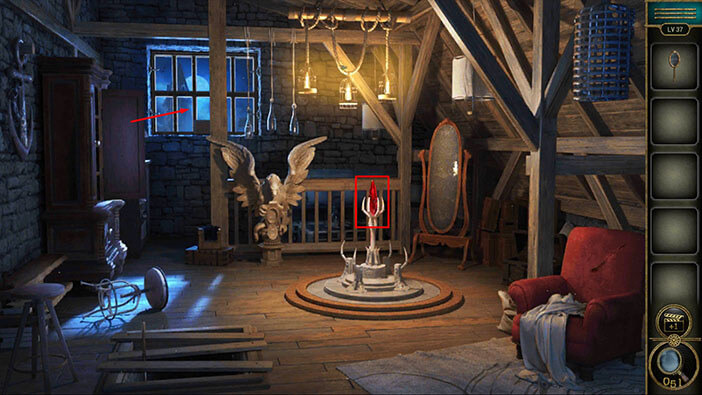
Next, tap on the winged statue in front of you to take a closer look at it.

Here, you will find a “Magic wand”. Tap on it to pick it up.
After that, tap on the green button in the bottom left corner of the screen to go back.
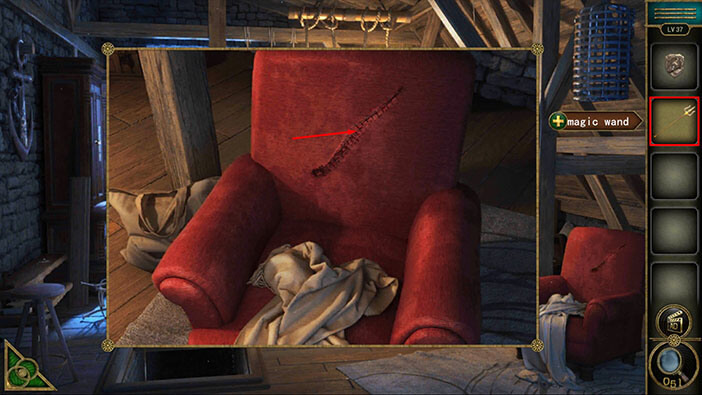
Next, let’s tap on the armchair to take another look at it.

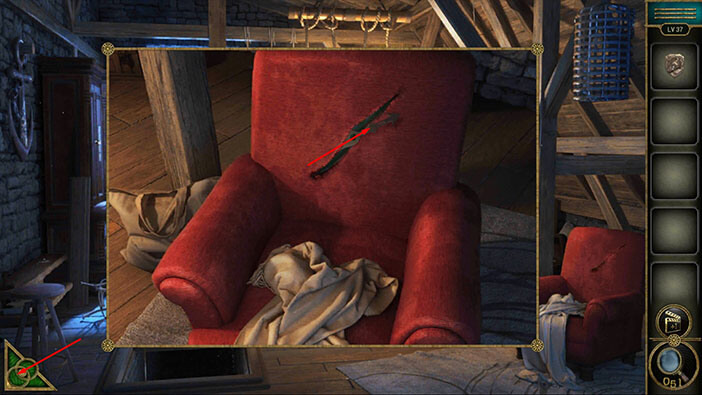
Select the “Magic wand” from the inventory and use it to cut open the armchair.
Inside you will find, a “Needle”. Tap on it to pick it up. After that, tap on the green button in the bottom left corner of the screen to go back.
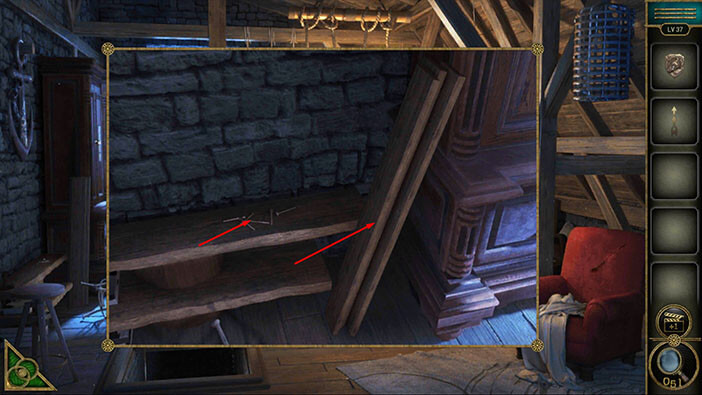
Next, let’s tap on the wooden bench on the left to take a closer look at it.
On the bench, you will find “Nails” and just to the right of the board you will find “Planks”. Tap on these two items to pick them up.
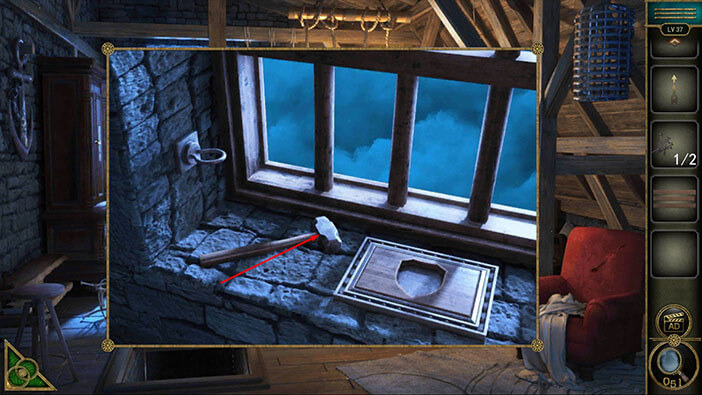
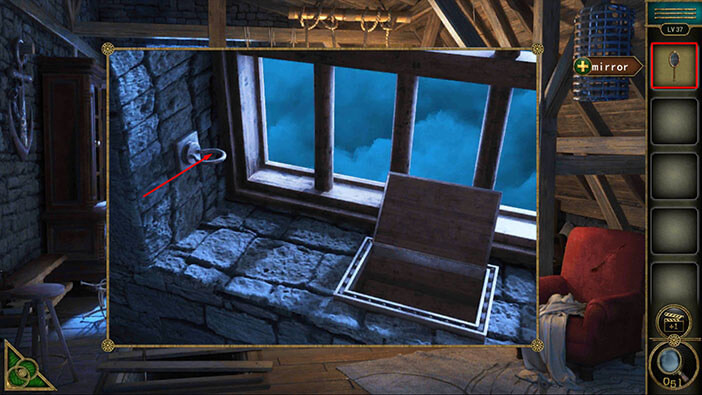
Next, tap on the window to take a closer look at it.

Here, you will find a “Hammer”. Tap on it to pick it up.
After that, select the “Werewolf emblem” from the inventory and insert it into the empty slot.
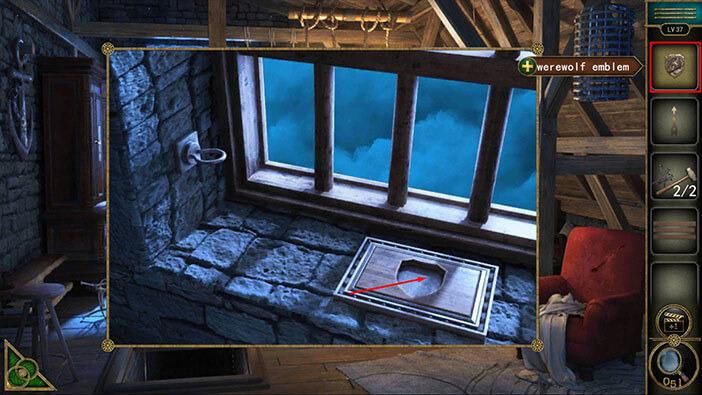
With that, you will open the small chest, and inside you will find the “Vampire badge”. Tap on it to pick it up.
After that, tap on the green button in the bottom left corner of the screen to go back.
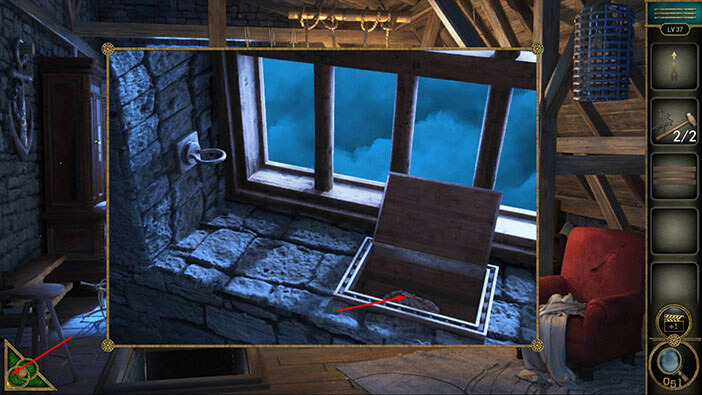
Next, let’s tap on the hole to take a closer look at it.
Select the “Planks” from the inventory and place them over the hole.
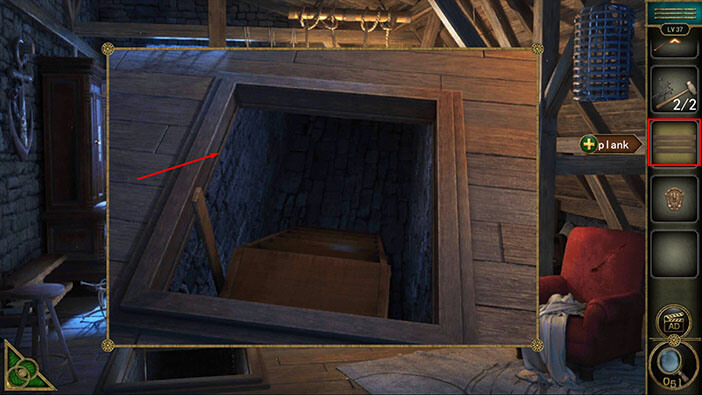
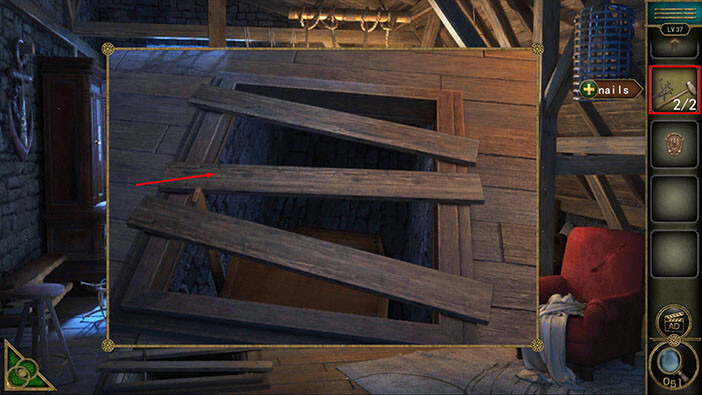
Next, let’s select the “Nails (and hammer)” from the inventory and use them to nail down the board. With that, we will block out the basement, and we can now play the game slowly because the monster can no longer reach us.
Once you’re done, tap on the green button in the bottom left corner of the screen to go back.
Next, let’s tap on the winged statue again to take a closer look at it, then tap on the slot in the middle of the statue to start the interaction.

Select the “Vampire badge” from the inventory and insert it into the empty slot.
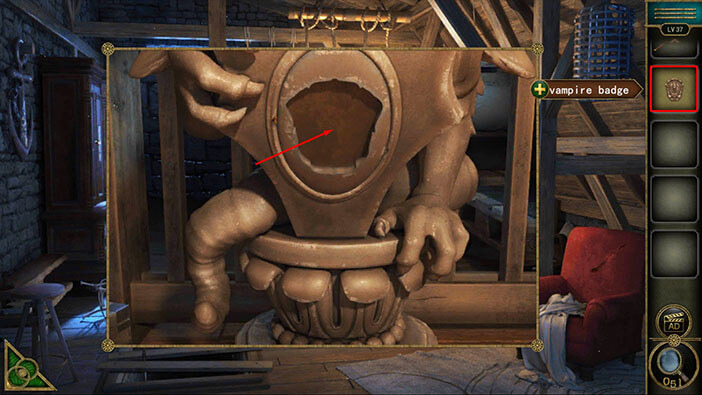
Here, you will find a “Hint paper”. Let’s tap on it to pick it up.
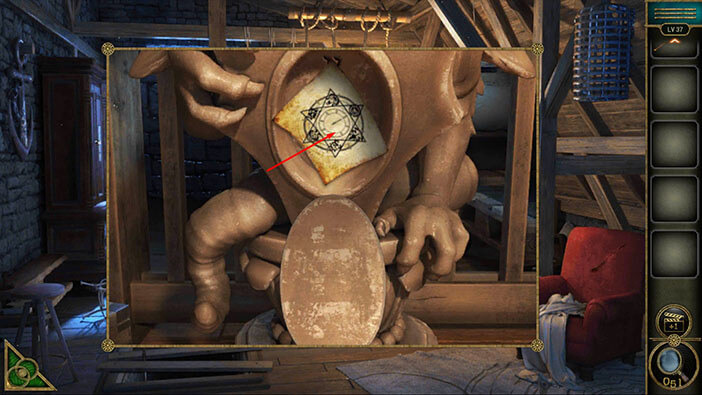
Once you pick up the “Hint paper”, you will discover four symbols on the statue. Let’s memorize/write down these symbols because we will need this information for the next puzzle.
Once you’re done, tap on the green button in the bottom left corner of the screen to go back.
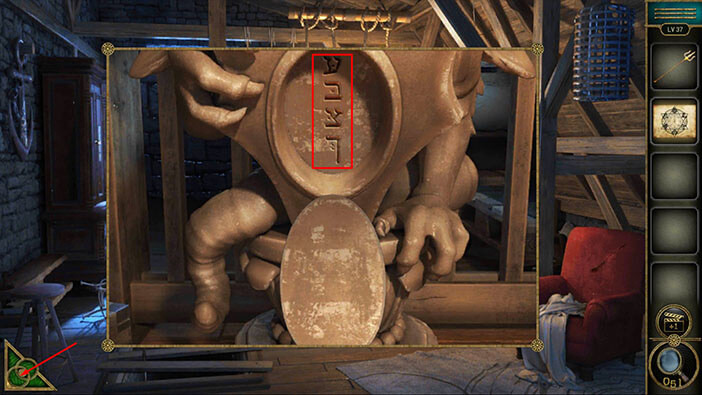
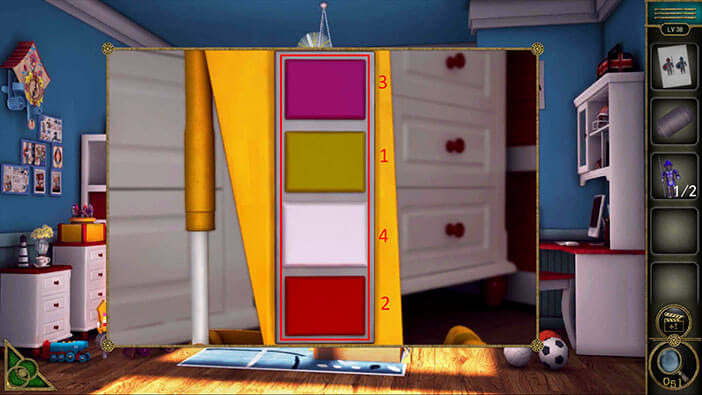
Next, let’s tap on the cabinet on the left to take a closer look at it, and here you will notice four slots with symbols. Let’s tap on them to start the interaction.
Enter the four symbols that we saw on the winged statue.
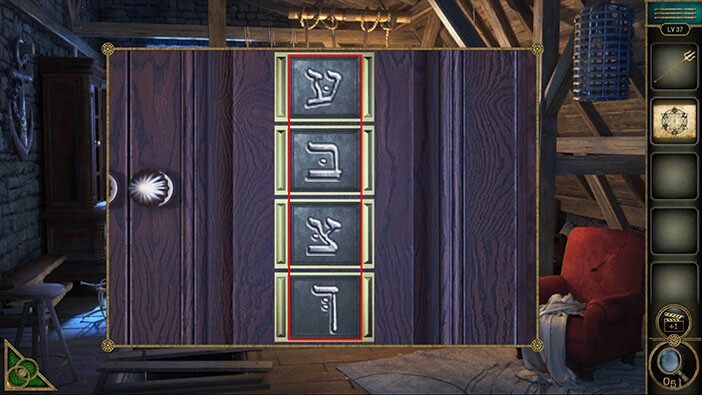
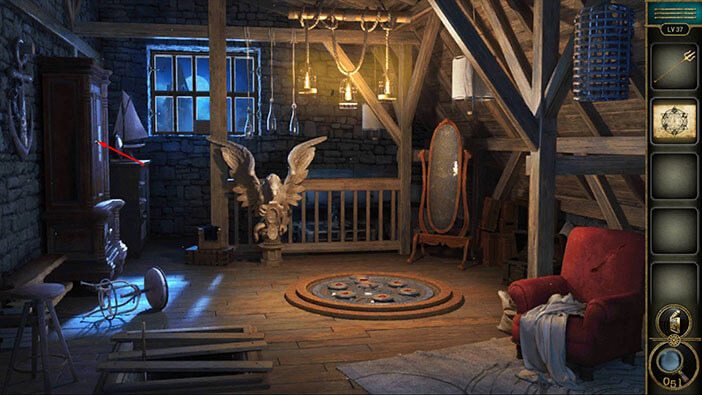
You will unlock the cabinet, as soon as you enter the correct symbols. In the cabinet, you will find a “Mirror” and another “Achievement star”. Let’s tap on these two items to pick them up.
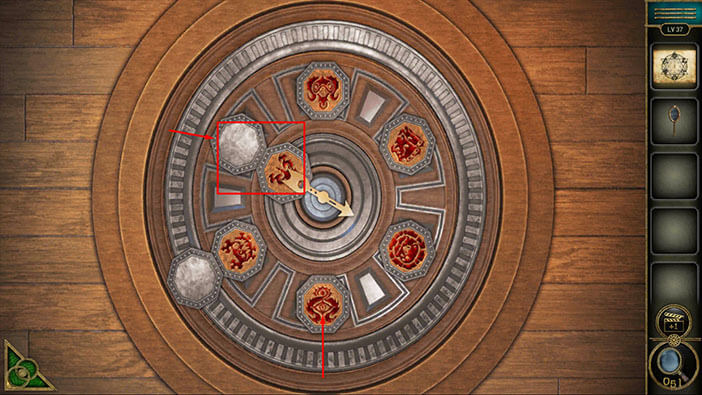
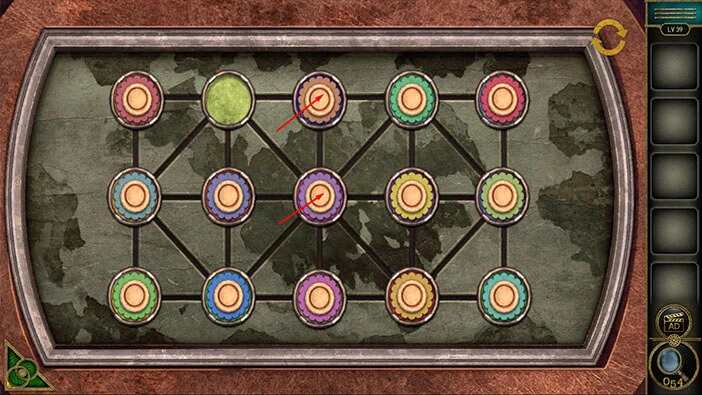
Next, let’s tap on the large disk in the middle of the room to take a closer look at it.
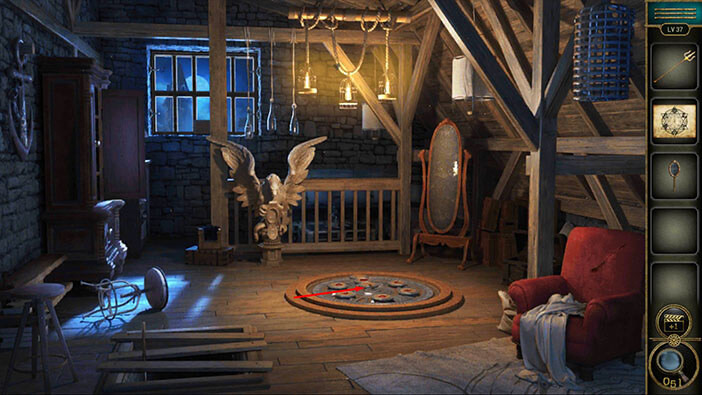
Let’s select the “Needle” from the inventory and attach it to the center of the disk.
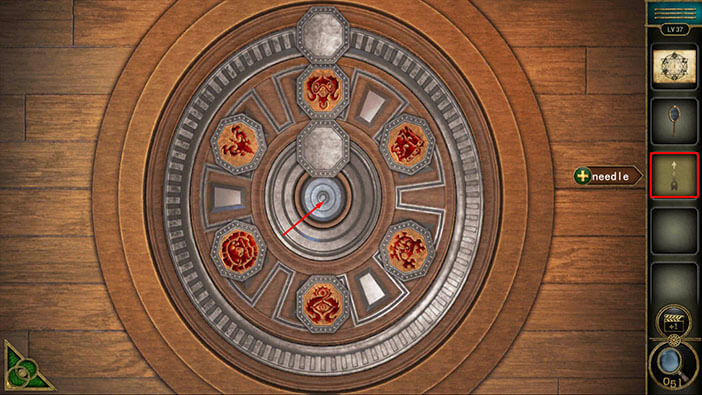
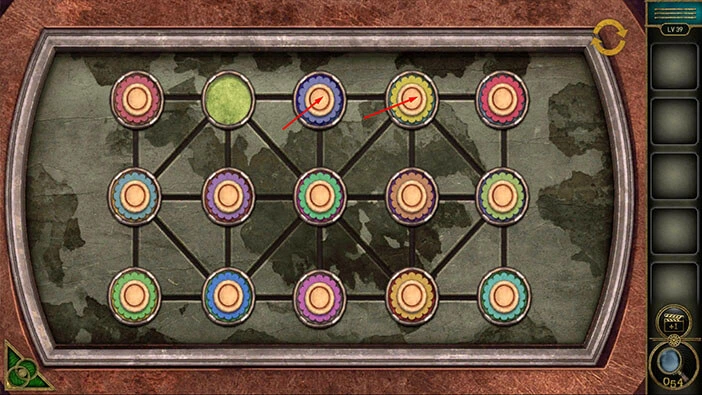
Here, we have another puzzle. First, let’s examine the “Hint paper” in our inventory.
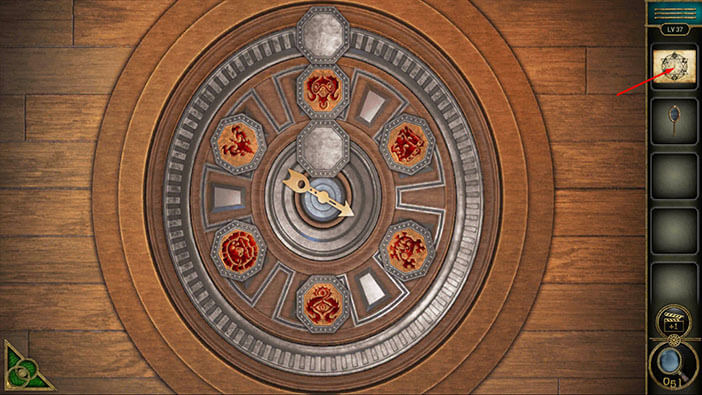
Here, we can see that the arrow is pointing at a specific symbol. So, the arrow on the disk should point to the same symbol. Let’s do that.
Tap on the empty inventory slot to put down the “Hint paper”.
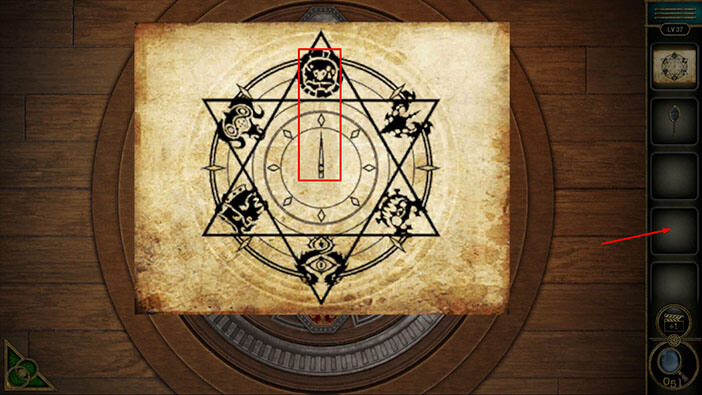
We can see that symbol in the bottom left corner. Tap on this symbol, and the slot in the middle will move next to it. After that, tap on the symbol in the bottom right (the arrow is pointing at this slot) to swap the positions of these two symbols.
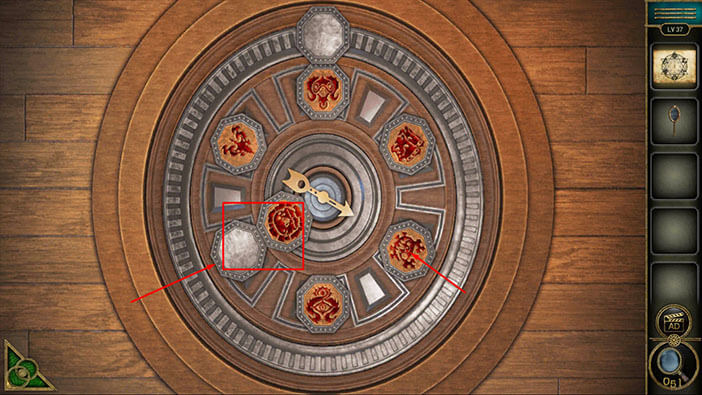
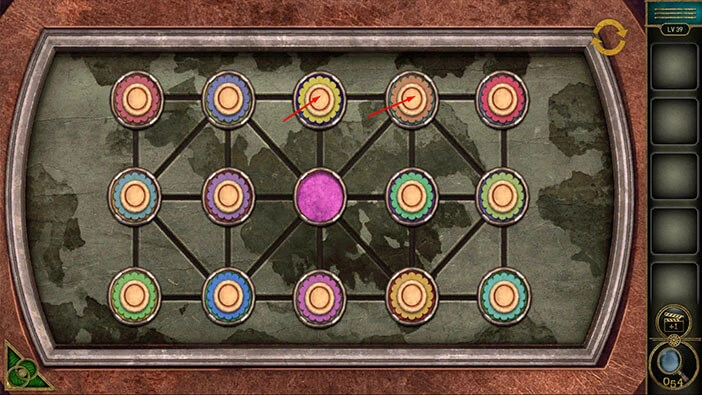
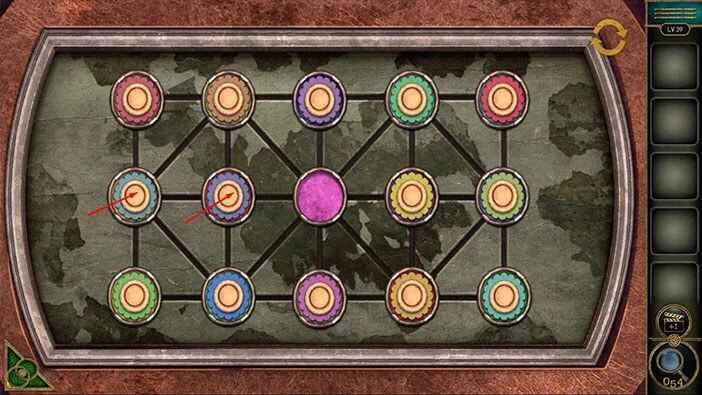
Let’s take another look at the “Paper with hints”. Here, we can see the symbols that should be positioned to the right of the arrow. Let’s go back and set it to the correct position.
We can see the symbol that we are looking for in the top left slot. So, let’s tap on it, and it will be placed in the inner slot. After that, tap on the symbol in the slot at the bottom (this slot is first on the right of the arrow) to swap their positions.
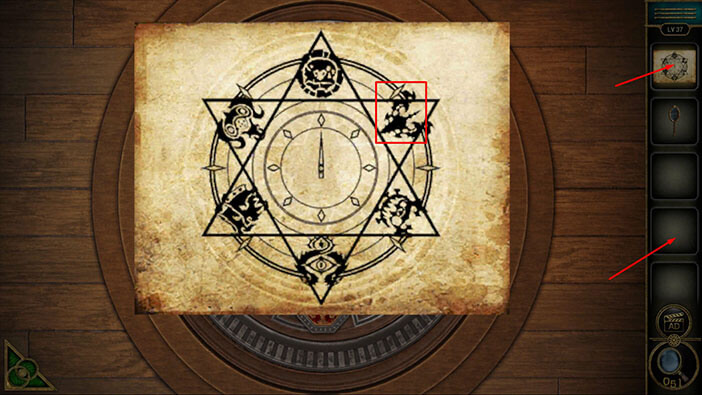
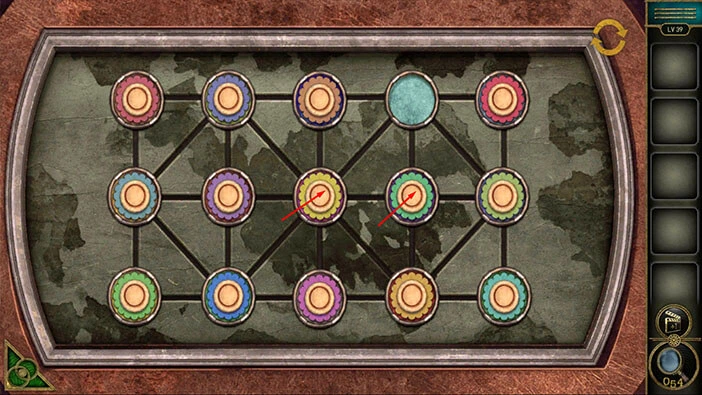
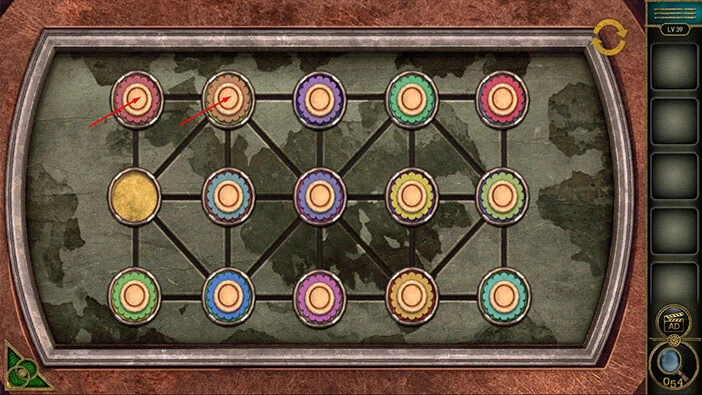
Let’s take another look at the “Paper hint”. The next to symbols that should be placed to the right of the arrow are already in the correct position. So, we just need to swap the positions of the first symbols on the left of the arrow with the second symbol on the left of the arrow. Let’s do that.
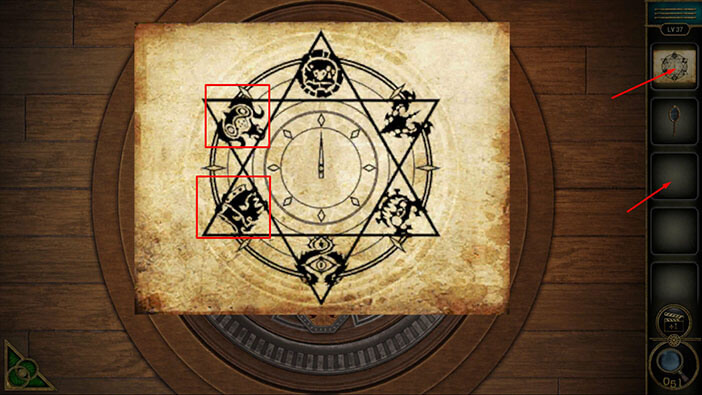
Let’s tap on the symbol in the top right, and it will be placed in the inner slot. After that, tap on the symbol in the top slot to swap their positions.
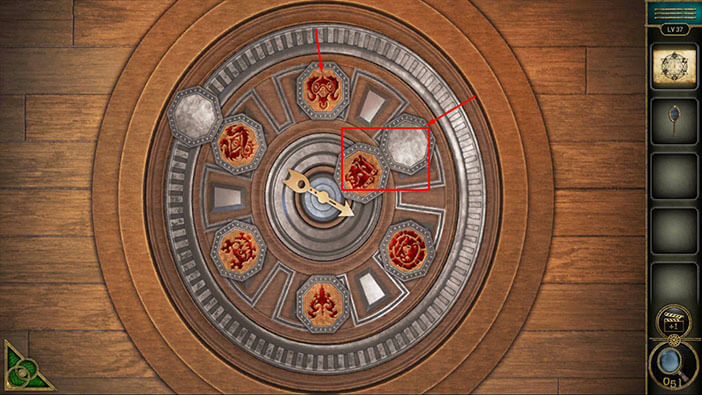
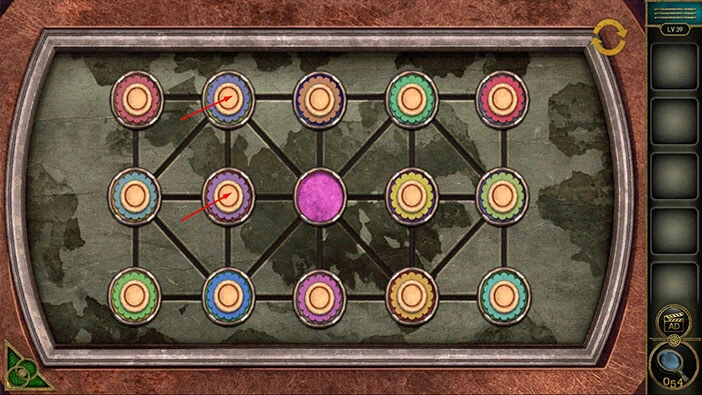
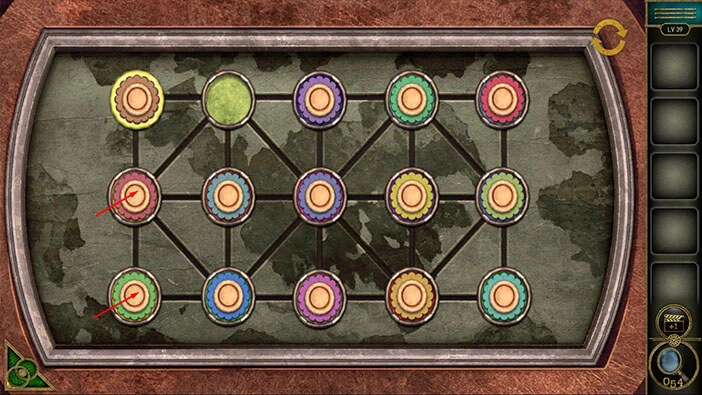
The strange pillar with the large red crystal will appear, as soon as you place the symbols in the correct positions. Let’s tap on the window to take another look at it.
Select the “Mirror” from the inventory and place it into the metal ring on the left side.
The mirror will redirect the moonlight to the crystals, and the crystal will activate the mirror. Let’s tap on the “Mirror” to start the interaction.
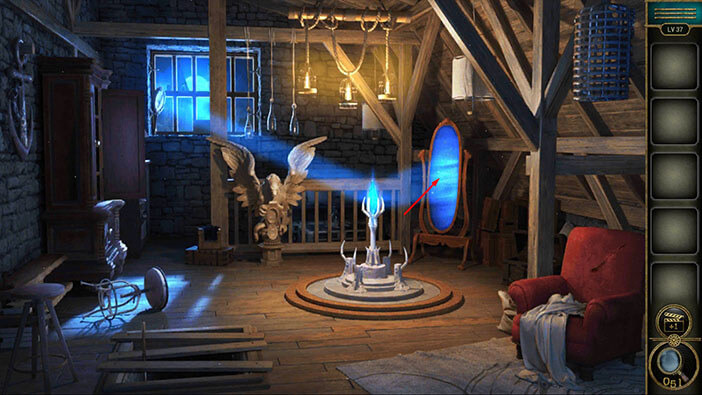
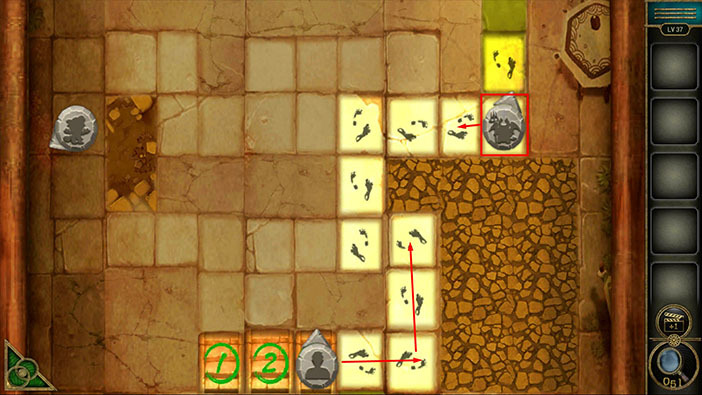
Here, we will have to play three minigames. Our task is to get to the top of the screen, and we will have to avoid the patrolling enemies while we move.
Let’s do that. Step on the number three position and the path will appear. Wait for the enemy to get to the bottom right corner, and once he starts moving up, you should start moving to the finish line.

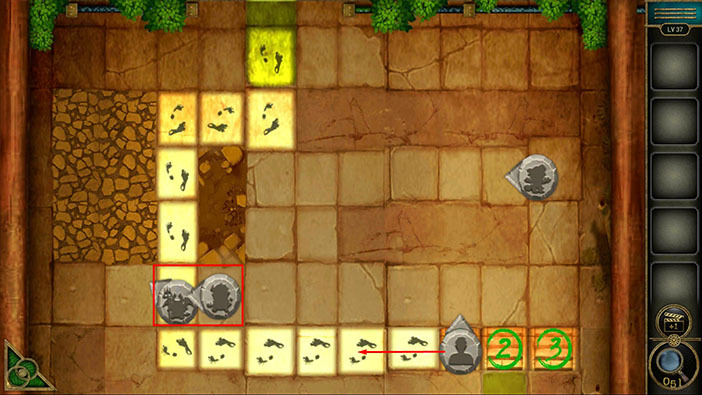
Second map. Step on the number three position and the path will appear. Wait for the enemy to get to the top right corner, and once he starts moving to the left, you should start moving to the finish line.
Third map. Step on the number one position and the path will appear. Wait for the two enemies to step into the same square of the path on the left, and then you should start moving to the finish line. This part requires precise timing, and it might be a bit difficult to get it right.
Once you complete the third map, you can tap on the mirror to proceed to the next level.
Level 38
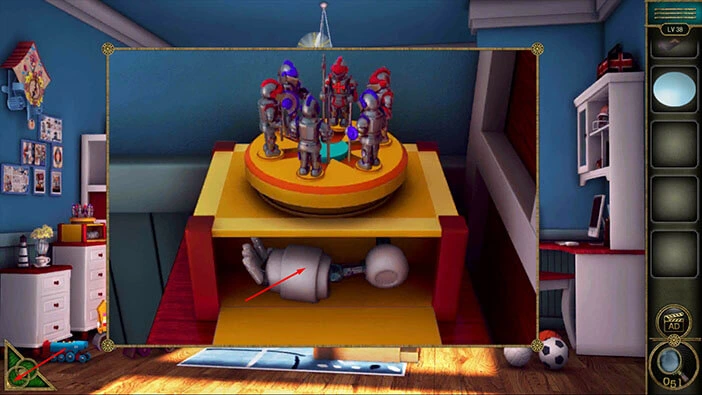
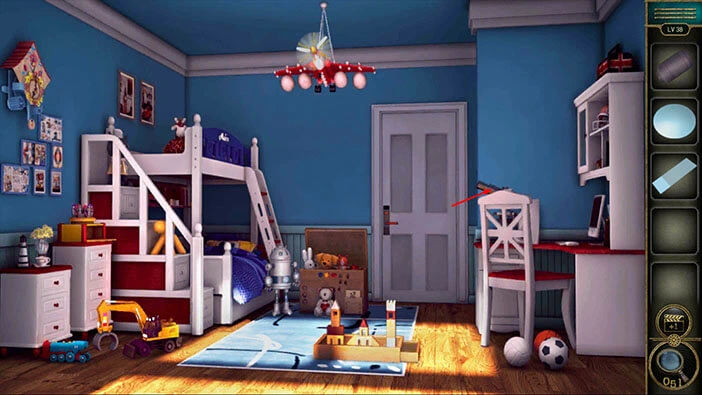
Let’s explore the thirty-eighth level. Let’s tap on the top bed to take a closer look at it.

Tap on the “Sponge Bob” pillow to lift it, and under it, you will discover a “Propeller”. Tap on it to pick it up.
Also, tap on the “Paper with hints” (Image) on the wall to pick it up.
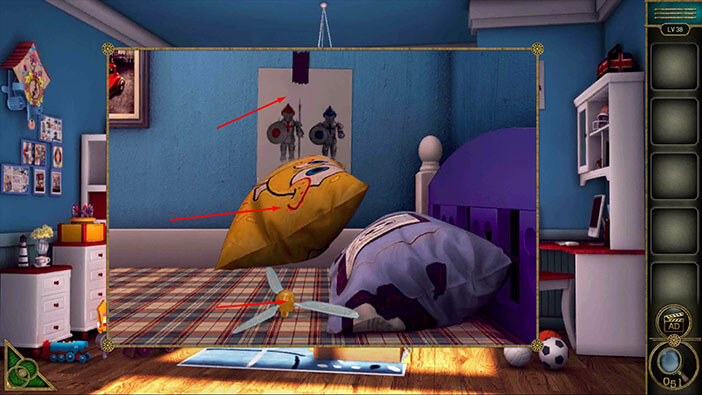
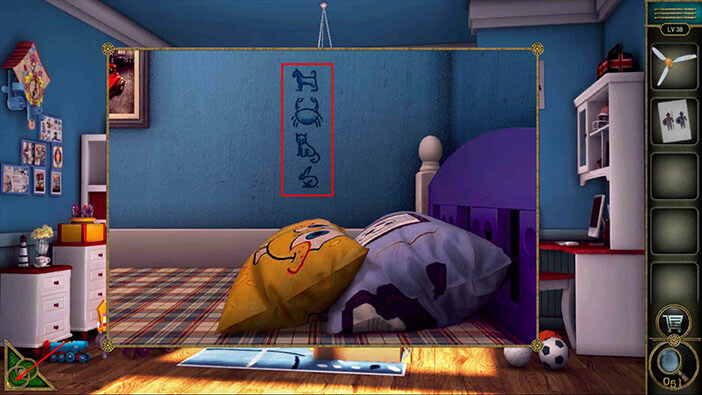
Once you take the image, you will notice a drawing of four animals on the wall. Let’s memorize/write down the order of the animals, starting from the top, because we will need this information for the next puzzle.
First = Dog
Second = Crab
Third = Cat
Fourth = Rabbit
Once you’re done, tap on the green button in the bottom left corner of the screen to go back.
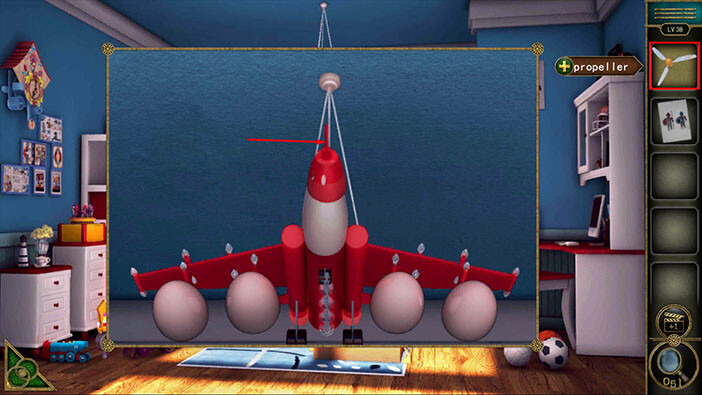
Next, let’s tap on the airplane to take a closer look at it.
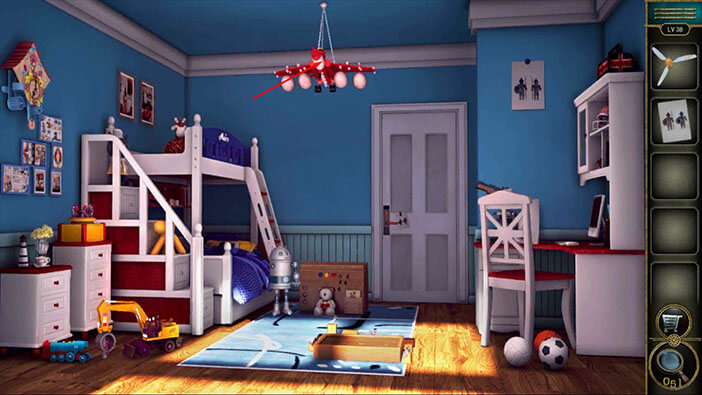
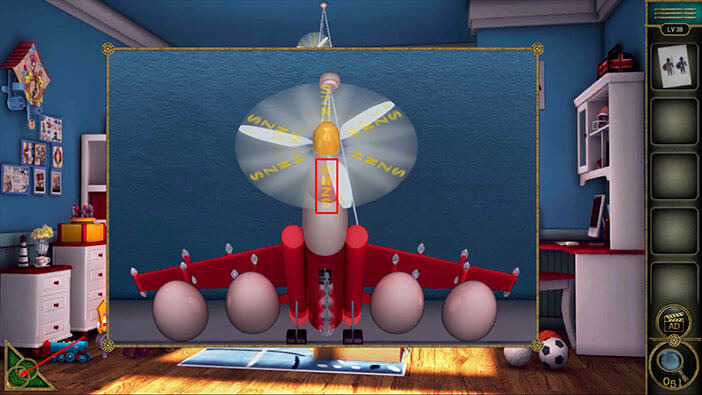
You will notice that the airplane doesn’t have a propeller. So, let’s select the “Propeller” from the inventory and attach it to the nose of the airplane.
Once you attach the propeller, you will be able to see the letters on the ceiling. These letters are “SZNH”. Let’s memorize/write down these letters because we will need this information for the next puzzle.
Once you’re done, tap on the green button in the bottom left corner of the screen to go back.
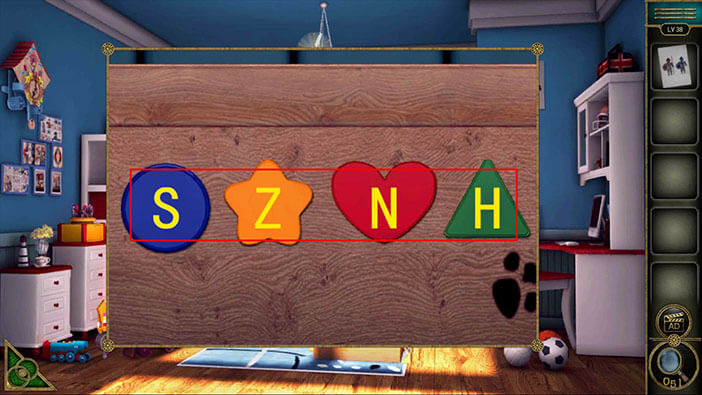
Next, to the door, you will notice a wooden chest. Let’s tap on it to take a closer look, and tap again to start the interaction.
Enter the password “SZNH” that we previously discovered.
In the chest, you will find an “Objective lens” and a “Toy soldier”. Tap on these two items to pick them up.
Here, we can also see the same four animals that we saw previously (drawings on the wall). So, let’s also memorize/write down the color of the animals.
First = Dog = Yellow
Second = Crab = Red
Third = Cat = Pink
Fourth = Rabbit = White
Once you’re done, tap on the green button in the bottom left corner of the screen to go back.

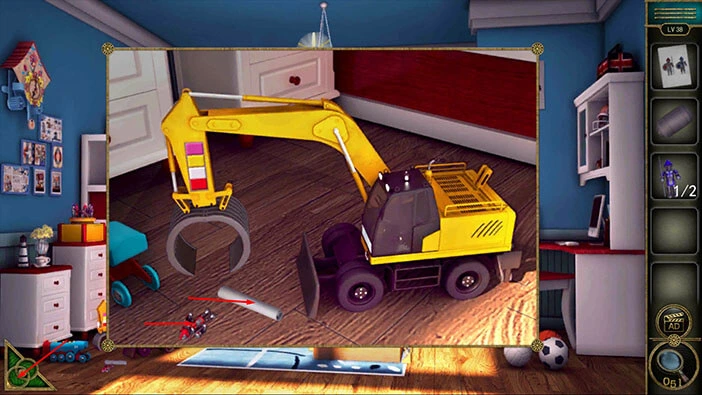
Next, you will notice a toy excavator in the left corner of the room. Let’s tap on it to take a closer look, and tap again to start the interaction.

The four colors on the toy excavator are the same as the colors of the animals. Let’s tap on these colors in the order that we discovered.
First = Dog = Yellow
Second = Crab = Red
Third = Cat = Pink
Fourth = Rabbit = White
The toy excavator will drop another “Toy” and a “Game hint”. Tap on these two items to pick them up.
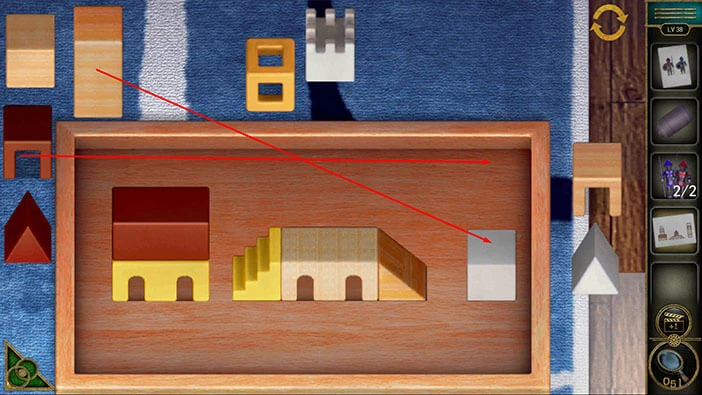
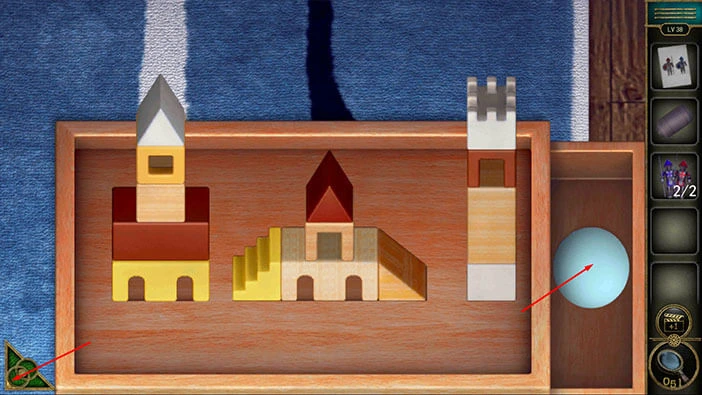
Next, let’s tap on the wooden box, located in the middle of the room, to take a closer look at it.
Here, we can see a lot of toy pieces. Let’s tap on the “Game Hint” to examine it.
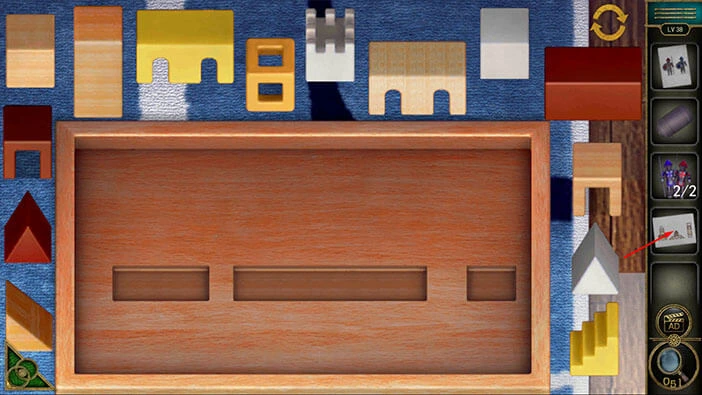
Here, we can see three buildings, and our next task is to use toy pieces to construct these buildings. Let’s do that.
Tap on the empty inventory slot to put down the “Game Hint”.
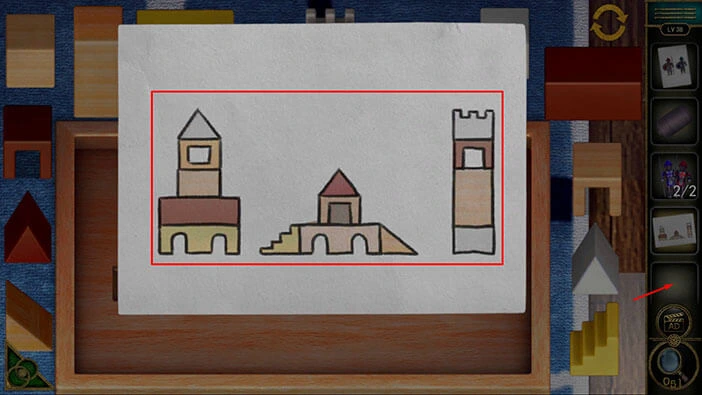
We will do this puzzle in several steps. Let’s begin.
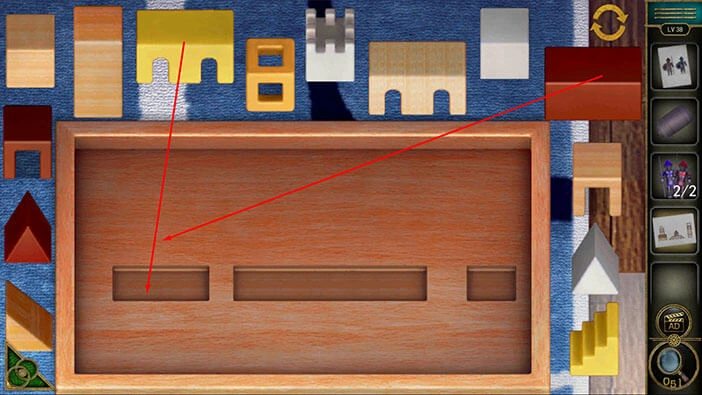
Step 1
Take the third toy piece from the top row, and place it into the left slot. After that, select the first toy piece from the column on the right, and place it onto the previous piece in the left slot.
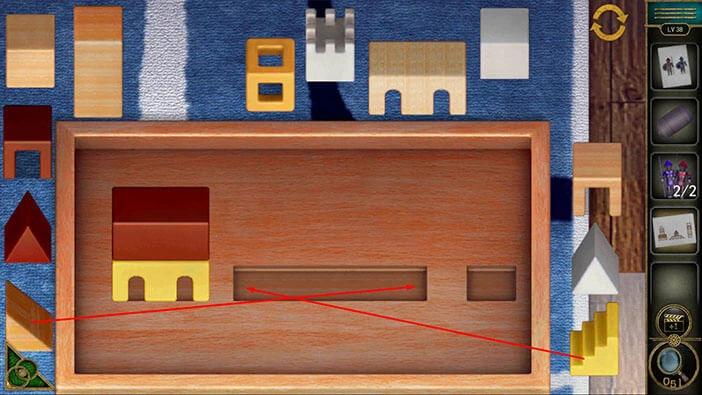
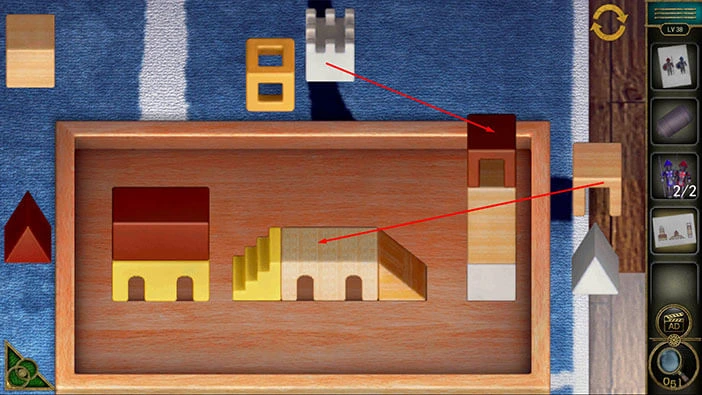
Step 2
Select the third toy piece from the column on the right, and place it into the left side of the middle slot. After that, select the toy piece from the column on the left, and place it into the right side of the middle slot.
Step 3
Select the fifth toy piece from the top row, and place it into the middle of the middle slot. After that, select the last toy piece from the top row, and place it into the right slot.
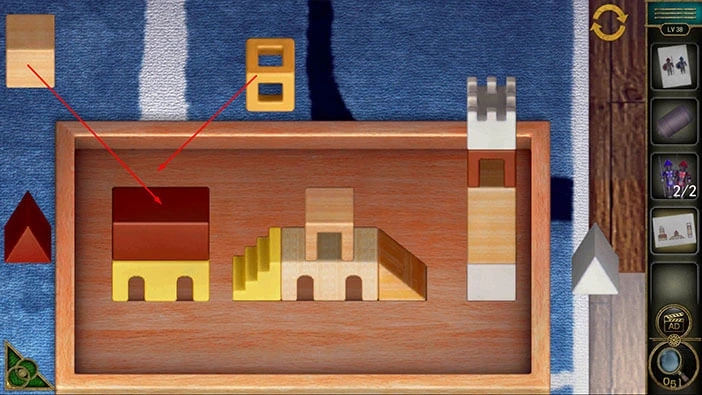
Step 4
Select the second toy piece from the top row, and place it into right slot. After that, select the second toy piece from the column on the left, and place it into the right slot.
Step 5
Select the third toy piece from the top row, and place it into the right slot. After that, select the first toy piece from the column on the right, and place it into the middle slot.
Step 6
Select the first toy piece from the top row, and place it into the left slot. After that, select the second toy piece from the top row, and place it into the left slot.
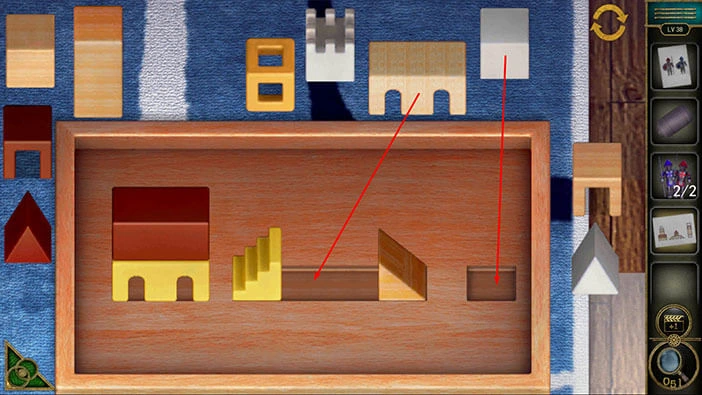
Step 7
Select the toy piece from the column on the left, and place it into the middle slot. After that, select the toy piece from the column on the right, and place it into the left slot.
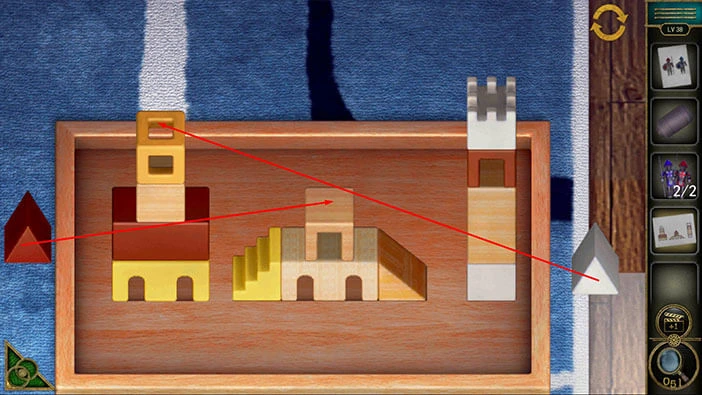
The drawer will open as soon as you solve the puzzle, and inside you will find an “Eyepiece”. Let’s tap on it to pick it up.
After that, tap on the green button in the bottom left corner of the screen to go back.
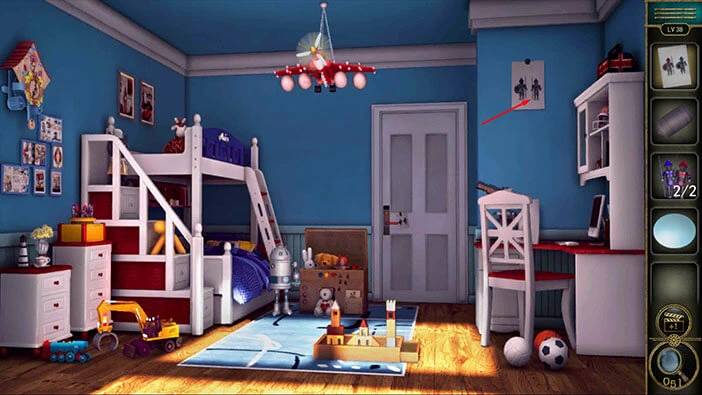
Next, on the wall on the right, you will notice another “Paper with hints”. So let’s tap on it to take a closer look at it, and tap again to pick it up.
Also, you will notice another “Paper with hint” on the door. So let’s tap on it to take a closer look at it, and tap again to pick it up.
Next, let’s tap on the toys on the cabinet on the left to take a closer look.
Here, we can see four toy soldiers, but you will notice that two slots are empty. So, let’s select the “Toys” from the inventory and insert them into the empty slot. After that, tap on the toy soldiers to start the interaction.
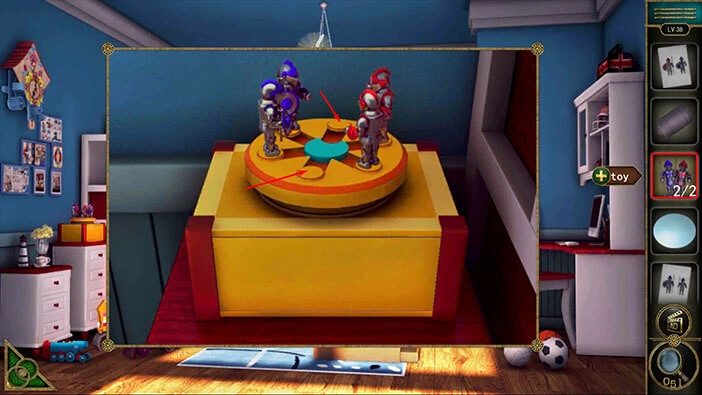
Here, we can see six soldiers, three of them are blue and three of them are red. One blue soldier has both a spear and a shield, one blue soldier has only a shield, and one soldier only has a spear. We have the same situation with the red soldiers (regarding their equipment).
That brings us to our next task. We should rearrange the soldiers and place them into the correct slots. We can discover the correct position of the soldiers by looking at the three “Game Hints”.
We will do this puzzle in several steps. Let’s begin.
Step 1
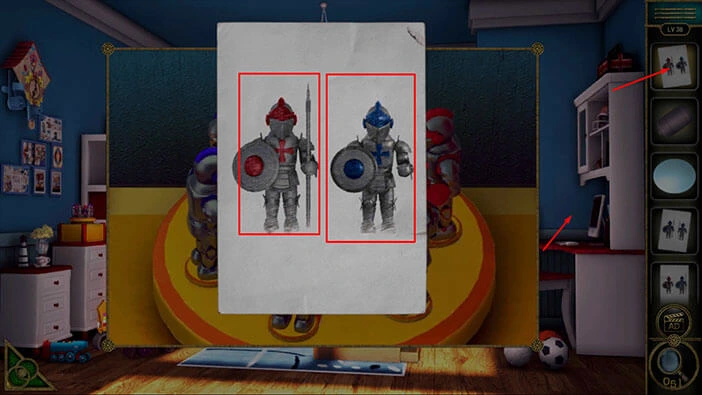
Let’s take a look at the first “Game Hint”. Here, we can see that to the right of the Blue soldier with a shield, we should place a Red soldier with a spear and a shield. Memorize/write down this information.
Once you’re done, tap on the empty space on the screen to put down the note.
Step 2
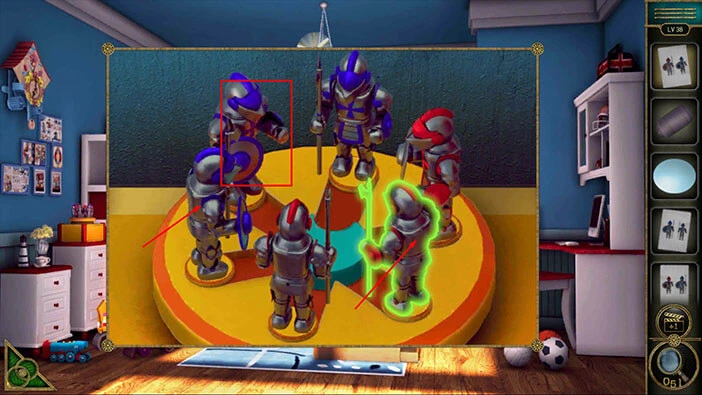
In the top left, we can see a Blue soldier with a shield. The Red soldier with a spear and shield is in the bottom right (the shield might be a bit difficult to see because of the angle). So, let’s select the Red soldier in the bottom right slot and swap its place with the soldier in the bottom left slot (to the right of the Blue soldier with the shield).
Step 3
Let’s take a look at the second “Game Hint”. Here, we can see that to the left of the Blue soldier with a spear and shield, we should place the Blue soldier with a spear. Memorize/write down this information.
Once you’re done, tap on the empty space on the screen to put down the note.

Step 4
In the top slot, we can see a Blue soldier with a spear. The Blue soldier with a spear and shield is in the bottom right (the shield might be a bit difficult to see because of the angle). So, let’s select the Blue soldier in the top slot and swap its place with the soldier in the bottom slot (to the left of the Blue soldier with the shield).
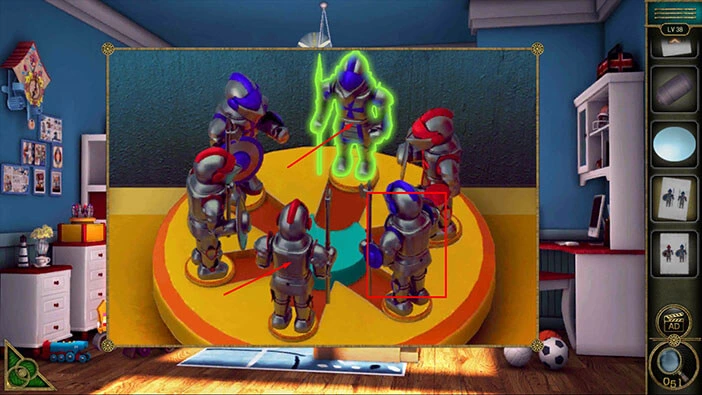
With that, you will place all the soldiers into the correct slots, and the secret compartment will open. Inside you will find an “Arm”. Tap on it to pick it up.
After that, tap on the green button in the bottom left corner of the screen to go back.
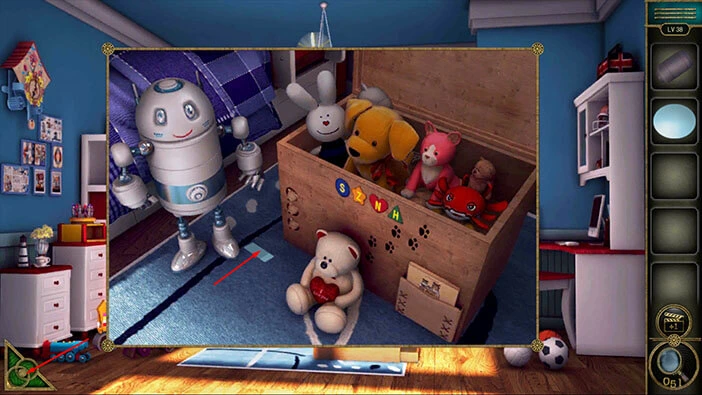
Next to the bed, you will notice a small robot. Let’s tap on it to take a closer look.

The robot is missing an arm, so let’s select the “Arm” from the inventory and attach it to the empty slot.
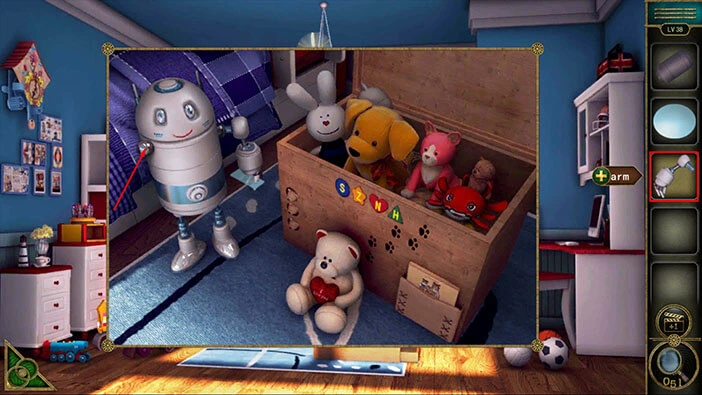
The robot will drop a “Glass slide’. Let’s tap on it to pick it up. After that, tap on the green button in the bottom left corner of the screen to go back.
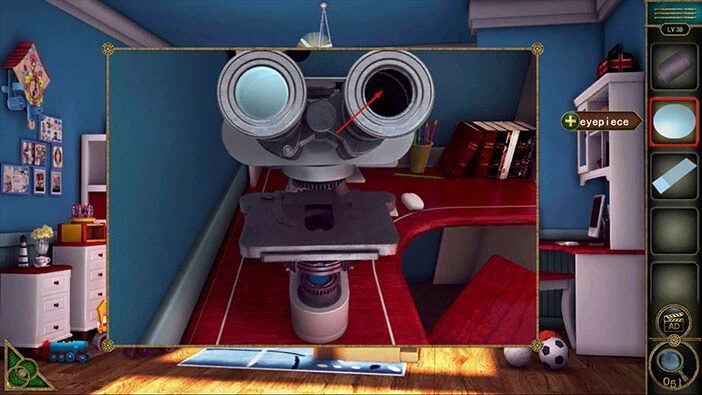
On the desk on the right (behind the chair), you will notice a microscope. Let’s tap on it to take a closer look.
You will notice that the lens on the right is missing, so let’s select the “Eyepiece” from the inventory and insert it into the empty slot.
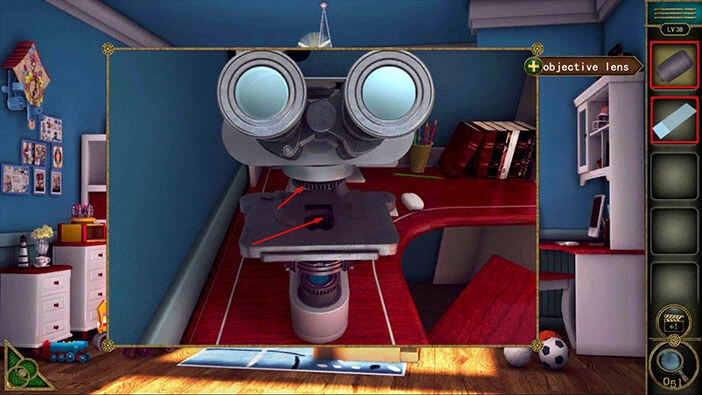
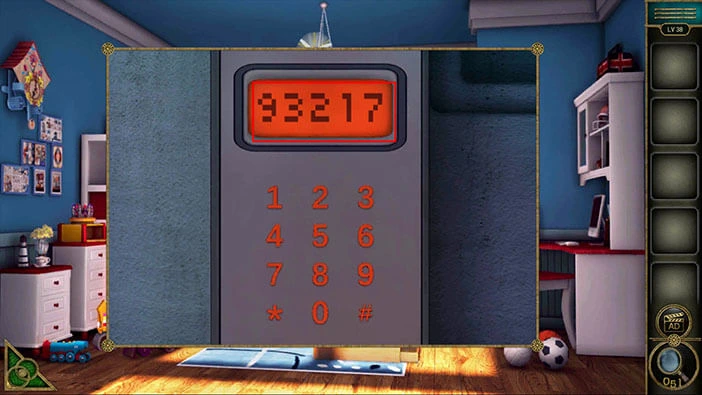
We still need two more items in order to use the microscope. Select the “Objective lens” from the inventory and attach it to the bottom part of the microscope. After that, select the “Glass slide” and put it under the microscope. Lastly, tap on the microscope to start the interaction.
Our next task is to set the three dials in the correct positions and get a clear image. Let’s do that.
Set the first arrow to the five o’clock position.
Set the second arrow to the nine o’clock position.
Set the third arrow to the eleven o’clock position.
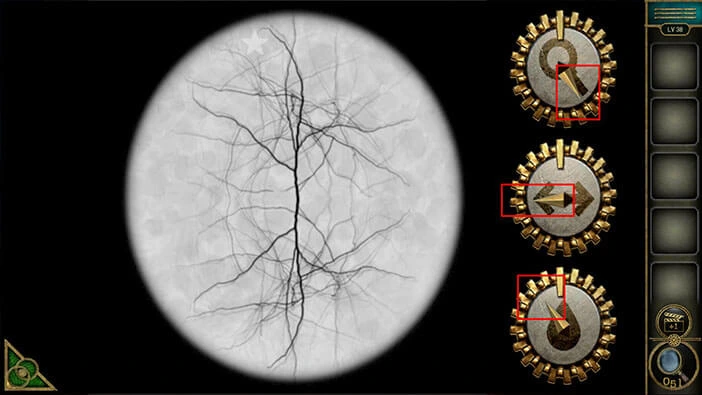
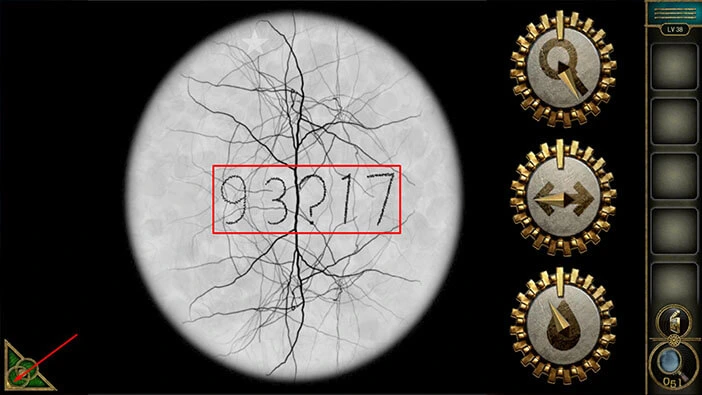
The number “93?17” will appear. Let’s memorize/write down this number because we will need it in order to open the door.
Once you’re done, tap on the green button in the bottom left corner of the screen to go back.
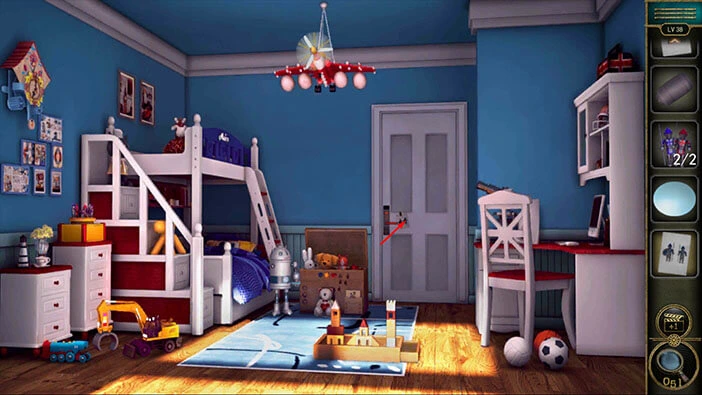
Next, let’s tap on the keypad on the door to take a closer look at it, and tap again to start the interaction.

Let’s enter the code that we discovered (“93?17”). We don’t know the third digit, so we will have to guess. In my game, the third digit was the number “2”. So, the code was “93217”.
NOTE: The third digit is randomized and might be different in your game. Just try all numbers (from 0 to 9) until you manage to unlock the door.
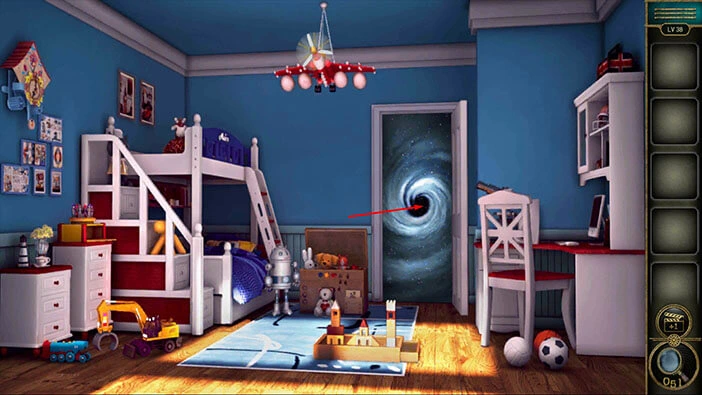
Once you correctly guess the third digit, the door will open. Let’s tap on it to proceed to the next level.
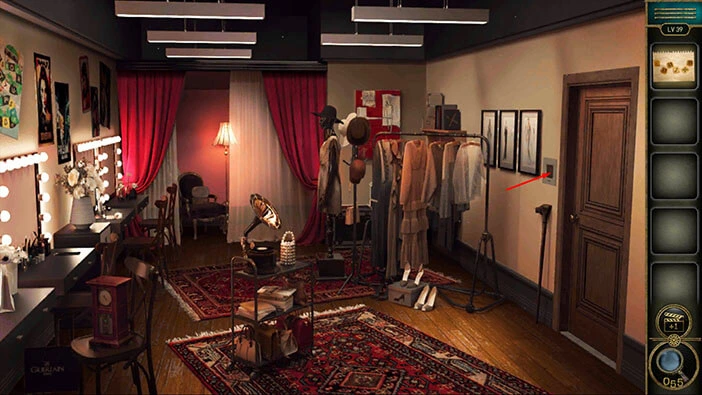
Level 39
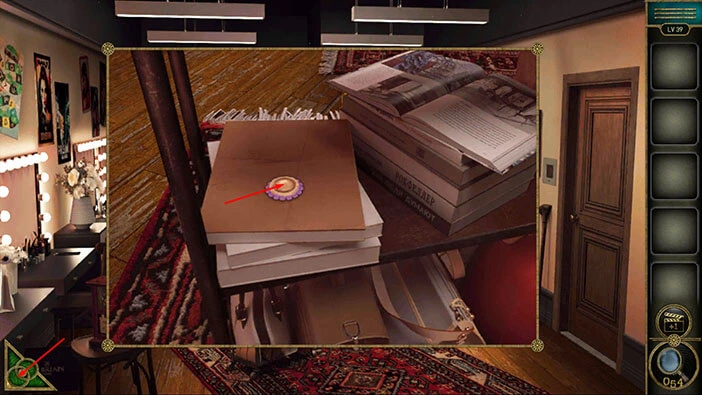
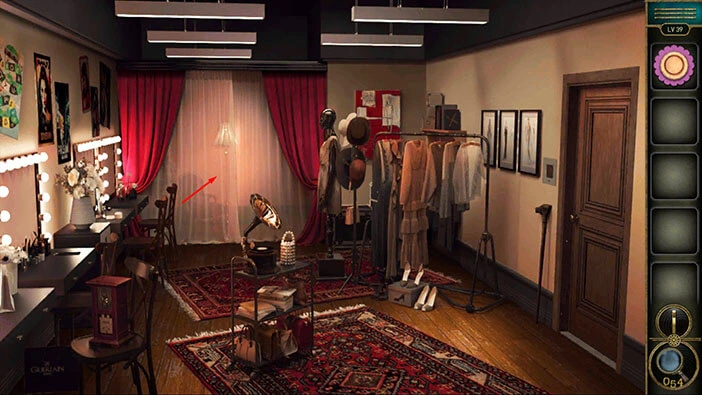
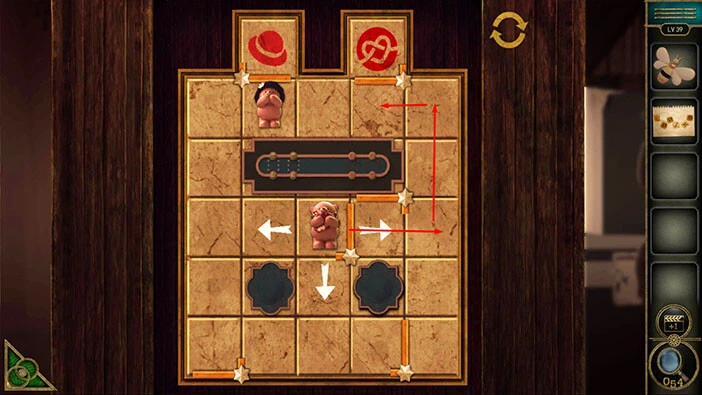
Let’s explore the thirty-ninth level. Tap on the small shelf in the middle of the room to take a closer look at it.
Here, you will notice a “Button”. Tap on it to pick it up.
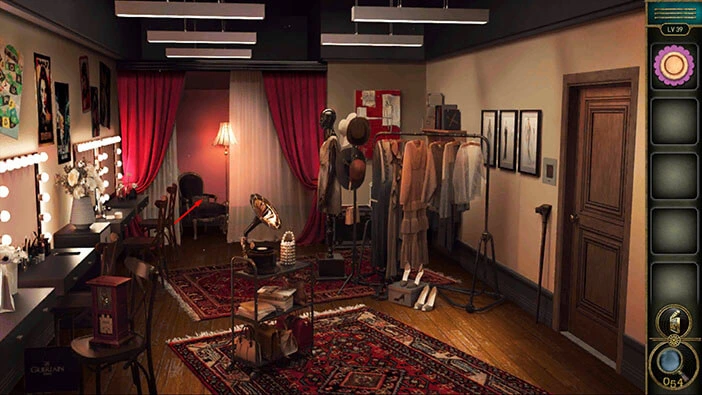
Next, tap on the curtain in front of you to open it.
You will discover a small chest on the armchair. Let’s tap on it to take a closer look, and tap again to start the interaction.
You will notice that one of the buttons is missing. So, let’s select the “Button” in our inventory and insert it into the empty slot.
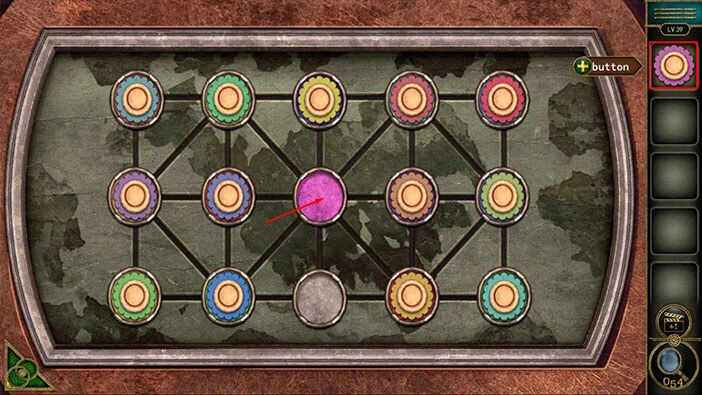
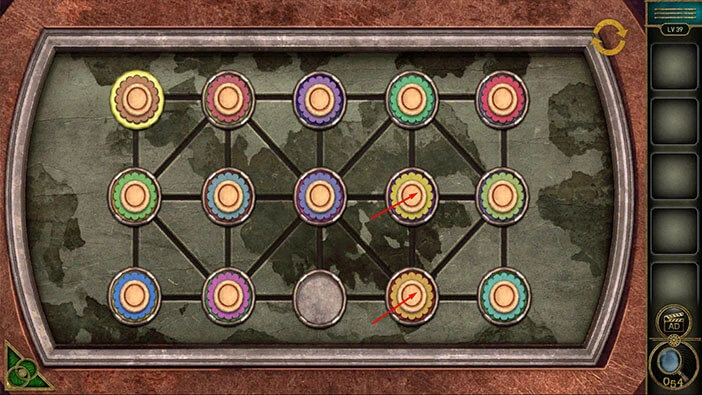
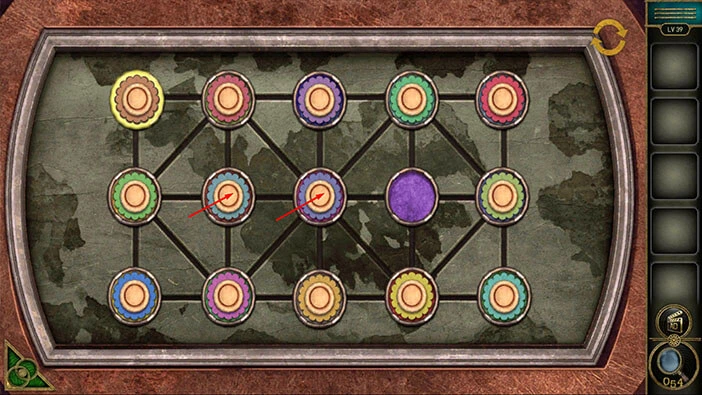
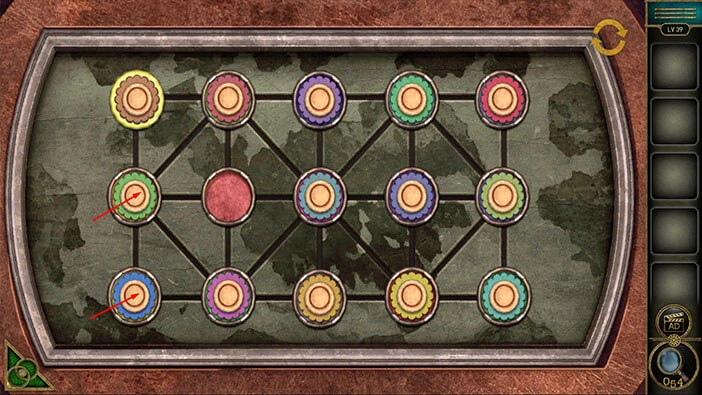
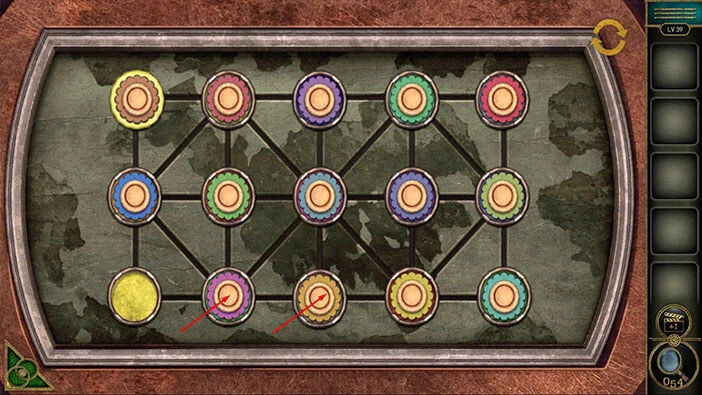
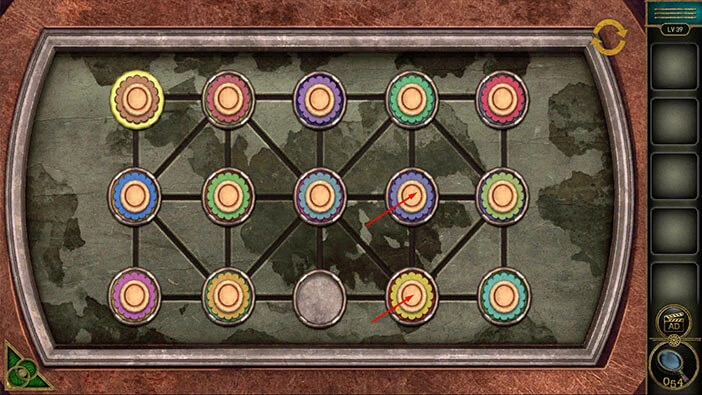
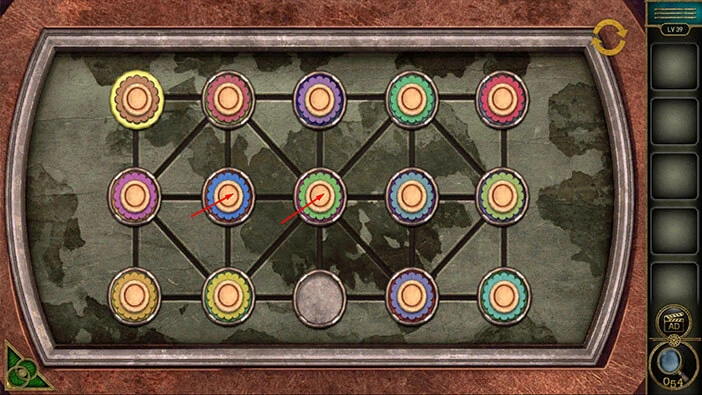
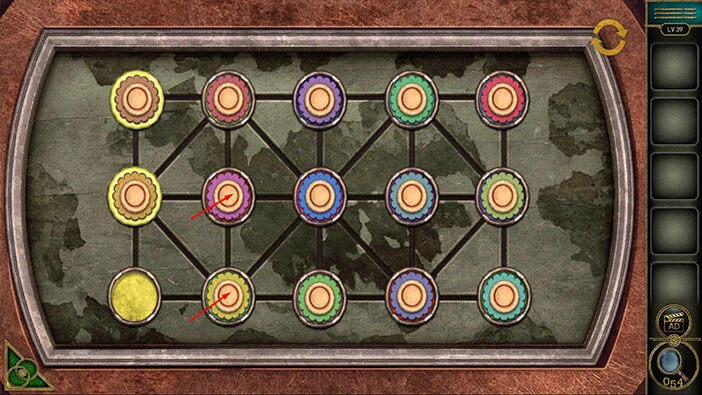
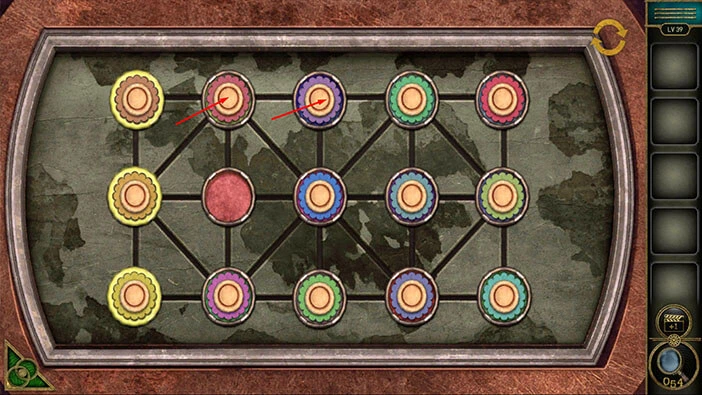
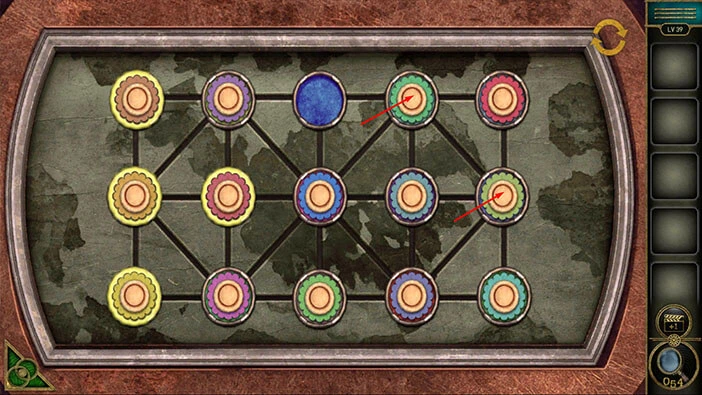
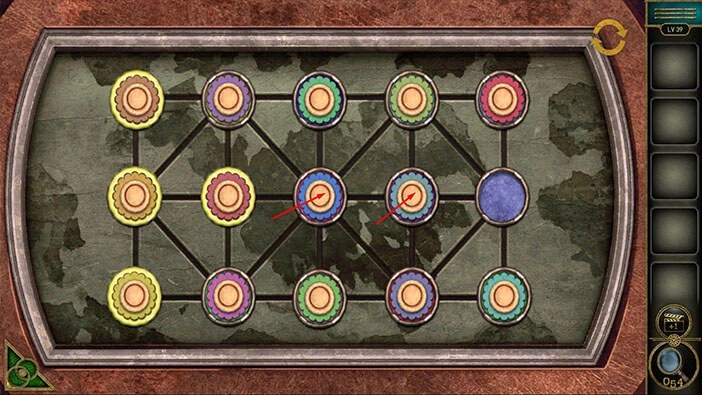
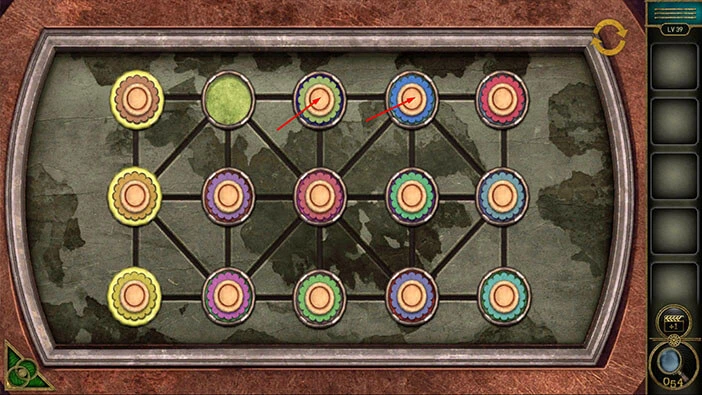
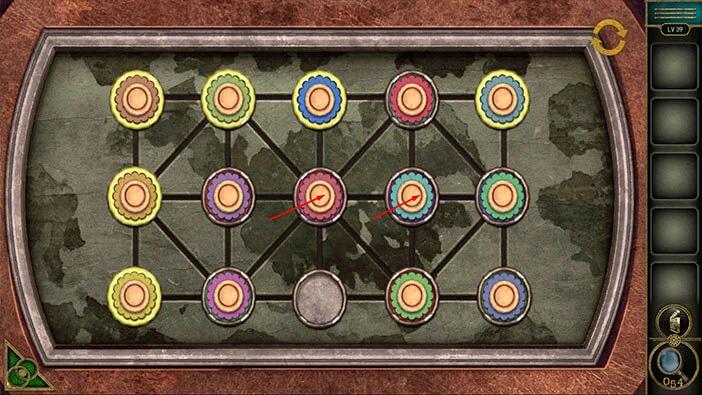
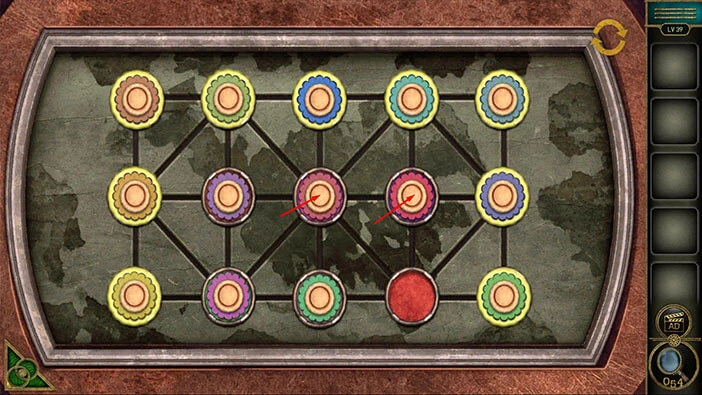
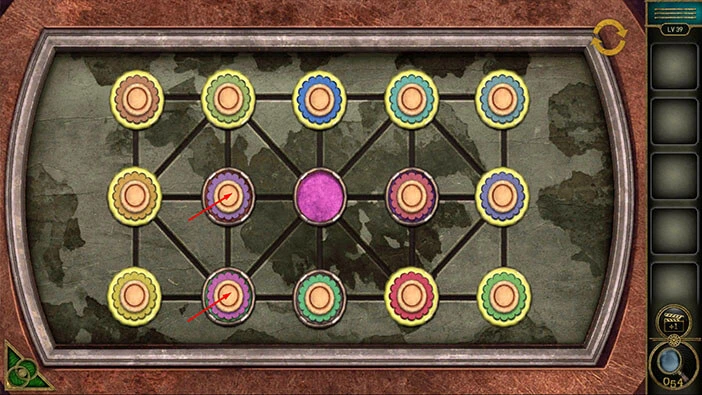
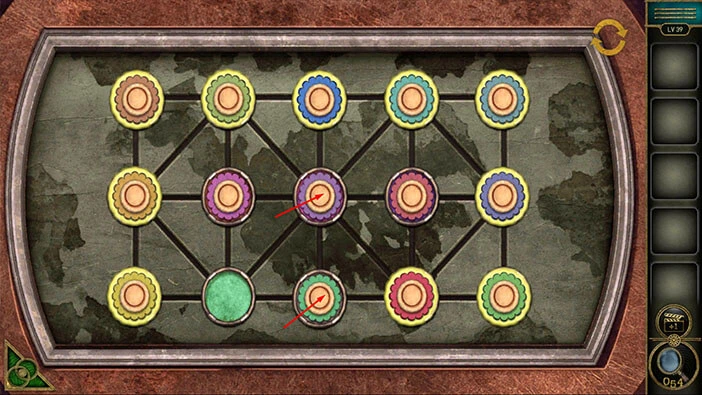
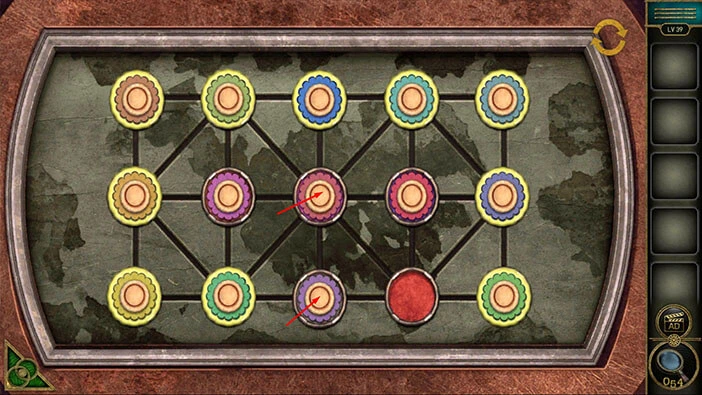
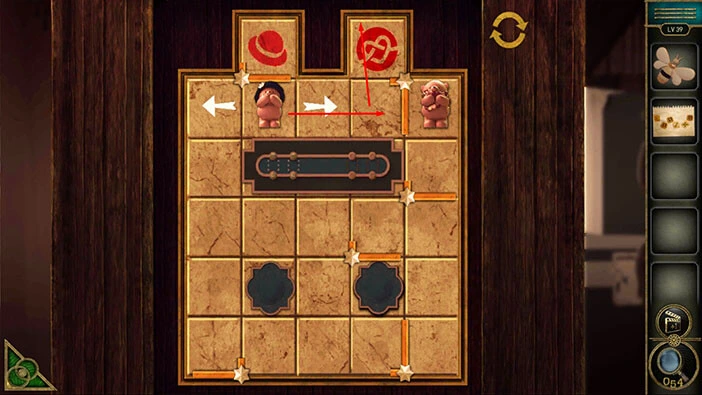
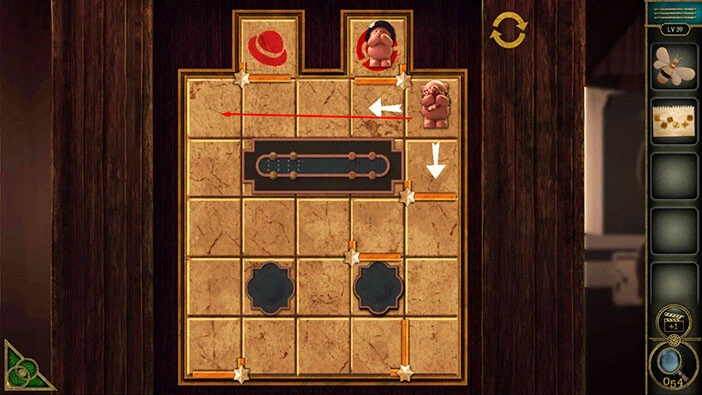
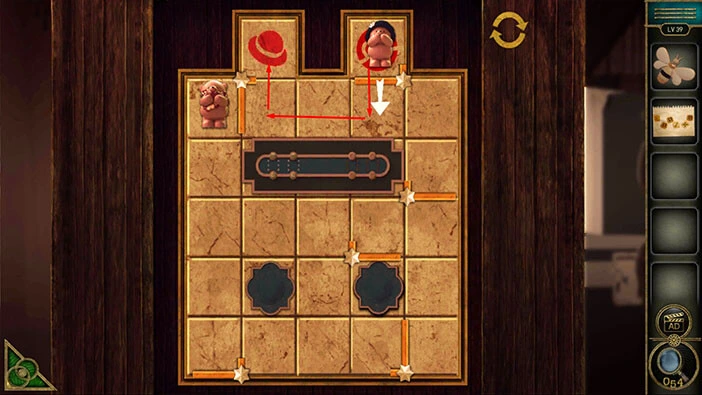
Here, we have another puzzle. You will notice that we have buttons in several colors. Our task is to shuffle the buttons and put them on the background of the matching color.
We will do this puzzle in multiple steps. Let’s begin.
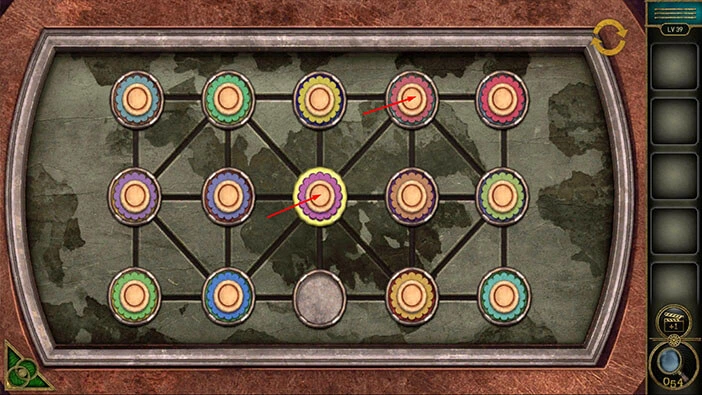
Step 1
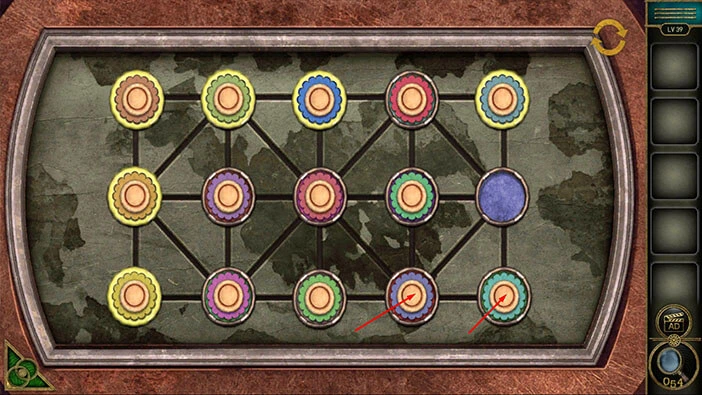
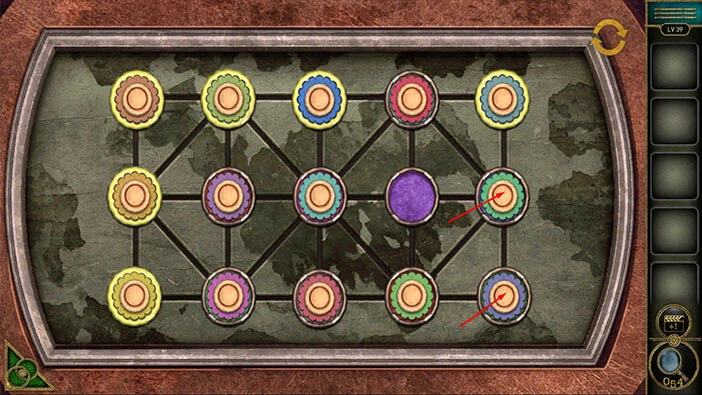
Tap on the third button in the second row to move it down. After that, tap on the fourth button in the first row to move it down and to the left.
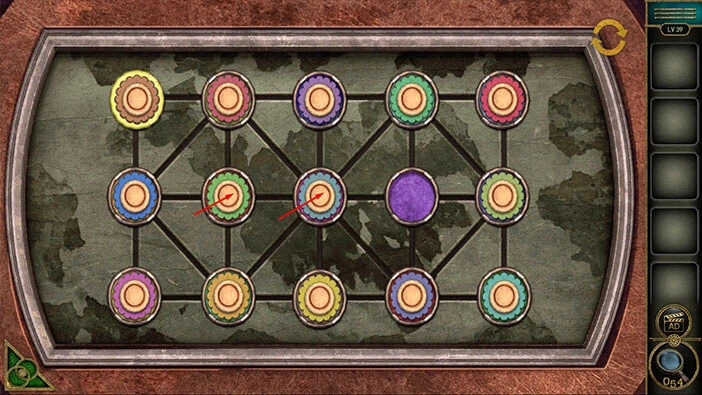
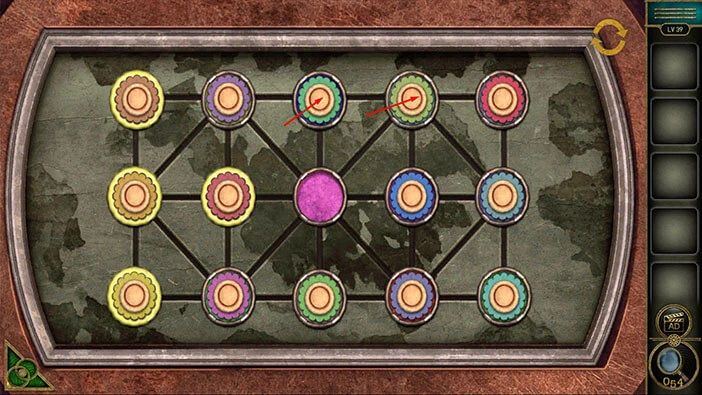
Step 2
Tap on the third button in the first row to move it to the right. After that, tap on the third button in the second row to move it up.
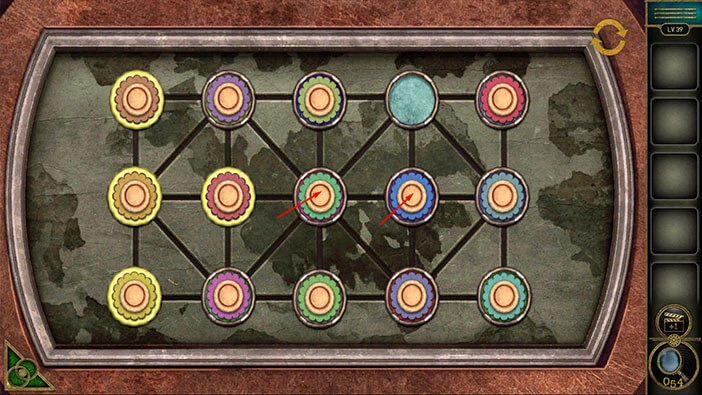
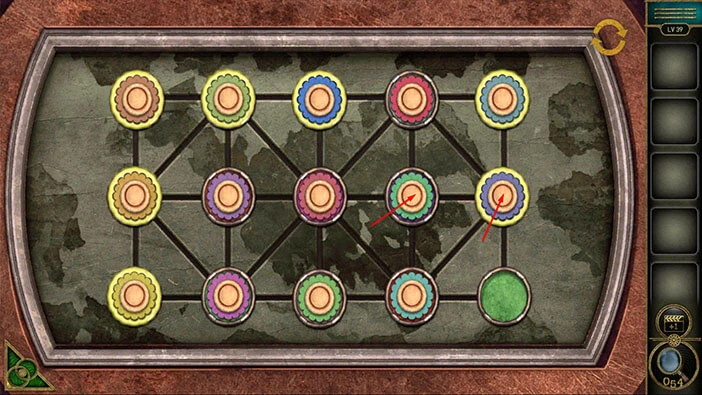
Step 3
Tap on the second button in the second row to move it to the right. After that, tap on the second button in the first row to move it down.

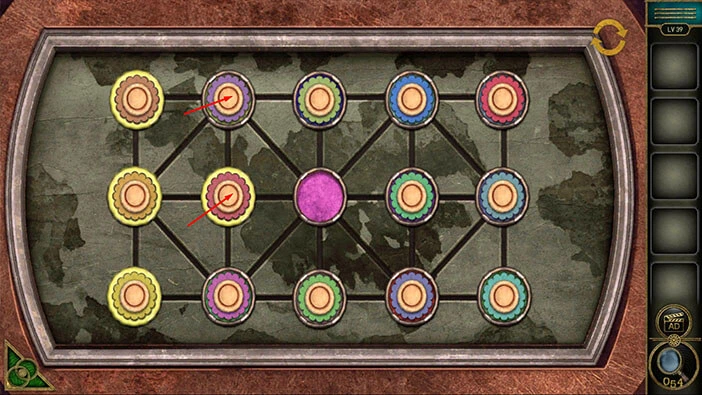
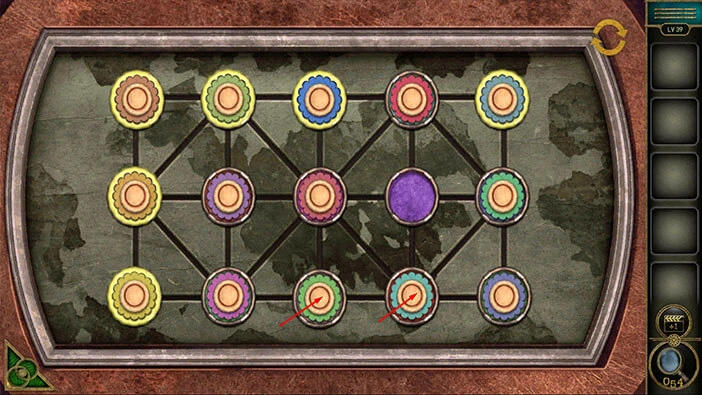
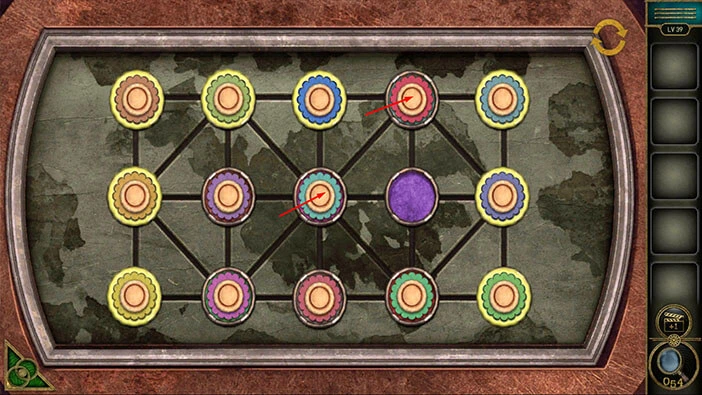
Step 4
Tap on the third button in the first row to move it to the left. After that, tap on the third button in the second row to move it up.
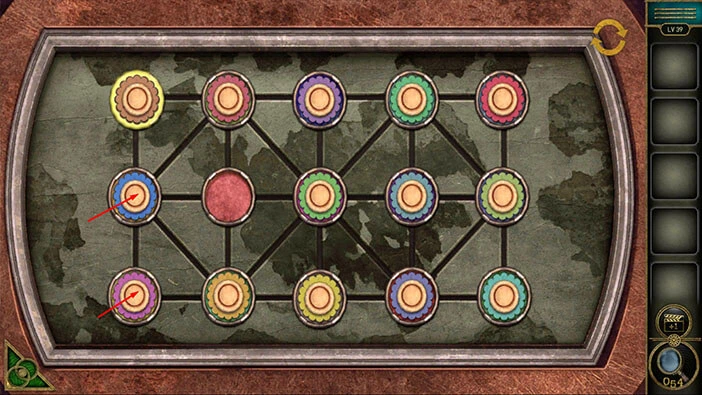
Step 5
Tap on the second button in the first row to move it to the right. After that, tap on the first button in the second row to move it to the right.
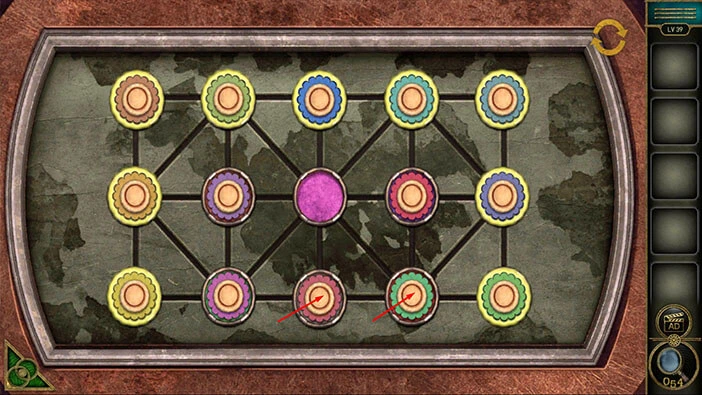
Step 6
Tap on the first button in the first row to move it down. After that, tap on the second button in the first row to move it to the left.
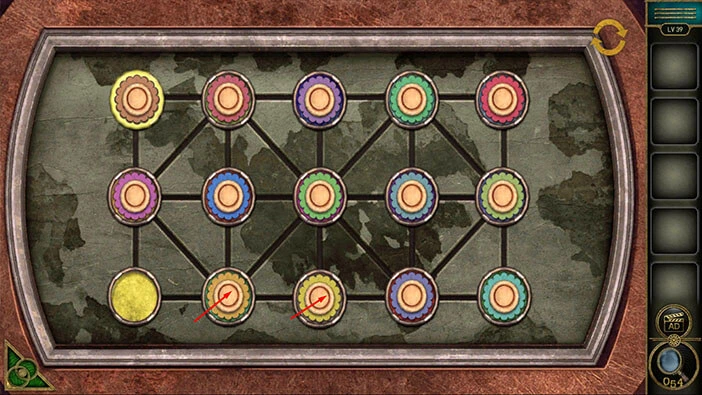
Step 7
Tap on the third button in the first row to move it to the left. After that, tap on the fourth button in the first row to move it to the left.
Step 8
Tap on the fourth button in the second row to move it up. After that, tap on the third button in the second row to move it to the right.

Step 9
Tap on the third button in the first row to move it down. After that, tap on the fourth button in the first row to move it to the right.
Step 10
Tap on the fourth button in the second row to move it up. After that, tap on the third button in the second row to move it to the right.
Step 11
Tap on the second button in the second row to move it to the right. After that, tap on the second button in the first row to move it down.
Step 12
Tap on the third button in the first row to move it to the left. After that, tap on the third button in the second row to move it up.
Step 13
Tap on the second button in the second row to move it to the right. After that, tap on the first button in the second row to move it to the right.
Step 14
Tap on the first button in the first row to move it down. After that, tap on the second button in the first row to move it to the left.
Step 15
Tap on the first button in the second row to move it up and to the right. After that, tap on the first button in the third row to move it up.
Step 16
Tap on the second button in the third row to move it to the left. After that, tap on the third button in the third row to move it to the left.

Step 17
Tap on the fourth button in the third row to move it to the left. After that, tap on the fourth button in the second row to move it down.
Step 18
Tap on the third button in the second row to move it to the right. After that, tap on the second button in the second row to move it to the right.
Step 19
Tap on the first button in the second row to move it to the right. After that, tap on the first button in the third row to move it up.
Step 20
Tap on the second button in the third row to move it to the left. After that, tap on the third button in the third row to move it to the left.
Step 21
Tap on the fourth button in the third row to move it to the left. After that, tap on the fourth button in the second row to move it down.
Step 22
Tap on the third button in the second row to move it to the right. After that, tap on the second button in the second row to move it to the right.
Step 23
Tap on the first button in the second row to move it to the right. After that, tap on the first button in the third row to move it up.
Step 24
Tap on the second button in the third row to move it to the left. After that, tap on the third button in the third row to move it to the left.
Step 25
Tap on the third button in the second row to move it down. After that, tap on the second button in the second row to move it to the right.
Step 26
Tap on the first button in the second row to move it to the right. After that, tap on the first button in the third row to move it up.

Step 27
Tap on the second button in the third row to move it to the left. After that, tap on the second button in the second row to move it down.
Step 28
Tap on the second button in the first row to move it down. After that, tap on the third button in the first row to move it to the left.
Step 29
Tap on the fourth button in the first row to move it to the left. After that, tap on the fifth button in the second row to move it up and to the left.
Step 30
Tap on the fourth button in the second row to move it to the right. After that, tap on the third button in the second row to move it to the right.
Step 31
Tap on the third button in the first row to move it down. After that, tap on the fourth button in the first row to move it to the left.
Step 32
Tap on the fourth button in the second row to move it up. After that, tap on the third button in the second row to move it to the right.
Step 33
Tap on the second button in the second row to move it to the right. After that, tap on the second button in the first row to move it down.
Step 34
Tap on the third button in the first row to move it to the left. After that, tap on the fourth button in the first row to move it to the left.
Step 35
Tap on the fifth button in the first row to move it to the left. After that, tap on the fifth button in the second row to move it up.

Step 36
Tap on the fourth button in the third row to move it up and to the right. After that, tap on the fifth button in the third row to move it to the left.
Step 37
Tap on the fifth button in the second row to move it down. After that, tap on the fourth button in the second row to move it to the right.
Step 38
Tap on the fourth button in the third row to move it up. After that, tap on the third button in the third row to move it to the right.
Step 39
Tap on the third button in the second row to move it down. After that, tap on the fourth button in the second row to move it to the left.
Step 40
Tap on the fifth button in the second row to move it to the left. After that, tap on the fifth button in the third row to move it up.
Step 41
Tap on the fourth button in the third row to move it to the right. After that, tap on the fourth button in the second row to move it down.

Step 42
Tap on the fourth button in the first row to move it to the down. After that, tap on the third button in the second row to move it up and to the right.
Step 43
Tap on the third button in the third row to move it up. After that, tap on the fourth button in the third row to move it to the left.
Step 44
Tap on the fourth button in the second row to move it down. After that, tap on the third button in the second row to move it to the right.
Step 45
Tap on the second button in the second row to move it to the right. After that, tap on the second button in the third row to move it up.
Step 46
Tap on the third button in the third row to move it to the left. After that, tap on the third button in the second row to move it down.
Step 47
Tap on the fourth button in the second row to move it to the left. After that, tap on the fourth button in the third row to move it up.

Step 48
Tap on the third button in the third row to move it to the right. After that, tap on the third button in the second row to move it down.
Step 49
Tap on the fourth button in the third row to move it up and to the left. After that, tap on the fourth button in the second row to move it down.
Step 50
Tap on the third button in the second row to move it to the right. After that, tap on the third button in the third row to move it up.
Step 51
Tap on the second button in the third row to move it to the right. After that, tap on the third button in the second row to move it down and to the left.
Step 51
Finally, tap on the second button in the second row to move it to the right. After that, tap on the second button in the third row to move it up. Lastly, tap on the third button in the third row to move it to the left.
The box will open, as soon as you solve the previous puzzle. Inside you will find, a “Cryptex” and a “Bird”. Let’s tap on these two items to pick them up.
After that, tap on the green button in the bottom left corner of the screen to go back.
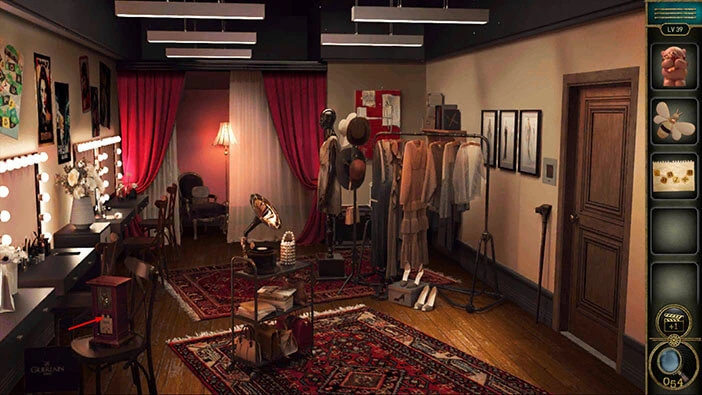
Next, let’s tap on the third table on the left to take a closer look at it.

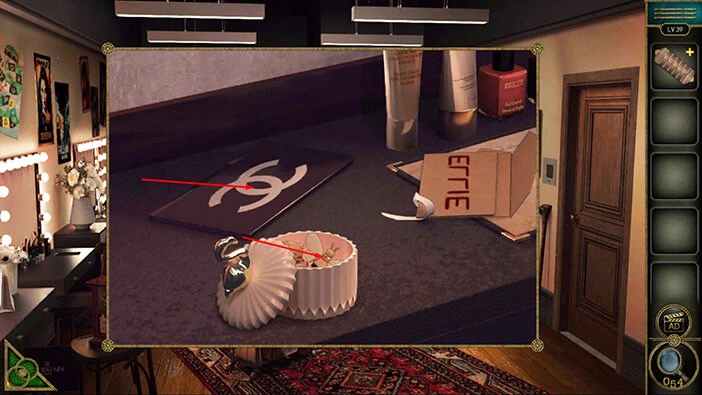
Select the “Bird” from the inventory and attach it to the top of the white box.
You will open the box, and inside you will find a “Bear” and a “Bee brooch”. Tap on these two items to pick them up.
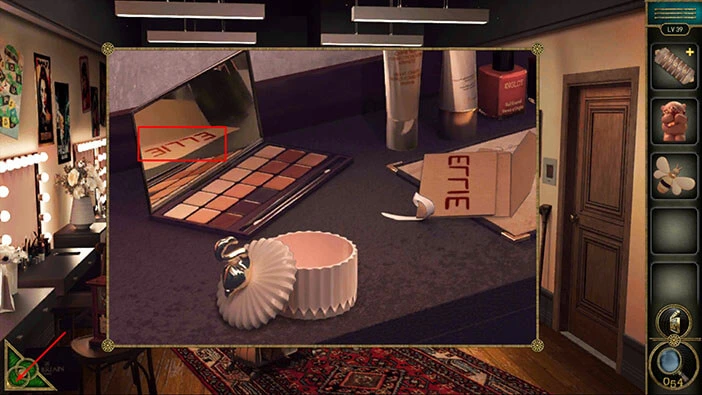
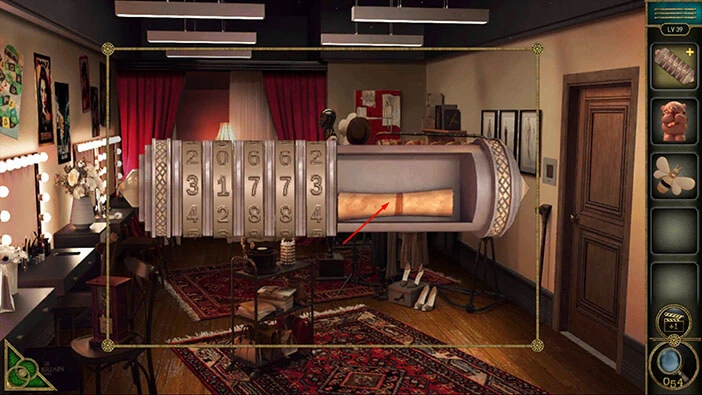
After that, tap on the mirror to open it.
In the reflection, you will see the number “31773”. Let’s memorize/write down this number because we will need it for the next puzzle.
Once you’re done, tap on the green button in the bottom left corner of the screen to go back.
Next, tap on the “Cryptex” in your inventory, and it will appear in the middle of the screen. We will need a five-digit code to unlock the “Cryptex” so let’s enter the code “31773” that we discovered in the reflection.

With that, you will open the “Cryptex” and inside you will find a “Paper with hints”. Let’s tap on it to pick it up.
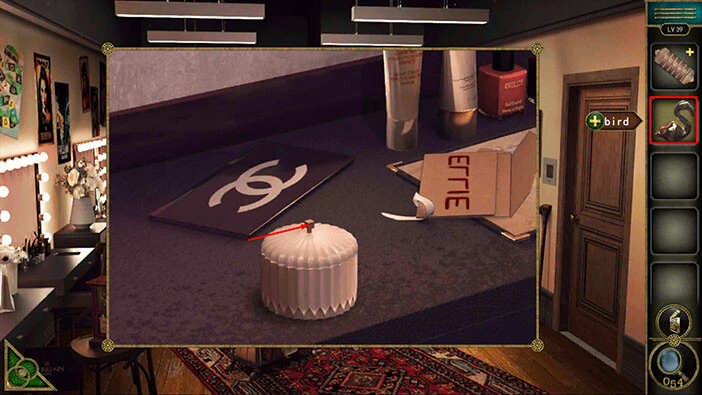
Next, on the chair in the bottom left corner of the screen, you will notice a wooden box. Let’s tap on it to take a closer look, and tap again to start the interaction.
Here, we can see a grid and one toy. So, select the “Bear” from the inventory and place it on the grid.
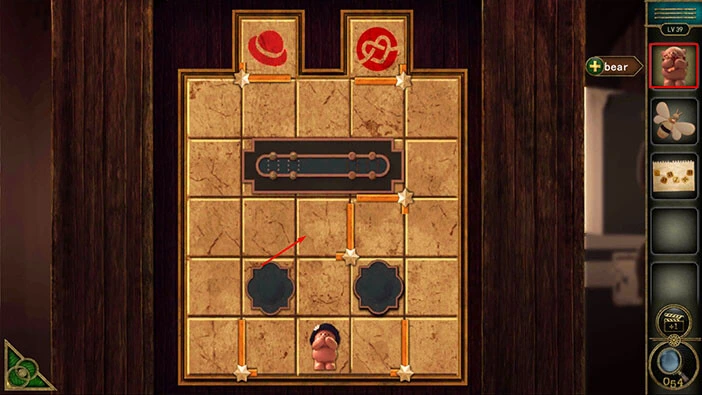
If you take a look at the two bears on the grid, you will notice that one of them is wearing a hat, and that the other one carries a heart. At the top of the grid, we can see the hat in the last slot on the left, and a heart in the last slot on the right. So, our task is to lead the bears to their slots.
We will do this puzzle in several steps. Let’s begin.
Step 1
Select the Bear with Hat, and move it all the way to the left. After that, move it all the way to the top of the grid. Lastly, let’s move the bear one slot to the right.
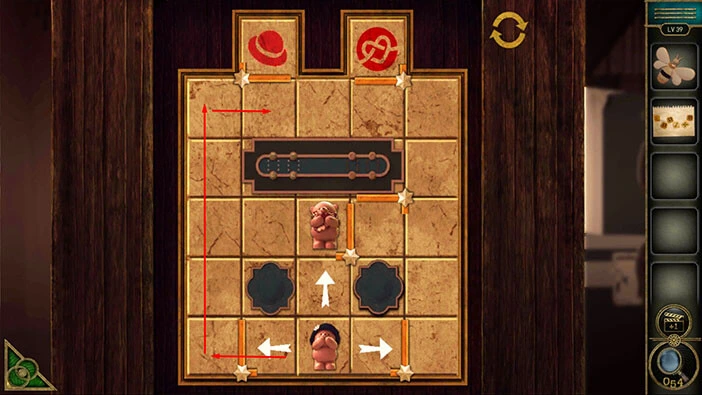
Step 2
Select the Bear with Heart, and move it all the way to the right. After that, move it all the way to the top of the grid. Lastly, let’s move the bear one slot to the left.
Step 3
Select the Bear with Heart, and move it one slot to the right.

Step 4
Select the Bear with Hat, and move it two slots to the right. After that, move the bear one slot up (into the slot with the heart).
Step 5
Select the Bear with Heart, and move it all the way to the left.
Step 6
Select the Bear with Hat, and move it one slot down. After that, move it two slots to the left. Lastly, move the bear one slot up (into the slot with the hat).
Step 7
Select the Bear with Heart, and move it three slots to the right. After that, move the bear one slot up (into the slot with the heart).

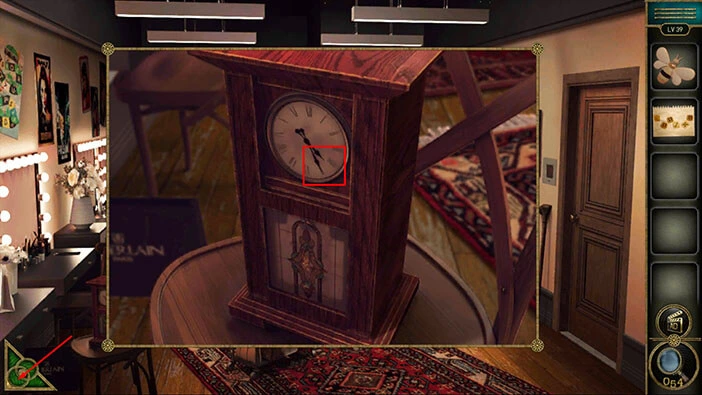
As soon as you solve the puzzle, you will discover a clock. We can see that the time on the clock is 04:25 o’clock. Let’s memorize/write down the times because we will need this information later in the walkthrough.
Once you’re done, tap on the green button in the bottom left corner of the screen to go back.
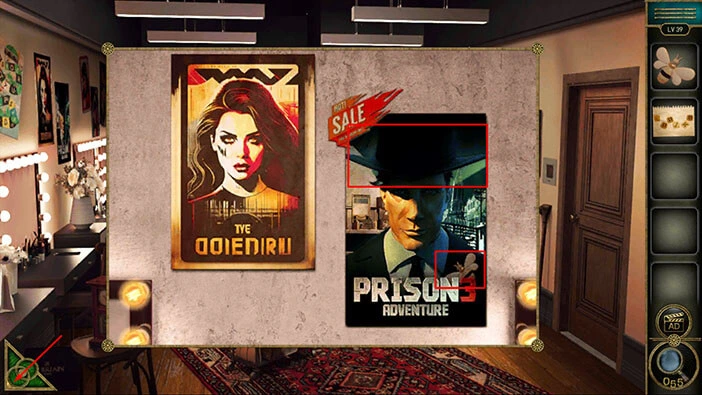
Next, let’s tap on the posters on the wall on the left to take a closer look at them.
If you pay attention to the man in the poster, you will notice that he is wearing a hat and that there is a “Bee brooch” on his chest. Memorize/write down this information because we will need it for the next puzzle.
Once you’re done, tap on the green button in the bottom left corner of the screen to go back.
Next, let’s tap on the mannequin to take a closer look at it, and tap again to examine it.

Select the “Bee brooch” from the inventory and attach it to the mannequin. After that, tap on the hat on the right and our character will put it on the mannequin.
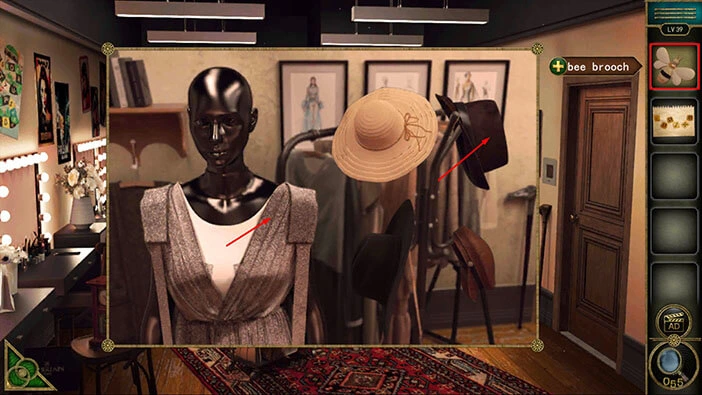
I made a small mistake, tap on the black hat, instead of the brown hat.

The small compartment below the mannequin will open and inside you will find a “Paper with hint”. Tap on it to pick it up.
After that, tap on the green button in the bottom left corner of the screen to go back.
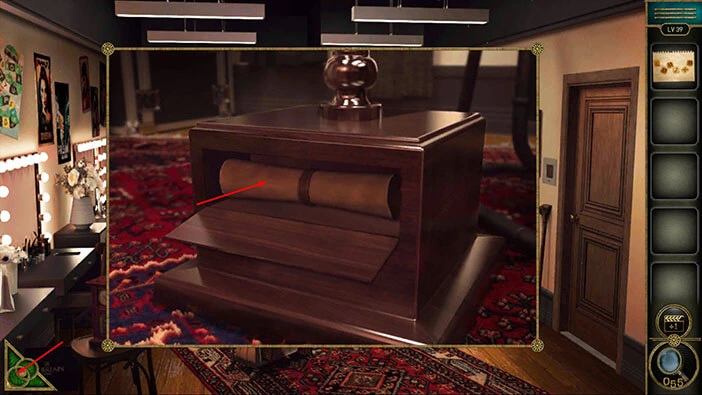
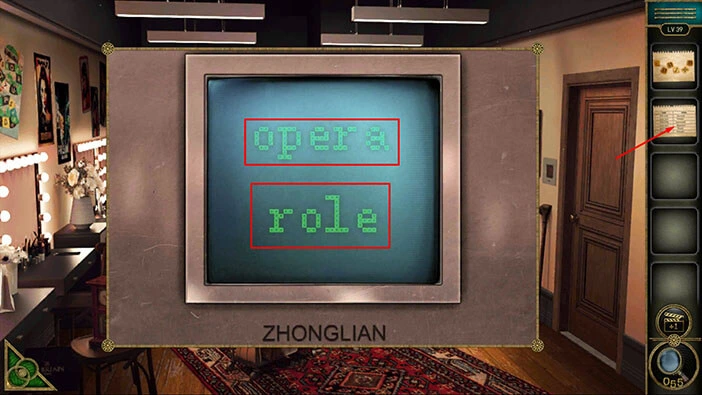
Next, let’s tap on the display, located just to the left of the door, to take a closer look at it.

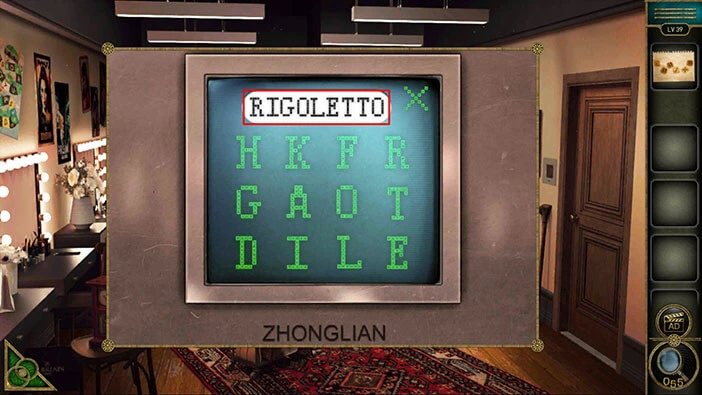
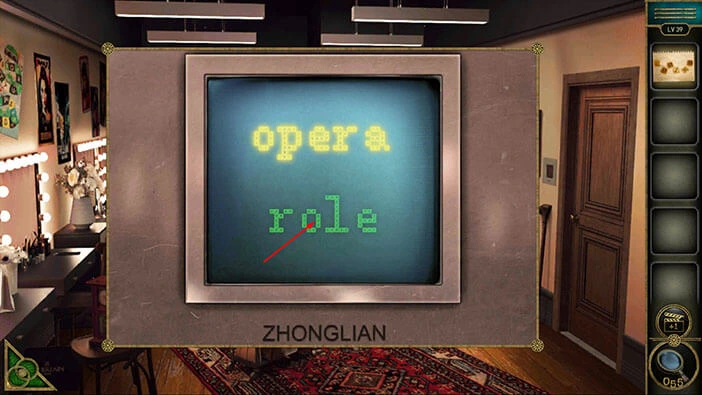
Here, we can see that we will have to discover the correct opera, and the role in the opera in order to unlock the door. Let’s do that.
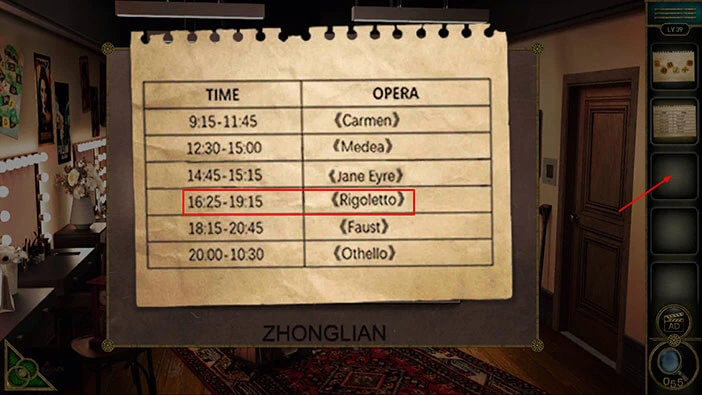
Tap on the “Paper with hint” in your inventory to examine it.
Here, we can see the list of opera plays and the time. Previously, we saw the time 04:25 on the clock. So, if we examine the list, we will see that, at 16:25, starts the “Rigoletto”. Memorize/write down the name of this opera.
After that, tap on the empty inventory slot to put down the “Paper with the hint”.
Tap on the “Opera” to star the interaction.
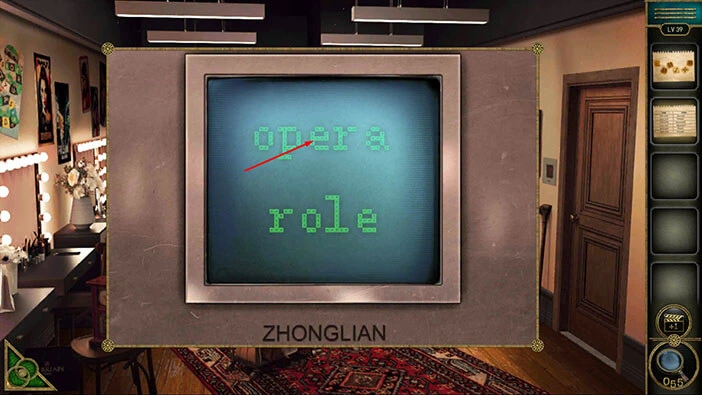
Enter the name of the play, “Rigoletto”.
Next, we need to discover the correct “Role”. Let’s do that. Tap on the green button in the bottom left corner of the screen to go back.

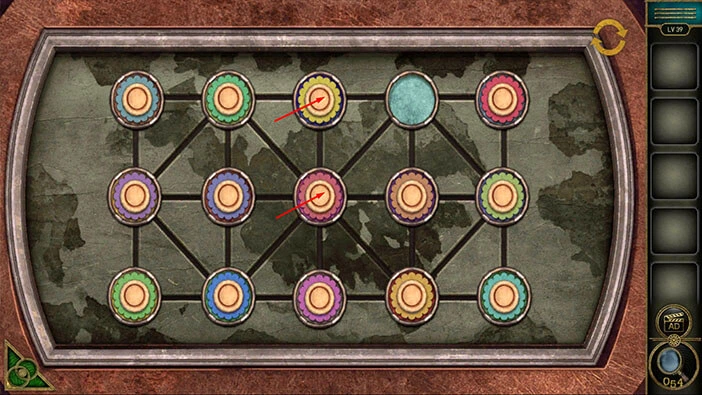
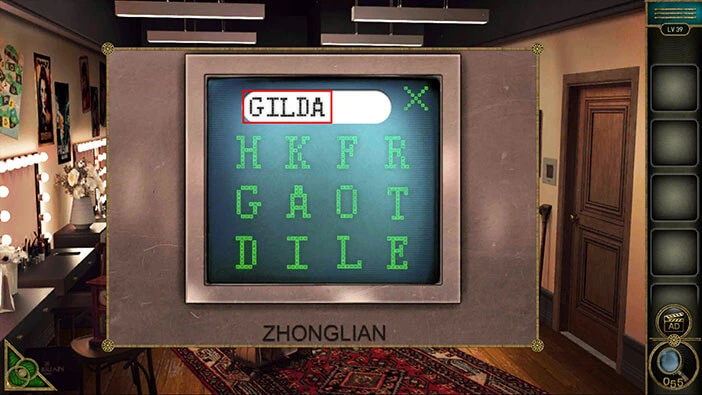
Next, you will see a puzzle on the wall, in the top left corner of the screen. Let’s tap on it to take a closer look.

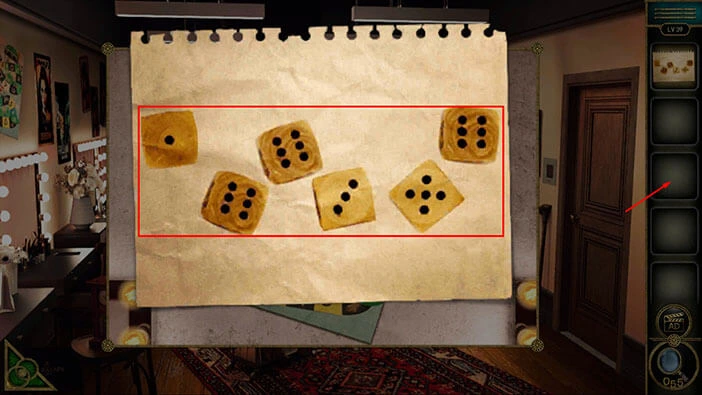
Our next task is to discover the role. First, let’s tap on the “Achievement star” to pick it up. After that, tap on the “Paper with hints” to examine it.
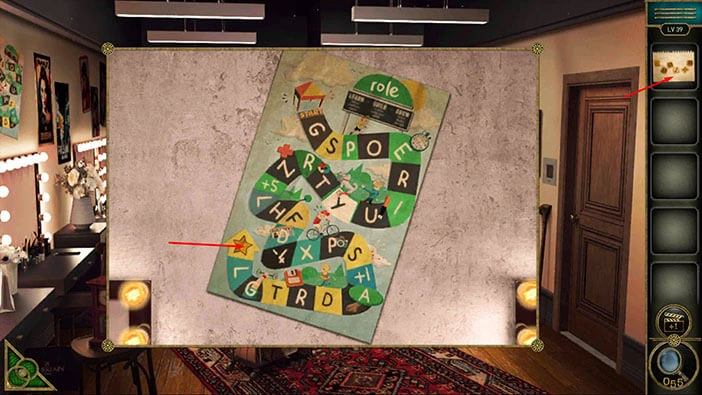
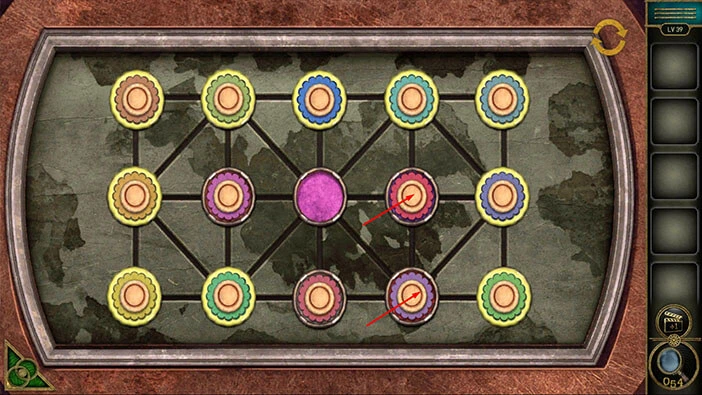
Here, we can see six dice. Let’s memorize/write down the numbers on the dice because these numbers represent a hint for this puzzle.
Starting from left to right, we have, 1, 6, 6, 3, 5, 6.
Once you’re done, tap on the empty inventory slot to put down the hint.
Ok, we can use the numbers on the dice to discover the correct letters. You will notice a “Start” slot in the top left corner, and that’s our start position. From there, we will use the numbers on the dice to move to the different slots on the puzzle and discover the letters.
We will do this puzzle in several steps. Let’s begin.
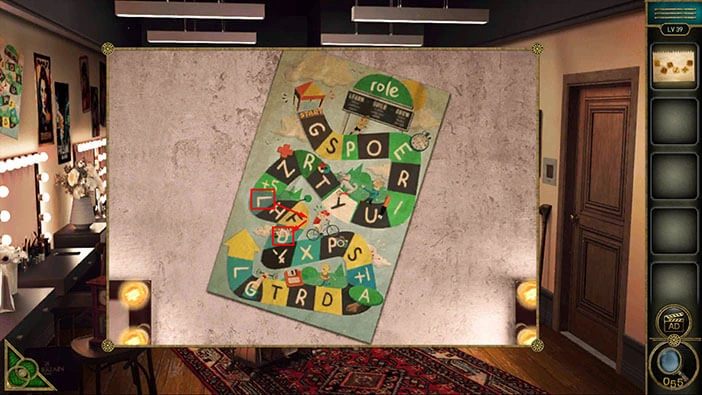
Step 1
First, we have the number 1. If we move by one slot from the start, we will stop at the letter “G”. So, the first letter is the letter “G”.

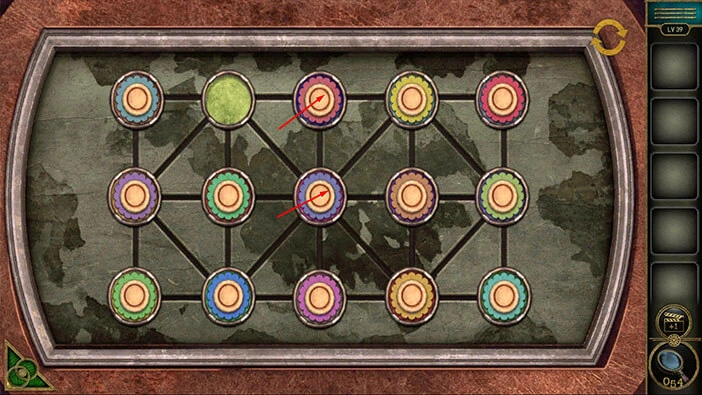
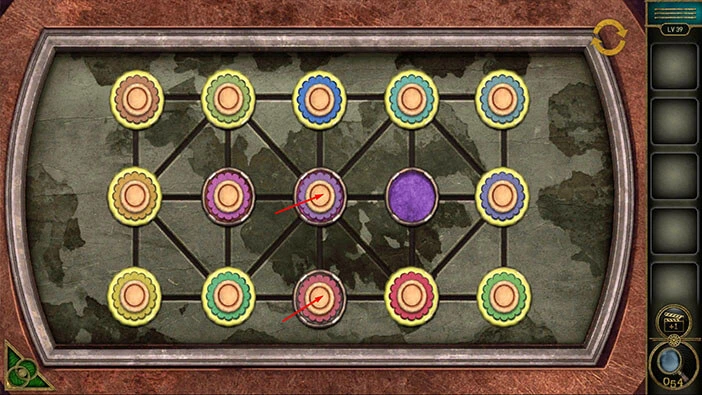
Step 2
Second, we have the number 6. If we move by six slots from the letter “G”, we will stop at the letter “I”. So, the second letter is the letter “I”.

Step 3
Third, we have the number 6. If we move by six slots from the letter “I”, we will stop at the slot “+5”. So, let’s move by 5 more slots. We will stop at the slot “-4”.

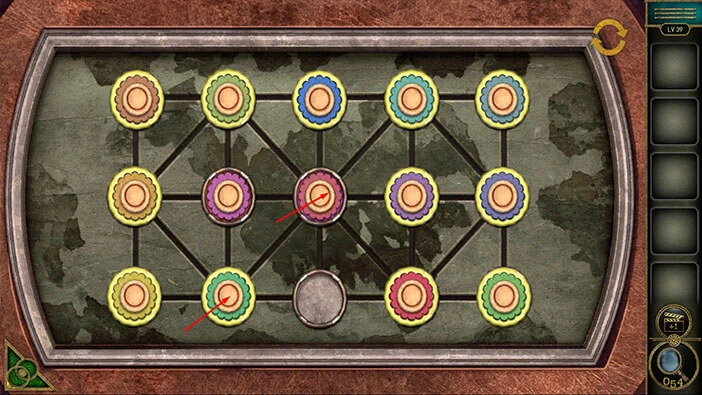
Step 4
We stopped at the slot “-4”. If we move 4 slots back, we will stop at the letter “L”. So, the third letter is the letter “L”.

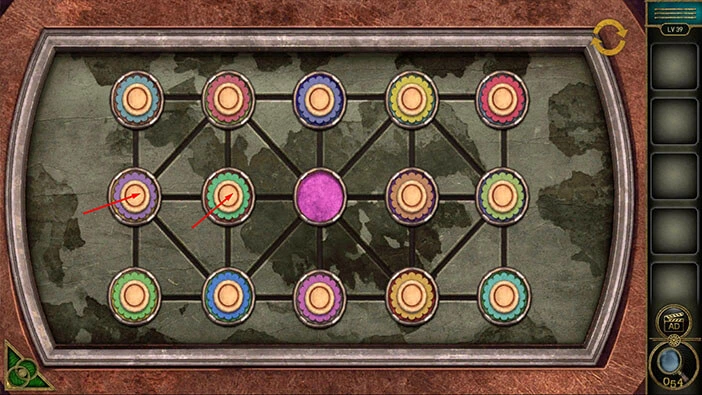
Step 5
Fourth, we have the number 3. If we move by three slots from the letter “L”, we will stop at the letter “D”. So, the fourth letter is the letter “D”.
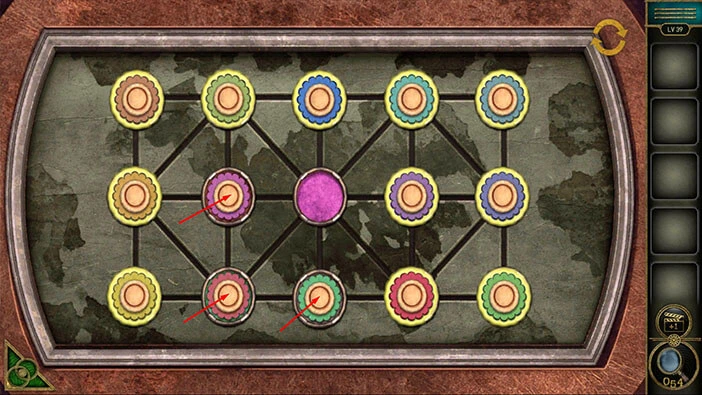
Step 6
Fifth, we have the number 5. If we move by five slots from the letter “D”, we will stop at the slot “+1”. If we move by one more slot, we will stop at the letter “A”. So, the fifth letter is the letter “A”.

Step 7
Fifth, we have the number 6. If we move by six slots from the letter “D”, we will stop at the letter “L”. So, the fifth letter is the letter “L”.
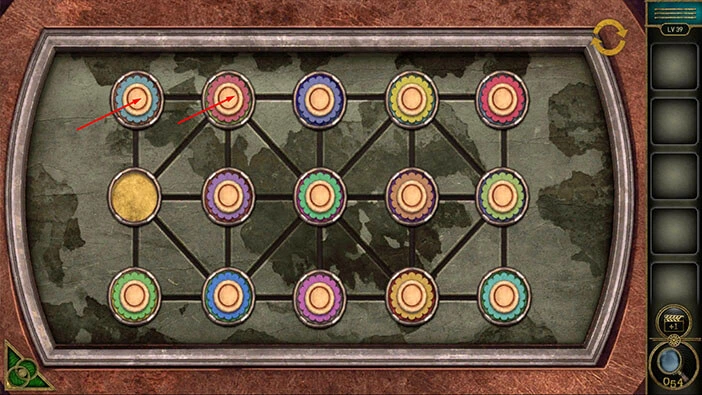
When we put it all together, we will get the name of the role, “GILDA”. Let’s memorize/write down this information.
Once you’re done, tap on the green button in the bottom left corner of the screen to go back.

Next, let’s tap on the display located just to the left of the door to take a closer look at it.
Next, tap on the “Role” to start the interaction.
Let’s enter the name of the role, “GILDA”. With that, you will unlock and open the door, so let’s tap on it to proceed to the next level.
Level 40
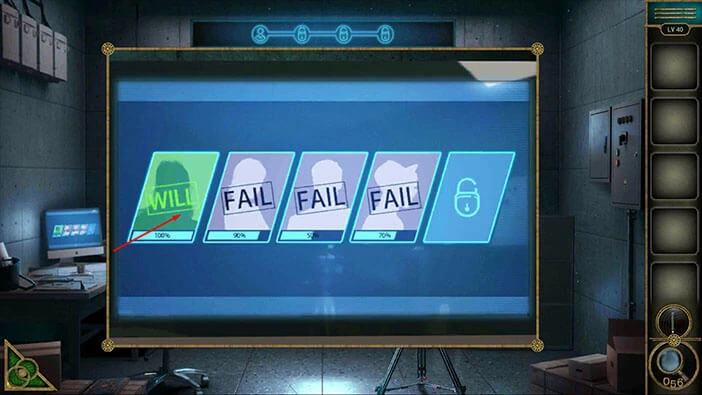
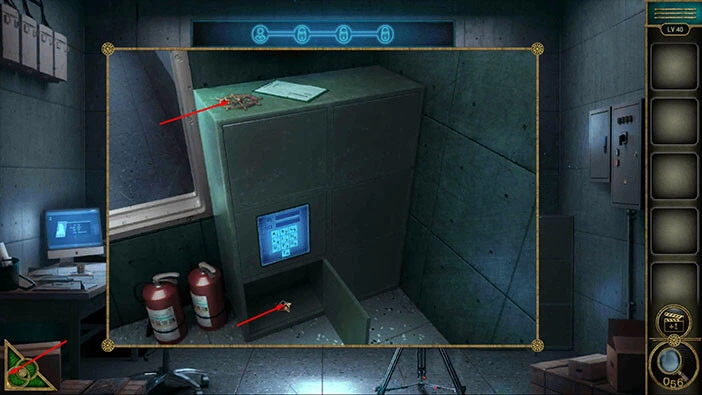
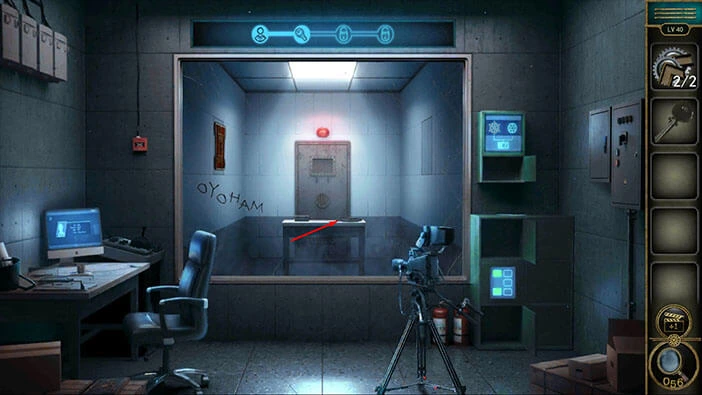
Let’s explore the fortieth level. Tap on the PC screen on the left to take a closer look at it, and tap again to start the interaction.
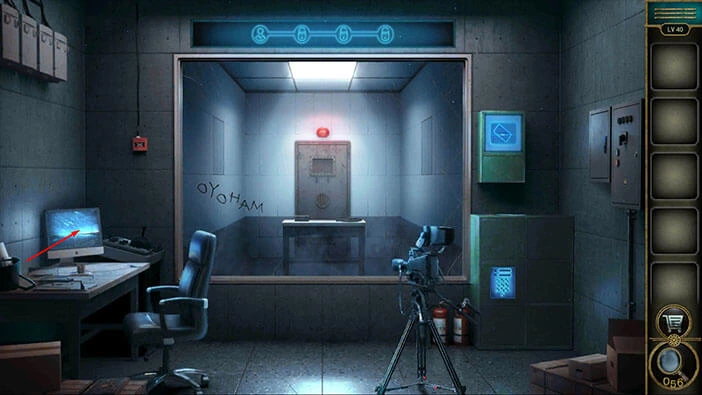
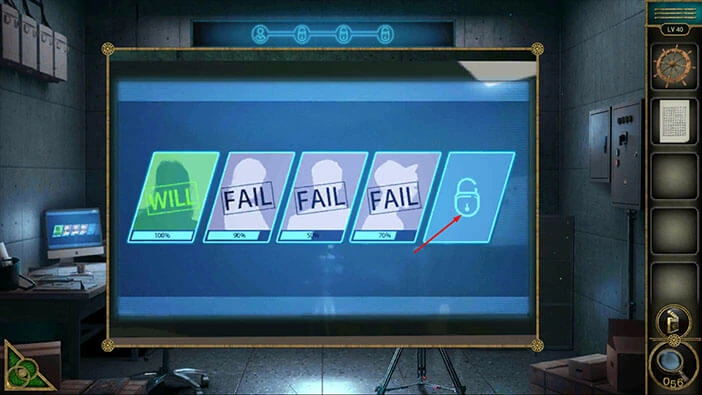
On the left side of the screen, you will see a file named “WILL”. Let’s tap on it to open it.
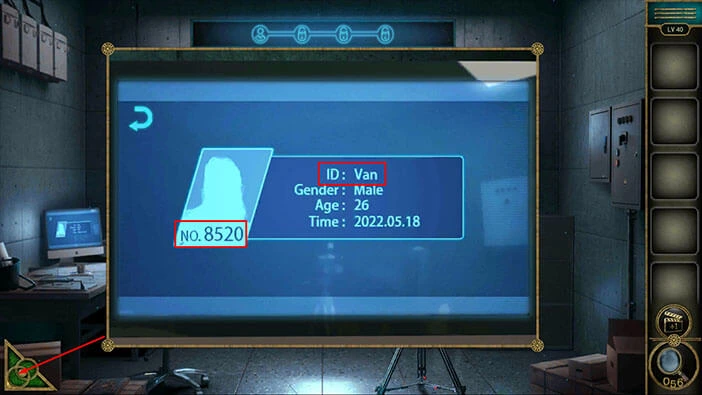
Here, we can see a profile. We need to memorize/write down two pieces of information, an ID and a profile number. So, let’s do that.
Profile name = “Van”
Profile number = “8520”
Once you’re done, tap on the green button in the bottom left corner of the screen to go back.
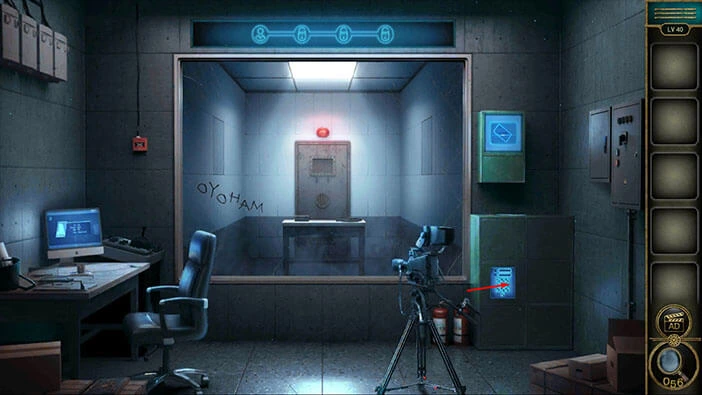
Next, let’s tap on the keypad on the safe on the right to take a closer look at it, and tap again to start the interaction.
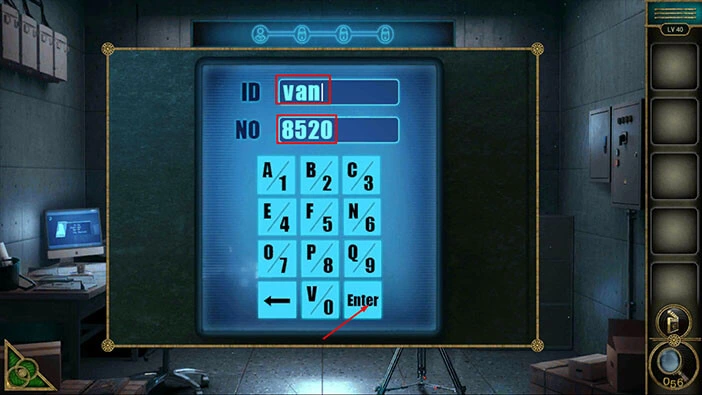
Enter the profile ID “Van” into the first field. After that, enter the profile number “8520” into the second field. Lastly, tap on the “Enter” to confirm.
With that, you will unlock and open one of the lockers, and inside you will find an “Achievement star”. Tap on it to pick it up.
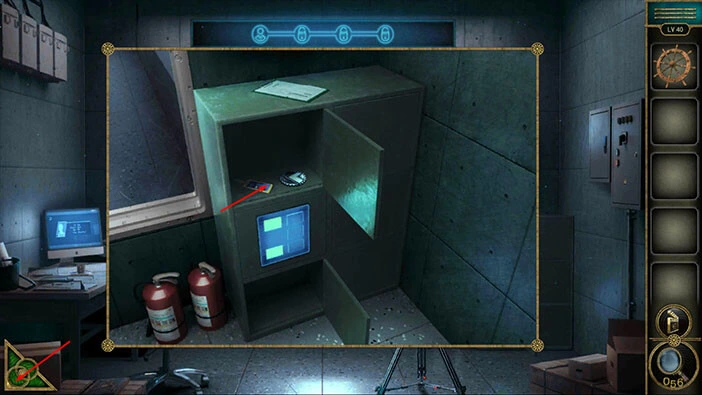
Also, at the top of the cabinet, you will notice a “Rudder”. Tap on it to pick it up.
Once you’re done, tap on the green button in the bottom left corner of the screen to go back.
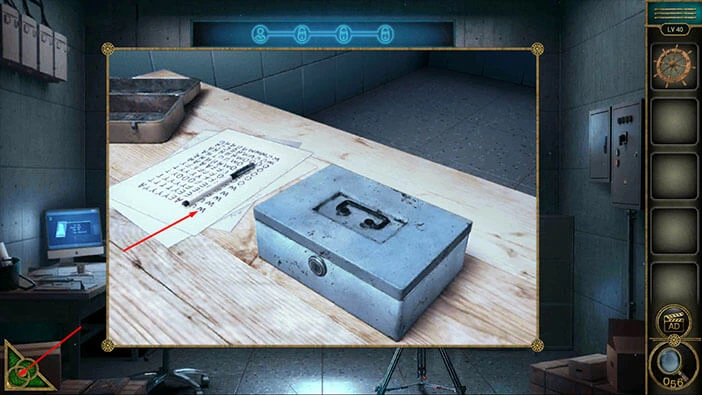
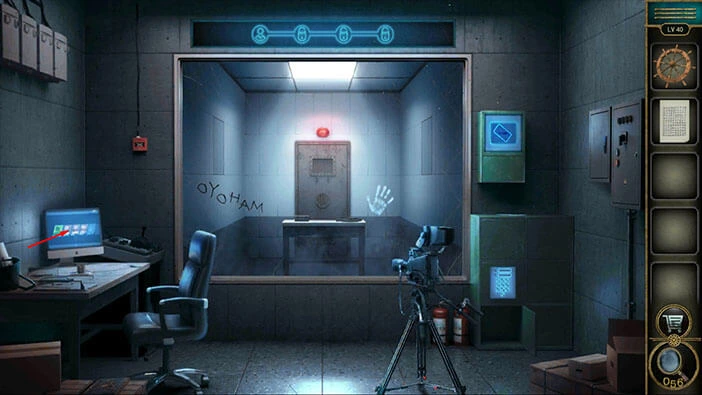
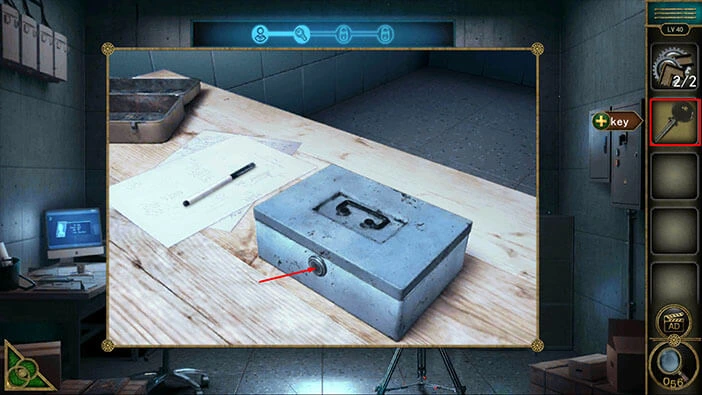
Next, tap on the table in the mirror to take a closer look at it.

On the left side of the table, you will notice the “Hint paper”. Tap on it to pick it up.
After that, tap on the green button in the bottom left corner of the screen to go back.
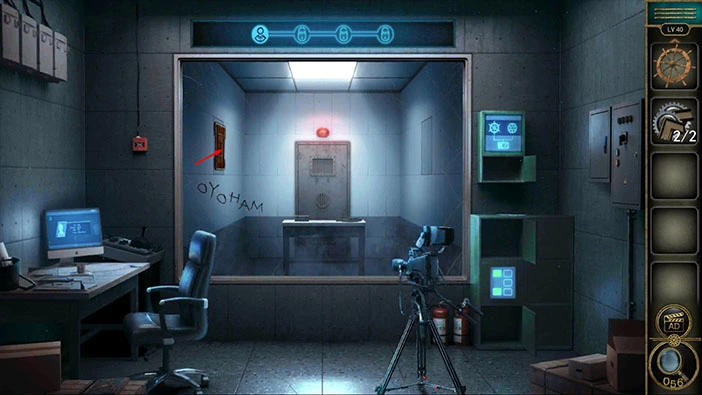
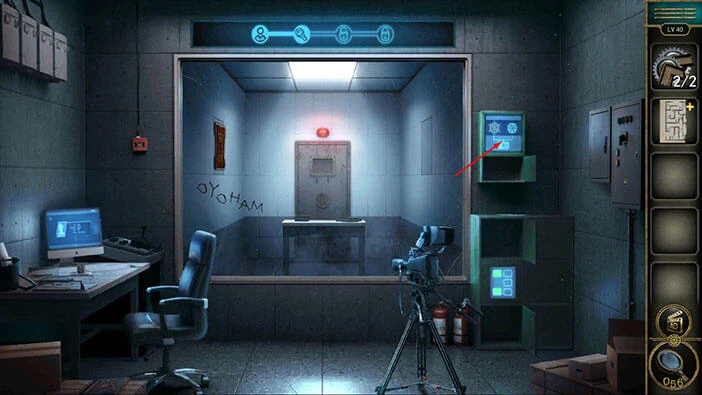
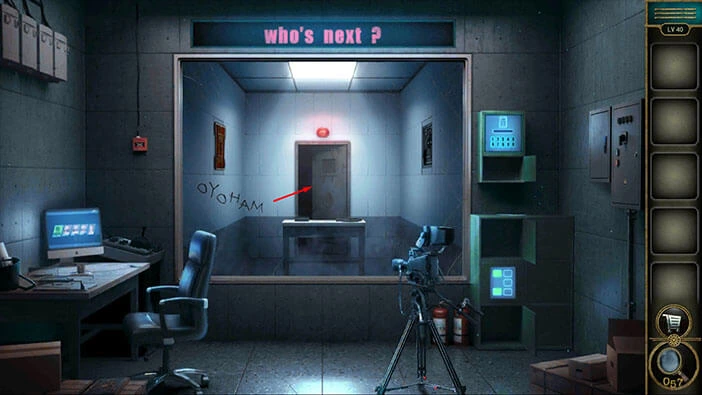
Let’s take a look at the large mirror in front of us. Here, we can see “OYOHAM”. However, we are looking at the mirror, so we should read these letters from right to left, and we will get “MAHOYO”. Memorize/write down these letters because they represent the hint for the next puzzle.
After that, tap on the “Hint Paper” in your inventory to take a closer look at it.

Our next task is to discover the numbers that these letters represent. So, we should discover the numbers that represent the word “MAHOYO”. We will do this puzzle in several steps. Let’s begin.
Step 1
First, let’s take a look at the letter “M”. If we draw the line that goes through all letters “M” on the “Hint Paper” we will discover the number 1. This is the first number.
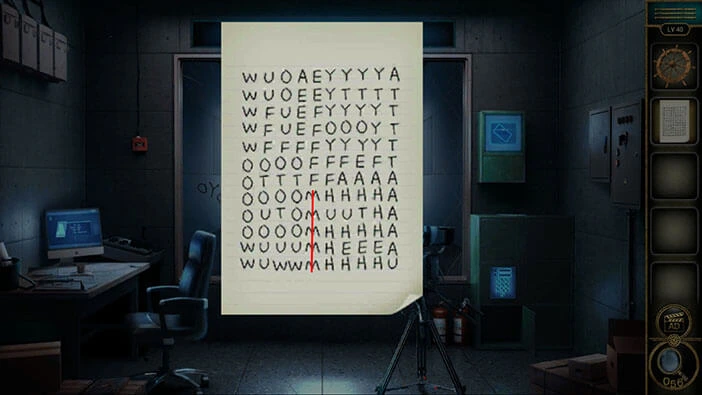
Step 2
Second, let’s take a look at the letter “A”. If we draw the line that goes through all letters “A” on the “Hint Paper” we will discover the number 7. This is the second number.
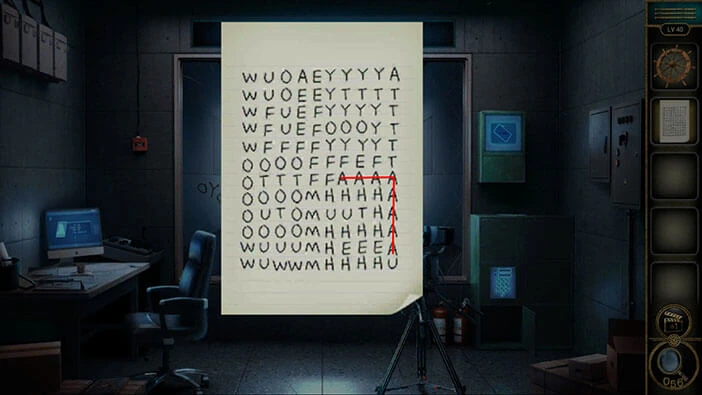
Step 3
Third, let’s take a look at the letter “H”. If we draw the line that goes through all letters “H” on the “Hint Paper” we will discover the number 2. This is the third number.
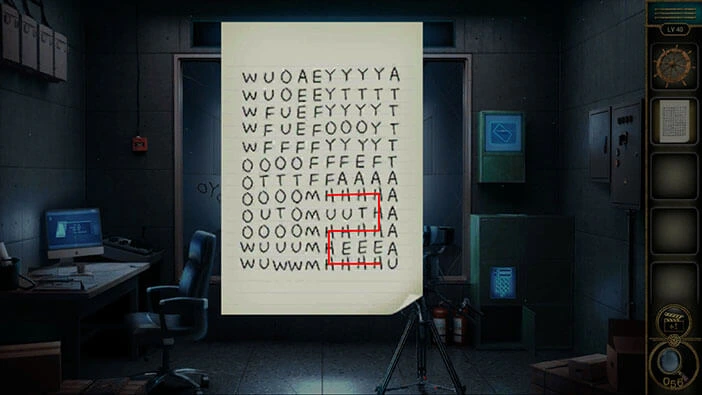
Step 4
Fourth, let’s take a look at the letter “O”. If we draw the line that goes through all letters “O” on the “Hint Paper” we will discover the number 6. This is the fourth number.
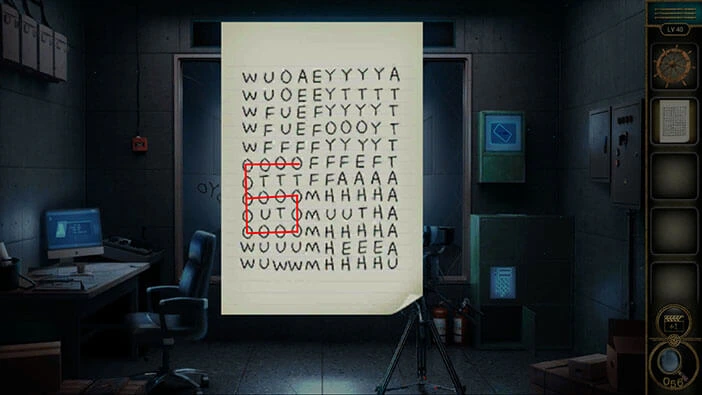
Step 5
Fifth, let’s take a look at the letter “Y”. If we draw the line that goes through all letters “Y” on the “Hint Paper” we will discover the number 5. This is the fifth number.
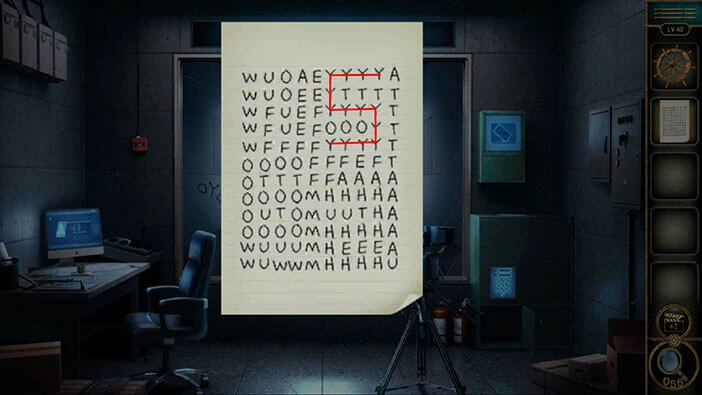
Step 6
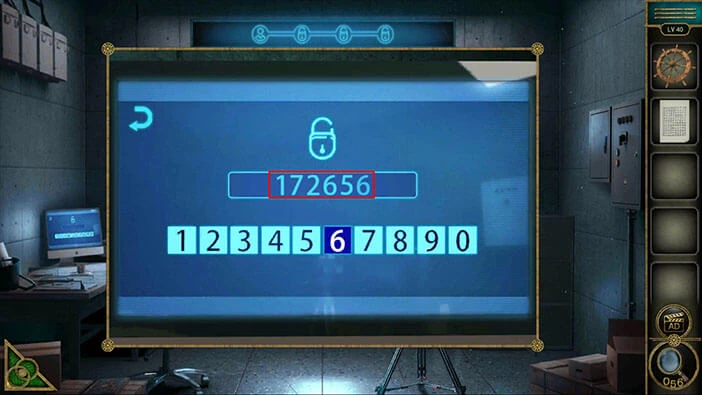
The sixth letter is the letter “O” and we already discovered that the letter “O” = 6. So, when we put it all together we will get the number “172656”. Let’s memorize/write down this number.
Once you’re done, tap on the empty inventory slot to put down the note.

Next, let’s tap on the PC screen to take a closer look at it.
Tap on the fifth profile (locked profile) to start the interaction.
Let’s enter the code “172656” that we discovered by deciphering the “Hint Paper”.
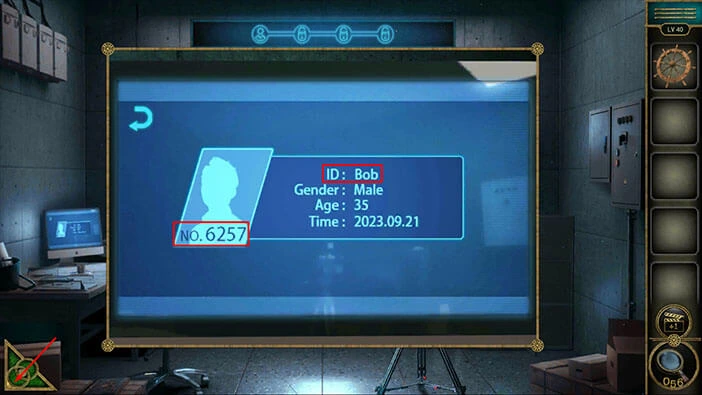
With that you will unlock the fifth profile, so let’s take a look at it.

Let’s memorize/write down the profile ID and profile number as we did with the previous profile.
Profile ID = “Bob”
Profile number = “6257”
Once you’re done, tap on the green button in the bottom left corner of the screen to go back.
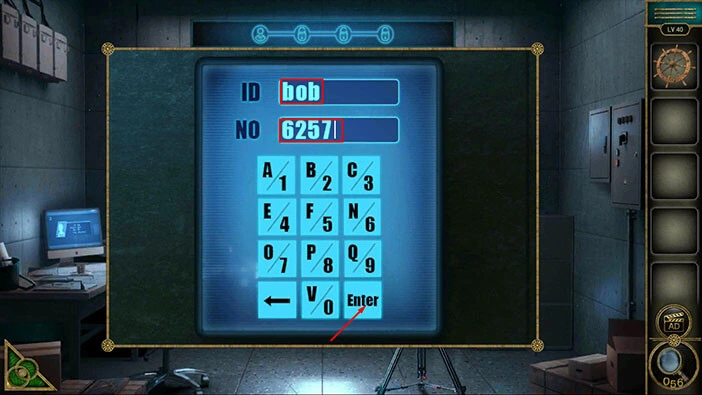
Next, let’s tap on the keypad on the safe on the right to take a closer look at it, and tap again to start the interaction.

Enter the profile ID “Bob” into the first field. After that, enter the profile number “6257” into the second field. Lastly, tap on the “Enter” to confirm.
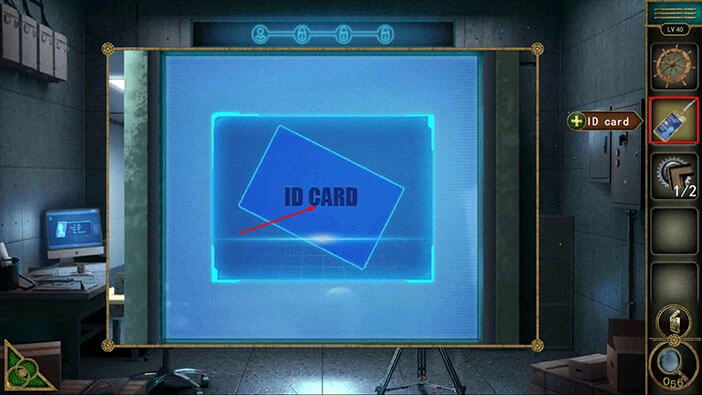
With that, you will unlock another locker, and inside you will find an “ID card” and a “Gear wheel”. Tap on these two items to pick them up.
After that, tap on the green button in the bottom left corner of the screen to go back.
Next, let’s tap on the display screen above the safe to take a closer look at it, and tap again to start the interaction.
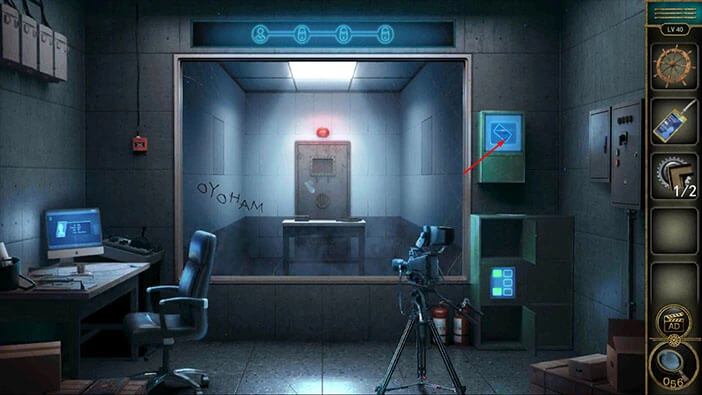
Select the “ID card” from the inventory and use it on the display screen.
With that, you will open the secret compartment under the screen, and inside you will find another “Gear”. Tap on it to pick it up.
After that, tap on the display screen to start the interaction.
Next, tap on the “Rudder” on the left and you will unlock the secret compartment on the left side of the mirror.
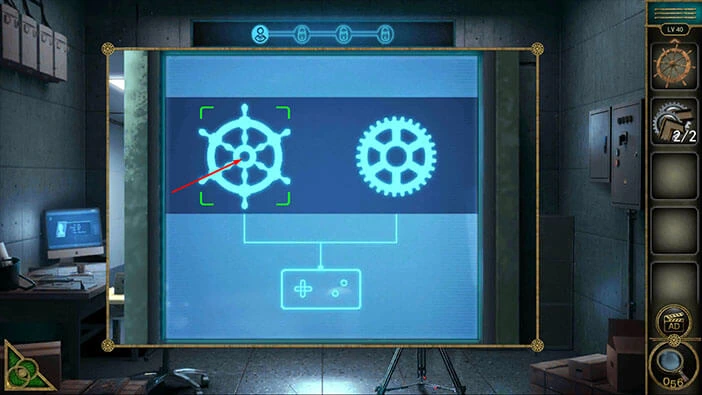
We will discover another puzzle, so let’s tap on it to take a closer look.
You will notice that one of the rudders is missing, so let’s select the “Rudder” from the inventory and insert it into the empty slot.
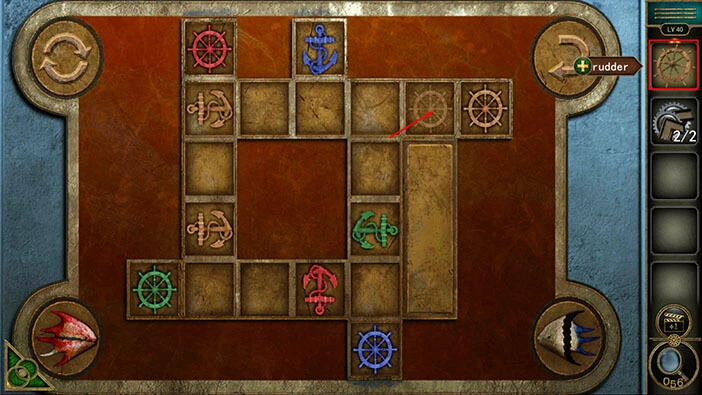
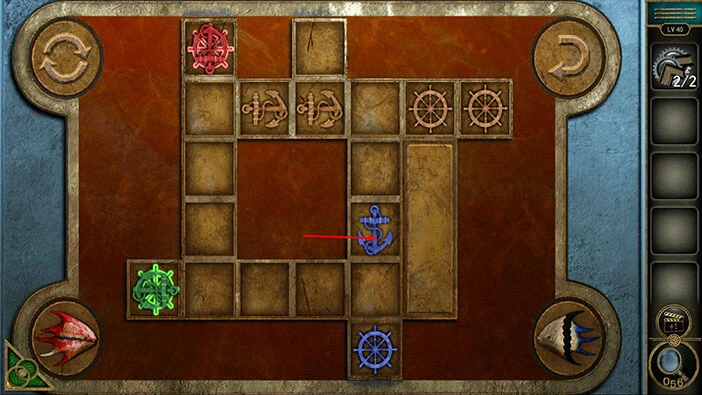
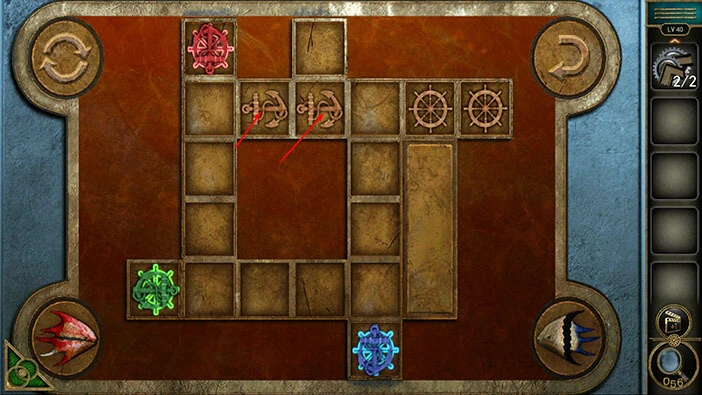
In this puzzle, our task is to get the anchors to the slot with rudders of the matching color. We will do this puzzle in several steps. Let’s begin.
Step 1
Tap once on the “Blue anchor” to move it one slot down.

Step 2
Next, tap twice on the “Brow anchor” in the top left to move it two slots to the right.
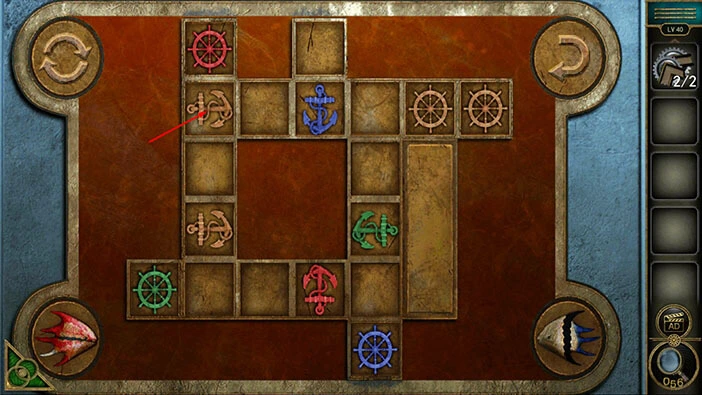
Step 3
Next, tap twice on the “Blue anchor” to move it two slots down.
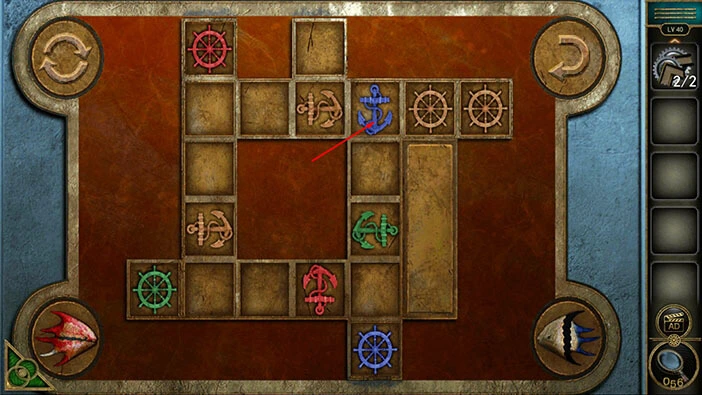
Step 4
Next, tap twice on the “Green anchor” to move it two slots to the left.
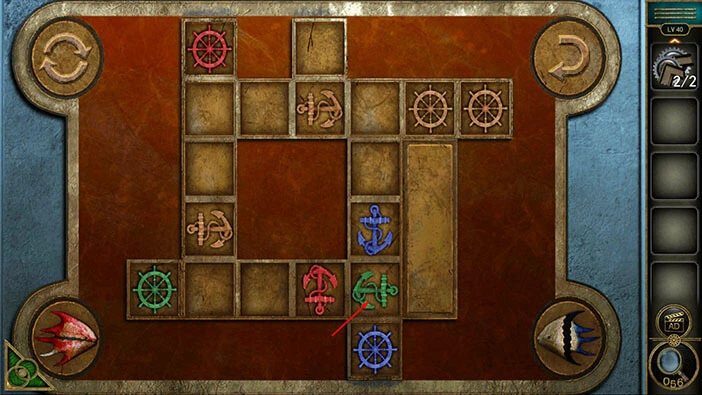
Step 5
Next, tap twice on the “Red anchor” to move it two slots up.
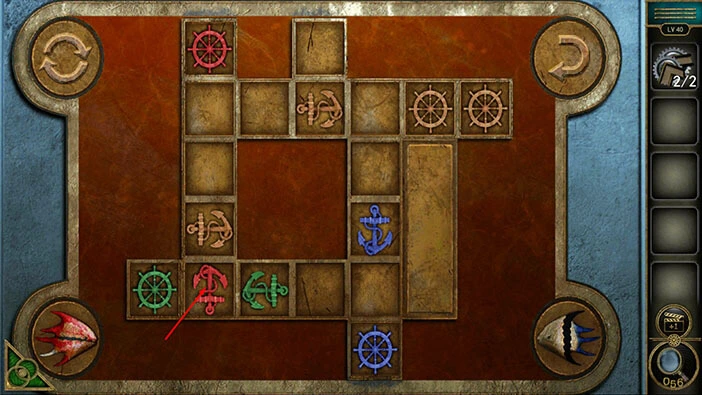
Step 6
Next, tap once on the “Brown anchor” to move it one slot to the right.

Step 7
Next, tap twice on the “Red anchor” to move it two slot up, to the red rudder.
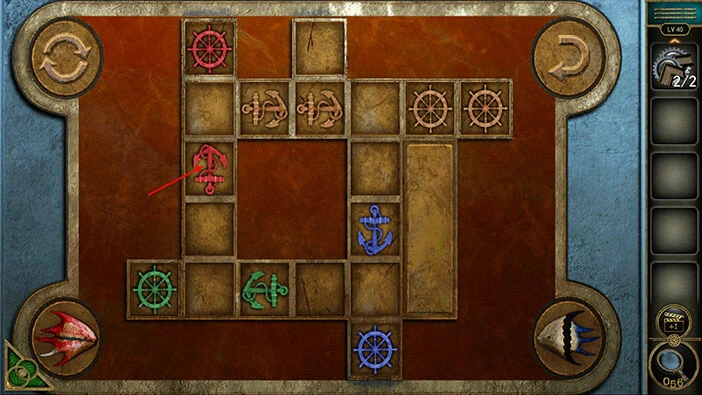
Step 8
Next, tap twice on the “Green anchor” to move it two slots to the left, to the green rudder.
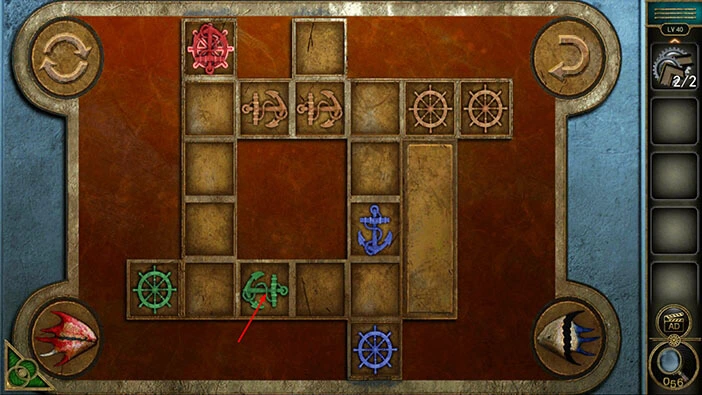
Step 9
Next, tap twice on the “Blue anchor” to move it two slots down, to the blue rudder.
Lastly, tap three times on the two brown anchors and you will get them into the brow rudder slots on the right.
The secret compartment will open as soon as you place all the anchors into the correct slots. Inside we will find a “Key” so let’s tap on it to pick it up.
After that, tap on the green button in the bottom left corner of the screen to go back.

Next, let’s tap on the table in the mirror to take a closer look at it.
Select the “Key” from the inventory and use it to unlock the metal box.
In the metal box, you will find a “First piece”. Tap on it to pick it up.
After that, tap on the green button in the bottom left corner of the screen to go back.
Next, let’s tap on the display screen above the safe on the right to take a closer look at it, and tap again to start the interaction.
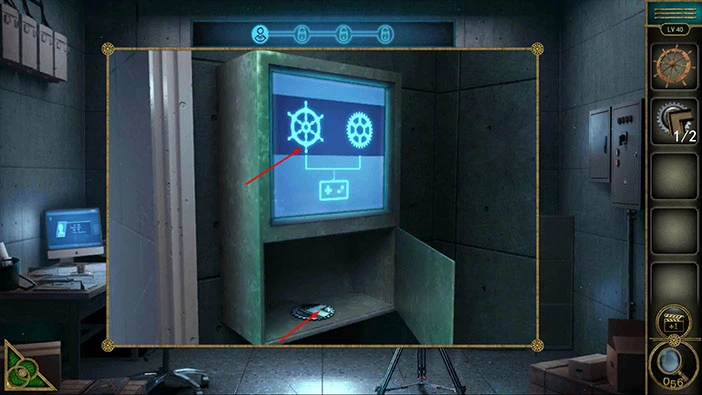
Tap on the “Gear wheel” on the right and you will discover another secret compartment, on the right side of the wall in the mirror.
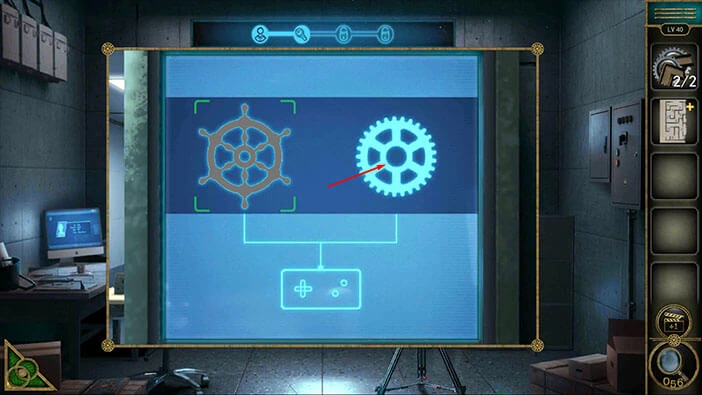
You will discover another puzzle, so let’s tap on it to start the interaction.

You will notice that two gears on the right side of the mechanism are missing, so select the “Gears” from the inventory and insert them into the empty slots.

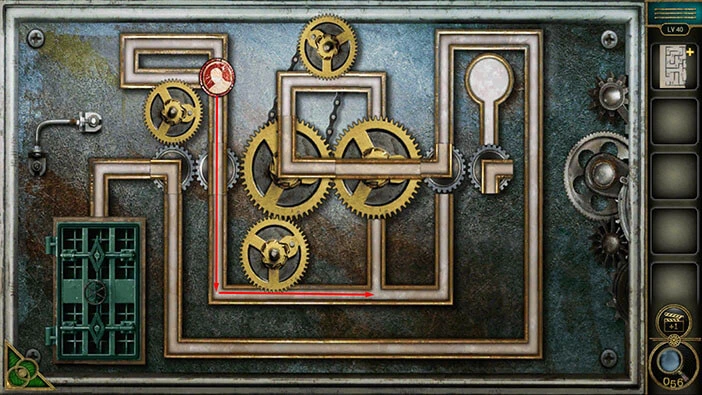
Let’s take a look at the puzzle. Our task is to get the red disk from the slot in the top right corner of the puzzle to the finish line in the top left corner of the puzzle. However, every time the red disk touches one of the yellow gears, some parts of the puzzle will rotate.
We will do this puzzle in several steps. Let’s begin.
Step 1
Drag the red disk into the bottom left corner of the puzzle.
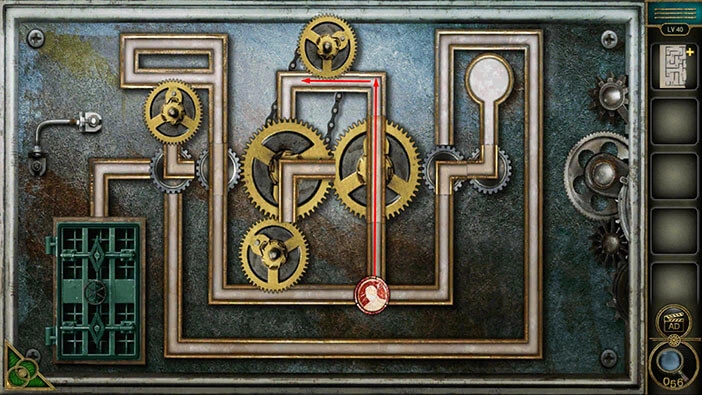
Step 2
Drag the red disk into the top left corner of the puzzle.
Step 3
Drag the red disk slightly to the right, to activate the yellow gear.
Step 4
Let’s make another circle with the red disk to activate the yellow gear once more.
Step 5
Drag down the red disk to the passage in the center.
Step 6
Drag the red disk to the yellow gear at the top.
Step 7
With that, we have created a clear path to the finish line. So, let’s drag the red disk to the finish line in the bottom left corner of the puzzle.
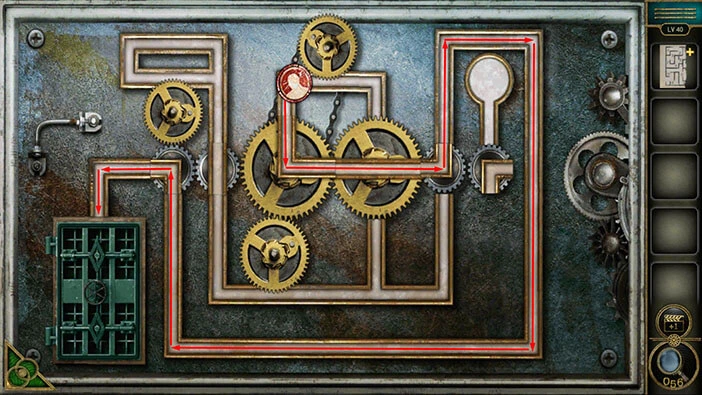
As soon as you get the red disk to the finish line, you will discover another “Puzzle piece” so let’s tap on it to pick it up.
After that, tap on the green button in the bottom left corner of the screen to go back.
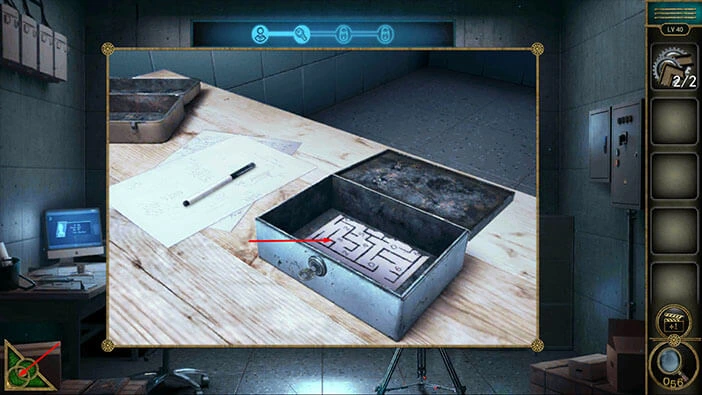
Tap on the first “Piece” in your inventory to select it, and it will appear in the middle of the screen. After that, tap on the second “Piece” to select it, then tap on the middle of the screen to merge the two pieces. “Maze” will be added to your inventory.
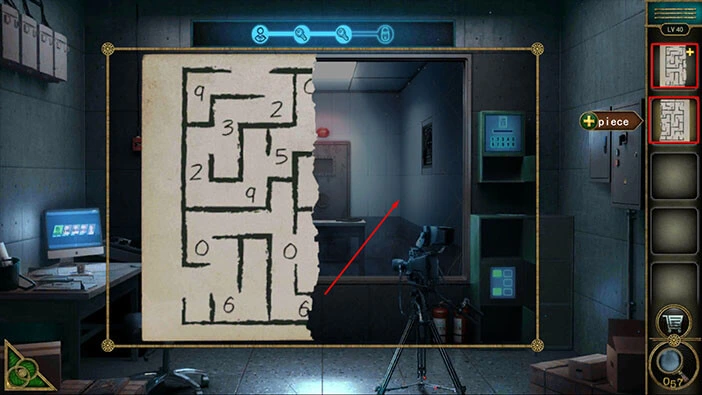
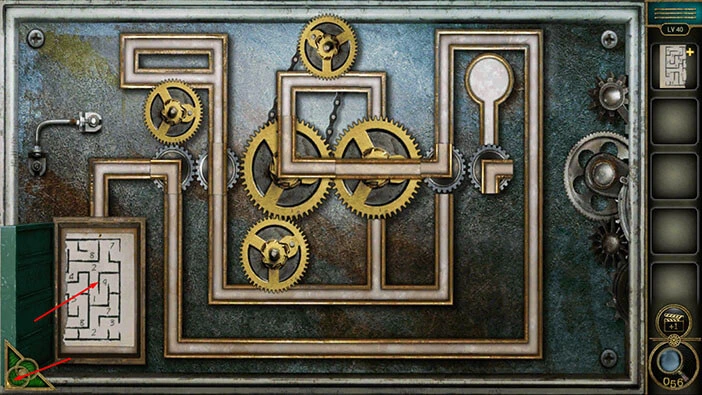
Next, tap on the “Maze” in your inventory to take a closer look at it.

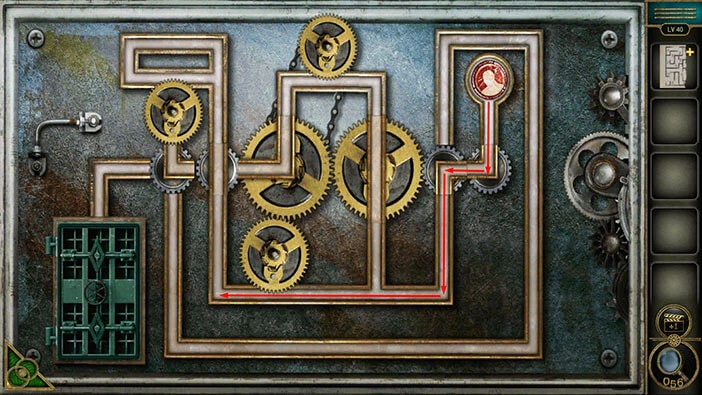
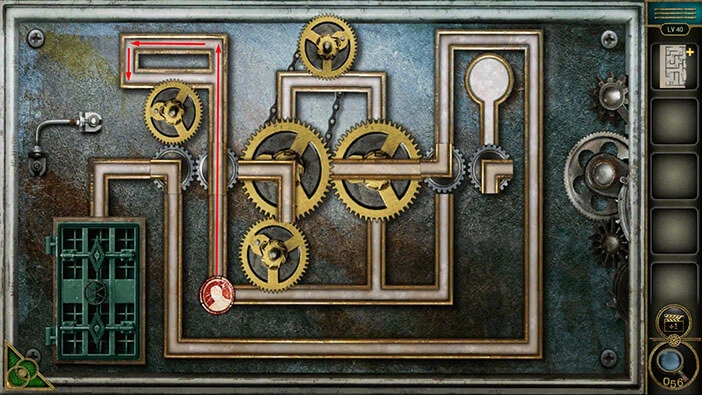
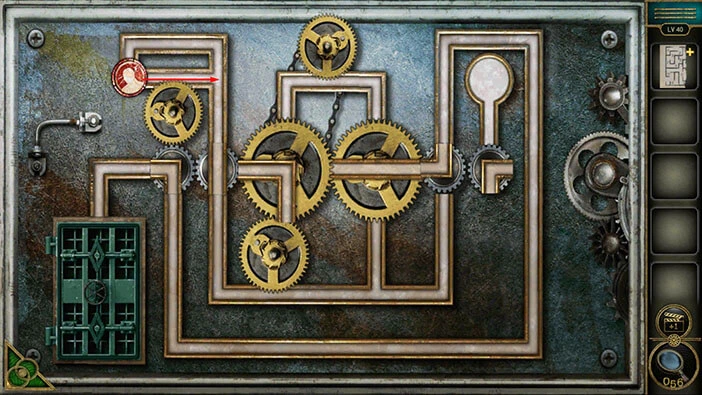
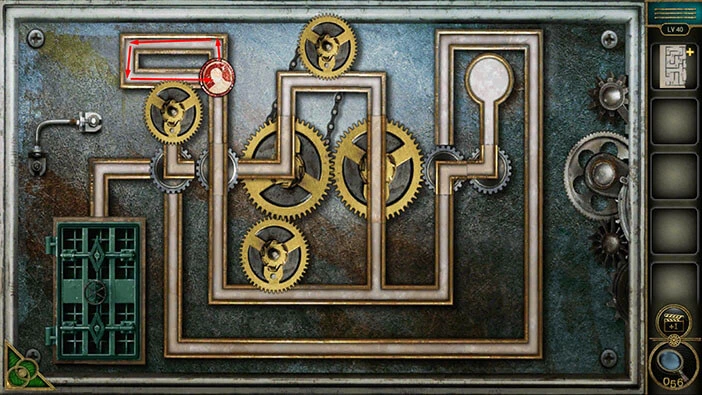
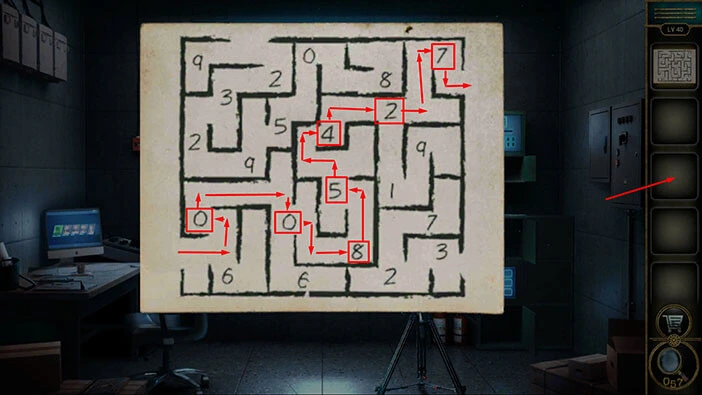
Our task is simple, we just have to find a way through the maze and write down the numbers that we encounter along this path. We will start in the bottom left corner, and we will draw the path to the exit in the upper left corner of the maze (he other two entrances, in the bottom right and the top left are dead ends).
The number that we will discover is “0085427”. Memorize/write down this number. You can see that path through the maze in the image below.
Once you’re done, tap on the empty inventory slot to put down the “Maze”.
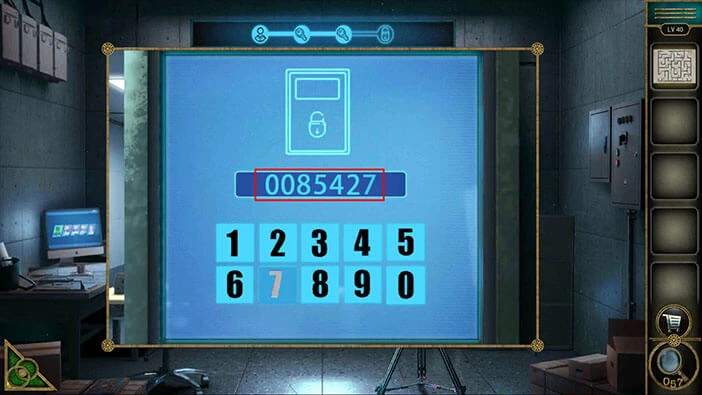
Next, let’s tap on the display screen, above the safe, to take a closer look at it, and tap again to start the interaction.

Enter the number “0085427” and you will unlock the door.
Tap on the door to proceed to the next level.
With that, we have reached the end of the tenth part of the walkthrough. If you want to see the eleventh part, tap on the next part button. In the eleventh part of the walkthrough, we will cover levels 41-44.
Thank you for reading.