Can you escape the 100 room 17 | Levels 1-4
Hello everyone and welcome to the first part of the walkthrough for “Can you escape the 100 room 17”. In the first part of the walkthrough, we will cover levels 1 to 4.
Level 1
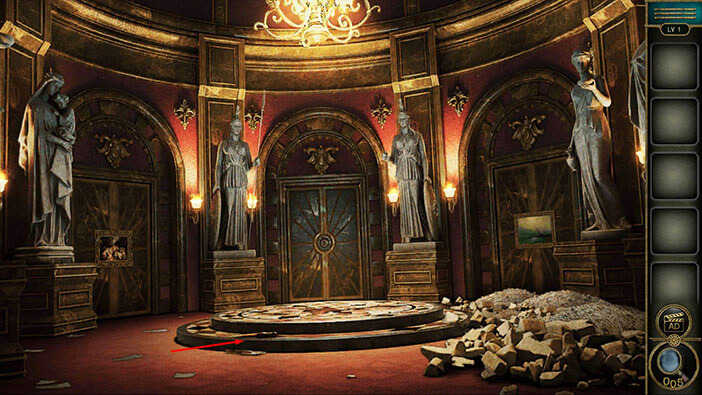
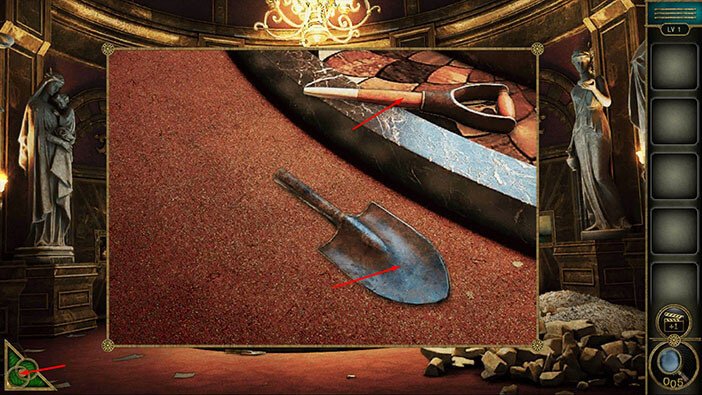
At the base of the small platform in the middle of the room, you will notice two items. Tap on them to take a closer look.
Here, you will discover a shovel, broken in two parts. Tap on the “Shovel” and “Shovel Handle” to pick them up.
After that, tap on the green button in the bottom left corner of the screen to go back.
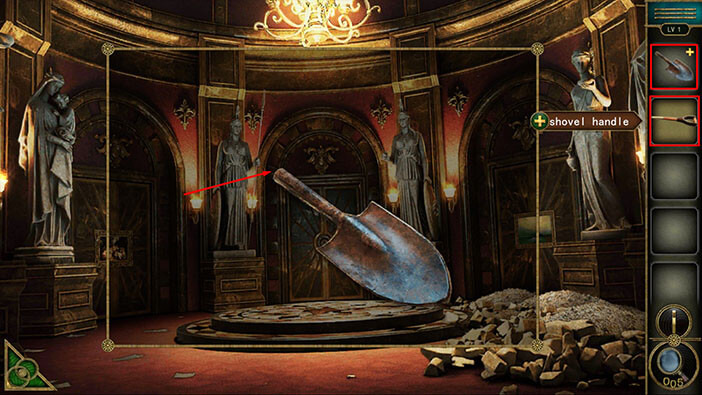
Let’s repair the shovel. Select the “Shovel” in your inventory (you will notice a “plus” sign, indicating that we can combine this item with other items), then tap on the “Shovel handle” to select it. After that, tap on the shovel (in the middle of the screen, not in the inventory) to merge these two items. A “Shovel” will be added to your inventory.
Next, tap on the rubble, located just below the statue on the right, to take a closer look at it.

Select the “Shovel” from the inventory and use it to dig through the rubble.
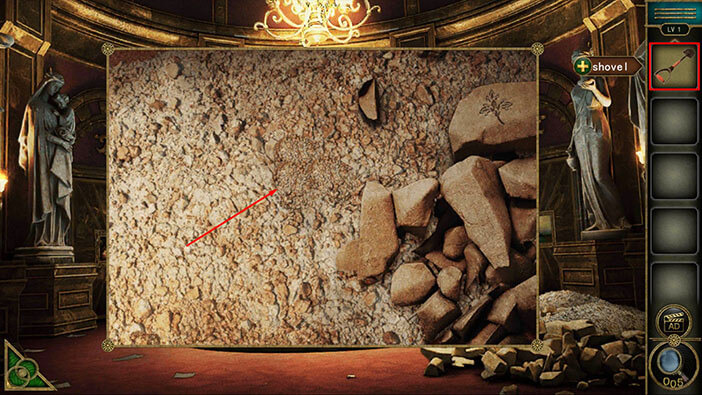
Below the rubble, you will discover a “Button”, so let’s tap on it to pick it up. Also, you probably noticed a symbol on the rock on the right. Memorize/write down this symbol because we will need it for the next puzzle (this is the third out of three symbols that we will need for that puzzle).
Once you’re done, tap on the green button in the bottom left corner of the screen to go back.

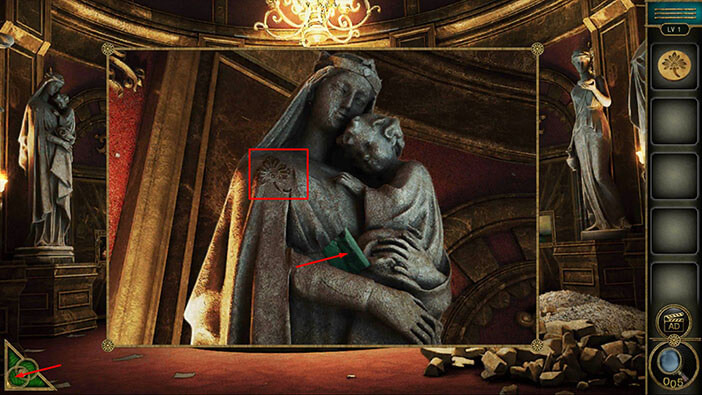
Next, tap on the first statue on the left to take a closer look at it.

Here, you will discover a green “Piece”, so let’s tap on it to pick it up. Also, on the shoulder of the statue, you will see another symbol. Memorize/write it down because we will need it for the next puzzle (this is the first out of three symbols that we will need for that puzzle).
Once you’re done, tap on the green button in the bottom left corner of the screen to go back.
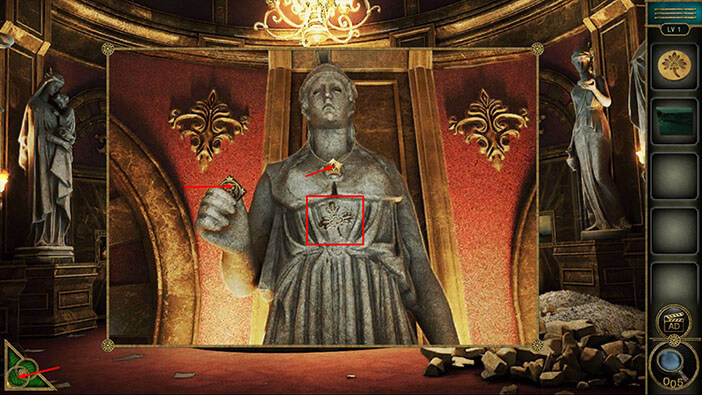
Next, tap on the statue located on the right side of the large door to take a closer look at it.

You will notice that the statue is holding something. Tap on this item to pick it up and a “Token” will be added to your inventory. On the chest of the statue, you will notice another symbol. Memorize/write it down, because we will need it for the next puzzle (this is the first out of three symbols that we will need for that puzzle).
Also, you will notice a star around the neck of the statue. Tap on it to pick it up. When you collect 3 stars, you can exchange them for a hint.
Once you’re done, tap on the green button in the bottom left corner of the screen to go back.
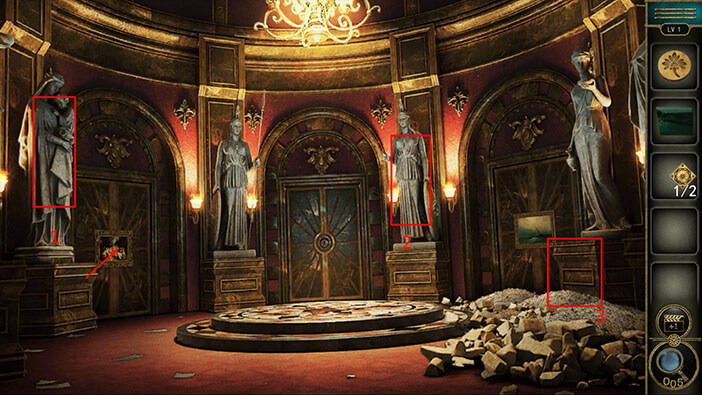
If you look at the locations where we discovered the symbols from left to right, you will see that the first symbol was located on the first statue on the left, that’s why it’s the first symbol.
The second symbol would be the symbol on the statue located on the right side of the door. The third symbol we discovered below is the last statue (looking from left to right).
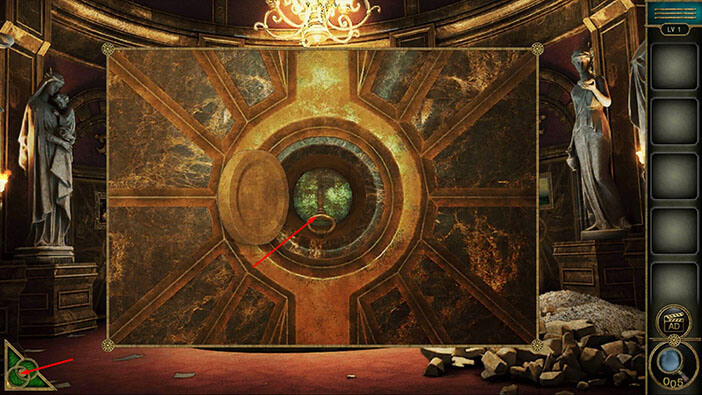
So, we are now ready for the next puzzle. Tap on the picture on the door on the left, to take a closer look at it. Tap on the picture one more time, and you will discover a puzzle below it.
Here, you will see two buttons with symbols, but the first slot is empty. So, select the “Button” from the inventory and insert it into the empty slot.

In order to solve this puzzle, we should set the symbols on the buttons. We already discovered these symbols and their correct order, so let’s tap on the buttons to set the correct symbols.
Tap four times on the first button to set the correct symbol (this is the symbol that we saw on the statue on the left).
Tap three times on the second button to set the correct symbol (this is the symbol that we saw on the statue located on the right side of the large door).
Lastly, tap once on the third button to set the correct symbol this is the symbol that we saw below the statue on the right side of the room).
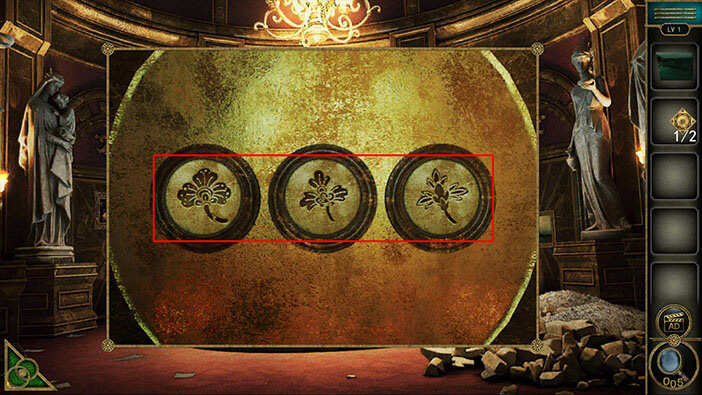
As soon as you set the correct symbols on the buttons, you will open the safe. In the safe you will find the second “Token” so tap on it to pick it up.
After that, tap on the green button in the bottom left corner of the screen to go back.
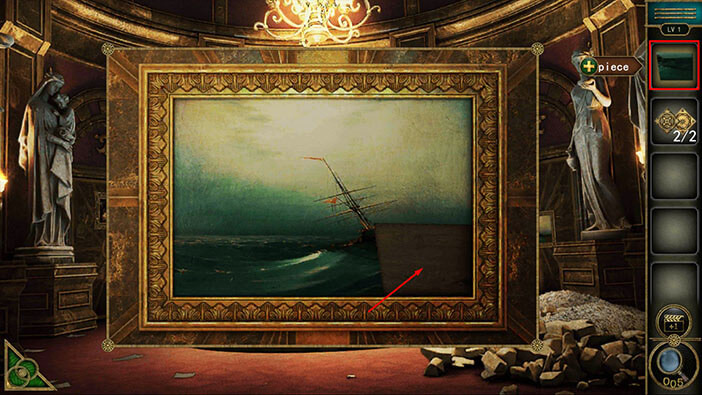
Next, let’s tap on the picture on the wall on the right to take a closer look at it.

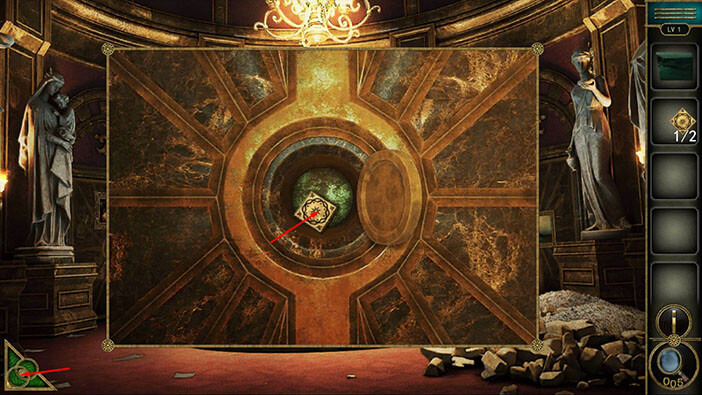
You will notice that the bottom right piece of the picture is missing. So, select the “Piece” from the inventory and place it in the bottom right corner of the picture.
You will remove the picture, and below it, you will discover another puzzle. Tap on it to start the interaction.
Select the “Game props” from the inventory, then tap on the puzzle to insert the buttons into the empty slots.
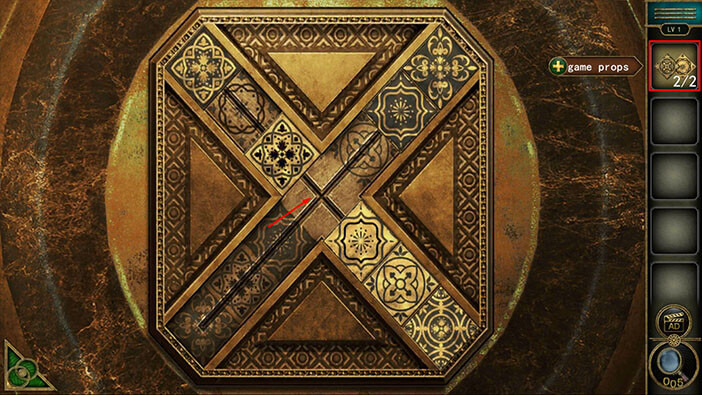
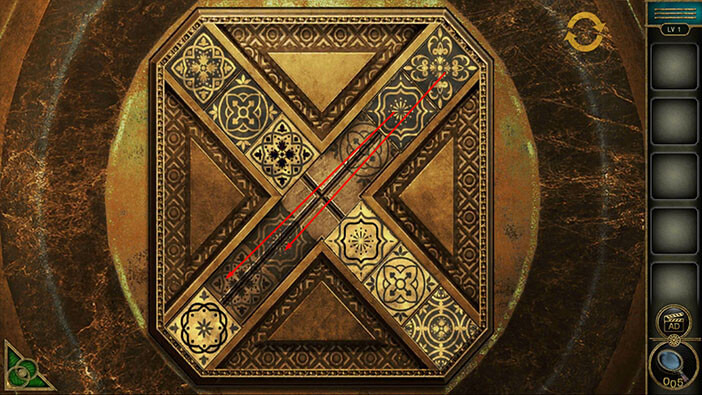
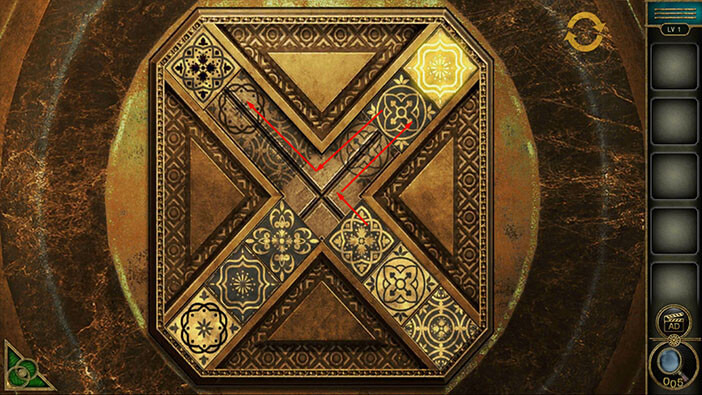
Our next task is to the pieces of the puzzle at the positions that have the matching symbol. We will do this in several steps. Let’s begin.
Step 1
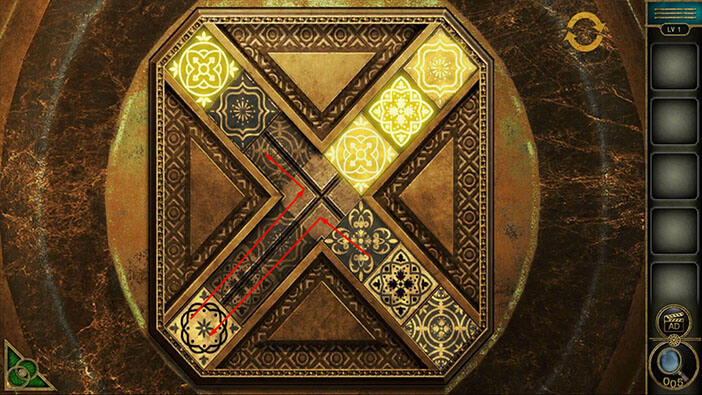
Select the first puzzle piece in the top-right branch, and drag it to the third position in the bottom-left branch.
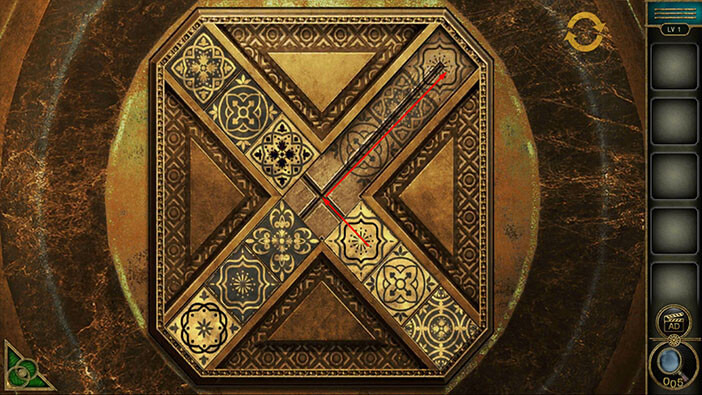
Step 2
Drag the second and third puzzle pieces from the top-right branch, and drag them into the second and first position in the bottom-left branch.
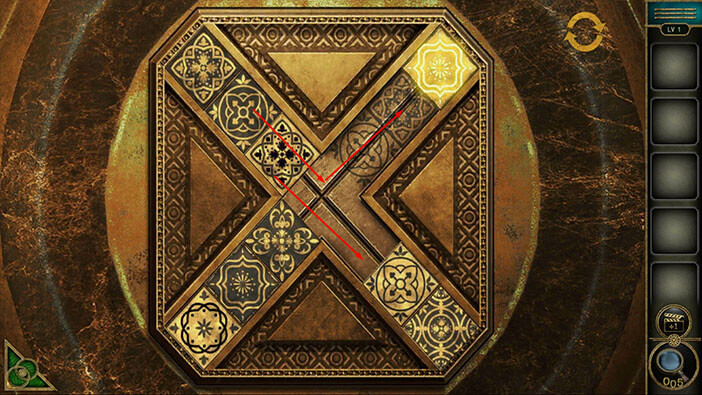
Step 3
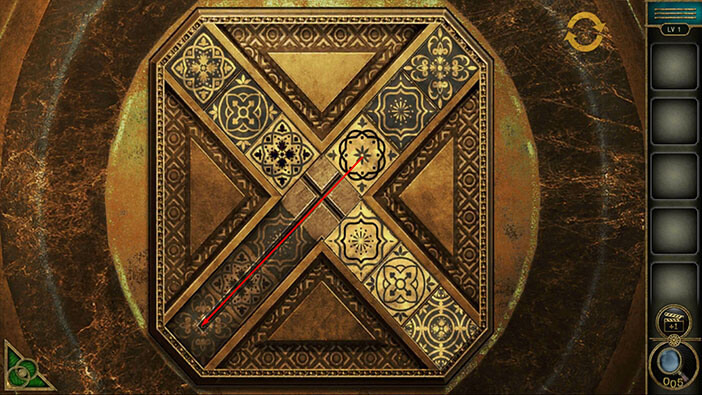
Select the first piece from the bottom-right branch and drag it into the third slot of the top-right branch. The symbol on the puzzle piece matches the symbol below it, and this piece will glow bright once you place it into this position.
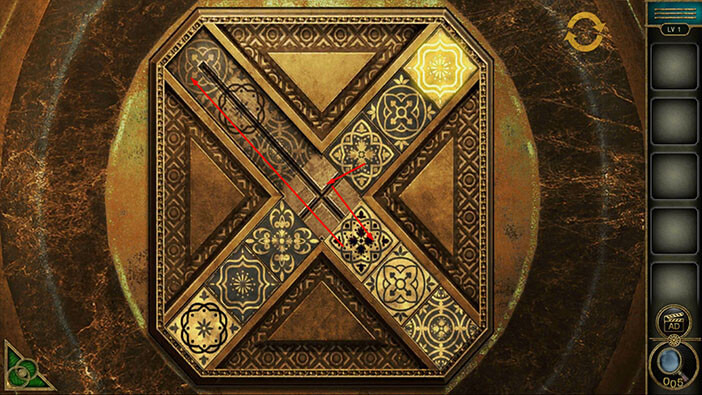
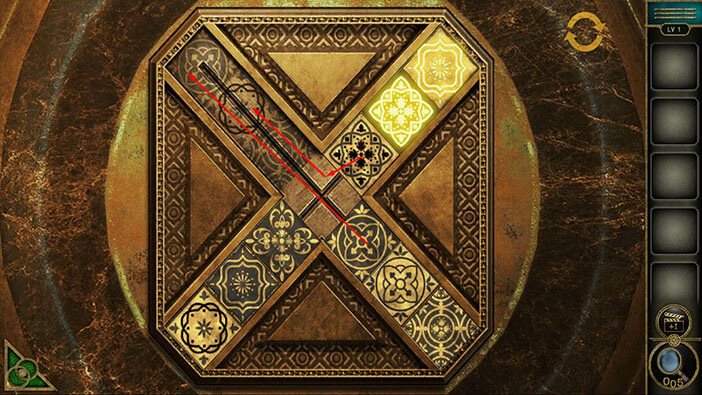
Step 4
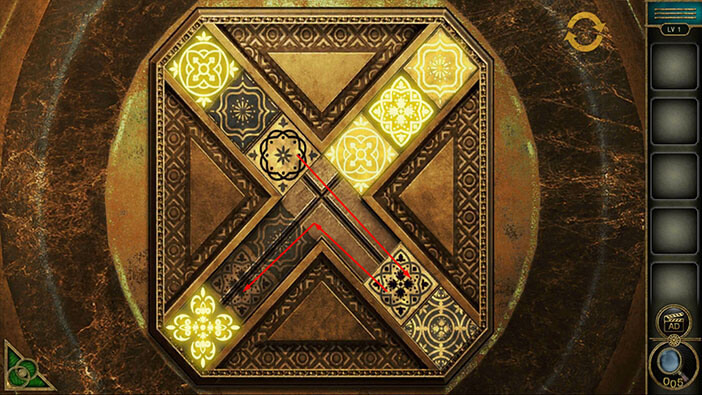
Select the first puzzle piece in the top left branch and place it into the first slot in the bottom right branch. After that, select the second puzzle piece from the top left branch and drag it into the second slot in the top right branch.
Step 5
Select the third puzzle piece in the top-left branch and place it into the first slot in the top-right branch.

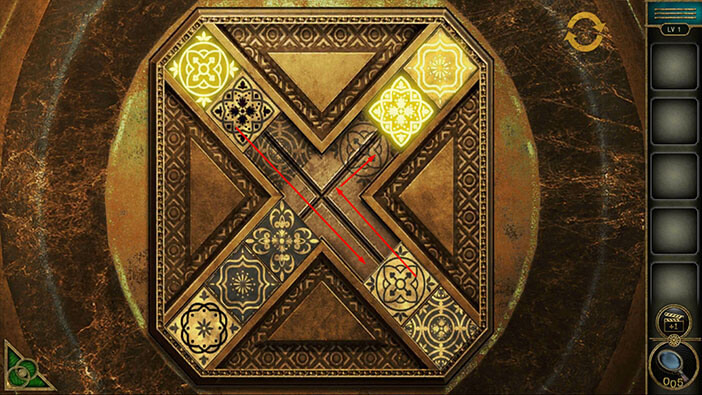
Step 6
Select the first puzzle piece from the bottom right branch and place it into the third slot in the top left branch. After that, take the first puzzle piece from the top right branch, and place it into the first slot in the bottom right branch (the position of the previous puzzle piece).
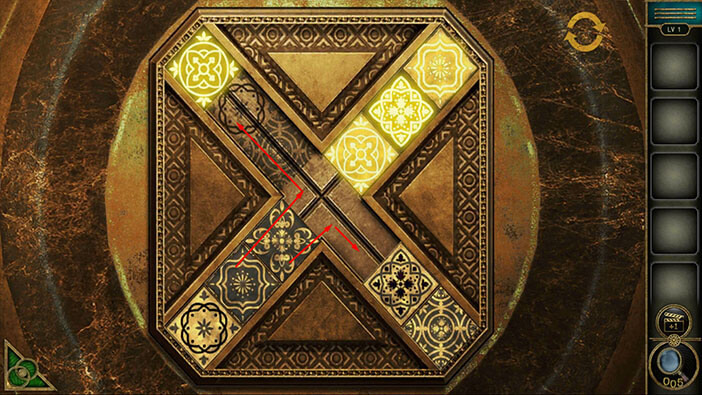
Step 7
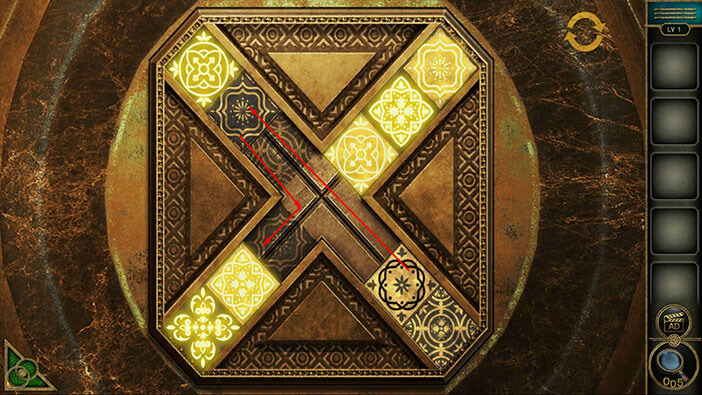
Select the second puzzle piece in the top right branch and place it into the second slot in the top left branch. After that, select the first piece in the bottom right branch, and place it into the second slot in the top right branch. The symbol on the puzzle piece matches the symbol below it, and this piece will glow bright once you place it into this position.
Step 8
Select the second puzzle piece in the top left branch and drag it into the first slot in the bottom right branch. After that, take the third puzzle piece in the top left branch, and place it into the first slot in the top right branch.

Step 9
Select the first puzzle piece from the bottom right branch, and place it into the third slot in the top left branch. The symbol on the puzzle piece matches the symbol below it, and this piece will glow bright once you place it into this position.
After that, take the first puzzle piece from the top right branch and place it into the second slot in the top left branch.
Step 10
Select the second puzzle piece from the bottom right branch, and place it into the first slot in the top right branch. The symbol on the puzzle piece matches the symbol below it, and this piece will glow brightly once you place it into this position.
After that, take the second puzzle piece from the top left branch, and place it into the second slot in the bottom right branch.
Step 11
Select the first puzzle piece from the bottom left branch, and place it into the first slot in the bottom right branch. After that, select the second puzzle piece from the bottom left branch and place it into the second slot in the top left branch.
Step 12
Select the third puzzle piece from the bottom left branch, and place it into the third slot in the top left branch. After that, select the first puzzle piece from the bottom right branch, and place it into the third slot in the bottom left branch. The symbol on the puzzle piece matches the symbol below it, and this piece will glow brightly once you place it into this position.
Step 13
Select the second puzzle piece from the bottom right branch, and place it into the second slot in the bottom left branch. After that, select the second puzzle piece from the top left branch and place it into the second slot in the bottom right branch.
Step 14
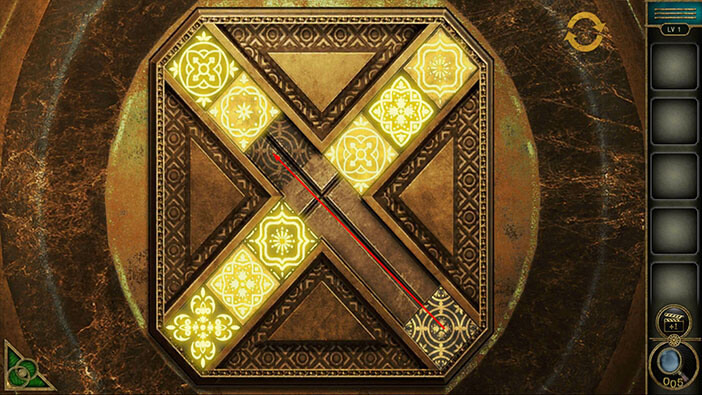
Select the second puzzle piece from the top left branch and place it into the first slot in the bottom left branch. After that, select the second puzzle piece from the bottom right branch, and place it into the second slot in the top right branch. Both pieces will glow because they are in the correct position.
Step 15
Lastly, select the third puzzle piece from the bottom right branch, and place it into the first slot in the top left branch. With that, you will solve this puzzle.
As soon as you solve the puzzle, you will unlock and open the safe, and inside you will find a “Key”. Tap on it to pick it up.
After that, tap on the green button in the bottom left corner of the screen to go back.
Next, tap on the large door in front of you to start the interaction.

Select the “Key” from the inventory and use it to unlock the door.
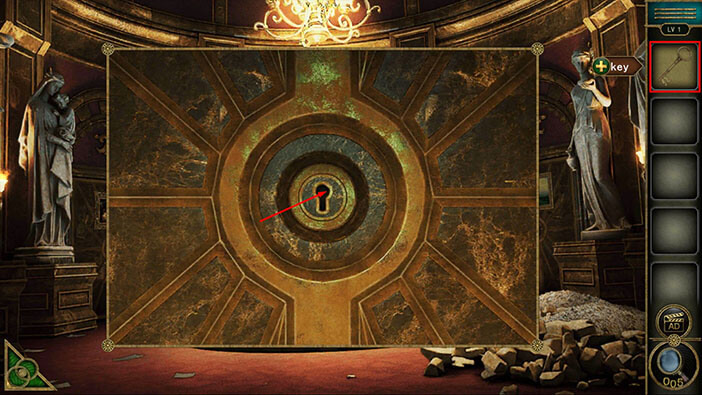
The door will open and you will see the stairs behind the door. Tap on the stairs to proceed to the next level.
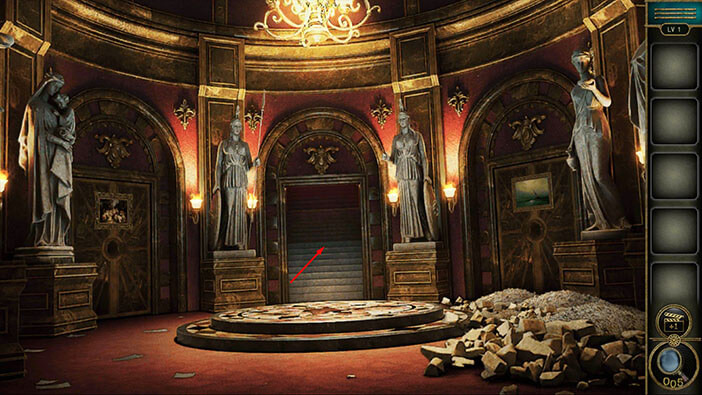
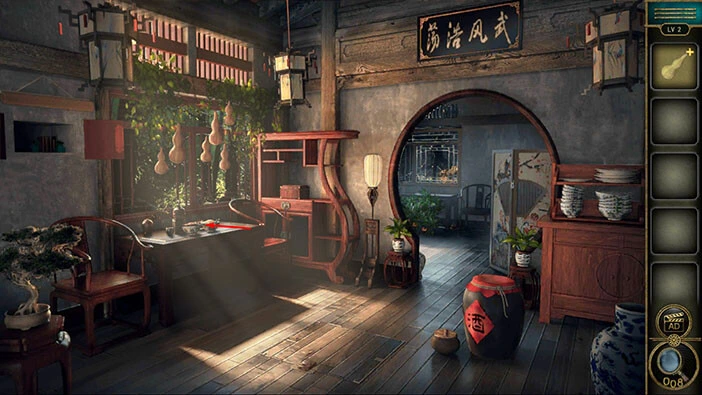
Level 2
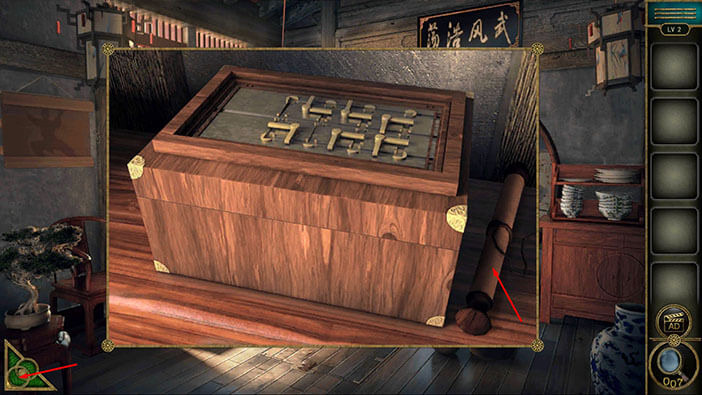
Let’s explore the second level. Tap on the box located on the shelf in the left corner of the room to take a closer look at it.
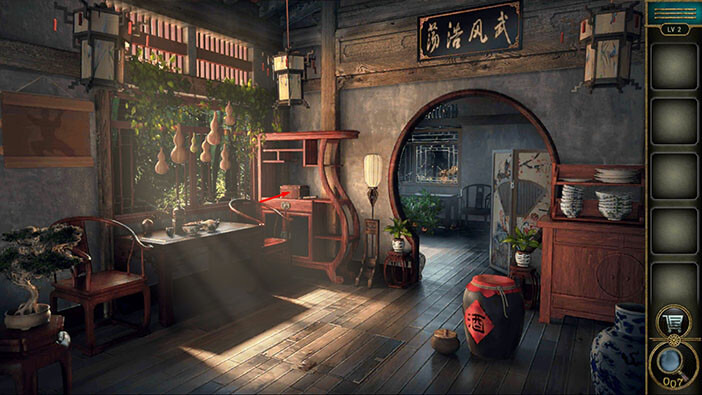
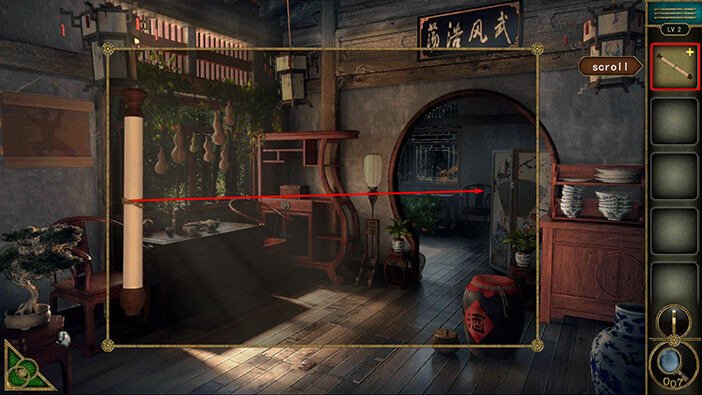
This box represents another puzzle, and we will come back to it a bit later (when we find the red ball). Just to the right, you will notice a “Scroll”. Tap on it to pick it up.
After that, tap on the green button in the bottom left corner of the screen to go back.
Tap on the “Scroll” in your inventory to select it. After that, drag the scroll to the right to unroll it, so that we can examine it.
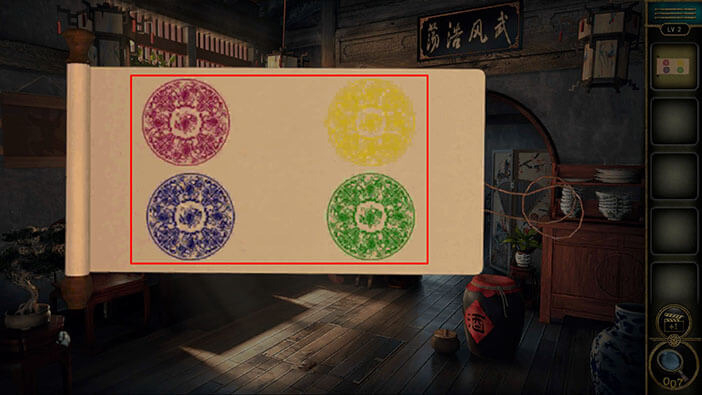
Let’s examine the scroll. Here, we can see the red circle in the top left corner, the yellow circle in the top right, the blue circle in the bottom left, and the green circle in the bottom right. Try to memorize the colors and the positions of the circles.
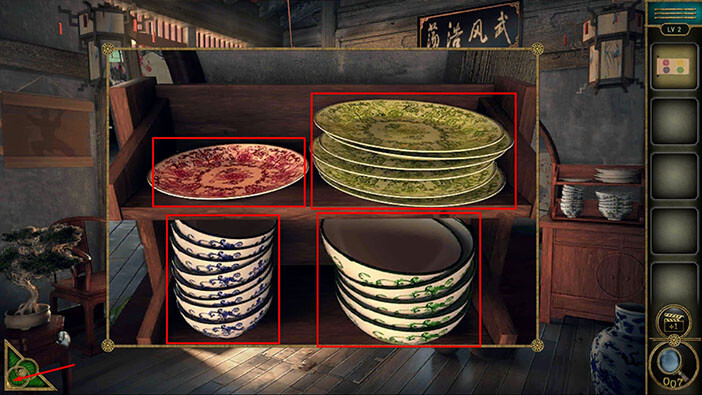
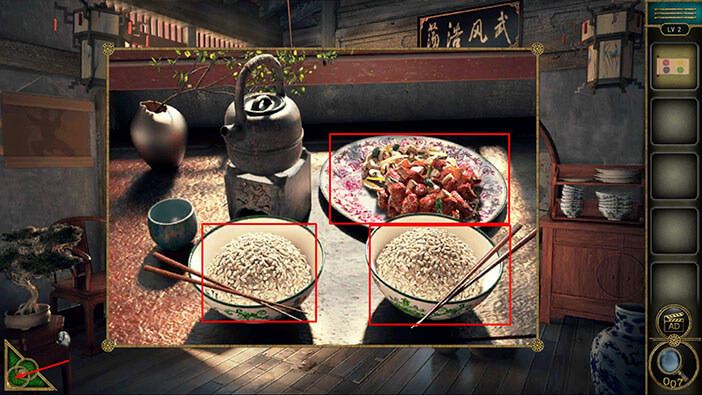
Next, tap on the cabinet in the right corner of the room to take a closer look at it.

You will notice that the color of the plates and bowls on the shelf matches the position of the colors on the scroll. Let’s count the bowls and plates.
Red = One plate
Yellow = Six plates
Blue = Eight bowls
Green = Five bowls
Memorize/write down this information. Once you’re done, tap on the button in the bottom left corner of the screen to go back.
Next, let’s tap on the table on the left to take a closer look at it.

Here, we can see one red plate and two green bowls. If we add them to the previous count, we will get,
Red = Two plates
Green = Seven bowls
Memorize/write down this information. Once you’re done, tap on the button in the bottom left corner of the screen to go back.
Next, tap on the wooden frame on the wall on the left to examine it, and tap again to start the interaction.

Here, you will discover another puzzle, and we will need a four-digit code in order to solve it. You will notice that the numbers are arranged in the same manner as the colors on the scroll (or the plates and bowls on the shelf). So, if we enter the numbers that we already discovered, we will solve this puzzle. We had,
The top left corner = Red. Red = Two plates. So, let’s enter the number 2 in the top left corner.
The top right corner = Yellow. Yellow = Six plates. So, let’s enter the number 6 in the top right corner.
The bottom left corner = Blue. Blue = Eight bowls. So, let’s enter the number 8 in the bottom left corner.
The bottom right corner = Green. Green = Seven bowls. So, let’s enter the number 7 in the bottom right corner.
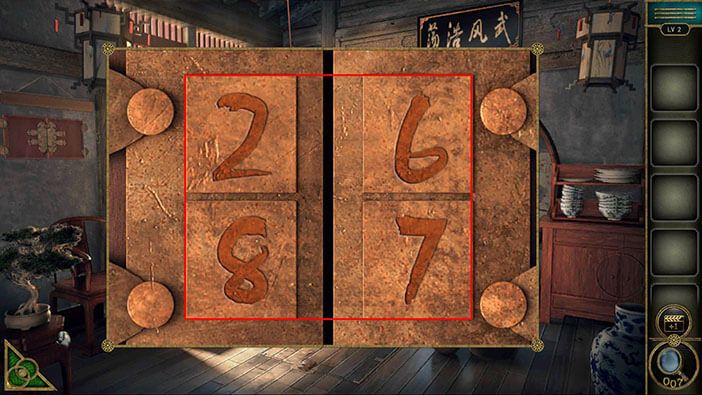
Once you enter the correct numbers, you will unlock the small compartment. Inside, you will find a bottle of “Fertilizer”, so let’s tap on it to pick it up.
After that, tap on the button in the bottom left corner of the screen to go back.

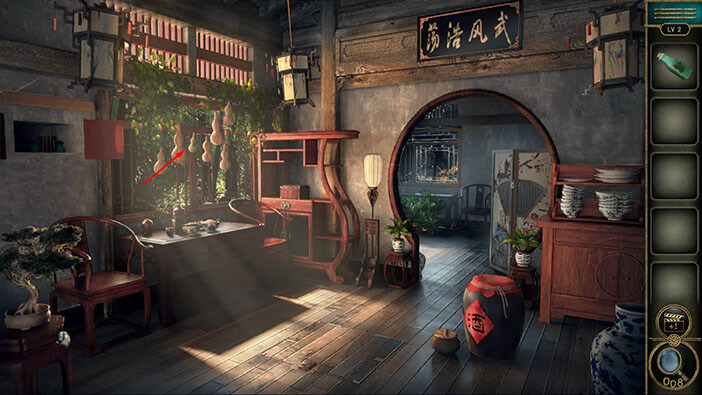
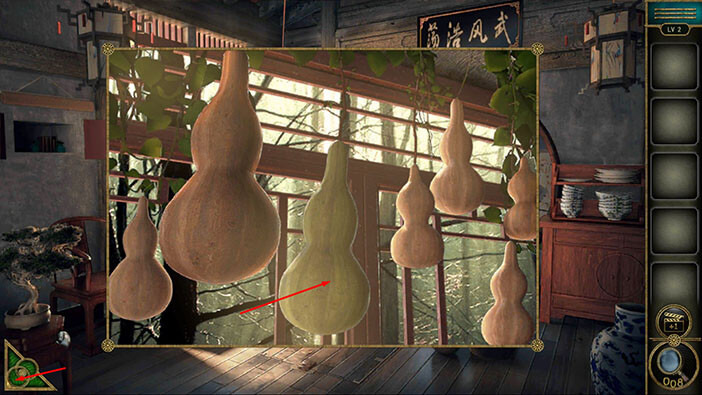
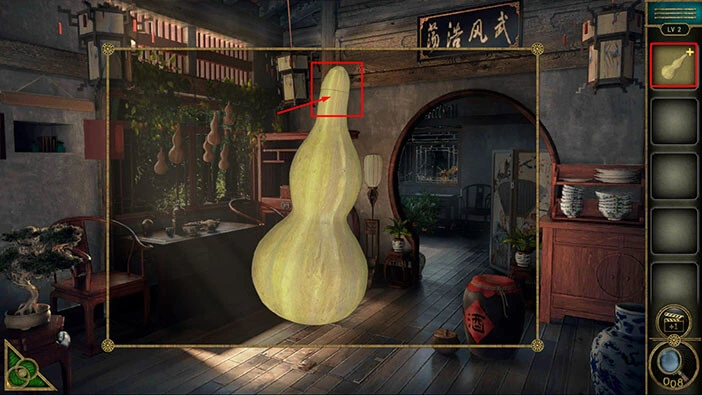
If you look above the table, you will notice several gourds hanging from the plant. Tap on the gourds to take a closer look at them.
You will notice that one of the gourds is green. So, select the “Fertilizer” from the inventory and use it on the green gourd.
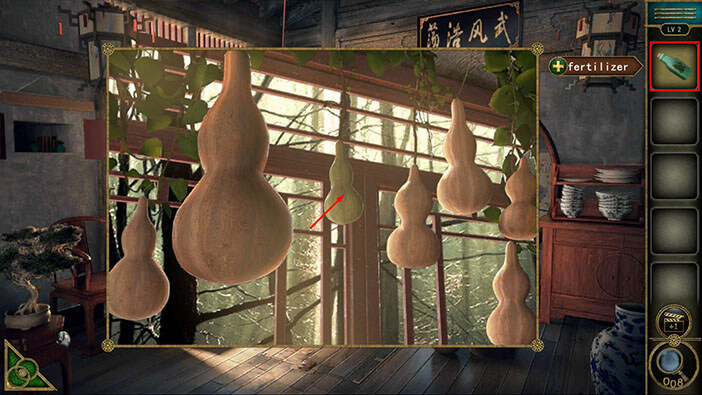
The green gourd will quickly grow to a full size, so let’s tap on it to pick it up (“Gourd” will be added to your inventory). After that, tap on the green button in the bottom left corner of the screen to go back.
Next, let’s take another look at the table on the left.
Tap on the tea kettle, and our character will fill up a cup of tea.
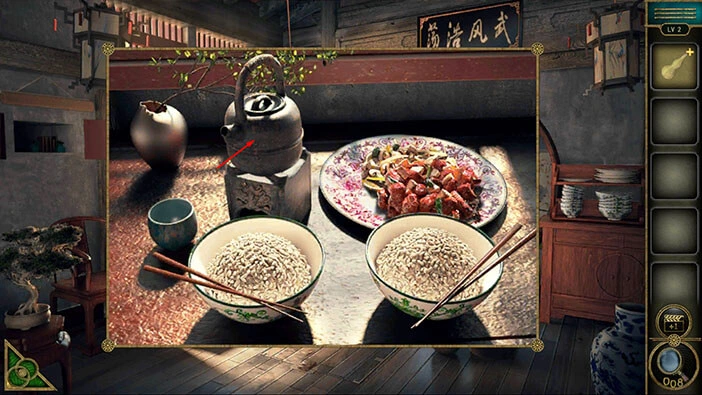
Tap on the teacup to drink the tea. After that, tap on the tea kettle again to pour another cup of tea.
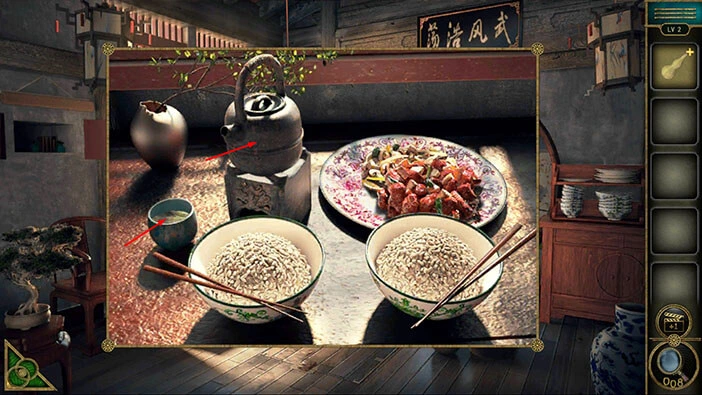
This time, a small item will fall into the teacup. Tap on it to pick it up, and you will get an “accomplishment”.
Once you’re done, tap on the button in the bottom left corner of the screen to go back.
Select the “Gourd” from the inventory, and you will notice that there is a small cut near the top of the gourd. Tap on it to open the gourd.
In the gourd, you will find a “Read bead” and it will be automatically added to your inventory.
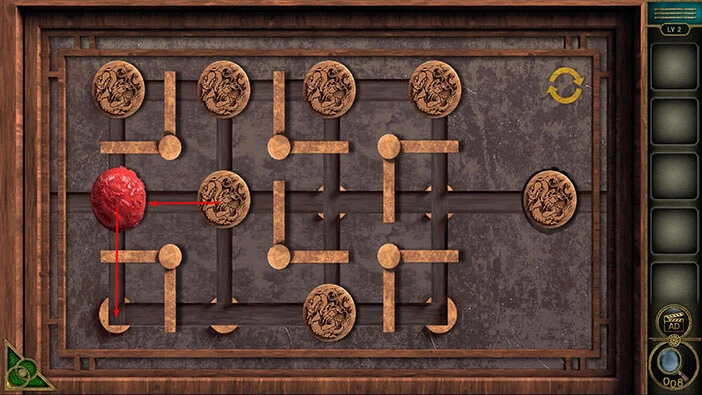
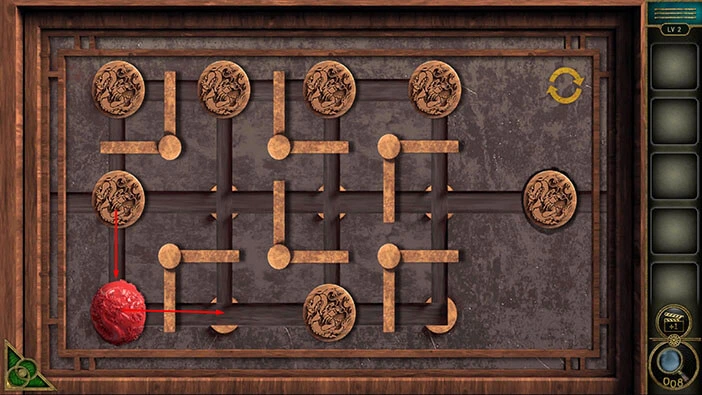
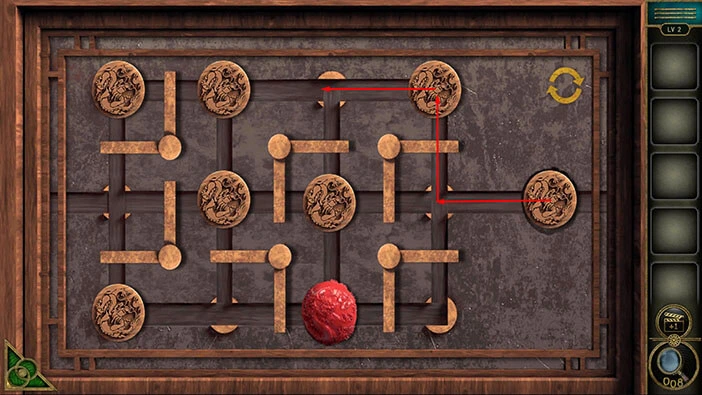
Tap on the small wooden chest, located on the shelf in the left corner of the room, to take another look at it. Tap on the chest again to start the interaction.
Select the “Red bead” from the inventory and place it on the spot on the left side of the puzzle (marked with a red circle) to start the interaction.

In this puzzle, our task is to get the red bead into the slot on the right side of the puzzle, but, before we can do that, we will have to remove the coin that is currently occupying this slot.
We will do this puzzle in several steps. Let’s begin.
Step 1
Drag the red bead down to the bottom left corner. After that, drag the coin located in the middle, a bit to the left (to the previous position of the red bead).
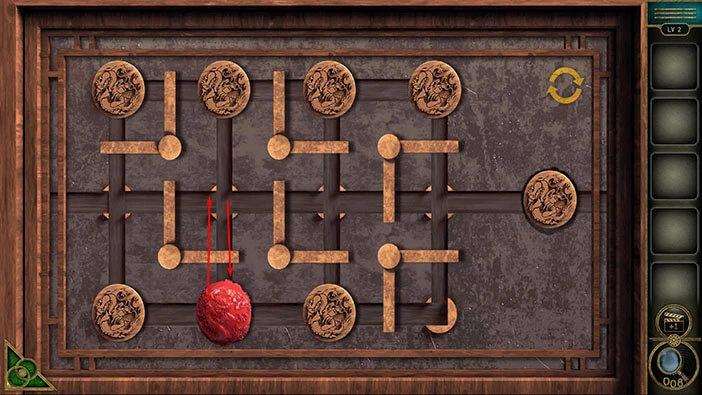
Step 2
Drag the red bead one step to the right. After that, drag the coin located all the way to the left and in the middle of the puzzle, one step down.
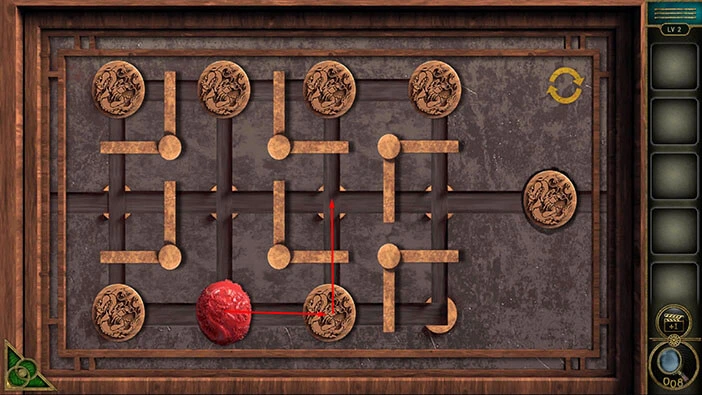
Step 3
Drag the red bead one step up to move the wooden stick to the left. After that, drag down the red bead to its previous position.
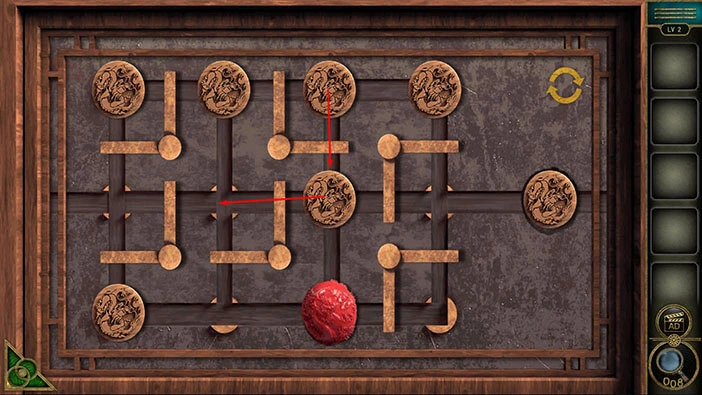
Step 4
Next, drag the coin, located on the right side of the bottom row, one step up. After that, drag the red bead one step to the right.
Step 5
Drag the coin from the middle row one step to the left. After that, drag the coin located in the top row (just above the red bead) and move it one step down.
Step 6
Drag the coin, located in the top right corner of the puzzle, one step to the left. After that, take the coin from the “finish line” slot and drag it to the top right corner of the puzzle.
Step 7
Take the red bead and drag it one step to the right. After that, take the right coin from the middle row and drag it one step down.
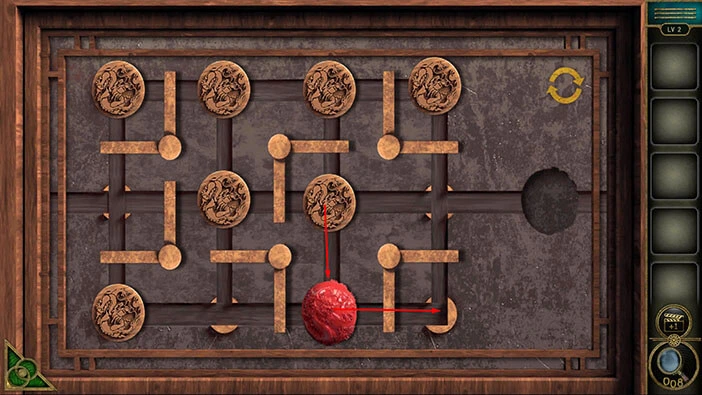
Step 8
Lastly, drag the red bead one step up and one step to the right, and you will drag it to the finish line slot.
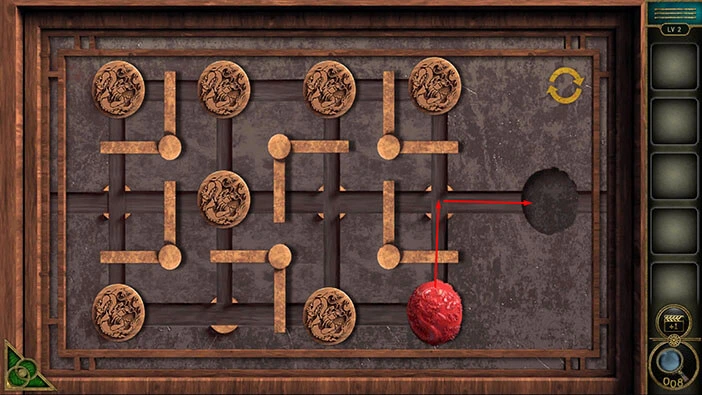
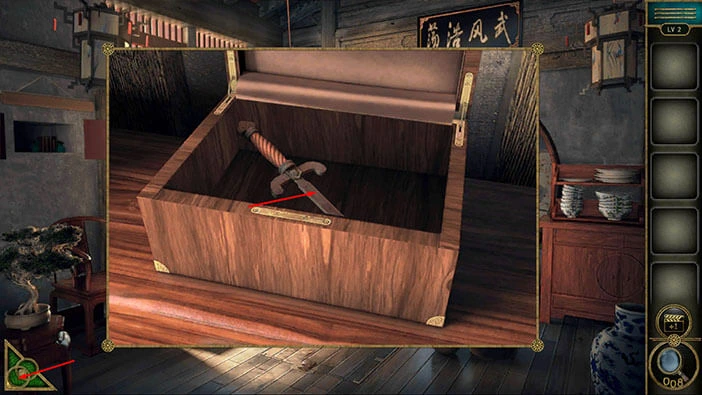
As soon as you get the red bead to the last slot, the box will open and inside you will find a “Sword”. Tap on it to pick it up.
After that, tap on the green button in the bottom left corner of the screen to go back.
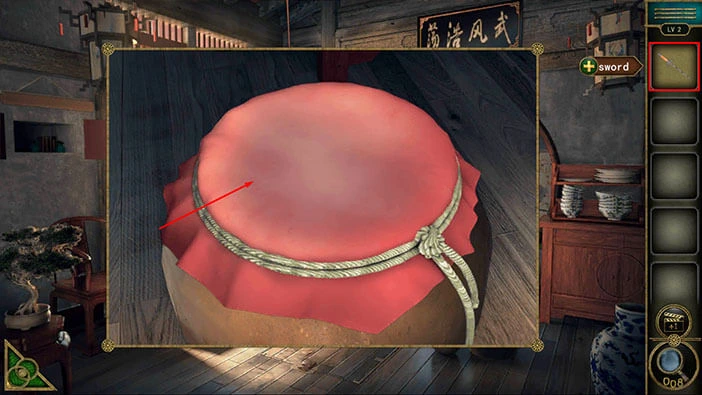
On the right side of the room, you will notice a wooden keg, covered with red fabric. Tap on the keg to take a closer look at it.

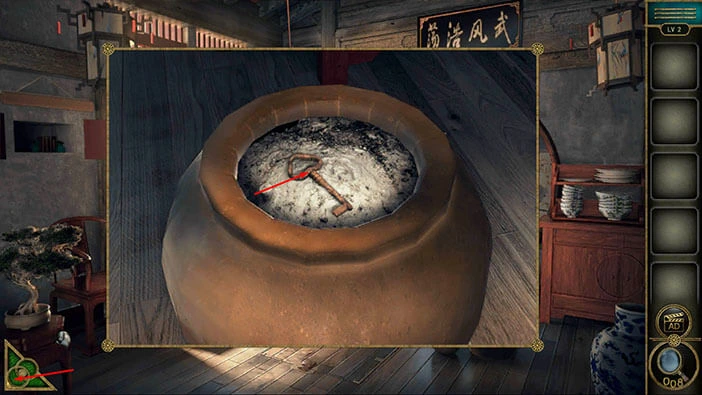
Select the “Sword” from the inventory and use it to cut open the fabric on the wooden keg.
Inside the wooden keg, you will find a “Key” so let’s tap on it to pick it up.
After that, tap on the green button in the bottom left corner of the screen to go back.
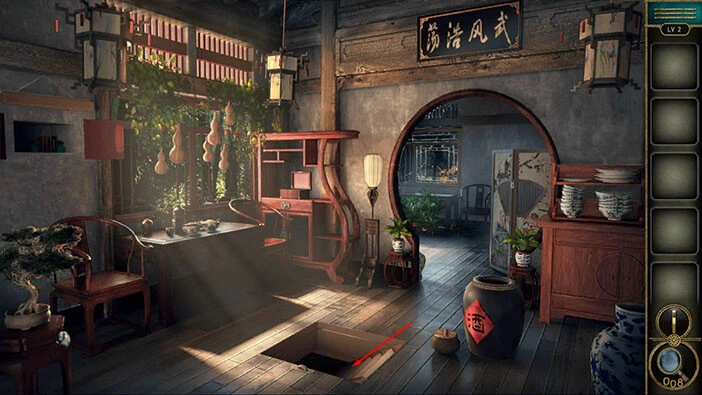
Next, there is a locked trapdoor in the middle of the room. Let’s tap on it to take a closer look.
Select the “Key” from the inventory and use it to unlock the trapdoor.
Tap on the stairs to proceed to the next level.
Level 3
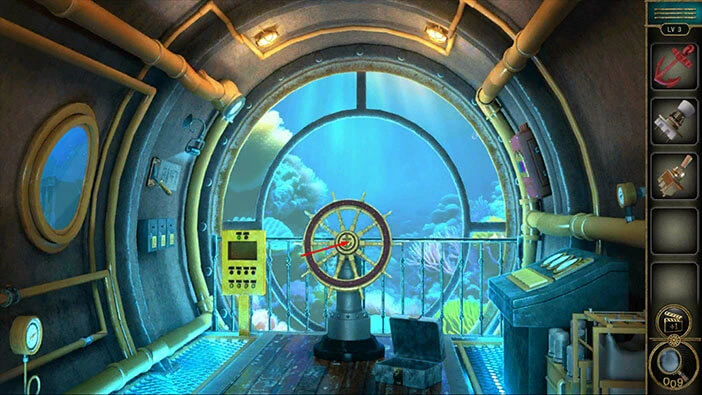
Let’s explore the third level. This time we will explore a strange submarine. On the floor, just to the right of the anchor, you will notice a blue box. Tap on it to take a closer look.

Just to the left of the box, you will notice a small “Anchor”. Tap on it to pick it up.
Also, you will notice that we will need a four-digit code in order to open the box. Let’s tap on the box to examine it more closely.
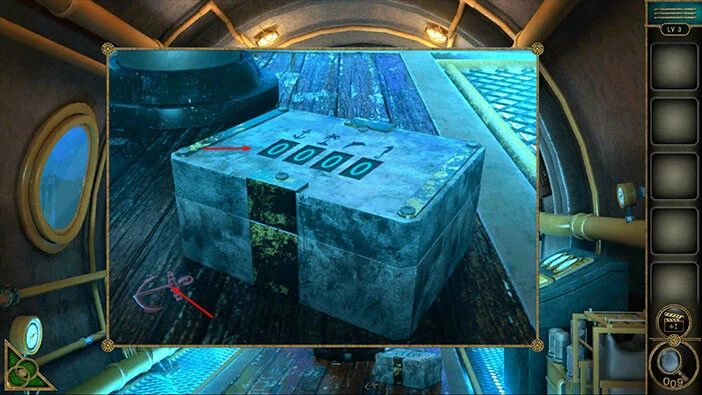
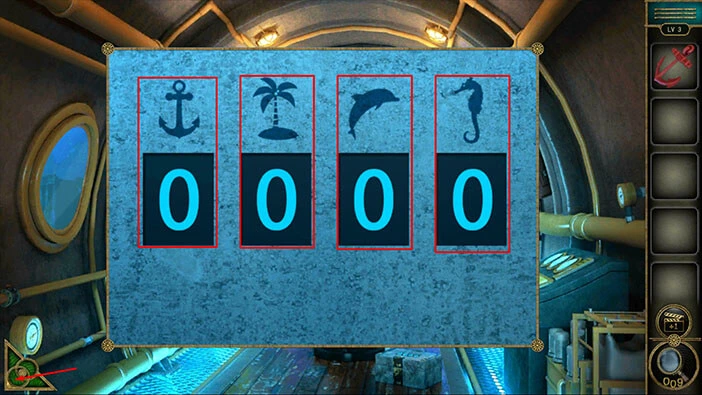
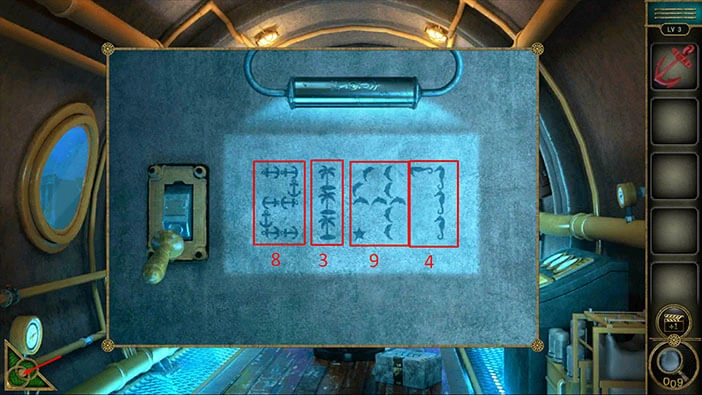
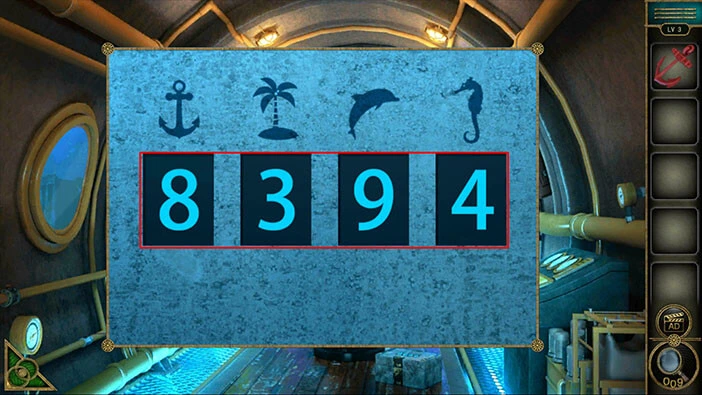
You will notice that there is a symbol above each digit. Looking from left to right, we have an anchor, a palm tree, a dolphin, and a seahorse. We will come back to this puzzle a bit later. For now, just take note of it.
Once you’re done, tap on the green button in the bottom left corner of the screen to go back.
On the wall on the left, you will notice a lever. Tap on it to take a closer look at it, and tap again to activate the lever.
Several shapes will appear on the wall, and you will notice that each shape is formed from the symbols that we previously saw on the box. So, let’s count these symbols,
In the first shape, we can see eight anchors.
In the second shape, we can see three palm trees.
In the third shape, we can see nine dolphins.
In the fourth shape, we can see four seahorses.
Memorize/write down this information. 8 anchors, 3 palm trees, 9 dolphins, 4 seahorses.
Once you’re done, tap on the green button in the bottom left corner of the screen to go back.
Tap on the box again to take a closer look at it, and tap once more to start the interaction.

We had 8 anchors, 3 palm trees, 9 dolphins, 4 seahorses. The order of the symbols that we saw on the wall is the same as the order of the symbols on the box.
So, enter the code “8394” and you will unlock the box.
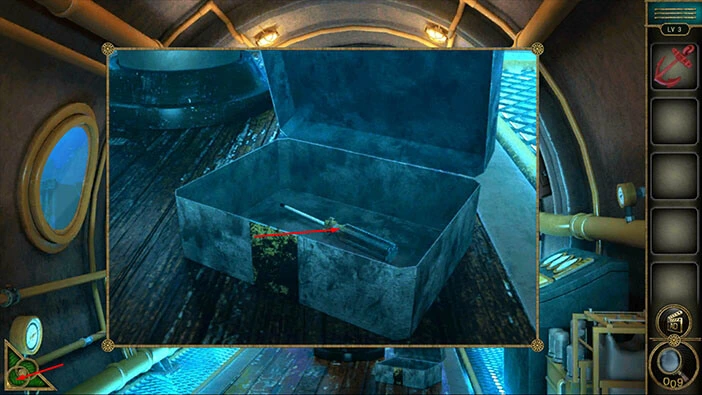
In the box, you will find a “Screwdriver”, so tap on it to pick it up. After that, tap on the green button in the bottom left corner of the screen to go back.
Next, tap on the yellow box, located just to the left of the anchor, to take a closer look at it.
On the box, you will notice a “Bulb”. Tap on it to pick it up.
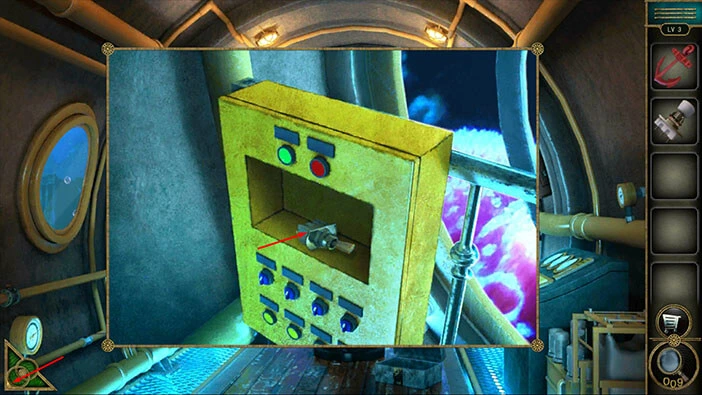
After that, select “Screwdriver” from the inventory and use it to open the panel on the yellow box.
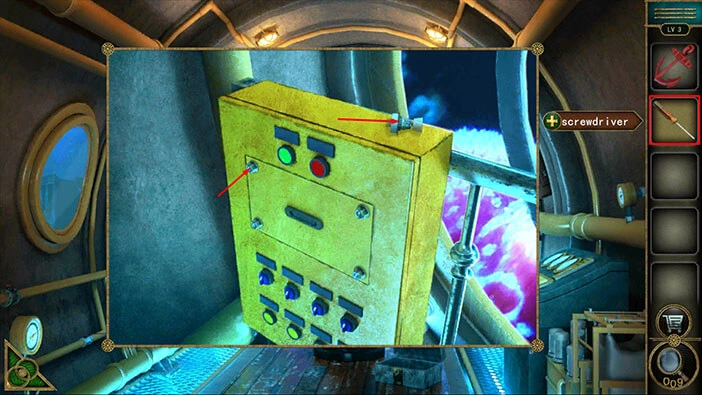
In the box, you will find a “Switch”. Tap on it to pick it up.
After that, tap on the button in the bottom left corner of the screen to go back.
Next, tap on the anchor to take a closer look at it.
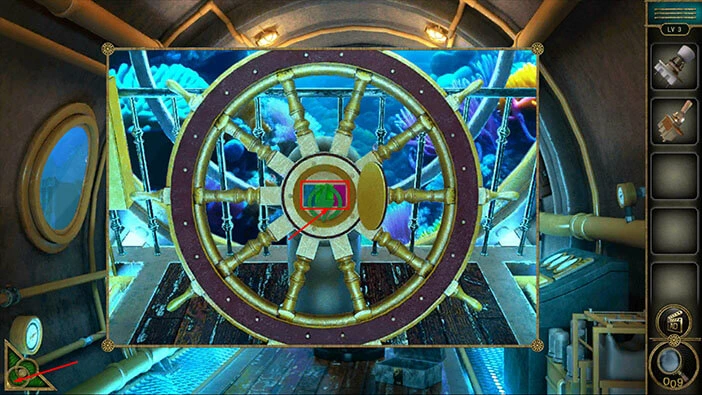
You will notice an empty slot shaped like an anchor. So, select the “Anchor” from the inventory and insert it into the empty slot.
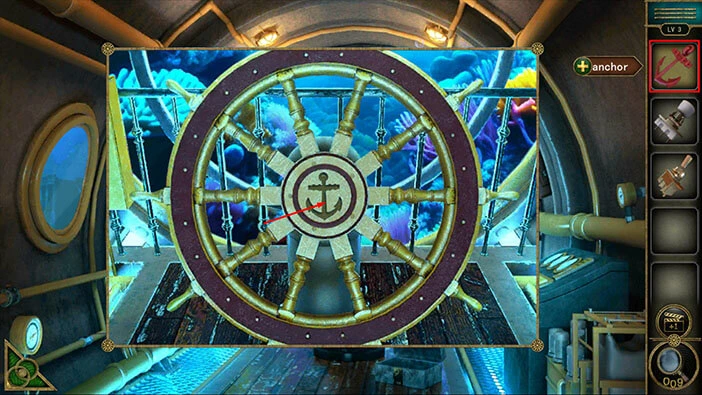
You will open the middle of the anchor, and inside you will find a “Lightning” symbol, so let’s tap on it to pick it up.
Also, pay attention to the colors in the anchor. Looking from left to right, we have Blue/Green/ Purple. Memorize/write down this information because it represents the hint for the next puzzle.
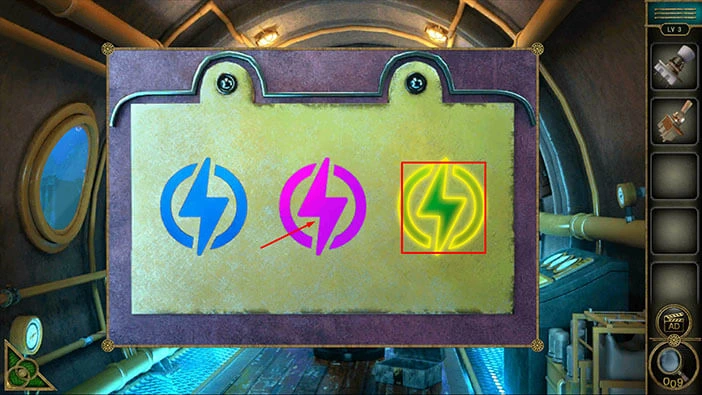
Next, tap on the box on the wall on the right to take a closer look at it.
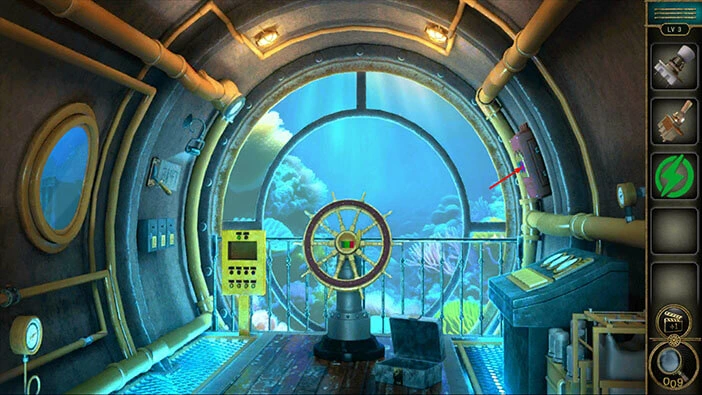
Here you will see purple lightning, a blue lightning, and the third slot is empty. Let’s select the green “Lightning” from the inventory and place it into the empty slot.
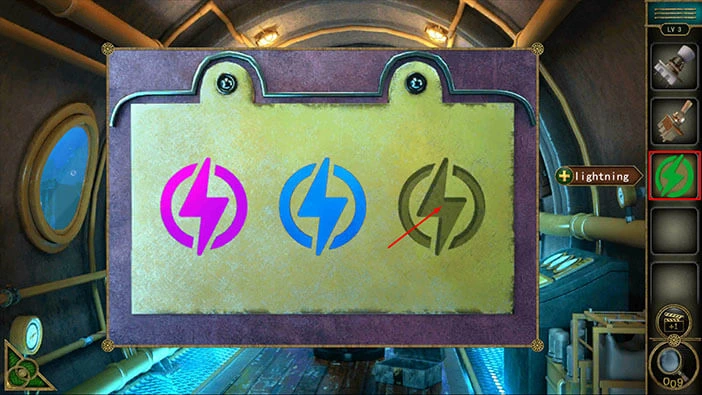
Our next task is to arrange the lightning symbols by color, and they should match the order that we saw on the anchor (Blue/Green/ Purple).
We will do this in several steps. Let’s begin.
Step 1
Select the blue lightning and swap its position with the purple lightning.
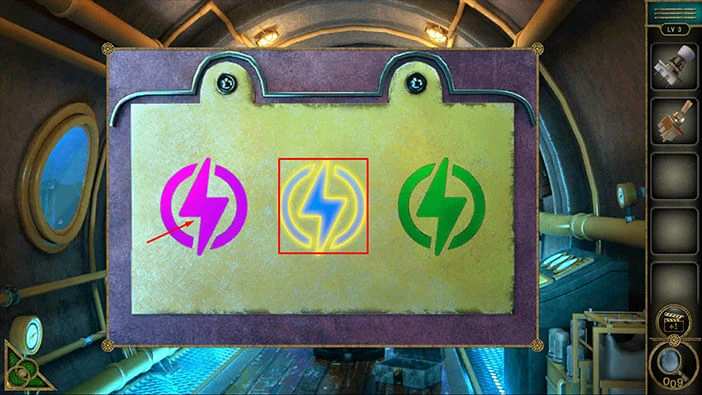
Step 2
Select the green lightning and swap its position with the purple lightning.
With that done, you will open the panel below the symbols and you will notice wires and mechanical parts. Tap on it to take a closer look.
In the bottom row, you will notice four bulbs, but there are five slots. So, select the “Bulb” from the inventory and insert it into the empty slot.
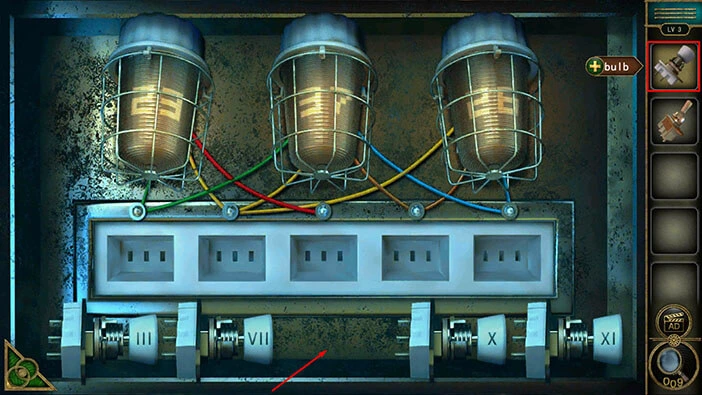
Here, we have another puzzle. If you take a look at the three lamps at the top, you will notice a number on each lamp (23, 27, and 36). Also, you will notice that each lamp is connected with wires to several slots below it.
These slots are currently empty and there are five of them. Below the slots, we have five “Bulbs”, and each bulb has a certain value (3, 7, 9, 10, 11). Our task is to identify which lamp is connected to which slot, and then place the bulbs into these slots. The total value of the bulbs in the slots should match the value of the lamps.
We will do this puzzle in several steps. Let’s begin.
Step 1
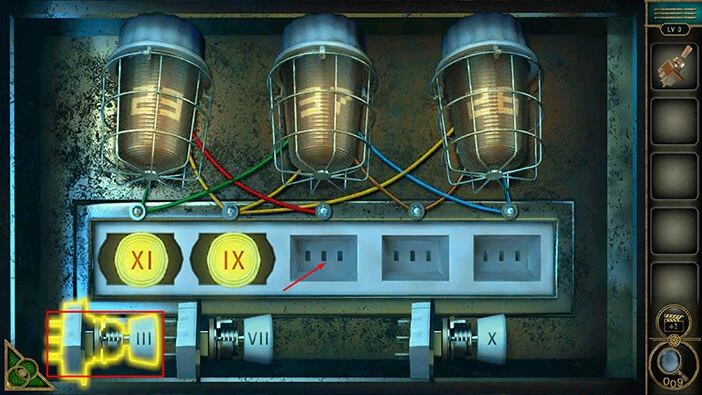
The first bulb has a value of 23. It is connected to three slots. It is connected to the first slot with the green wire, it is connected to the second slot with the yellow wire, and it is connected to the third slot with the red wire. So, let’s place the bulbs into this slot to get the value of 23.
Select the fifth bulb (XI) and insert it into the first slot. This slot is connected to the first and second bulbs with green wires.
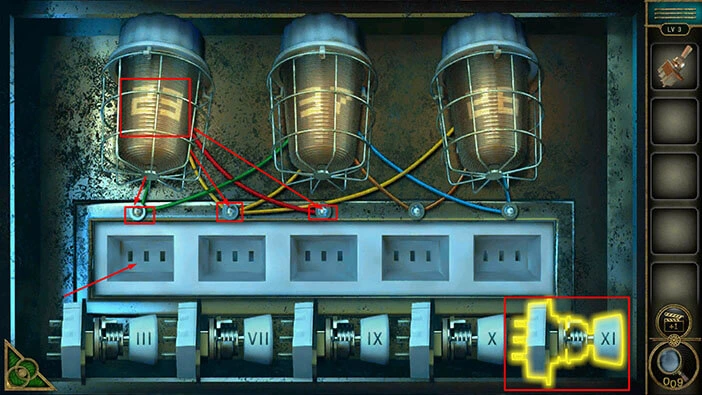
Step 2
Select the third bulb (IX) and insert it into the second slot. This slot is connected to all three lamps with the yellow wires.
Step 3
Select the first bulb (III) and insert it into the third slot. This slot is only connected to the first lamp with the red wire.
As already mentioned, the first lamp is connected to the first, second, and third slots. When we add the values of bulbs in these slots, we will get 11+9+3=23. With that, we have the correct value for the first lamp.
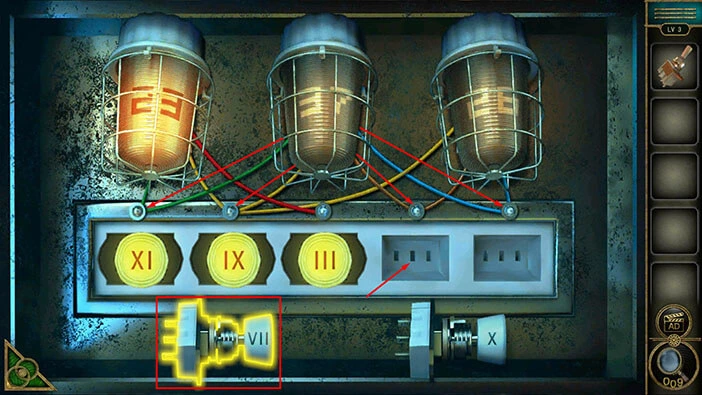
Step 4
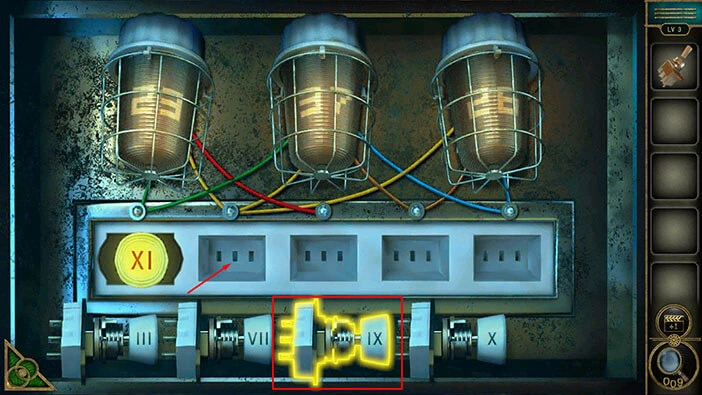
Let’s look at the second lamp. This lamp has a value of 37, and it is connected to the four slots. It is connected to the first slot with the green wire, it is connected to the second slot with the yellow wire, it is connected to the fourth slot with the brown wire, and it is connected to the fifth slot with the blue wire.
The bulb in the first slot is 11, and the bulb in the second slot is 9. Both of these slots are connected to the second lamp, so we already have a value of 20.
So, select the second bulb (VII) and insert it into the fourth slot. This slot is connected to the second and third lamps with brown wires.
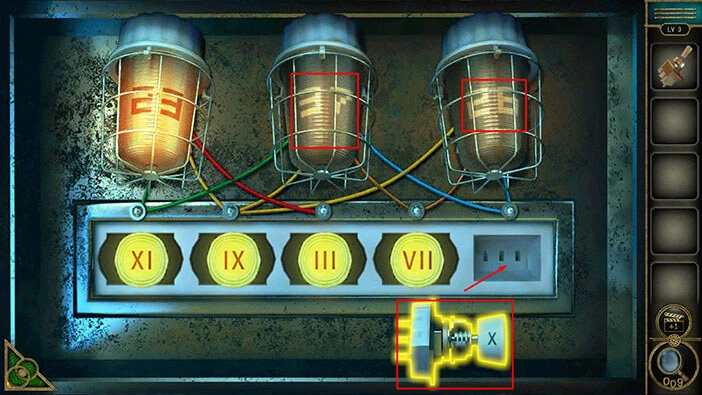
Step 5
Select the last bulb (X) and insert it into the fifth slot. This slot is connected to the second and third slot with blue wires.
With that, we will get the correct values for the second and third lamps.
The second lamp which is connected to the all slots except the third one, will have the value 11+9+7+10=37. Correct value.
We will also get the correct value for the third lamp. The third lamp is connected to the second, fourth, and fifth slots. The value of the bulbs in these slots is 9+7+10=26. Correct value.
With that done, you will solve this puzzle.
Once you set the correct value on the lamps, you will trigger the next puzzle. Here, you will also notice an empty slot on the right. So, select the switch from the inventory and insert it into the empty slot.
After that, tap on the switch to activate it.
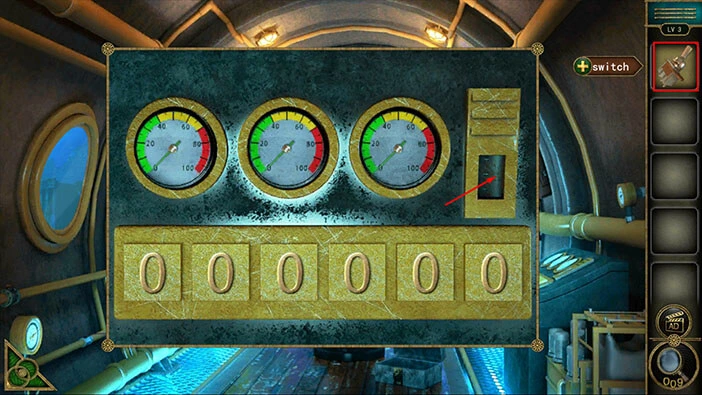
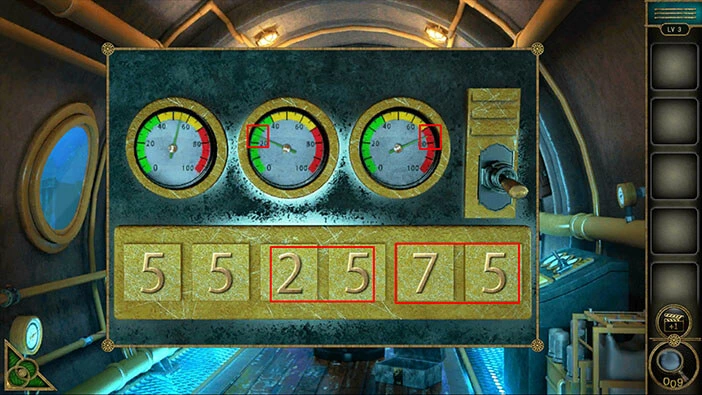
This puzzle is very straightforward. Our task is to read the value on the display and enter it into the fields below it.
First, we have the number 55.
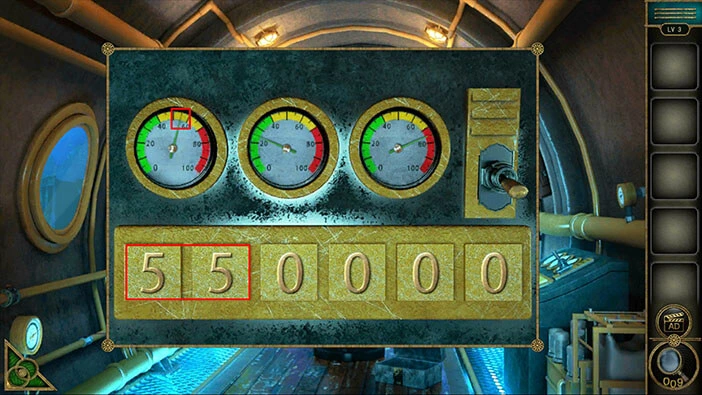
The second value is 25, and the third value is 75.
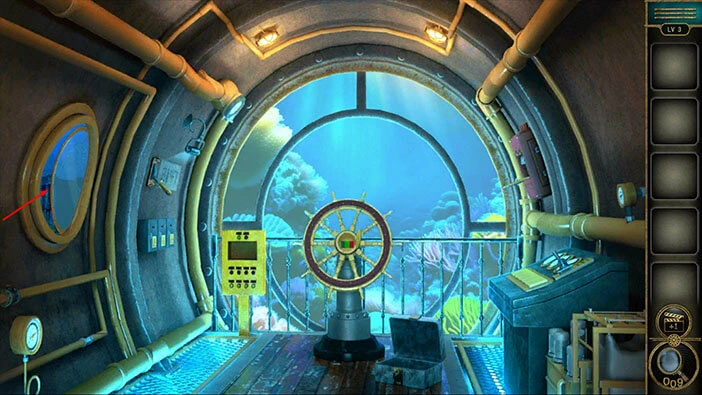
When you enter the correct values, you will open the window on the left side of the submarine. Tap on it to proceed to the next level. (Hmm, opening a window while the submarine is submerged is a very bad idea, for several reasons, but ok.)
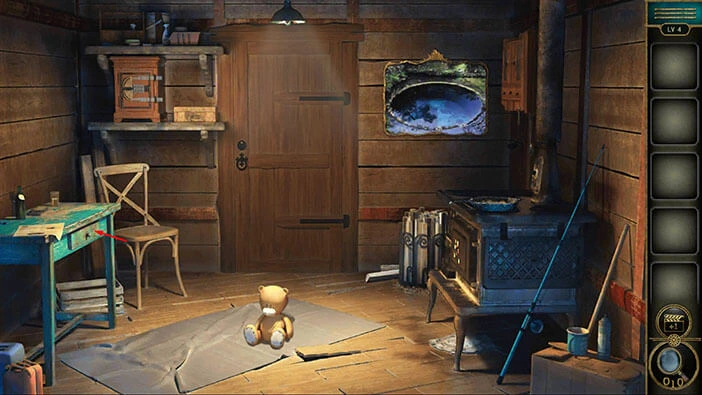
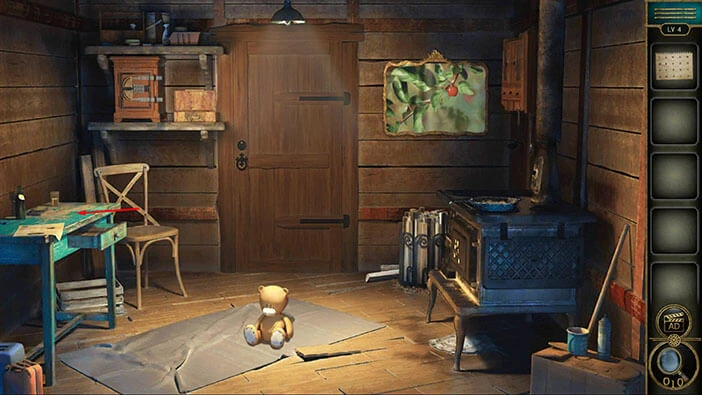
Level 4
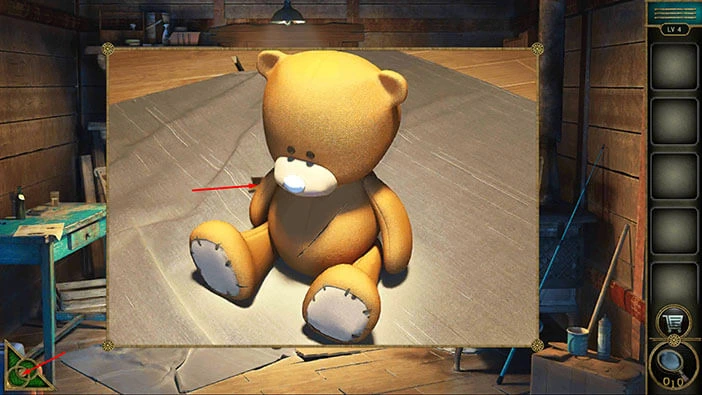
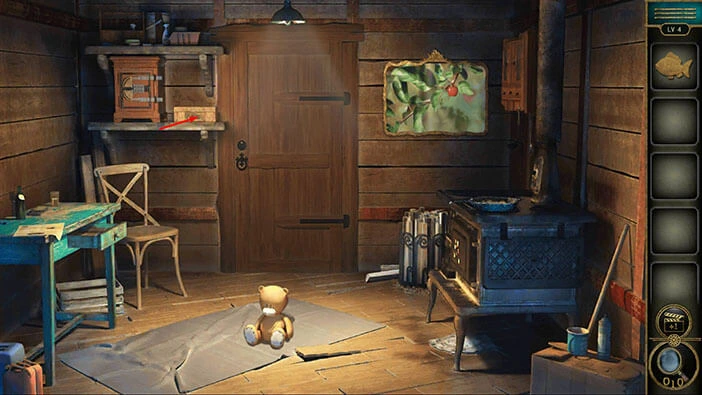
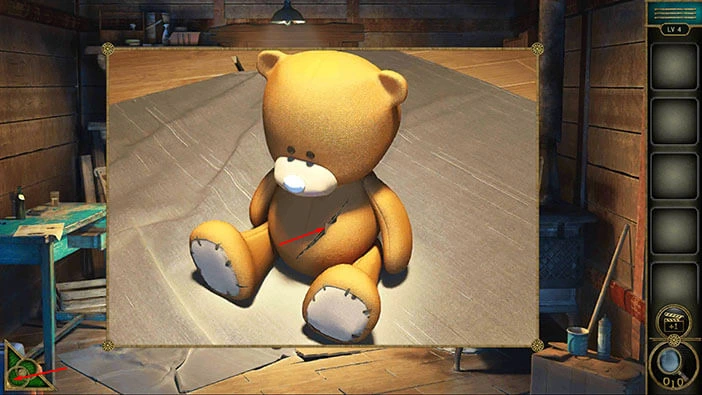
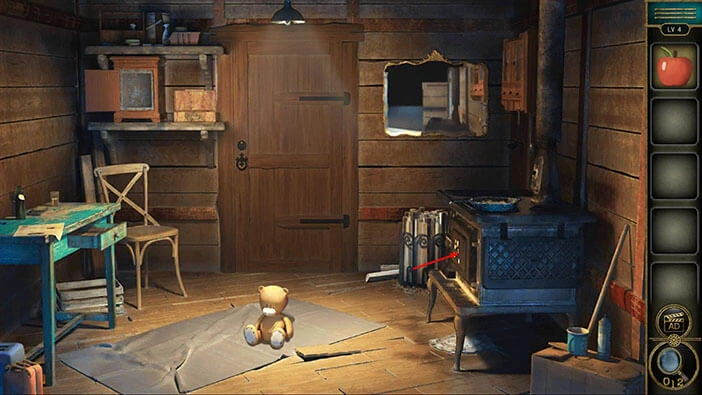
Let’s explore the fourth level. This time we will explore a fishing cabin. Tap on the teddy bear to take a closer look at it.
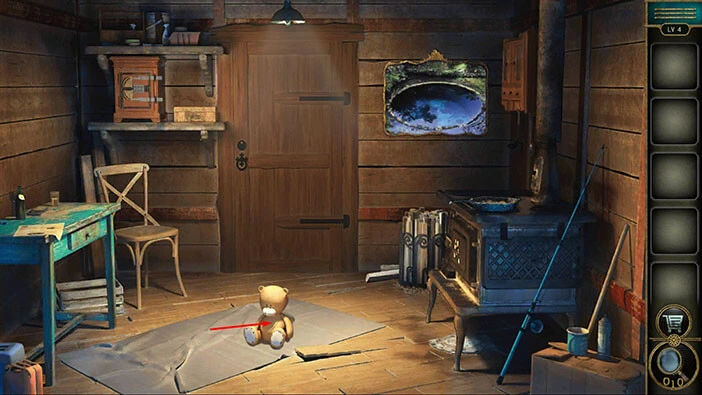
Slightly behind and to the left of the teddy bear you will notice an item. Tap on it to pick it up, and you will get a third “Achievement”.
After that, tap on the green button in the bottom right corner of the screen to go back.
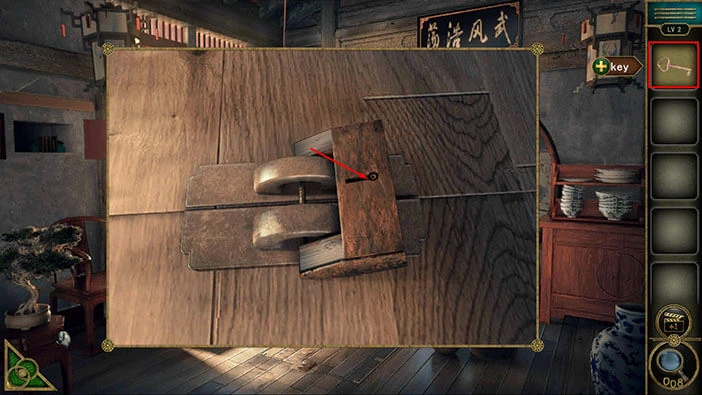
Next, on the left, you will notice a blue table. Tap on it to take a closer look, then tap on the drawer to open it.
In the drawer, you will find a “Hook”. Tap on it to pick it up. After that, tap on the button in the bottom left corner of the screen to go back.
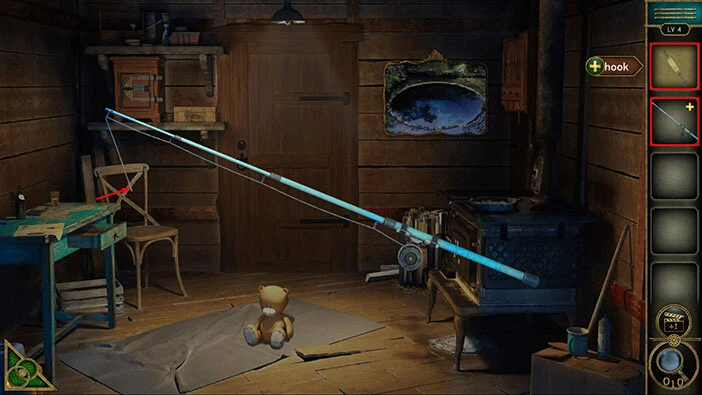
Next, on the right, next to the stove, you will notice a “Fishing rod”, so tap on it to pick it up.

Next, select the “Fishing rod” from the inventory. After that, select the “Hook” and attach it to the end of the string.
Next, just to the right of the door, you will notice a picture of a well. Tap on it to take a closer look.

You will notice a fish swimming in the well. Let’s catch it. Select the “Fishing rod” from the inventory, then tap on the well to start fishing.
A few moments will pass, and our character will catch the “Fish”, which will be automatically added to your inventory. The picture on the wall will change, and now you will see an apple hanging from the branch. We will come back to it.

Next, on the shelf on the left, you will notice a brown cabinet and a yellow box. Tap on the box to take a closer look at it.
You will notice an empty slot, shaped like a fish. So, select the “Fish” from the inventory and insert it into the empty slot.
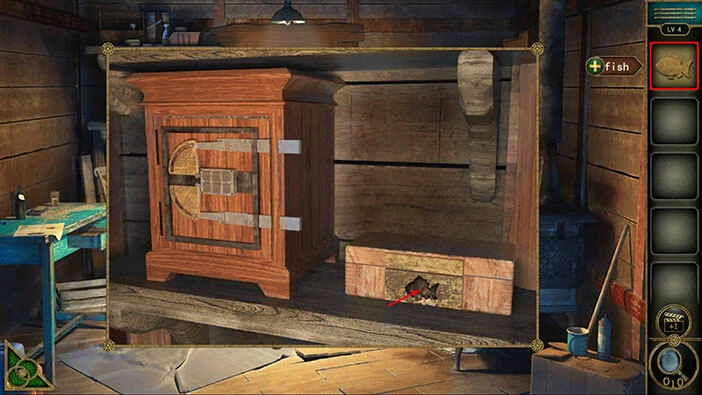
The box will open, and inside you will find “Scissors”. Tap on it them pick them up.
After that, tap on the button in the bottom left corner of the screen to go back.
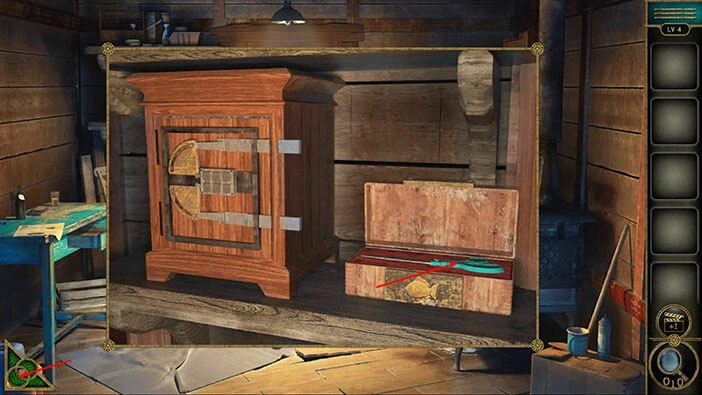
We will use the scissors to cut open the teddy bear. So, tap on the teddy bear to take a closer look at it. After that, select the “Scissors” from the inventory and tap on the cut on the teddy bear.
In the teddy bear, you will find a “Paper with hints”. Tap on it to pick it up.
After that, tap on the button in the bottom left corner of the screen to go back.
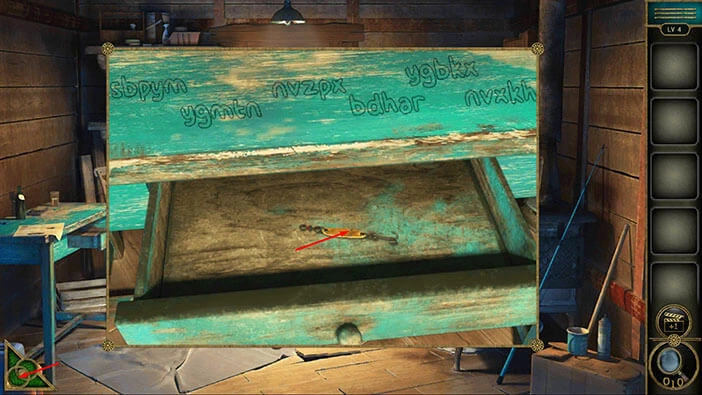
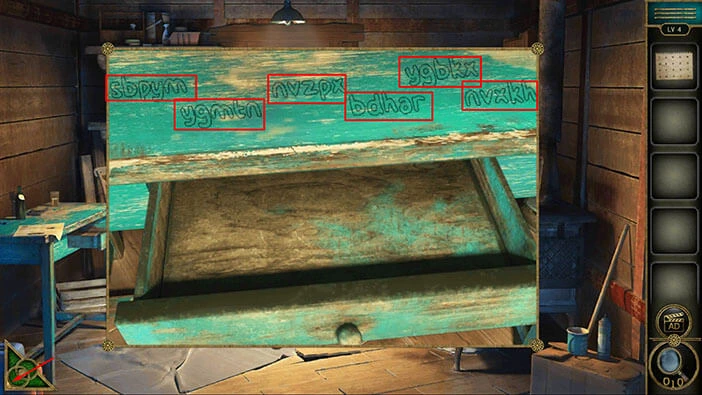
Next, let’s take another look at the table on the left.
At the top of the table, you will see six groups, with five letters in each group. Let’s memorize/write down these letters because they represent the hint for the next puzzle.
Group 1: sbpym
Group 2: ygmtn
Group 3: nvzpx
Group 4: bdhar
Group 5: ygbkx
Group 6: nvxkh
Once you’re done, tap on the button in the bottom left corner of the screen to go back.
Next, let’s tap on the small chest on the shelf on the left to take a closer look at it, and tap again to start the interaction.

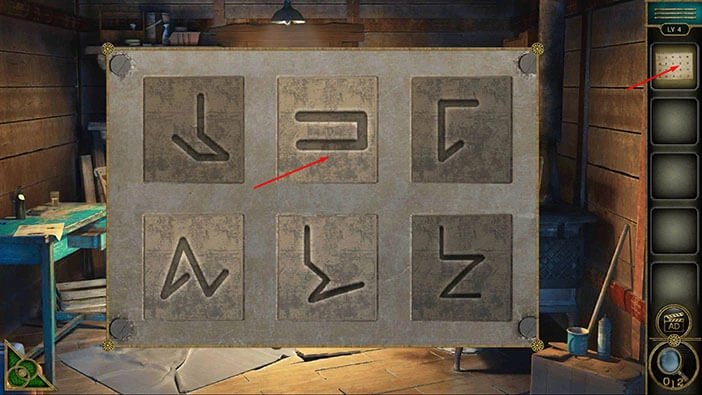
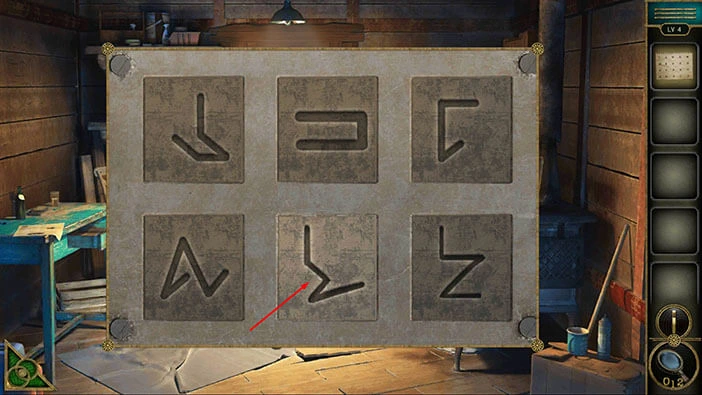
Here, you will see six curvy lines. This doesn’t make much sense at first, but the logic behind this puzzle will soon become very clear.
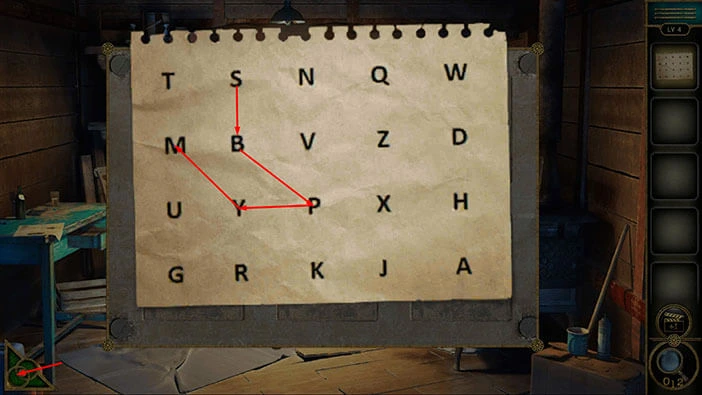
Tap on the “Paper with hints” in your inventory to examine it.

Here, we can see a paper with letters. Previously, we saw (on the table) six groups with five letters each, and there are six curvy lines in this puzzle.
We will do this puzzle in several steps. Let’s begin.
Step 1
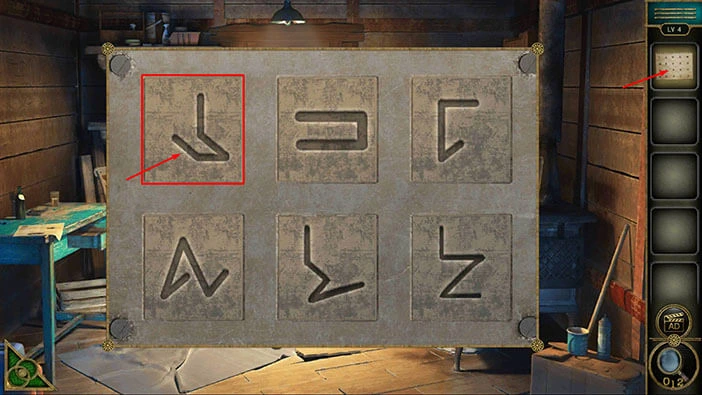
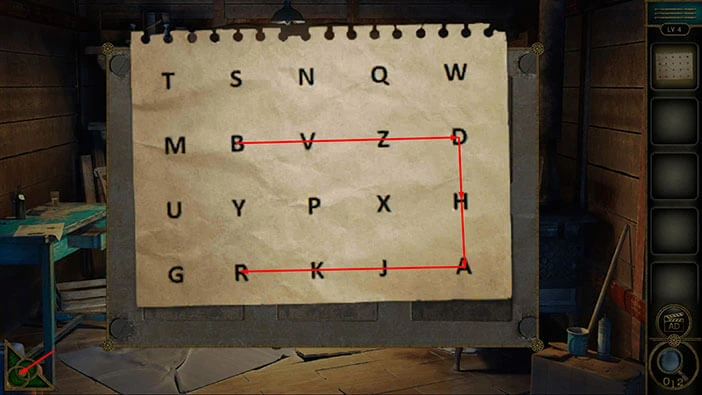
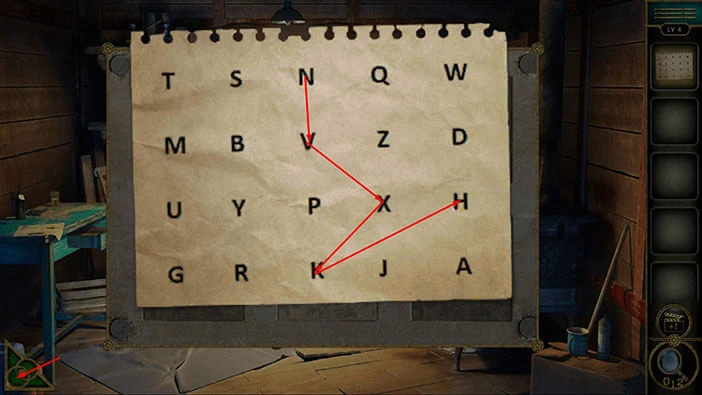
We will look at the letters from the first group, and we will draw a line that connects these letters on the “Paper with hints”. In the first group, we had “sbpym”. In the image below, you can see the line/shape that these letters will form. Memorize/write down this shape.
After that, tap on the green button in the bottom left corner of the screen to put down the “Paper with hints”.
You will notice that the first line in the first row has the same shape as the line that we drew on the “Paper with hints”. So, let’s tap on the first line in the first row.
After that, tap on the “Paper with hints” and we will look at the next group of letters.
Step 2
We will look at the letters from the second group, and we will draw a line that connects these letters on the “Paper with hints”. In the second group, we had “ygmtn”. In the image below, you can see the line/shape that these letters will form. Memorize/write down this shape.
After that, tap on the green button in the bottom left corner of the screen to put down the “Paper with hints”.

You will notice that the third line in the first row has the same shape as the line that we drew on the “Paper with hints”. So, let’s tap on the third line in the first row.
After that, tap on the “Paper with hints” and we will look at the next group of letters.
Step 3
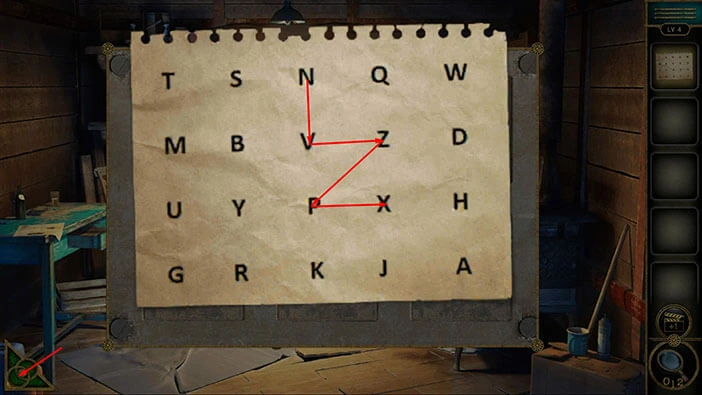
We will look at the letters from the third group, and we will draw a line that connects these letters on the “Paper with hints”. In the third group, we had “nvzpx”. In the image below, you can see the line/shape that these letters will form. Memorize/write down this shape.
After that, tap on the green button in the bottom left corner of the screen to put down the “Paper with hints”.
You will notice that the third line in the second row has the same shape as the line that we drew on the “Paper with hints”. So, let’s tap on the third line in the second row.
After that, tap on the “Paper with hints” and we will look at the next group of letters.
Step 4
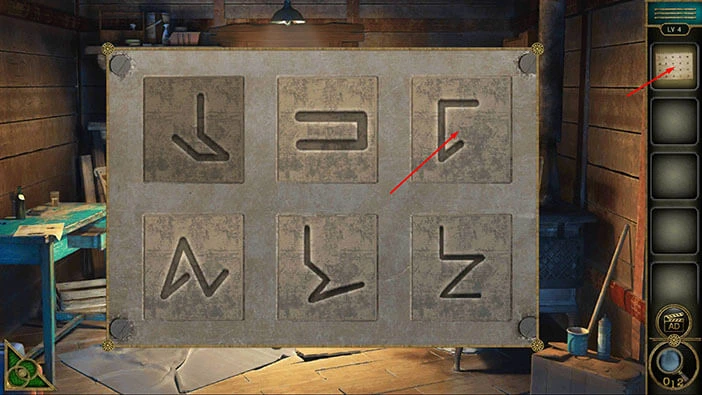
We will look at the letters from the fourth group, and we will draw a line that connects these letters on the “Paper with hints”. In the fourth group, we had “bdhar”. In the image below, you can see the line/shape that these letters will form. Memorize/write down this shape.
After that, tap on the green button in the bottom left corner of the screen to put down the “Paper with hints”.
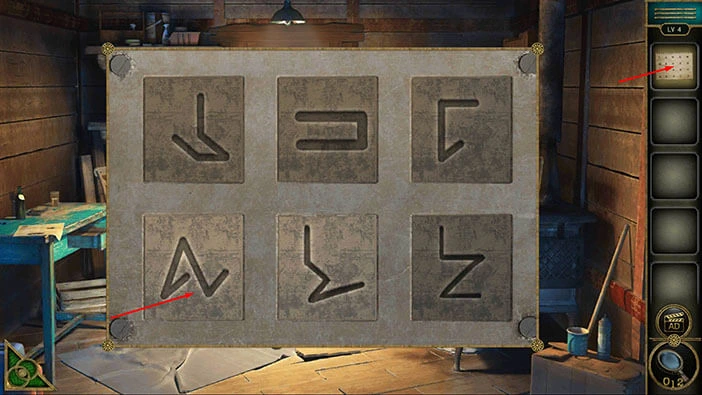
You will notice that the second line in the first row has the same shape as the line that we drew on the “Paper with hints”. So, let’s tap on the second line in the first row.
After that, tap on the “Paper with hints” and we will look at the next group of letters.
Step 5
We will look at the letters from the fifth group, and we will draw a line that connects these letters on the “Paper with hints”. In the fifth group, we had “ygbkx”. In the image below, you can see the line/shape that these letters will form. Memorize/write down this shape.
After that, tap on the green button in the bottom left corner of the screen to put down the “Paper with hints”.
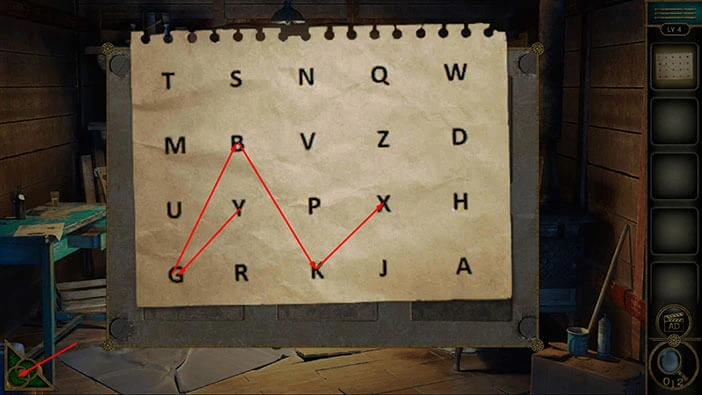
You will notice that the first line in the second row has the same shape as the line that we drew on the “Paper with hints”. So, let’s tap on the first line in the second row.
After that, tap on the “Paper with hints” and we will look at the next group of letters.
Step 6
There is only one shape/line left, but let’s go through this step anyway, just to confirm that the last lines will match.
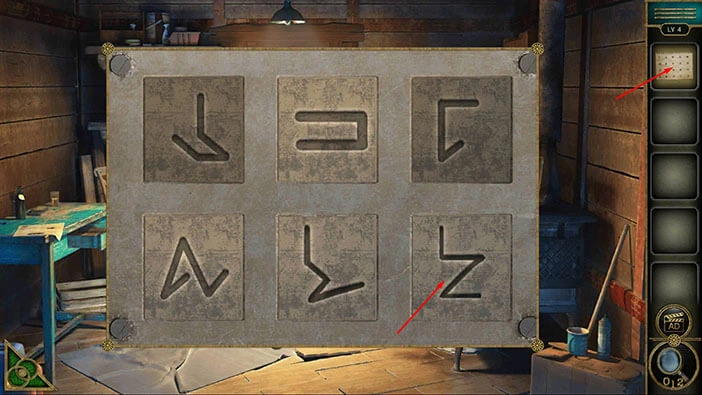
Lastly, we will look at the letters from the sixth group, and we will draw a line that connects these letters on the “Paper with hints”. In the sixth group, we had “nvxkh”. In the image below, you can see the line/shape that these letters will form. Memorize/write down this shape.
After that, tap on the green button in the bottom left corner of the screen to put down the “Paper with hints”.
These lines also match, so let’s tap on the second line in the second row, and we will solve this puzzle.
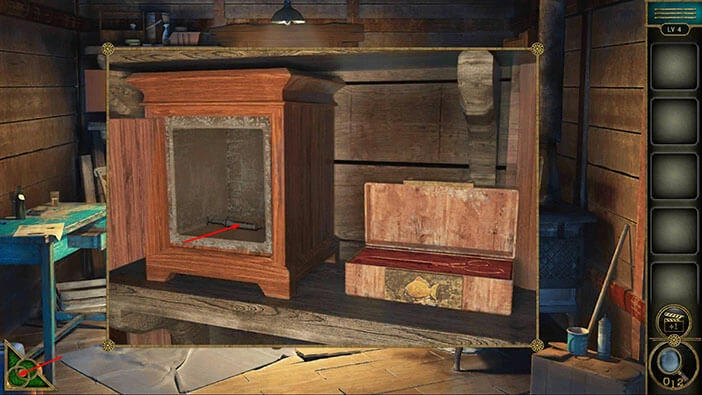
As soon as you solve the previous puzzle, you will open the cabinet, and inside you will find an “Injector”. Tap on it to pick it up.
After that, tap on the button in the bottom left corner of the screen to go back.
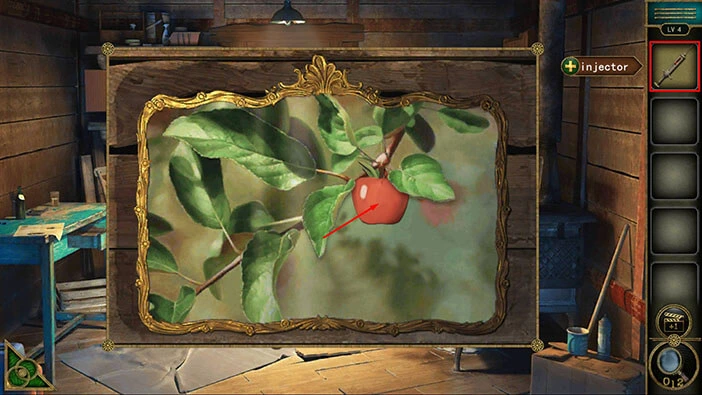
On the wall on the right we now have a picture of an apple hanging from the branch. Tap on it to take a closer look.
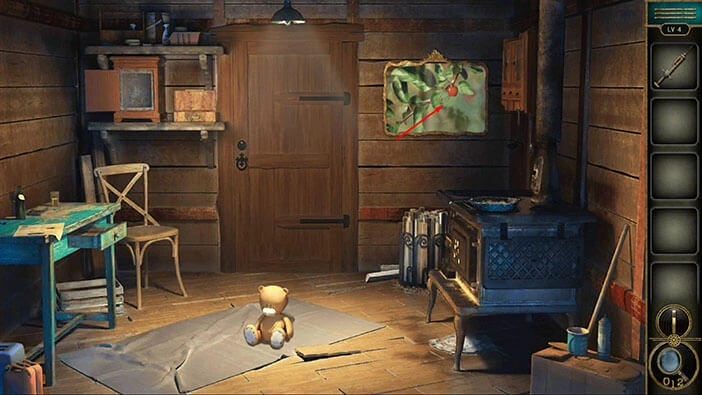
Select the “Injector” from the inventory and inject its contents into the apple. The “Apple” will be automatically added to your inventory, and the picture will disappear.
After that, tap on the green button in the bottom left corner of the screen to go back.
Next, tap on the stove on the right to take a closer look at it, and tap again to start the interaction.
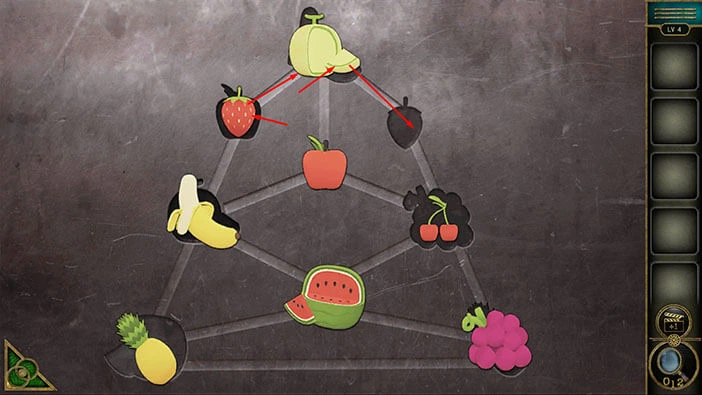
You will notice eight slots and seven slots are filled with different fruit. So, select the “Apple” from the inventory and insert it into the empty slot.
Well, for some reason, the apple will be added to the middle slot.
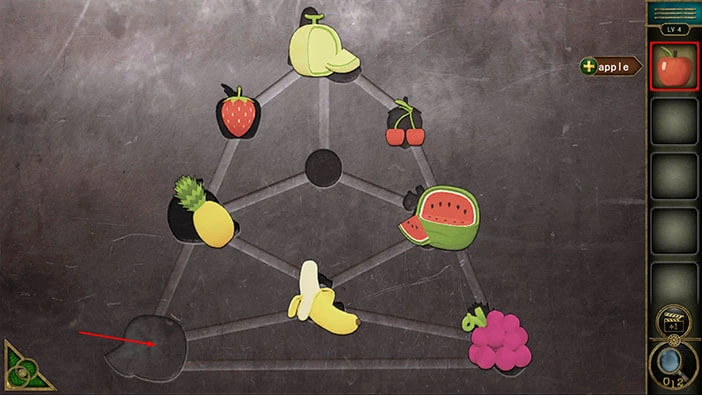
Our next task is to rearrange the fruit and place it into the slot of the matching shape. We will do this puzzle in several steps. Let’s begin.
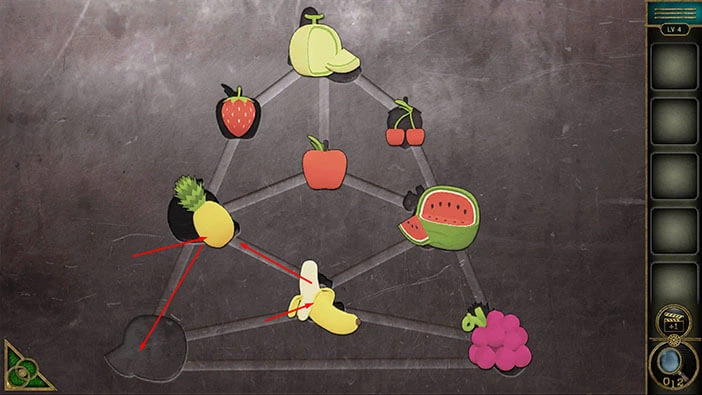
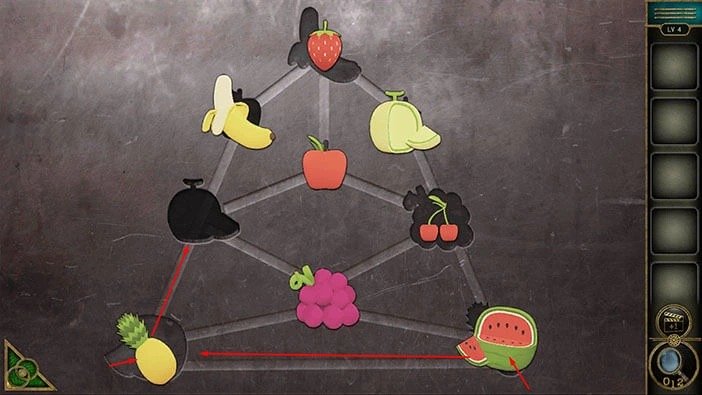
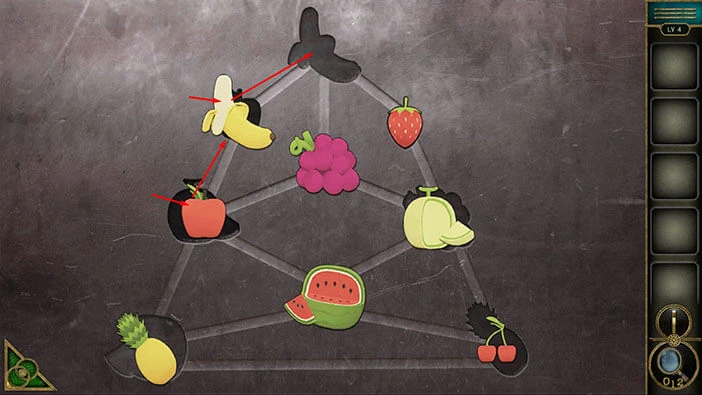
Step 1
Tap on the “Pineapple” to move it to the empty slot down and to the left. After that, tap on the “Banana” to move it to the slot where “Pineapple” has previously been.
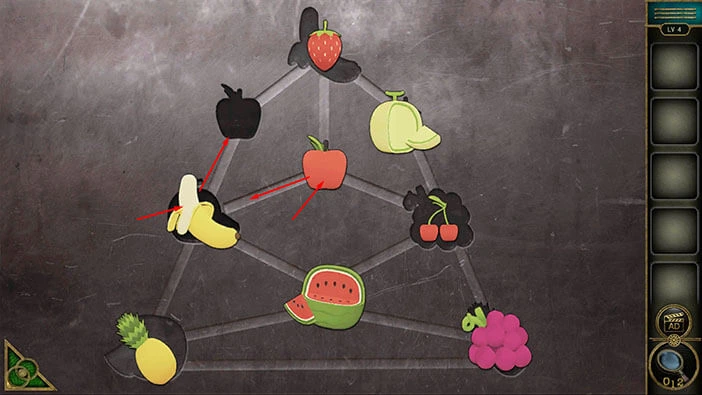
Step 2
Tap on the “Watermelon” to move it to the empty slot down and to the left. After that, tap on the “Cherry” to move it to the slot where “Watermelon” has previously been.

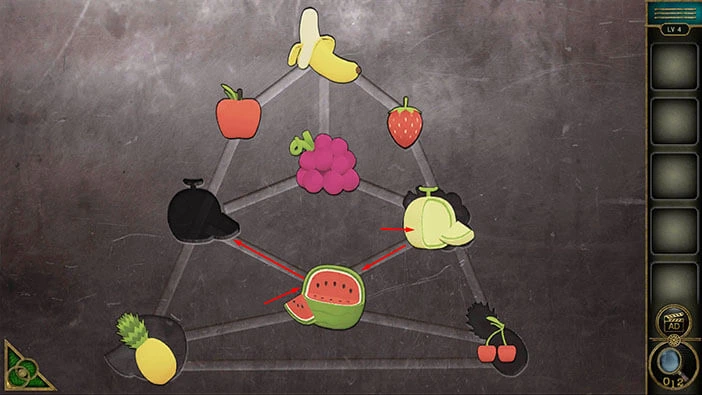
Step 3
Tap on the “Melon” to move it to the empty slot down and to the right. After that, tap on the “Strawberry” to move it to the slot where “Melon” has previously been.
Step 4
Tap on the “Banana” to move it to the empty slot up and to the right. After that, tap on the “Apple” to move it to the slot where “Banana” has previously been.
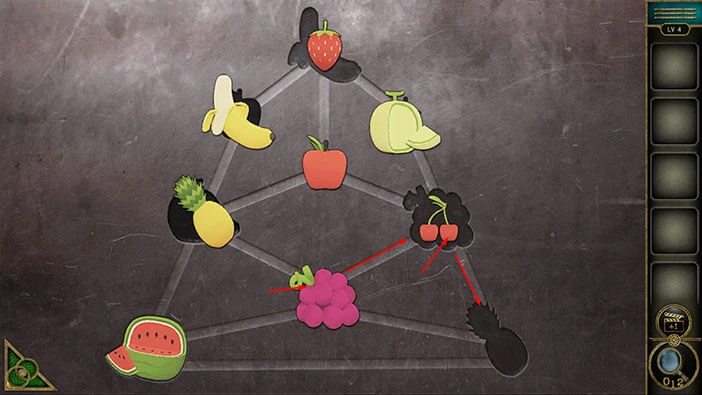
Step 5
Tap on the “Cherry” to move it to the empty slot up and to the left. After that, tap on the “Grapes” to move it to the slot where “Cherry” has previously been.
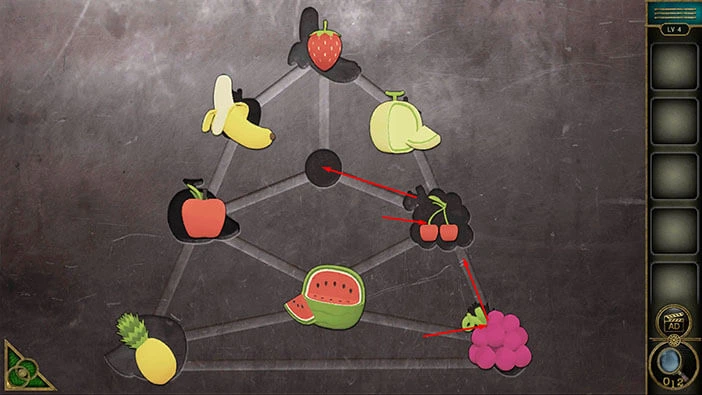
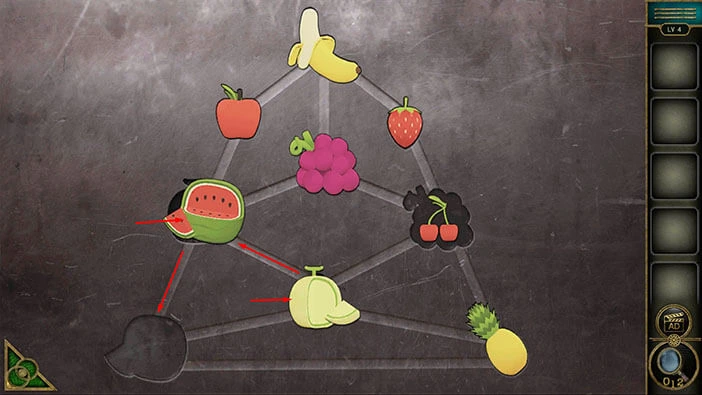
Step 6
Tap on the “Watermelon” to move it to the empty slot down and to the right. After that, tap on the “Grapes” to move it to the slot where “Watermelon” has previously been.

Step 7
Tap on the “Cherry” to move it to the empty slot down and to the right. After that, tap on the “Apple” to move it to the slot where “Cherry” has previously been.
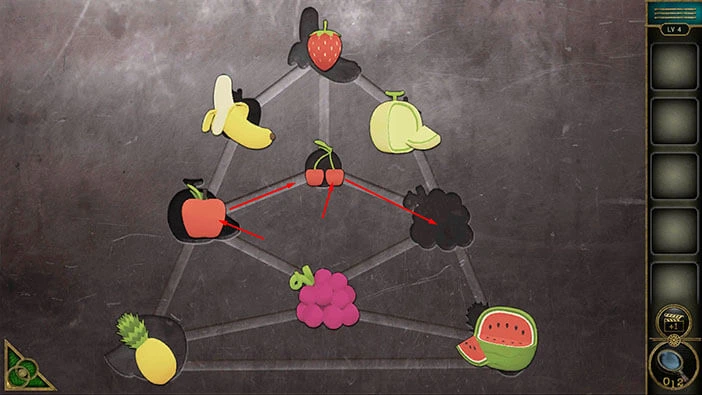
Step 8
Tap on the “Pineapple” to move it to the empty slot up and to the right. After that, tap on the “Watermelon” to move it to the slot where “Pineapple” has previously been.
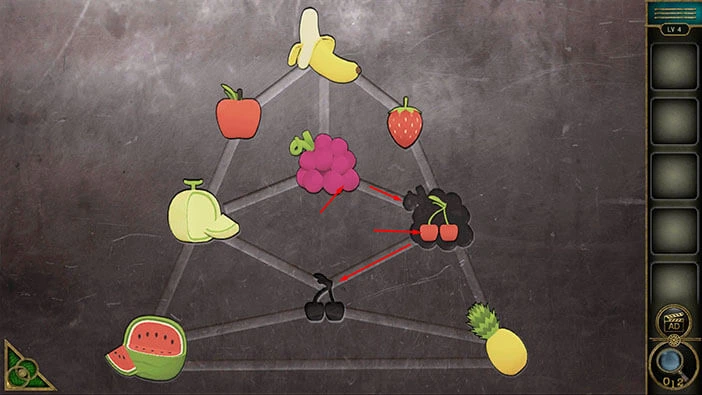
Step 9
Tap on the “Cherry” to move it to the empty slot down and to the right. After that, tap on the “Grapes” to move it to the slot where “Cherry” has previously been.
Step 10
Tap on the “Watermelon” to move it to the empty slot up and to the right. After that, tap on the “Pineapple” to move it to the slot where “Watermelon” has previously been.
Step 11
Tap on the “Apple” to move it to the empty slot down and to the left. After that, tap on the “Grapes” to move it to the slot where “Apple” has previously been.

Step 12
Tap on the “Melon” to move it to the empty slot down and to the right. After that, tap on the “Strawberry” to move it to the slot where “Melon” has previously been.
Step 13
Tap on the “Banana” to move it to the empty slot up and to the right. After that, tap on the “Apple” to move it to the slot where “Banana” has previously been.
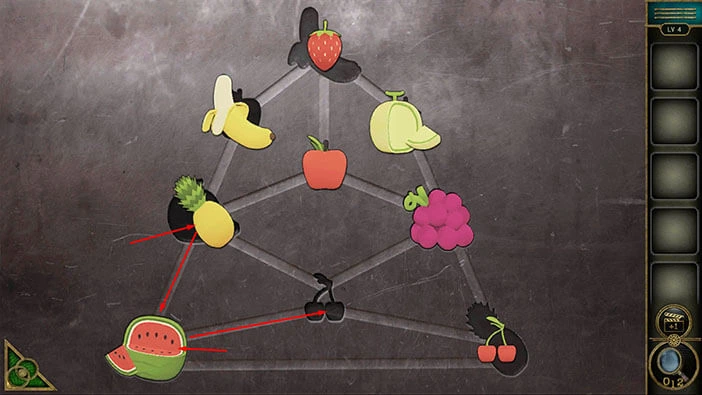
Step 14
Tap on the “Watermelon” to move it to the empty slot up and to the left. After that, tap on the “Melon” to move it to the slot where “Watermelon” has previously been.
Step 15
Tap on the “Cherry” to move it to the empty slot up and to the left. After that, tap on the “Pineapple” to move it to the slot where “Cherry” has previously been.

Step 16
Tap on the “Watermelon” to move it to the empty slot down and to the left. After that, tap on the “Melon” to move it to the slot where “Watermelon” has previously been.
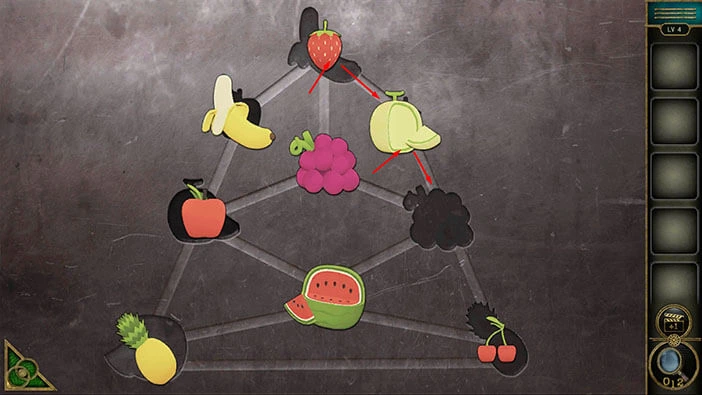
Step 17
Last step. Tap on the “Cherry” to move it to the empty slot down and to the left. After that, tap on the “Grapes” to move it to the slot where “Cherry” has previously been. With that done, you will place all fruit into the correct slots.
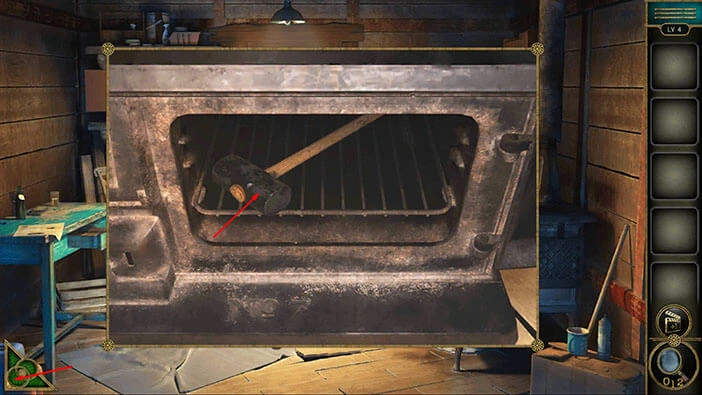
As soon as you solve the previous puzzle, you will open the stove. Inside you will find a “Hammer”. Tap on it to pick it up.
After that, tap on the green button in the bottom left corner of the screen to go back.
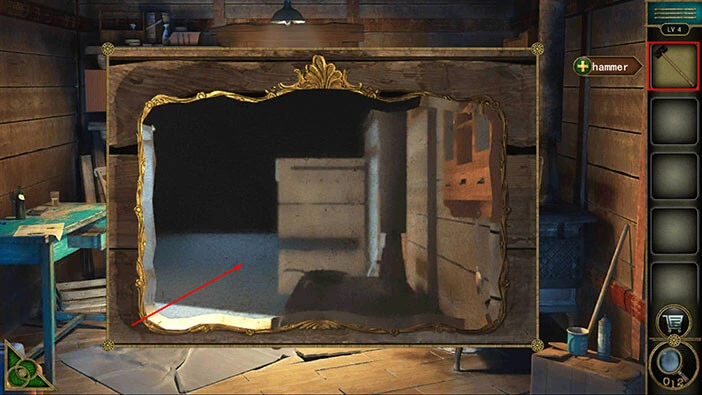
Instead of the picture, we now have a mirror on the wall (just to the right of the door). Tap on the mirror to take a closer look at it.

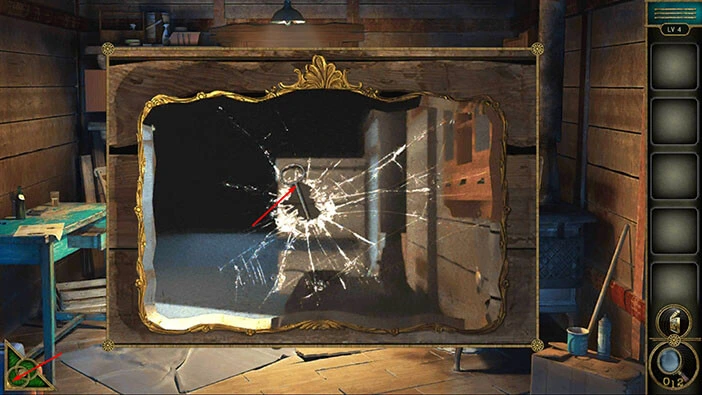
Next, select the “Hammer” from the inventory and use it to smash the mirror.
Behind the broken mirror, you will find a “Key”. Tap on it to pick it up.
After that, tap on the button in the bottom left corner of the screen to go back.
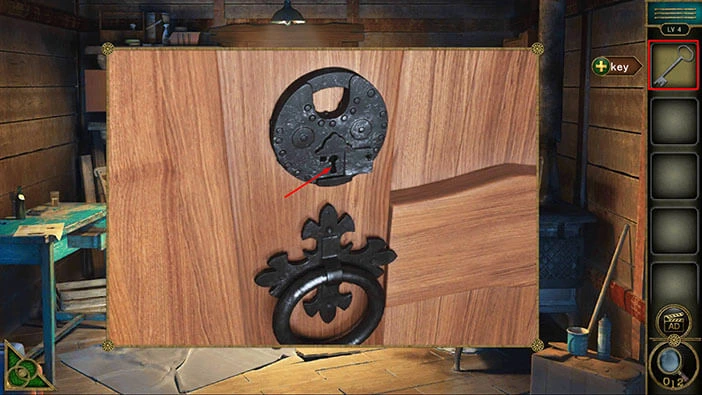
Next, tap on the front door to take a closer look at it.
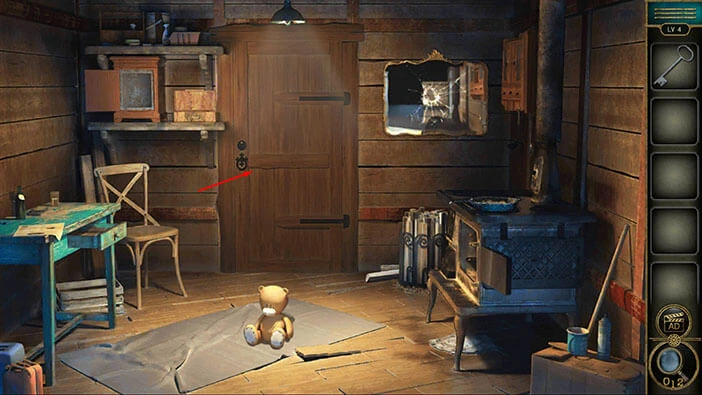
Select the “Key” from the inventory and use it to unlock the door. Tap once more on the door to proceed to the next level.
With that, we have reached the end of the first part of the walkthrough. If you want to see the second part, tap on the next part button. In the second part of the walkthrough, we will cover levels 5-8.
Thank you for reading.