Amnesia – Room Escape Games Part 3
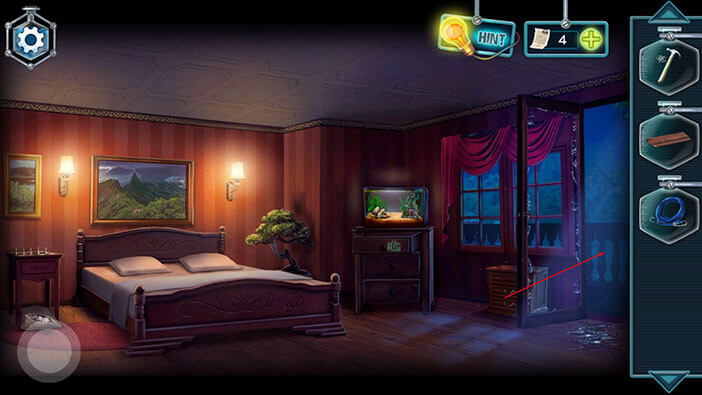
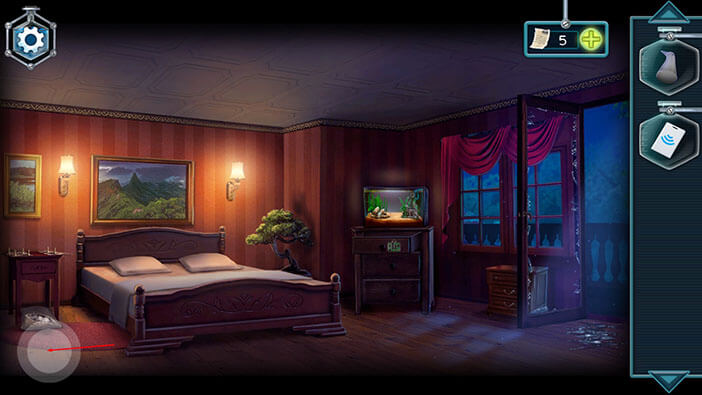
Hello everyone and welcome to Part 3 of our walkthrough for the “Amnesia – Room Escape Games”. At the end of the previous part, we managed to reach the red potion that was hidden under the bed, and we placed it inside the drawer with the other two potions (blue and yellow). We also placed the “Phosphor recipe” in the drawer. We will continue the story from this point.
NOTE: The second part of the walkthrough ends when you get to the puzzle which involves mixing the colors to get the correct recipe. At this point, the third part of the walkthrough begins.
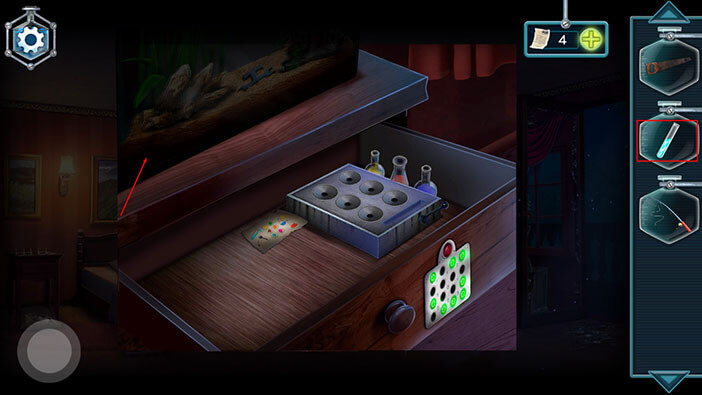
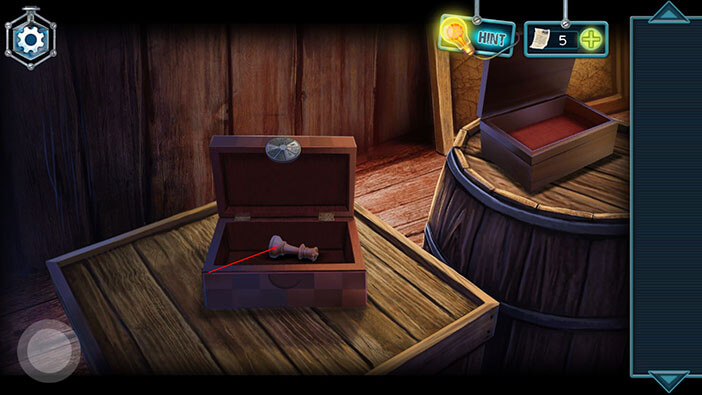
Ok, let’s tap on the “Phosphor recipe” to examine it.
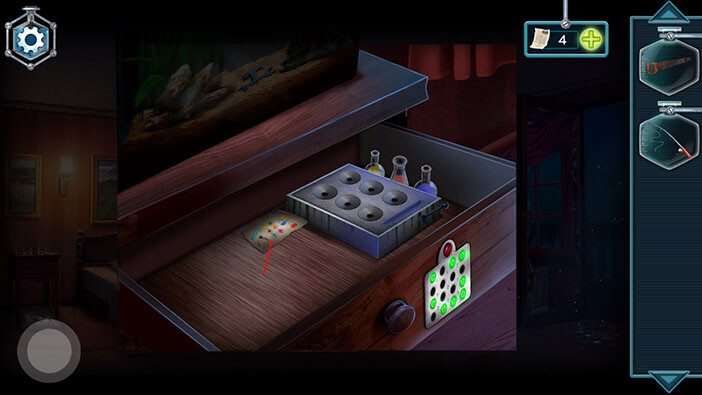
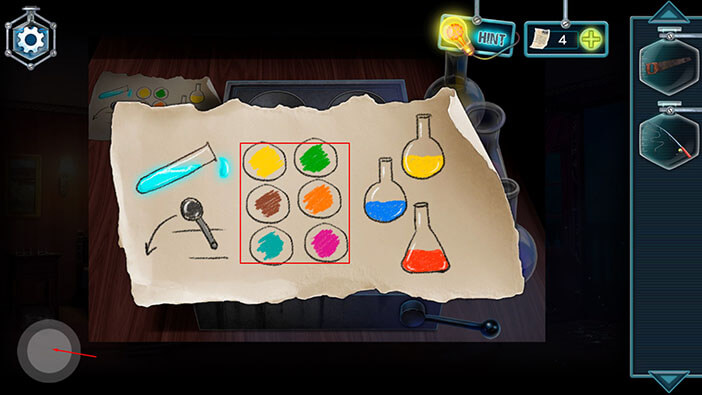
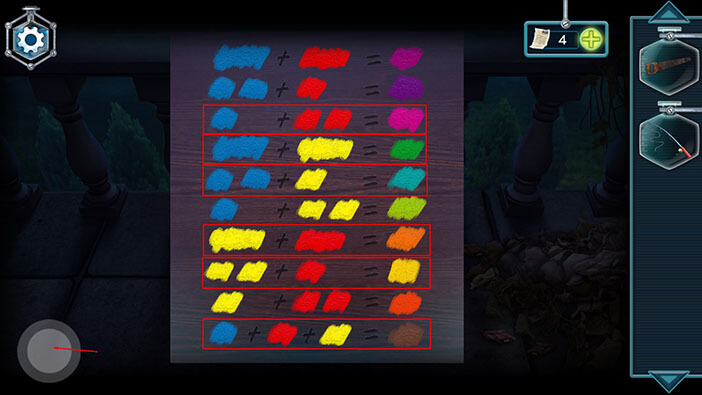
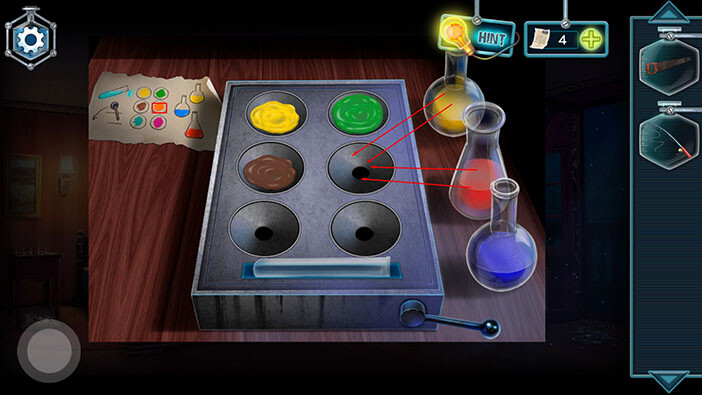
We can see six colors on the “Phosphor recipe” on the left. We should create these colors in the six slots on the left, by mixing the three potions on the right (blue, red, and yellow). For now, let’s memorize/write down the colors that we need.
In the first row, we have yellow and green.
In the second row, we have brown and orange.
In the third row, we have teal and “strong pink”.
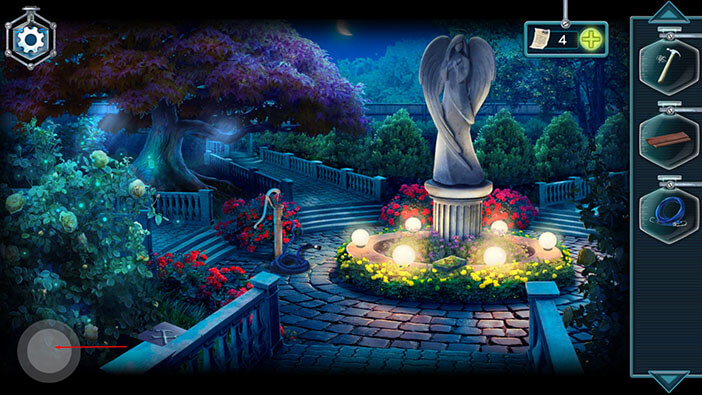
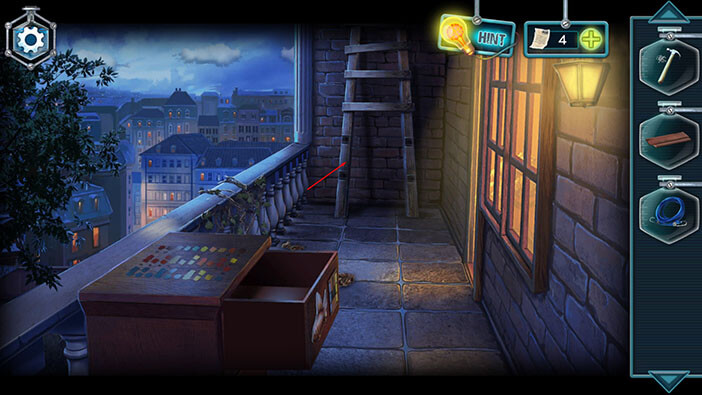
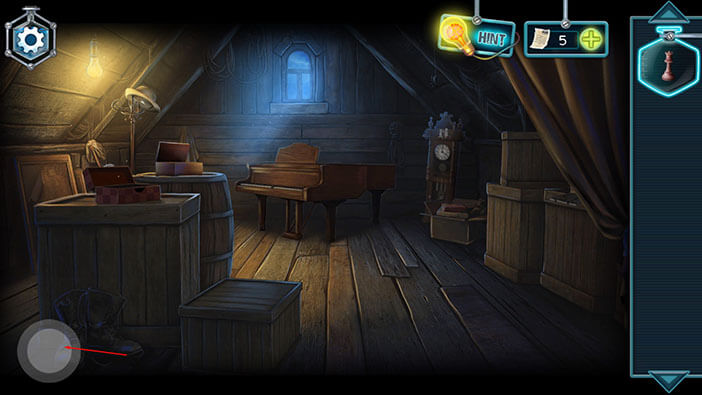
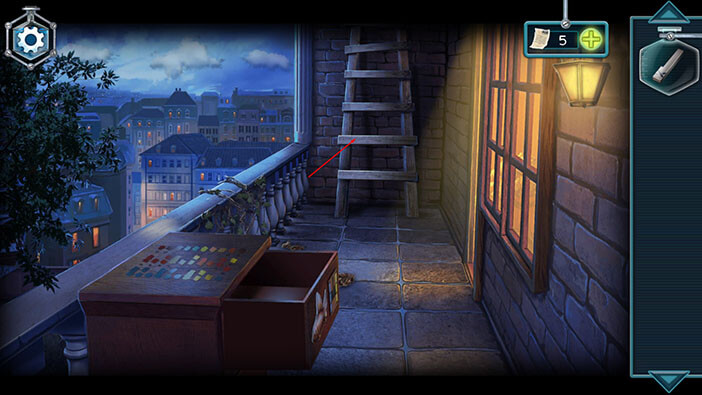
After memorizing the colors, we should head to the balcony, because there, we previously saw the instructions for mixing the colors. So, tap twice on the button in the lower-left corner to go back.
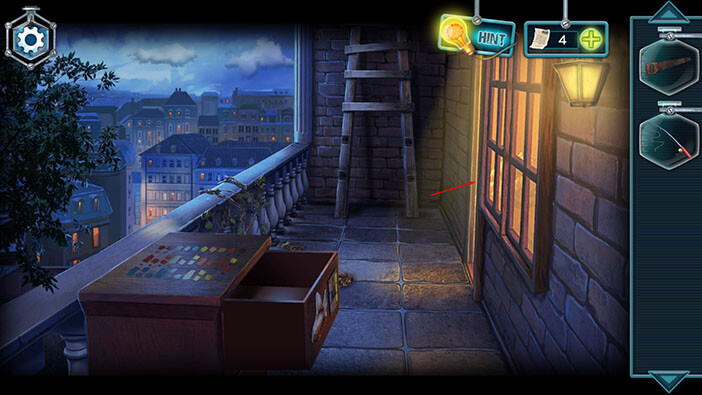
Let’s go to the balcony.
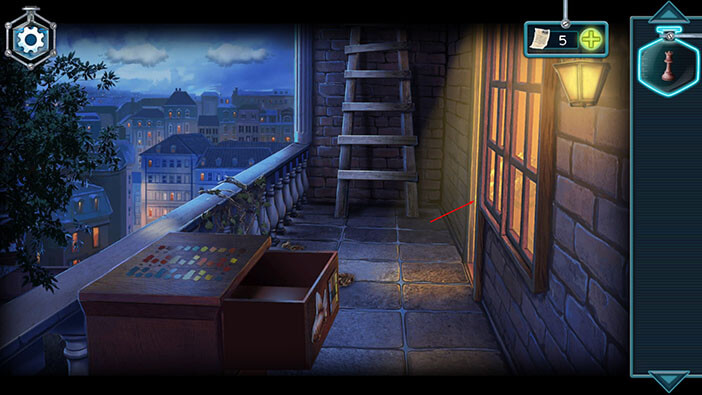
Tap twice on the color scheme on the cabinet to take a closer look at it.

Ok, let’s write down the recipes for the six colors that we need.
First row
The recipe for yellow = 2x yellow + 1x red
The recipe for green = 2x blue + 2x yellow
Second row
The recipe for brown = 1x blue + 1x red + 1x yellow
The recipe for orange = 2x yellow + 2x red
Third row
The recipe for teal = 2x blue + 1x yellow
The recipe for dark pink = 1x blue + 2x red
After that, tap twice on the button in the lower-left corner to go back.
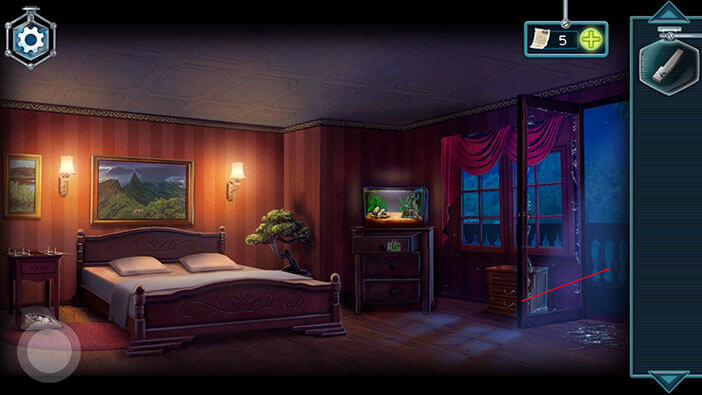
Tap on the door to go back inside.
Tap on the drawer again to take a closer look, then tap on the six slots to start the interaction.
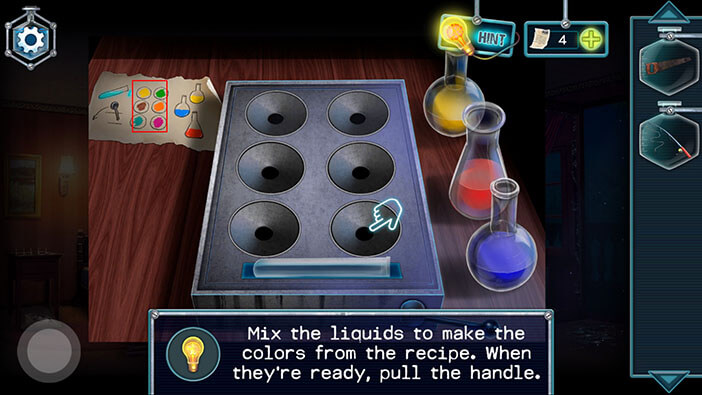
Ok, we should now use the information that we memorized/wrote down to mix the colors.
The first color in the top row is yellow. For the yellow color, we will need 2 units of yellow + 1 unit of red.
So, drag the yellow bottle from the right two times, and pour the red liquid into the first slot in the top row. After that, drag the red bottle to the same slot.
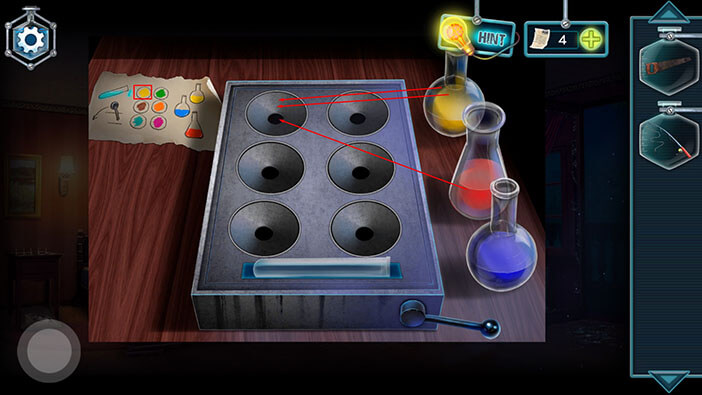
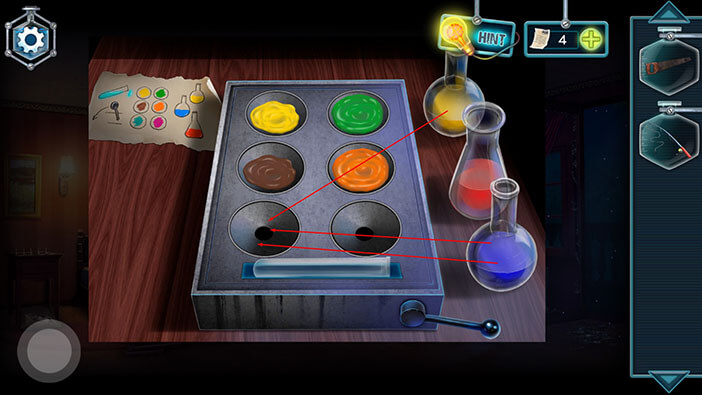
The second color in the top row is green. For the green color, we will need 2 units of blue + 2 units of yellow.

The first color in the middle row is brown. For brown color, we will 1 unit of blue, red, and yellow.

The second color in the middle row is orange. For the orange color, we will need 2 units of yellow + 2 units of red.
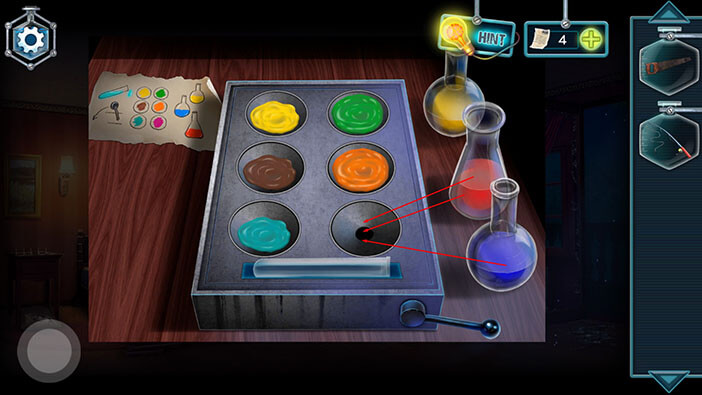
The first color in the bottom row is teal. For teal color, we will need 2 units of blue + 1 unit of yellow.
The second color in the bottom row is dark pink. For the dark pink color, we will need 1 unit of blue + 2 units of red.
Well, we created the correct colors, by using the instructions. Now, let’s pull the lever to start the process.
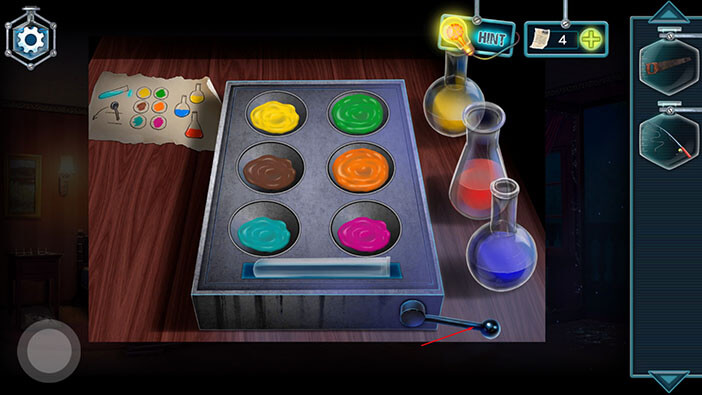
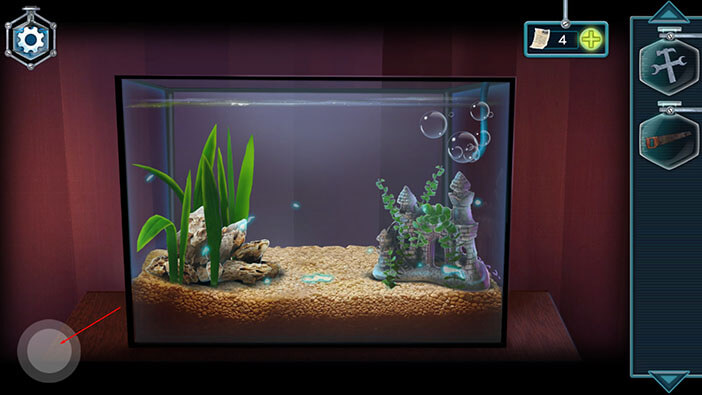
After we pulled the lever, all colors from the six slots evaporated, but we created “Phosphor” which has been automatically added to our inventory. Well, it looks like a luminescent fluid, and our character mentioned earlier that he could use it to illuminate the aquarium, so let’s do that.
So, tap on the aquarium to start the interaction.
Select the “Phosphor” from the inventory and tap on the aquarium to pour it in.
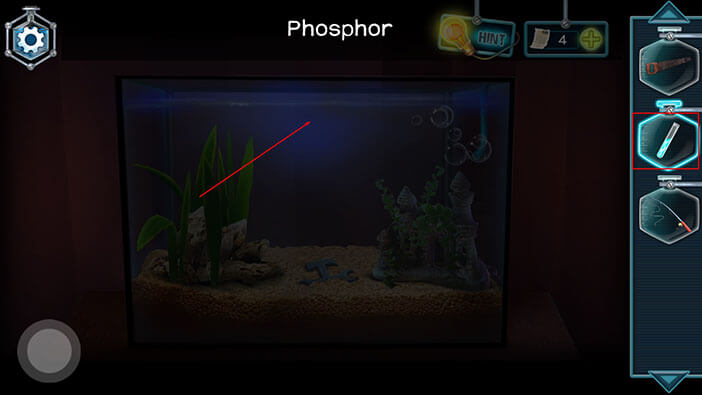
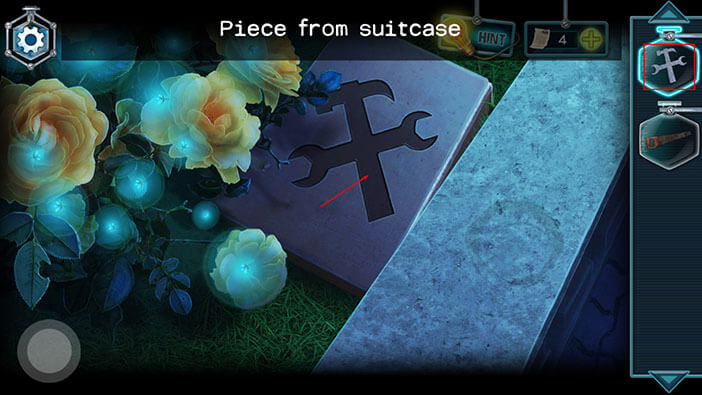
Well, after we illuminated the aquarium, we can see that there’s some kind of object at the bottom. So, let’s fish it out. Select the “Fishing rod” from the inventory, then tap on the object in the aquarium, and our character will hook it.
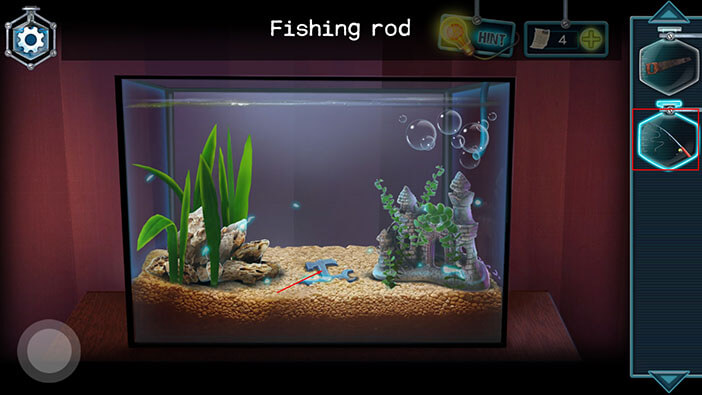
Now, we have to reel in the object by rotating the handle on the fishing wheel counterclockwise.
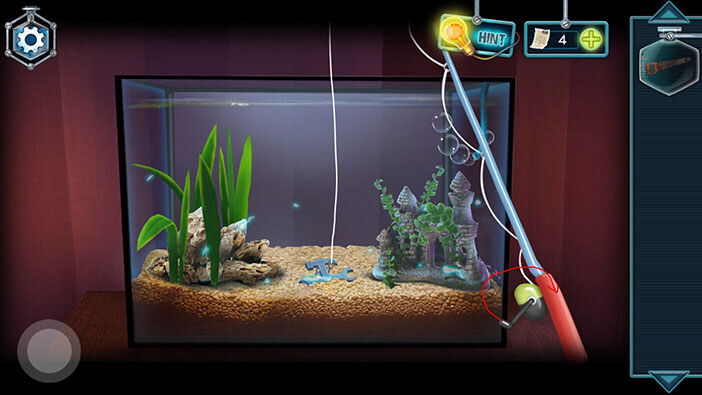
After you fish the object from the aquarium, your character will automatically pick it up, and the “Piece from suitcase” will be added to your inventory. Tap on the bottom in the lower-left corner to step away from the aquarium.
Ok, we should now go back to the garden. To get there, first tap on the button in the lower-left corner to go back into the front yard.
When you reach the front yard, tap twice on the small gate on the left to proceed into the garden.
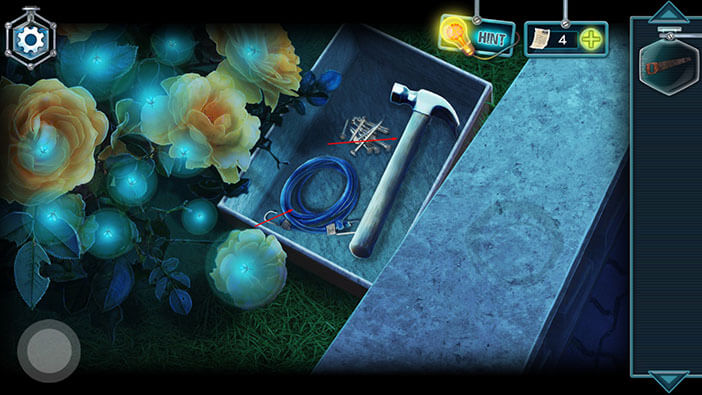
Tap on the container on your left to take a closer look at it (you will immediately notice that it has a slot, shaped like a “Piece of suitcase” that we found in the aquarium).
Select the “Piece from suitcase” from the inventory and tap on the slot to insert it. You will automatically unlock and open the container.
Tap on the items in the container to pick them up. “Hammer with nails” and “Tie cord” will be added to your inventory.
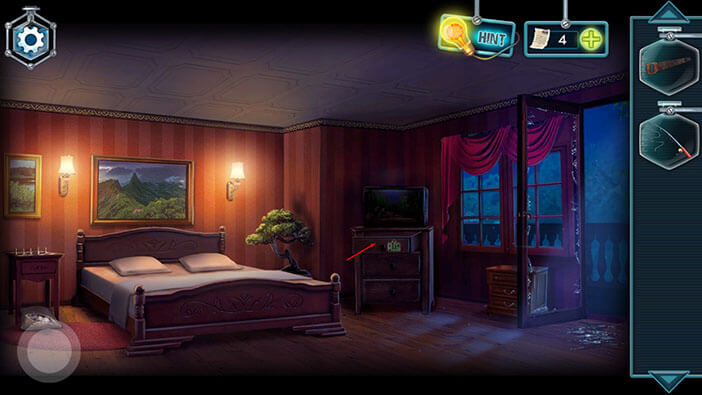
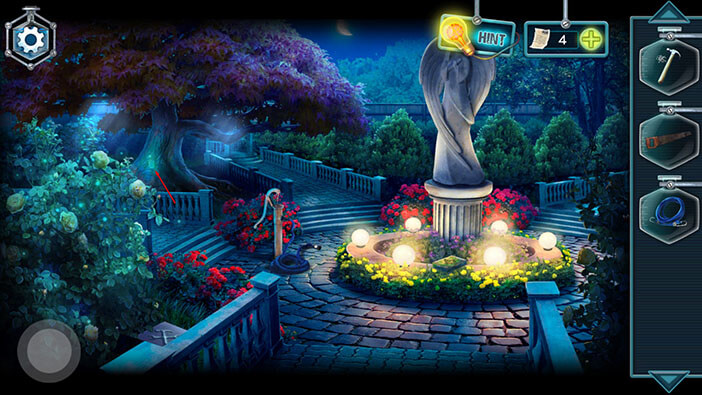
Ok, now let’s take another look at the tree that we illuminated by using the jar of fireflies.
Select the “Saw” from the inventory and tap on the plank to start the interaction.
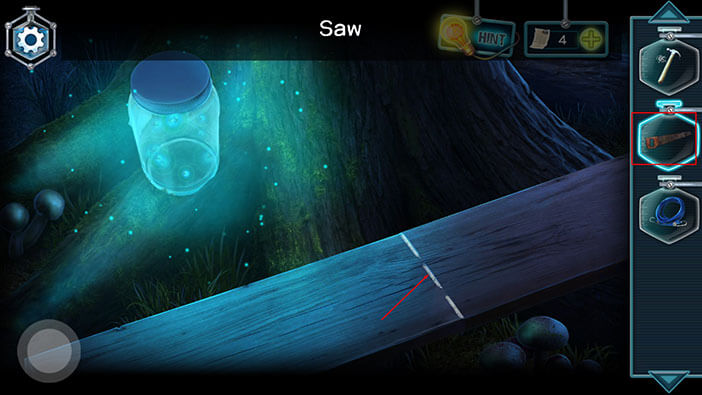
We can see two white lines on the plank and they indicate the point at which we should cut. However, we should move the line on the blank directly below the saw (you can do this by tilting the phone).
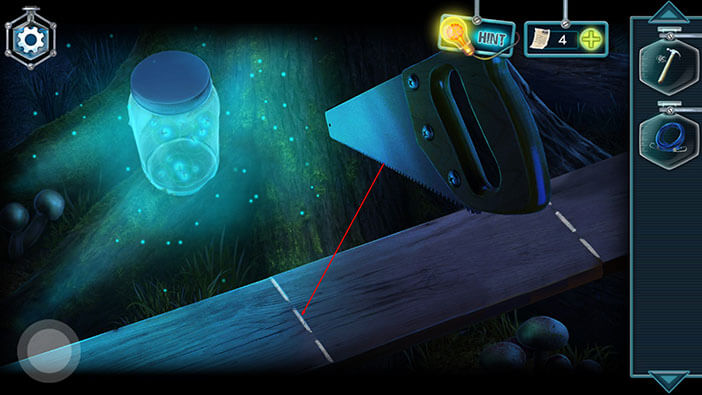
After aligning the line on the plank, drag the saw back and forth to cut it.
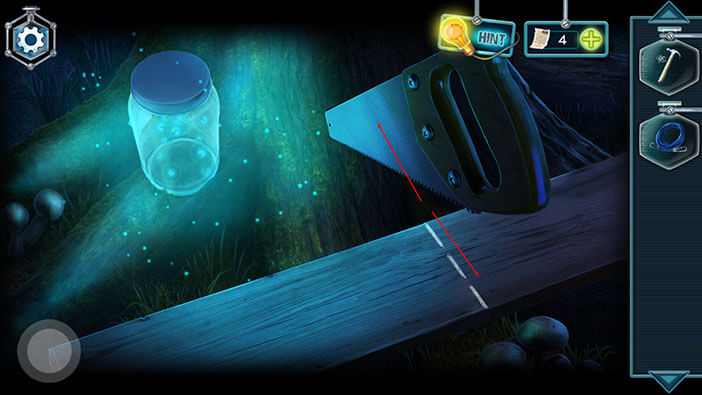
There are two marked lines on the plank, so repeat this process. Tilt the phone until you get the other line on the plank directly below the saw. After that, drag the saw back and forth to make the second cut.
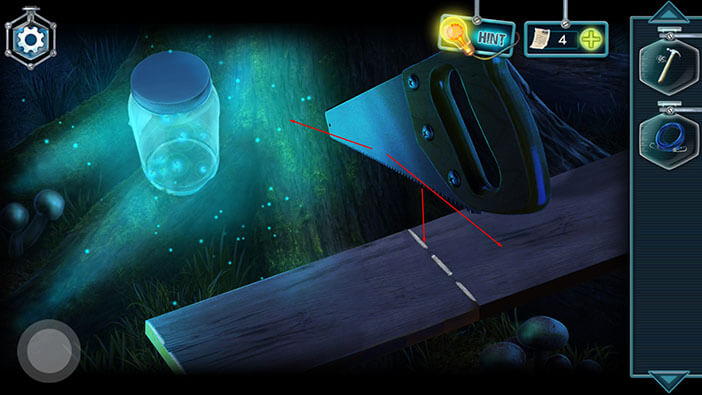
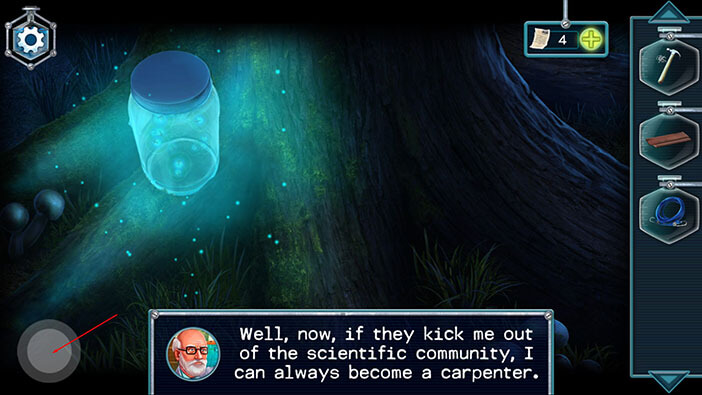
After making the two cuts, “Planks” will be added to your inventory, and Jack will make a funny comment about his woodworking skills.
Tap on the bottom in the lower-left corner to go back.
Ok, we should now go back to the balcony, because with “Planks” and “Hammer with nails” we might be able to repair the ladders. Let’s first go back into the house.
When you get inside the house, go to the room on the right. After that, go to the room marked with the letter “D”.
Finally, tap on the shattered glass door to go onto the balcony.
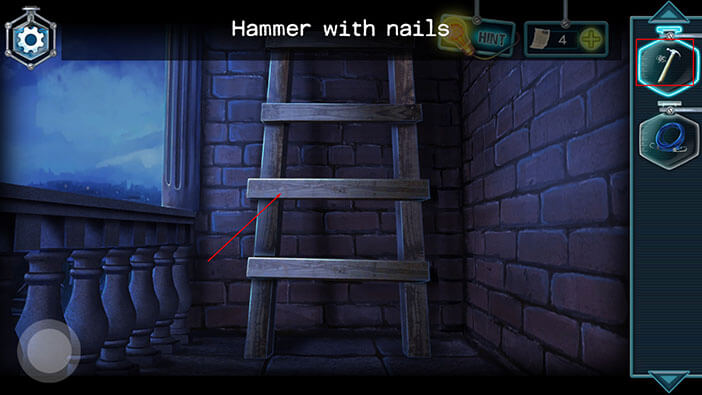
Ok, we finally reached the balcony. Tap on the ladder to take a closer look.
We can see that two steps are missing. So, select the “Planks” from the inventory and tap on the empty slots to attach them.

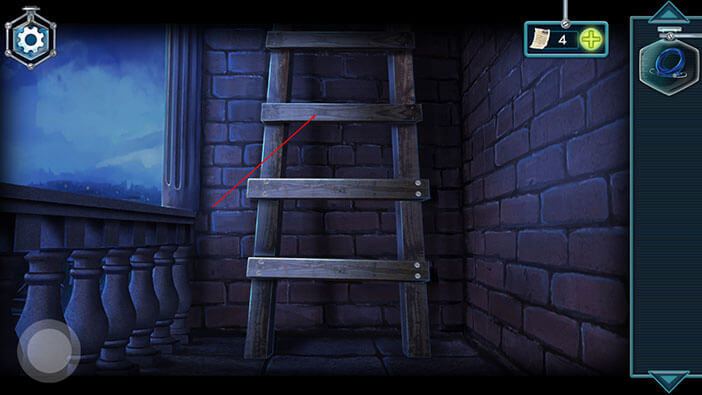
After that, select the “Hammer with nails” from the inventory and tap on the two steps that we just attached.
Ok, we repaired the ladder, and our character can now use it. So, tap on the ladder to proceed into the next room.
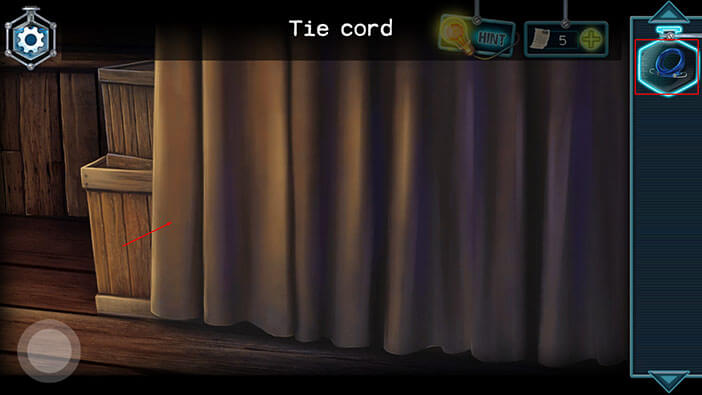
Tap on the curtain on the right to take a closer look at it.
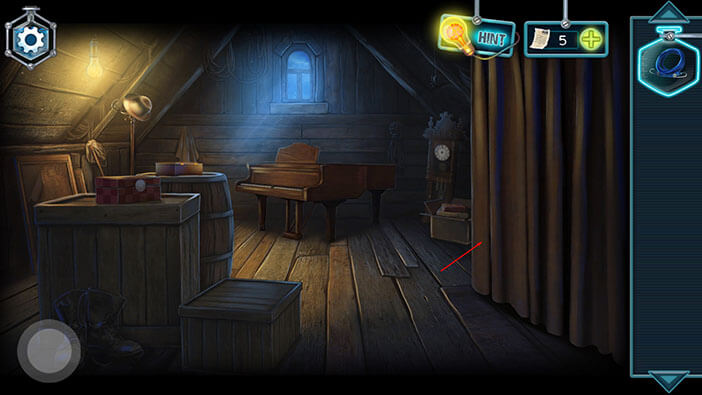
Select the “Tie cord” and tap on the curtain. Our character will tie the curtain, revealing an area that was hidden behind it.
On your right, you will see tablets with numbers. Tap on them to pick them up, and “Signs” will be added to your inventory.
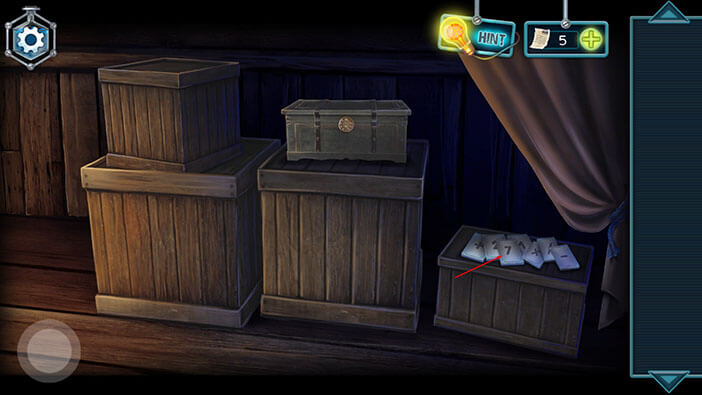
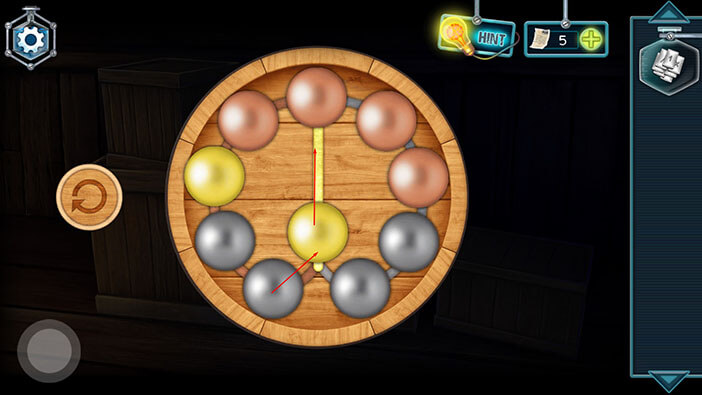
Well, while we’re here, we could also check out the chest, located on top of the middlebox.
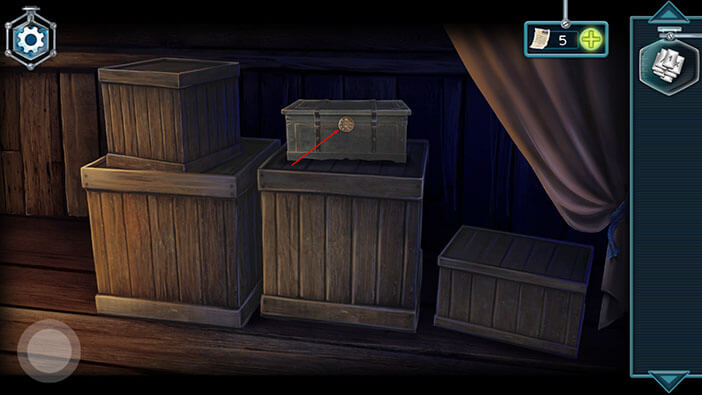
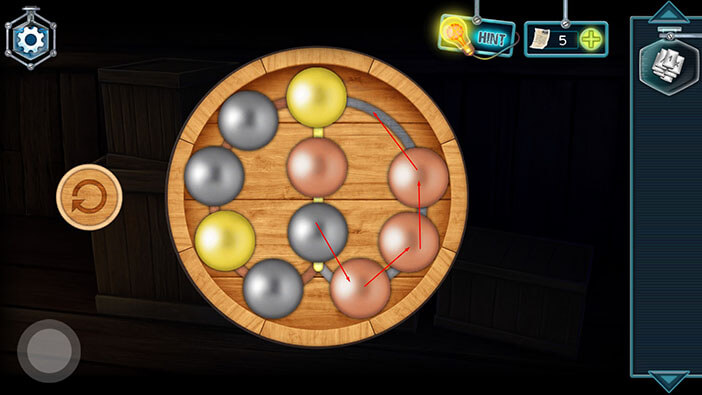
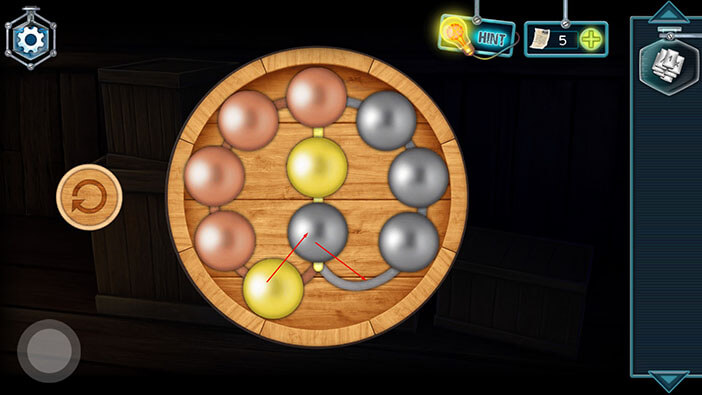
Ok, to unlock the chest we will have to solve a puzzle by rearranging the position of the balls. We can see 2 yellow, 4 gray, and 4 brown balls. The balls are mounted on the rails. In the middle we have a yellow rail, on the right is the grey rail, and on the left is the brown rail. We should shuffle the balls and place them on the rails of matching color. We will do this puzzle in several steps. Let’s begin.
Step 1
Move the three brown balls on the right one space up. After that, move down the grey ball from the middle.
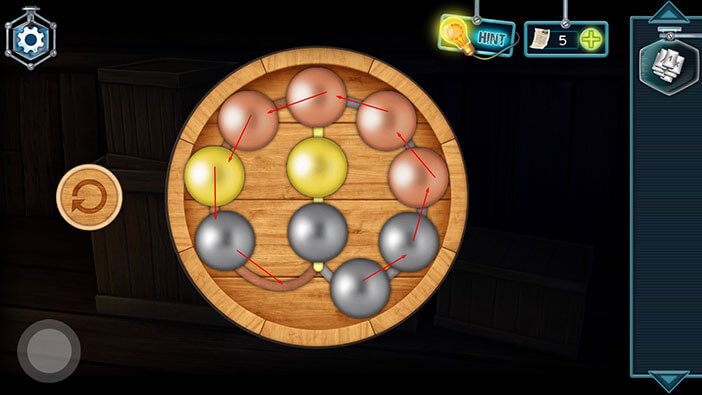
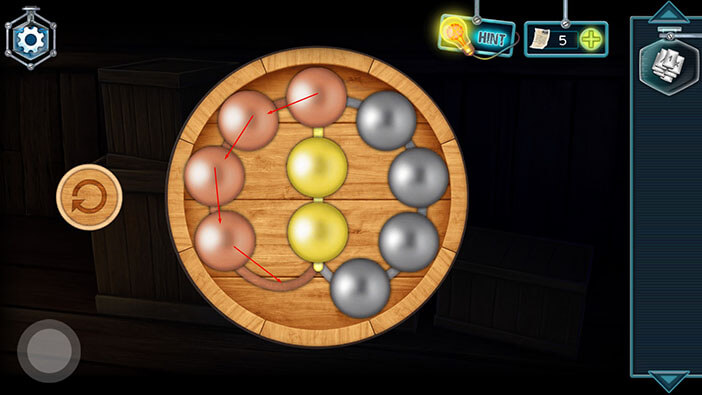
Step 2
Move the grey ball in the lower-left corner into the middle. After that, rotate all other balls on the brown and grey rail by one position to the left.
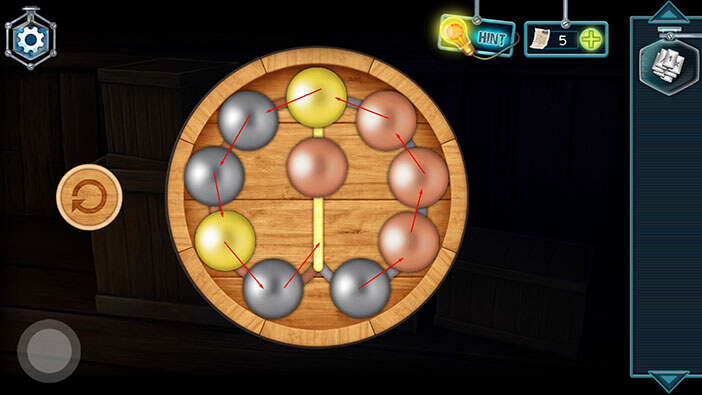
Step 3
Move down the grey ball from the middle. After that, move the yellow ball in the lower-left corner to the middle rail.
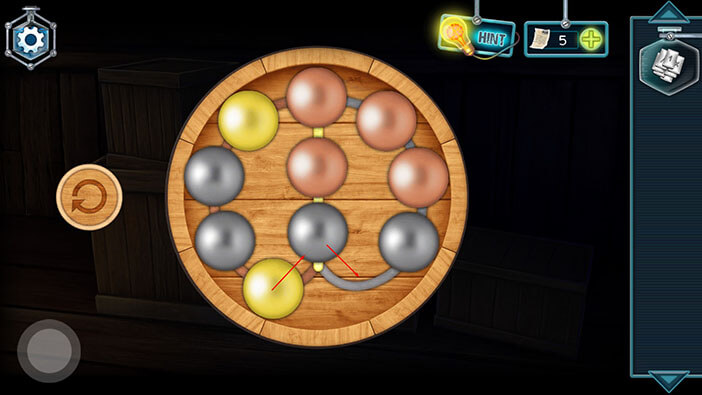
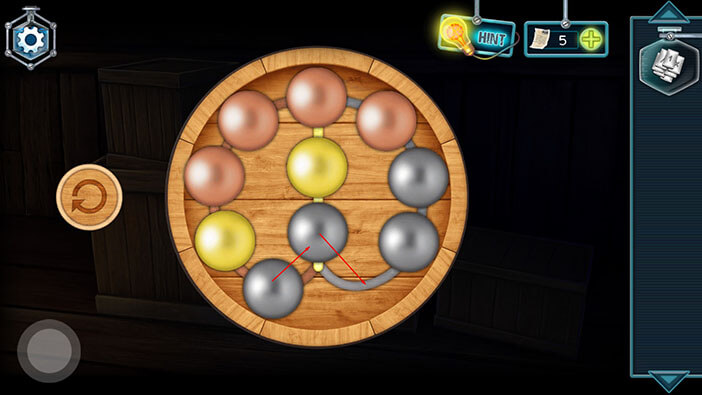
Step 4
Rotate all balls on the brown rail by one position to the left. After that, move up the brown ball from the middle rail.
Step 5
Move up the yellow ball on the middle rail. After that, move the grey ball in the lower-left corner onto the middle rail.
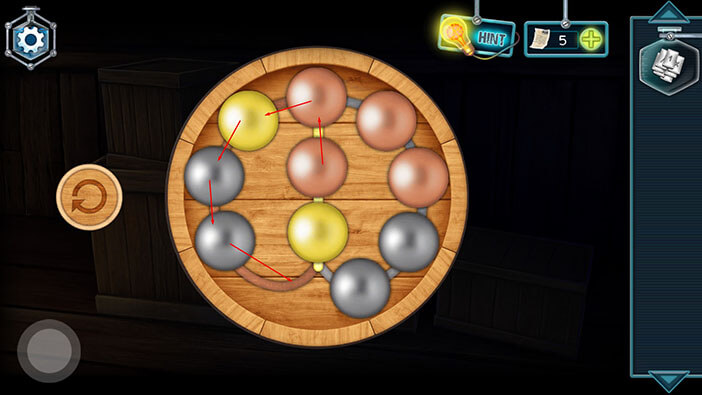
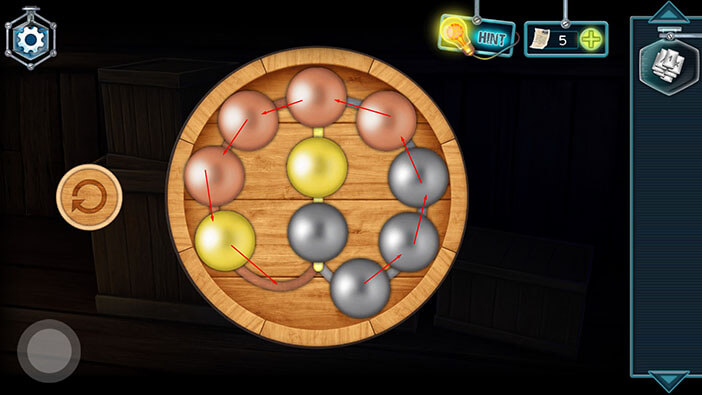
Step 6
Rotate counterclockwise all balls on the grey and brown rails.
Step 7
Move down the grey ball from the middle rail. After that, move the grey ball in the lower-left corner to the middle rail.
Step 8
Rotate counterclockwise all balls on the grey and brown rails.
Step 9
Move down the grey ball from the middle rail. After that, move the yellow ball from the lower-left corner to the middle rail.
Step 10
Finally, rotate all brown balls by one spot counterclockwise, and you will solve this puzzle.
As soon as you properly arrange the balls, you will hear the clicking sound and the box will automatically open. Tap on the item inside it to pick it up and “Arrows” will be added to your inventory.

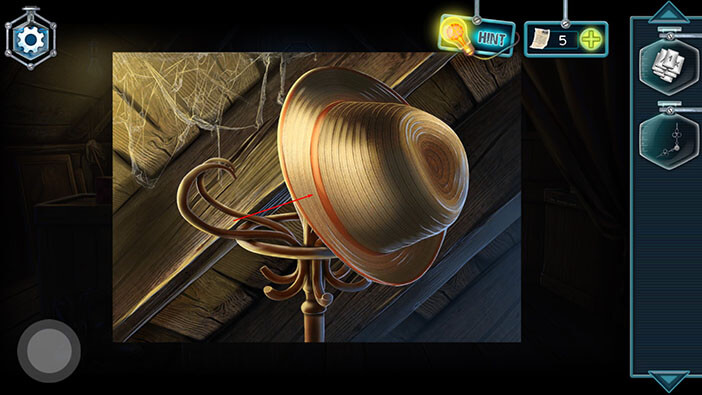
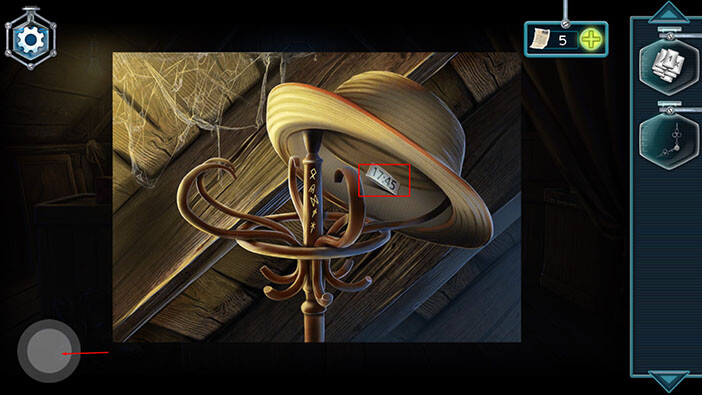
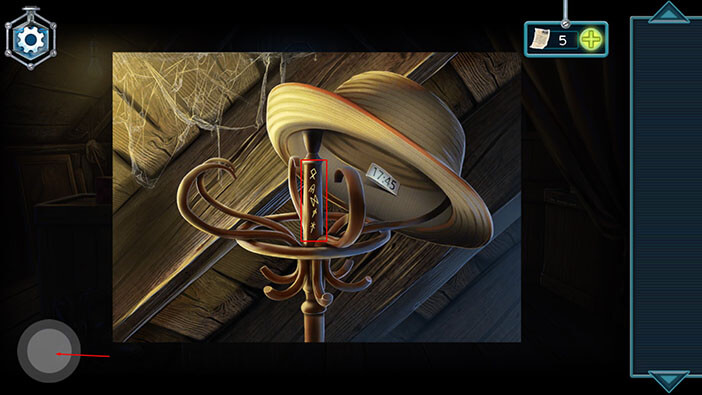
Ok, let’s take a closer look at the hat on our left.

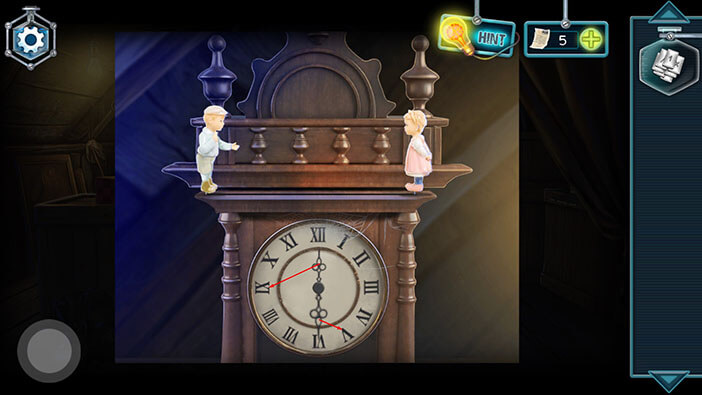
Tap on the hat again, and our character will tip it revealing a label inside the hat with a “17:45” mark on it. Memorize the time on the label, 17:45, because we will need it for the following puzzle.
After that, tap on the button in the lower-left corner to go back.
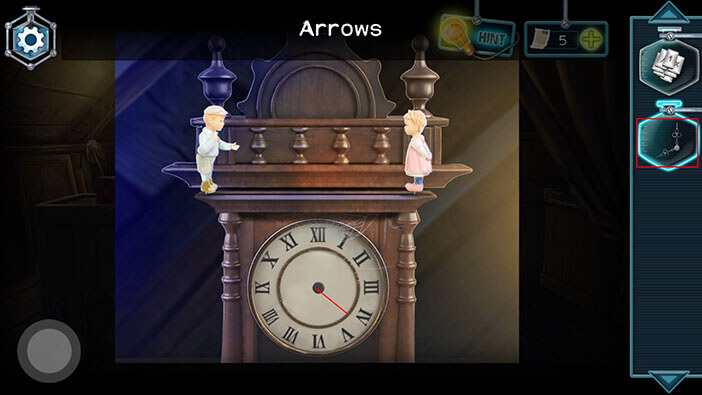
Tap on the clock on your right to take a closer look at it.
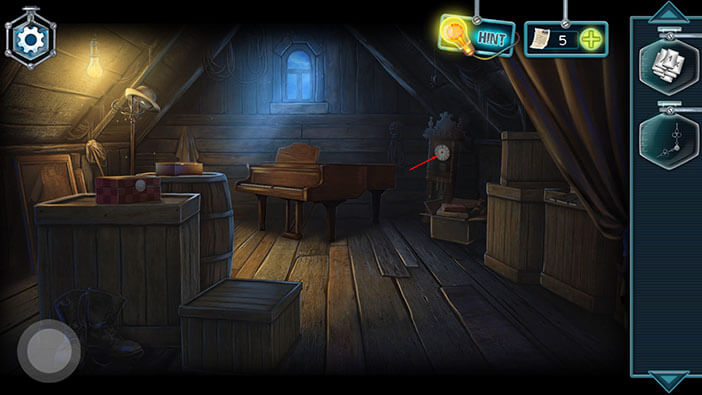
Select the “Arrows” from the inventory and tap on the clock. It turns out that arrows are actually clock hands, and our character will attach them to the clock.
Well, now we should set the time to 17:45 (the label inside the hat). So, the smaller clock hand is the hour hand and it should point to V, while the larger clock hand is the minute hand and it should point to IX.
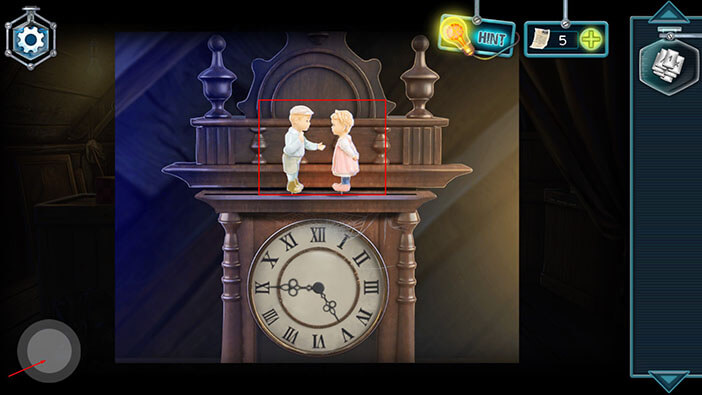
Well, the two figurines above the clock moved closer to each other, but nothing else happened. Let’s go back and see what else we can do in this room.
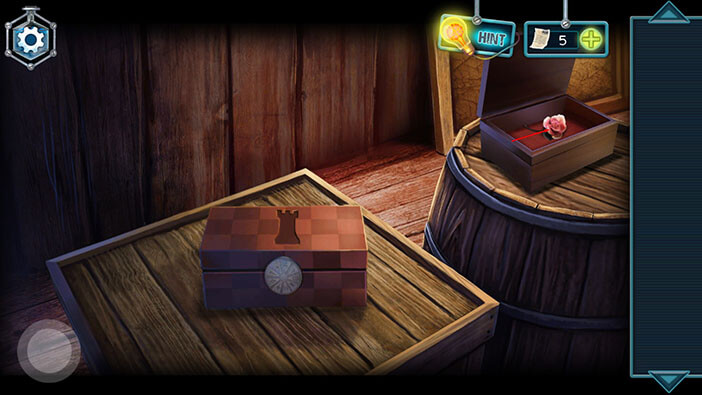
Tap on the box on the barrel on your left to take a closer look at it.
Select the “Signs” from the inventory, then tap on the box to insert the “Signs” into a slot.
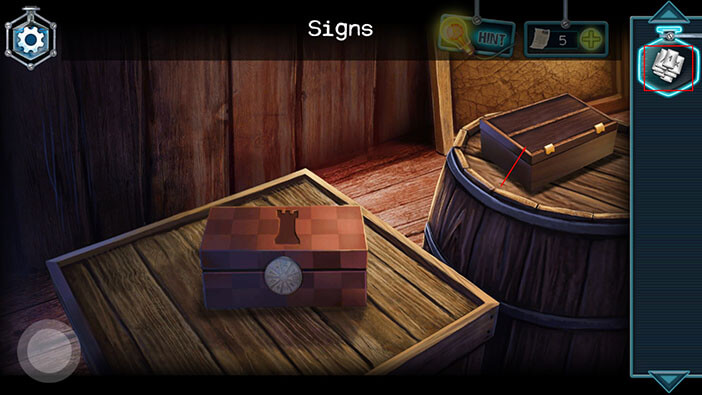
After that, tap on the box to start the interaction.
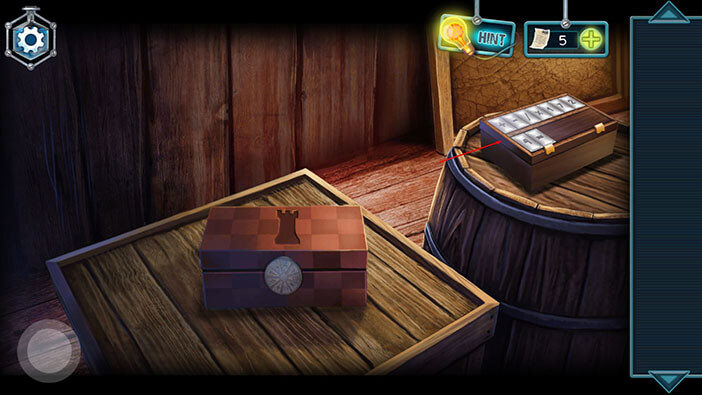
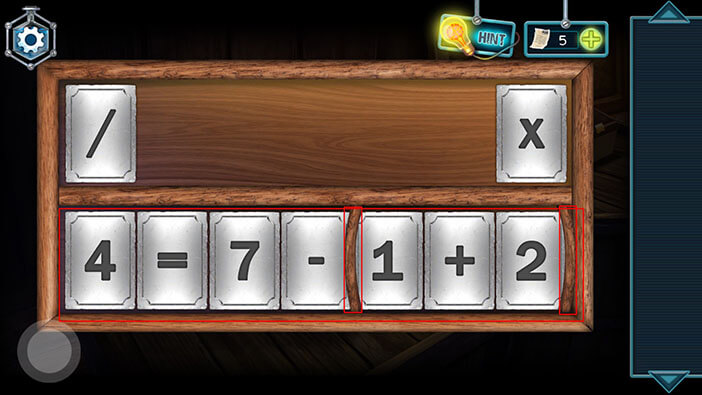
Well, here we have to solve the equation by using the numbers from the upper row. The result has to equal 4. This one is fairly easy.
4 = 7 – (2 + 1)
NOTE: The wood in the lower row represents the parenthesis.
After you solve the equation, the box will open. Tap on the “Flower” inside it to pick it up.
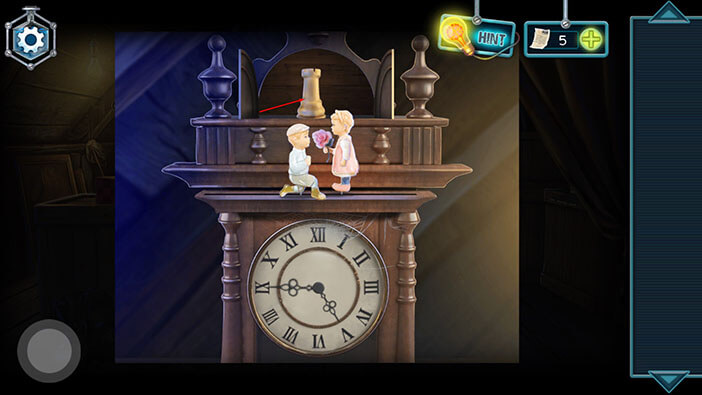
Ok, let’s get back to the clock.

Select the “Flower” from the inventory and tap on the boy figurine.
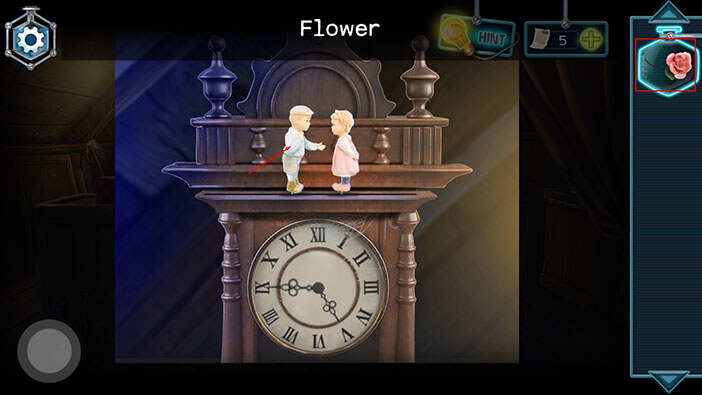
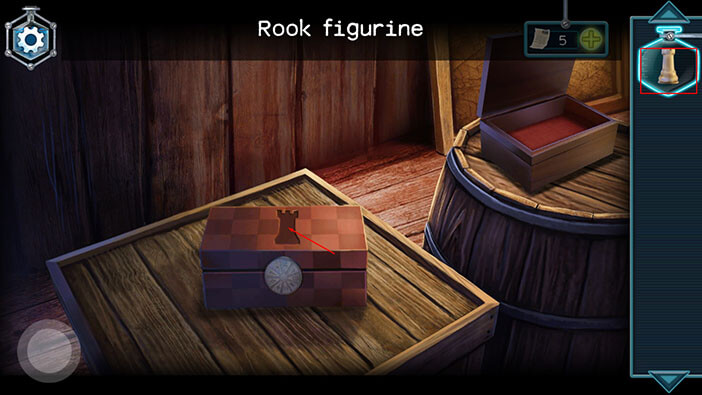
The boy figurine will kneel and give the flower to the girl figurine. Also, the top compartment of the clock will open revealing a chest piece. Tap on it to pick it up and “Rook figurine” will be added to your inventory.
Ok, let’s take a look at the other box on our left.

Select the “Rook figurine” from the inventory and tap on the empty slot on the box to insert it. After that, tap on the box to open it.
To solve this puzzle, we will have to select the correct symbols (possibly, also in the correct order).
Tap on the button in the lower-left corner to go back.

Let’s take another look at the hat.
We can see five symbols below the hat. Looking from top to bottom we have,
A fish-like symbol
A rocket symbol
A sand clock
A rhombus intersected by a vertical line
An “X” intersected by a vertical line
Memorize/write down the symbols and then tap on the button in the lower-left corner to go back.
Let’s get back to the box. Tap on it twice to start the interaction.
Ok, let’s tap on the symbols that we saw on the hat stand.
First, tap on the fish-like symbol.
Second, tap on the rocket symbol.
Third, tap on the sand clock symbol.
Fourth, tap on the rhombus intersected by a vertical line
Fifth, tap on the “X” intersected by a vertical line
As soon as you select the correct symbols, the box will open, and inside we can see another chess piece. Tap on it to pick it up and a “Queen” will be added to your inventory.
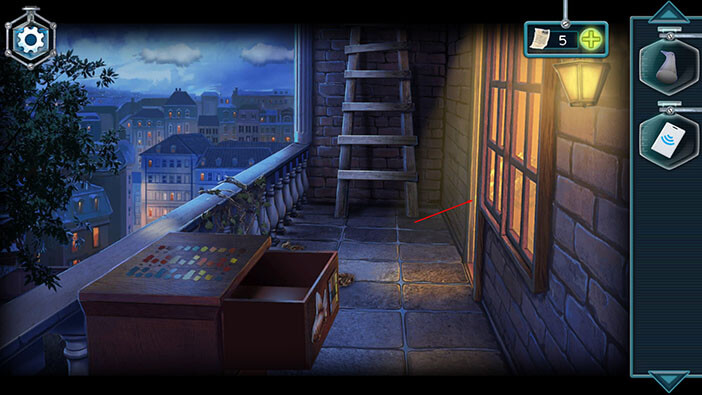
Ok, we should head downstairs. Tap on the button in the lower-left corner to go back to the balcony.
Tap on the door on the right to go inside.
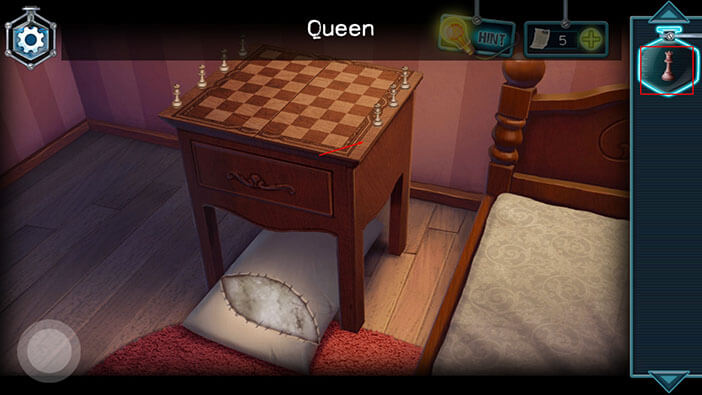
Tap on the chessboard located to the left of the bed to take a closer look at it.
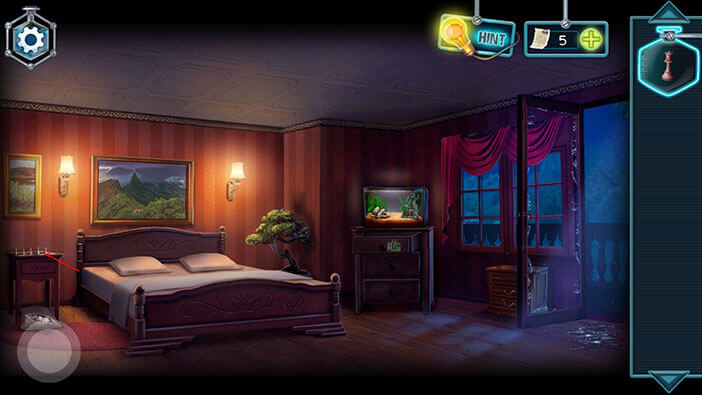
We can see that one Queen chess piece is missing. So, select the “Queen” from the inventory and tap on the chessboard to place it on the empty spot.
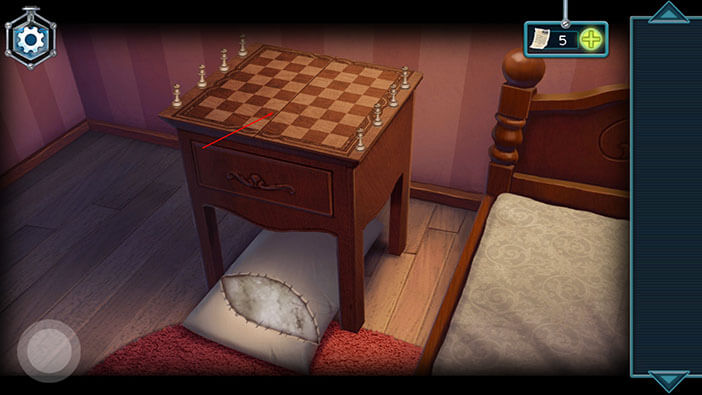
Ok, let’s tap on the chessboard to start the interaction.
In this puzzle, the goal is to place all eight queens on the chessboard, without them threatening each other. Well, here’s my solution.
First Queen = A6
Second Queen = B4
Third Queen = C7
Fourth Queen = D1
Fifth Queen = E8
Sixth Queen = F2
Seventh Queen = G5
Eighth Queen = H3
You can also see the solution in the image below.
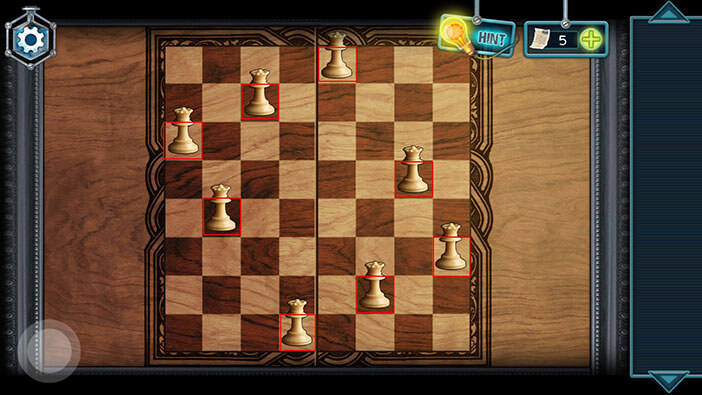
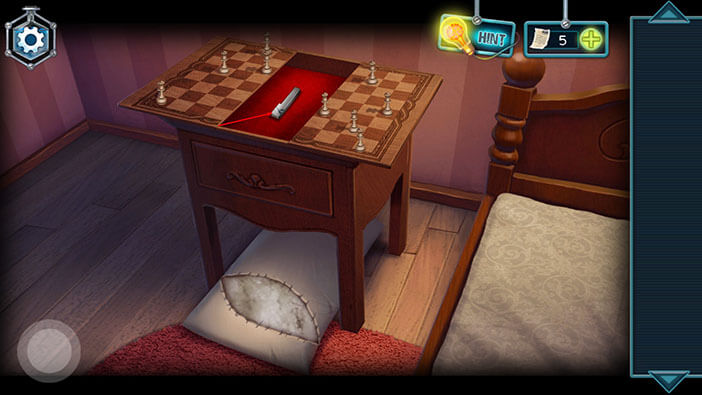
As soon as you enter the correct solution for this puzzle, the chessboard will split in half and open, revealing a secret compartment. Tap on the item inside to pick it up and a “Piano key” will be added to your inventory.
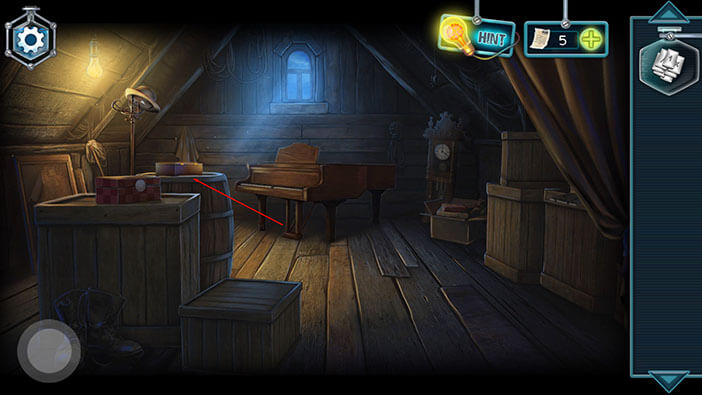
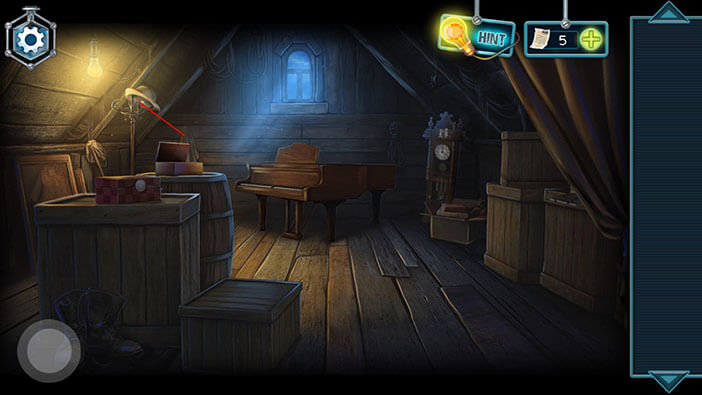
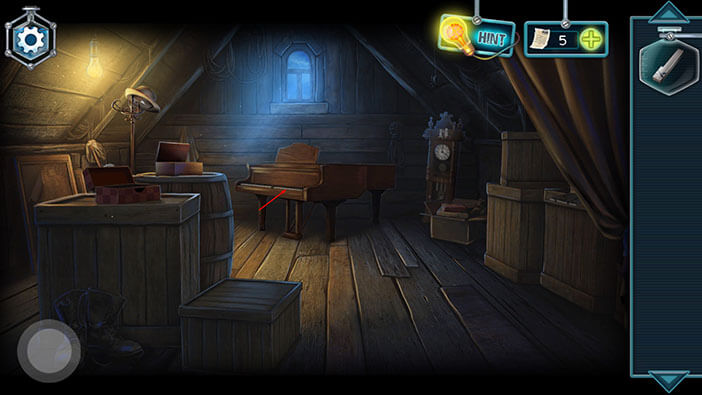
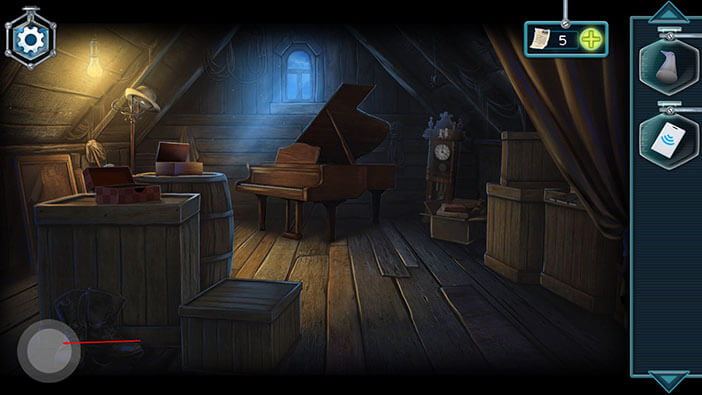
Well, we saw the piano in the attic, so let’s go there. Tap on the glass door to go to the balcony. After that, tap on the ladder to go to the attic.
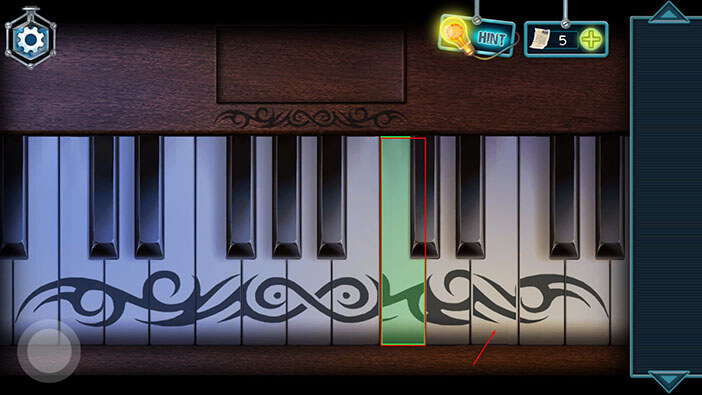
Tap on the piano to take a closer look at it.
We can see that one of the keys is missing. So, select the “Piano key” from the inventory and tap on the empty slot to insert it.
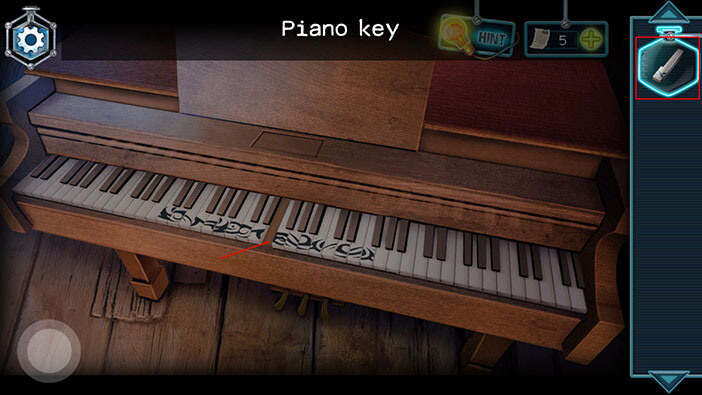
Tap on the piano keys, once more, to start the interaction.
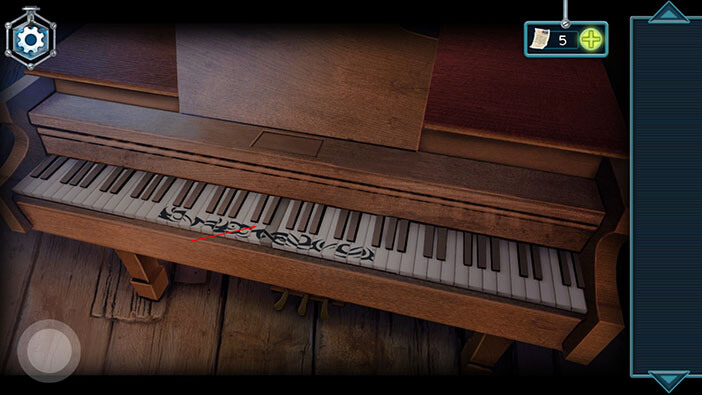
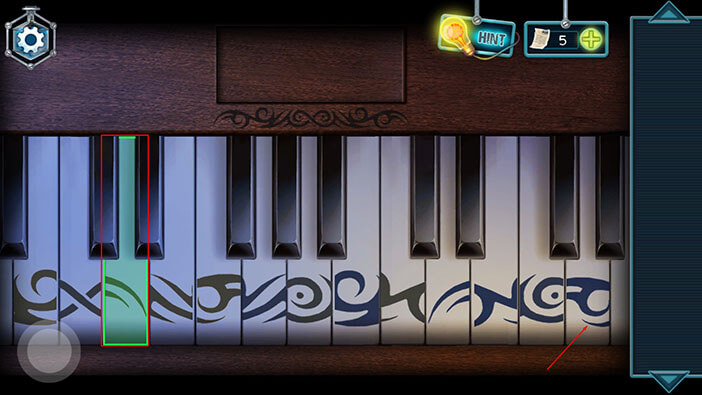
Well, now we should rearrange the piano keys, by aligning the drawings at the bottom of each key. We will do this in several steps. Let’s begin.
Step 1
Select the third key (looking from left to right) and swap it with the thirteenth (last) key.
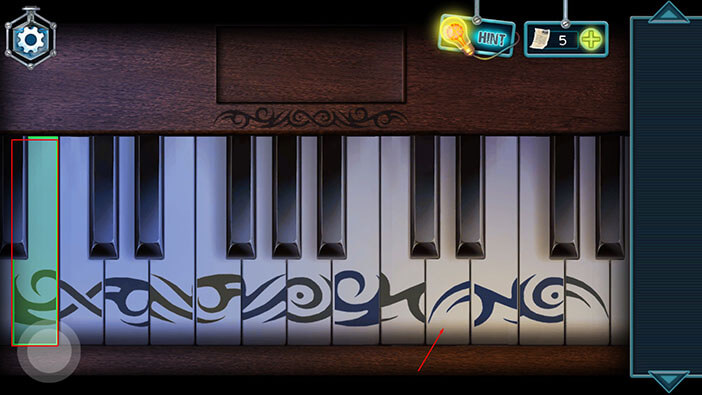
Step 2
Select the first key and swap it with the tenth key.
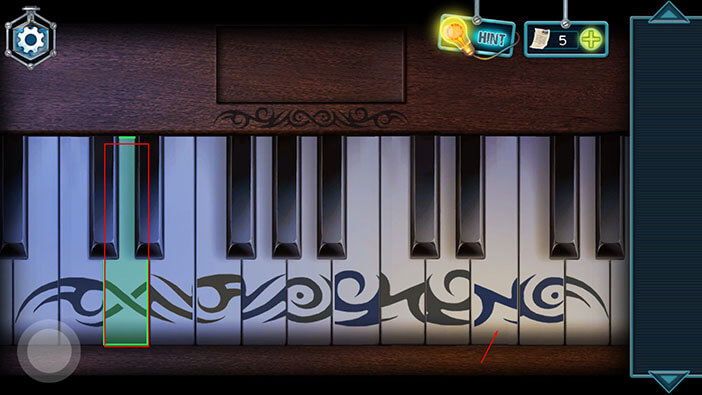
Step 3
Select the second key and swap it with the third key.

Step 4
Select the third key and swap it with the eleventh key.
Step 5
Select the fourth key and swap it with the eighth key.
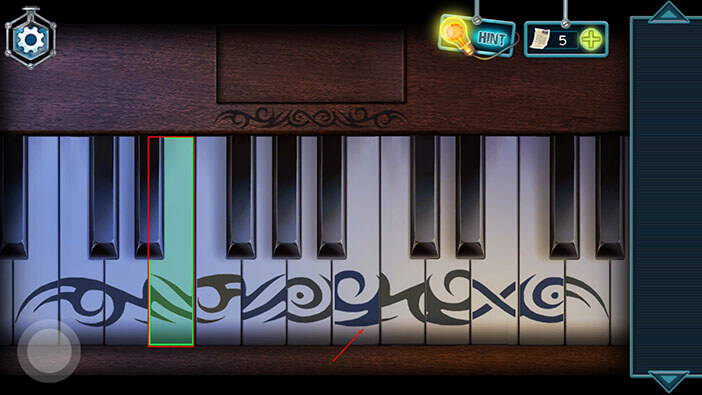
Step 6
Select the fifth key and swap it with the sixth key.
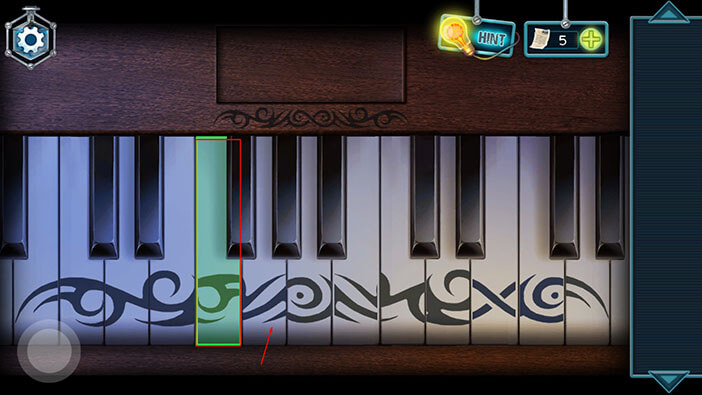
Step 7
Select the sixth key and swap it with the twelfth key.

Step 8
Select the seventh key and swap it with the eleventh key.
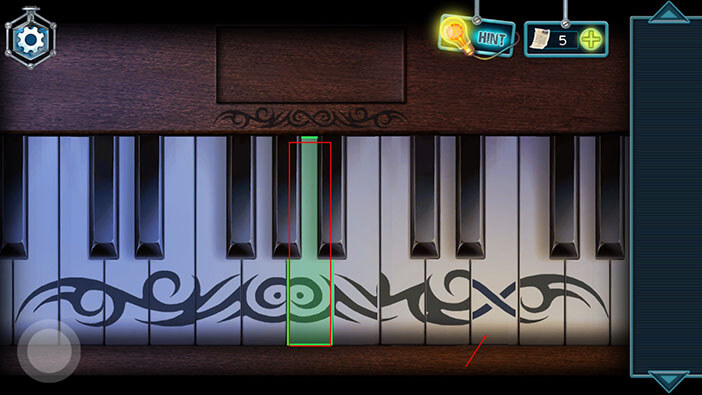
Step 9
Select the eighth key and swap it with the eleventh key.
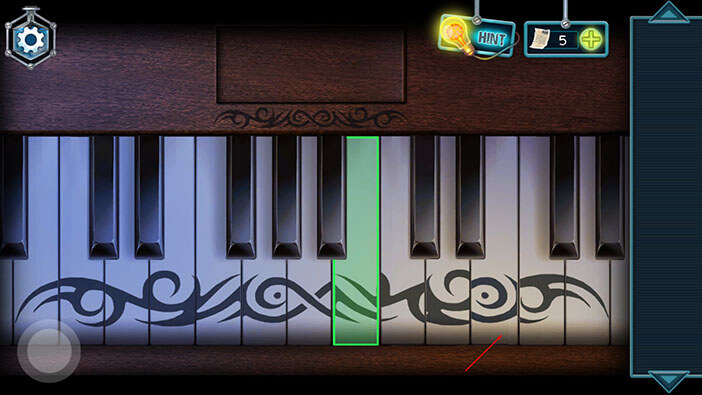
Step 10
Finally, select the ninth key and swap it with the eleventh key.
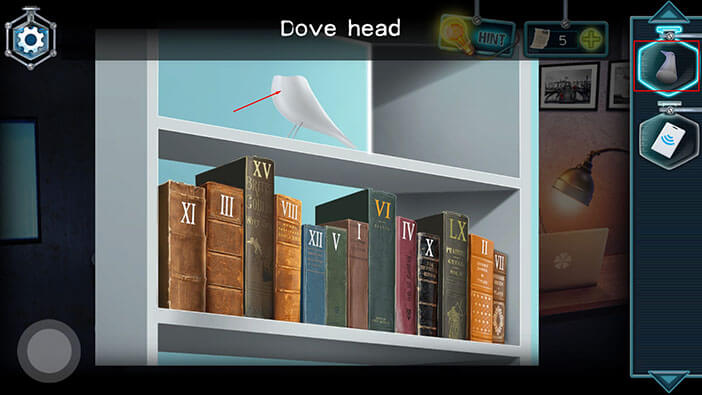
As soon as you complete this puzzle, the secret compartment will open and our character will pick up a “Key card”. Tap on the pigeon figurine to pick it up and a “Dove head” will be added to your inventory.
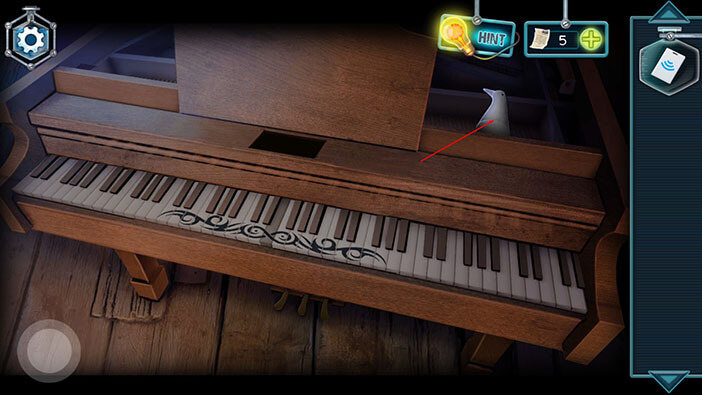
Ok, we should now go back to the office. To get there from the attic, tap on the button in the lower-left corner to go to the balcony. After that, tap on the door on the right to go to the bedroom.
Tap on the button in the lower-left corner to go to the hallway. Once you get there, go through the door on the left.
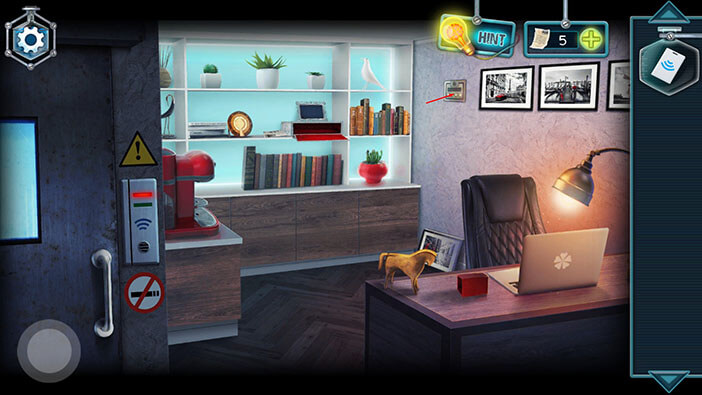
We can see that the figurine on the shelf is missing its upper half. Let’s tap on it to take a closer look.
Select the “Dove head” from the inventory and tap on the figurine to reassemble it.
The picture next to the shelf moved, so let’s tap on it to take a closer look.
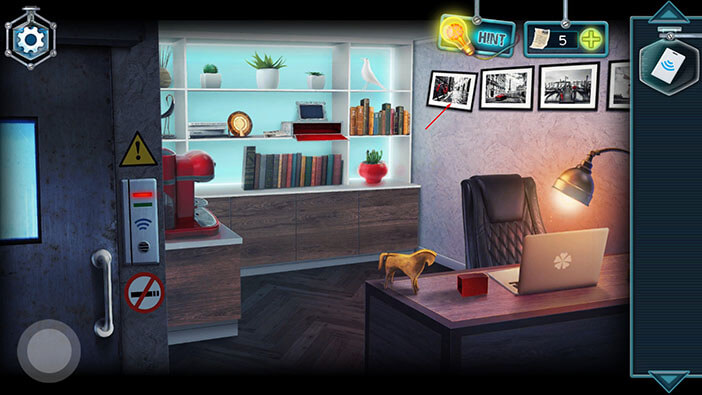
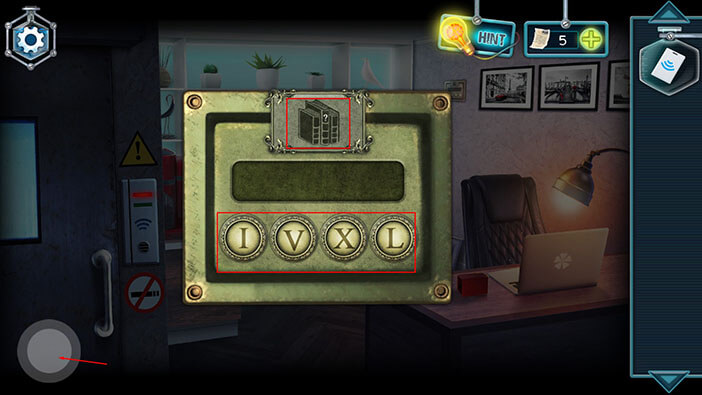
The wall safe was hidden behind the picture. Let’s take a closer look at it.
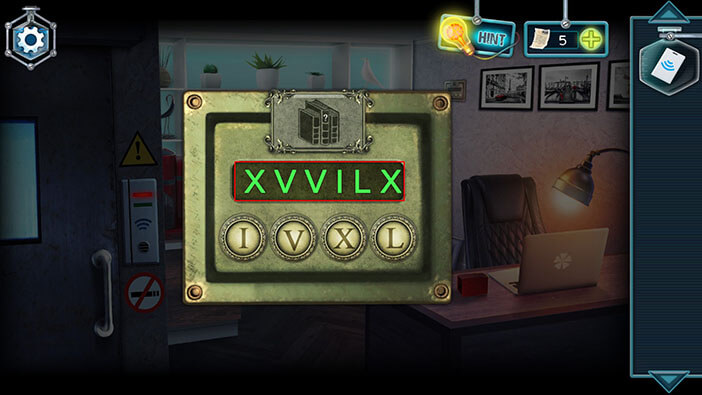
Here, we can see that we will need a combination of roman numerals in order to open the safe. We also see a picture of the three books. The largest book is in the middle and it is marked with the question mark. Well, this hint will help us find the password for the wall safe. Tap on the button in the lower-left corner to go back.
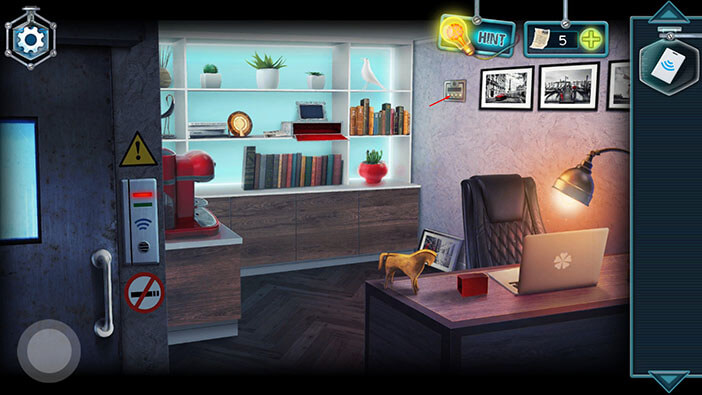
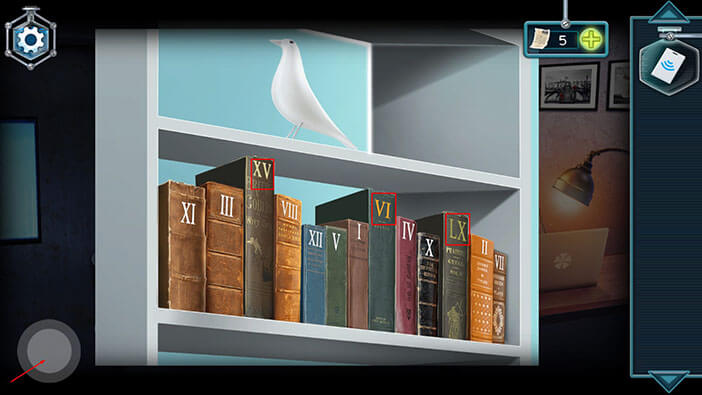
Tap on the books below the pigeon figurine to take a closer look at them.

We can see that three of these books are noticeably larger than the other ones. These books are marked with the roman numerals “XV” “VI” and “LX”. When adding the numerals on the books, we will get “XVVILX”.
Memorize/write down this information, because the roman numerals on these three books form a password for a wall safe.
After you’re done, tap on the button in the lower-left corner to go back.
Tap on the wall safe again to start the interaction.
Enter the code “XVVILX” that we previously discovered.
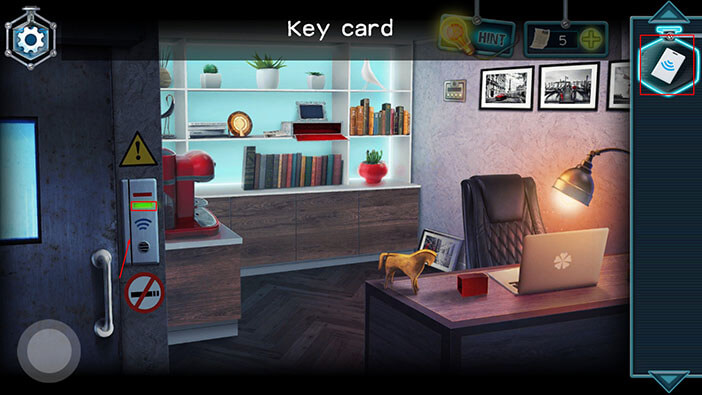
Well, we managed to unlock the safe, and the light on the door on our left has changed to green. So, select the “Key card” from the inventory and tap on the door on the left to unlock it. After that, tap on the door again to open it and proceed into the next room.
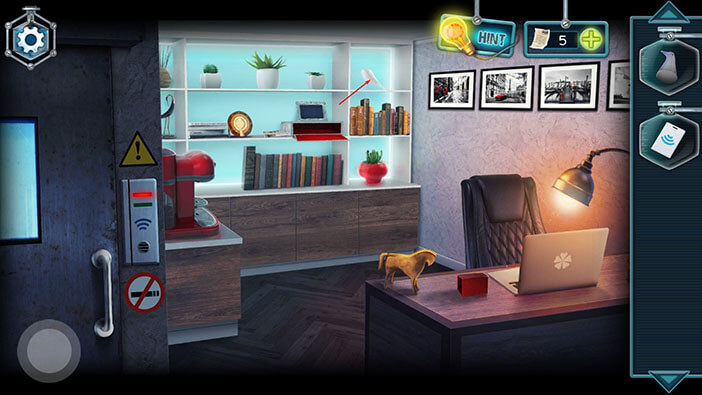
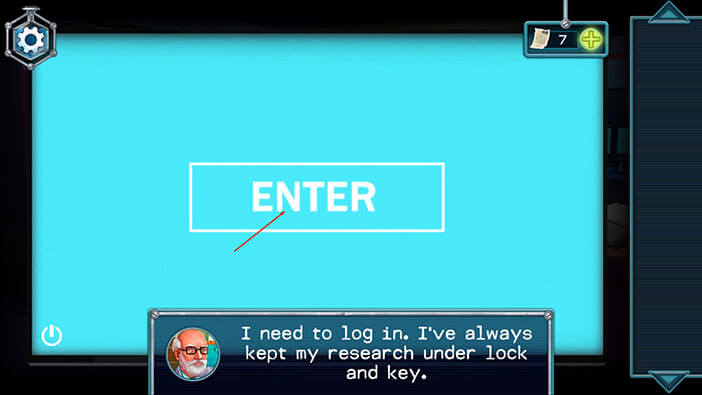
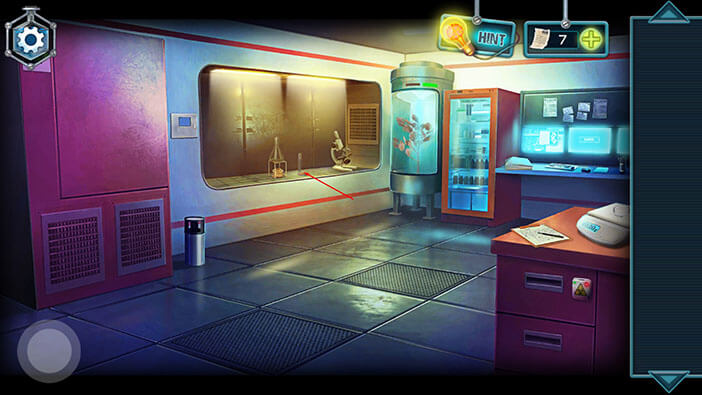
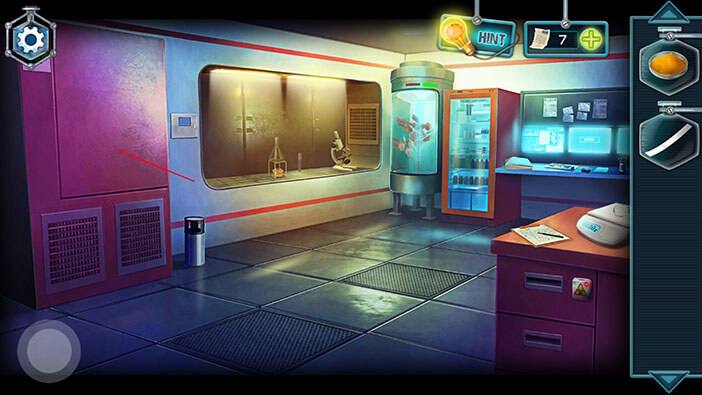
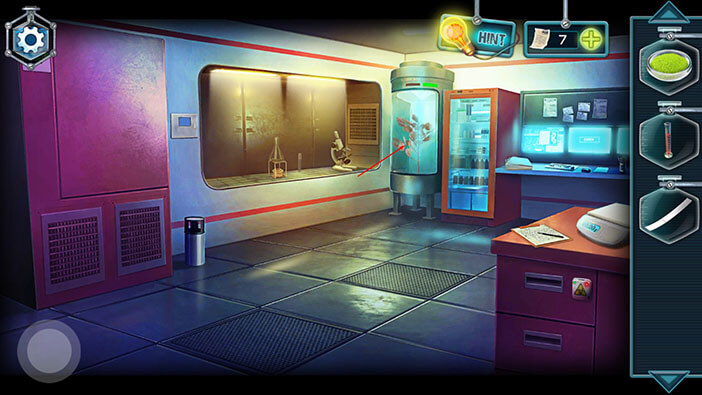
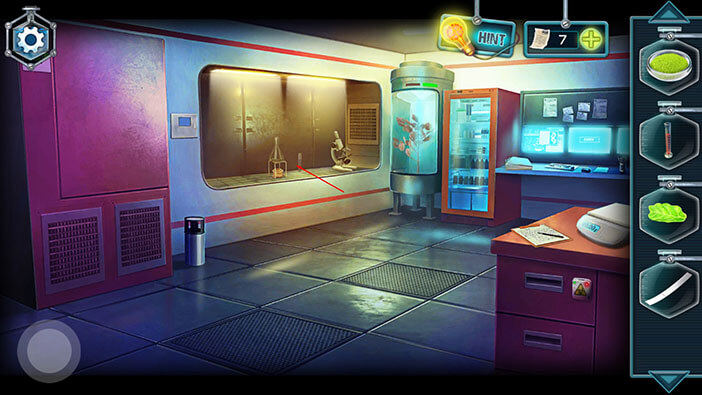
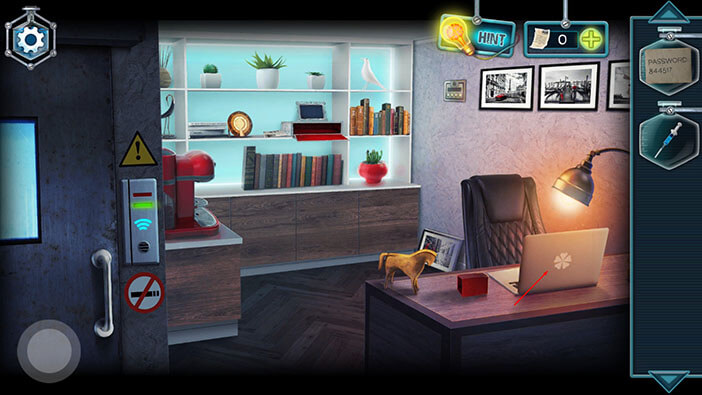
Ok, we are now inside the laboratory. First, let’s check out the computer on our right.

Well, it seems that we will finally see what kind of experiments our characters have been conducting. Tap on “Enter”.
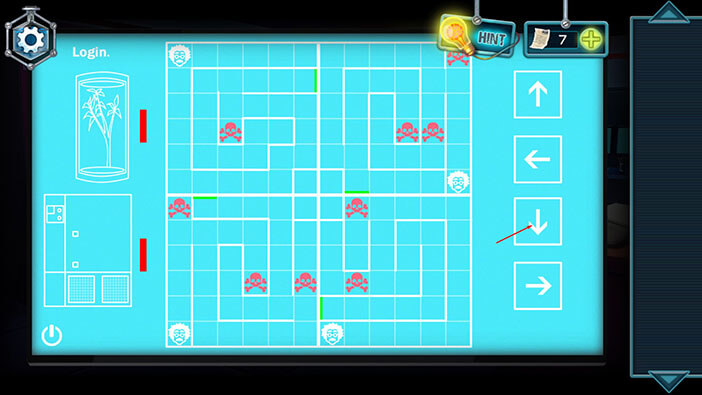
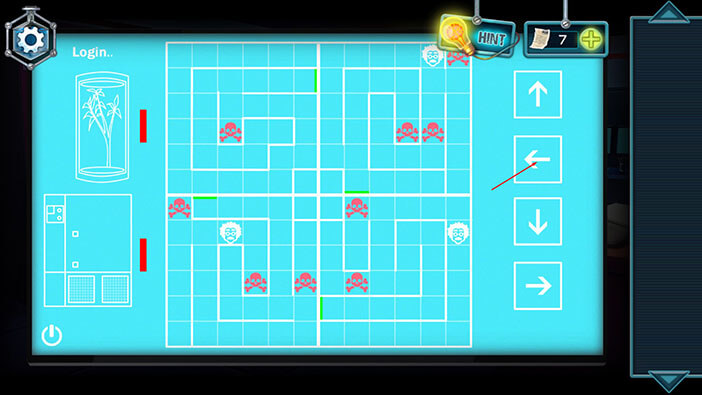
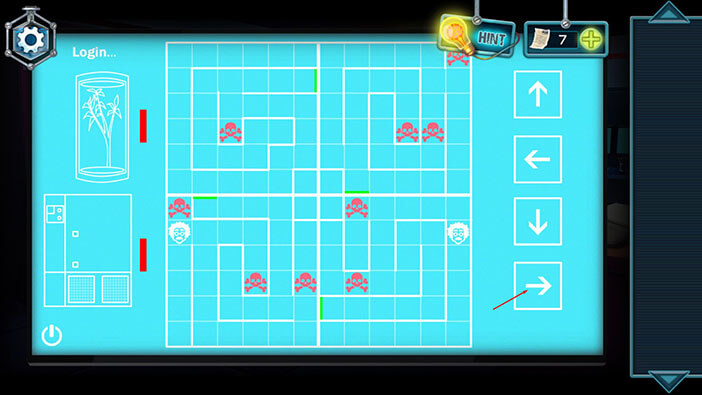
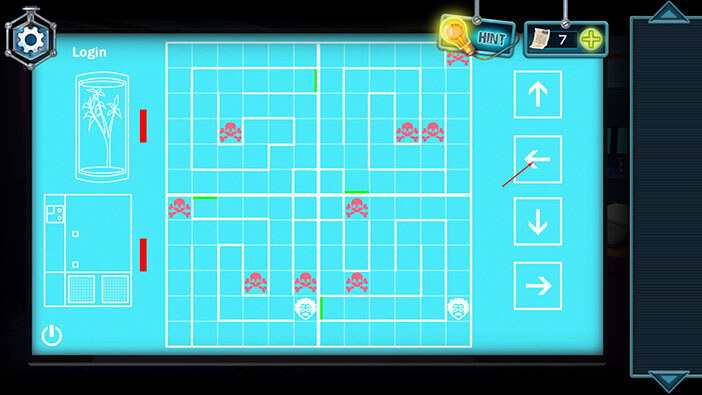
In order to “Log in” we have to solve another puzzle. Here, we have four mazes, and inside each of them is an Einstein. Inside every grid, there’s also one exit (marked with the green line) and several red skulls. We can move the Einstein’s by tapping on the four arrows on the right. However, when you tap on the arrow, all Einstein’s will move in that direction, if possible (they can’t move through walls, so if you tap on the right arrow, and the wall is on the right of one of the Einsteins, that Einstein won’t move).
The goal is to get all four Einsteins to the exits while avoiding the red skulls. If we manage to do that, we will get access to a refrigerator and a plant, as indicated on the picture on the left side.
We will do this puzzle in multiple steps. Let’s begin.
Step 1
Tap on the Left arrow five times. Only the Einstein in the upper left grid will move to the left because the other three Einstein’s are blocked by the walls on their left.
We will first save Einstein in the upper left grid.


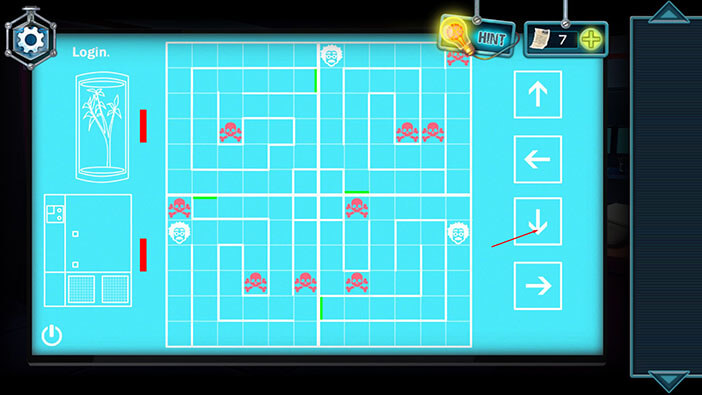
Step 2
Next, let’s tap on the Down arrow five times. Again, only the Einstein in the upper left grid will move.
Step 3
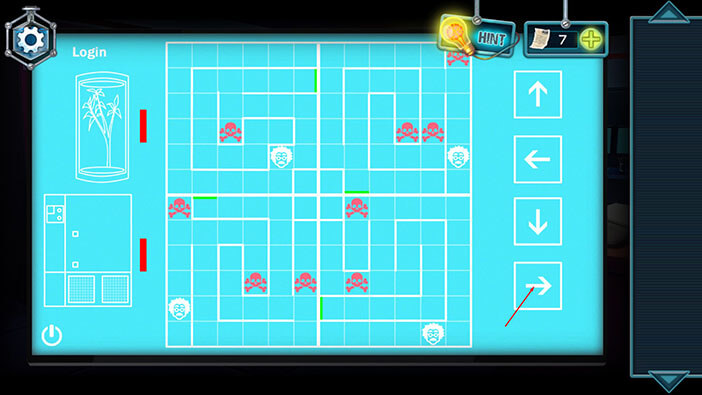
Tap on the Right arrow four times. This action will move both Einstein in the upper left grid, and Einstein in the lower right grid.

Step 4
Tap once on the Up arrow. This will move all Einstein’s except the one in the lower right grid.

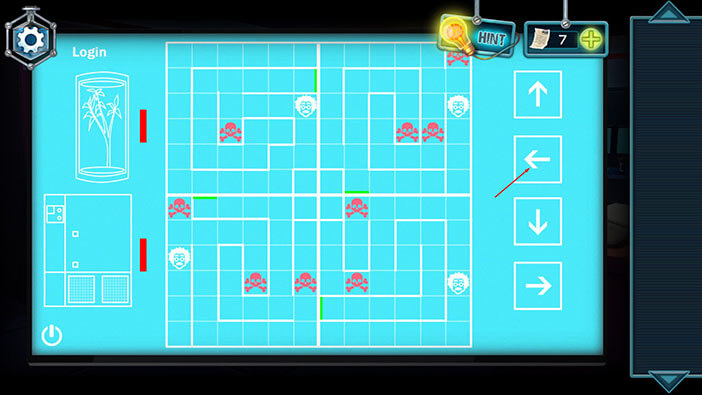
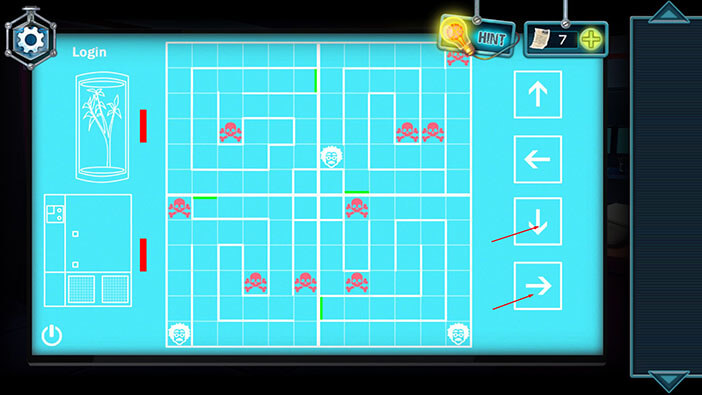
Step 5
Tap once on the Right arrow. This will move the Einsteins in two grids (the upper left and lower right).
Step 6
Tap twice on the Up arrow. This will move all Einsteins.

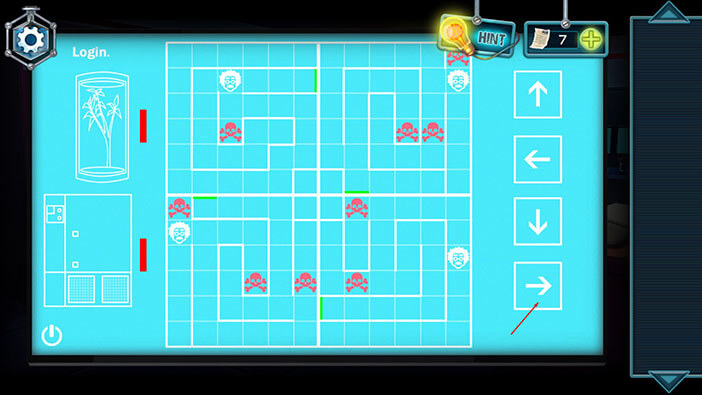
Step 7
Tap three times on the Left arrow. This will only move Einstein in the upper left grid.
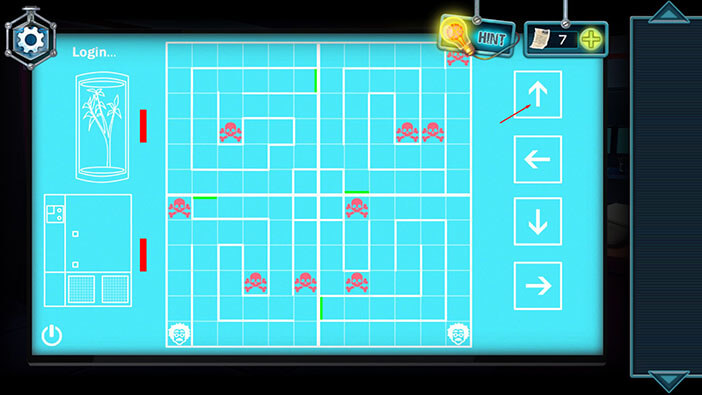
Step 8
Tap once on the Up arrow. This will move all Einsteins.

Step 9
Tap on the Right arrow three times. This will move two Einsteins (the upper left and lower left).
Well, with that we will save the first Einstein. Let’s continue.
Step 10
Next, we will try to save Einstein in the upper right grid. Tap once on the Left arrow. This will move two Einsteins (the upper right and lower left).

Step 11
Tap once on the Up arrow. This will move two Einsteins (the upper right and lower right).

Step 12
Tap four times on the Left arrow. This will move Einstein in the upper right four tiles to the left, and Einstein in the lower left will move two tiles to the left.
Step 13
Tap four times on the Down arrow. This will move all three Einsteins.
Step 14
Tap once on the Right arrow. After that, tap once on the Down arrow. With that, we will save the second Einstein. Let’s continue.
Step 15
Next, we will try to save Einstein in the lower right grid. Tap four times on the Up arrow. This will move both Einsteins.
Step 16
Tap once on the Right arrow. This will only move Einstein in the lower-left grid.
Step 17
Tap four times on the Down arrow. This will move both Einsteins.

Step 18
Tap four times on the Right arrow. This will only move Einstein in the lower-left grid.

Step 19
Tap once on the Up arrow. This will move both Einsteins.

Step 20
Tap once on the Left arrow. This will only move Einstein in the lower-left grid.
Step 21
Tap four times on the Up arrow. This will move both Einsteins into the upper left corner of their grids.

Step 22
Tap three times on the Left arrow. This will move both Einsteins three fields to the left, and we will save Einstein in the lower right grid.
Step 23
Well, this is very easy, since we have only one Einstein left. Tap three times on the Down arrow. After that, tap once on the Right arrow.

Step 24
Tap twice on the Up arrow. After that, tap once on the Right arrow.

Step 25
Tap three times on the Down arrow. After that, tap four times on the Left arrow. With that, we will save the last Einstein.

Ok, we managed to unlock the fridge, and we now have access to the arboretum. Let’s check out the notes.
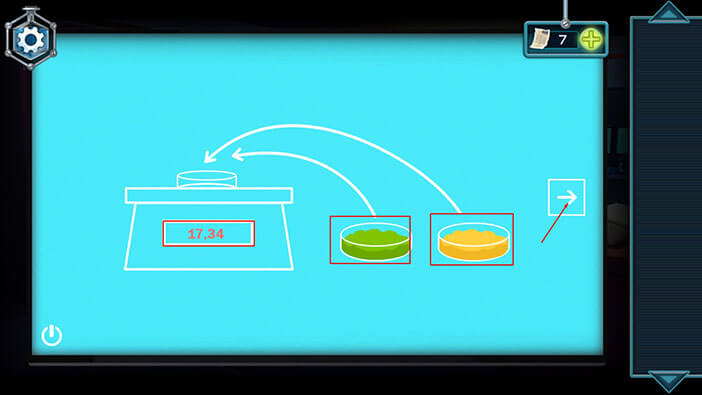
By looking at the first note, we can see that the combination of the green and yellow powder should weigh 17,34g. Memorize this weight, because we will need it, very soon.
Let’s see the next note.
The next note represents steps for some kind of experiment. We can see that we will need some kind of a blue liquid, red liquid, a green powder, and a heater in order to conduct this experiment.
We will get back to it later, for now, let’s check the next note.
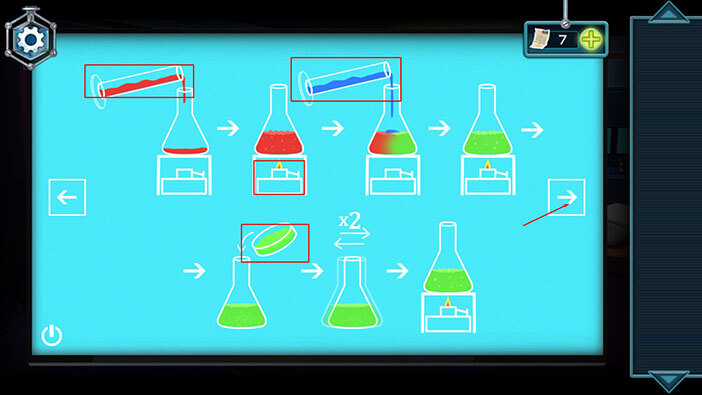
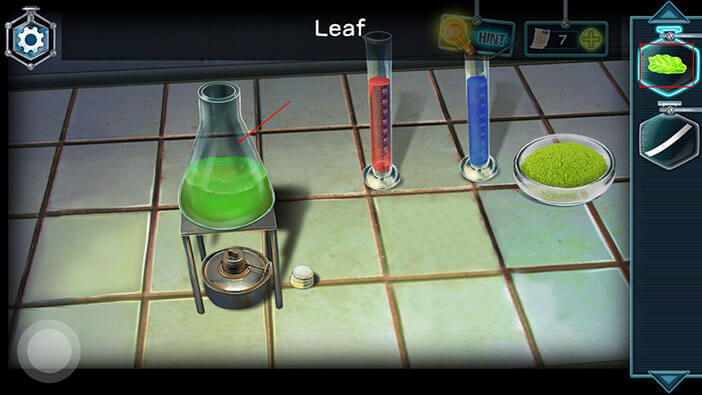
Well, it seems that we will also need a green leaf and some paper for the final steps of the experiment.
Tap on the button in the lower-left corner to go back.
Ok, let’s gather the ingredients for the experiment. Tap on the instruments on your left to take a closer look.
Tap on paper and powder to pick them up. “Powder 1” and “Litmus indicator” will be added to your inventory.
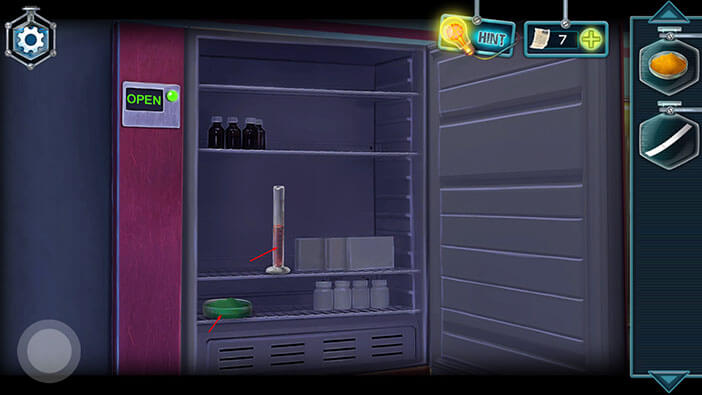
Well, we unlocked the fridge on our left, so let’s check it out.
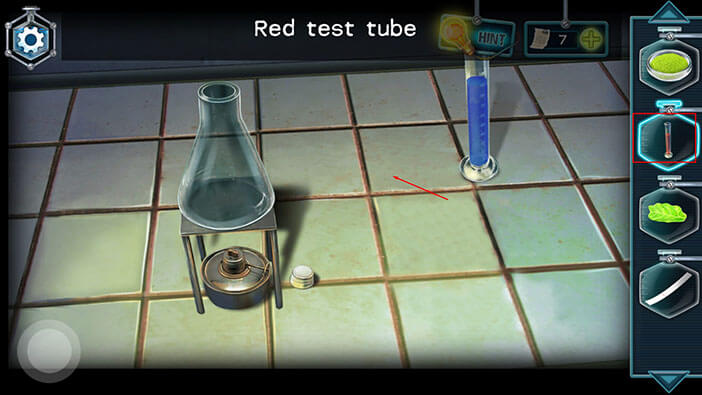
Tap on the green powder and test tube to pick them up. “Powder 2” and “Red test tube” will be added to your inventory.
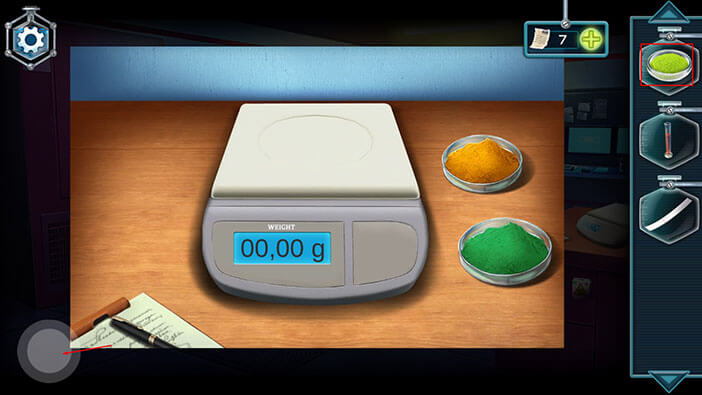
Let’s take a closer look at the digital scales on our left.
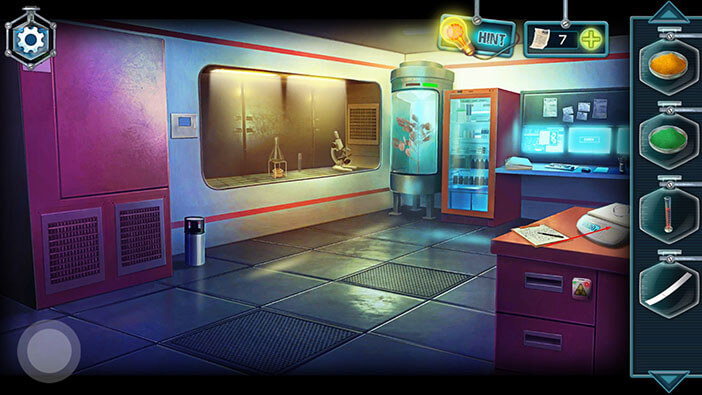
Select “Powder 1” and “Powder 2” from the inventory, and then tap to the right of the digital scale to put them down.
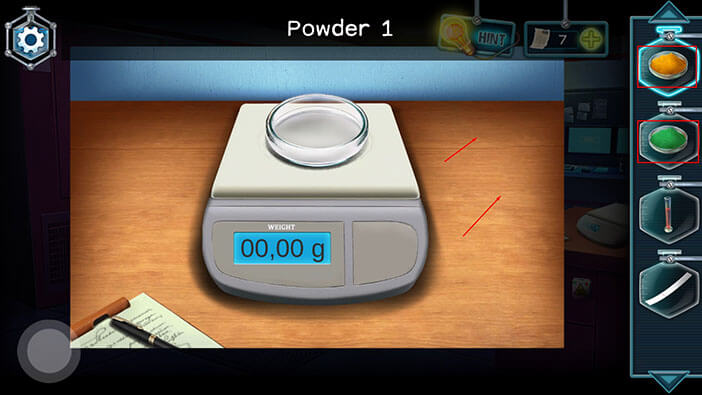
Well, a bit earlier, we saw that we will need 17,34g of powder. We should get this weight by mixing green and yellow powders. If we test how much one spoon of powder weights, we will discover that,
One spoon of green powder = 5.07g
One spoon of yellow powder = 2.40g
So, by doing some quick math, we know that we will need 2 spoons of green and 3 spoons of yellow powder to get to 13.74g.
2 spoons of green = 10.14 (2x 5.07)
3 spoons of yellow = 7.20 (3x 2.40)
10.14 + 7.20 = 17.34g
So, tap twice on the green powder and three times on the yellow powder to get to 17.34g.

Our character will shake the powders, and the “Mixture” will be added to our inventory. Tap on the button in the lower-left corner to go back.
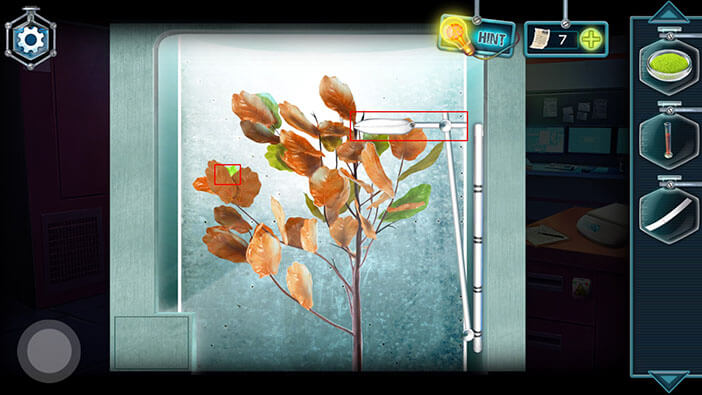
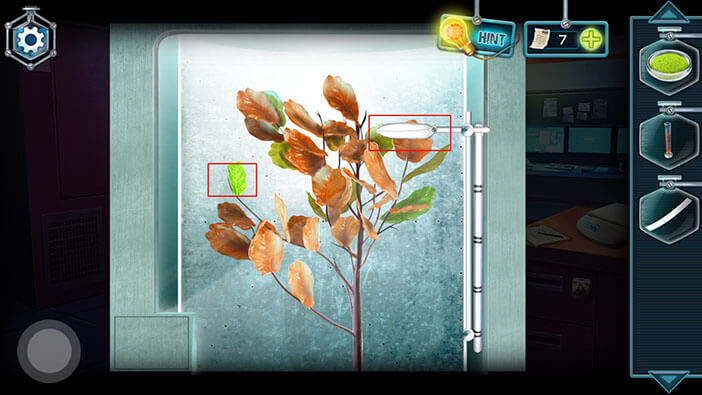
Well, we still need a green leaf in order to start the experiment, so let’s check the arboretum (which we opened by solving the “Einstein” puzzle).
Here, we have another minigame. We should tap and hold on to the auto-pruner until it reaches the top, and then release it. The goal is to cut off the brown leaves and clear the way to the green leaf on the left side of the tree.
Finally, we will cut the green leaf, and “Leaf” will be added to our inventory.
Ok, we should now have all the ingredients for the experiment. So, let’s take another look at the notes (located next to the computer) and memorize/write down the exact steps of the experiment.

We are already on the last page, so tap on the “Back” button to take a look at the previous page.
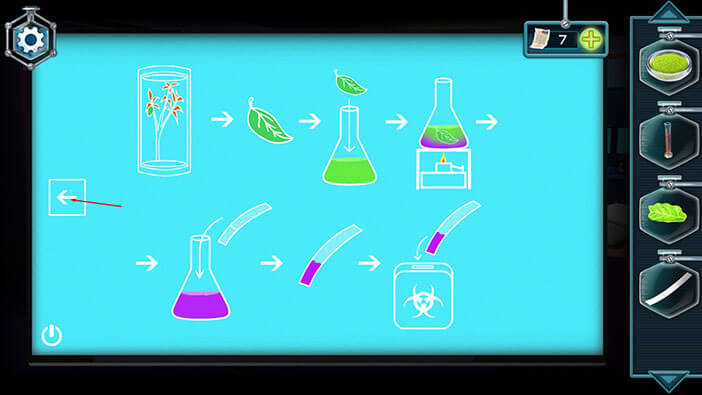
Well, let’s memorize the steps.
Step 1 – pour in the red liquid
Step 2 – heat
Step 3 – add the blue liquid
Step 4 – heat (again)
Step 5 – add the green powder (17.34g that we made by mixing green and yellow powder)
Step 6 – Shake twice
Step 7 – heat, once more
Memorize/ write down these steps.
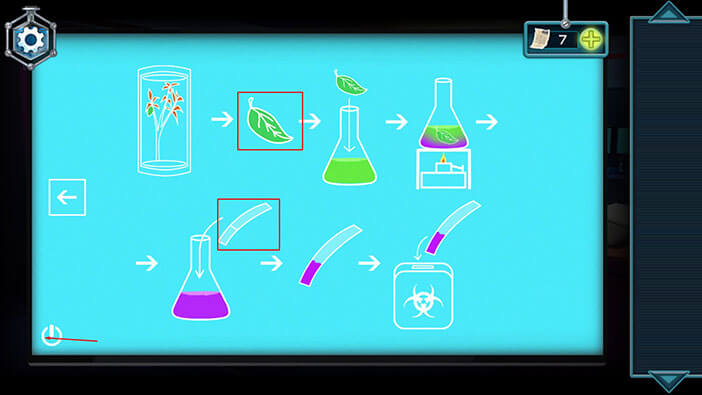
After that, we should go to the next page and take a look at the final steps of the experiment.
We already have the “Leaf” so let’s see the next steps.
Step 8 – add the green leaf
Step 9 – heat
Step 10 – take a sample by using the “Litmus indicator”
Step 11- Use the “Litmus indicator” to open some kind of chemical lock
Memorize/write down these steps, then tap on the button in the lower-left corner to go back.
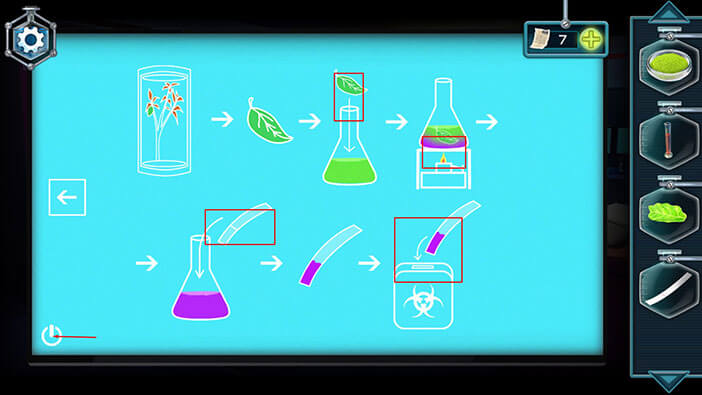
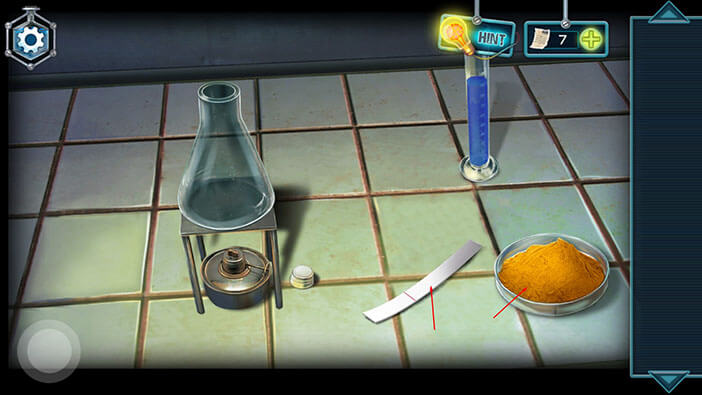
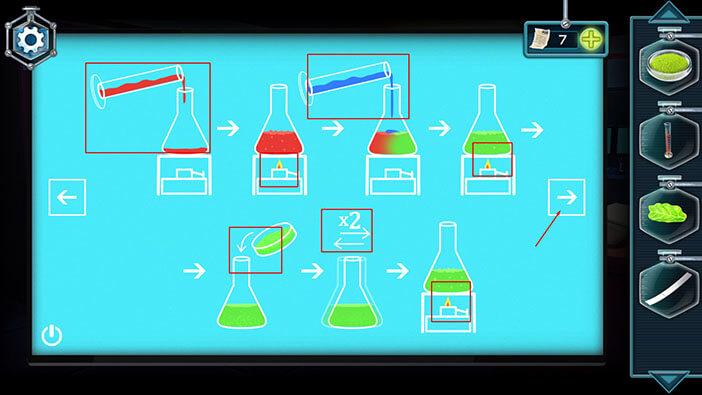
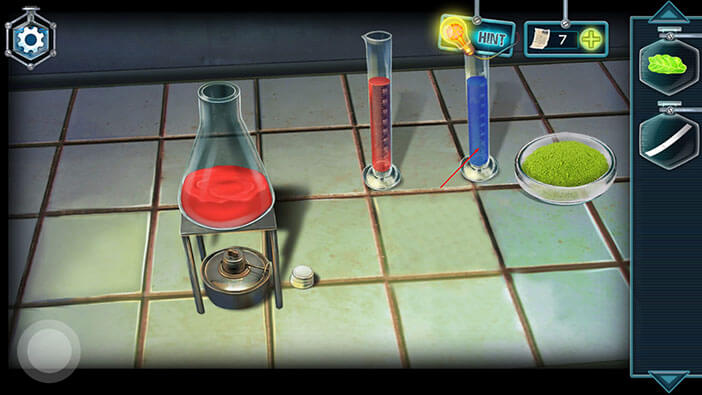
Ok, let’s tap on the laboratory equipment on the left to start the experiment.
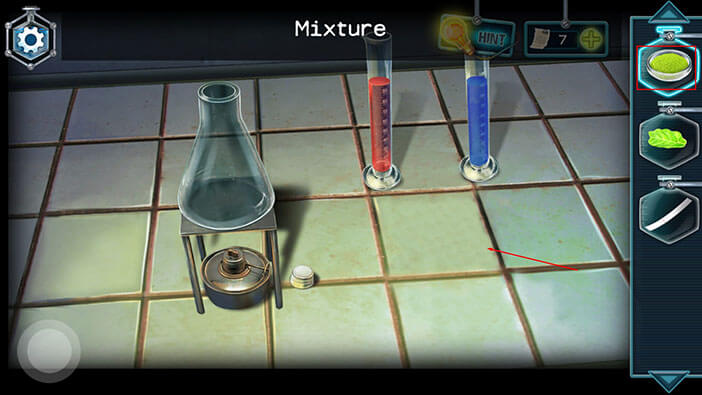
First, select the “Red test tube” from the inventory and place it to the left of the blue test tube.
After that, select the “Mixture” from the inventory and place it to the right of the blue test tube.
Ok, let’s take a look at our notes and start the experiment.
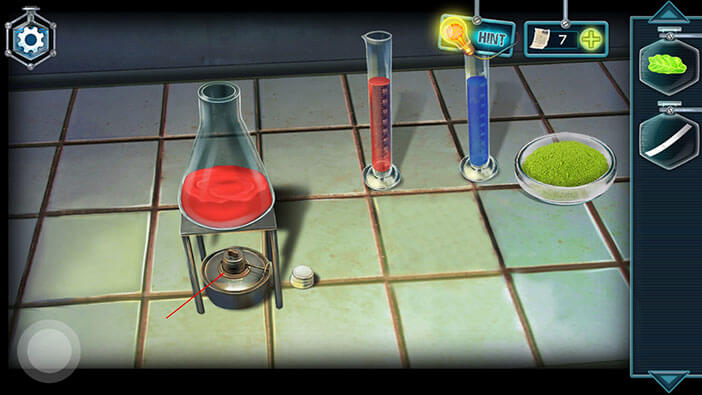
Step 1- pour in the red liquid
So, tap on the red test tube.
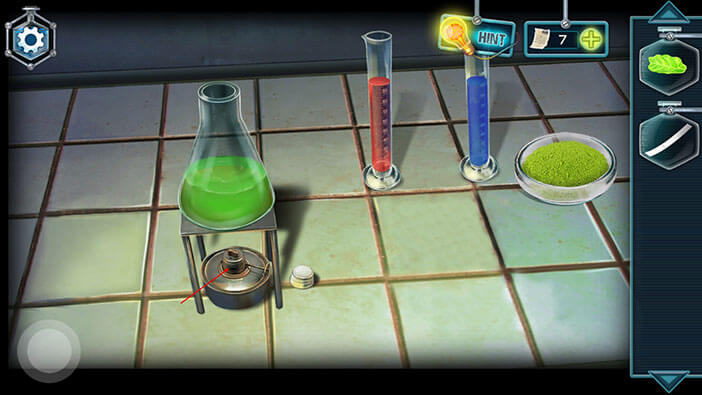
Step 2 – heat
Tap on the heater to turn it on.
Step 3 – add the blue liquid
Tap on the blue test tube.
Step 4 – heat
Tap on the heater to turn it on.
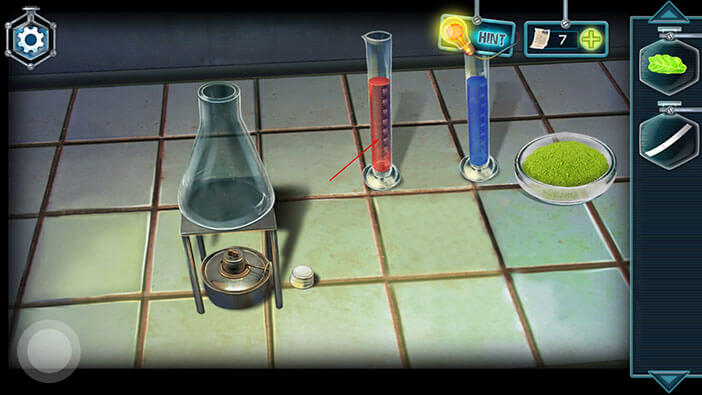
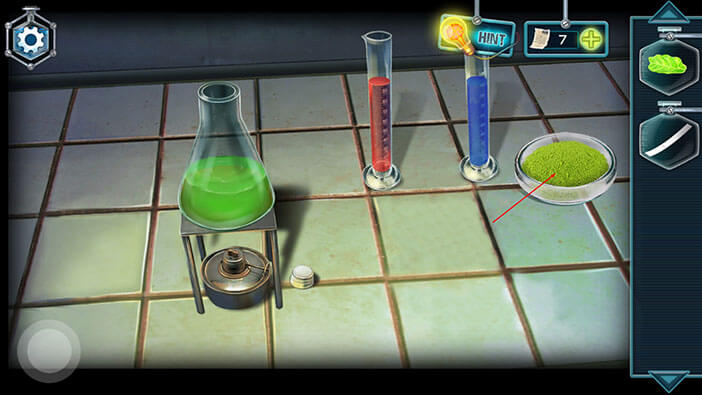
Step 5 – add the green powder
Tap on the 17.34g of “Mixture”.
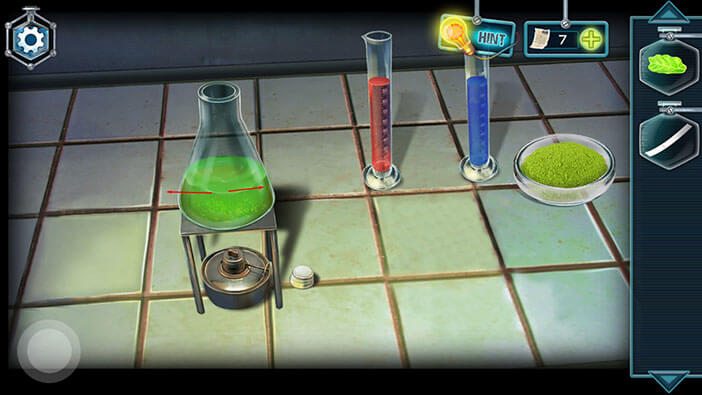
Step 6 – Shake twice
Drag the bottle left and right to shake it.
Step 7 – heat, once more
Tap on the heater to turn it on.

Step 8 – add the green leaf
Select the “Leaf” from the inventory, and tap on the bottle to add it to the mixture.
Note: the heater will automatically turn on after you add the leaf (so, we skip Step 9 – heat).
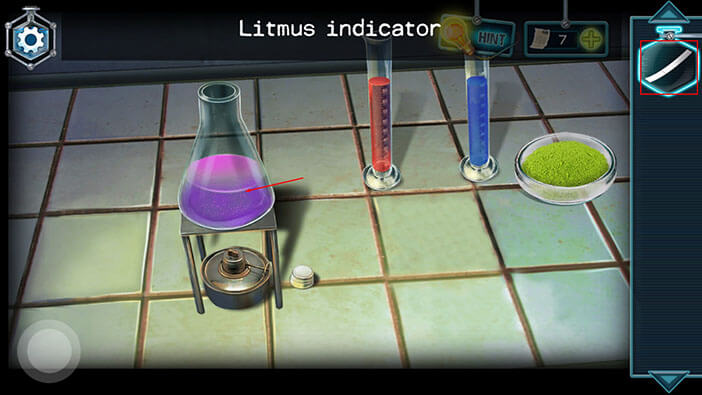
Step 10 – take a sample by using the “Litmus indicator”
Select the “Litmus indicator” from the inventory and tap on the mixture to take a sample. “Litmus indicator (activated)” will be added to your inventory.
Tap on the button in the lower-left corner to go back.
Tap on the top drawer on your right, to take a closer look at it.
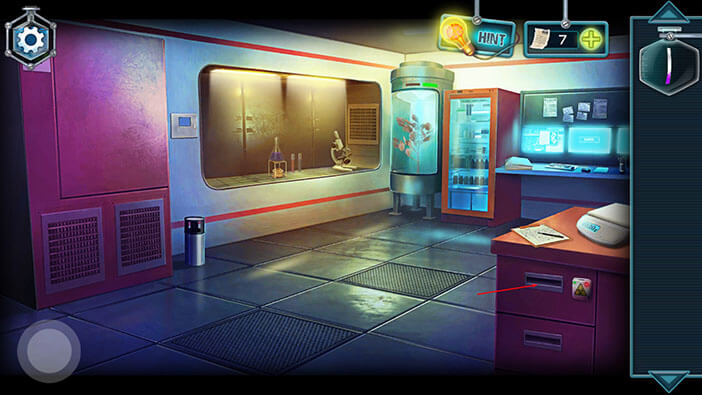
Select the “Litmus indicator (activated)” from the inventory and then tap on the chemical lock.
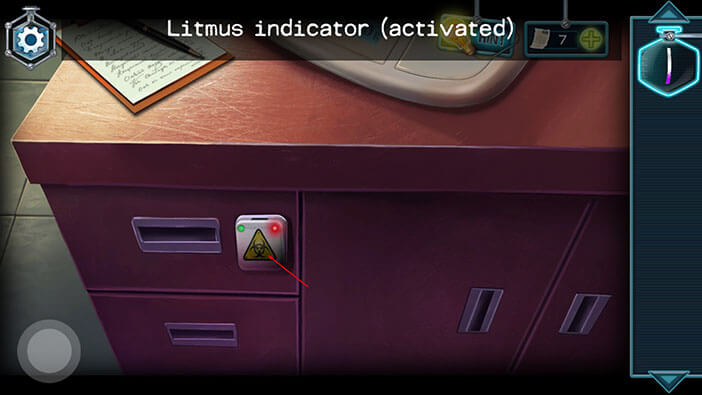
Well, we managed to open the drawer, so tap on the keycard inside to pick it up, and “Key from the basement” will be added to your inventory.
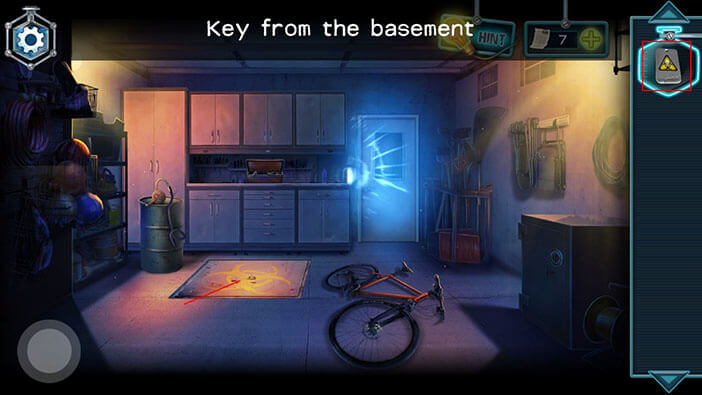
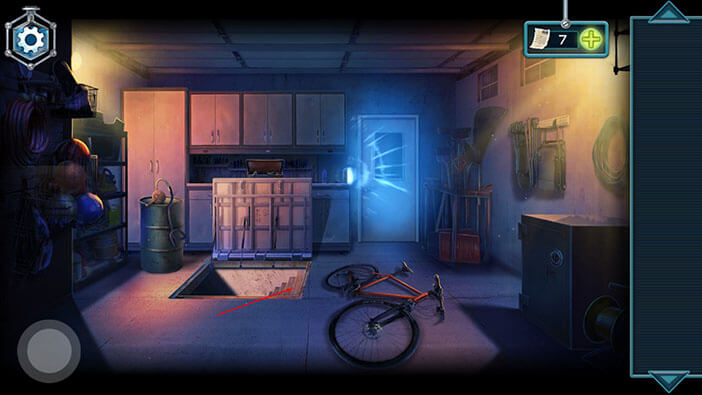
Our character says that the basement is located under the garage, so we should now go back to the garage.
Tap on the button in the lower-left corner to go back.

Ok, to get to the garage, we should tap four times on the button in the lower-left corner. This will take us to the front yard.
After reaching the front yard, the garage will be on your right. Tap twice to enter.
We can see the same sign on the trapdoor, as the one on the keycard. So, select the “Key from the basement” from the inventory and then tap on the trap door to open it.
Tap again to go to the basement.
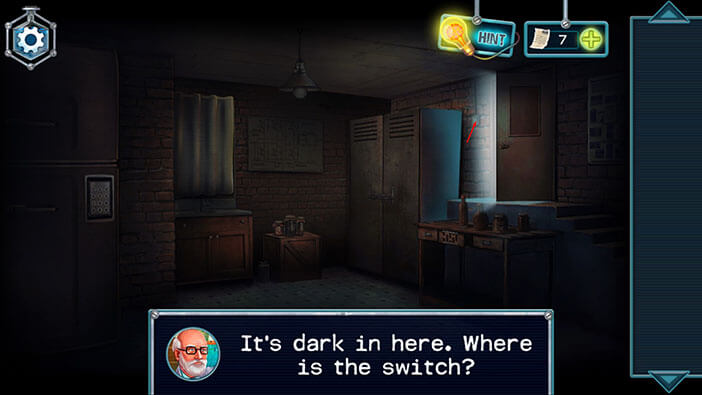
It’s dark in this room, so tap on the switch on your right to turn on the light.
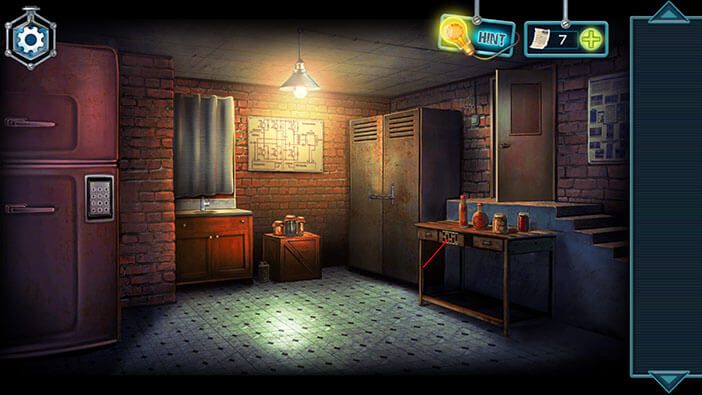
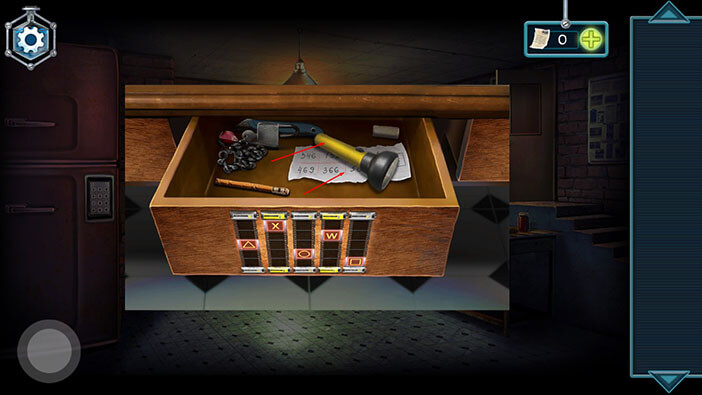
Tap on the drawer on the right to take a closer look at it.

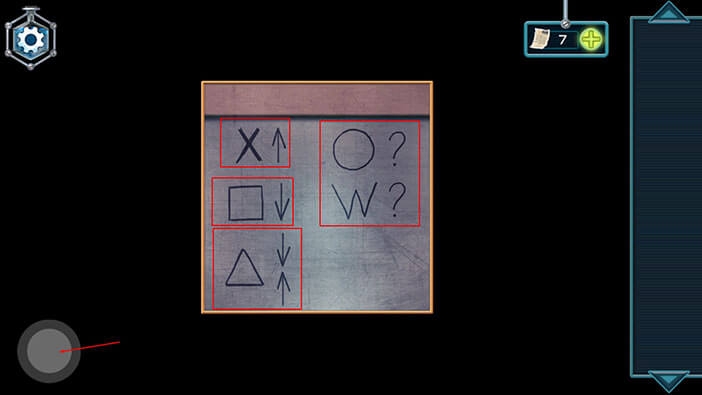
Here, we have another puzzle. Our task is to properly arrange the five films by rotating their symbols (square, triangles, etc.). We can also notice that the field for a symbol on each film is at a different height.
To solve this puzzle, we will have to go back to the garage, so let’s do that.

Tap on the door to go back to the garage.

We can see that there are some symbols on the inner side of the trapdoor. So, let’s tap on these symbols to take a closer look.
Well, here we can see the “UP” arrow next to the letter X. This indicates that the letter “X” should be positioned higher than the other symbols on the films.
Next to the “Square”, we can see a “DOWN” arrow. This indicates that “Square” should be positioned lower than the other symbols in the films.
Next we the “Triangle” we can see both “UP” and “DOWN” arrows. This indicates that “Triangle” should be positioned in the middle.
We can also see a question mark next to the “O” and “W” so we will have to guess the position of these two symbols but that shouldn’t be a problem because there are only two options left (middle-up, and middle-down).
Memorize/write down this information. After that, a tap on the stairs goes back to the basement.

Let’s tap on the drawer again to start the interaction.
Ok, we can see that the symbol in the second column (looking from left to right) is positioned higher than all other symbols. Previously, we saw that “X” had an Up arrow next to it.
So, we should change the symbol in the second column to “X” by dragging the film.
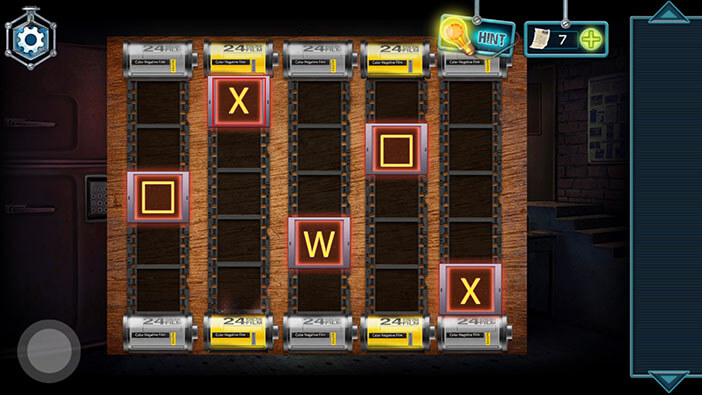
The symbol in the fifth column is positioned lower than all other symbols. Previously, we saw that “Square” had a Down arrow next to it.
So, we should change the symbol in the fifth column to “Square”.

The symbol in the first column is in the middle, because two symbols are positioned above it, and the other two symbols are below it. Previously, we saw that “Triangle” had both the Up and Down arrow next to it.
So, we should change the symbol in the first column to “Triangle” by dragging the film.
Ok, now let’s guess the position of the two remaining symbols “O” and “W”.
“O” could be either in the middle-down (third) or middle-up (fourth) column. The same goes for “W”, it could be at one of those two positions.
Ok, let’s try to solve this puzzle by putting,
“O” in the third (middle-down) column
“W” in the fourth (middle-up) column
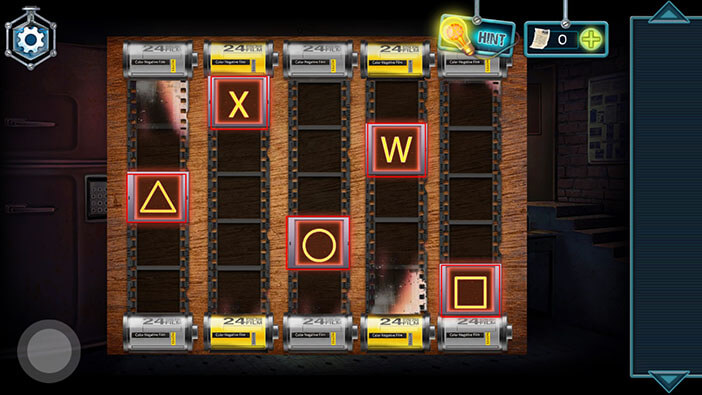
Well, it looks like we got the correct combination on the first try because we managed to open the drawer. Tap on the flashlight and the note to pick them up. “Torch” (probably an error in translation) and “Note with password” will be added to your inventory.
After that, tap on the button in the lower-left corner to go back.
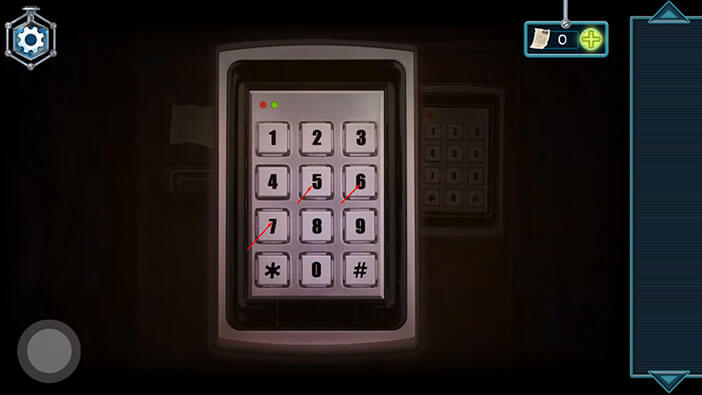
As soon as our character stepped away from the table, the light bulb exploded. So, select the “Torch” (flashlight) from the inventory and tap twice on the door on your left to take a closer look at the Numpad.

Select the “Note with password” from the inventory and tap to the left of the Numpad to attach it.
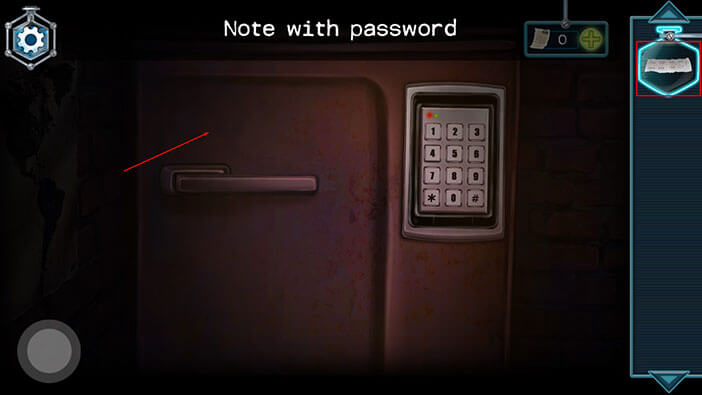
Ok, now let’s take a look at the “Note with password”.
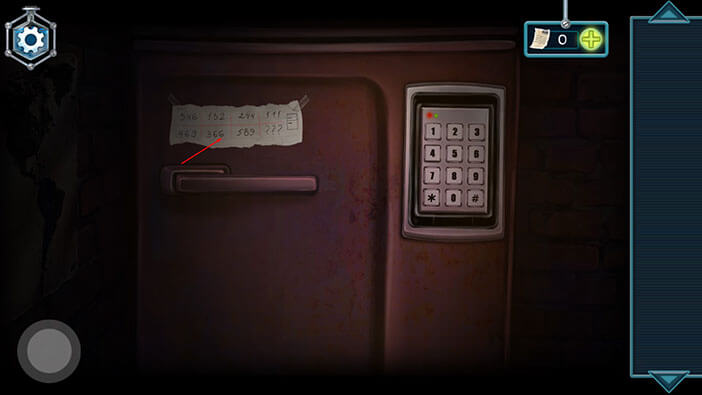
Our character will comment that there’s some kind of a pattern here.
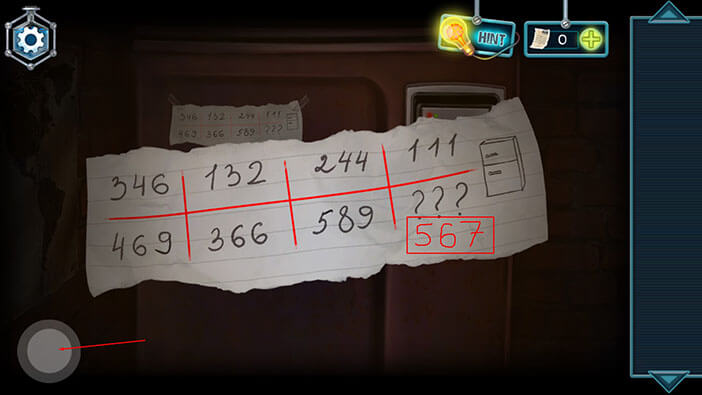
By looking at the note we can see that there are two three-digit numbers in each of the three columns. However, in the fourth column, we only have the upper number, which is “111” and we have to discover the other number.
Ok, let’s subtract the lower number (value) from the higher number in each column.
First column = 469 – 346 = 123
Second column = 366 – 132 = 234
Third column = 589 – 244 = 345
Well, we can definitely see a pattern here, and the result of subtracting 111 from the unknown number should be 456.
X – 111 = 456
X = 456 + 111 = 567
So, the number that we’re looking for is “567”. Memorize or write down this number, and then tap on the button in the lower-left corner to go back.
Interestingly, the number 567 would also be the continuation of the pattern – the result of subtraction of the following two numbers, if they existed.
Tap on the Numpad to start the interaction and then enter the code “567”.
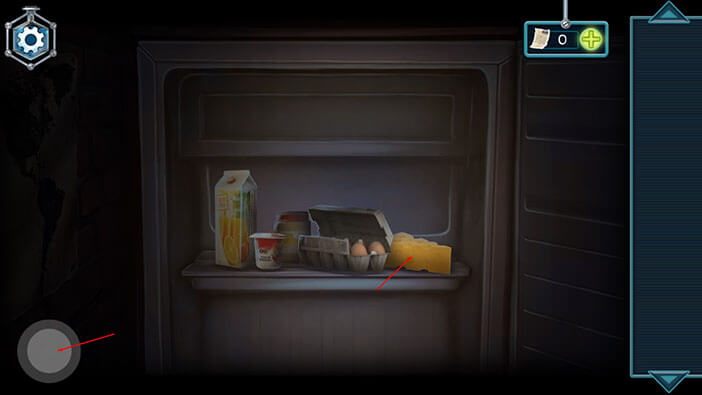
Well, we went through a lot of trouble to open this fridge. Tap on the cheese to pick it up and then tap on the button in the lower-left corner to go back.
Tap twice on the curtain to move it aside.
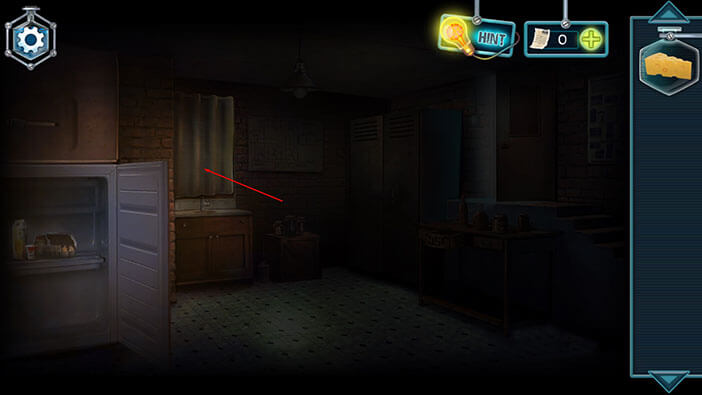
We can now see that there is a hole in the wall. Tap on it to take a closer look.
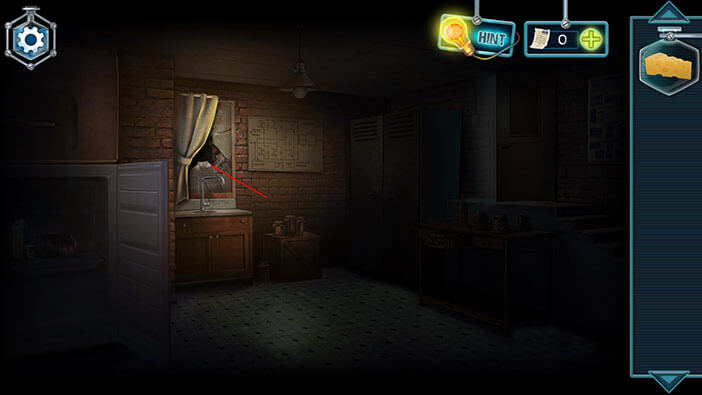
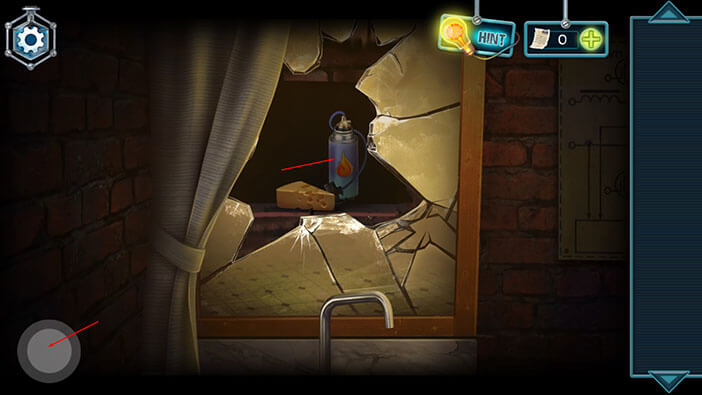
Quickly select the “Cheese” from the inventory and throw it at the rat.
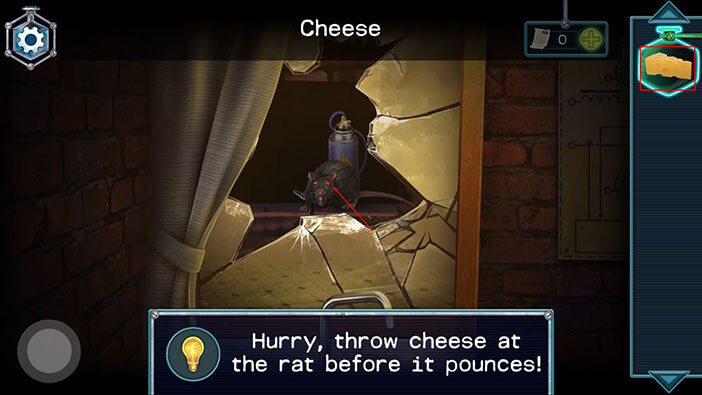
Well, after it took a piece of cheese, the rat went away. So, tap on the item inside the hole to pick it up and a “Gas torch” will be added to your inventory.
After that, tap on the button in the lower-left corner to go back.
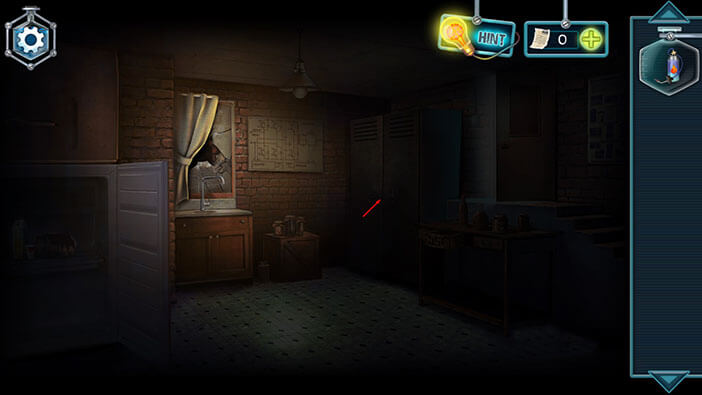
Tap on the cabinet on the right to take a closer look at it.
Select the “Gas torch” from the inventory and use it to heat up the chain.
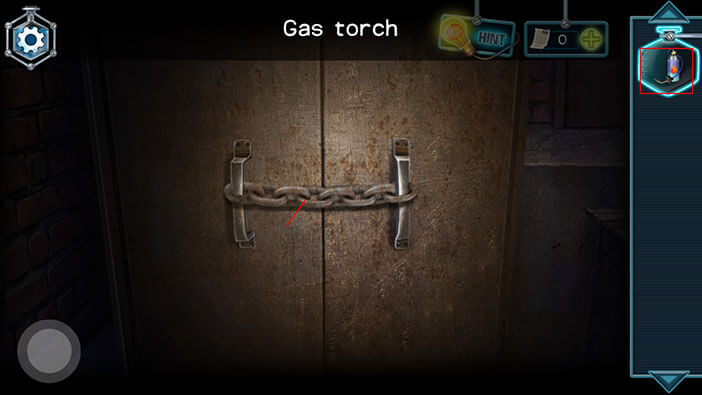
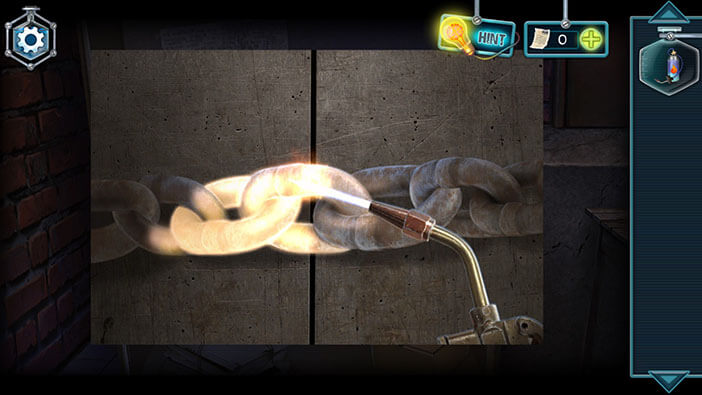
After that, tap on the chain to break it, and open the cabinet.
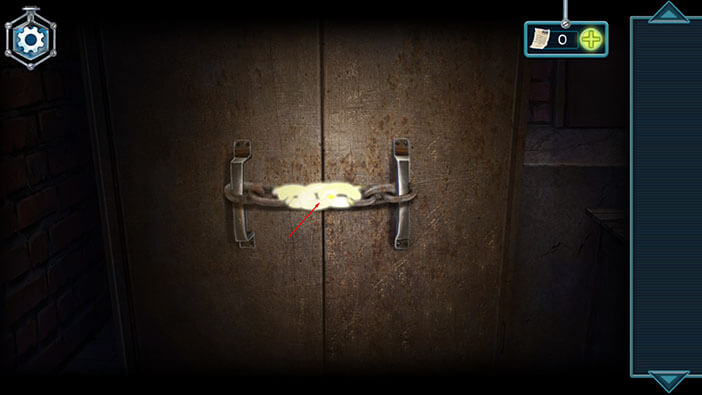
Tap on the “Laptop password” and “Antidote” to pick them up. After that, tap on the button in the lower-left corner to go back.
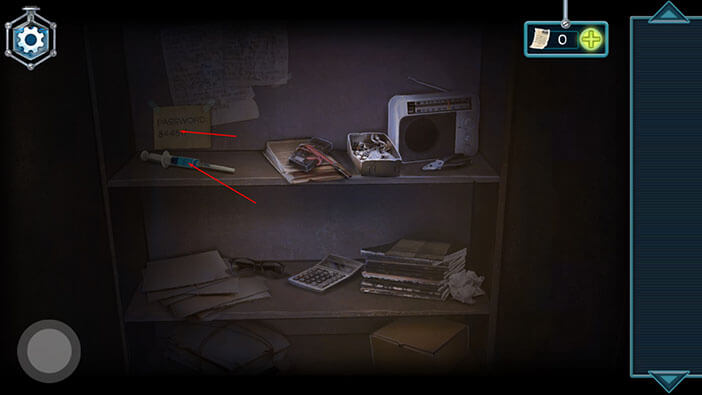
Well, since we found the password, we should now go to the office and use it to access the information inside the laptop.
To get to the office, we will first have to go back to the front yard.

Go inside the house.
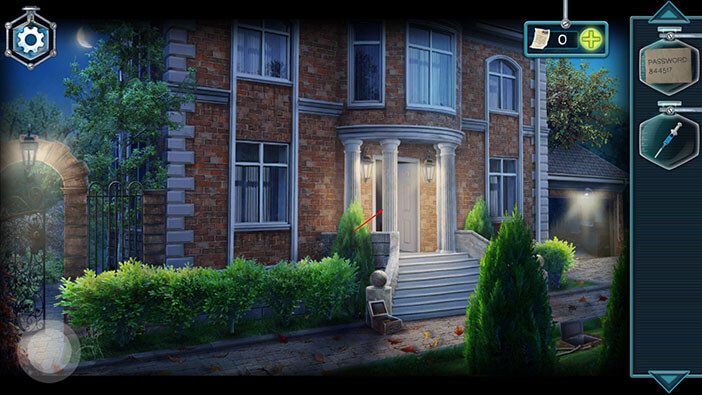
After that, go through the doors on the right.
Next, go through the door on the left and you will reach the office.
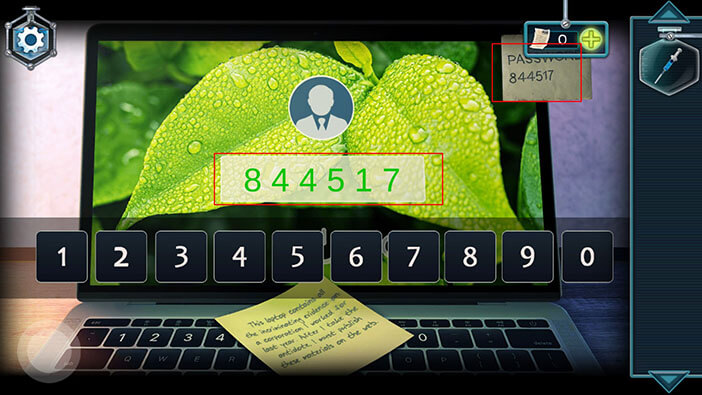
Tap on the laptop to start the interaction.
Select the “Laptop password” from the inventory and tap on the upper right corner of the laptop screen.
Also, if you take a look at the note (located on the laptop keyboard), you will discover that our character managed to gather and save the evidence about a company that he was forced to work for.
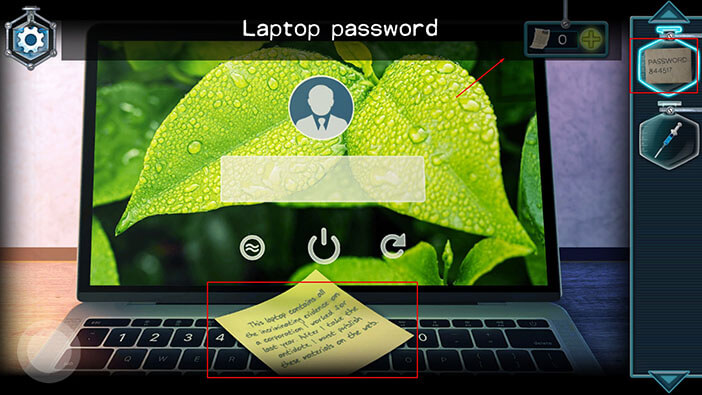
Enter the code “844517”.
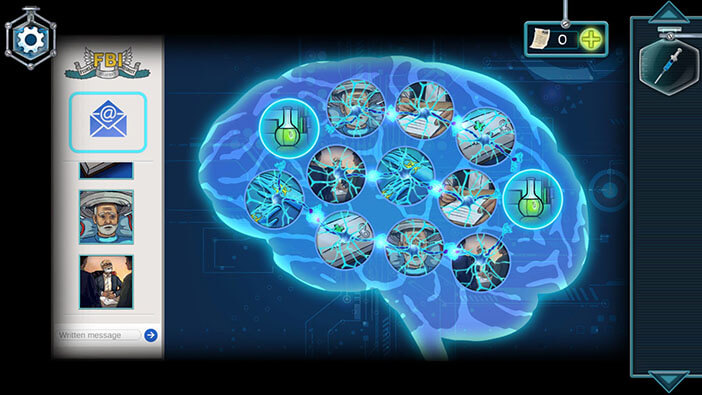
We have access to the laptop, but now we have to solve another simple puzzle. This is a very simple memory game – you have to match a pair of the same pictures. You can find the solution in the image below.
After we solved the memory game, our character’s memory returned, and he now remembers what happened. First, he injected himself with the antivirus.
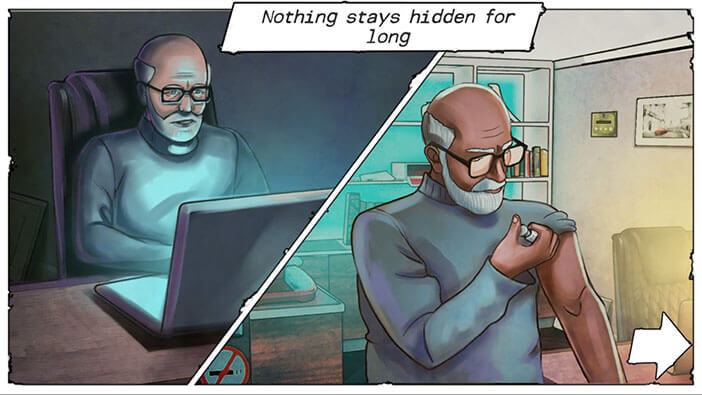
Our character quickly recovered, gathered the evidence about the company that created the virus, and gave it to the FBI. Needless to say, these vile people were arrested immediately.
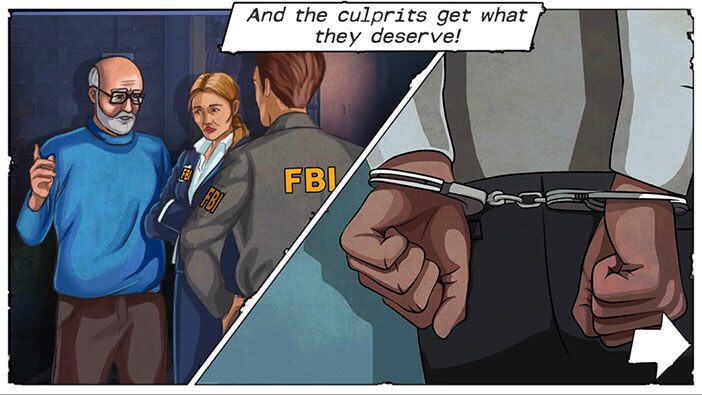
In the next scene, we can see that our character, Jack, was praised on national TV because he saved the world from biological catastrophe.

Well, that brings us to the end of this story. If you’re interested in Escape Room games, check out our guides for the other games of this genre.
Thank you for reading.